GoFAST : User Guide
Introduction
This guide will teach you how to use GoFAST in the most efficient way, with many platform screenshots to guide you step by step. It explains all the “tips and tricks”, shortcuts and different ways of doing the same action on documents, content, Collaborative Spaces, users, etc.
Note
Nous vous recommandons de visionner la vidéo de démonstration: https://mautic.ceo-vision.com/asset/109:demo-gofast-standard
Note
User community forums are available for discussion with the teams of the CEO-Vision publisher, do not hesitate to create an account: https://community.ceo-vision.com
GoFAST Digital Workplace and DMS Concept
GoFAST in 2 words
GoFAST, the result of years of development, is a powerful collaboration and document management platform. GoFAST is based on the most recognized and proven Open Source technologies including Alfresco, Drupal, Bonitasoft, OnlyOffice, Element and many others. This functionally rich GoFAST platform is known for being very easy-to-use and allows you to quickly learn basic functions. Finally, GoFAST is hosted in your organization (on-premises) or in a dedicated, sovereign SaaS to ensure the best level of privacy and security.
Who is the GoFAST platform intended for?
GoFAST Digital Workplace is intended for Large or SMEs, Communities, Ministries, Schools and Universities, Associations… All the members of your organization can work together in a collaborative way, as well as with your partners through the “Extranet” zone.
What is the GoFAST platform used for?
This is a platform for the exchange of information that will allow all colleagues, both at headquarters and in the field (and even external people), to be able to manage / modify and comment on documents, share information, chat live, process workflows, manage collaborative tasks, etc. In short, it’s a modern and interactive collaboration tool that works anywhere you have the Internet connection, and even offline with synchronization when you reconnect. Improving collaboration is the main problem solved by GoFAST: it makes it possible to centralize documents and exchanges about these documents in a single place, accessible anywhere and at any time; to limit duplicates; broadcast automatic notifications that optimize not only collaboration but also document management.
GoFAST Objectives and Benefits
Supporting the collaborative work (up to simultaneous co-editing) and information sharing
Reduction of the number of internal emails and deletion of the emails with attachments (quota issues, wrong versions)
Stop of the content duplication
Saving time on searching for information (including files)
Following the established workflows and without missed deadlines
Reduction of the errors by having access to all versions of a document
Security improvement (management of access rights)
Simplified work while travelling
Reduction of the amount of paper
For more information on the objectives achieved with GoFAST, please refer to the section: “Some best practices”
Prerequisites for using GoFAST
Caution
We only support browsers supported by publishers for security reasons. The approval of unsupported versions may in some cases be considered with discharges of responsibility and additional costs
Preferred Windows Browsers: Firefox (Latest ESR version or Latest Classic version), Edge-Chromium, Chrome.
Note
As an illustration, on 01/04/2022 we support Firefox 111 and Firefox ESR 111 (and ESR 91.10 in addition)
Edge-Chromium: https://www.microsoftedgeinsider.com/fr-fr/enterprise
Firefox ESR in French: https://www.mozilla.org/fr/firefox/organizations/all/
MacOS Browser: Safari (latest supported version), Firefox (latest supported version), Chrome (latest supported version)
Linux browser: Firefox (latest ESR version)
Operating system Windows 10 Pro and above, MacOS 12 and above and Linux (Ubuntu 20+), ChromeOS
Note
GoFAST is known to work in Remote Desktop (Citrix, … ) even though some features like web conferencing may lose performance
Mobile Android or iOS 13+
Productivity suit: Office 365 and Office Pro 2016+ for Windows, MS-Office Pro 2016 for Mac, LibreOffice 6+, OnlyOffice Desktop (coming soon)
Note
Since Microsoft ended support for Office 2010 on October 13, 2020, CEO-Vision will no longer support this version. We encourage a migration to use OnlyOffice included in GoFAST or LibreOffice 7+ Windows 7 support ended by Microsoft on January 14, 2020, CEO-Vision no longer supports this version
Email: Outlook 2013+ (Outlook 2010 without warranty), Thunderbird 78+, browser app Bluemind
A relatively good connection is required: 512 kbits/s min. download and 256kbps upload . You can test your connection directly via this link: http://www.speedtest.net/
A very good connection for the HD web conference: up to 6MB/s may be required. Some network filters may prevent the operation of the web conference. If https://gofast-docs.readthedocs.io/en/latest/docs-gofast-users/doc-gofast-problemes-connus.html#webconference doesn’t help you, contact your network administrator if you have a problem.
Screen resolution 1366x768 minimum (16:9 format)
Computer with 8GB RAM
On the move: latest tablet or smartphone (iOS or Android)
Some best practices
Important
Even if GoFAST requires a small change in habits, it is important that as many people as possible make the effort to change. The time saving is then very significant, everyone is a winner!
Objective 1: Reduction of the number of emails between colleagues and partners
I no longer send e-mails with attachment, but I add a comment on the document on GoFAST, all people will receive a notification.
in many cases, the attachment is already out of date when your recipient receives it, and attachments clutter up the messageries.
I no longer send emails with attachments to my contacts who do not have a GoFAST account but I use the “Share by email” feature
I no longer create a document “one-by-one”, but I use OnlyOffice co-editing
This saves time and reduces errors, helps to avoid merging the sections written by each user
I no longer send task requests or validation by email, but I use the ‘’workflows’’ (task processes) for review, validation, signature, etc. Everyone is notified, everyone knows their task and deadlines are met.
I use forums for my questions / answers instead of emails. Everyone shares their knowledge.
Objective 2. Saving time on searching for information and content
All content (even spreadsheet cells, etc.) is indexed (“full-text” indexing) and the search engine is considered one of the most powerful
I save up to 30% of my time (IDC source: 30% of executives spend their time searching for scattered and duplicated content)
Objective 3: Elimination of duplicate files and version errors
I no longer keep files on my PC or inbox, documents are centralized and accessible according to user rights.
- I never copy a document in multiple places again, I use the Location / Sharing feature that allows the same document to be seen in multiple spaces.
Whatever the space, everyone will have the right version
- I no longer create one file per version
GoFAST versions and all versions are automatically available at any time.
I access my working documents on the move and I do not need a local copy or a paper version (Online access on Tablets and Online/Offline on PC).
I share the information with my customers and suppliers in the GoFAST Extranet and thus, they have access to the same documents and no longer duplicates, which are quickly obsolete.
I no longer store my documents in the e-mail because a simple drag and drop is enough to transfer them to GoFAST.
Objective 4: Management of the workflows, validation and signature of documents
Informal workflows or often inefficient paper procedures are modeled in GoFAST. With predefined task schemes, you regain control over various business workflows.
I no longer have to look for deadlines in my emails, they are clearly stated in workflows and reminded me in notifications.
Objective 5: Reduction of the amount of paper
I scan paper documents (contracts, invoices, emails, etc.) and send them directly to the GoFAST platform, where they will be full-text-indexed on the fly.
I transform paper forms into electronic documents and disseminate them efficiently (targeting a group, automatic reminders, activity tracking, etc.) and export the data to a spreadsheet.
I electronically sign PDFs with a secure certificate instead of printing them to sign and re-scan.
What’s new in the latest version of GoFAST
Please view the “Release-Notes” of the latest available version.
Cookie Acceptance Guide to Enhance Your Experience on GoFAST
To optimise performance and analyse any problems on our platform, you need to accept cookies. By default, browsers can block cookies, which requires manual configuration for our site. Here’s how to do it:
Chrome
Go to Google Chrome then Settings,

Click on ‘privacy and security’, then ‘third-party cookies’
Scroll down to ‘Custom behaviour’ then ‘Add’
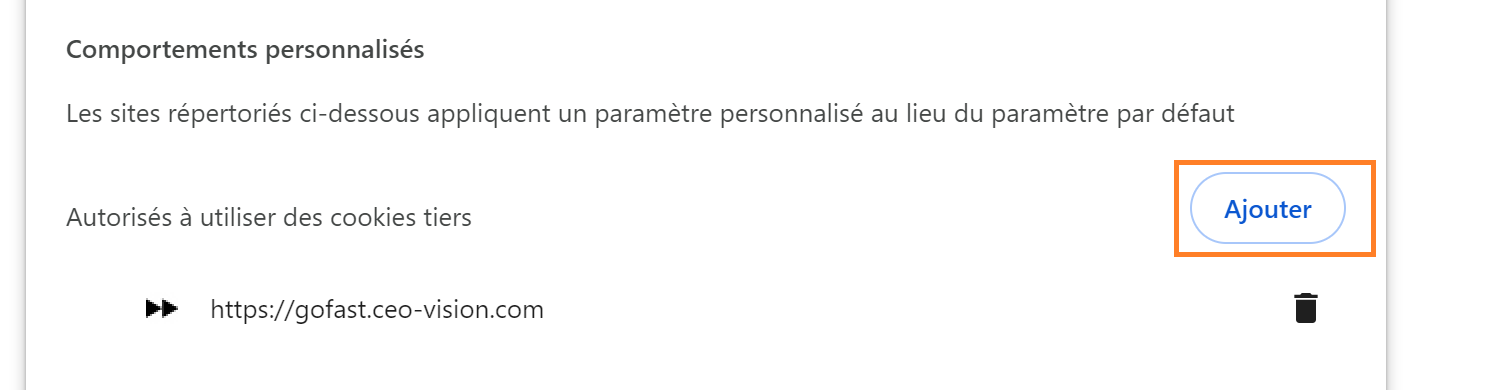
Add the address of your platform and click on ‘Add’.

FireFox 1. click on the shield to the left of the url on your platform’s website,
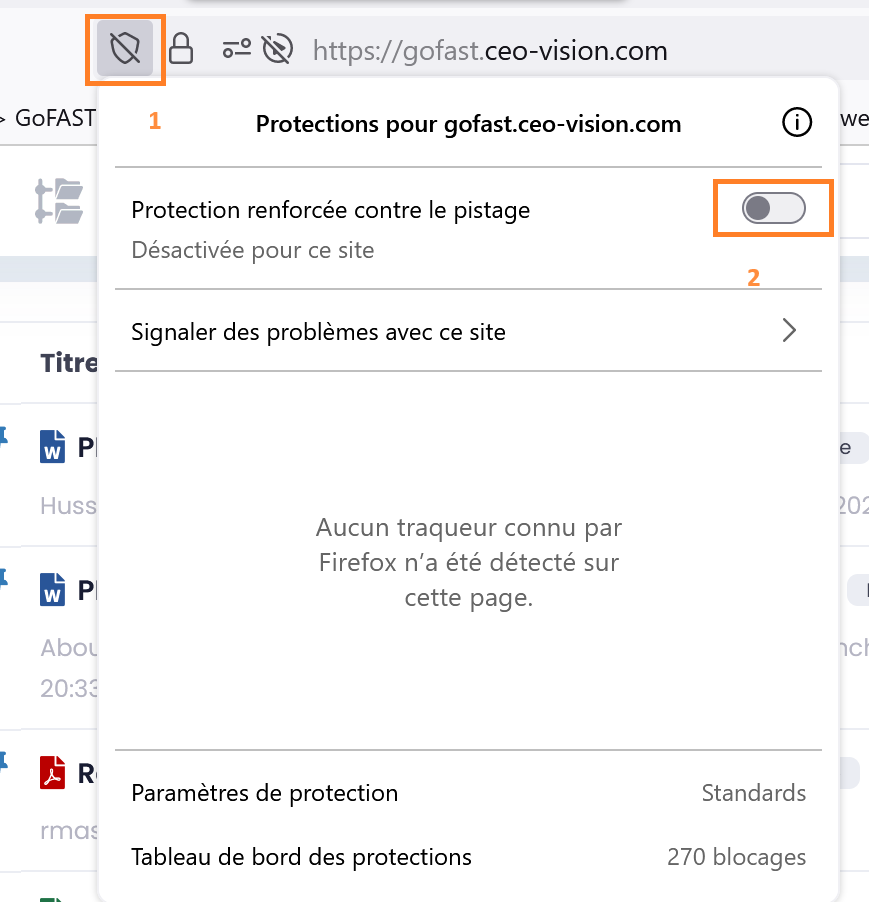
Then deactivate ‘Enhanced protection against tracking’.
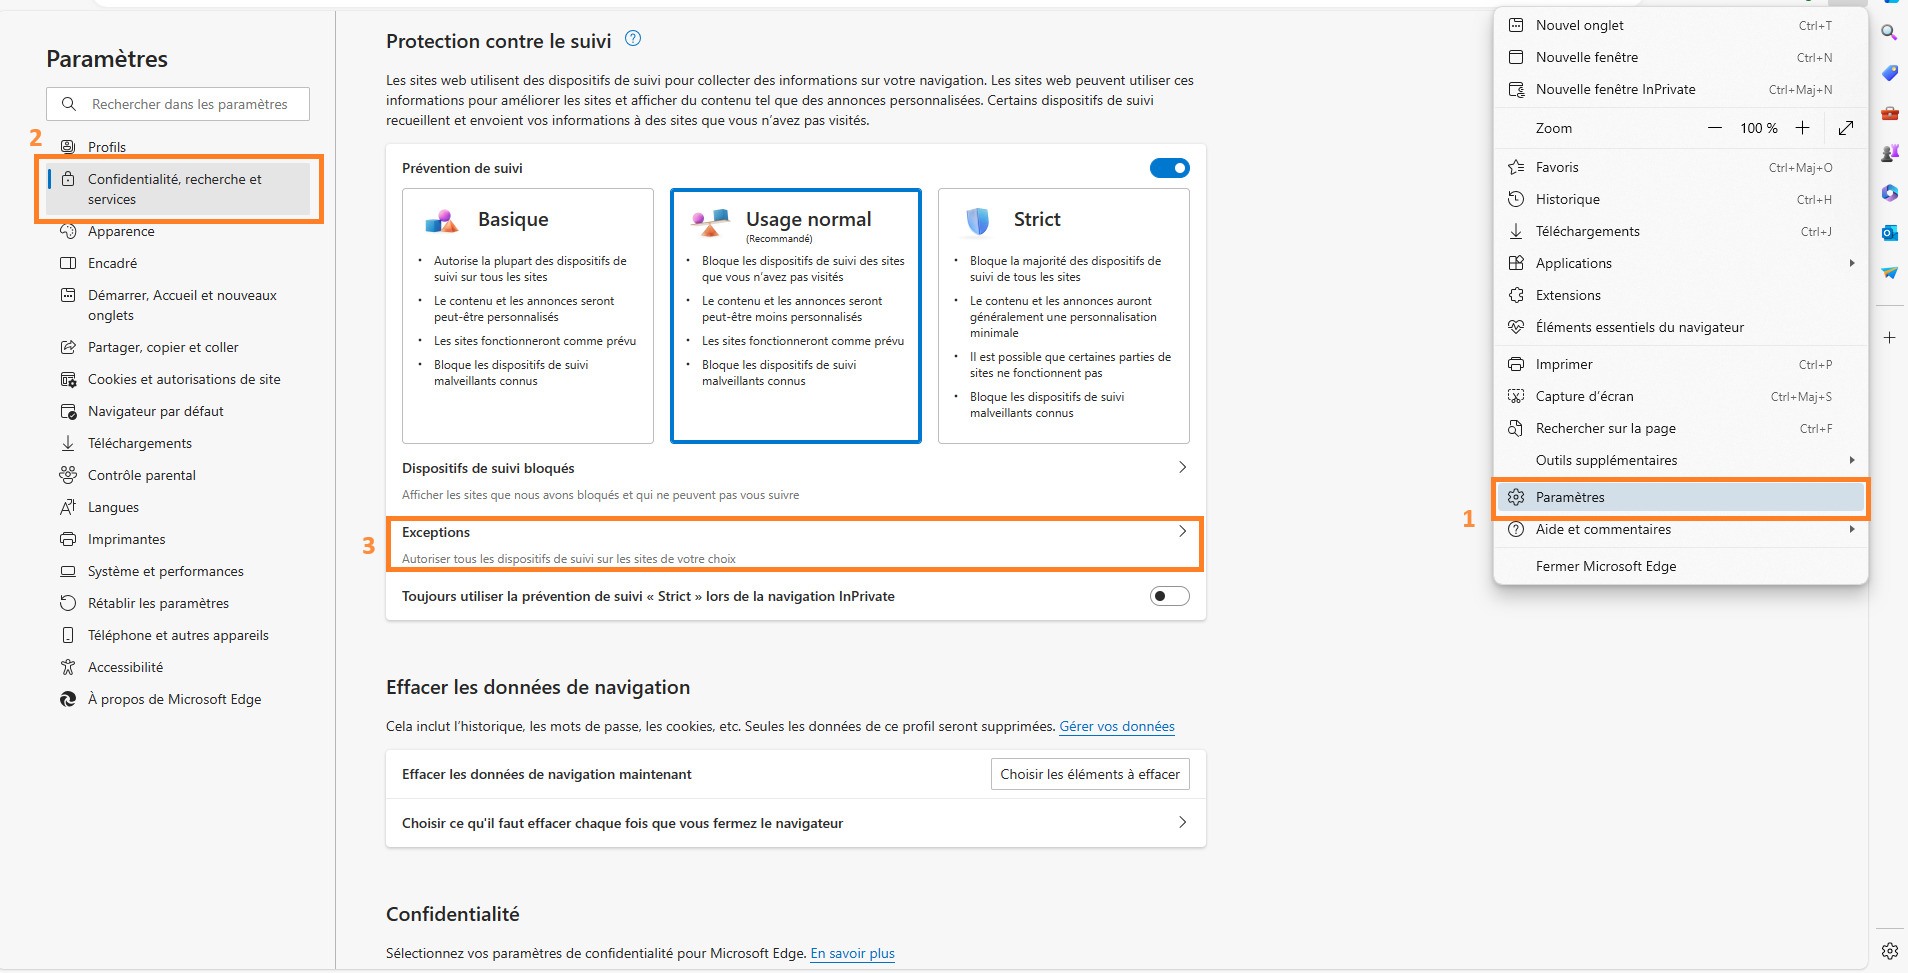
Microsoft Edge 1. launch Edge and go to Settings 2. Go to ‘Privacy, search and service’ 3. Then go to ‘Tracking Protection’ and click on ‘Exceptions’.
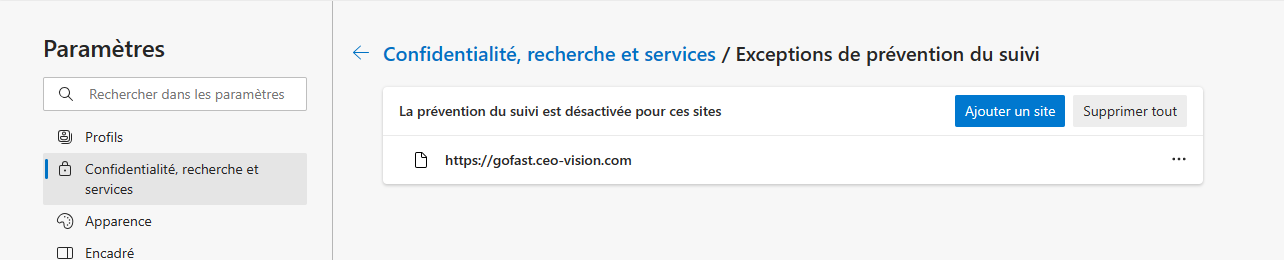
And ‘Add a site’
You can then add a site
The Basics
Login
You can log in to GoFAST via the URL on the following template: https://gofast.monorganisation.com
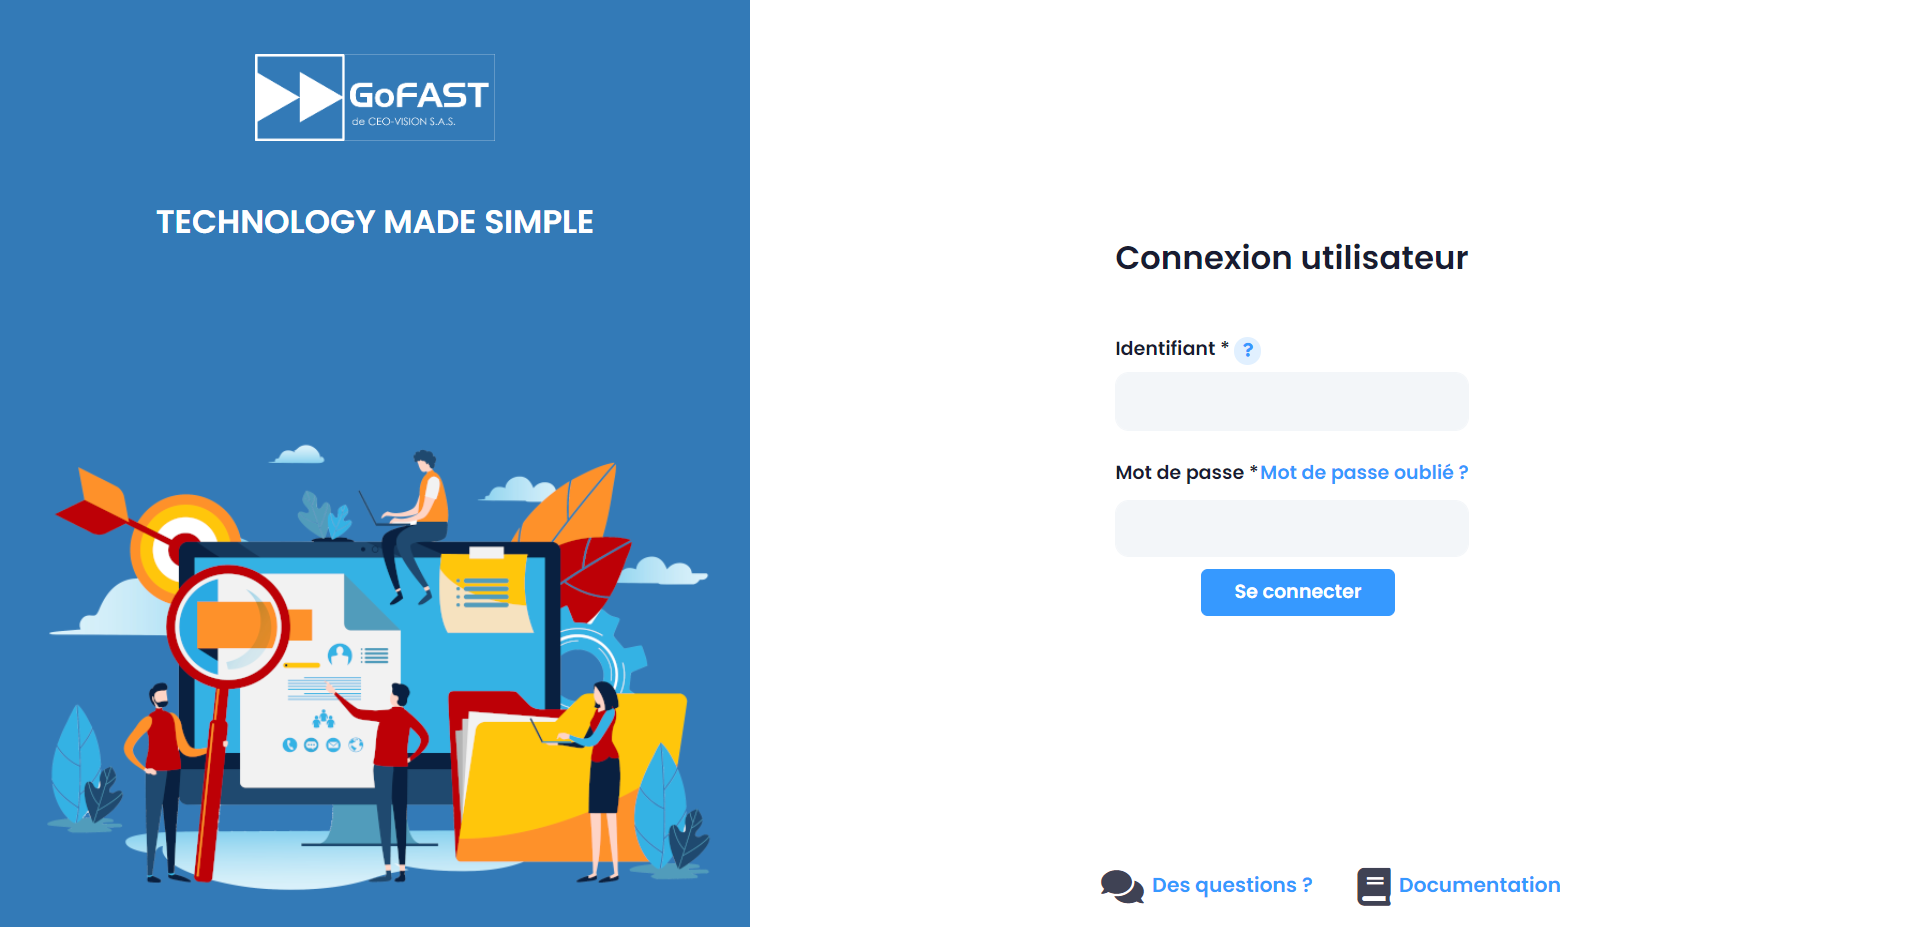
Simply enter your username and password or log in via SSO (Automatic Authentication if configured on your platform).
Caution
The e-mail address is not the ID
Note
If the authentication delegation has been activated on your site, this is your usual password (your organization/company password). If the SSO has been configured, you do not need to enter your ID or password, but just click on the automatic login button.
Note
When an account is blocked after 5 attempts, you can click on “Forgot your password? ».
If the GoFAST account is linked to the AD, you will receive an e-mail telling you that it is not possible to change your password, because it is linked to the AD, then you need to contact a super administrator or the IT department of your organization.
If the GoFAST account is not linked to the AD, an email will be sent to reset its username and/or password. Attention, a valid e-mail address is required for this to work. Once the reset is completed, the user’s status will automatically change from “Blocked” to “Active” in the GoFAST directory.
When you first connect, you can choose between two interfaces: GoFAST plus or GoFAST Essential From your profile picture, you can change this choice at any time. The GoFAST Essential interface is the “restricted” version of GoFAST Plus (full interface). It offers the main features and hides some more advanced features (e. g. Space Management) with a home page and navigation more suited to a casual user. If you have any questions, feel free to go to the user community forums.
If you want to know more about the GoFAST Essential interface, please watch this video :
How to navigate GoFAST (menus, icons, etc.)
Quick access menu
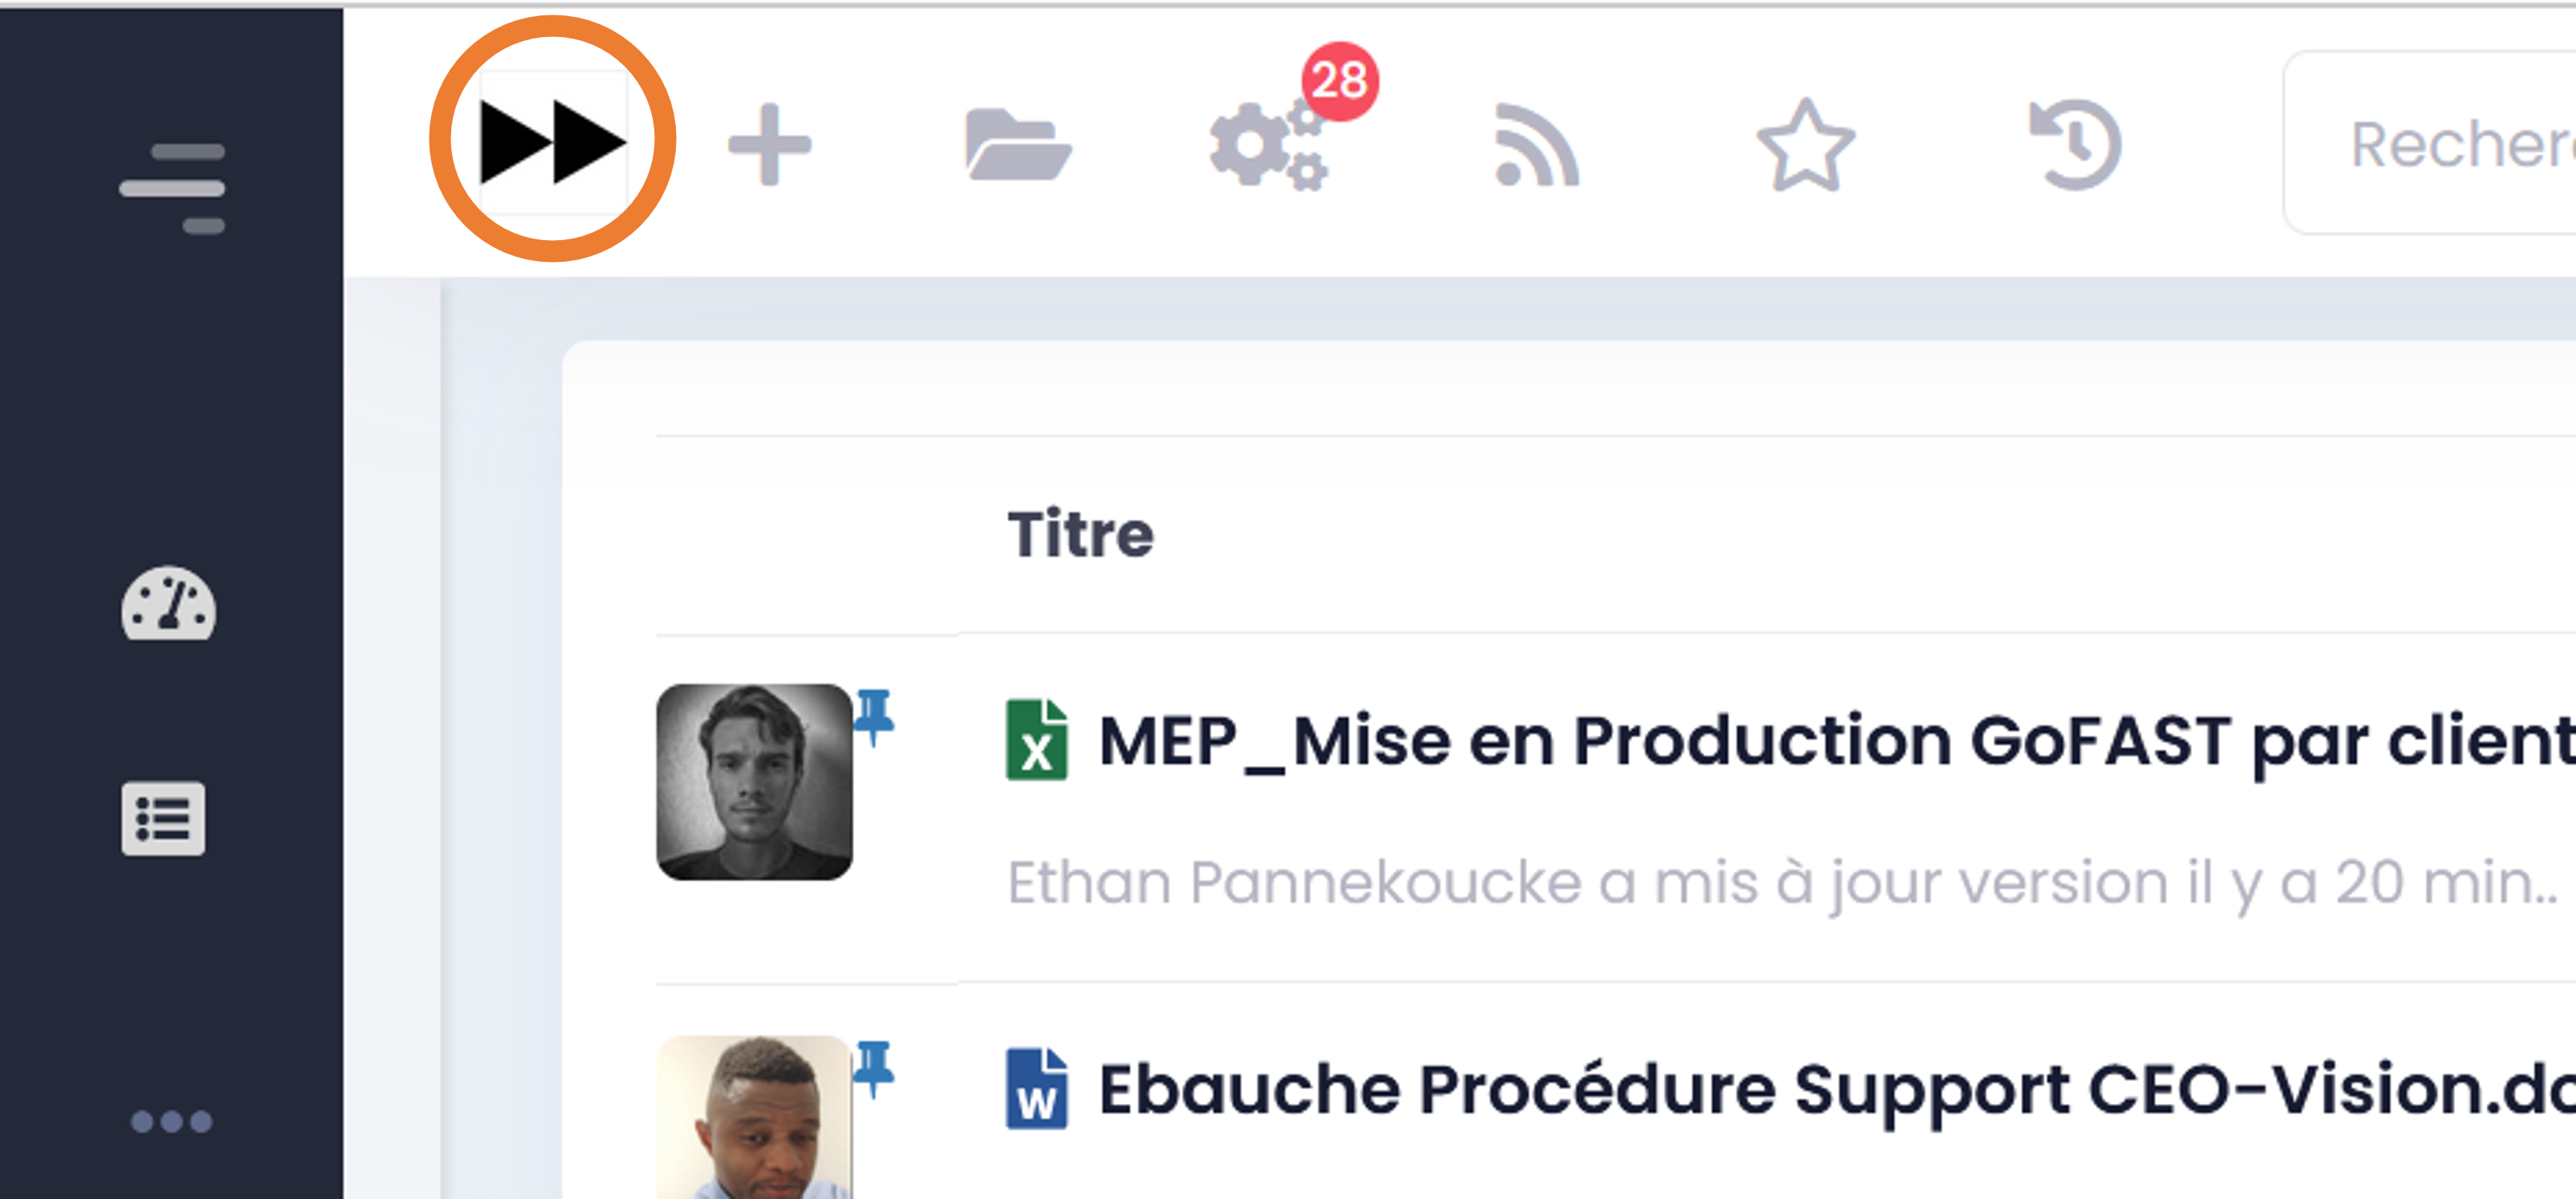
Logo: allows you to return to your homepage, either the activity feed or the dashboard depending on the configuration of your platform.
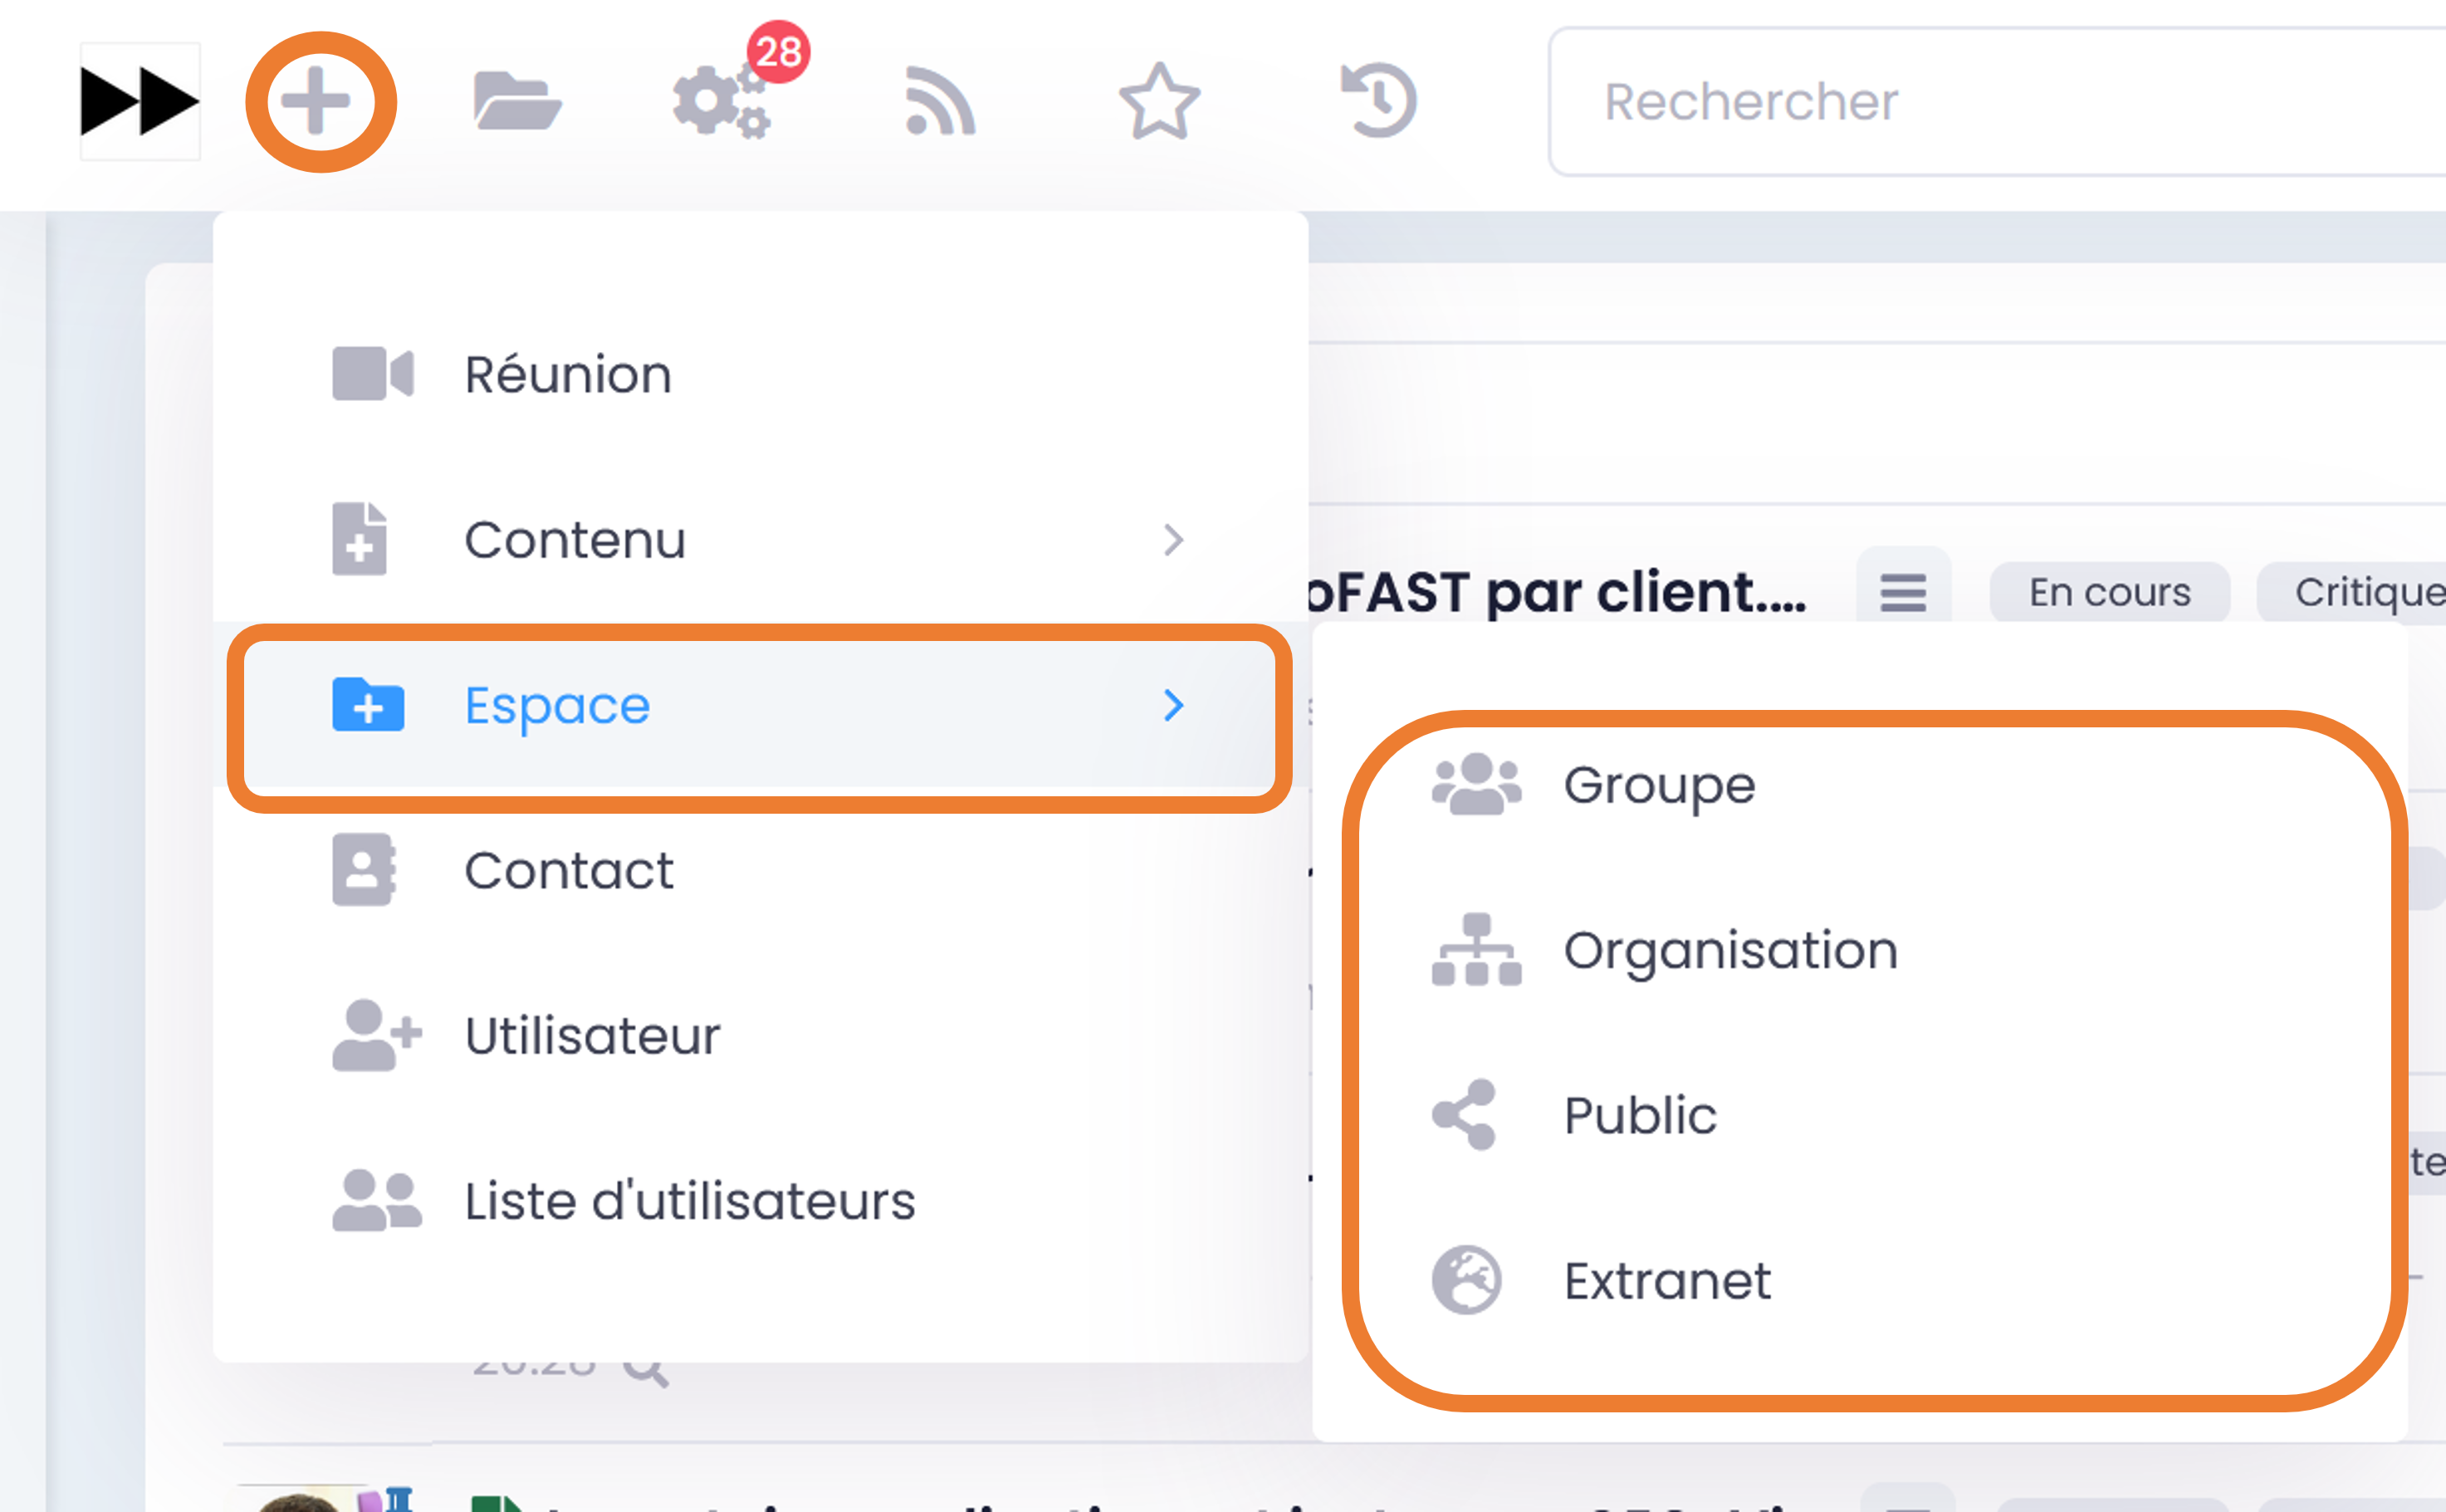
The “+” icon: allows you to create content, documents and users. For more information, see the section: Creation of Documents, Content, Users.
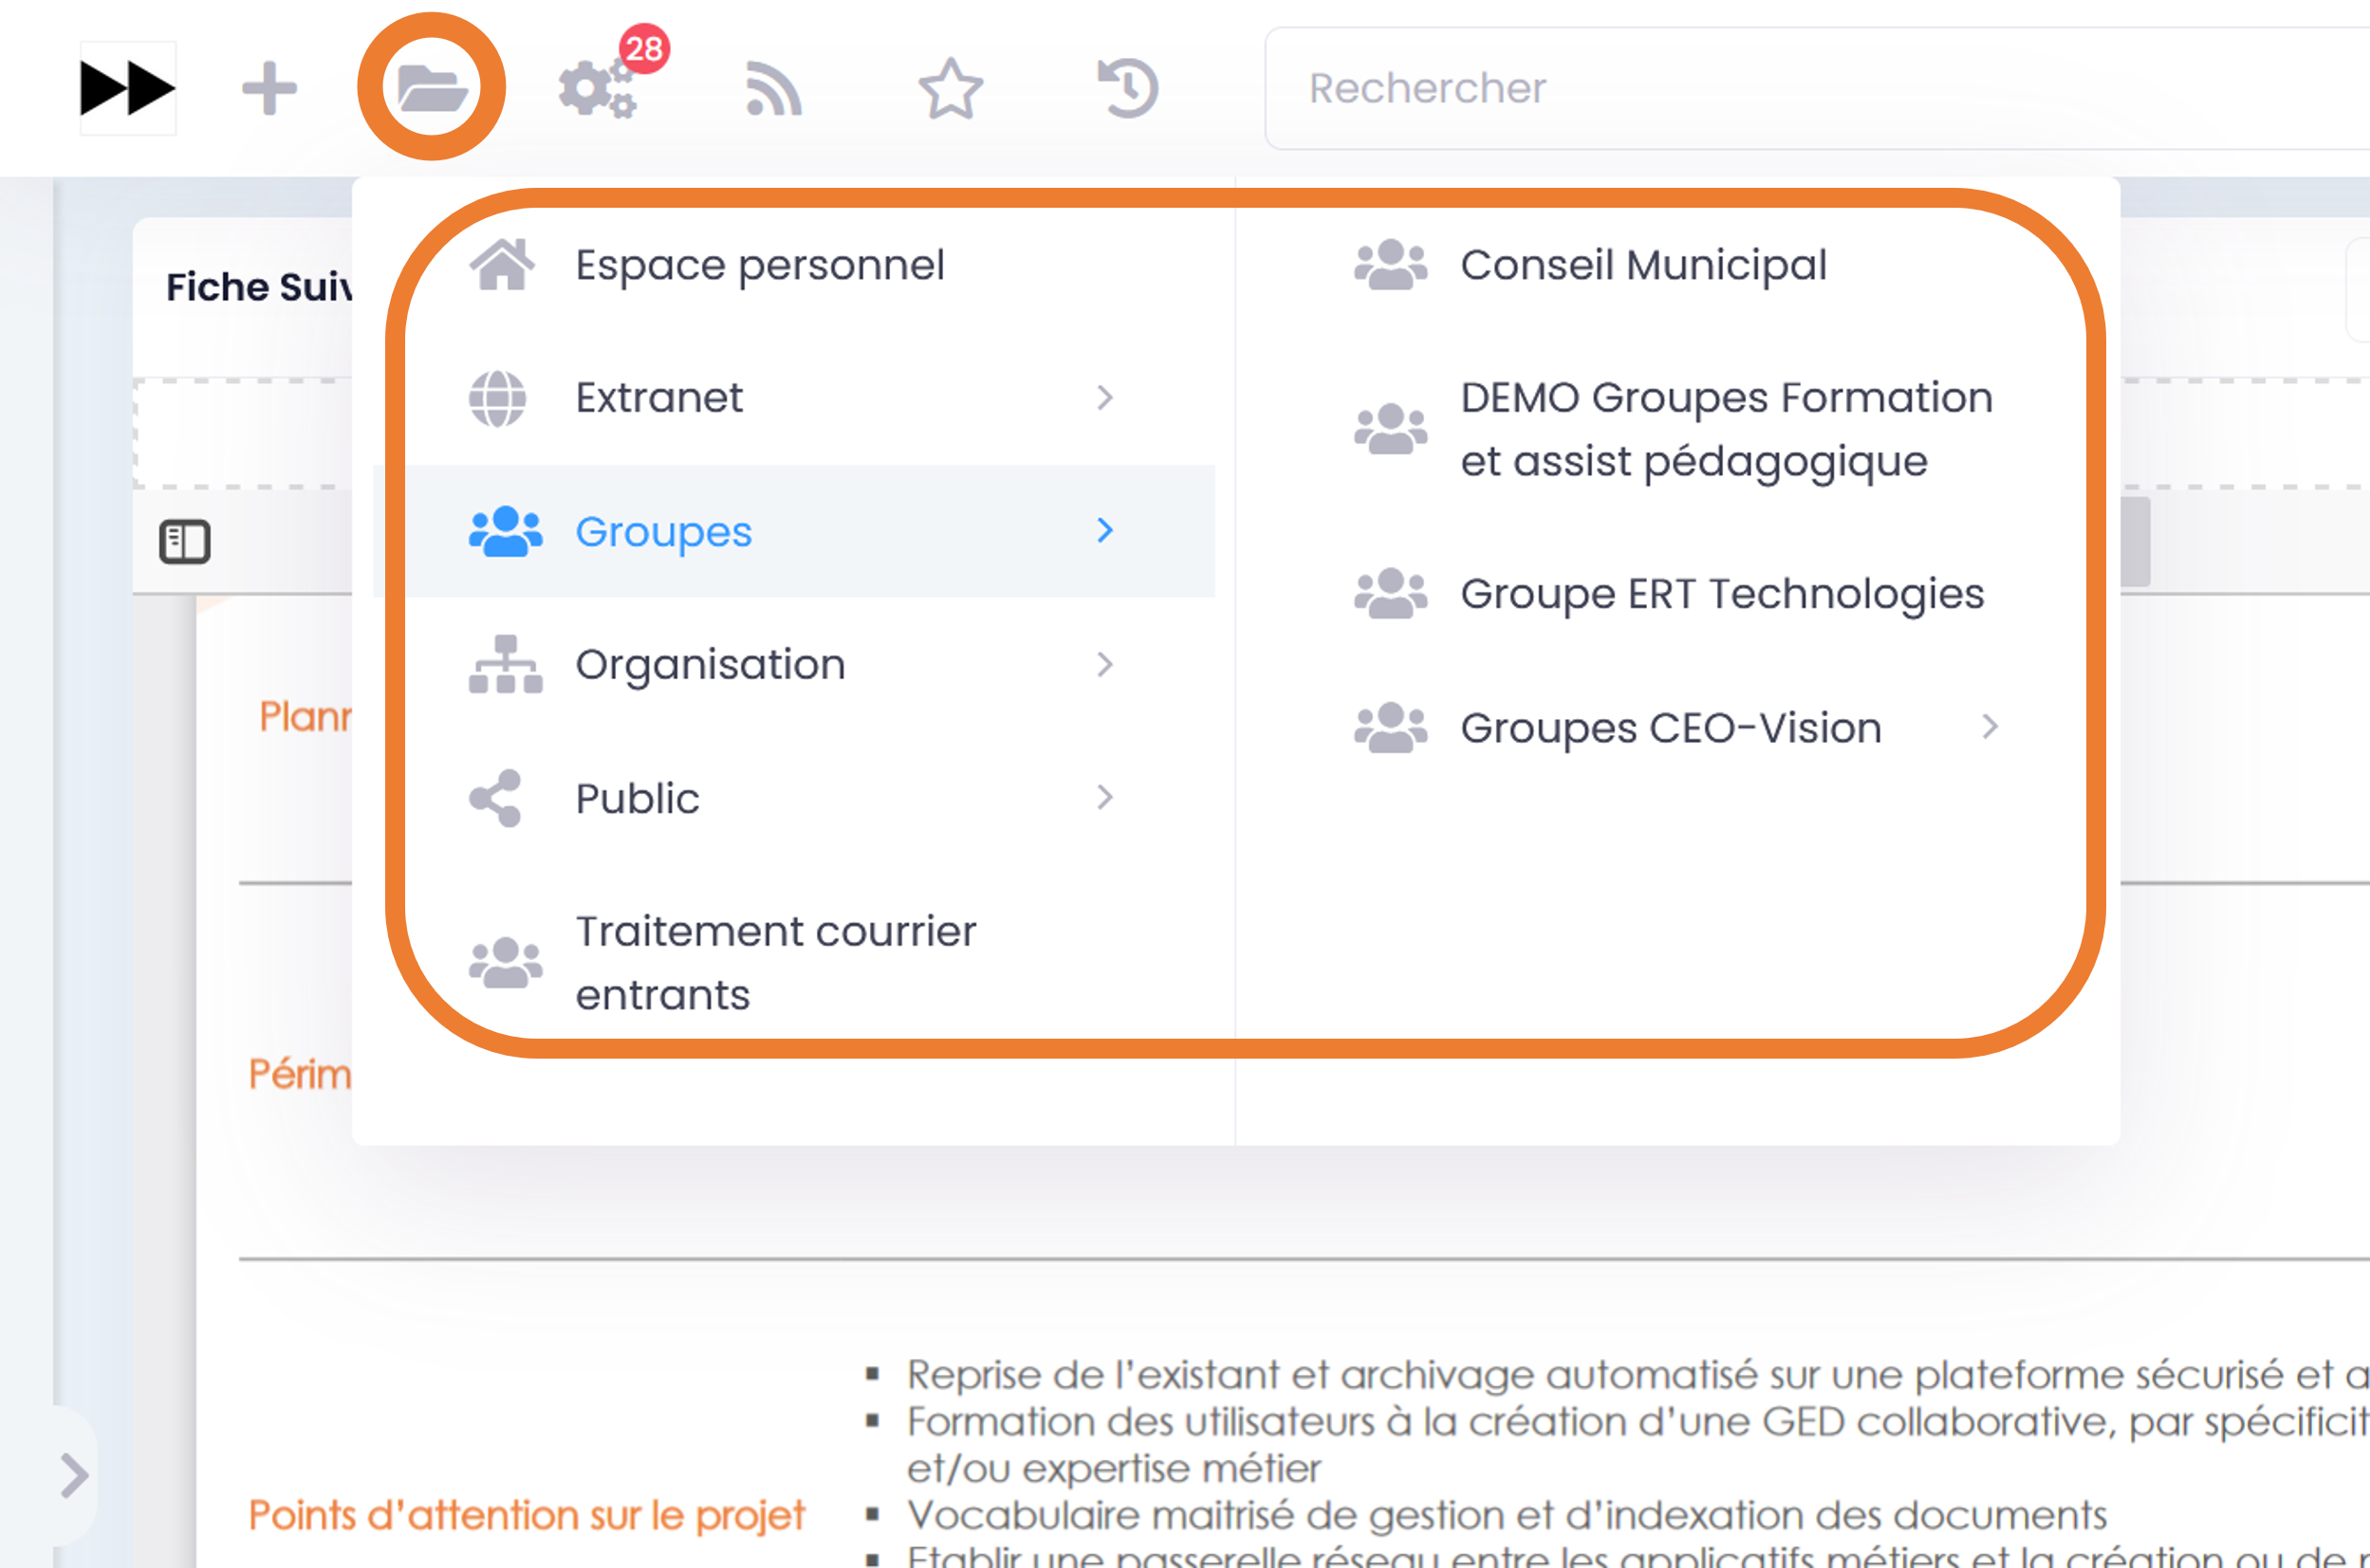
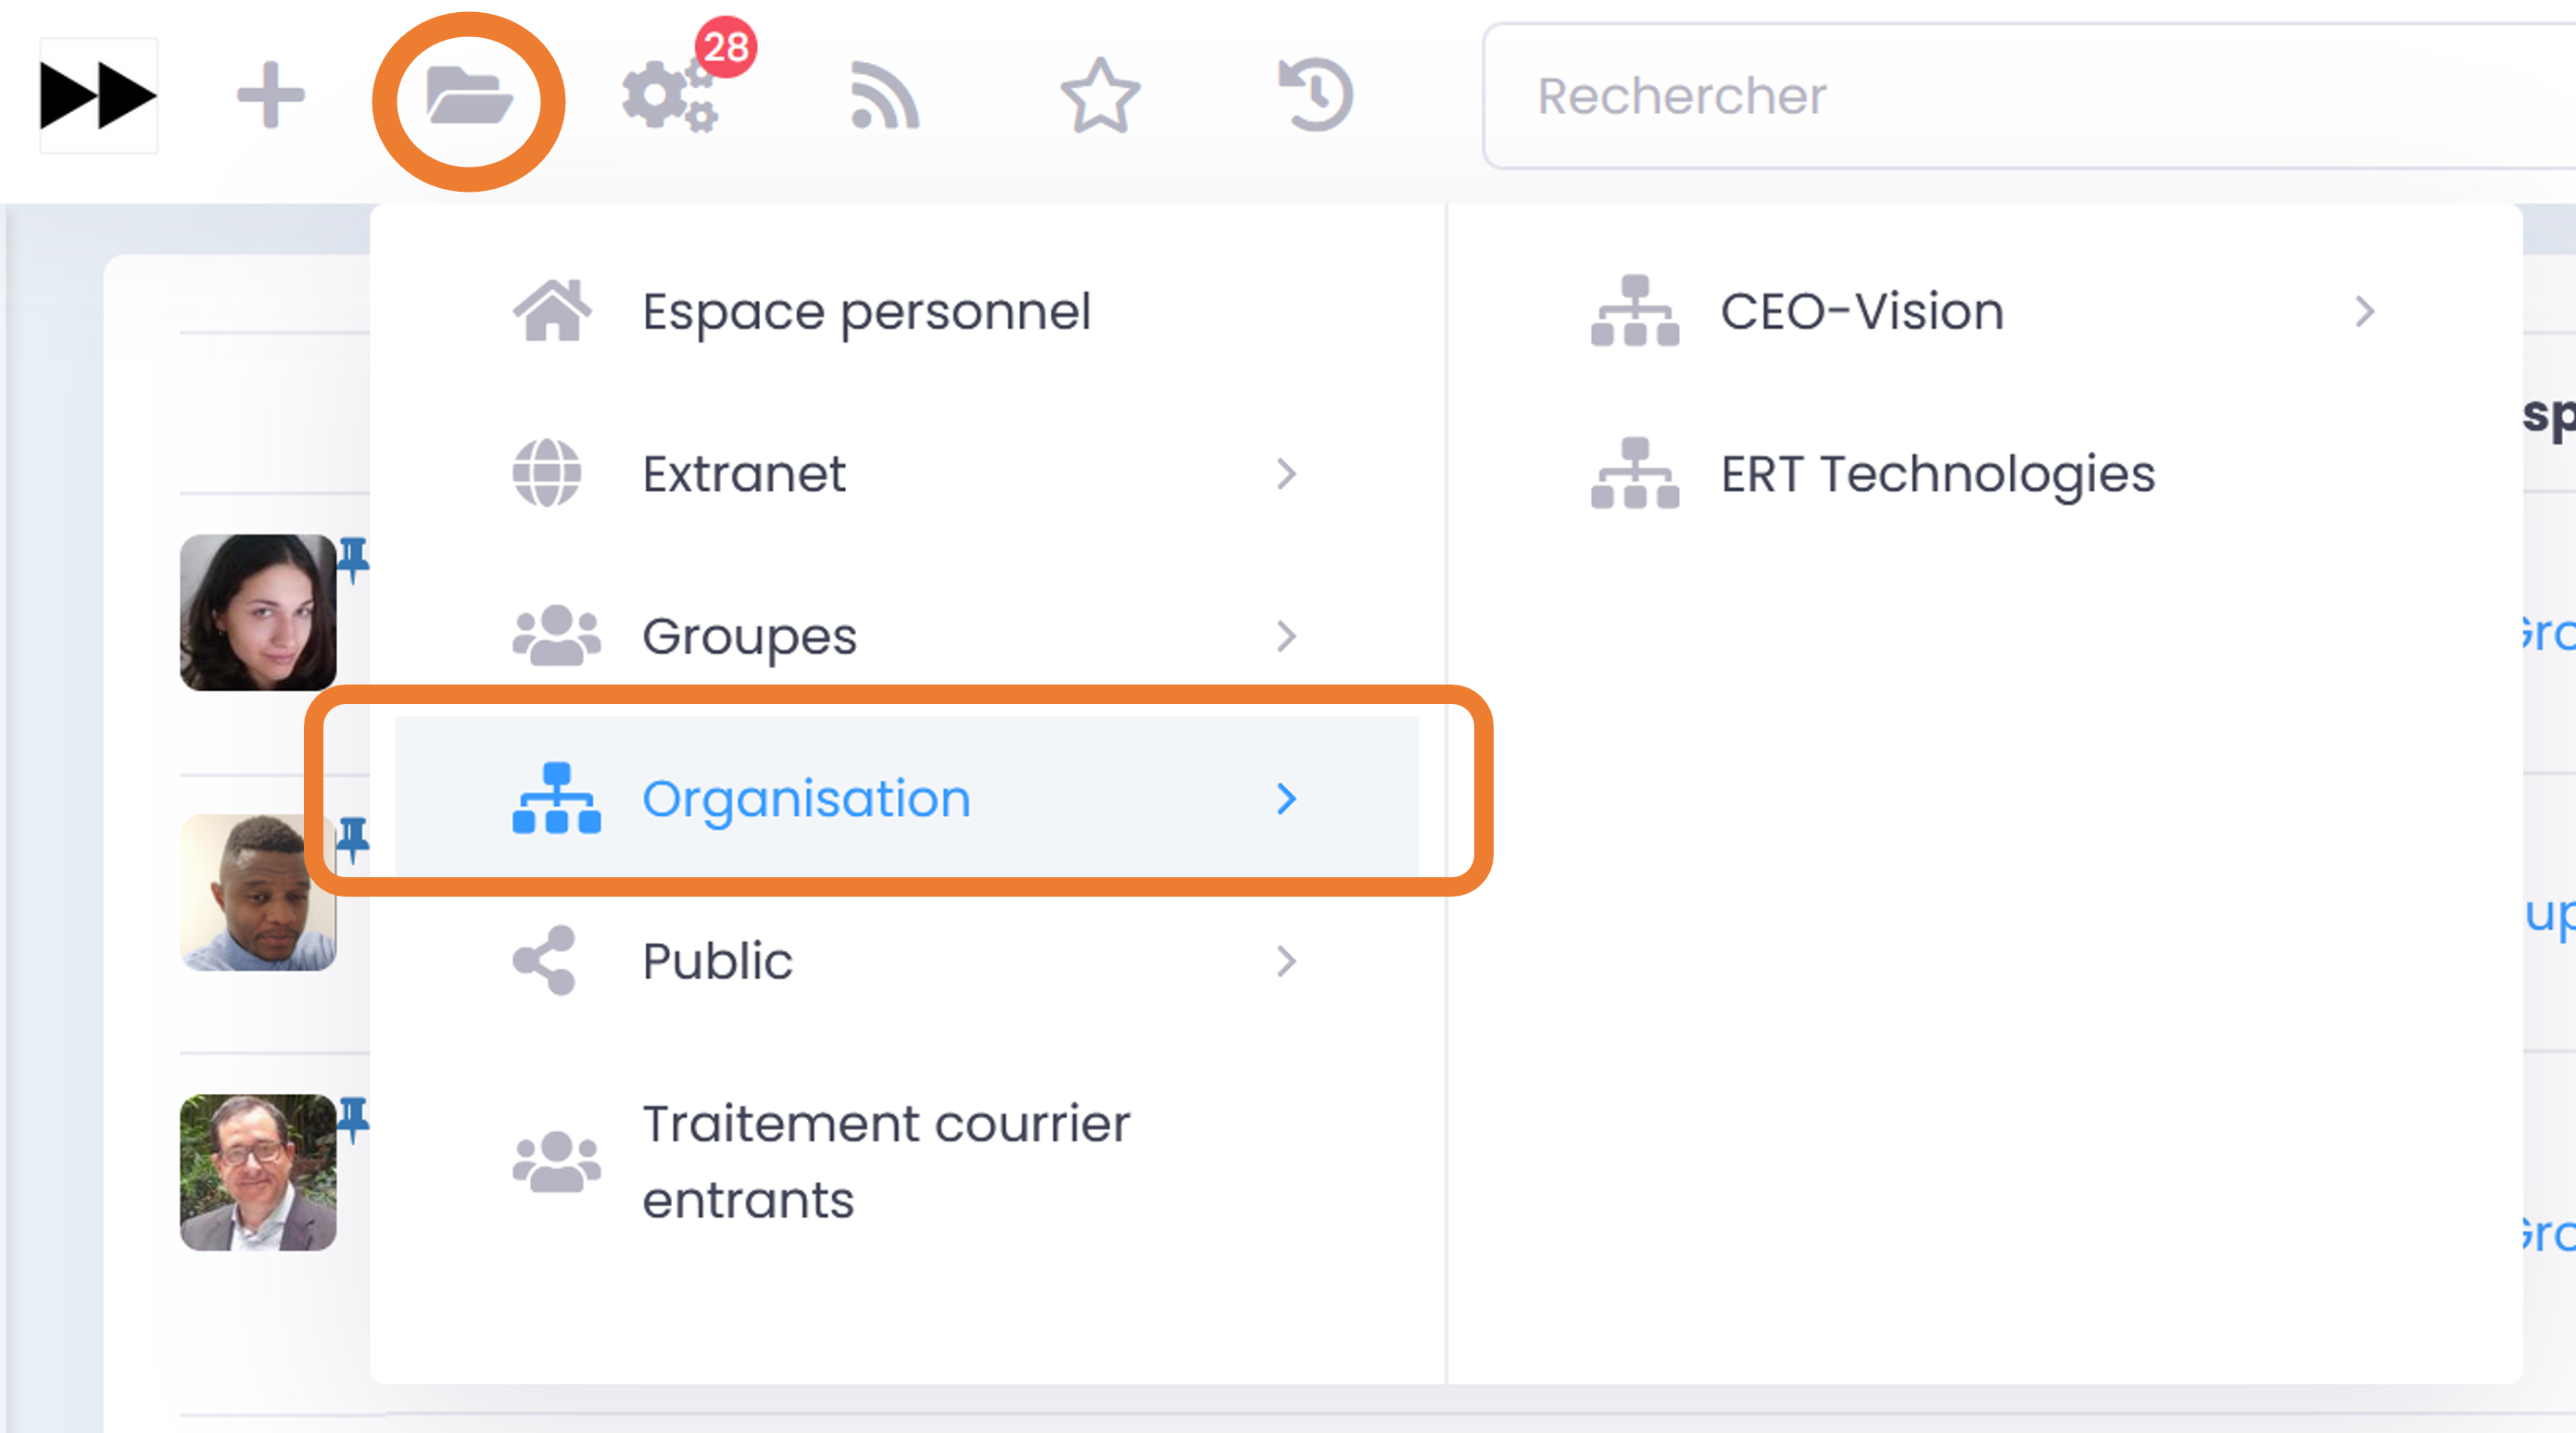
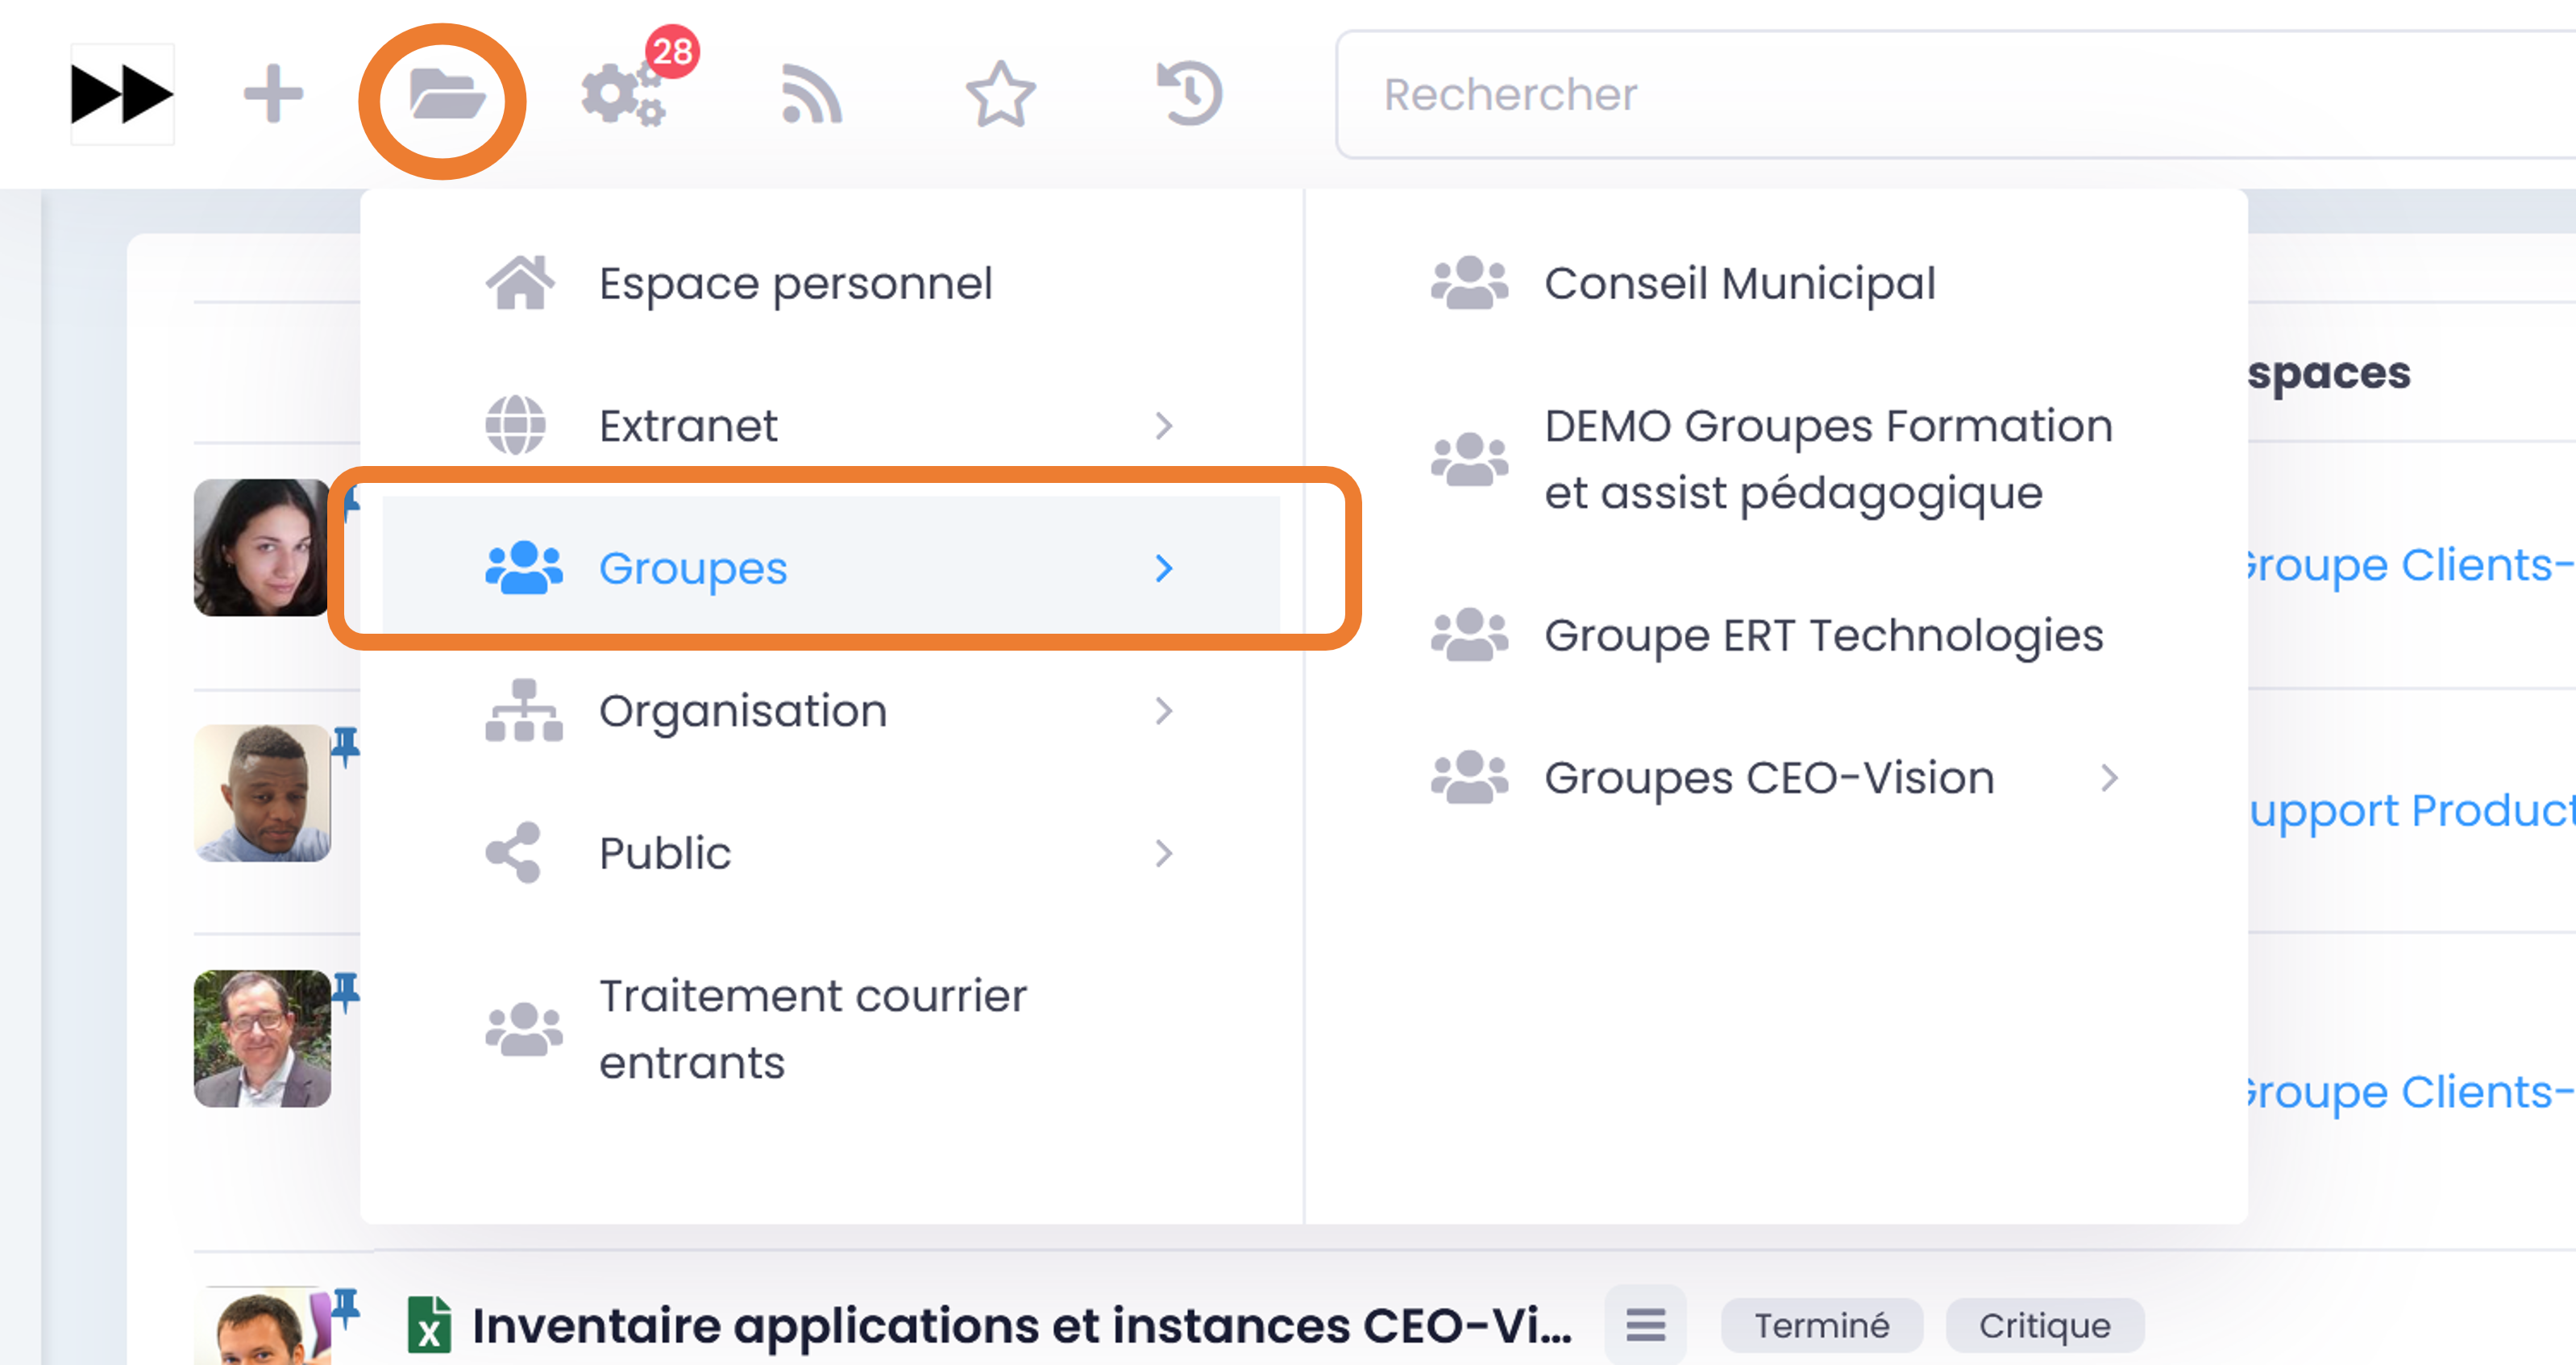
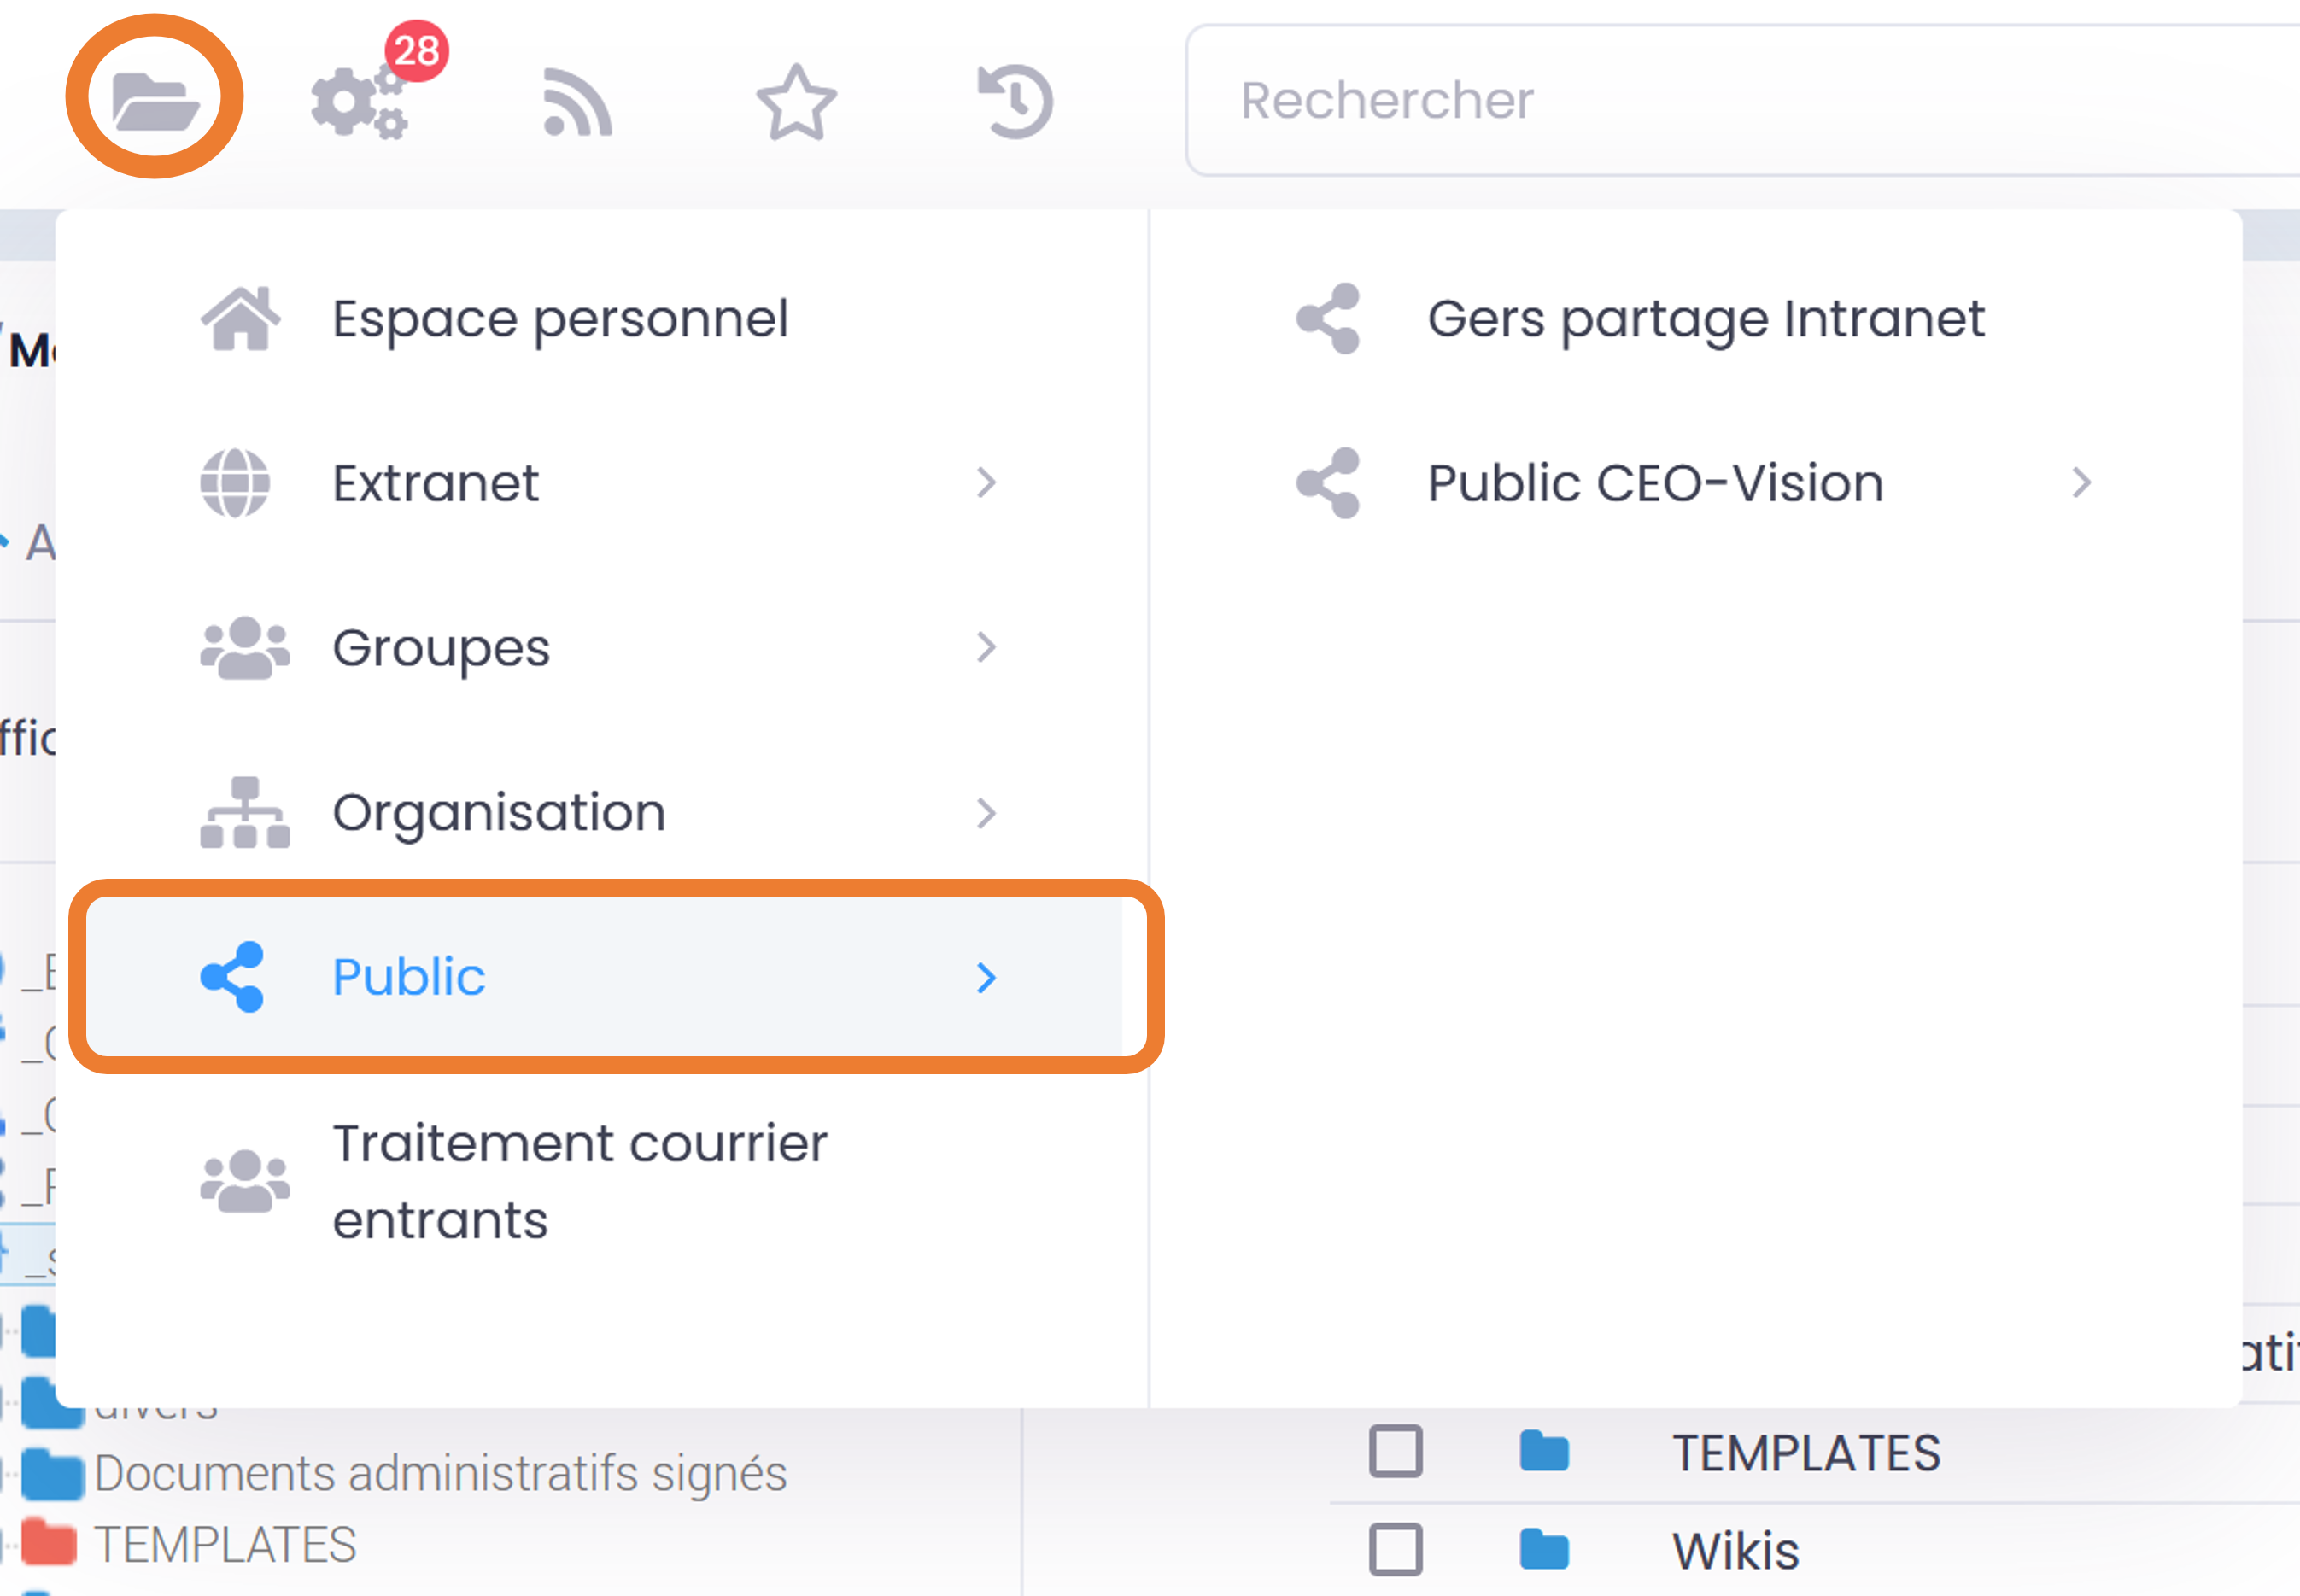
The Folder icon: allows you to access the spaces tree of the platform you have access to.
Wheel icon: allows access to the workflows and tasks. For more information, see the section: Workflows and Signature: Workflows and Tasks (Enterprise Only).
The Feed icon: allows you to see the news of the defined website.
The Star icon: allows you to find your content and folders pinned as personal favorites.
The Clock icon: allows you to access your last 10 viewed contents.
The search bar: allows you to search all the content you have access to on the platform (documents, spaces, users, forums, etc.). For more information, see the section: Search Engine.
Cart icon: Allows you to access the list of documents you have previously placed there to perform actions on all documents in the Cart. For more information on this part, see: Document Cart.
Flag icon or language letters (for example, FR/EN): Allows you to change the language of the platform interface.
- The Question Mark icon provides access to:
Forums: Refers to forums where all GoFAST users can discuss issues, developments, best practices, functional issues, etc. among themselves and with the CEO-Vision (publisher of GoFAST) teams.
New Features: Displays the carousel of new features brought by the version you are using.
Documentation: refers to this online documentation.
About: In this part, you can get acquainted with the various components installed on the platform, as well as their versions.
Finally, if you have set up a personalized link (see the Administrator part). You can find the link here (subtab after About).
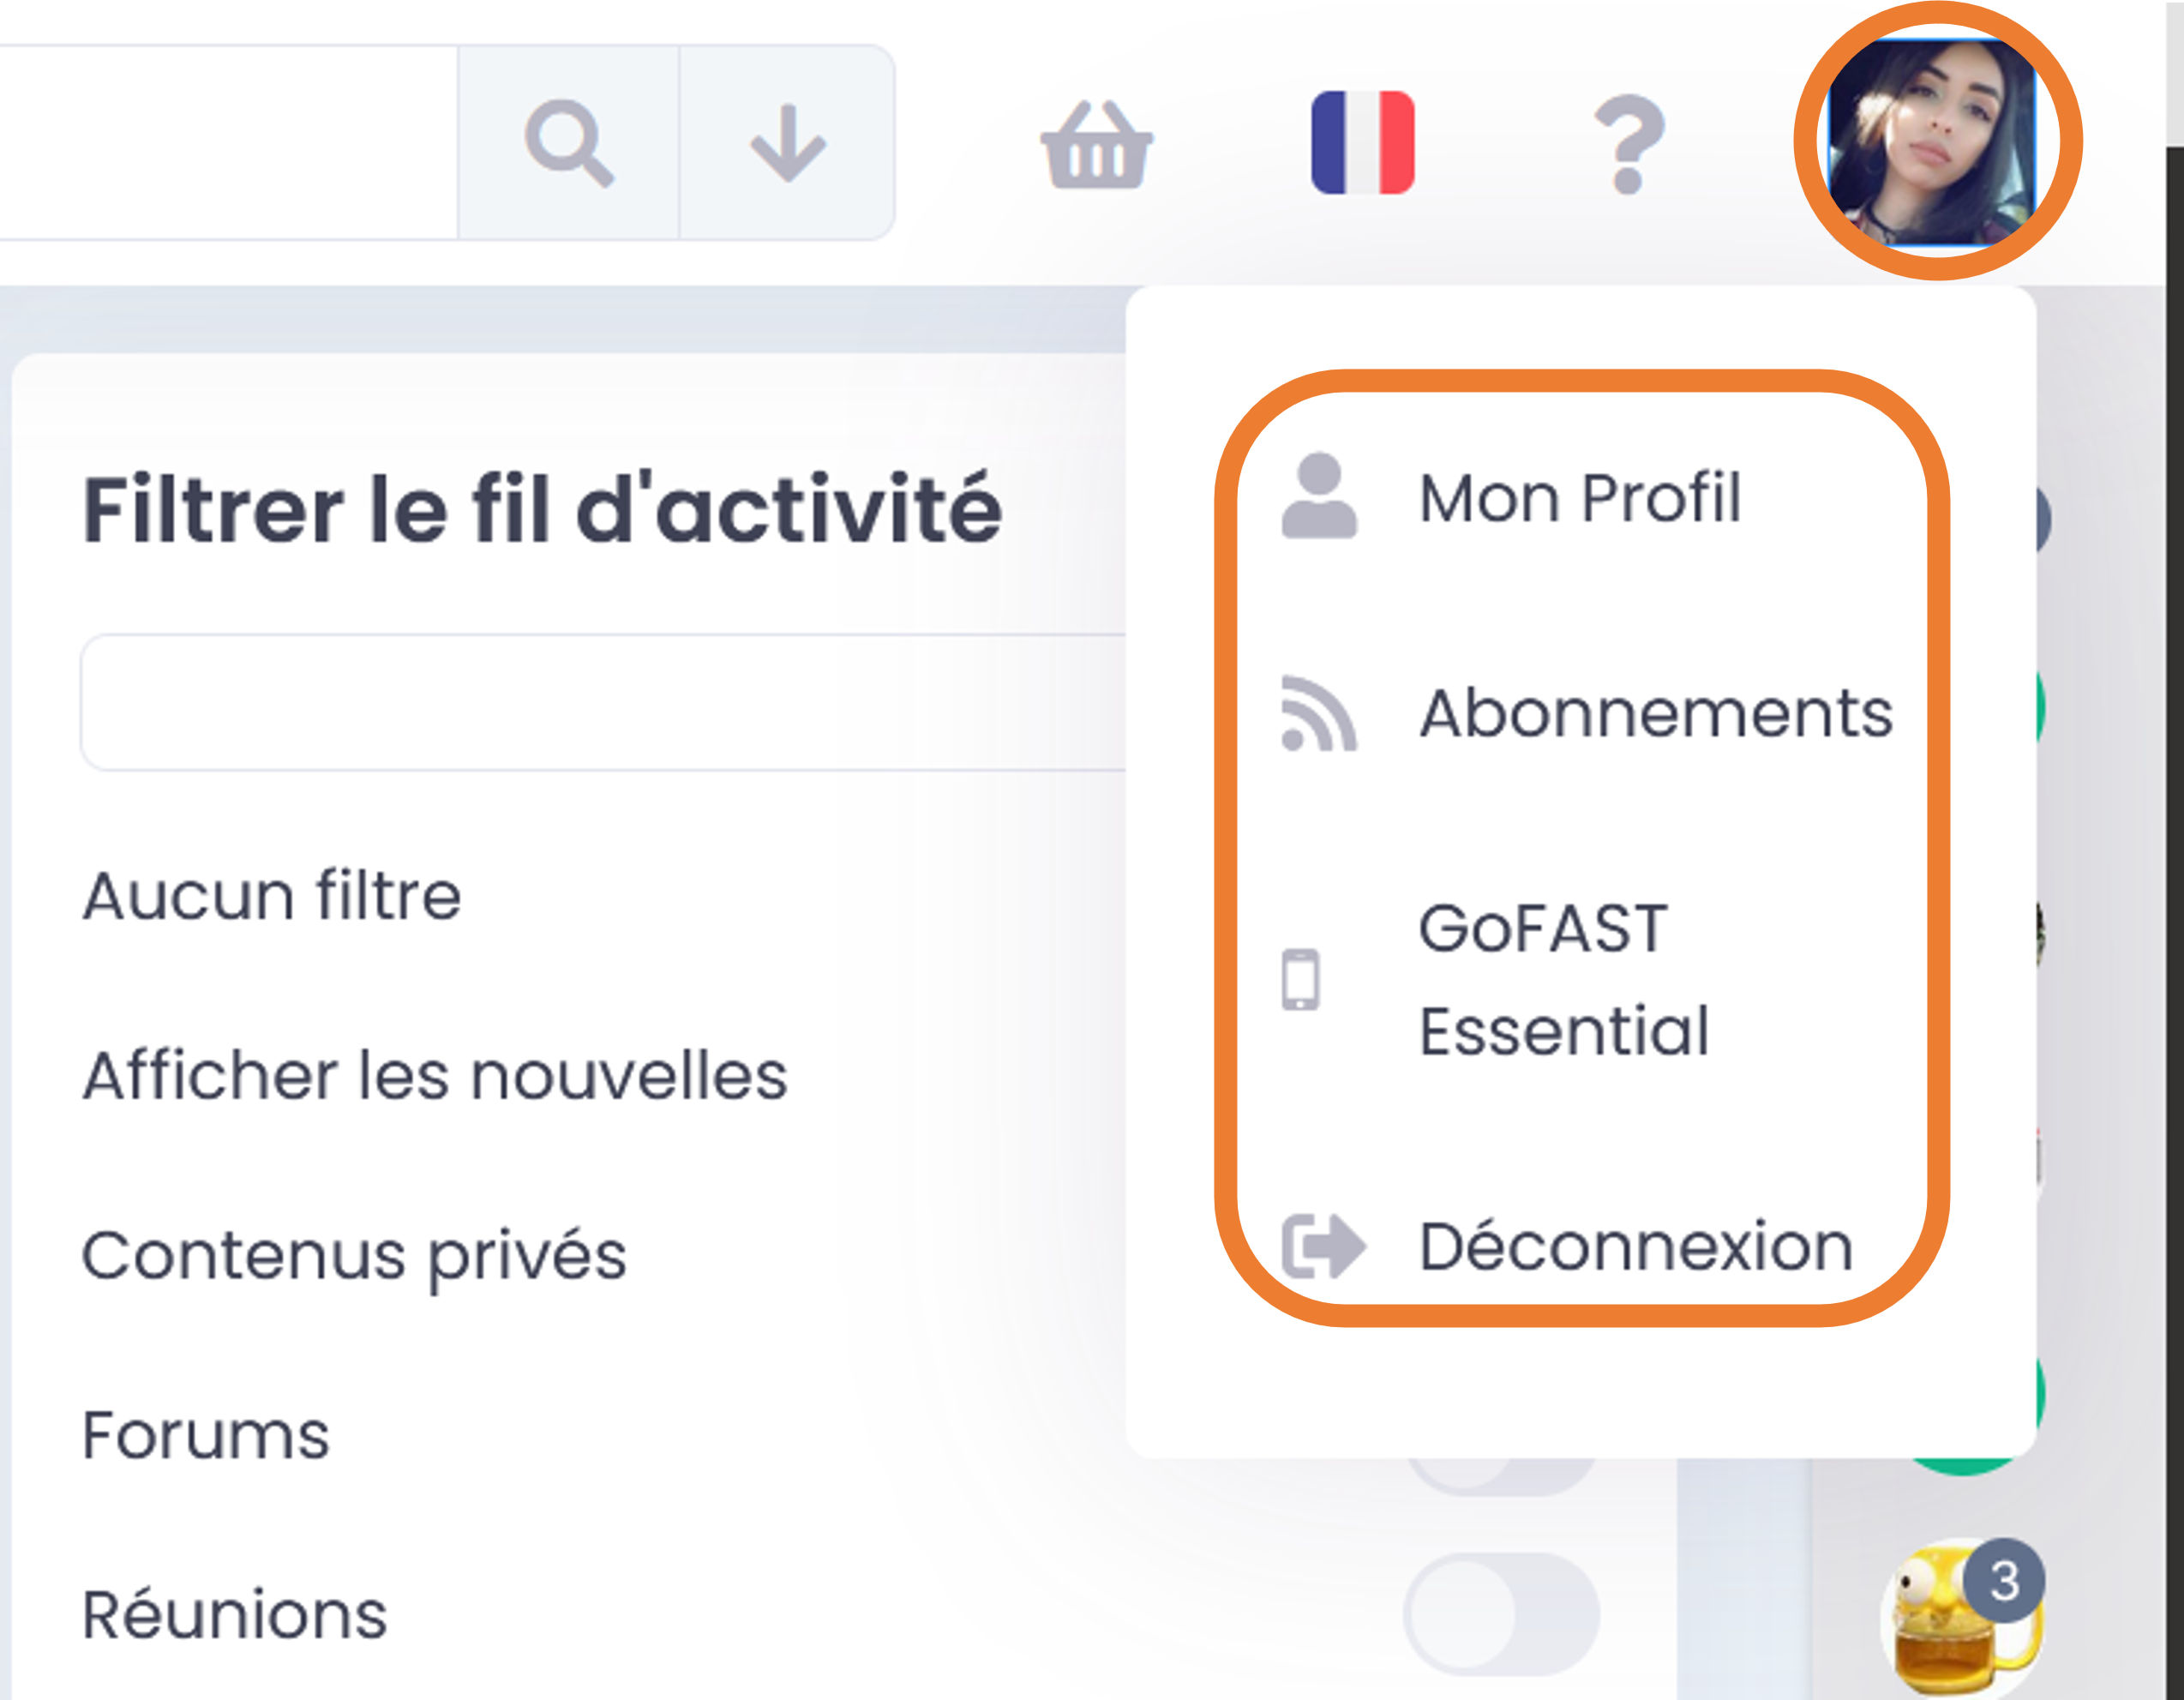
- The photo (user’s avatar) gives access to:
My Profile: you give access to your profile, see part: My Profile
Subscriptions: allows you to access your subscription page, see the part: Subscription management
The choice between GoFAST Essential or GoFAST Plus.
Logout to exit the platform. Please note that GoFAST session duration is limited in time anyway, so you will be disconnected after a delay (10 hours).
Homepage
When you first log in to GoFAST after an update, you may arrive on the carousel that displays the new features. Depending on the configuration of your platform homepage, you can arrive either on the Activity Feed or on the Dashboard.
Activity Feed
The GoFAST activity feed gives you an overview of what happened to the content in your collaborative spaces (Groups/Organizations/Public/Extranet).
The Activity Feed page is organized into four parts:
The profile photo: which refers to the person who carried out the action.
Title of the concerned document/content and the type of taken action. To the right of the content, a “Hamburger” menu allows you to carry out actions on the content, directly from the activity feed.
Space(s) where the relevant content is located (with one click you can go to the Space).
Activity stream filters (allow you to filter the activity feed on various criteria).
Note
You can return to the activity feed page at any time from the main left menu (or the top left logo, if that’s the default homepage).
Actions possible from the Activity Feed:
The “Hamburger Menu” (contextual actions)
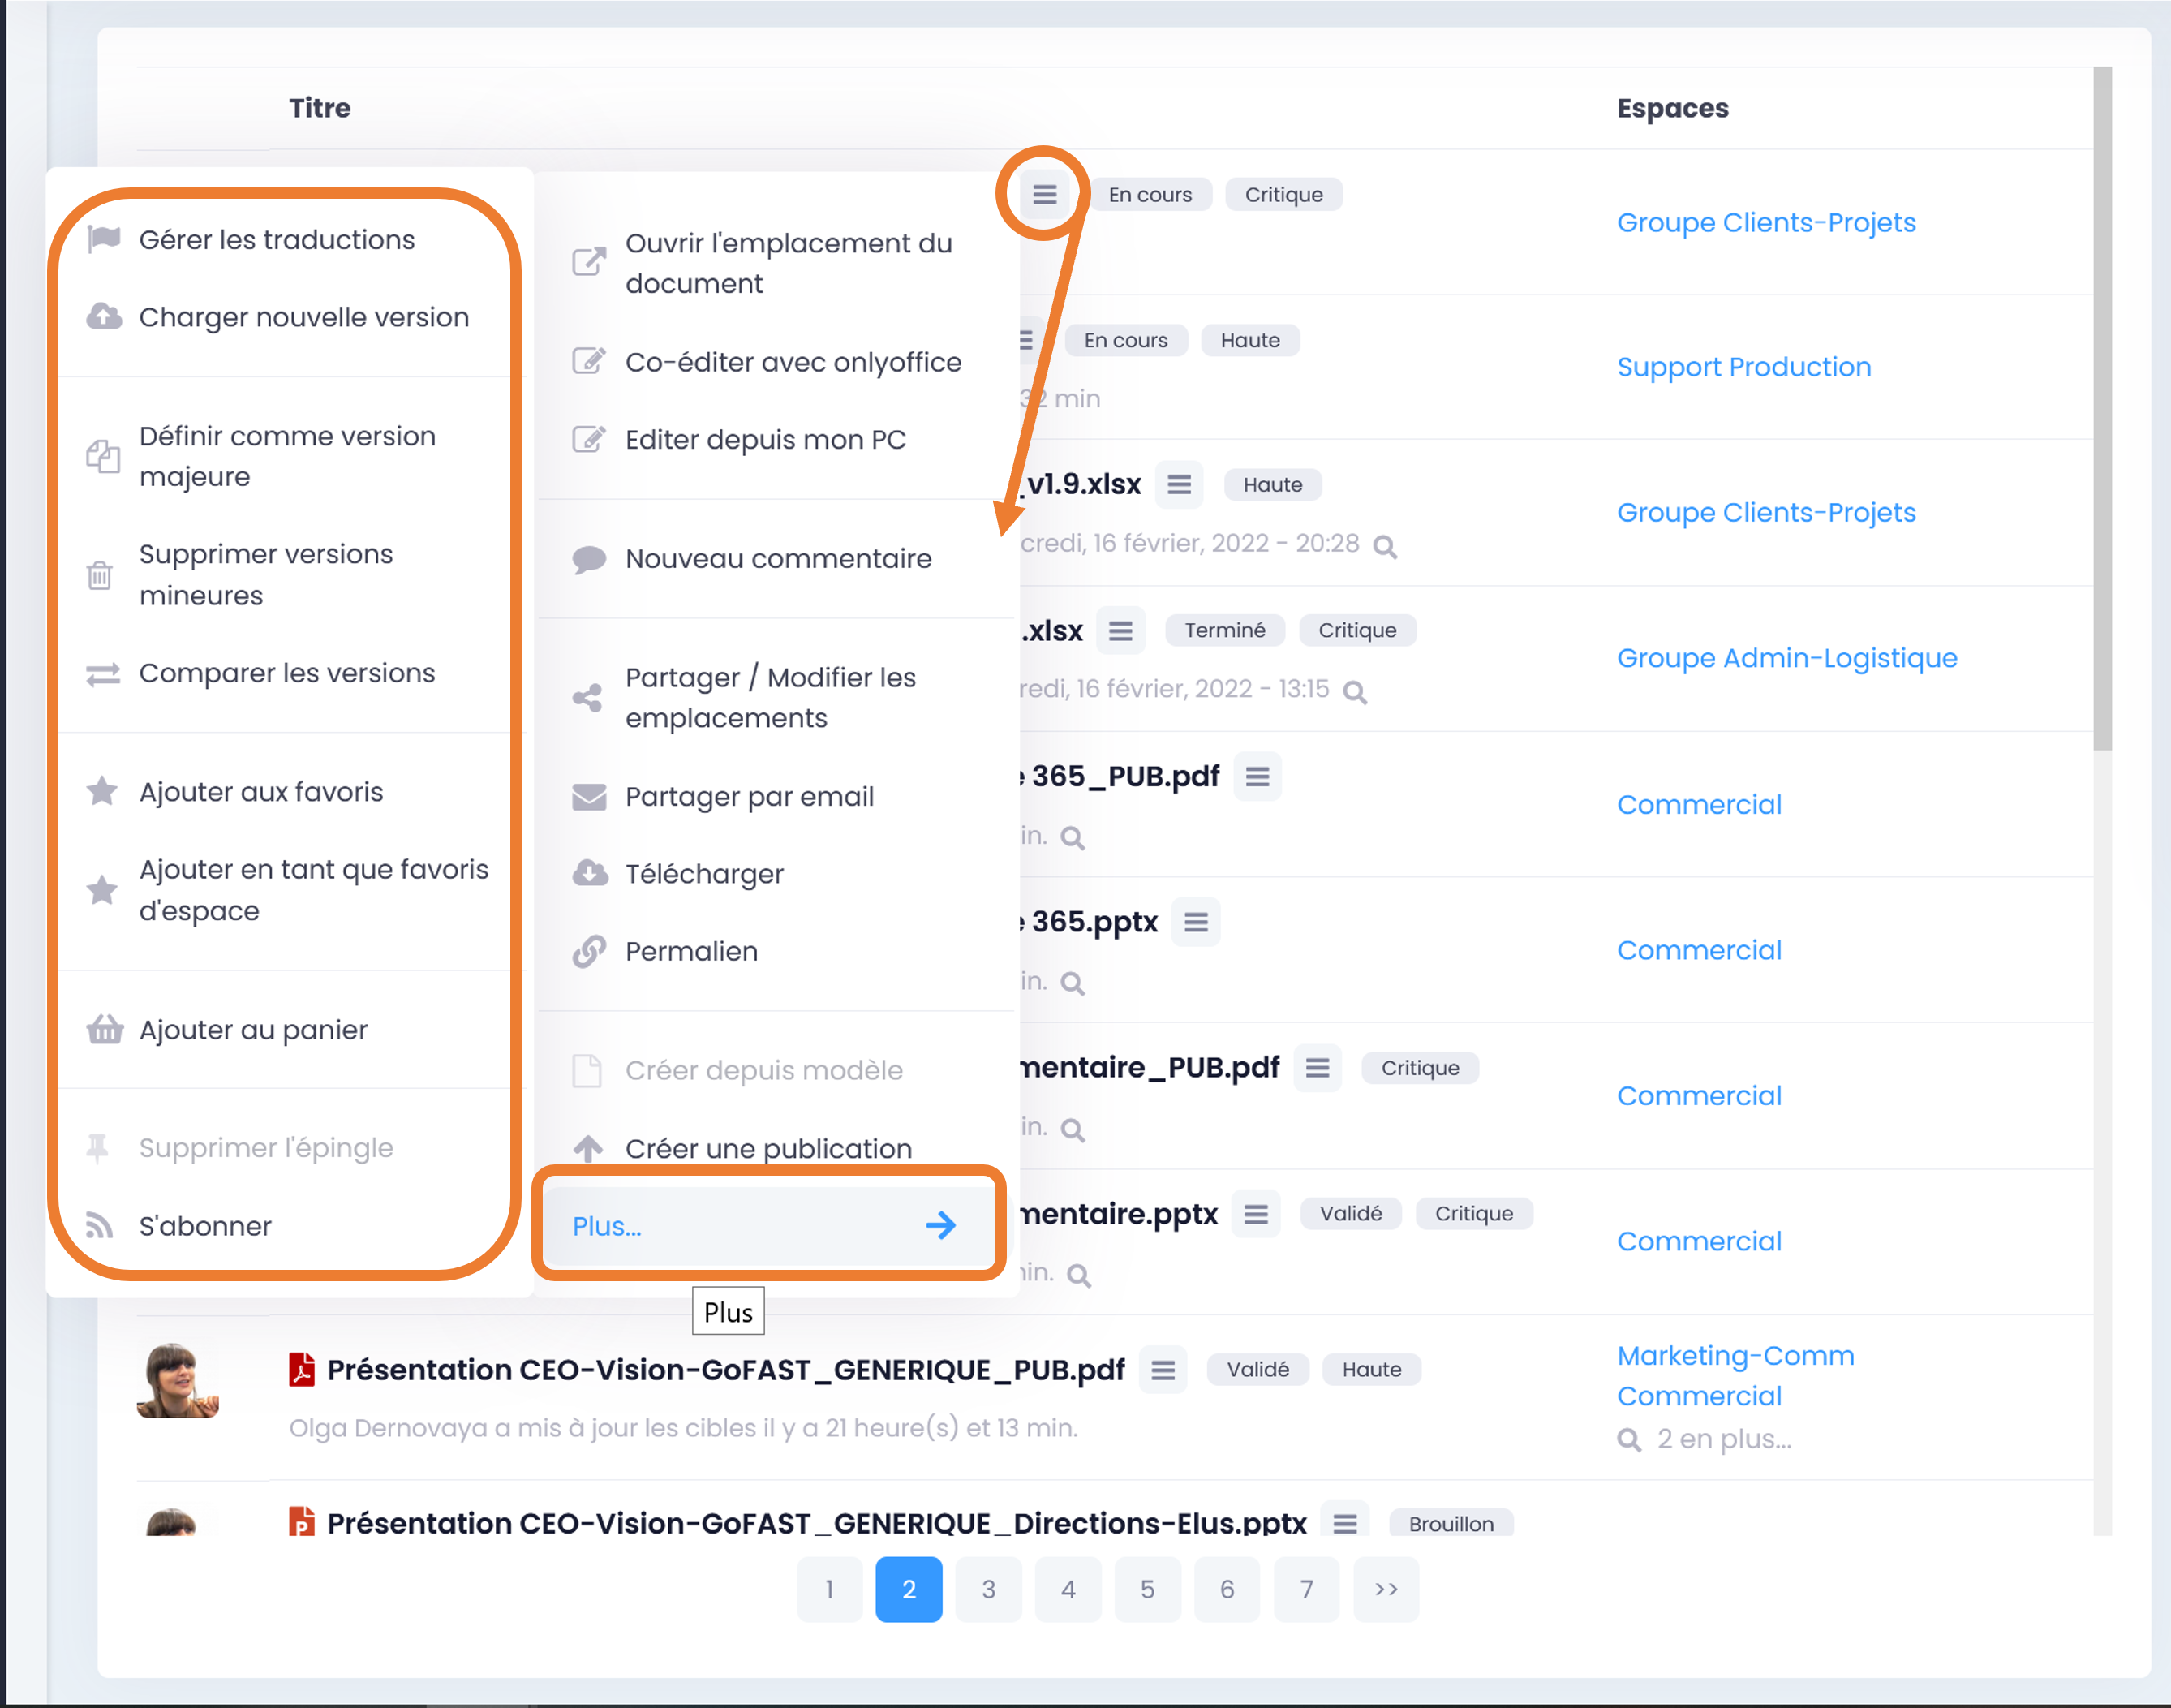
To find out more about possible actions on a document/contents, please refer to the section: “Collaborative Document / Content Management”
You can filter the list of documents in your activity feed according to Spaces, the state of the documents (draft, in progress, validated, etc.).
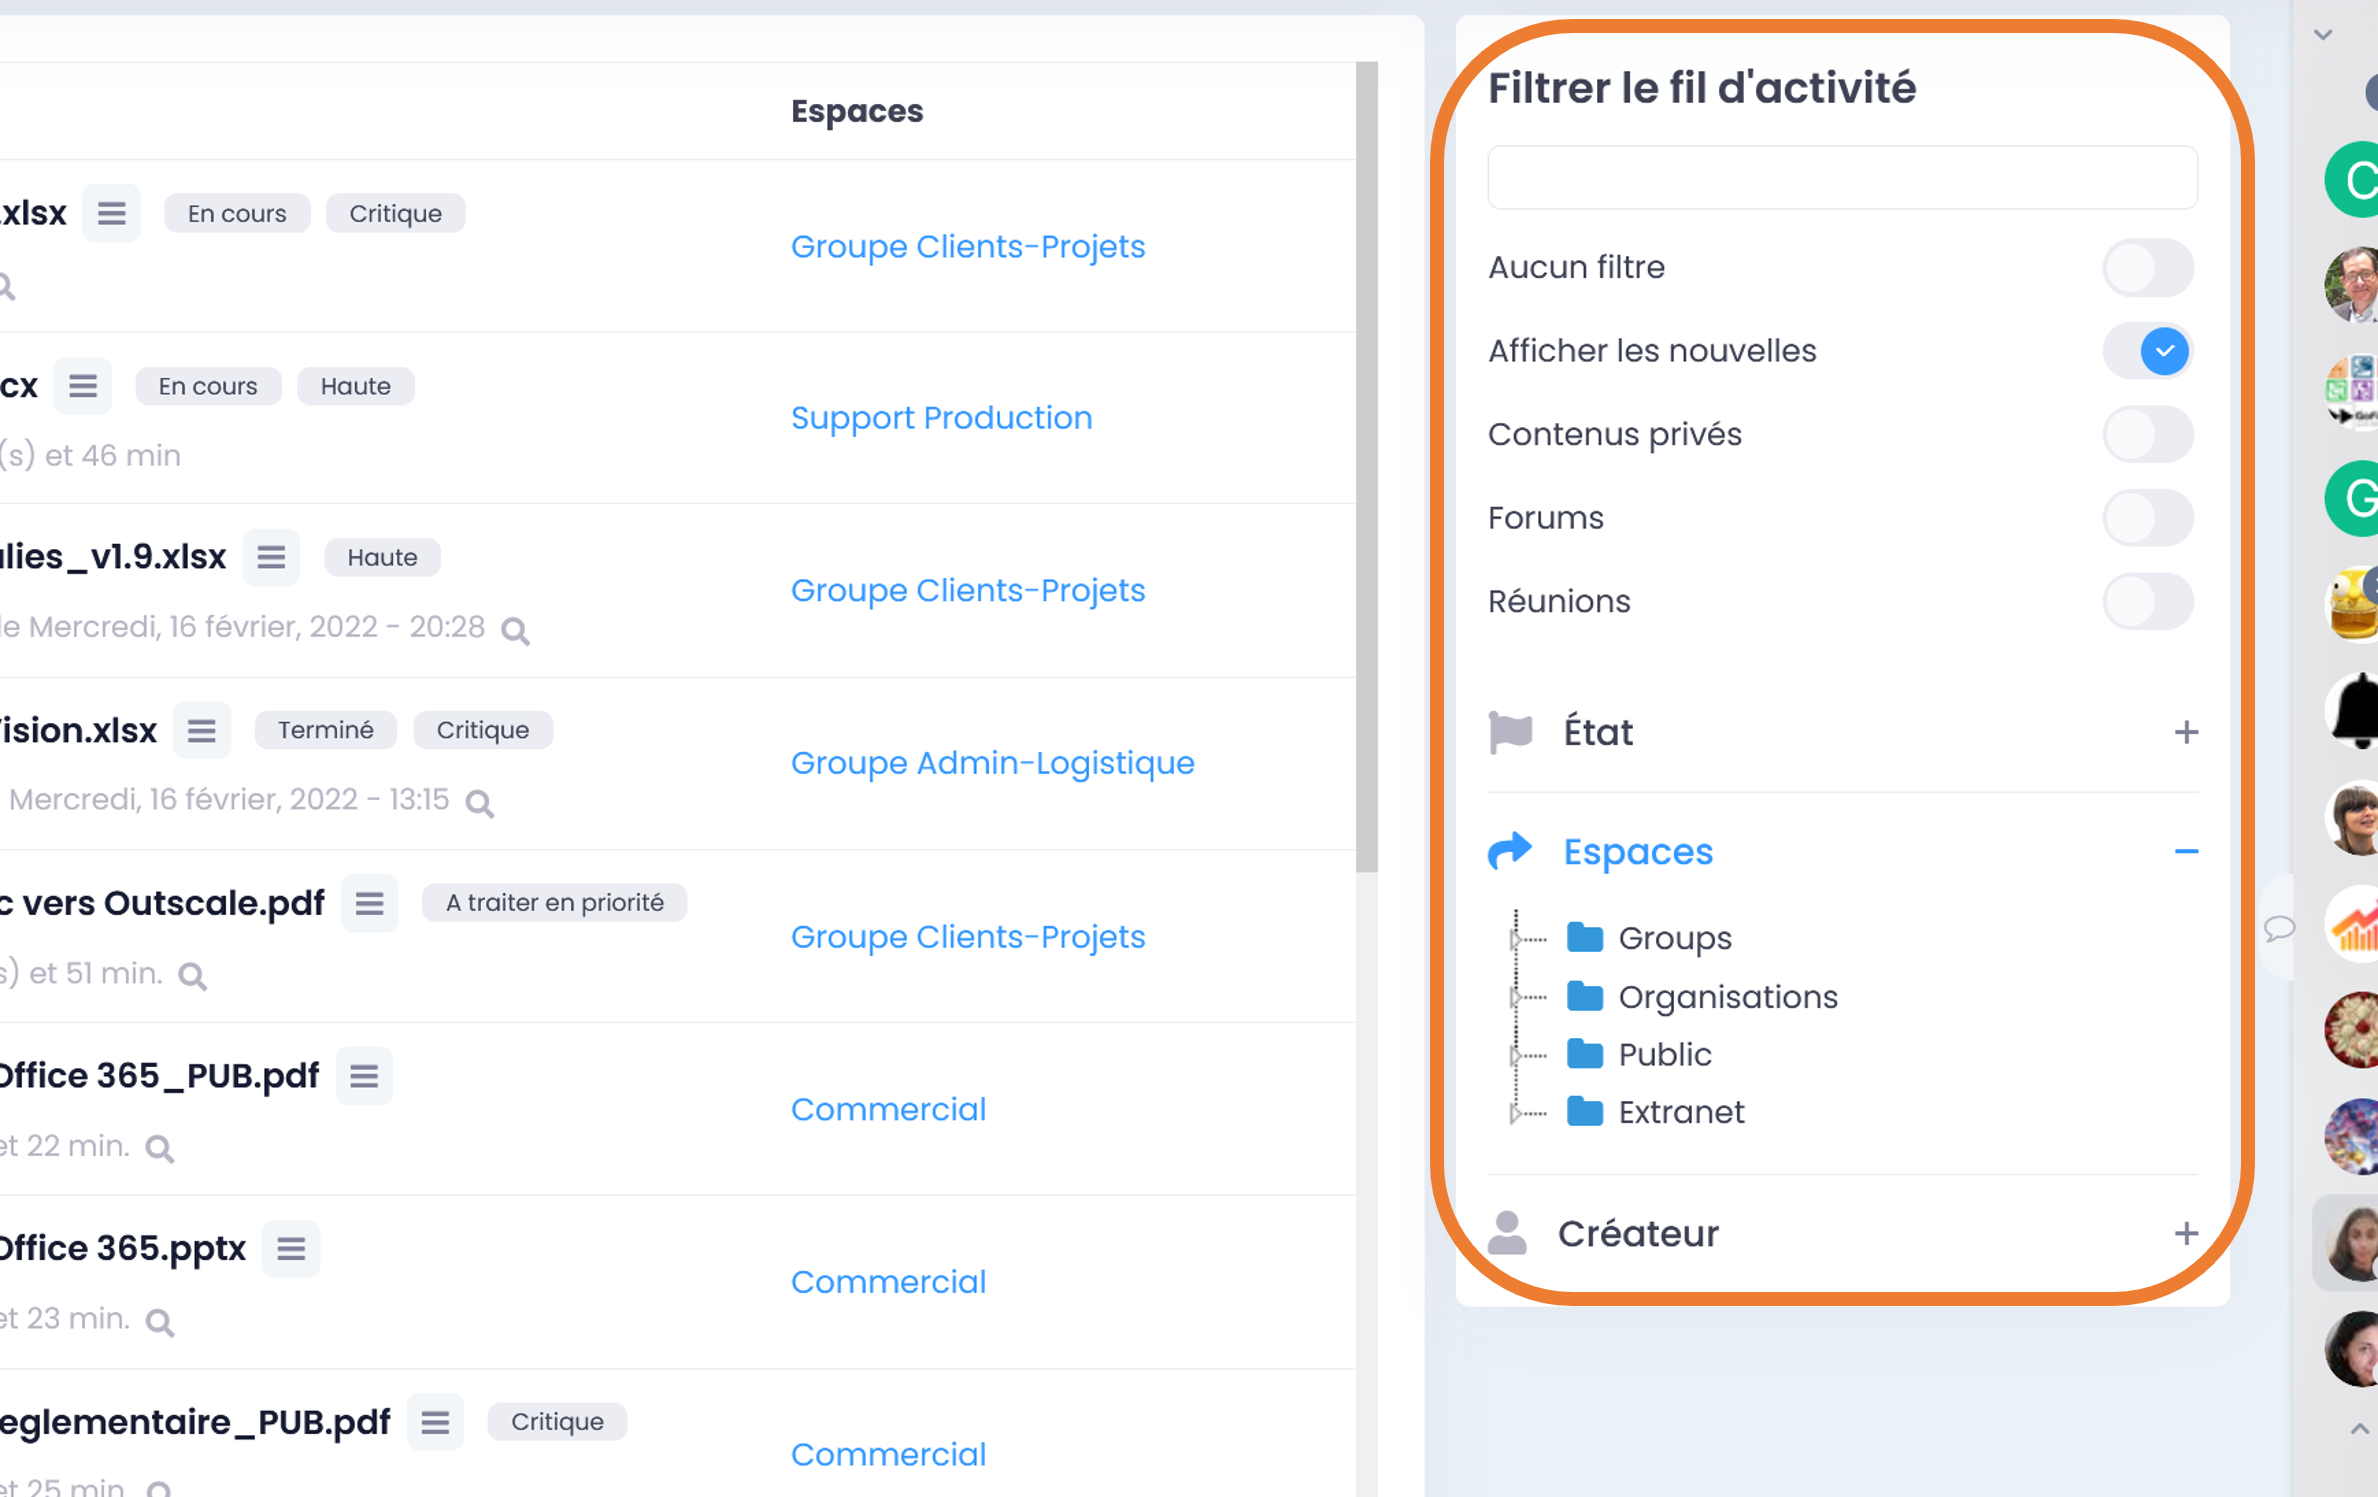
You can choose to hide or display the “News” that are mailed to all users on the platform by a user with the User-Support or Super-Administrator profile.
If you have one of these profiles, you can share information:
click “Share news” (top center of the activity feed), a window opens,
write your message
Click on “Send”.
The message will be visible in the activity feed for all users.
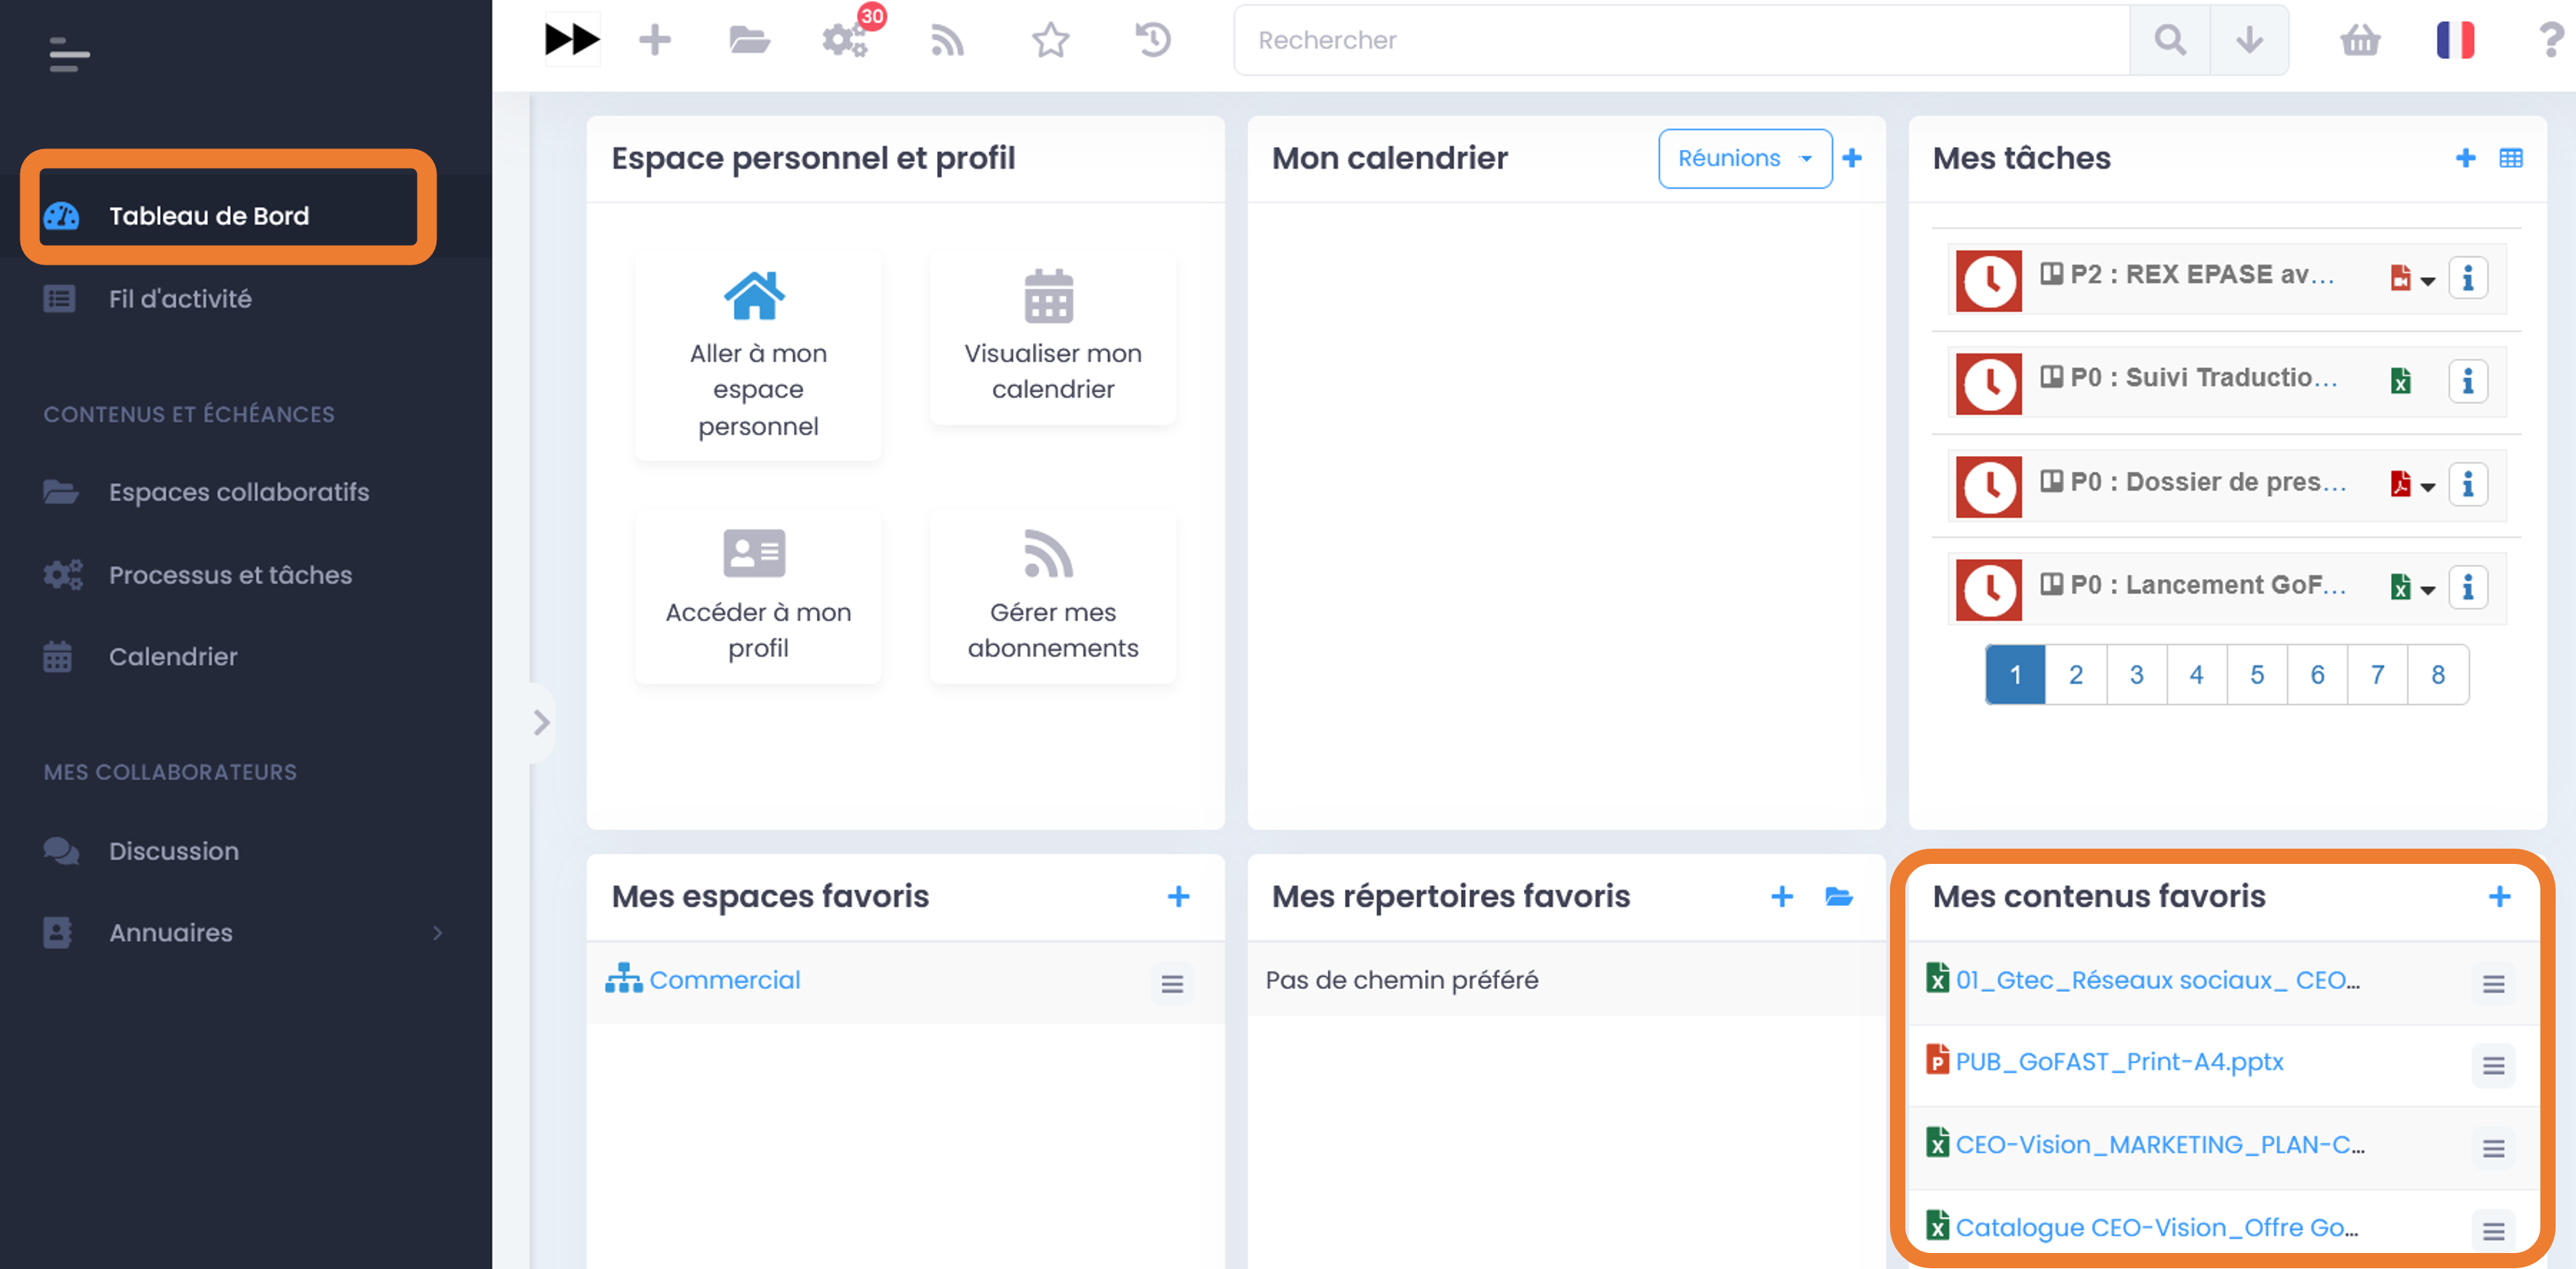
Dashboard
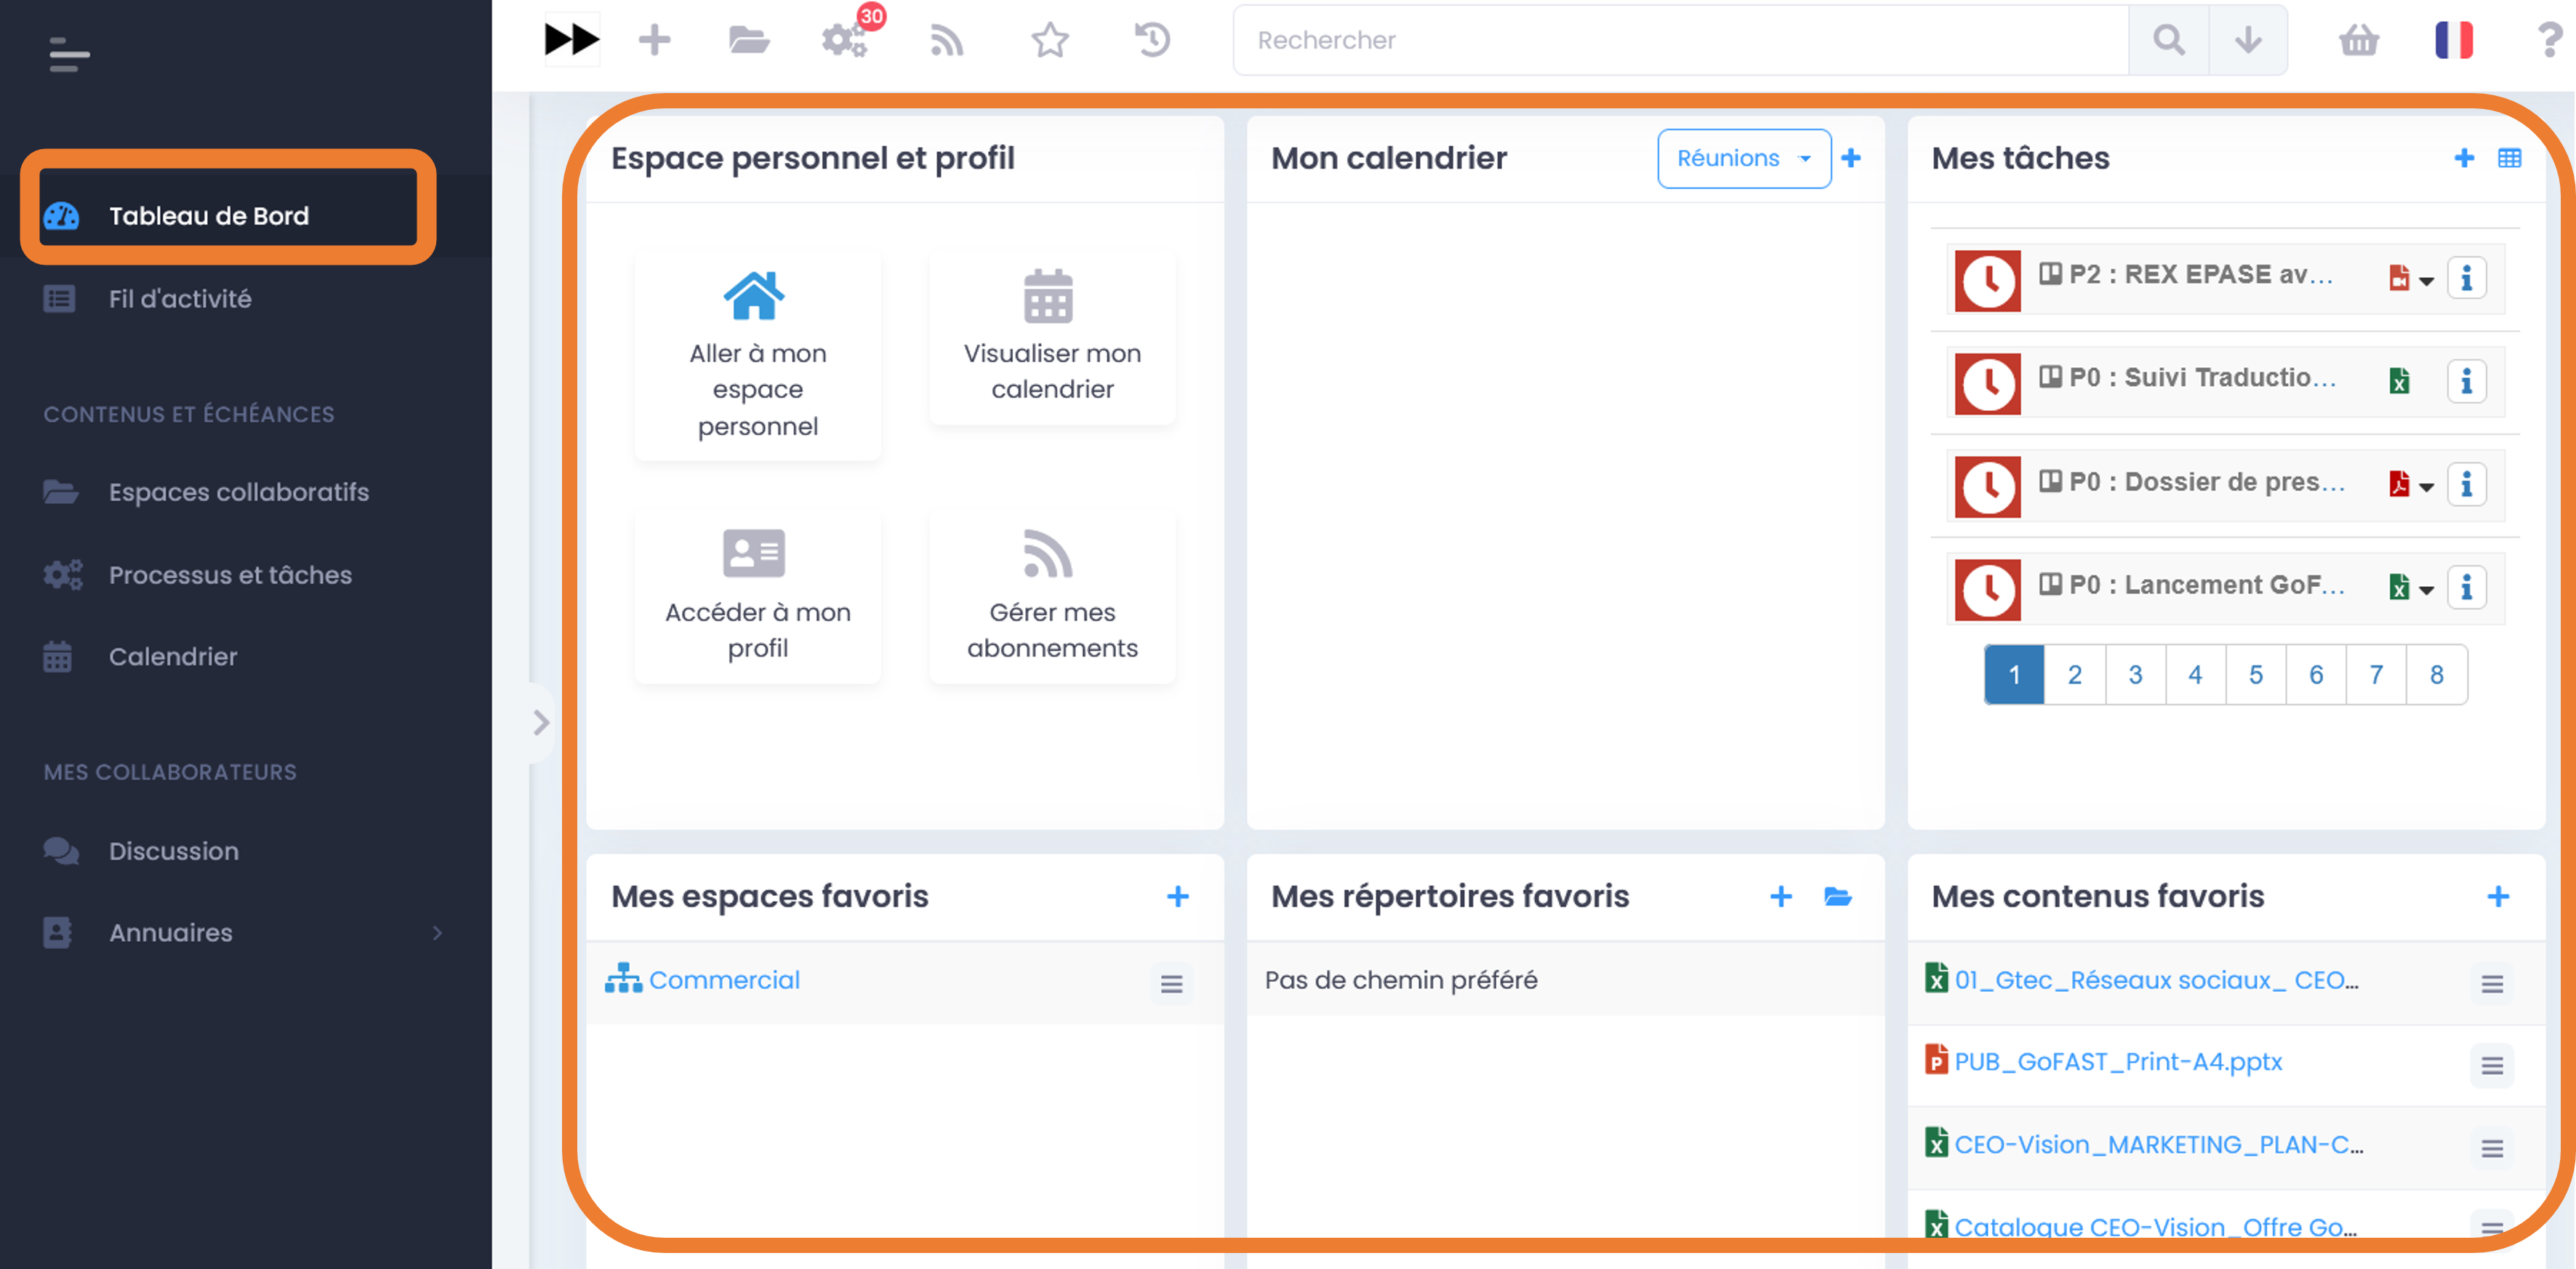
The dashboard allows quick access to the most requested elements. By default, all users have the same dashboard.
Access to the Dashboard:
From the main menu on the left, click on “Dashboard”.
From the logo at the top left, if the Dashboard is set as the default homepage.
The default dashboard displays six blocks:
Note
Only one main space can be highlighted in this Dashboard block. To change a user’s main space, go to the user’s profile page and then to the account settings.
My Calendar: access to your upcoming meetings and all documents with deadlines that you have access to. On the block filter (top right), you can choose to view meetings or documents. You can also create a meeting with the “+” button.
My Tasks: Access to workflows and tasks assigned to you. You can start a new process via the “+” button at the top right. Via the “dashboard” icon, you can go to the Workflows Dashboard.
My Favorite Spaces: it shows all the spaces you have pinned as favorites. You can add a favorite space via the “+” icon.

Select from the proposed tree structure the space you want to bookmark and click the “Bookmark on Dashboard” button.
You can perform actions on a space via the “Hamburger Menu”.
To remove a space from the favorites, go through the “Hamburger” menu, then “Unbookmark this”.
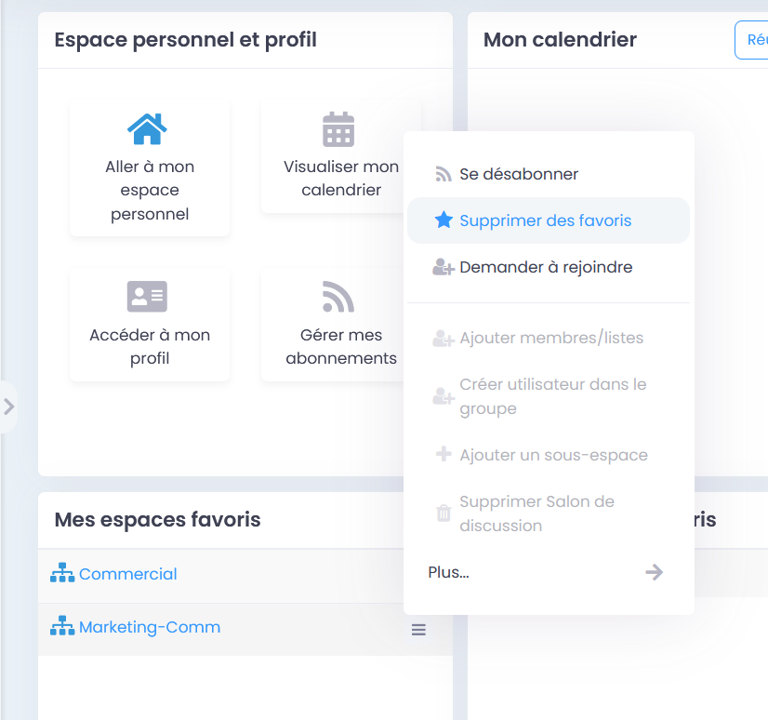
An unbookmark confirmation message is displayed at the top right of the window.
My Favorite Folders: it displays all the folders you have pinned as favorites. Using the arrow icon, you can access the tree at the folder location. You can add a favorite folder via the + icon.
My Favorite content: it displays all documents and other types of content (excluding spaces) that you have pinned as favorites. Using the “+” icon, you can access to add other favorite content. You can perform actions on a document/content via the “Hamburger Menu”.
To add one or more contents, click on the “+” icon to the right of the block title:
Enter the name of the desired content in the input bar (at least three letters) then click on one of the suggested content and finally validate via the “Pin on dashboard” button.
Pinned documents can be previewed, edited, shared, archived and commented directly from the dashboard.
Don’t hesitate to ask your questions about the dashboard and other blocks available through the Forums.
“User Profile” Page
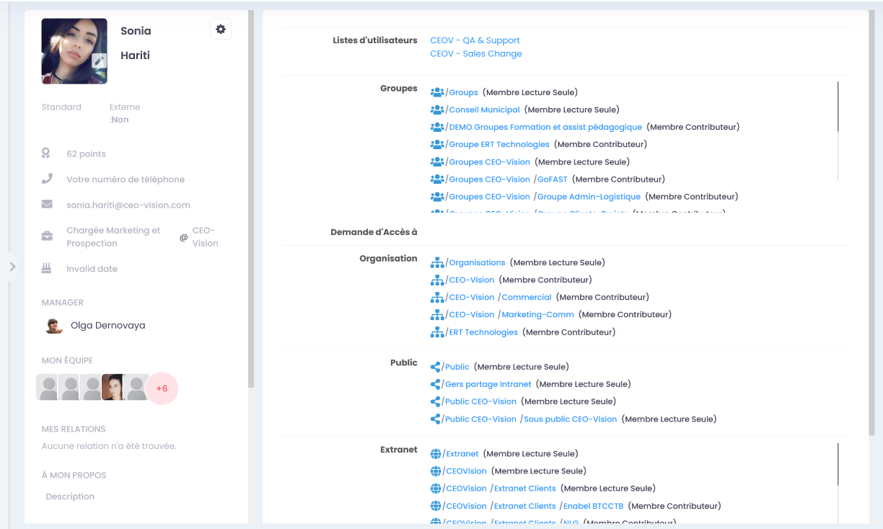
From your profile photo (via the quick access menu, at the very top right), you can access your profile page, which is like your “virtual business card”.
This page displays information about you: last name, first name, job position, organisation, phone number, email, a word about you, your skills… as well as information related to your access to the platform: your profile (e.g. User-Support, Super-Administrator or Standard or External) your collaborative spaces, groups, organizations, userlists, etc…
Account settings
- You can view and/or edit the various elements of your profile directly by clicking on them in the left-hand box or through the account settings menu:
identifier (not modifiable)
last name
first name
email (modifiable only by you)
authentication option (whether the connection is delegated to the internal directory of your Organization/Company or not)
password (hidden and modifiable only if authentication is not delegated to the internal directory of your Organization/Company)
your Profiles on the platform (User-Support, Super-Administrator or Standard or External, Broadcaster, notification sharing restriction)
Your default role when you are added to a space (Contributor or Read Only)
Information about your organisation, your position and management, your manager, your telephone numbers, your birthday, etc.
Language displayed for the platform interface and your email notifications.

Most of this information is not mandatory, but it can be important to facilitate collaborative work with your colleagues.
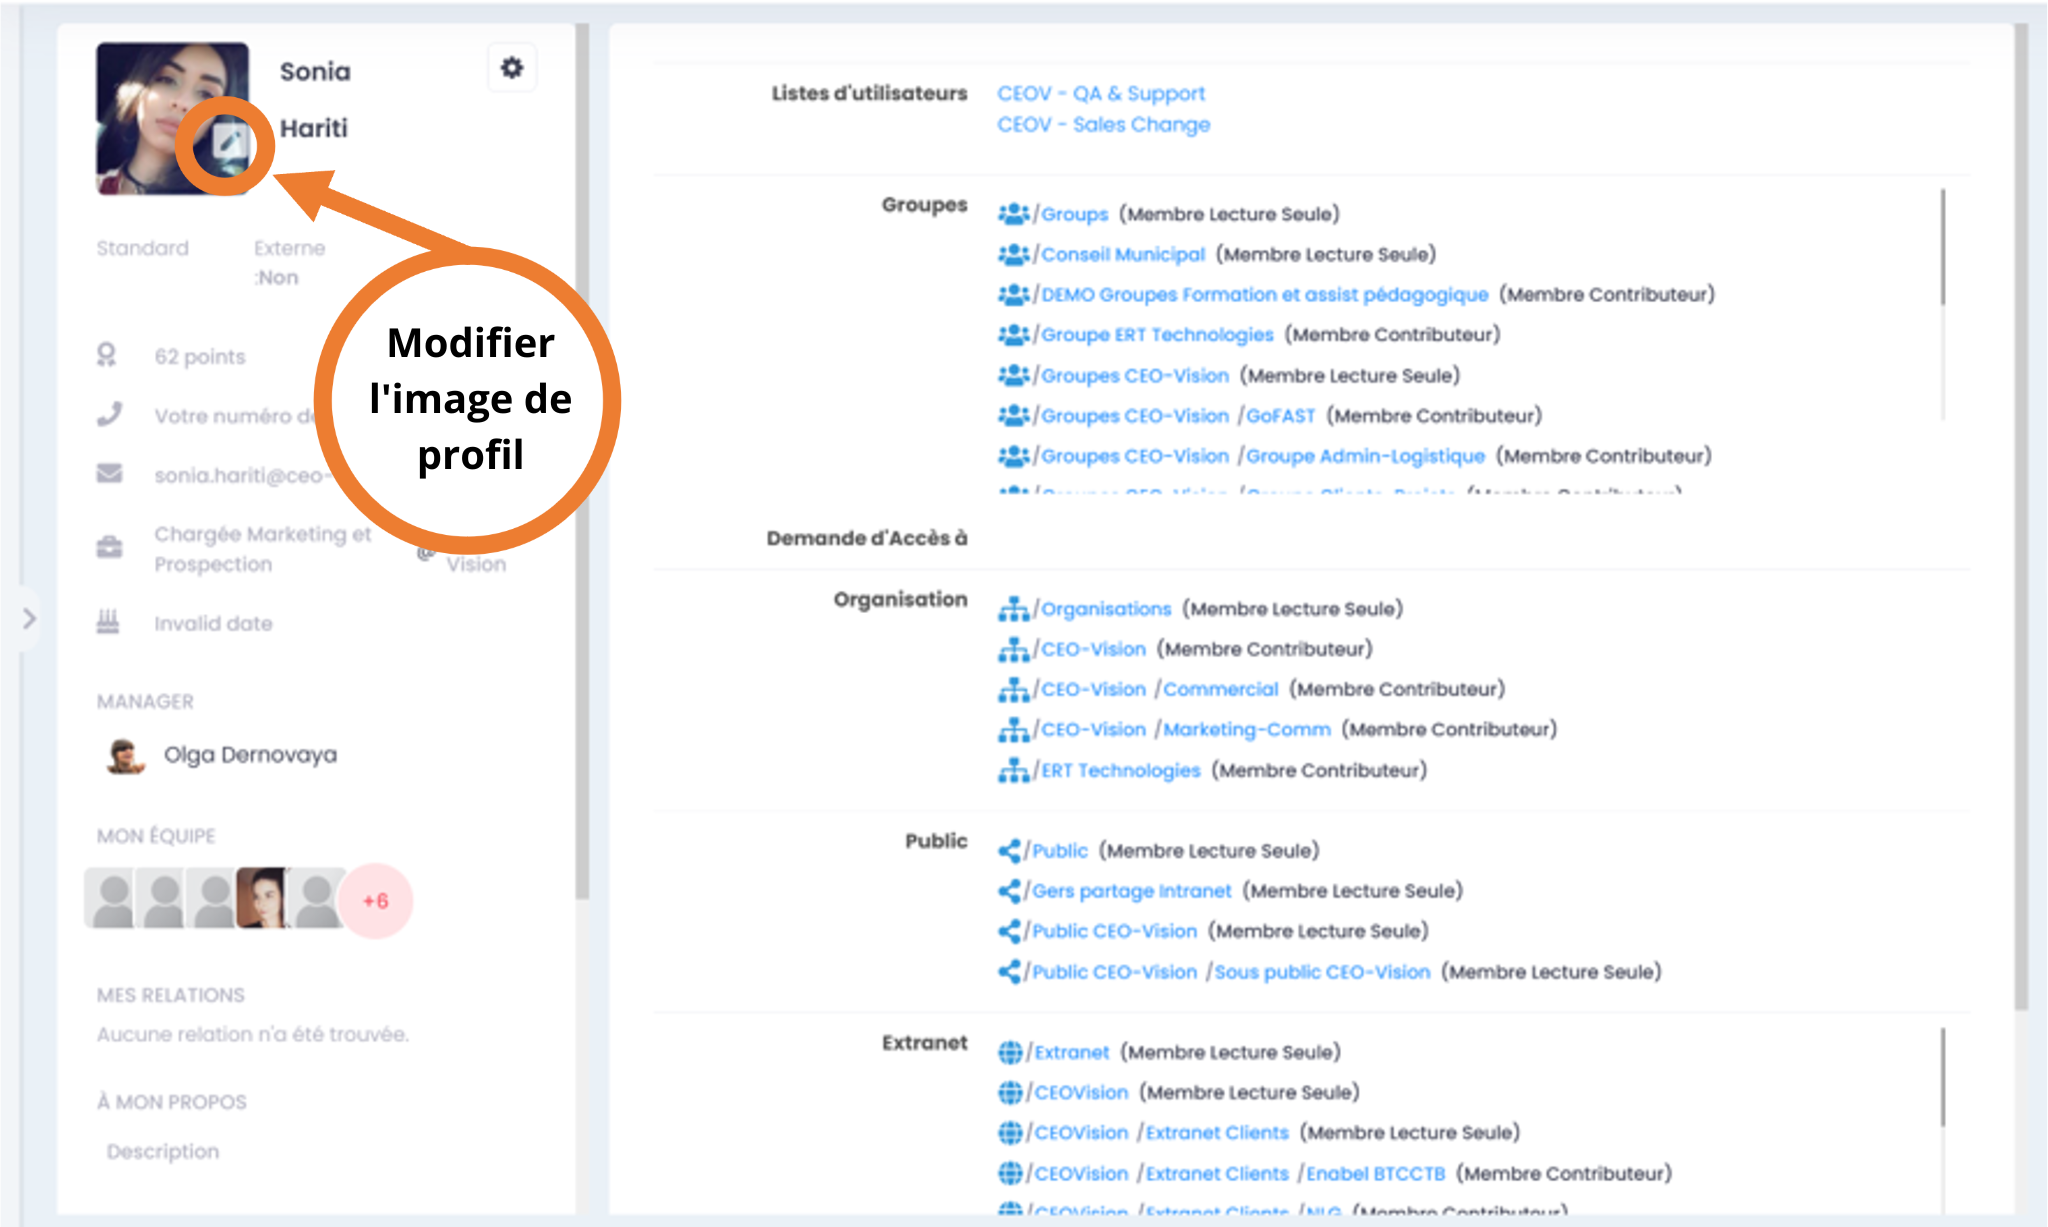
Add a photo to your profile
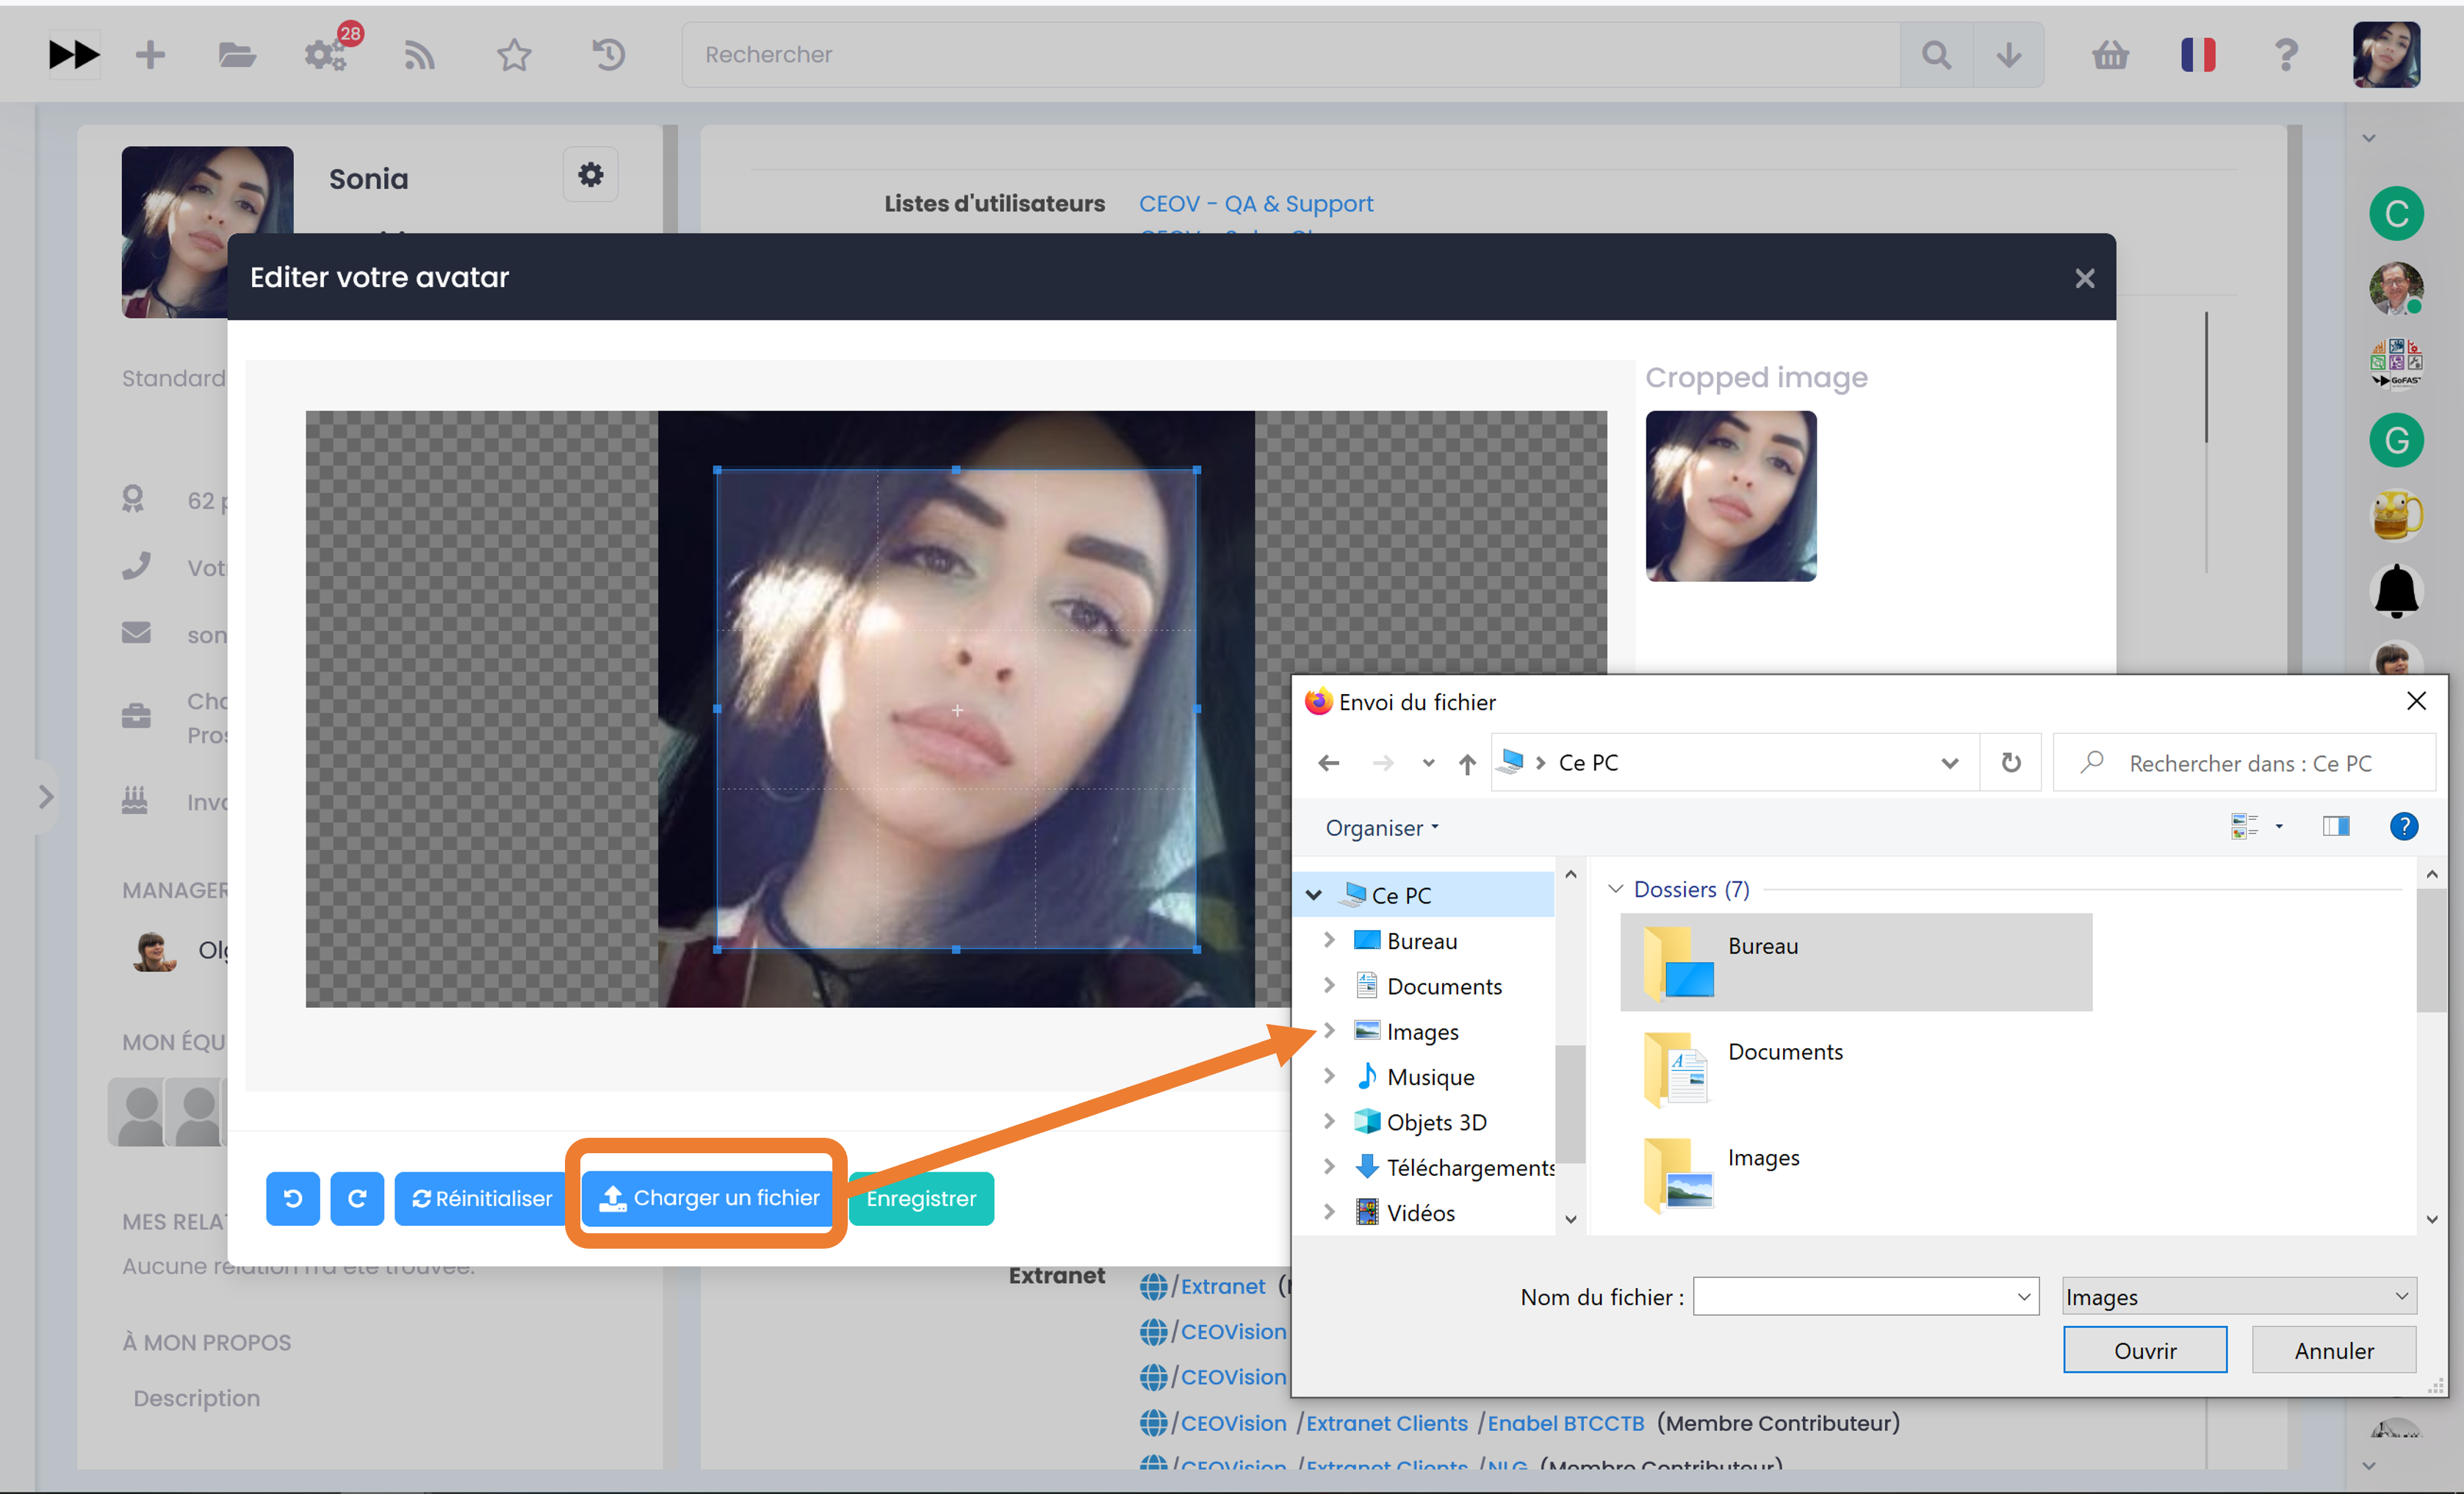
Go to your profile page, click on the “pencil” icon that appears when hovering over the image (in the top left corner).
You will arrive on the page where you can add/edit the profile photo. Tap “Upload” to retrieve your photo from your computer, double-click or click OPEN. Once uploaded, you can adjust the frame and then “Save”.
Your photo will then appear on your profile and wherever you are mentioned on the platform (e.g. activity feed, task, etc.). It’s a quick and user-friendly way to get to know your distant colleagues and find out who you’re talking to (assuming you’ve posted real profile photos).
Collaborative Spaces
Collaborative Spaces are areas for working and sharing documents, tasks and other types of content, discussions, accessible only to member users.
Types of Available Collaborative Spaces
Organizations (globally represent the organizational structure: units, departments, services, etc.)
Groups (Dedicated to cross-functional work: project, knowledge base, product, geographical site, theme…)
Extranet (dedicated to work with external partners)
Public (accessible to all internal read-only users, not external users)
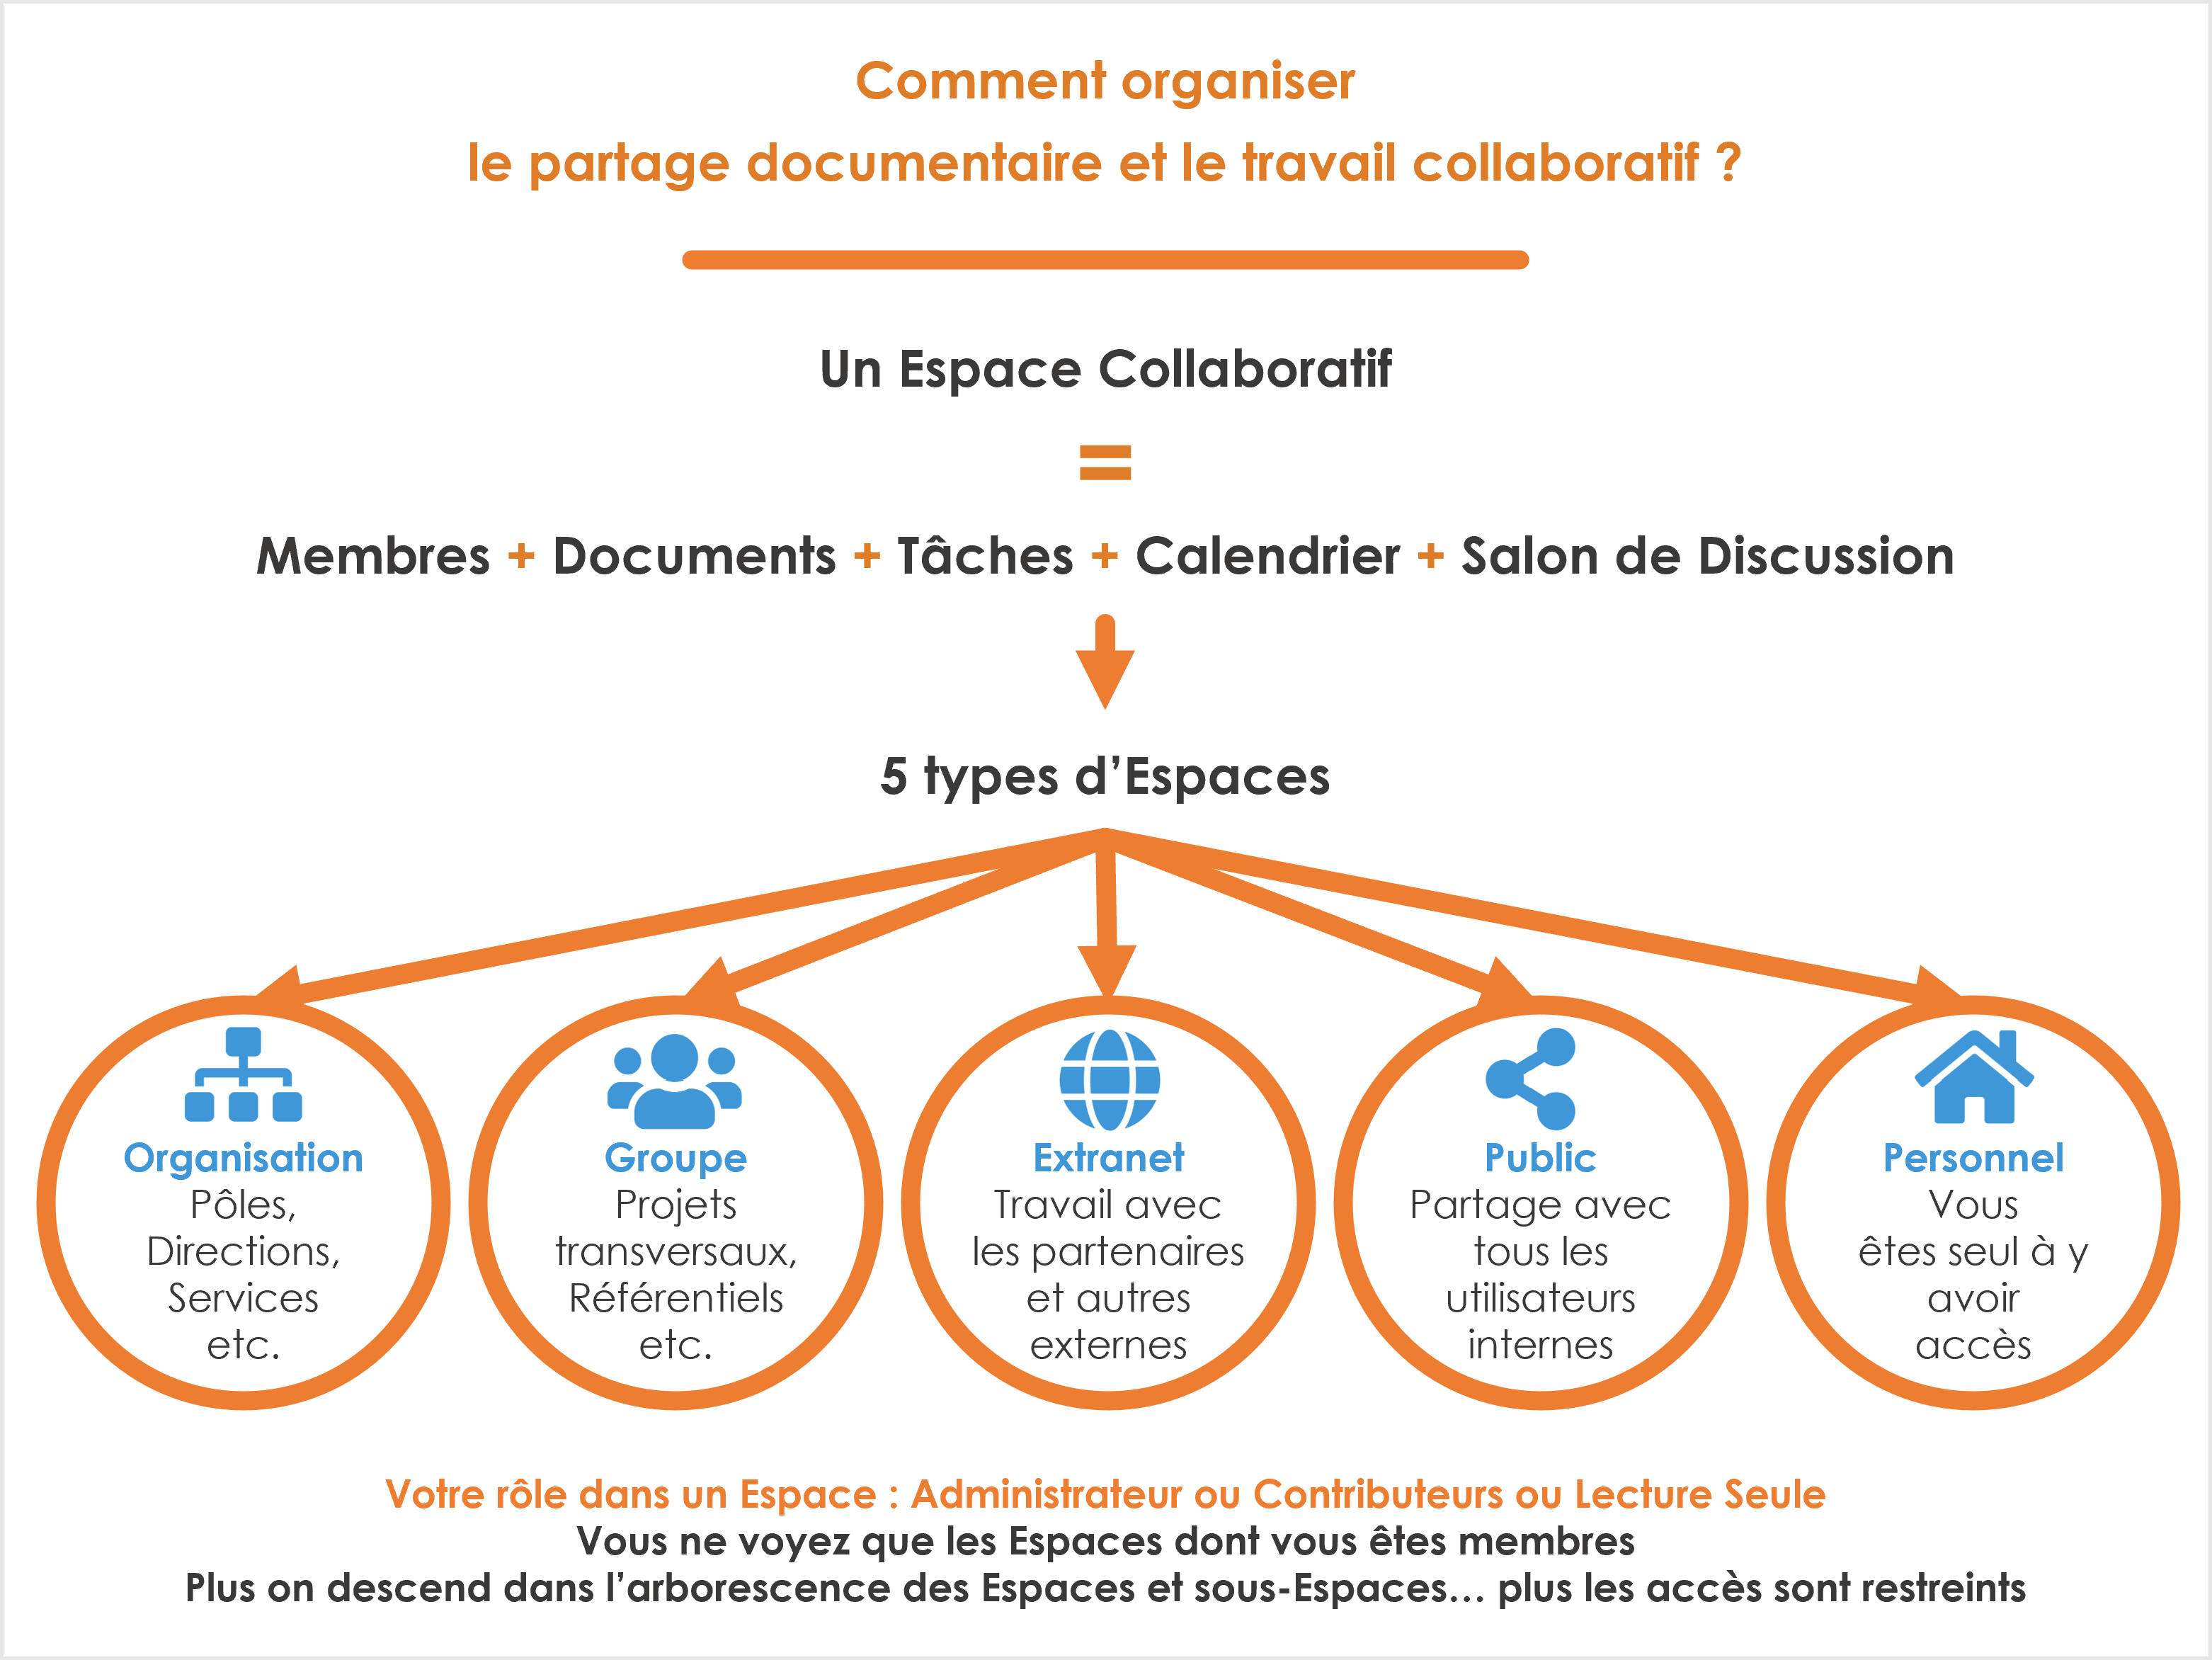
Each Collaborative Space is organized in the same way (Documents tab, Tasks, members, etc.). However, there are some features that differ depending on the type of Space (please refer to the sections describing each type of Space).
Space access control follows a logical funnel:
Each space can contain one or more sub-spaces. In this case it is possible to have a subset of members in these subspaces to restrict access. The further down you go in the tree, the fewer members there are potentially.
Note
Spaces can contain files, other content (e.g., forums, Wiki pages, etc.), sub-spaces (with associated rights) or classic folders. Classic folders have the same access rights as the parent space where they are located. Spaces are represented in the integrated file explorer by separate icons and with “_” in front of the space name (e.g.: _Organization) in the Windows or Mac file explorer. Before uploading the files on the GoFAST platform, make sure to create the “right” collaborative spaces and sub-spaces of the Organization, Group or Extranet type!
Personal space: available to every user (only user has access to this personal space).
A “Set Content to full windows size” icon allows to expand the page view by hiding the main platform menus.
Just click the same icon with two arrows again to return to the previous view.
Roles of the Collaborative Spaces members
Administrator (can modify the space and its members)
Contributor (can perform actions on space content/folder)
Read-Only (can view space content and share comments)
To find out the “Profiles” that exist on the platform, refer to the dedicated section. These profiles do not provide access to Collaborative Spaces, but they allow you to perform configuration steps.
The concept of content sharing between Collaborative Spaces
GoFAST allows documents/content to be exchanged without creating duplicates and thus avoiding version errors.
Important
In order for a document to be found in multiple spaces without duplicates, it is shared* by changing its visibility in the “Hamburger” menu, document page, or explorer (right-click or “Manage” menu, then “Location/Sharing”).
Find your Collaborative Spaces
Collaborative Spaces are accessible from the main menus, search, the activity feed and wherever a content location is displayed.
For more information, please refer to: “How to navigate GoFAST (menus, icons, etc.)”
Organizations Spaces (= Departments/Units)
The collaborative spaces called “Organizations” correspond to the departments and units according to the organization chart of your Organization/Company; Apart from the directories, you only see the spaces where you are members (HR, CFO, CIO, etc.).
The “Organizations” therefore represent a hierarchical structure and each department (HR, IT, Finance, etc.) can have sub-spaces for units.
Note
Often you will only have access to one organization at the first level, and then its sub-organizations. A user can possibly belong to several first-level organizations if he has functions shared between 2 departments.
Note
If you need to share documents between different departments, you must do so through a Group dedicated to the project, topic, etc. For example, a contract is in the “Legal” Organization and also in the “ProjectA” Group because it is a contract that concerns this “ProjectA” in which members of several departments are gathered.
Groups spaces (= cross-functional work)
The “ Groups ” are cross-functional / cross-business-unit sharing zones (e.g. project groups). These are spaces dedicated to specific themes that play a big role in collaboration: all the people associated with the project/subject have access to them, also in case where they are not associated with the same “Organization” (=Management, Unit, etc.). You can therefore be part of a large number of Group-type Spaces.
Outside the directories, you will only see the groups you are a member of.
Public Spaces
Unlike other Spaces, Public Space has no concept of member management because it gives Read Only access to all internal users (not “External”) to all documents that are shared there.
What’s in this Public Space?
Dedicated to totally cross-functional and public content for the Organization. It can also include support forums and other knowledge bases. Note that the working documents remain in other Collaborative Spaces, where they are created and managed, then only PDF publications created from the working documents are shared in the Public Spaces (question of best practices).
At the root of the Public space, you will find the possibility to make available to the whole organization the templates created in the “Template” root folder. Thus, it is possible to give to the greatest number (except extranet users), the use of certain templates.
Management of Public Spaces: These internal Public Spaces are managed by all users who are members of the “Public List” (allows you to create sub-spaces, file documents, etc.). Other users are Read Only.
You can subscribe to this space by clicking on “subscribe”. You will receive notifications related to the content of this space (in your activity summary report). You can also do this for all spaces.
[Prochainement] Toutefois, les administrateurs de la plateforme (profil Support-Utilisateur) peuvent également configurer l’espace public de telle sorte que tous les utilisateurs interne (non Externes) puissent contribuer aussi à cet espace public (choix de configuration : soit la lecture, soit l’écriture).
Extranet Spaces
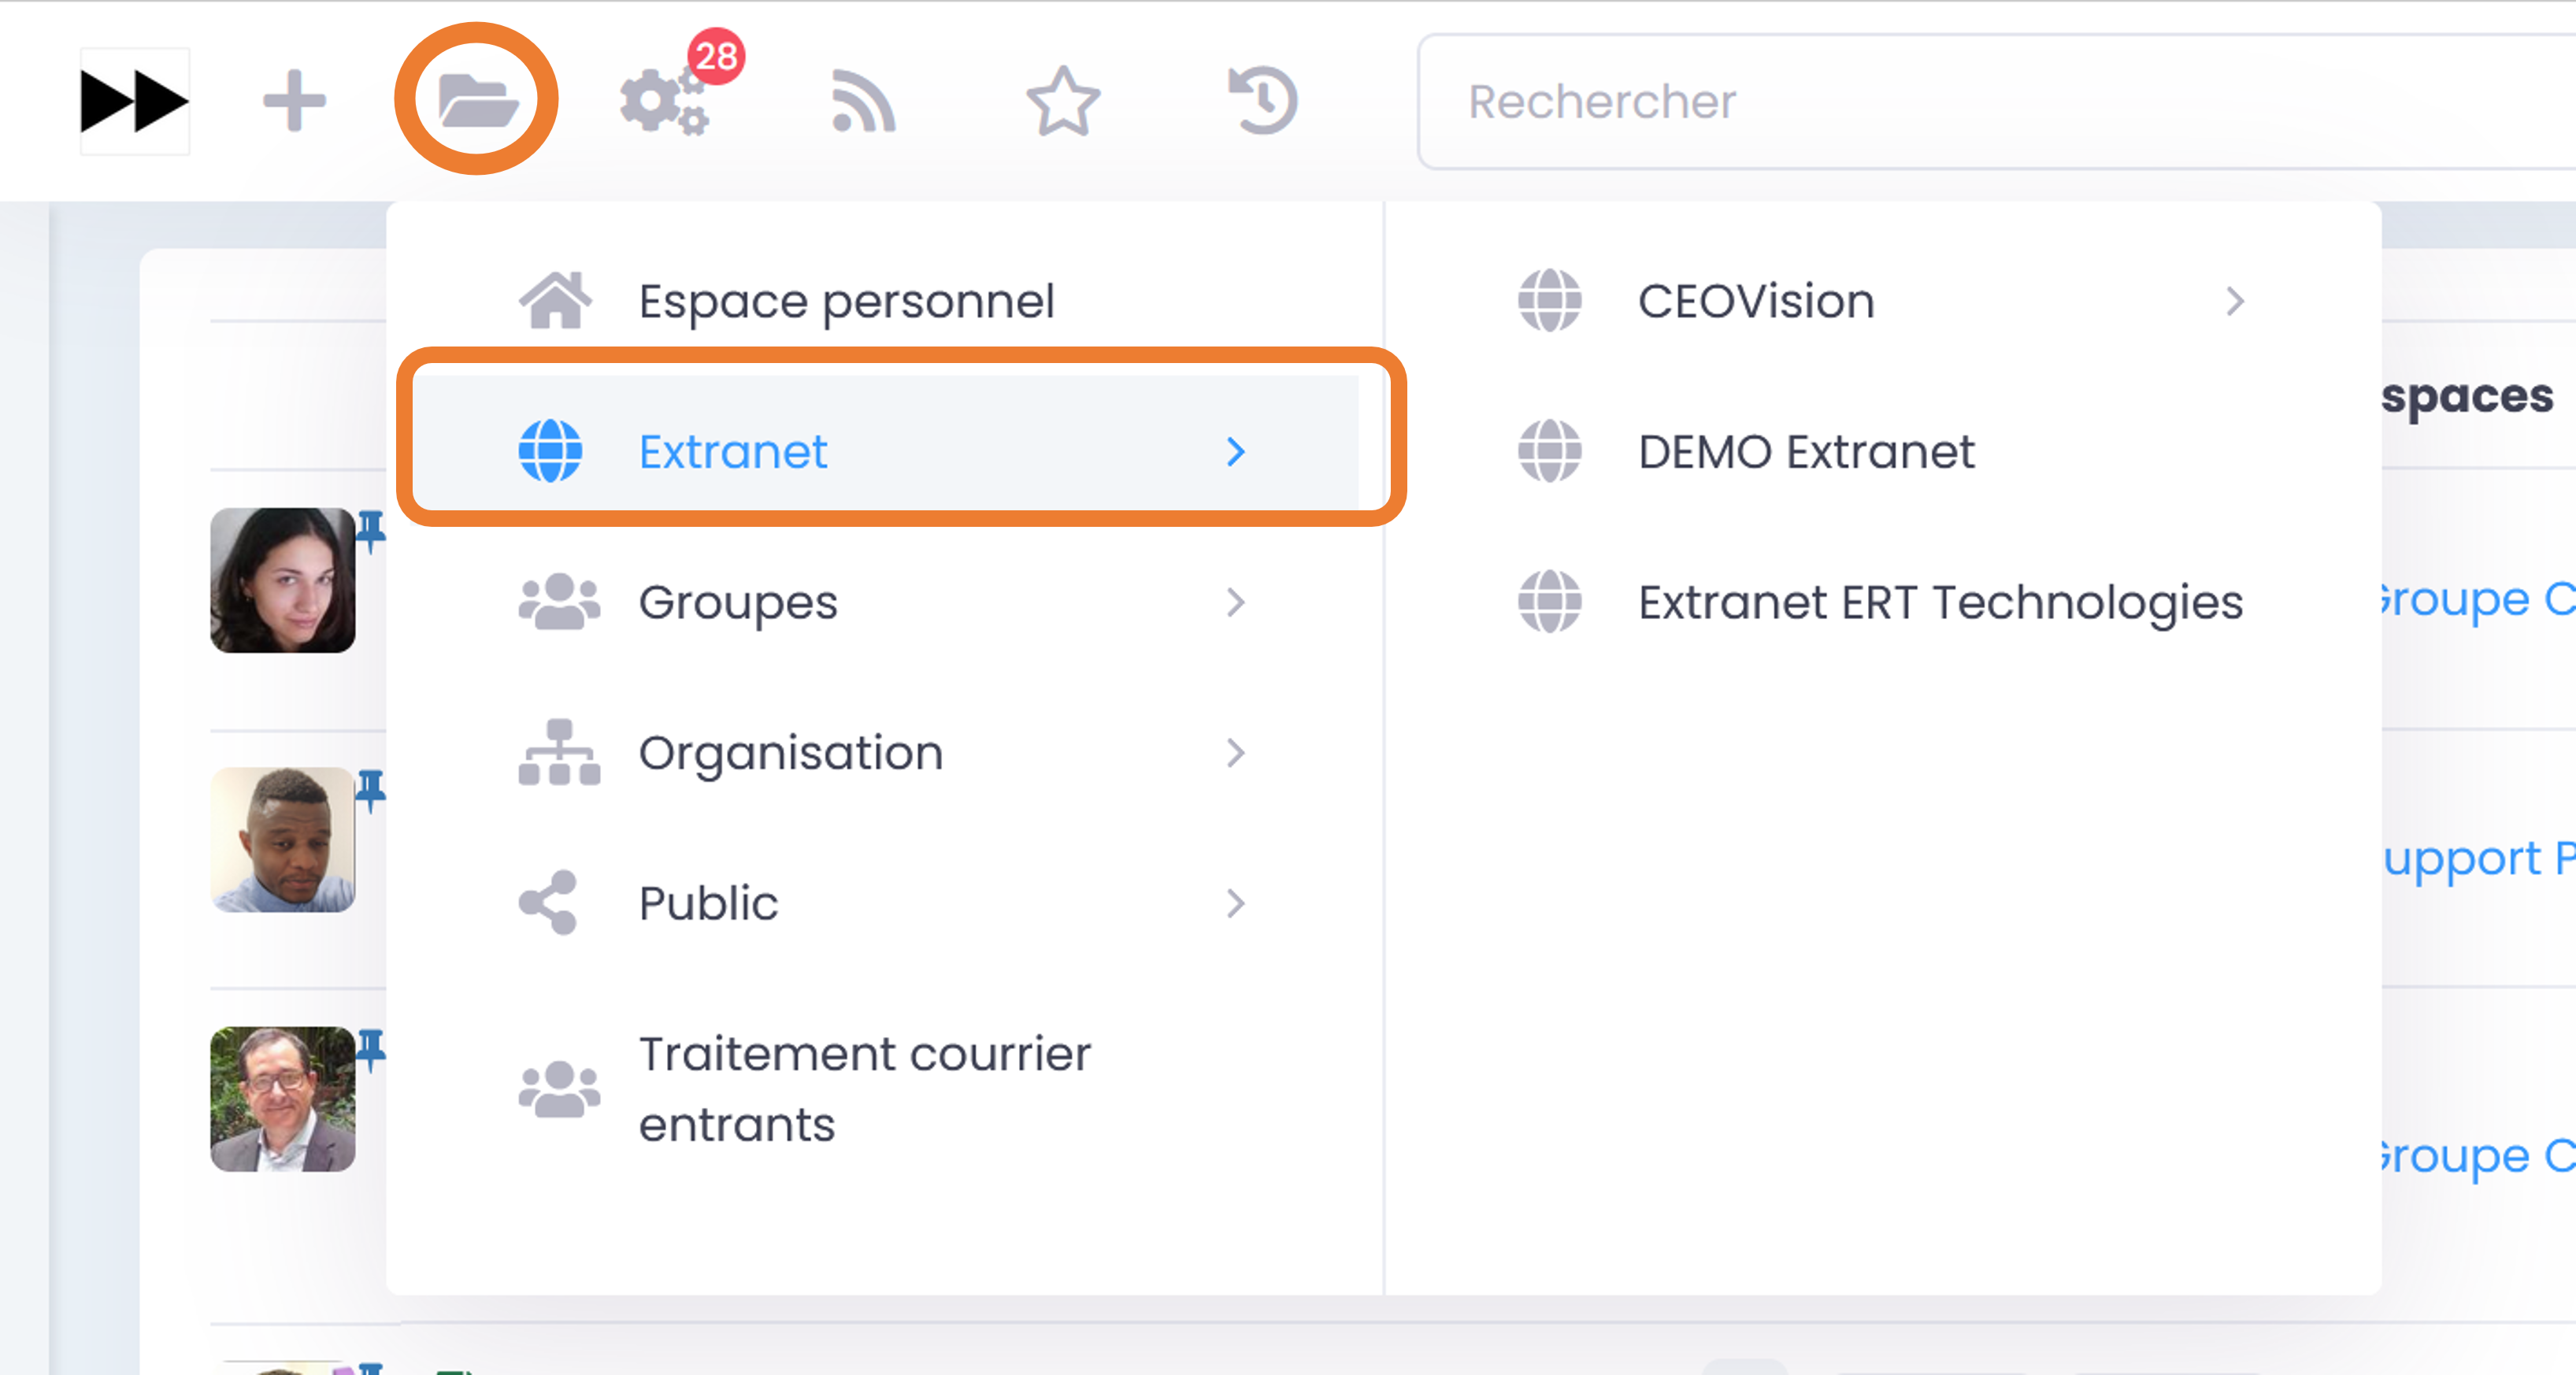
This “Extranet” space allows you to share content with customers, suppliers or any other partner organization that frequently collaborates but **is not part of the internal organization. **
If you want to give access to this space to an external person, the principle is the same as for any new user, you must create an account for them and make them a member of the Extranet subspace. We can give the role of “contributor” to this new external member if we want him to be able to work on the shared documents or just put him in “read only”, so he cannot modify shared documents, but just comment on them and download (attention: he will not be able to add any more).
Note
If you are an administrator of a space, you can create user accounts but you can only add those users into the spaces which you are responsible for.
Note
GoFAST allows you to send messages to non-users (= who do not have an account), with the link to a document that is on GoFAST; they will be able to download via the link and have access to the document within 14 days. So if you just want to share documents for information and not to work on, no need to create an account.
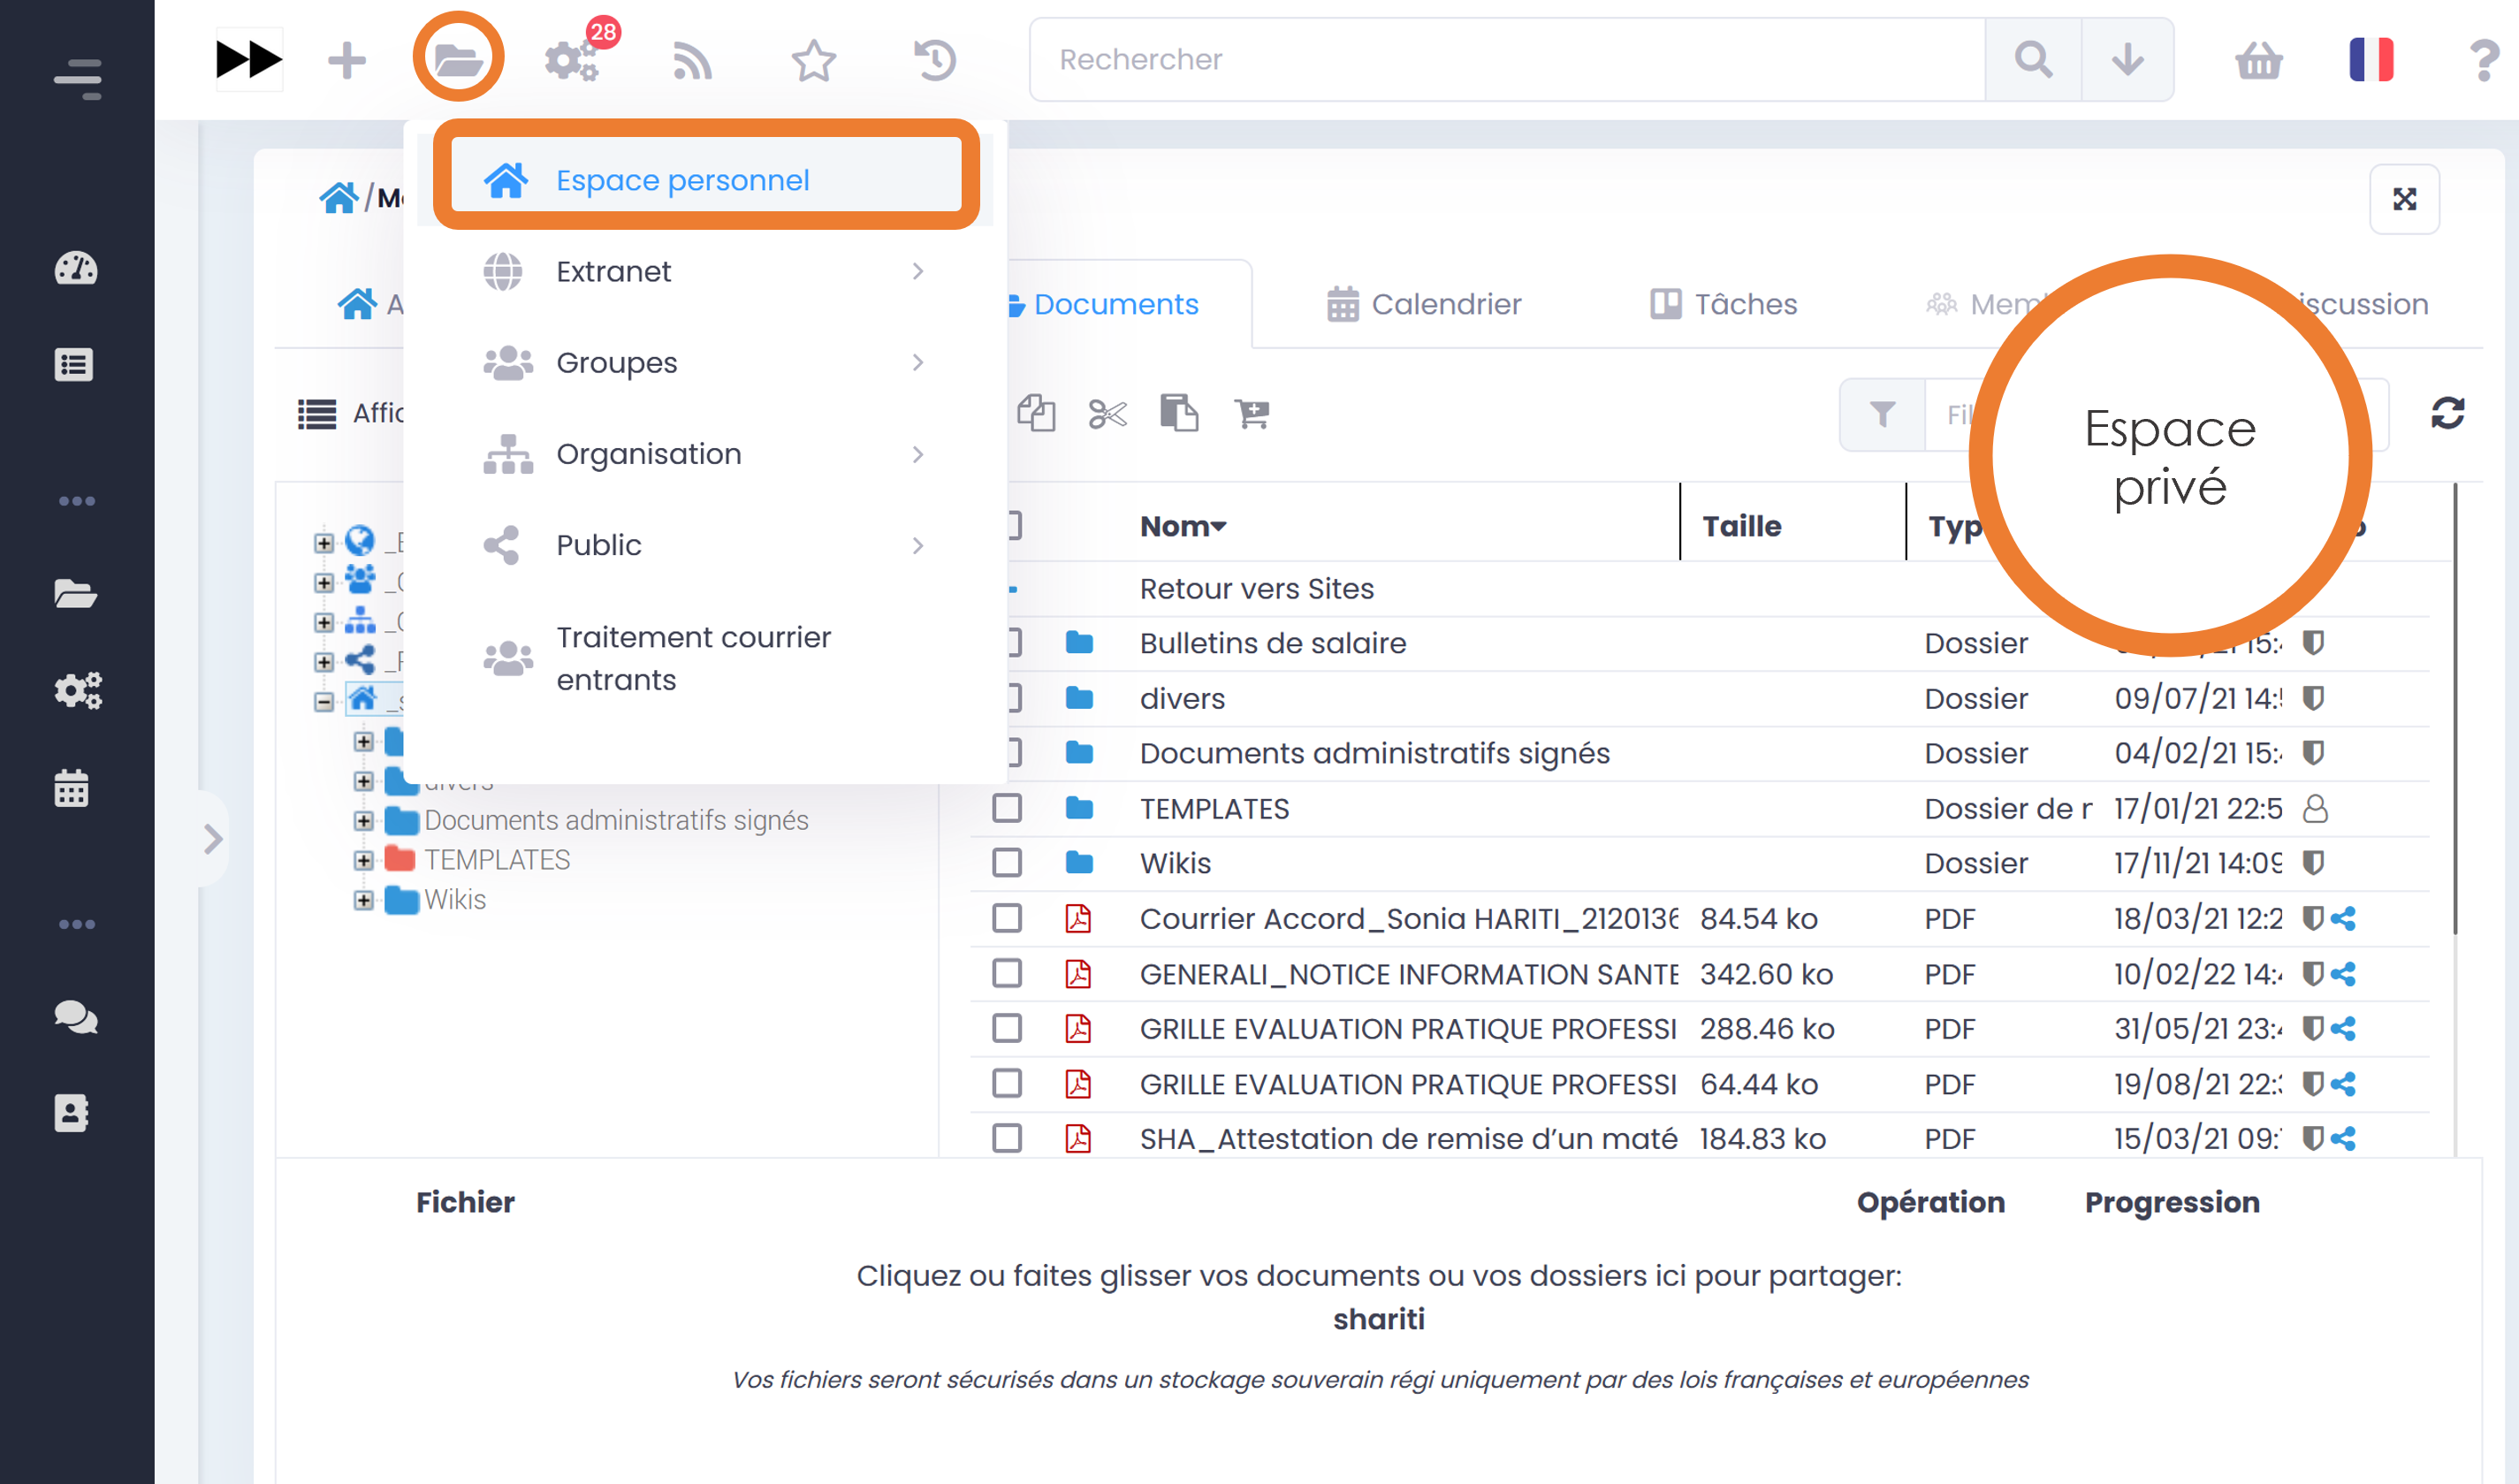
Personal Space
Rather than storing documents on your desktop, it is recommended to add them into this personal space to benefit from GoFAST features, including search engine, version management (which avoids losing information if a file version is corrupted) or remote access to its files (via another PC, tablets and smartphone).
To access your personal space, simply go to the quick access menu (top main bar), “folders” icon, then “Personal Space”. You arrive on your Space with your homepage, your documents, your tasks, your calendar… (= the same tabs that you will find in each collaborative space, excluding “Members” and “Chat”).
How to Create Content (Documents, Meetings, Forums, etc.)
How to Create/Add Documents/Files
Creation of an empty file (Office file)
You can create new documents directly on the platform, no need to first create the document on your PC and then share it afterwards on the platform.
Go to the “+” tab, “Content”, then “File, Document”.
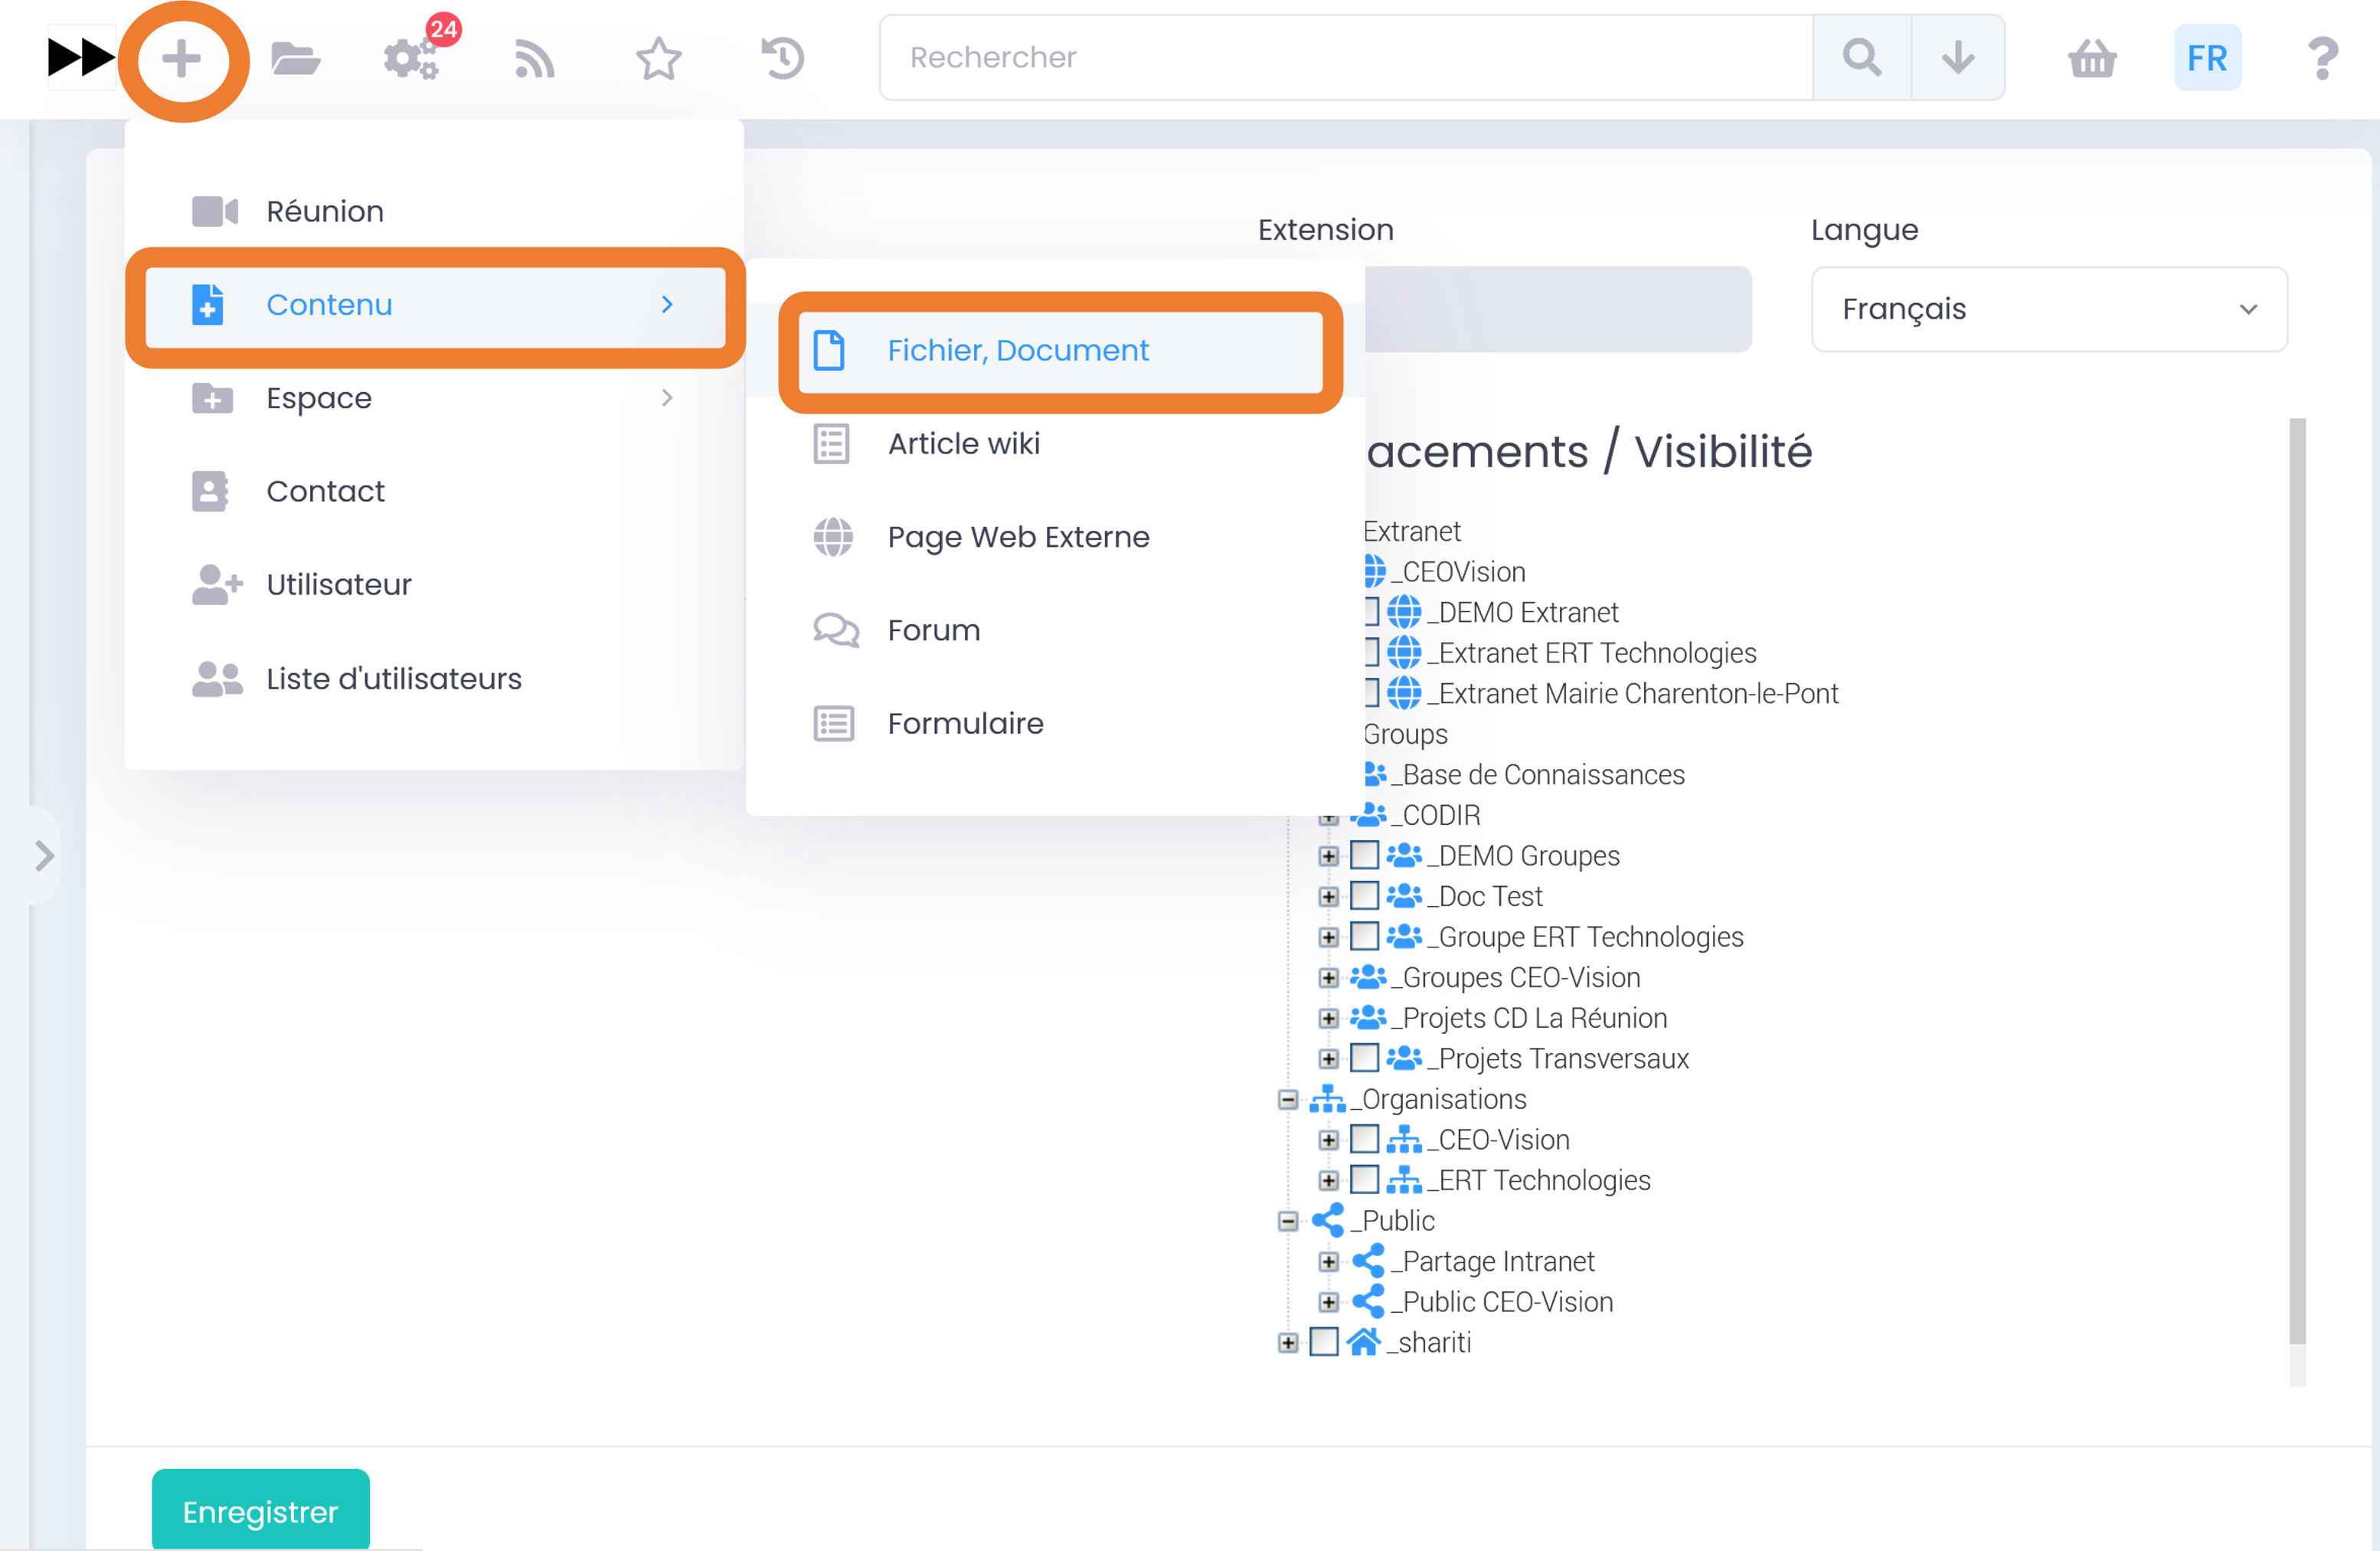
A page opens, on which you can specify the document name “title” and check the two basic pieces of information (metadata): extension (file format) and language.
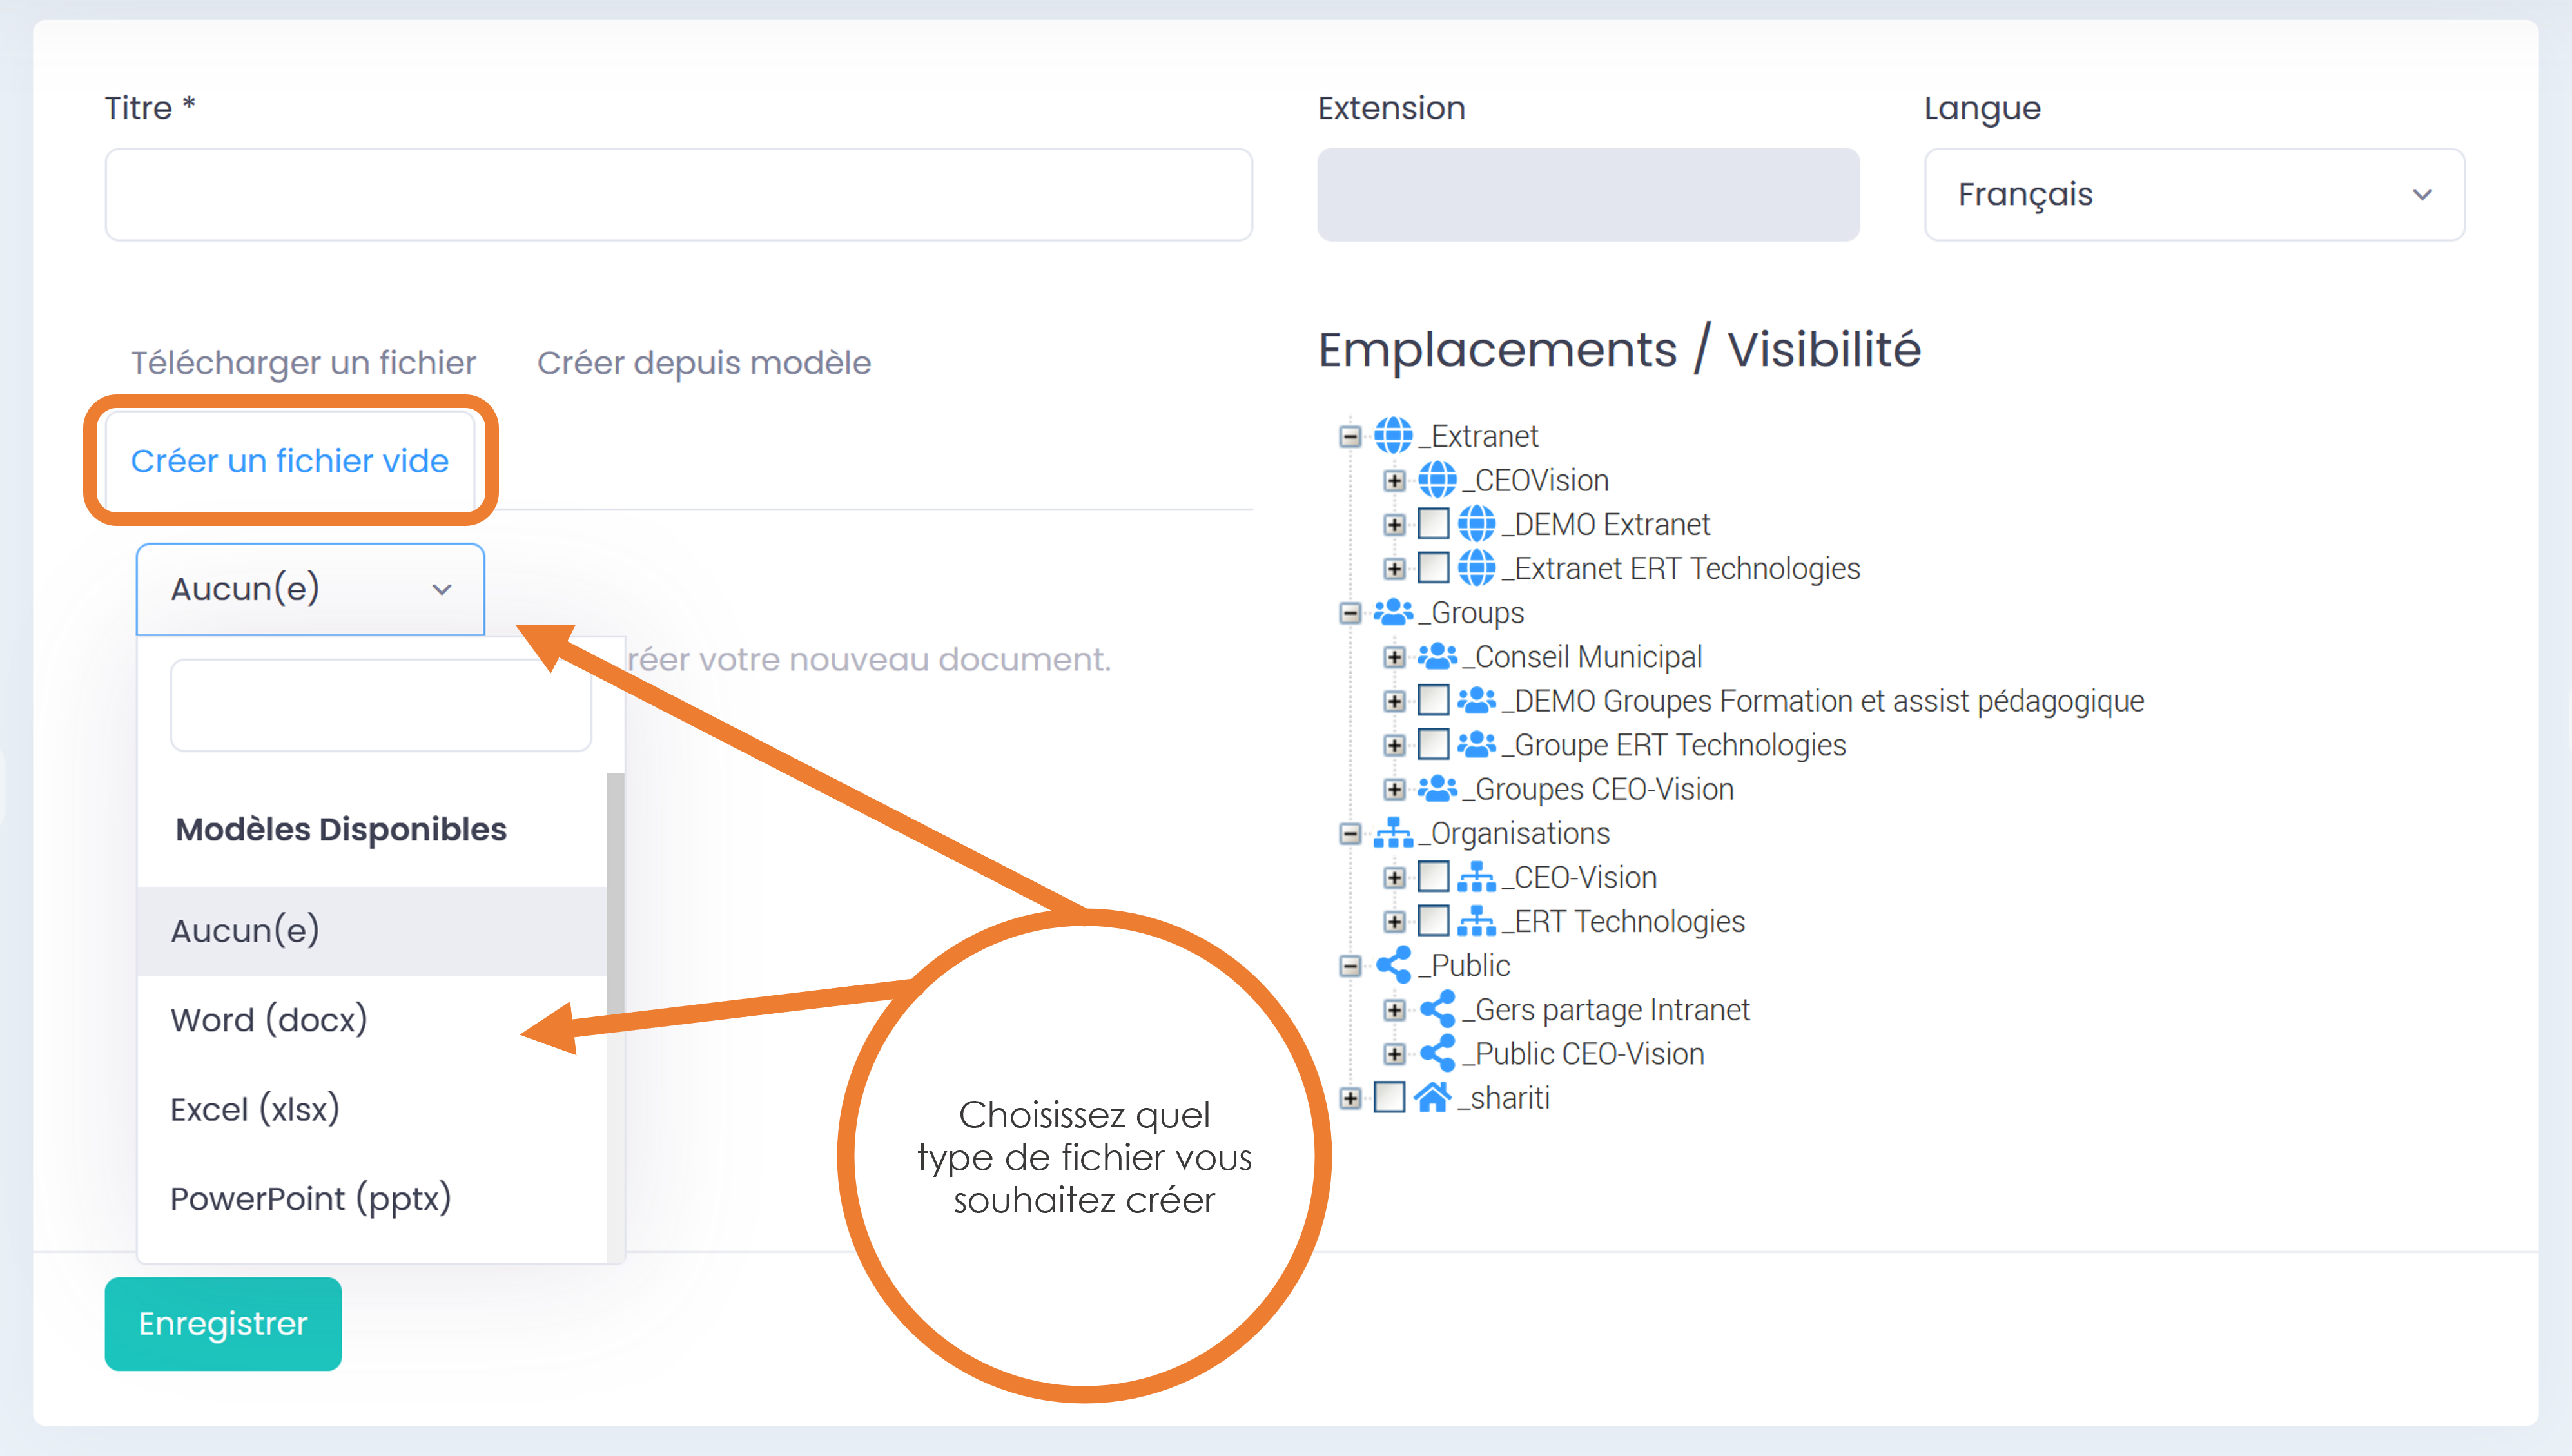
Choose the option “Create an empty file”
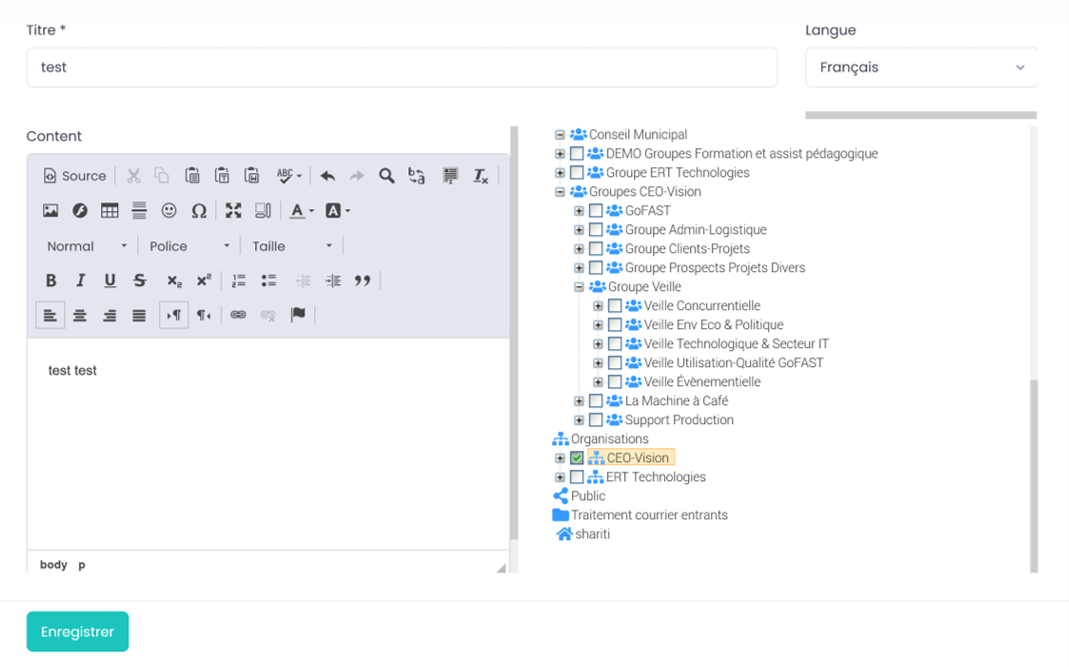
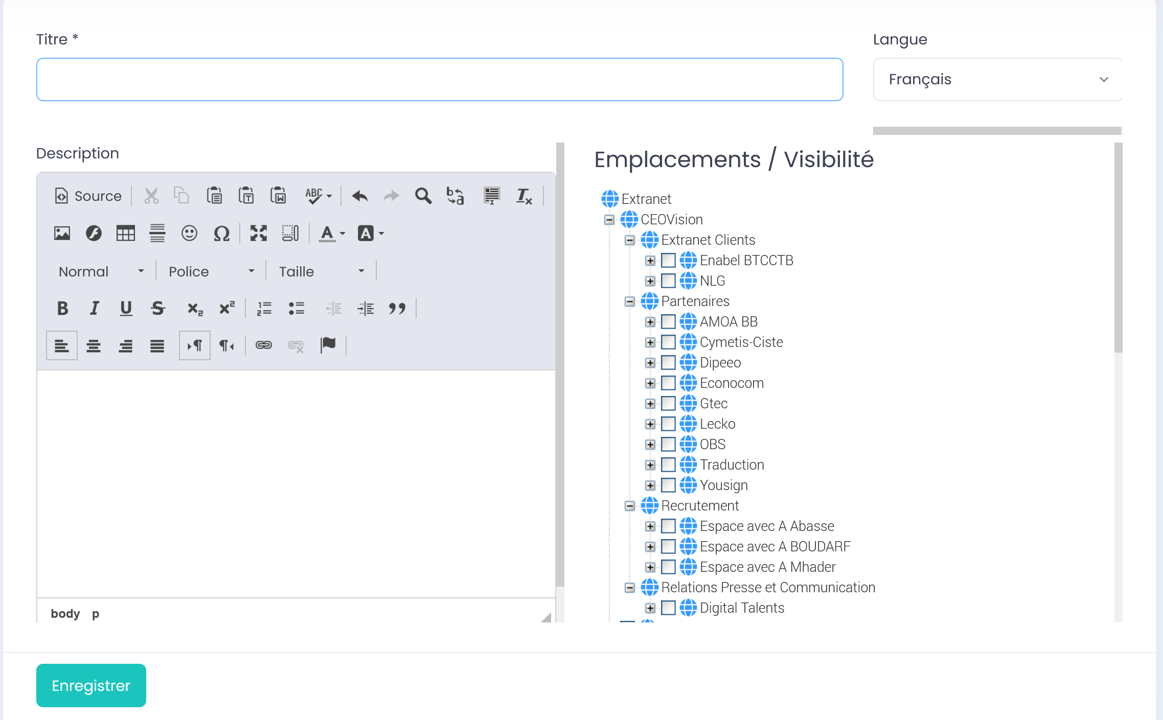
Choose the location where the document will be found in the tree structure by ticking the box in front of the name of a Space or a folder. You can tick several locations as soon as the document is created, to be able to collaborate on it with various teams/Directions.
Then save.
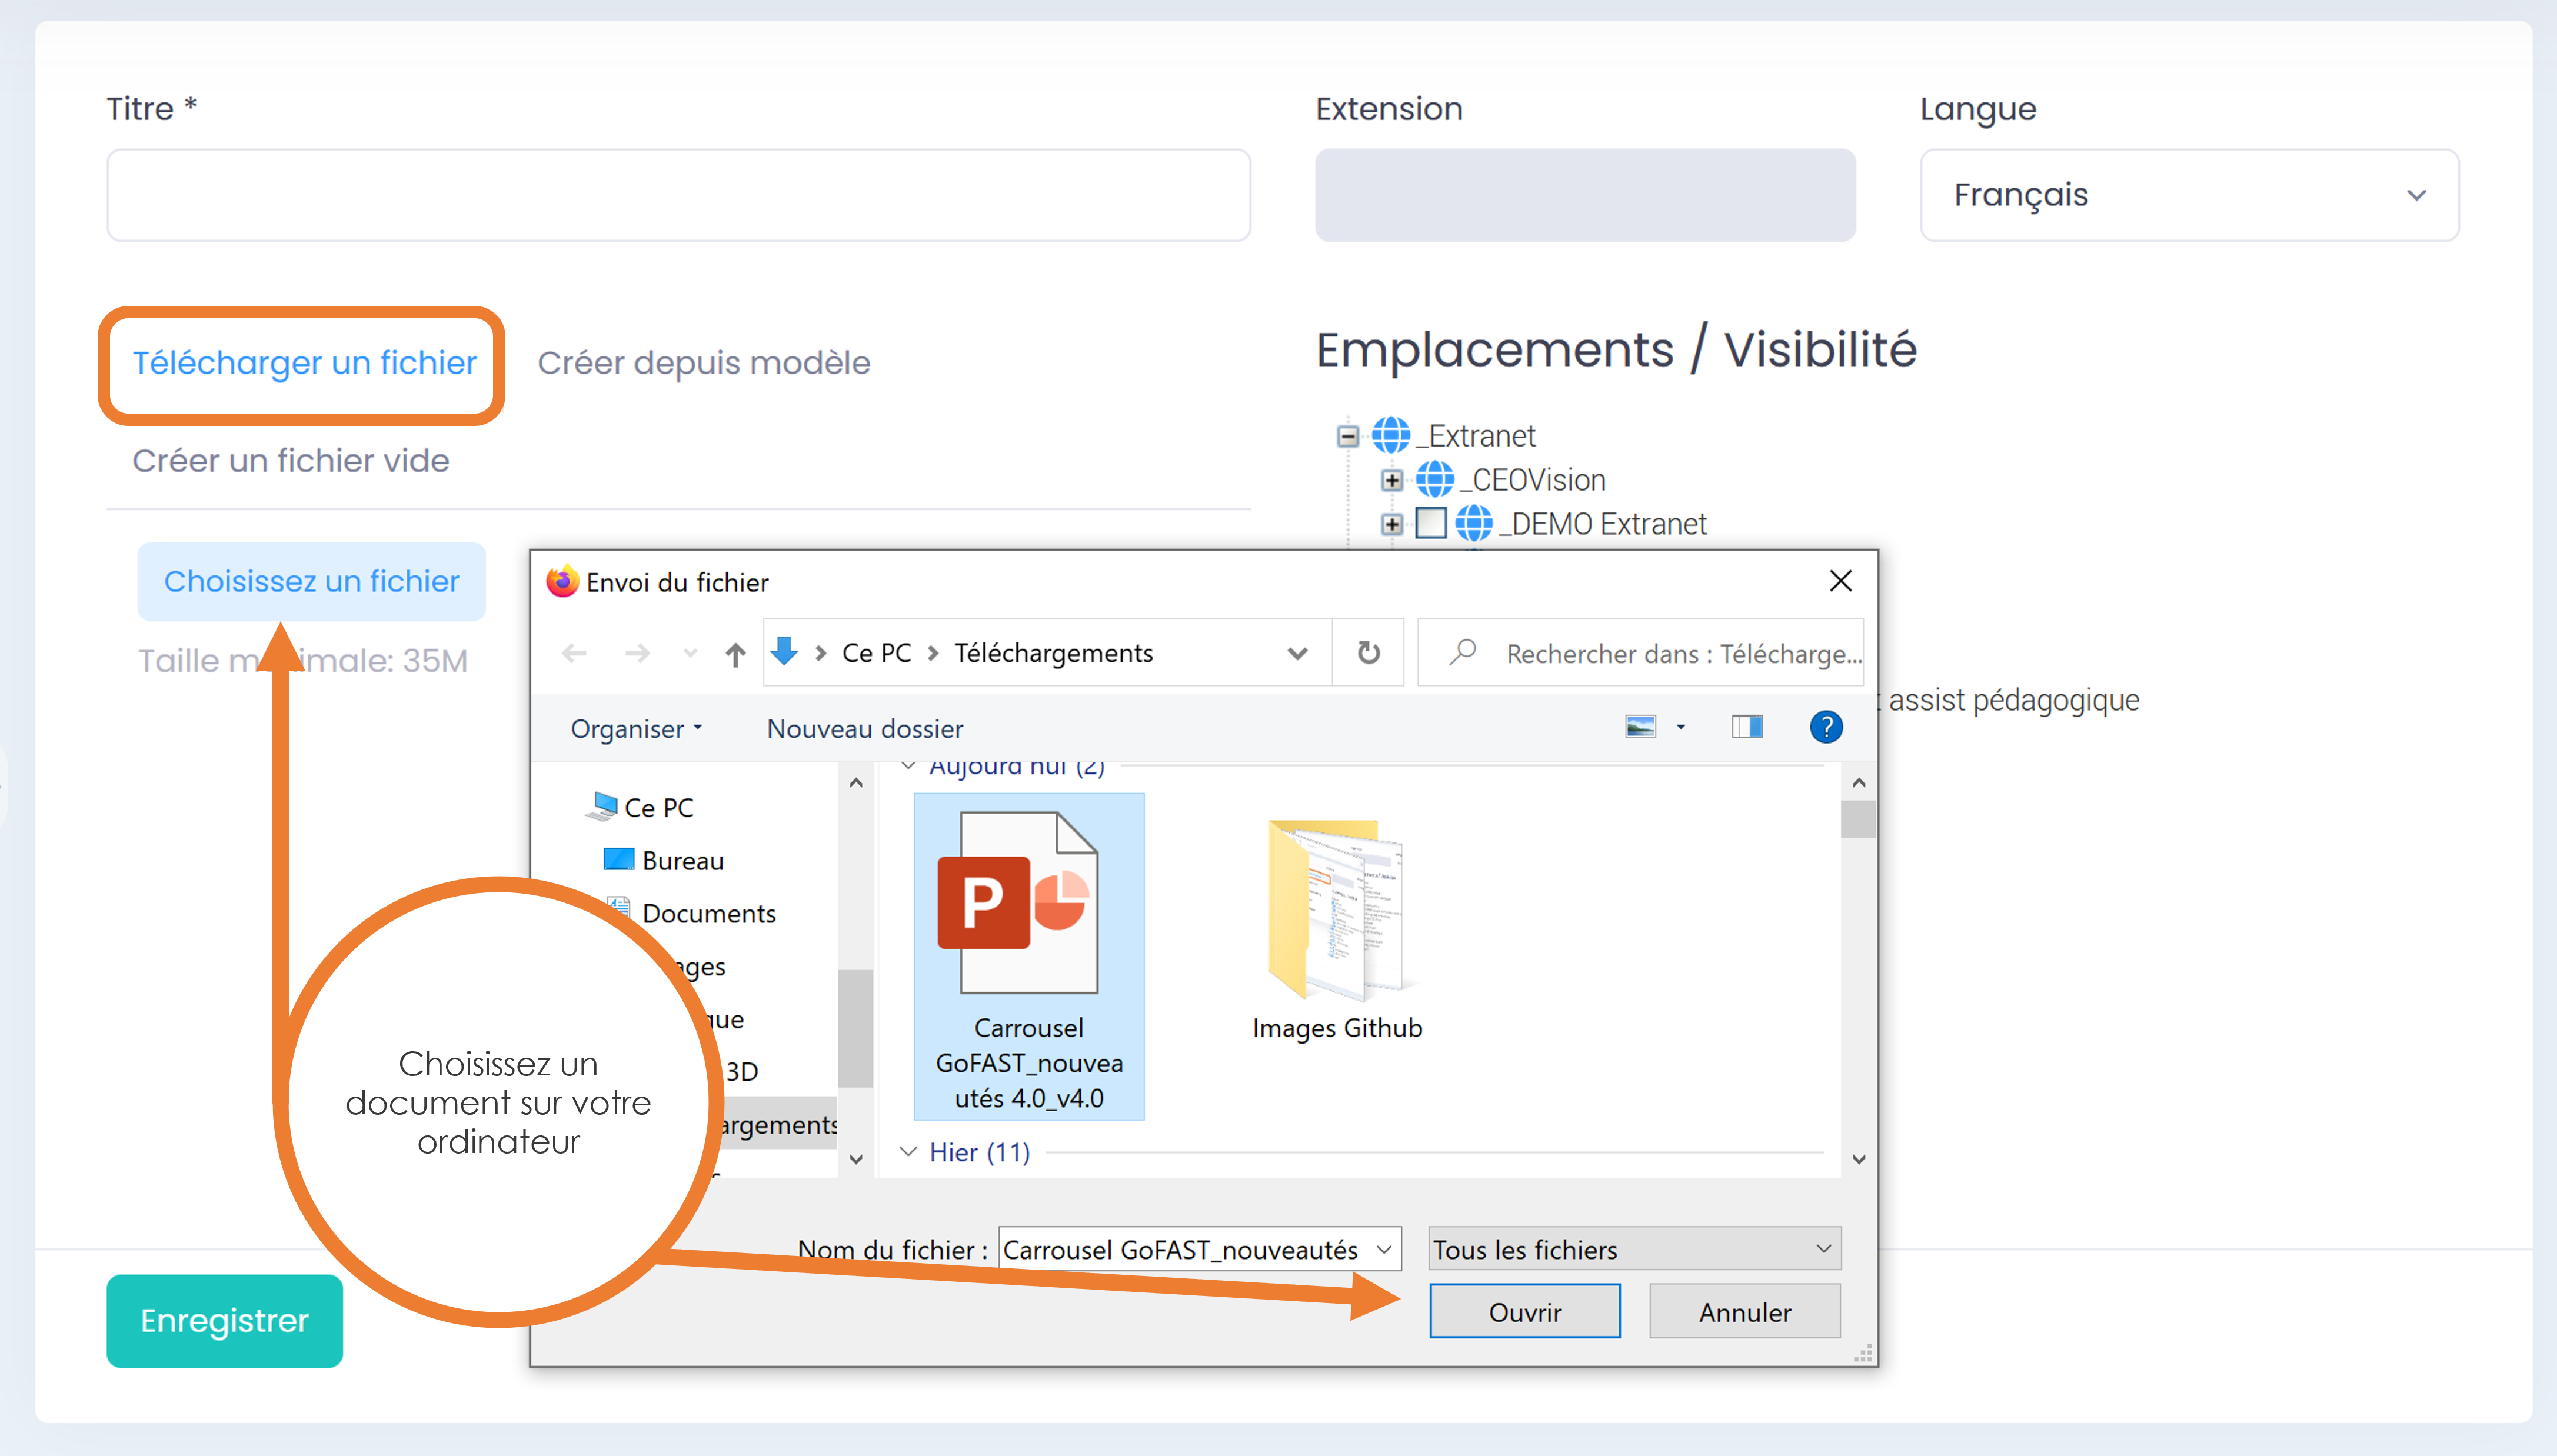
If the document already exists elsewhere on your PC, you can add it to GoFAST via this channel as well.
Simply download it by clicking on “Download a file” and “Choose a file”; your PC’s file explorer opens, choose your document. Then choose the location(s) in the GoFAST tree. Then save.
You will see the preview of your document and can start working on it: add metadata, edit/co-edit it, comment on it…
Creation of a document from a template
You can create a new document from an existing template on GoFAST. To do this, your templates must first be placed in a specific directory called «TEMPLATES» which is located in spaces and sub-spaces. Placing them in this folder automatically gives them the “Template” tag. You can then find these documents in the “Create from template” form.
The “TEMPLATES” folders are automatically created in each Collaborative Space and can be viewed in the “Documents” tab of the Space.
In order to create this new document from a template, via the Quick Access menu, go to the “+” icon, then “Content” and “File, Document”.
Choose the option “Create from template” (tab on the document creation form), you will then see the different TEMPLATES folders containing the templates. Select the template you want to use. The title and extension will be supplied automatically according to the template type you choose. Enter a new title, language and location(s) where you want to share it and click “Save”.
After clicking “Save” you will be redirected to a page of this new document with a preview and related information that you can complete/edit.
Note
When a document is created from a template, it automatically takes a “From Template” tag and a link to the original template is added.
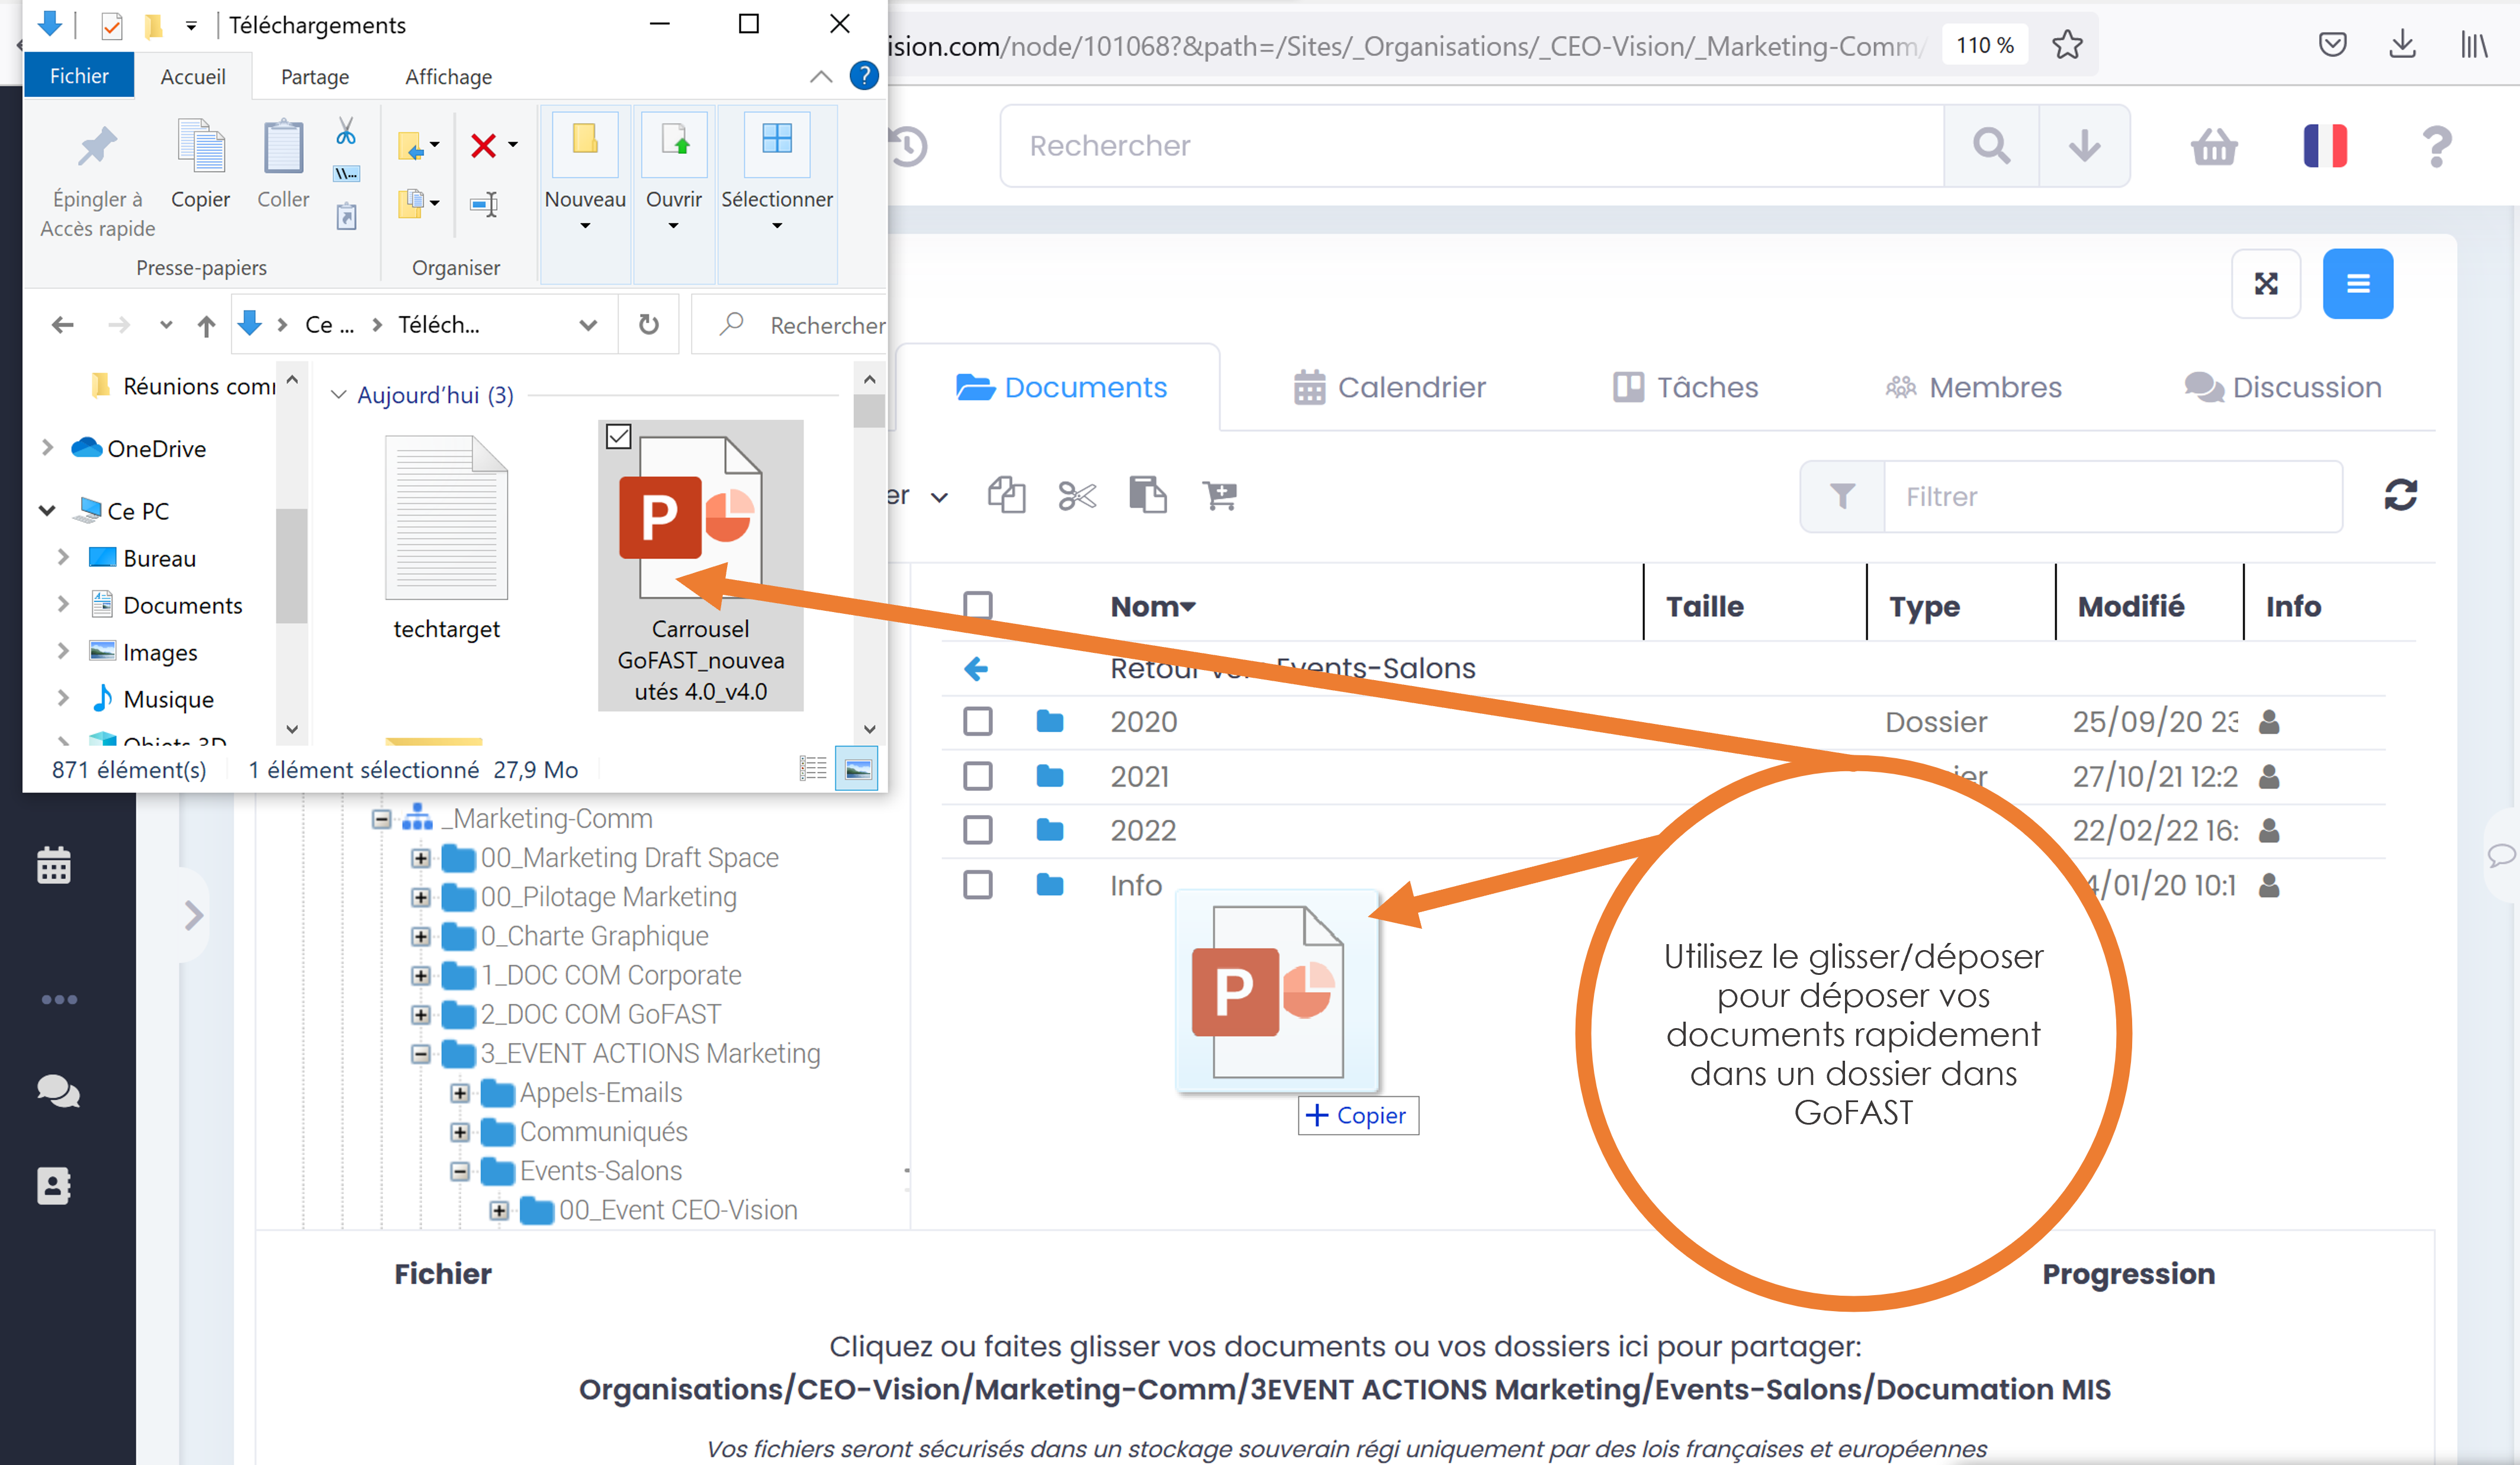
How to drag and drop documents from your PC (Office, PDF, Image, etc.)
You can drag a document to GoFAST at any time from the file explorer.
Addition of documents via Network Drive
To use Windows Explorer (or Explorer on MAC) you must configure it to access GoFAST. Please refer to the section: “Optional Configurations/Installations” Once the Network Drive is mounted, you can navigate through the tree and drop files to it, as well as edit them via your PC applications. Please note that this practice is not recommended in most cases, as it prevents effective collaborative work. This is, above all, a simple way to drop a large number of files on the platform, especially at the start of its use.
Creation of Meeting/Web conference (Enterprise only)
Caution
The «Full-Web» conference technologies are quite recent and require good resources (PC, network, …). Be sure to follow the prerequisites. If you have a problem, check for common problems: http://gofast-docs.readthedocs.io/en/latest/docs-gofast-users/doc-gofast-problemes-connus.html#webconference
It is always preferable to create the meeting directly in GoFAST because it sends an agenda invitation to all participants and also allows to link content (e.g. agenda, annexes, etc.)
A web conference can be created in 2 different ways:
To schedule a meeting on a specific date, with calendar invitation: from the quick access bar (top menu) or the Calendar of a Space.
For an immediate web conference: from an instant discussion room (Chat), via the “camera” icon.
How to schedule a meeting/web conference
Through the quick access menu (main menu at the top), go to the “+” tab, then to “Conference”.
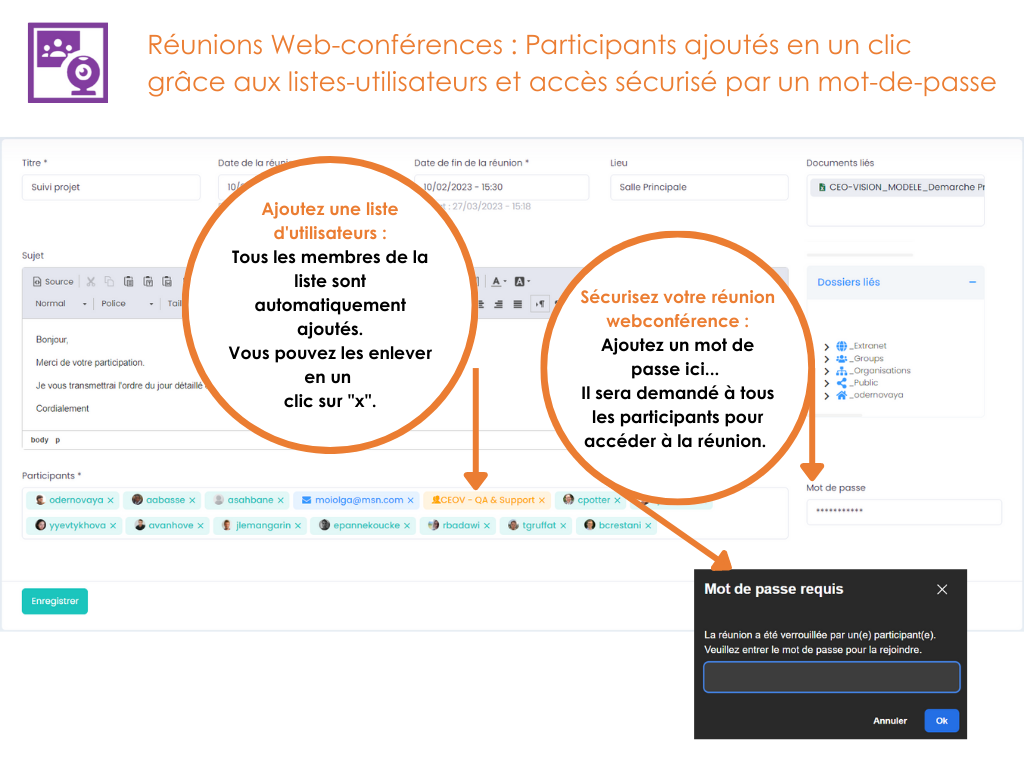
Give the meeting a title, write a summary in the text box, choose a start and end date and time.
Add user attendees and/or user lists (write the first 3 letters of the name, a space or a list to invite all members).
It’s possible to attach links to documents (access or download link depending on whether you are a user on GoFAST or not) to the invitation that will be sent by email (e. g. Agenda) and links to files (required to be a member of the Space where these files are located).
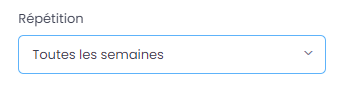
But it’s also possible to set the frequency of a meeting
After entering the information and clicking the “Save” button, another window opens with the elements you entered.
We therefore see the list of participants, the name of the organizer, the date and time, etc. A message in red may be displayed if you do not have the necessary prerequisites (microphone, camera, network, etc.).
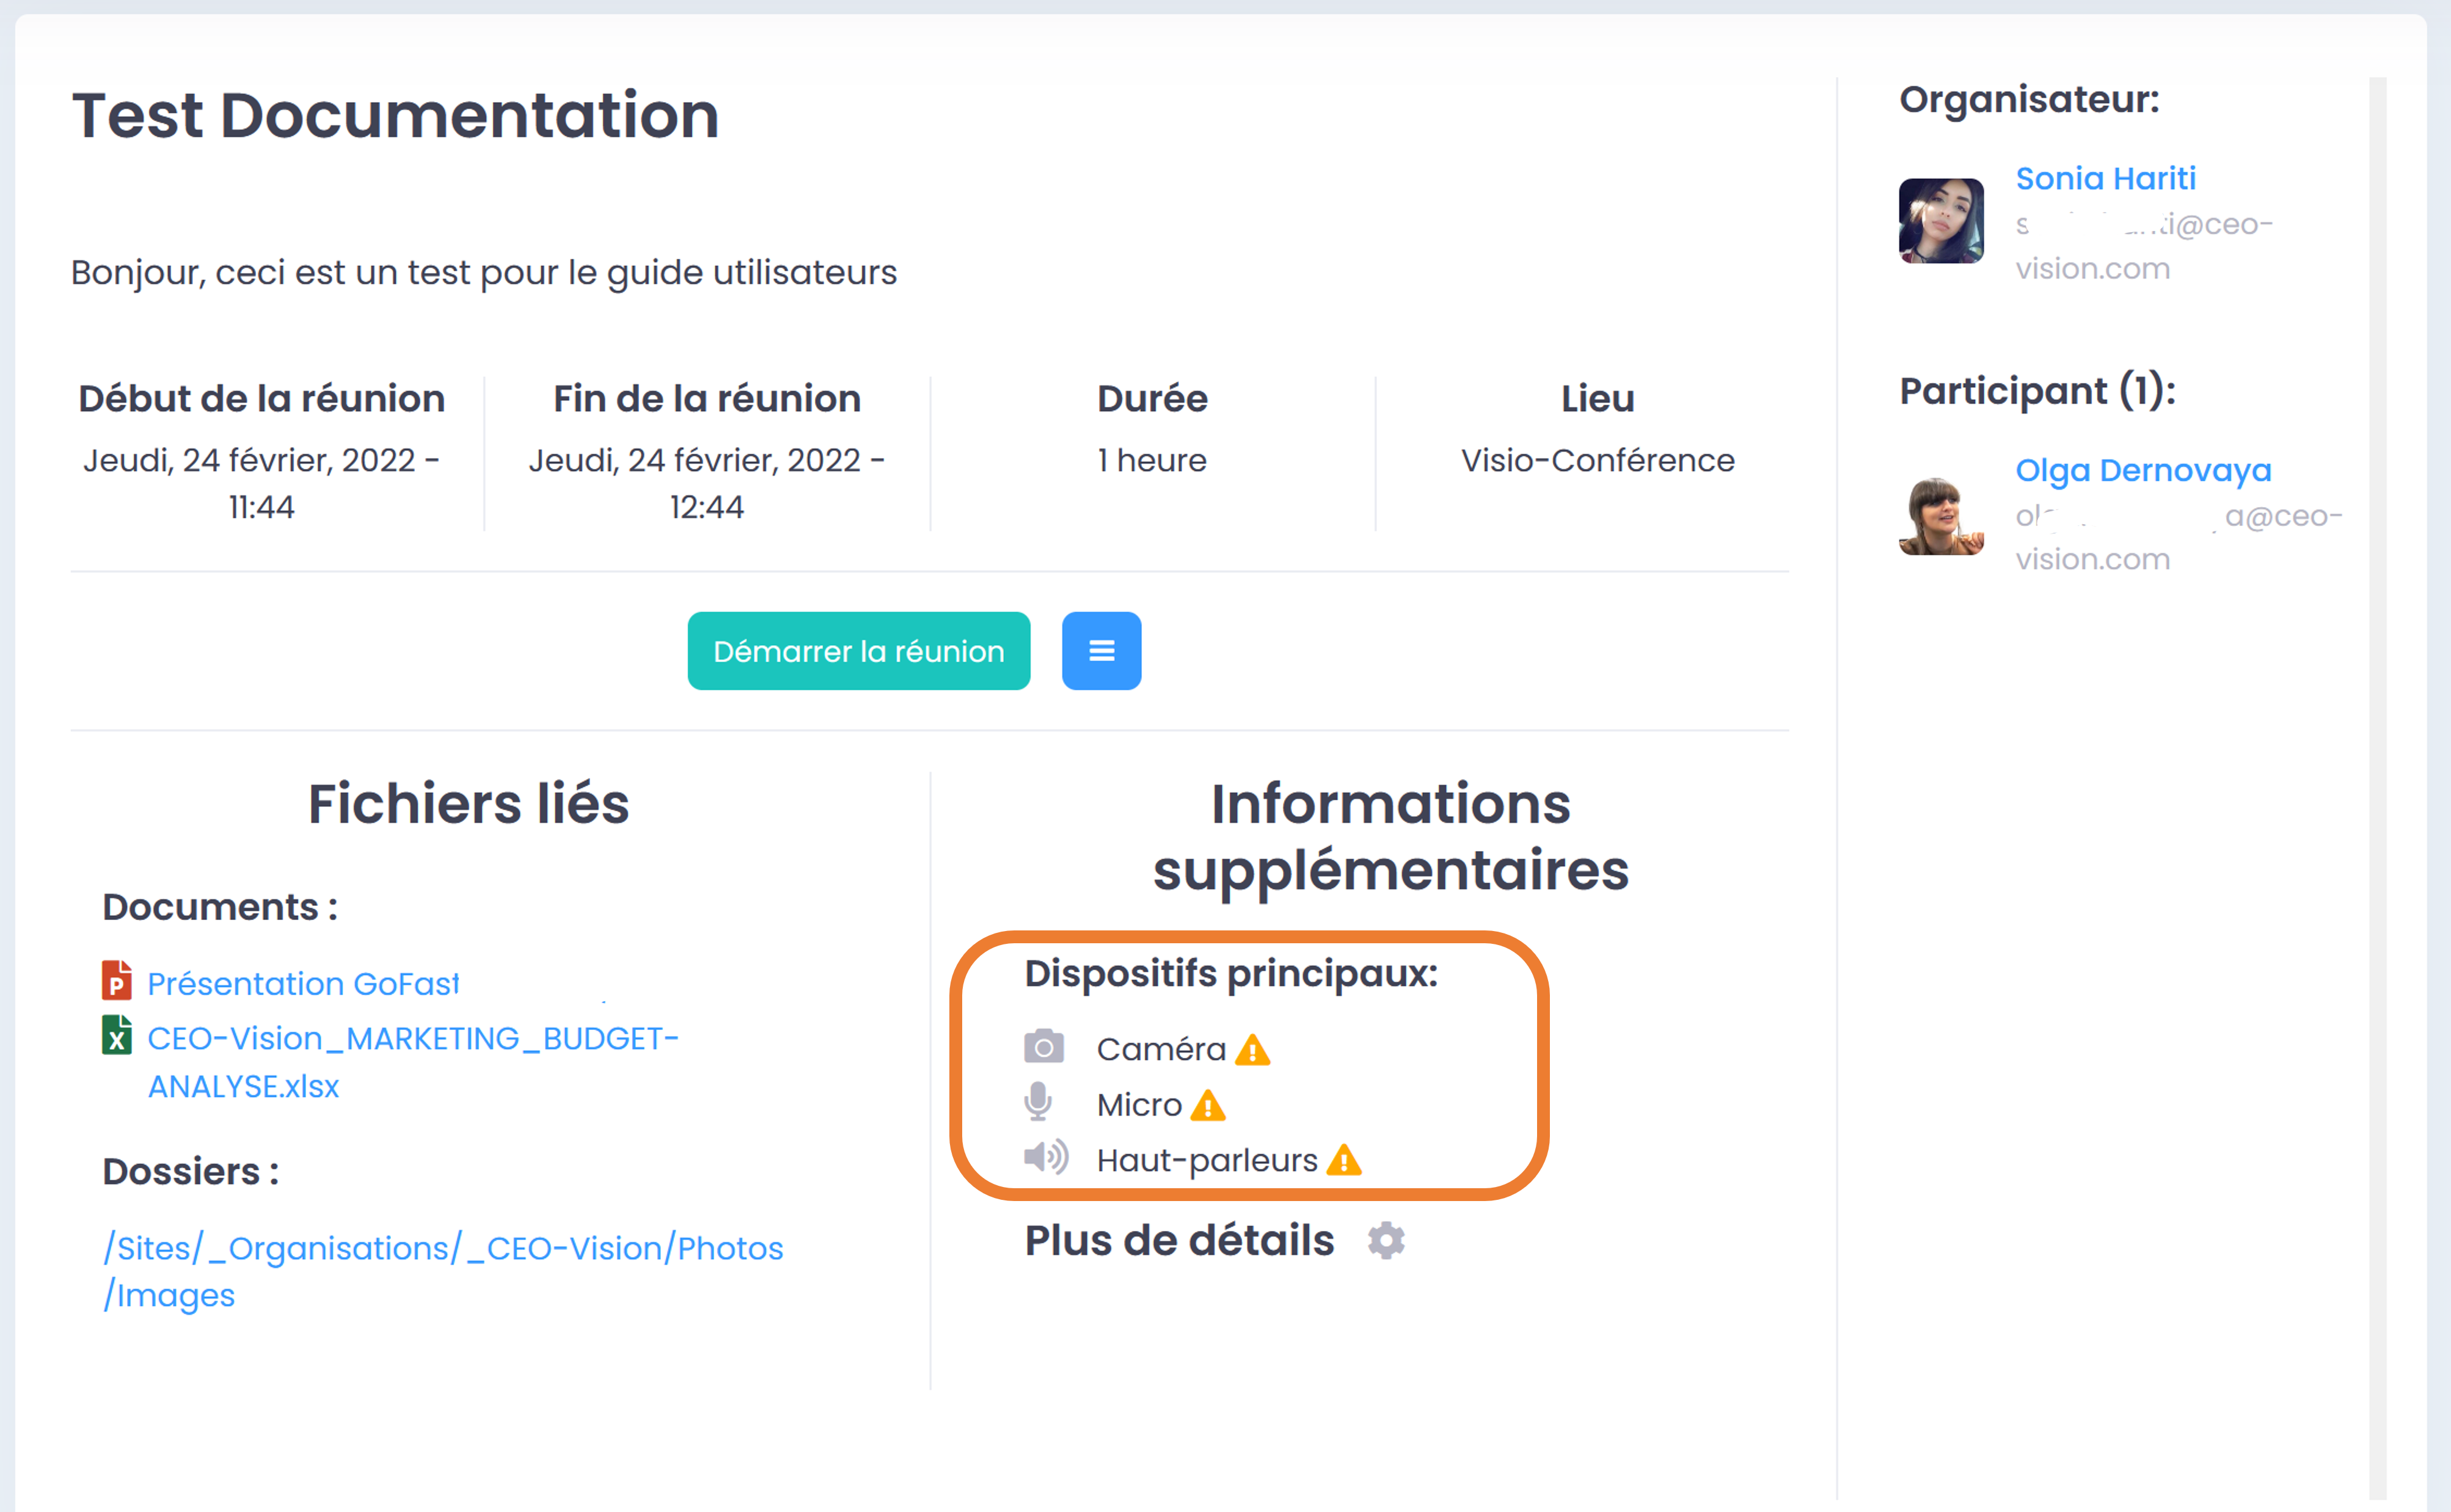
An invitation by email will be sent to participants with the title of the conference, a URL link to join the conference.
You can even save this event in your personal calendar (non GoFAST) by clicking on the “Accept” icon from your regular email (Outlook, BlueMind, Thunderbird, etc.)
If the conference has been modified (change of date or participants), the participants and you will receive the email associated with the modification on the agenda side. The user who creates the meeting is considered as its “organizer” and will be the only one who can modify it.
How to start a Web conference from the Chat
You can start a web conference from a chat room (Element Instant Messaging). It is convenient if you want to switch from written communication with colleagues to voice communication without wasting time. Go to the chat room where you want to start the web conference (e.g. via the side block of the chat on the right of your screen), click on the “camera” icon and a confirmation message is displayed with an area for the web conference. You can detach the web conference area to open it in plain page in a new tab of your browser. Click on the “Join” button. Members of the chat room can also join the meeting. For more information on the web conference features, please refer to the section: «Meetings/ Web conference (Enterprise only)» (and the Jitsi Meet documentation).
Create a Wiki Article
You can create Wiki articles that are internal web pages to the platform, shared within a Collaborative Space.
Go to the “+” tab then “Content”, “Wiki article”.
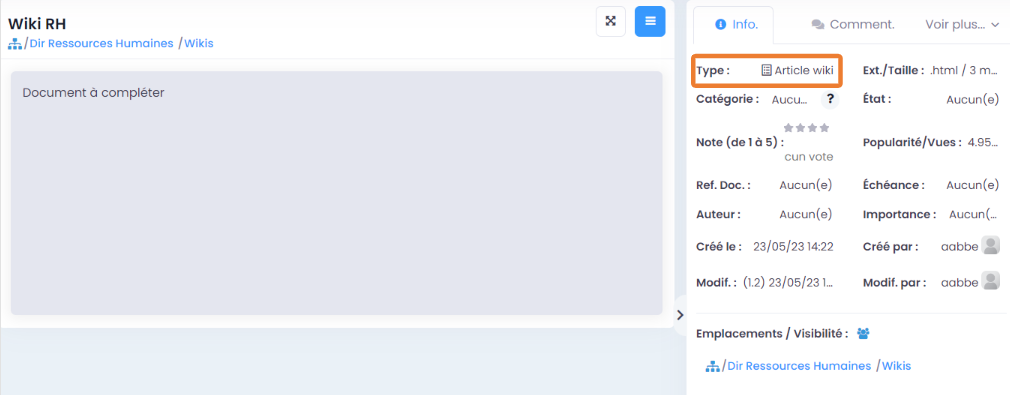
Give your article a title, create its content (you have a menu with various possible layout actions, such as when sharing a comment), choose its location in the “Wikis” location in the Spaces tree.
Here is an example of a web page preview with the corresponding metadata on the right :
How to create an external web page (URL)
With this feature, you can integrate external pages from other websites. Thus, we can view the contents of an external web page directly on the GoFAST platform.
Go to the “+”, “Content”, “External Page” icon
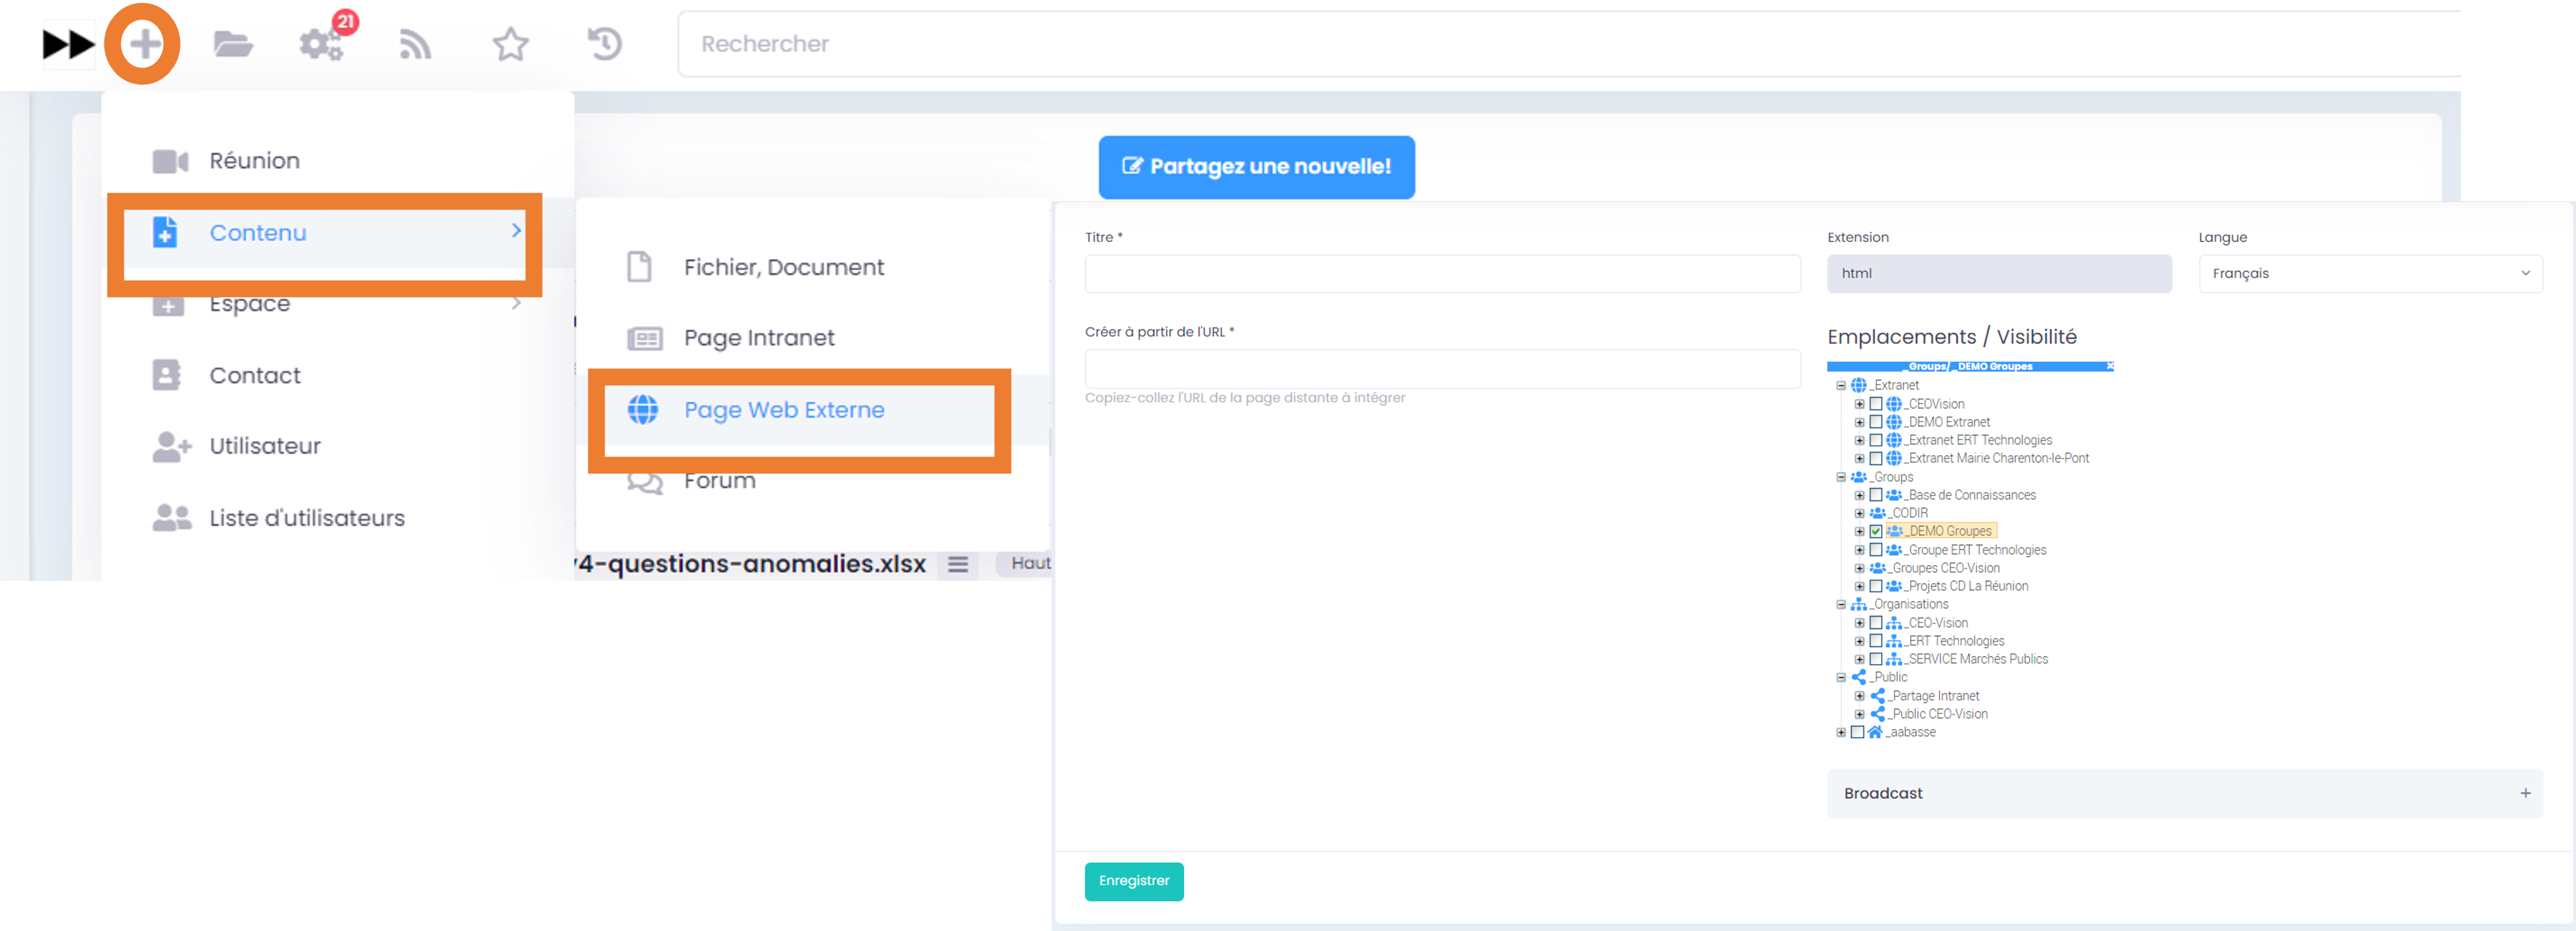
Specify a title, choose the language, copy the URL link, choose the location in the tree view (tick the box or click the name of the group to find it in blue on the right), save.
External web pages behave like other files/documents on GoFAST (can qualify/add metadata, share in multiple locations, update…). These pages are visible in the file explorer, in the locations where they are located, as well as via the search engine.
Creation of a forum
Objective of Forums:
Share ideas, best practices and advice with members of one or more Collaborative Spaces, on one or more themes. The forums allow to preserve the exchanges and thus to constitute a knowledge base. This saves valuable time when information is needed, rather than constantly asking the same questions.
You can create “forums” in one Space and share them across multiple Spaces (like a document).
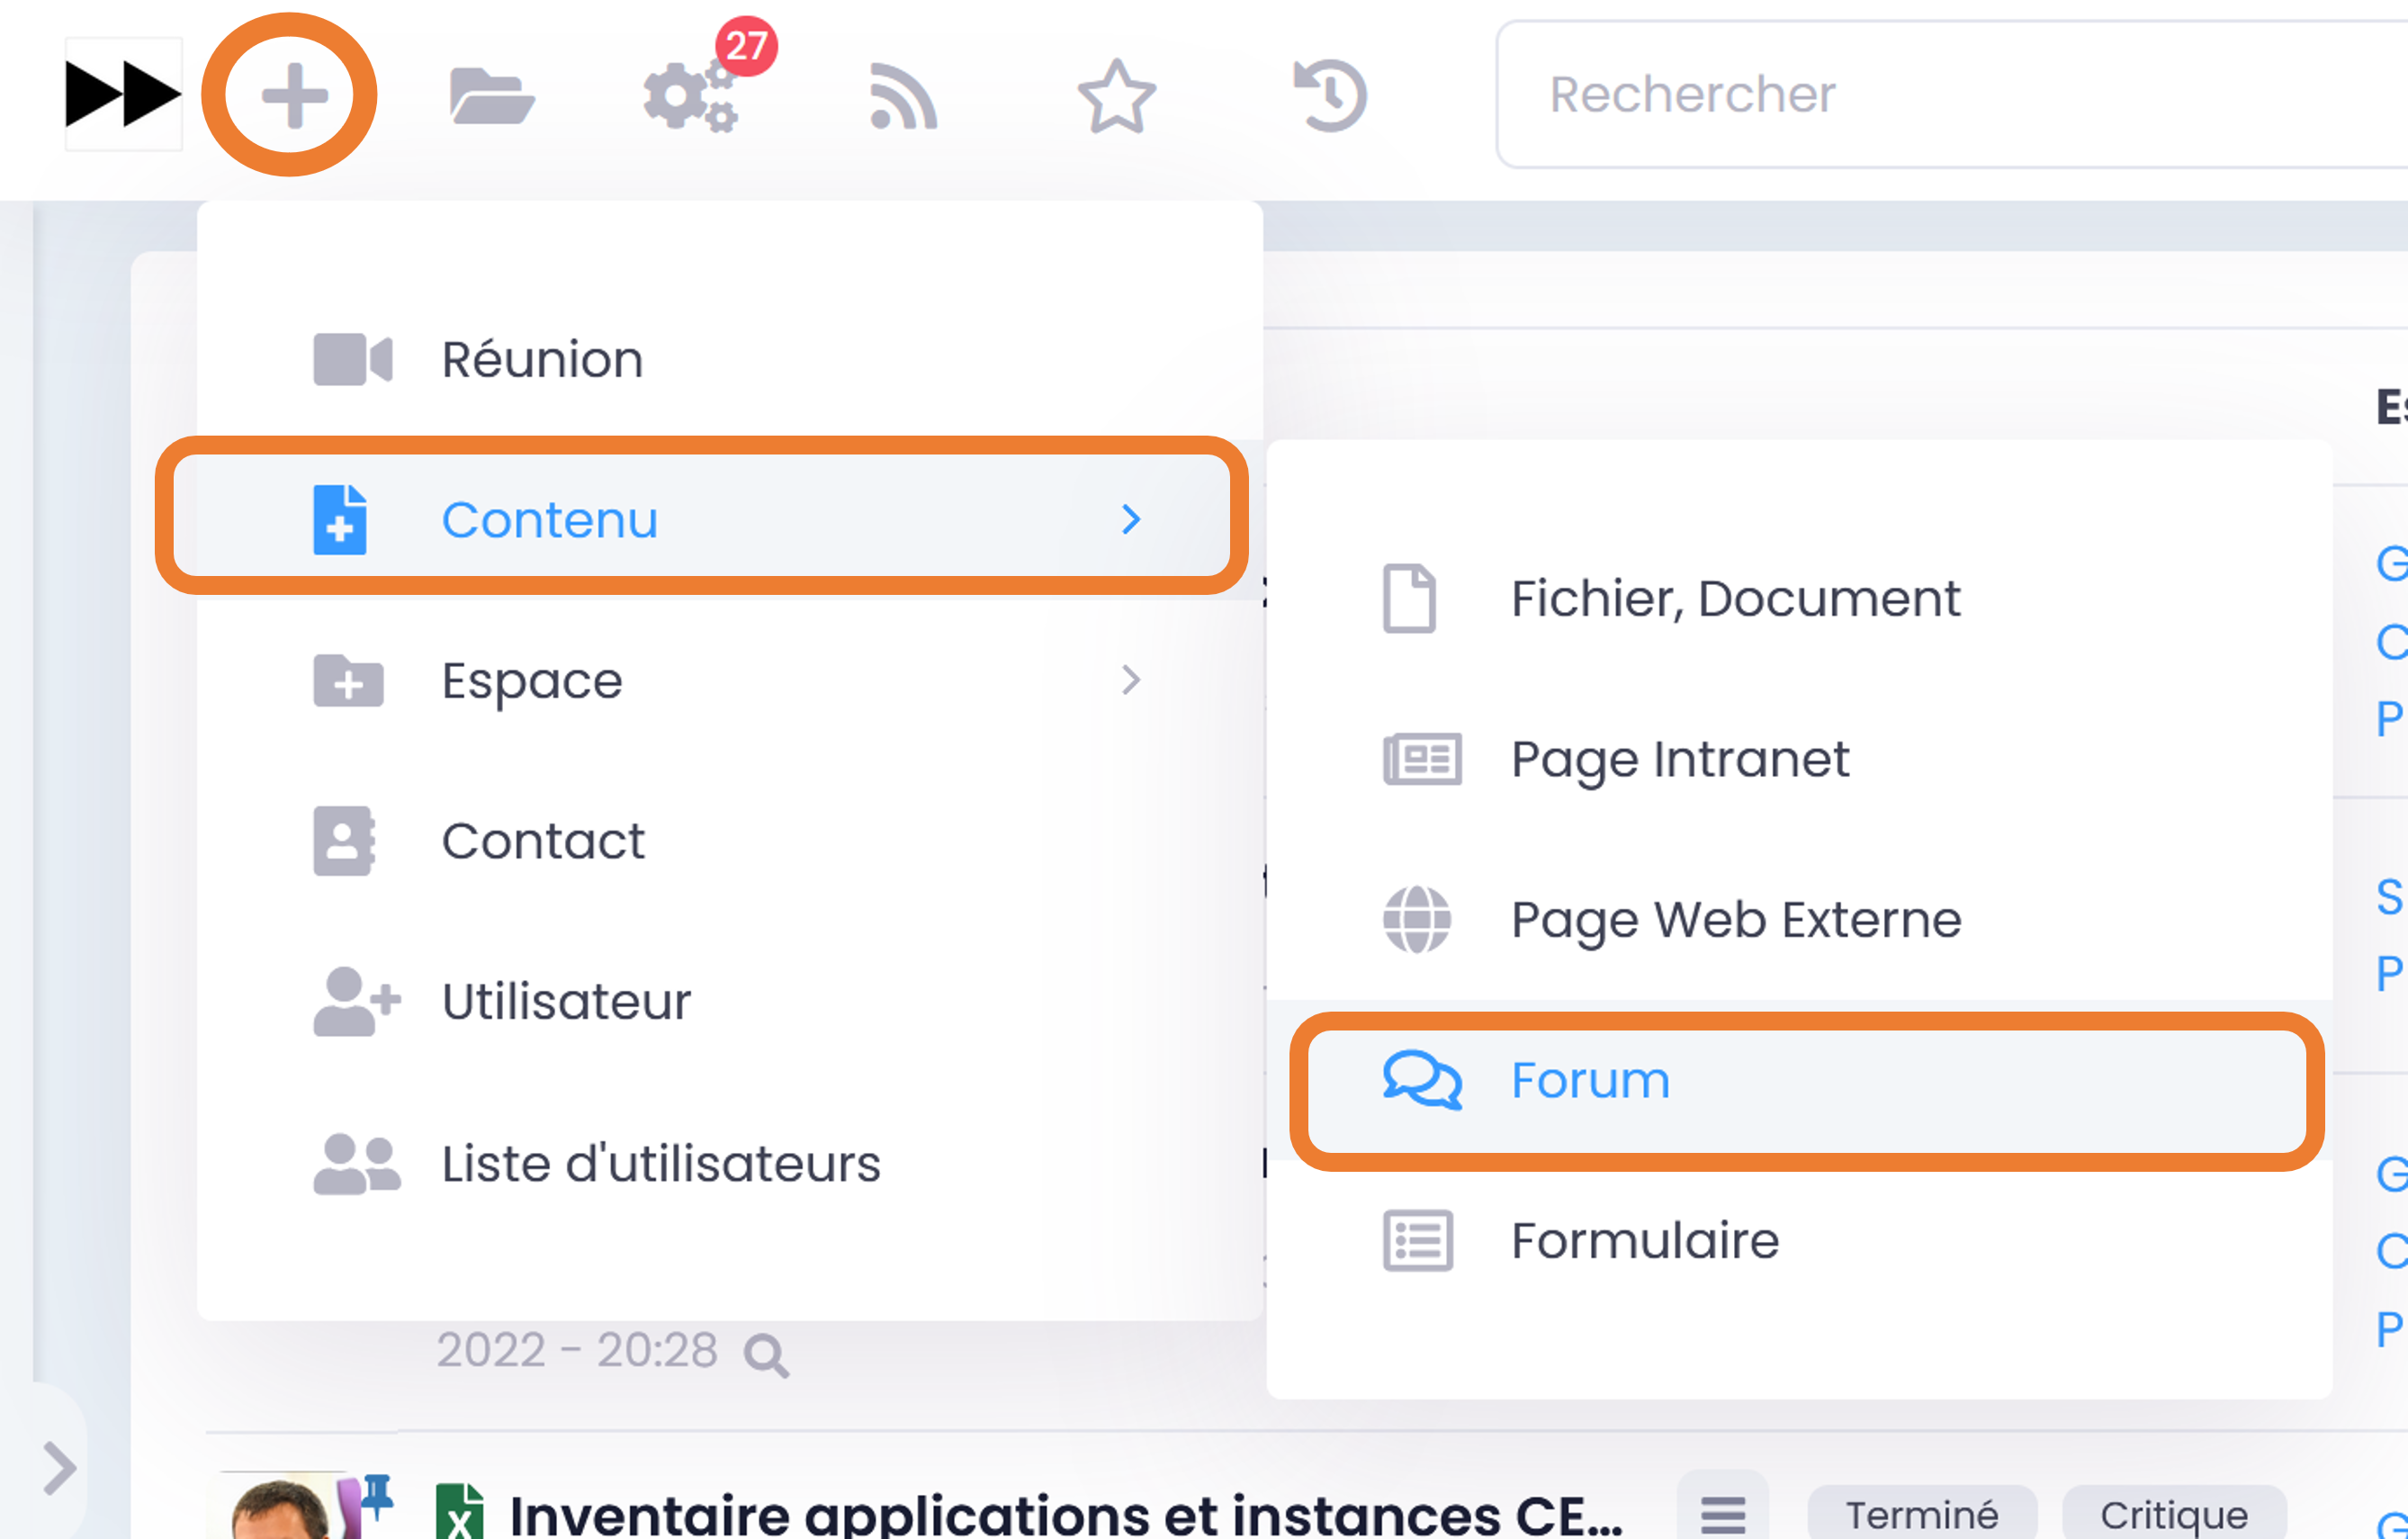
From the Quick Access bar (top main menu), click “+” then “Content”, “Forum”.
Specify the topic of the Forum, choose the language, write the introduction, choose the location in the Spaces tree and save.
You and other users with access can enrich the forum by the same principle as adding comments on a document’s page. You can then either delete (Recycle bin) / modify (pencil on sheet) your comment, or reply to a comment (small arrow), as well as subscribe/unsubscribe to this forum. A message at the top right will appear indicating the publication of your new comment.
To find out more about the use of the Forums, please refer to the section: “Forums”
Creation of a Form
Objective of forms:
Collect opinions, ideas, carry out a survey on a predetermined subject… the forms allow you to create questionnaires with various fields (dates, text, checkboxes, drop-down lists, etc.) and distribute them to users. Once the forms have been completed by GoFAST users, it is possible to view and analyze the results.
How to start the creation of a webform:
In the Quick Access bar (top main menu), go to the “+” icon, to “content”, then in the submenu click on “Webform”
You will be redirected to the webform creation page.
Continuation of the webform creation:
Fill in a title (and check the language defined for your webform)
Check the Space(s) where the webform will be shared (a webform is filed directly at the root of the Spaces, so it is normal not to be able to scroll the tree of classic folders in the Spaces).
You can add a description (optional) so that the webform has an introduction.
Click on “Save” at the bottom of the page

You will be redirected to the webform management page where the title and description will be displayed. It is on this page that users who want to fill in the form (“Fill” tab) will arrive. However, just after this 1st creation step, this page is empty because you have not yet added any fields to your webform.
How to find a webform:
Activity feed (if webform has been created, modified or commented recently).
In the calendar of one of the Spaces where the webform is located or in its personal calendar (if a deadline has been added to this webform).
Via keyword search, a “blank” search (= without keyword) and search filters, in particular by type of “webform” content
In their favorite content (if the webform has been added to it beforehand)
It is also possible to add a form to a space’s favourites.
Note
Once your webform is created, you will arrive at the webform page. This page is where users will arrive to fill out your webform. Right now it’s empty, and until you publish your webform, no one can fill it out. As the creator of the webform, you have the possibility to access the “Manage” and “Results” tabs. The administrators of the space, in which this webform is, also have access to it.
For more information on the use of webforms, please refer to “Webforms”
How to create the Collaborative Spaces
Creation of the Space at the root
In order to build the tree structure of the Collaborative Spaces, it is necessary to start with the very first levels, that is to say at the root of Organizations, Groups, Extranet or Public. To find out which profiles have the possibility of creating these first Collaborative Spaces, please refer to the sections:
Dashboard of permissions by profile
User-Support profile
Creation of a Collaborative Space/Sub-Space
You can create new collaborative spaces (subspaces), however, if you have permissions, i.e. if you are an administrator of the parent space.
You can create a new space, such as:
Organization (your units/departments/etc.)
Group (cross-functional projects/sharings)
Public (only if you are a member of the “Public List”)
Extranet (sharing with external users)
To learn more about the types of Spaces, please refer to the section: «Collaborative Spaces»
Space creation form:
From the Quick Access bar (top main menu) click on “+” then “Space” and go to the type of Space you want to create. A page opens where you can add:
a space title (required)
a brief description (mandatory)
choose a secondary administrator (mandatory)
to create a homepage (optional)
to choose the location (mandatory): you will see the entire tree of spaces in which you can create a new subspace.
To add a visual identity (optional: image that will be used for the chat room/ chat dedicated to this Space if you decide to create one afterwards).
then “Save” and you will be redirected to your new Space page.
The principle is identical for all space creation in Groups, Public and Extranet.
You can also see the path and the name of the Space, above the tabs:
The different tabs of your Space:

The “Home” tab:
You can personalize it at any time with a photo, a message, a web page). The other administrators of this Space will also be able to modify this home tab.
“Statistics” tab:
Allows you to view the evolution of members and documents over a given period.
“Documents” tab:
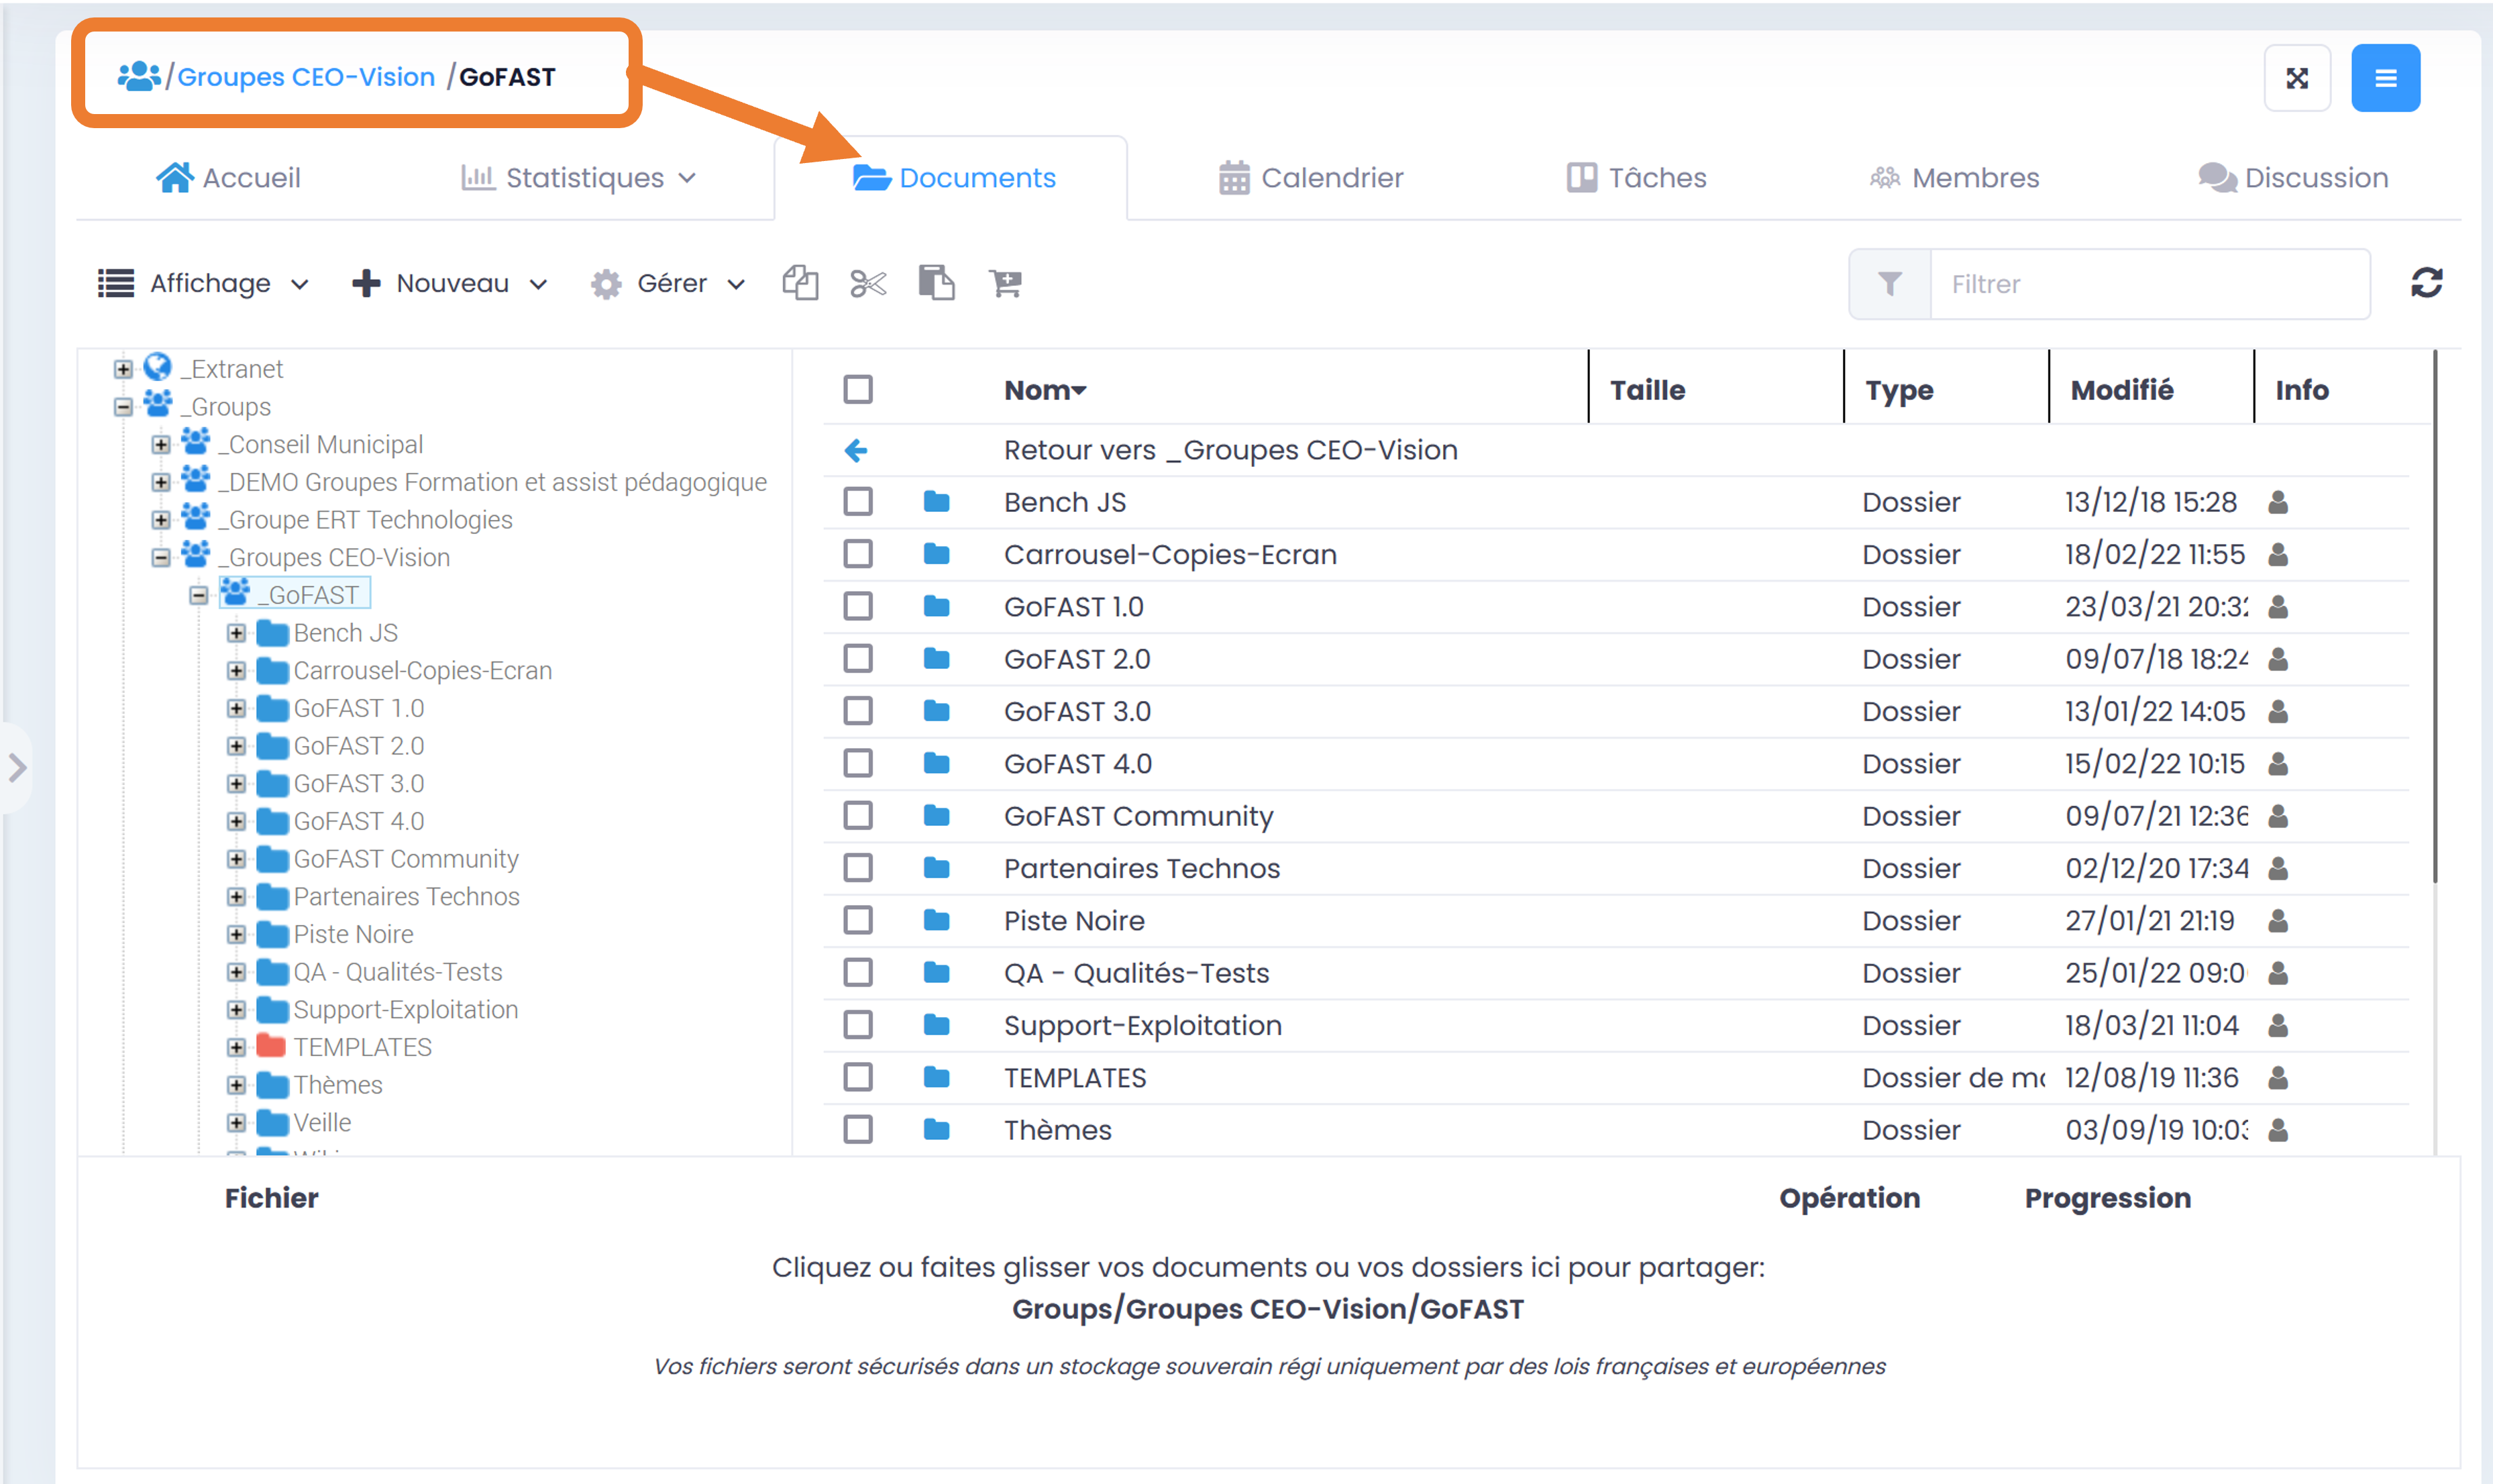
Shows the GoFAST File Explorer, with all the contents in your space in the main area in the center of the screen, as well as the full tree structure you have access to in the left area (so you can easily navigate between different Spaces from the tree structure).
Note
In the tree structure, spaces are marked with an underscore before their name “_”; if there is nothing, then these are folders. In both cases, you can see their lower levels by clicking on the little “+” in front of each. Or hide them with a small “-“.
Here you can directly drag and drop files from your computer or download them using the “New” button.
To learn how to add a document from this “Documents” tab, please refer to: “How to drop Files to GoFAST via File Explorer”
“Calendar” tab:
Allows you to view meetings and web conferences scheduled in your space, document deadlines or collaborative tasks (= Kanban cards).
“Tasks” tab:
Contains a Kanban board with columns and maps usually corresponding to tasks.
“Members” tab
Allows you to view users or userlists who have access to the space, as well as their roles in the space.
“Chat” tab:
If activated by one of the Space administrators, it allows you to have a chat room associated with the same members, who can then chat or launch web conferences from this room.
Creation of folders in Collaborative Spaces
Unlike Collaborative Spaces, a folder does not have a notion of members. It is intended to classify the various contents/files in Spaces. All members of a Collaborative Space see and can access folders (Space Administrators and Contributors can create folders in the Space). To learn how to create a folder, please refer to: File Explorer
Creation of Users / Userlists / Contacts listing
User creation form
On the main menu bar, click “+”, then “User”. You will then be redirected to the user creation form. You must fill in all the required fields (marked with *) and you can fill in other suggested fields (see also section: “User Profile Page”).
Each Space Administrator can create a new user that they will then link to that Space (and others if needed and if they are the Administrators).

See “Creation of a User in a Space/Group”
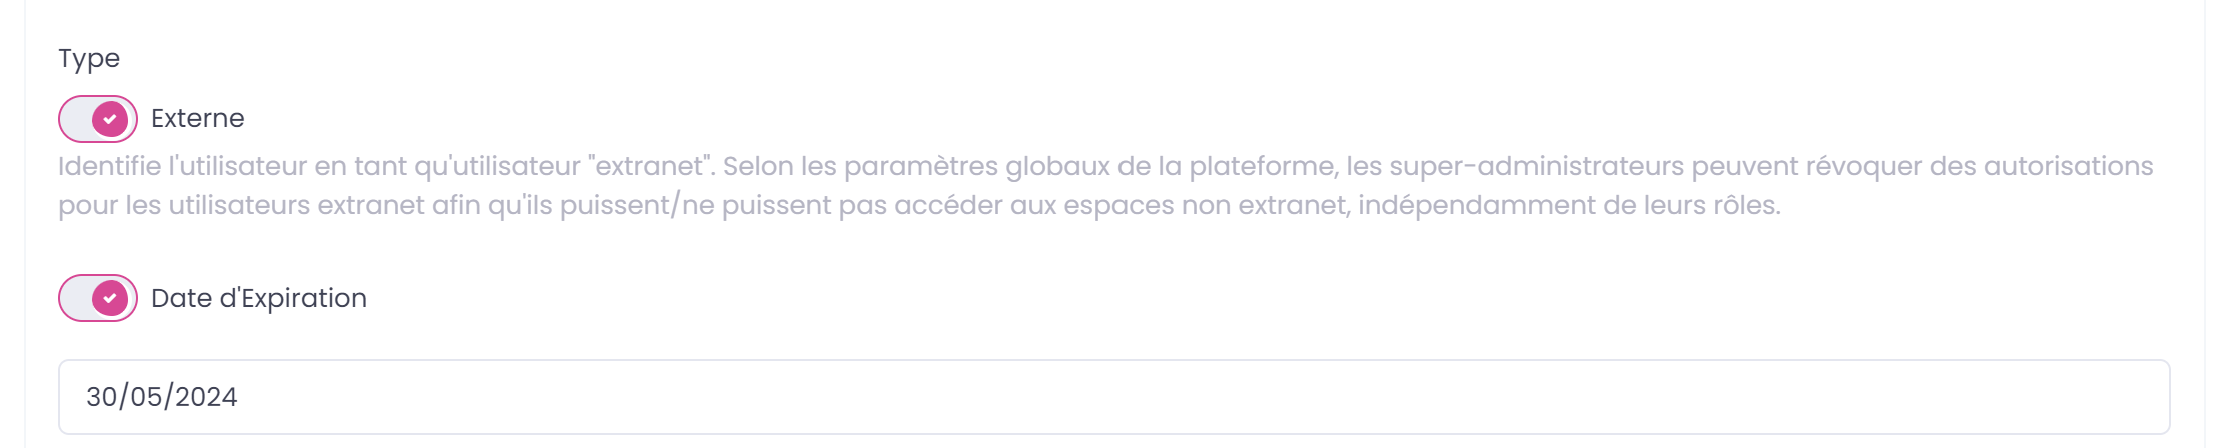
Apply an expiry date to an external account
For the User Creation Validation option, please refer to the section “GoFAST Administration / User Support/Configuration User Creation Validation”
To set an expiration date for an account, this account should be “External”.
To assign an expiry date to a new account, in the profile configuration, under “Permissions and profiles”, check “Expiry date”, then enter the desired expiry date.
Import of Users from AD/LDAP
To find out how to create users in bulk via an import from the internal directory of your Organization/Company, please refer to the section: “User-Support profile”)
Creation of a Userlist
Userlists facilitate mass and automated management of Collaborative Space members and their roles. So when GoFAST users are added to a list, they automatically become a member of all spaces associated with that list. To create a list, via the quick access bar (main menu at the top) click on “+”, then “Userlist”.

You are redirected to the form and just fill in the 4 displayed fields :
Name of the list,
Member list (enter at least 3 characters of a user’s last name/first name for suggestions),
Administrator list
Description
Note
The creator of a userlist becomes its administrator. To learn more about userlists, please refer to the section: Management of Userlists.
Caution
The administrator of a list does not have access to the spaces associated with that list. Its role is to manage the members of the roster. However, it is possible to be both an administrator and a member of a list, the two roles being decorated from each other.
Creation of contacts listing (non-user)
Creating a contact allows you to save professional information of external employees. This allows you to add him to GoFAST meetings, make it easy to sign documents and share by email even if he is not a GoFAST user.
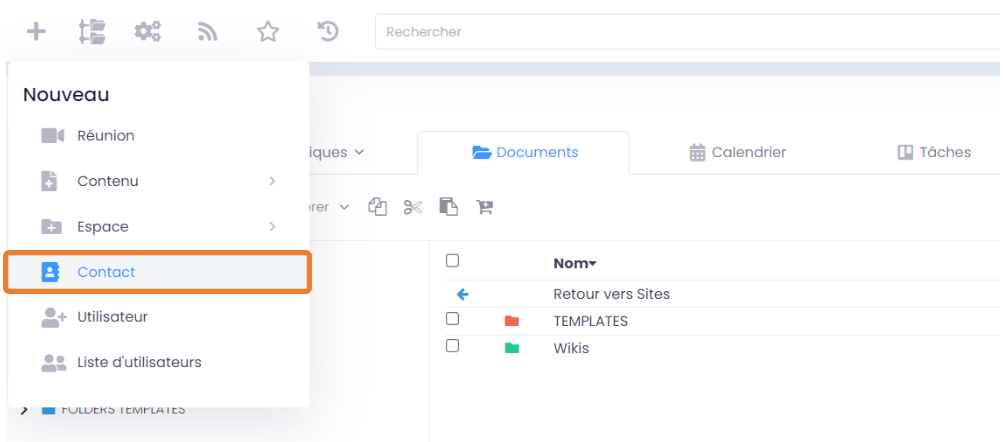
You will be redirected to a form asking you to fill in the following information :
Family name
First name
Email
Mobile
Entity
How to View a Document/Content and related information
In addition to being able to view the document or other content, there are several features such as: refresh the overview, workflows and tasks, full page, contextual actions (browse, modify, download, etc.).
Access to a Document/Content
GoFAST provides access to a document or other content through a variety of means. As soon as content is mentioned (title of the content), just click on it to get to the page of the preview and related information. A document/content can be accessed from:
the activity feed
the dashboard
search results
a link from another document
access to these last seen contents
access from favorites
the document cart
file explorer (double click to do)
list of tasks/workflows on documents
Chat (if a link was shared)
Comprehension of a document page/content
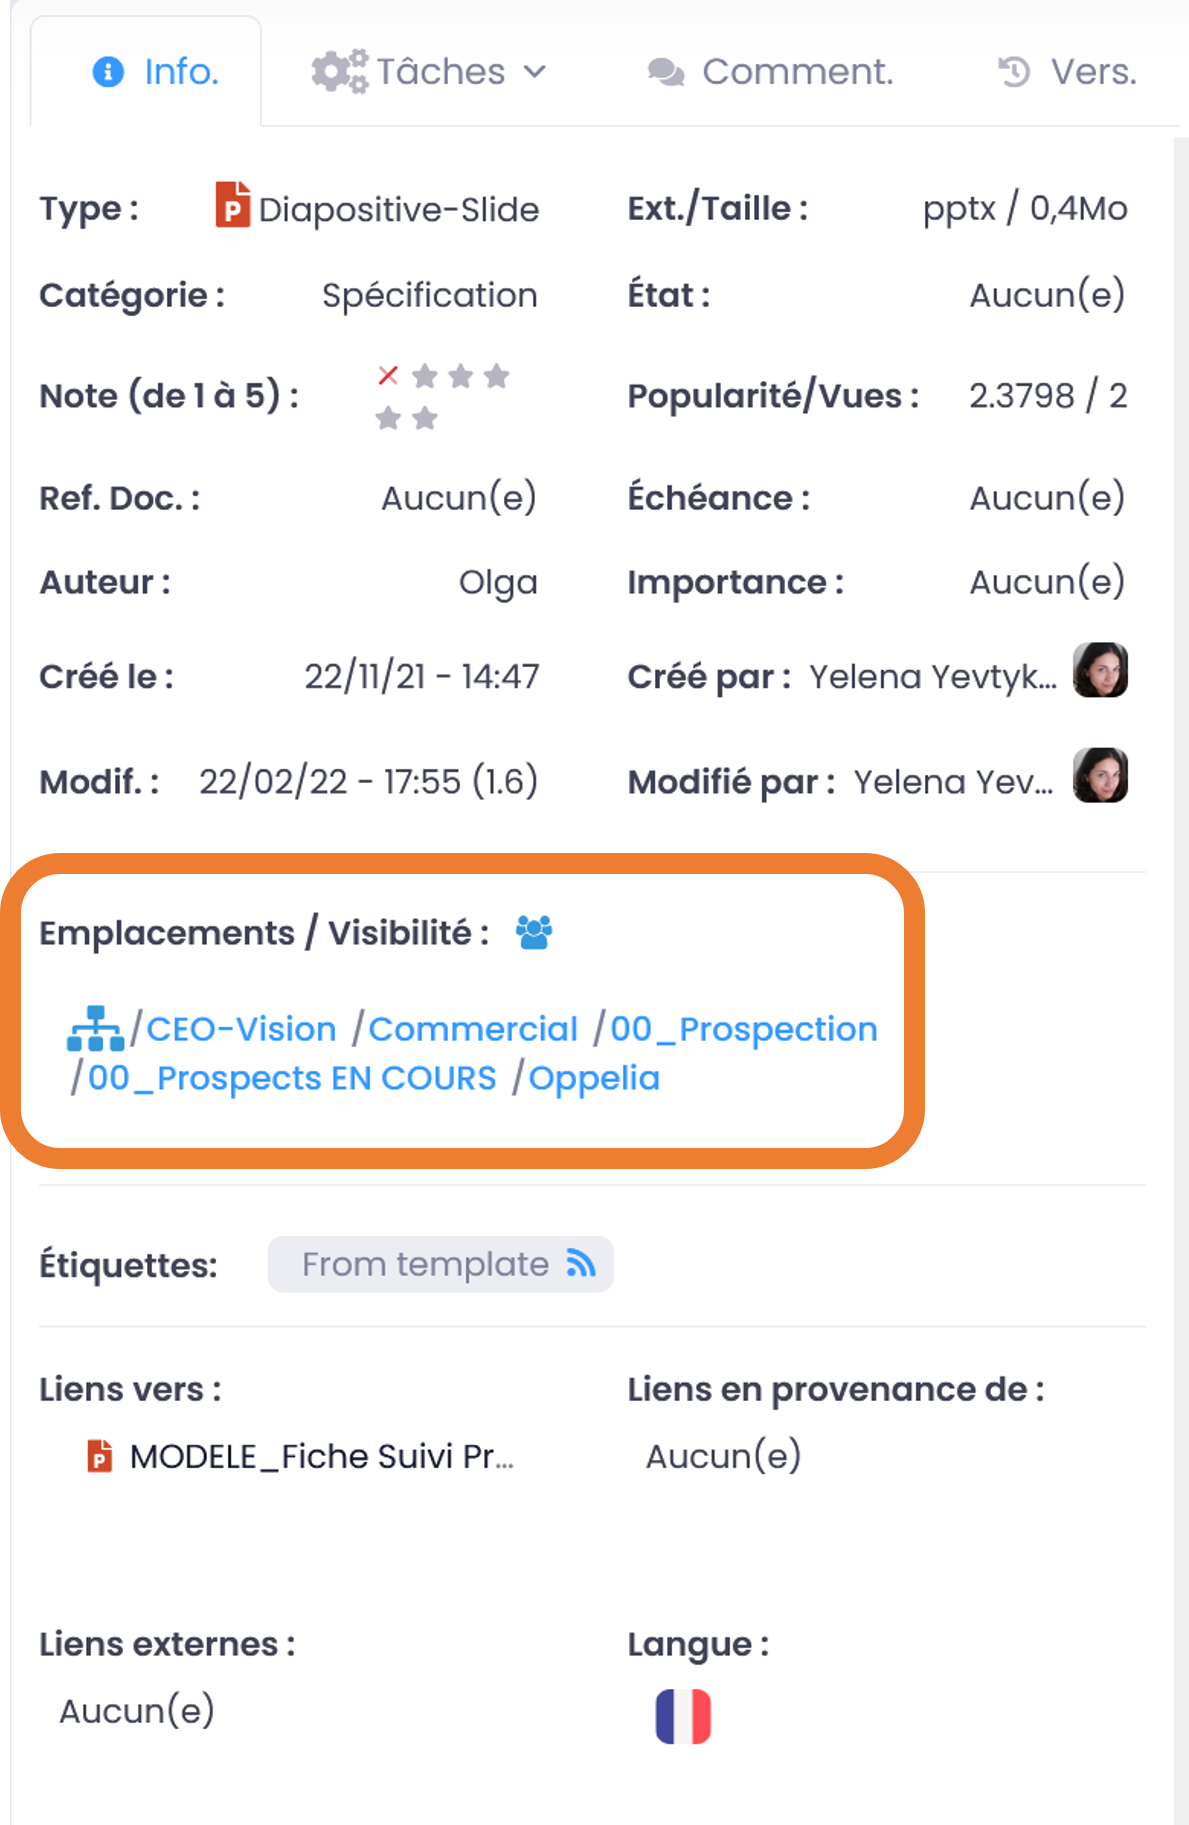
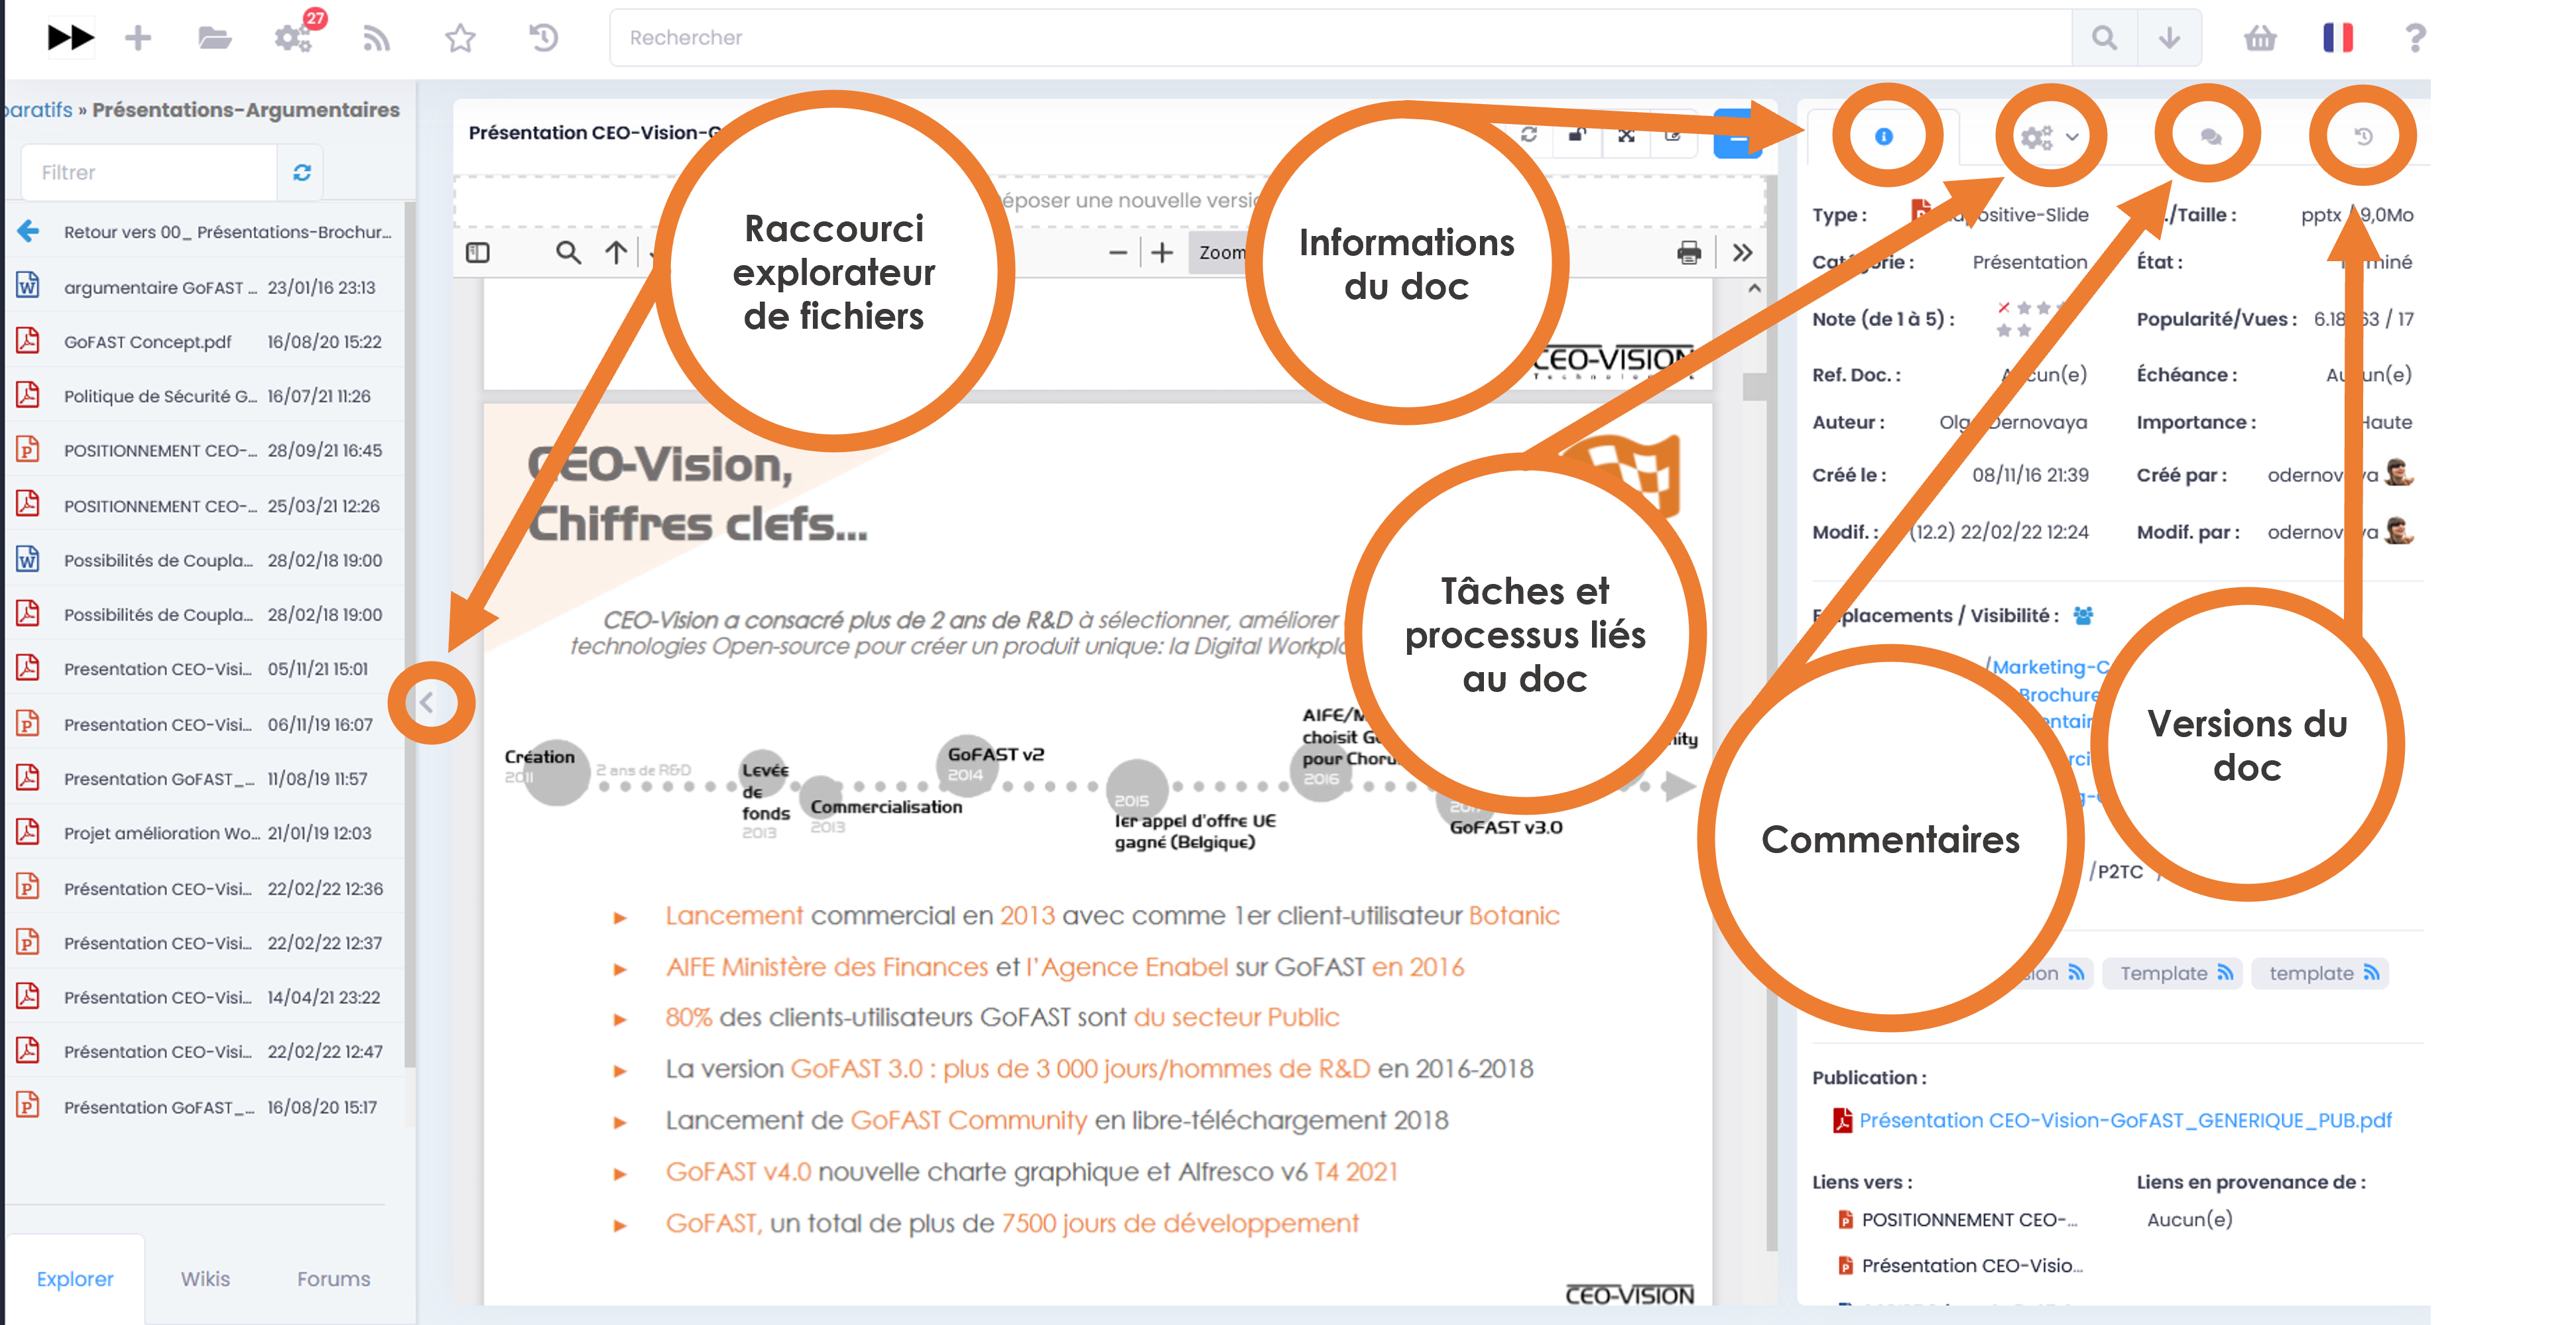
On the page of a document/content, you can view it and access several features directly related to the type of content and your rights to it. In the central area, the preview of your document allows you to check the content at a glance and see if it is the right document. Above the preview, there is the document title and the location(s) where the document is located in the tree structure. On the right there is all the information (metadata) related to the document: type, format, category, state, language, location(s), history, versions, etc.
You can unfold the hidden block on the left (quick access to the file explorer without leaving the document page), to see the other documents that are in the same location.
But it is also possible to change the title metadata. To do this, unfold the title using the chevron at the end of the title. Then enter the title you want in the ‘title’ field. This title will also be replicated in the documents.

You can access document-related features via the “Hamburger” menu (contextual actions menu: 3 horizontal bars, in the right corner above the preview).
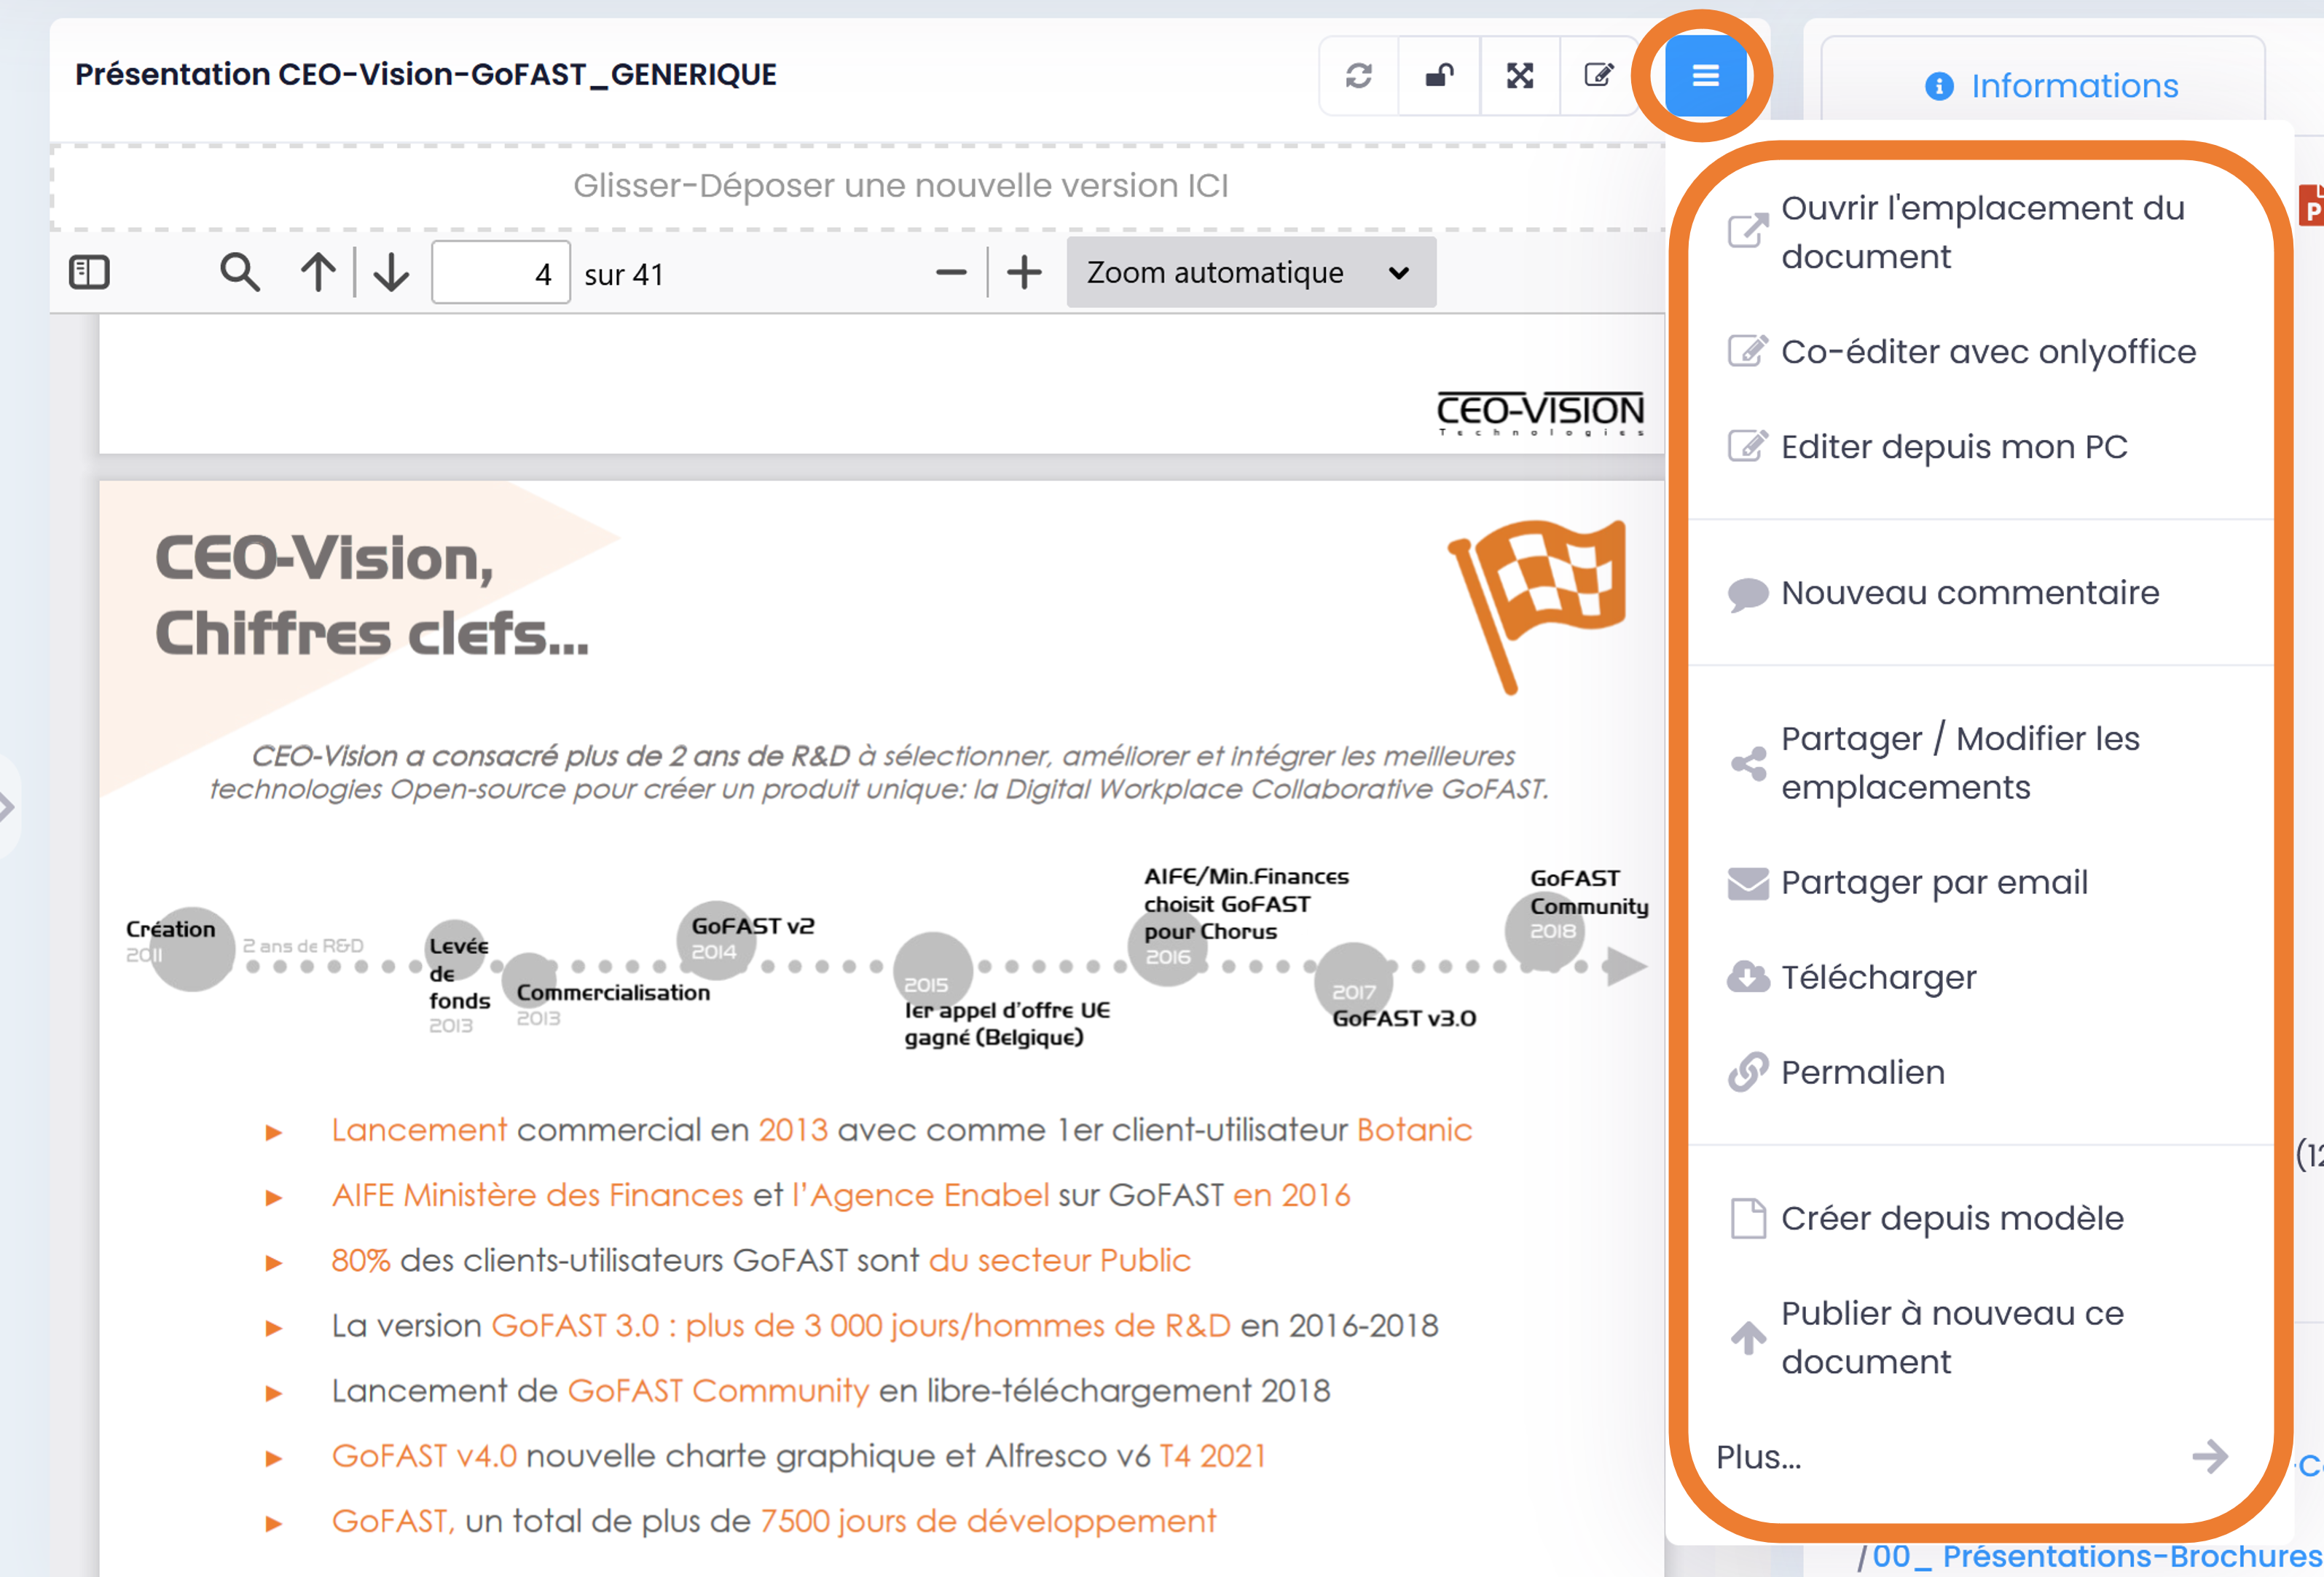
For the list of the various actions possible from this menu, please refer to the section: «Contextual actions menu / Hamburger Menu»

Preview/Overview area (including title +)
The preview of a file is used to view the file (document, image, video…) directly in the browser, without having to open it for editing with an application on PC or the integrated Collaborative Suite.
Note
Some file types (MS-Office or LibreOffice) are displayed in PDF format in this preview area. On-the-fly transformation from MS-Office to PDF formats is performed by a Libreoffice (Community) or OnlyOffice (Enterprise) GoFAST system. Be careful, the document itself does not change format, this on-the-fly transformation is only useful for previewing. Spreadsheet files are displayed either in PDF or directly via OnlyOffice (depending on the configuration of your platform).
The main previewed formats :
Formats |
Comments |
|---|---|
doc, dot, ppt, pps, xls, eml, vsd, odg, msg |
converted to PDF |
xlsx, xlsm, xls, ods |
directly displayed onlyoffice |
ods |
converted to PDF |
DWG, IFC |
can be previewed |
jpg, jpeg, png, gif, bmp, webp |
directly displayed by the browser |
svg |
directly displayed by the browser |
mp3 |
directement lu dans le navigateur (streaming audio) |
mp4, webm |
directement lu dans le navigateur (streaming vidéo) |
directly read in the browser |
|
html |
directly displayed by the browser |
Note
other formats can be previewed
Above the preview of the document, you see a toolbar. This allows some features such as magnifying glass, zoom, next page, etc.
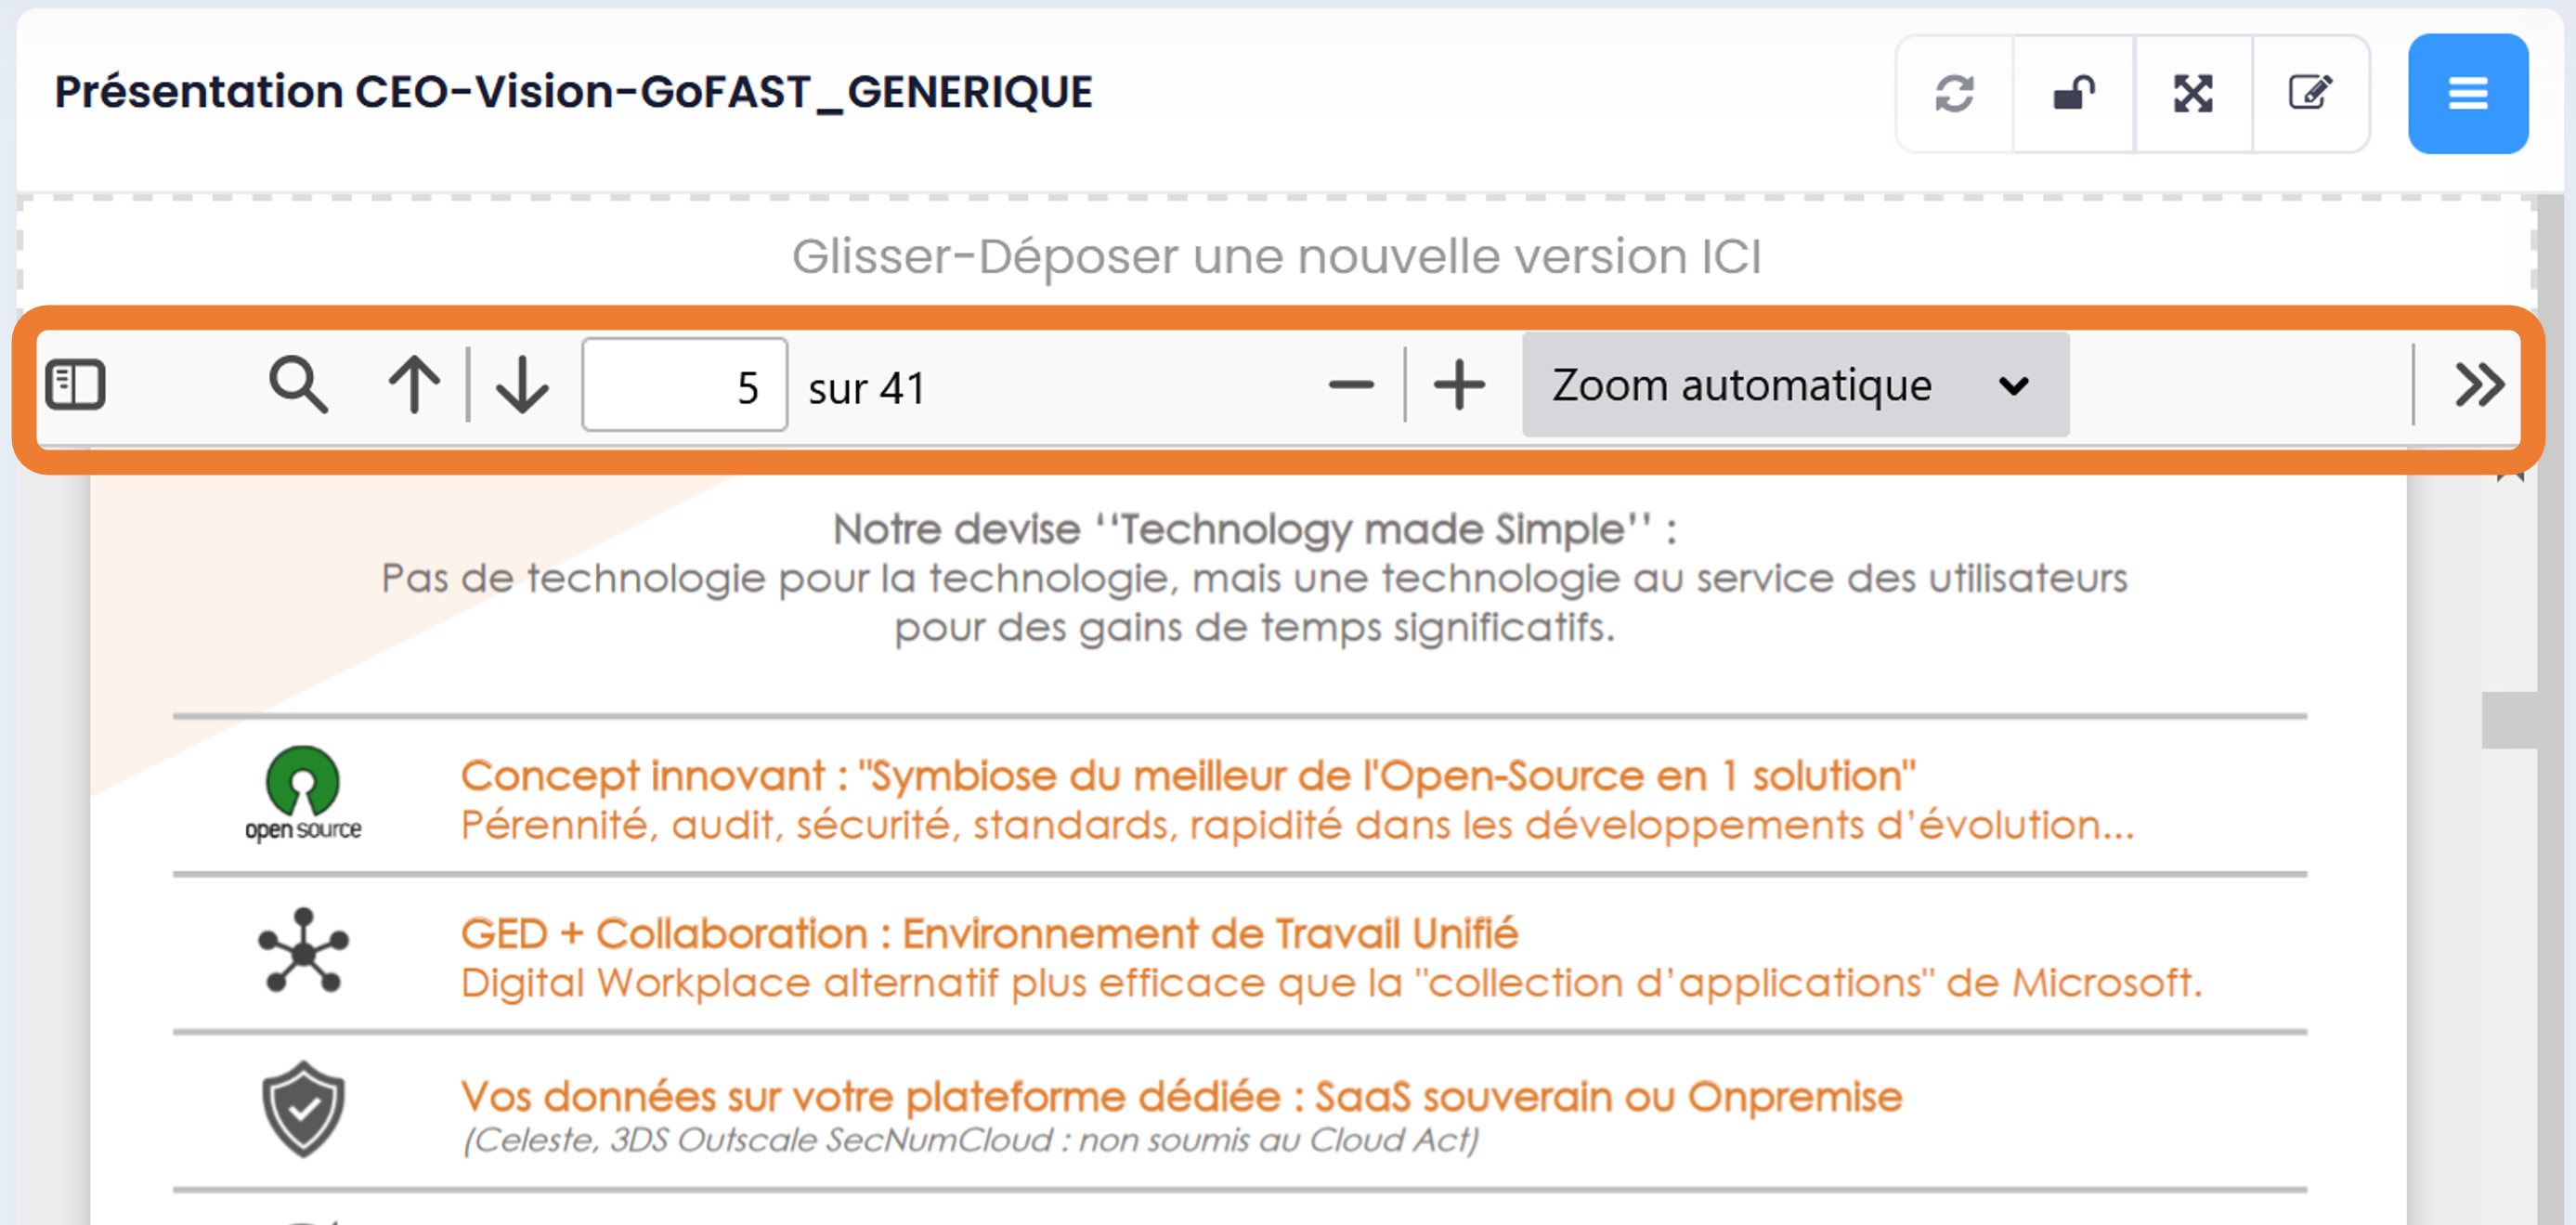
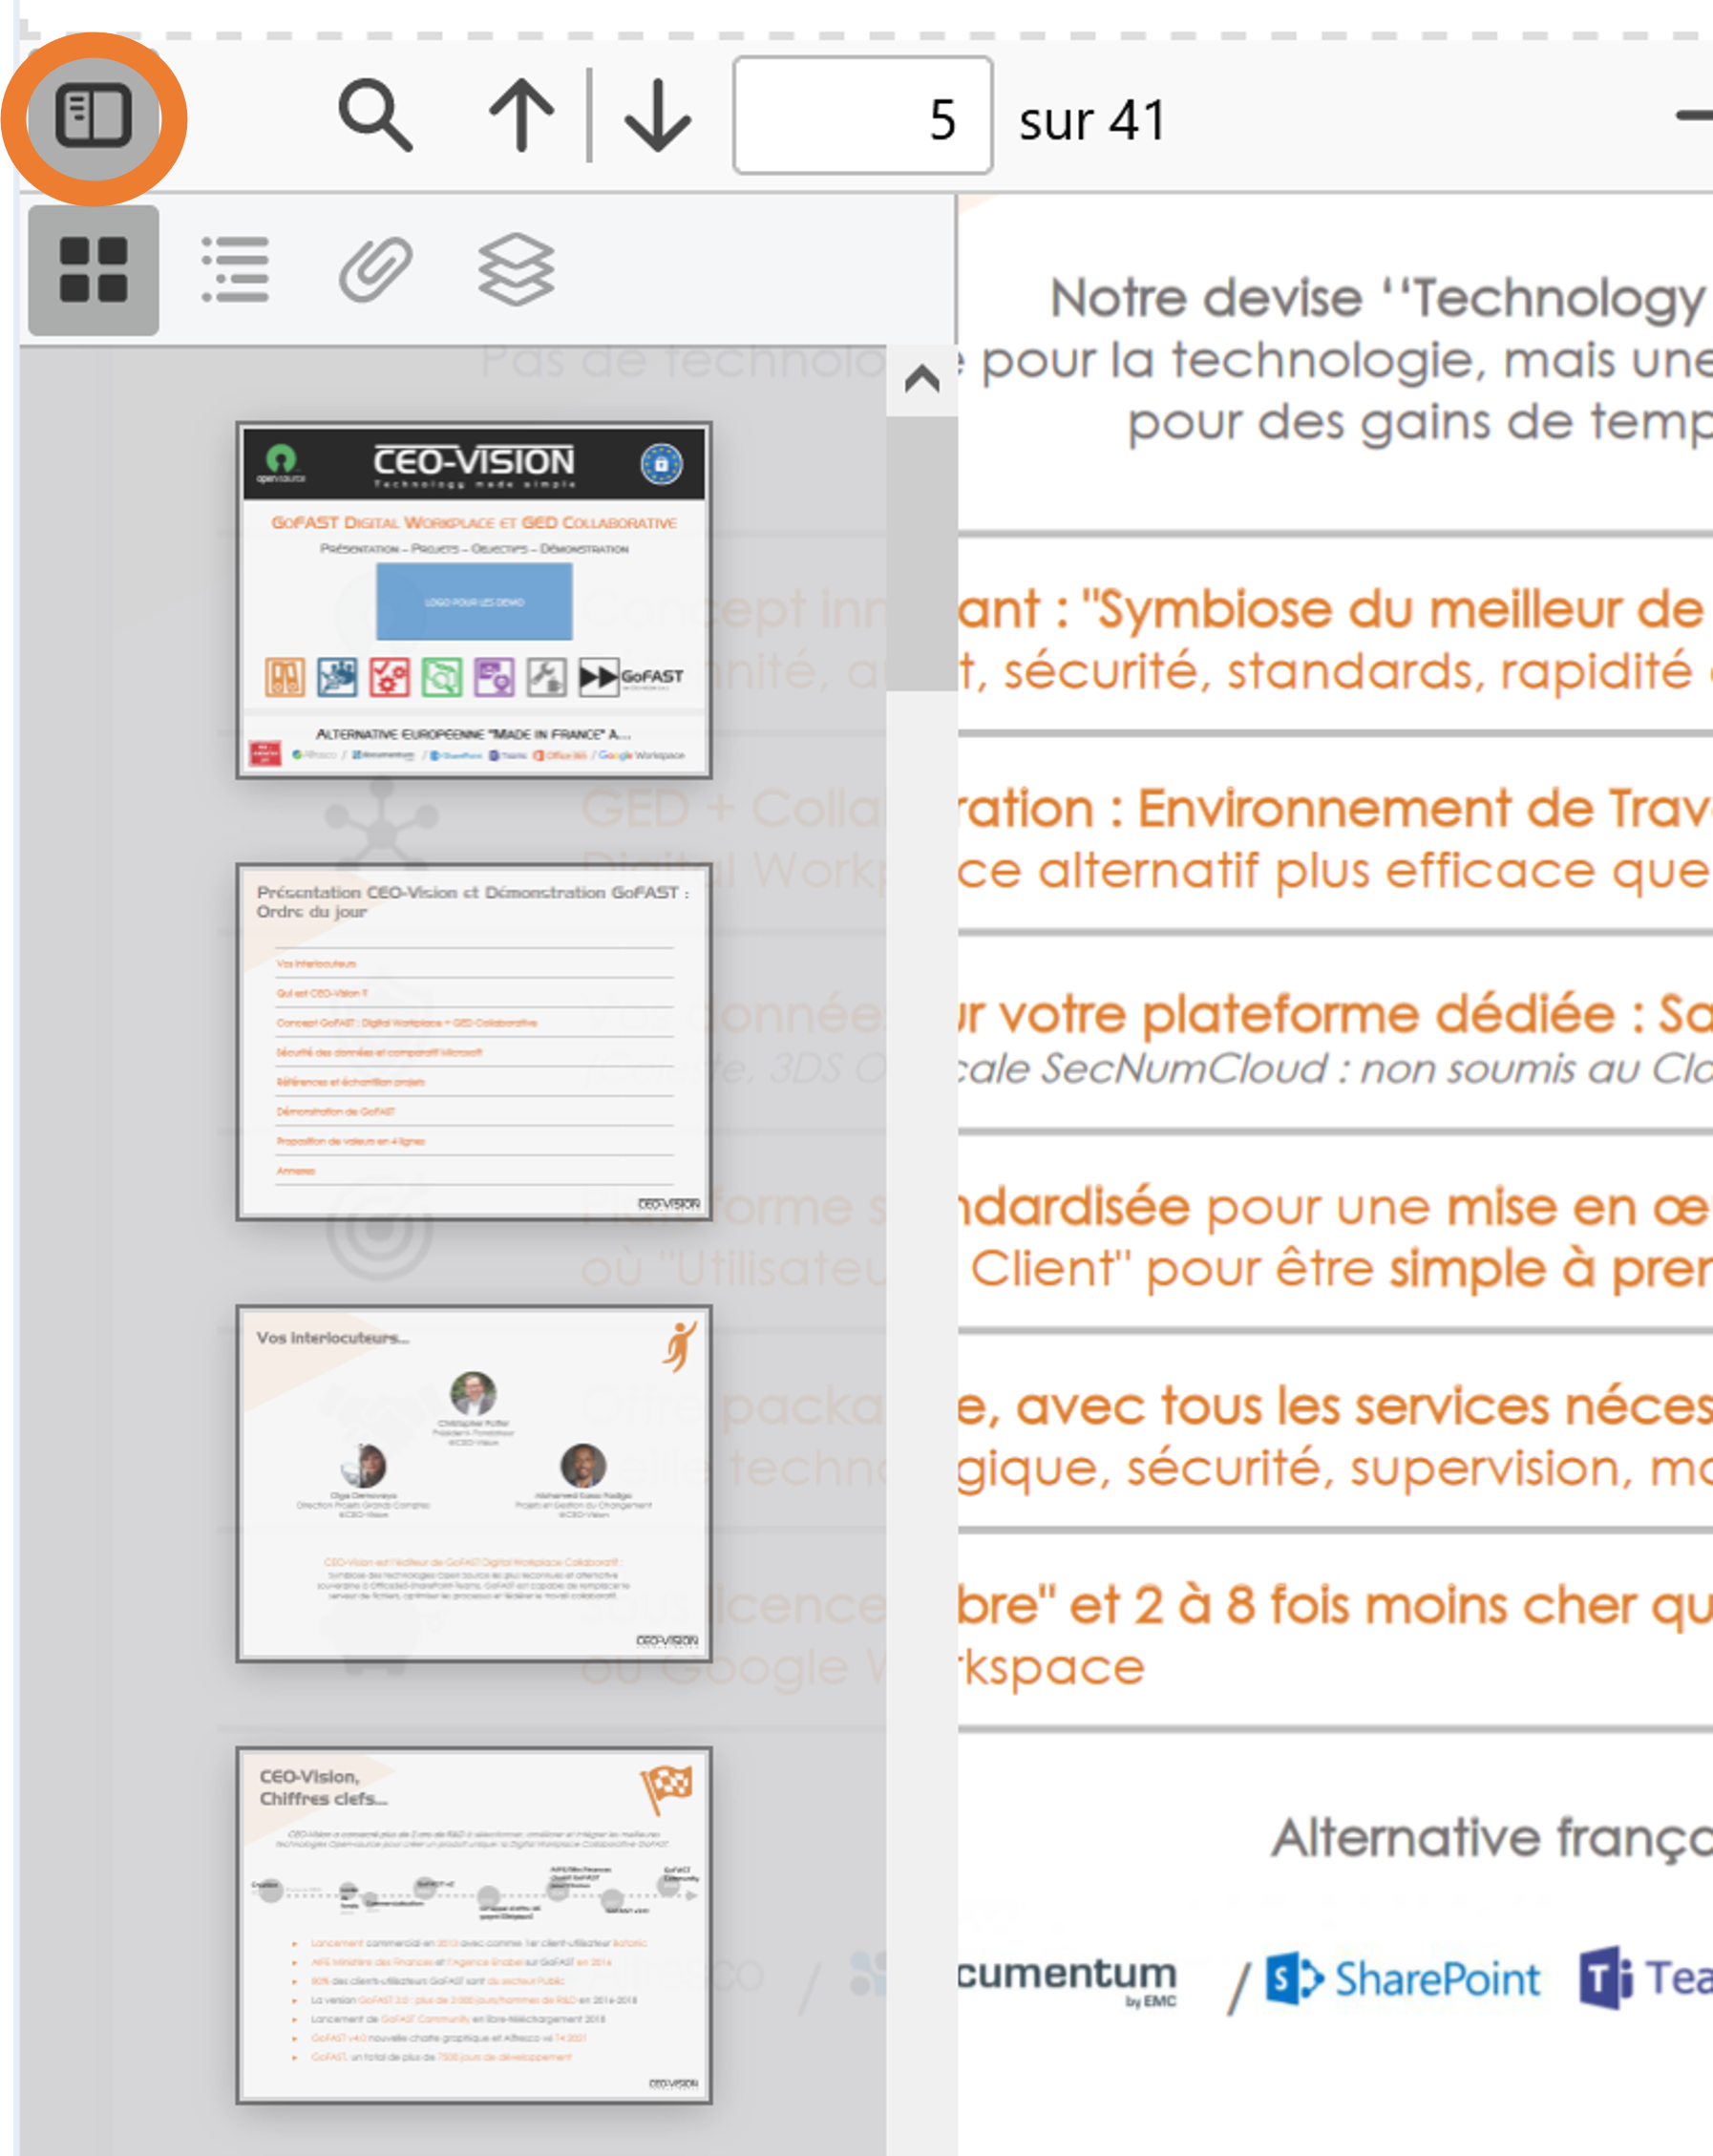
The first icon (grey square) “Toggle sidebar” allows you to see the “slides/pages” included in the document. You can go directly to the desired page. This same icon gives access to 3 other options «Show thumbnails», «Show document outline», «Show attachment»
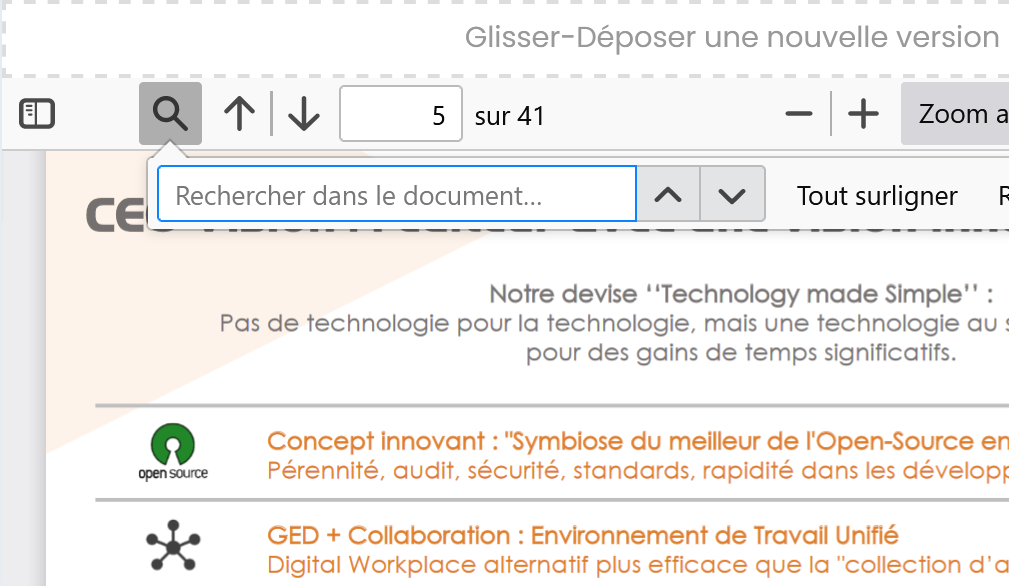
The magnifying glass searches for a word in the text (= Ctrl+F)
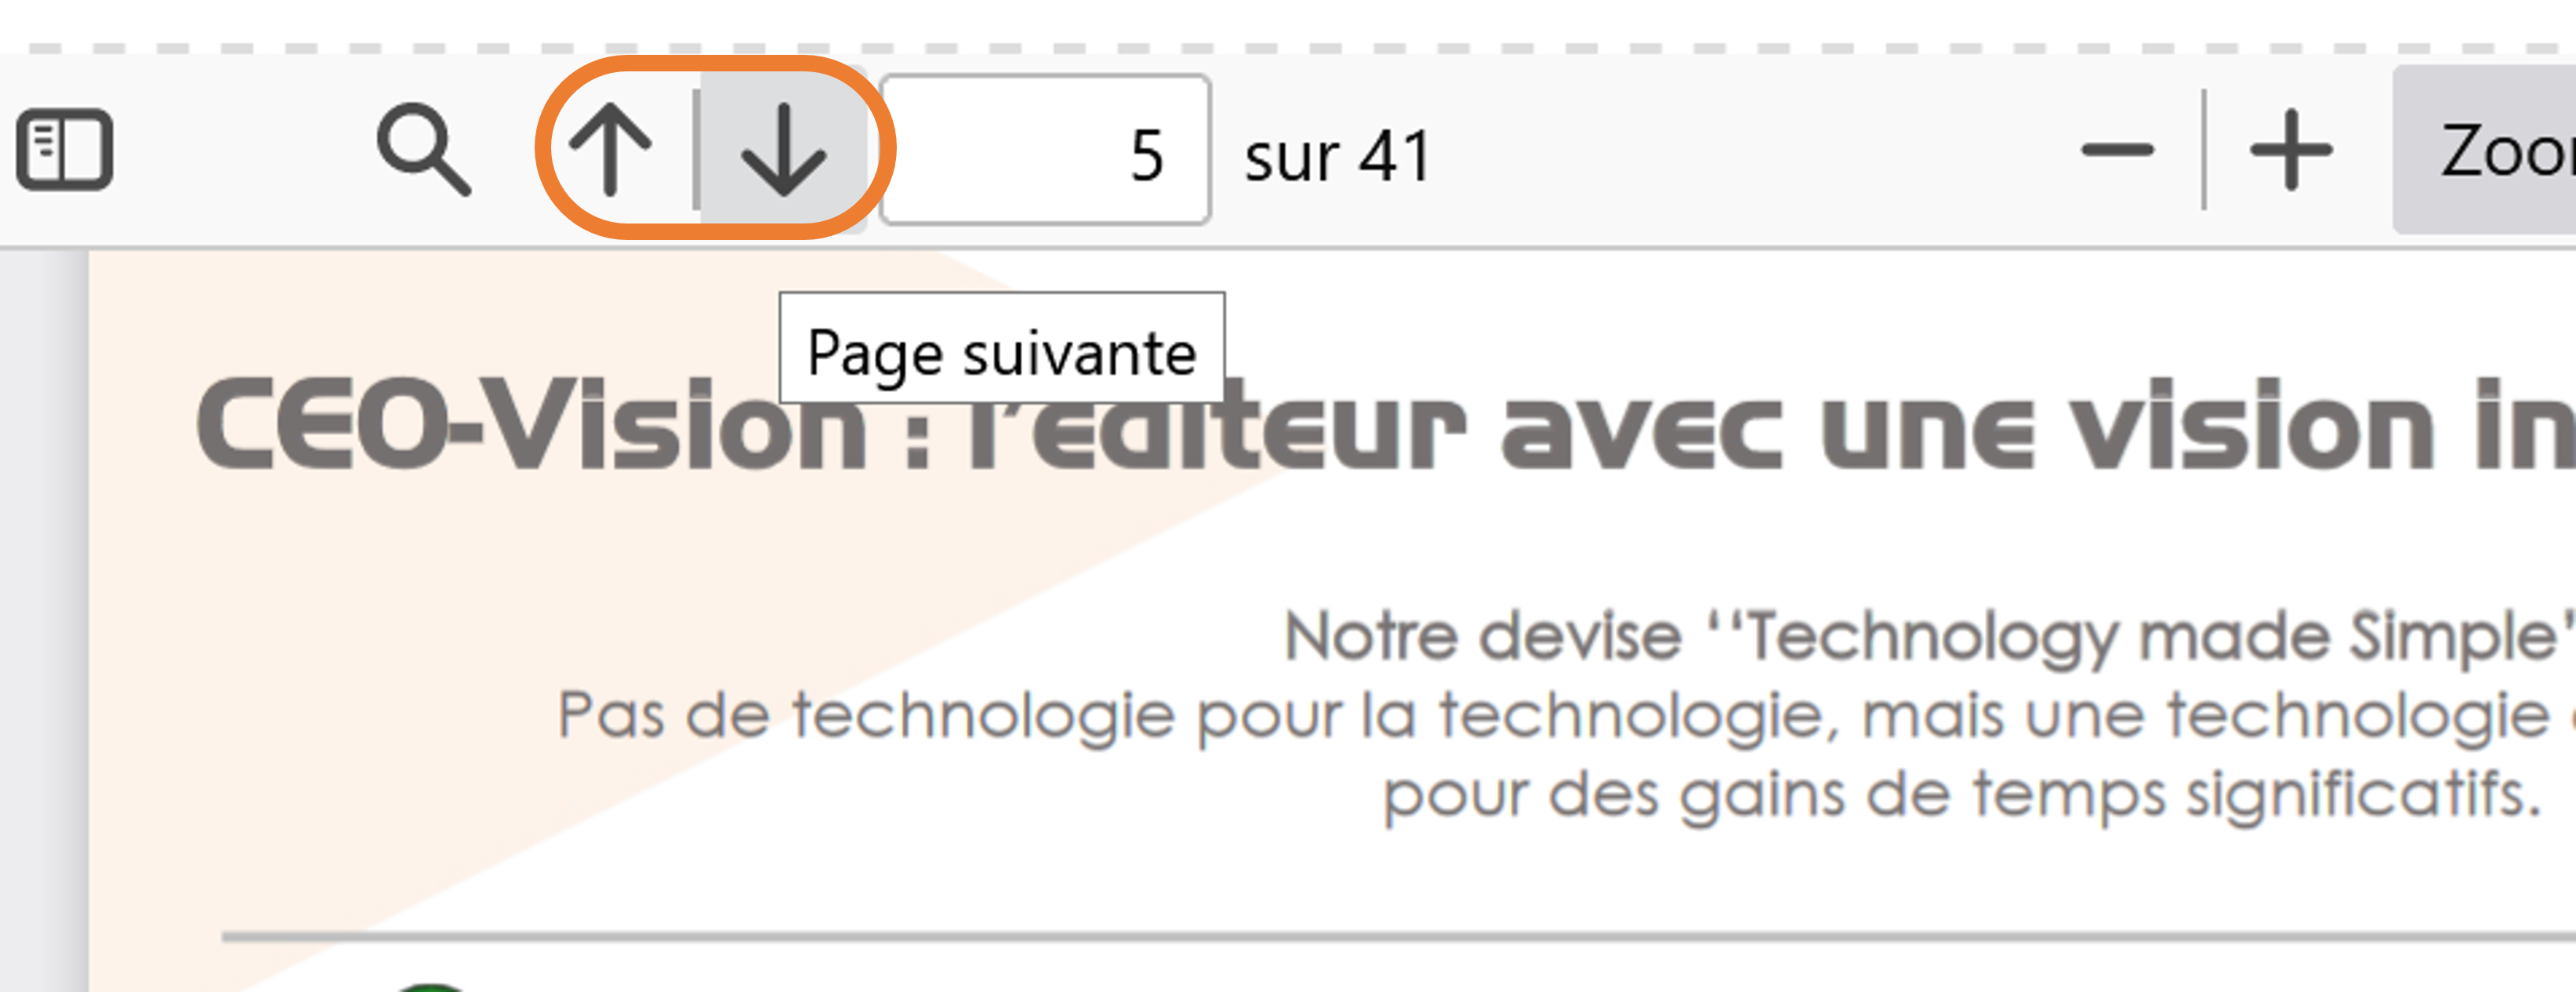
The up or down arrows allow you to go to the previous or next page
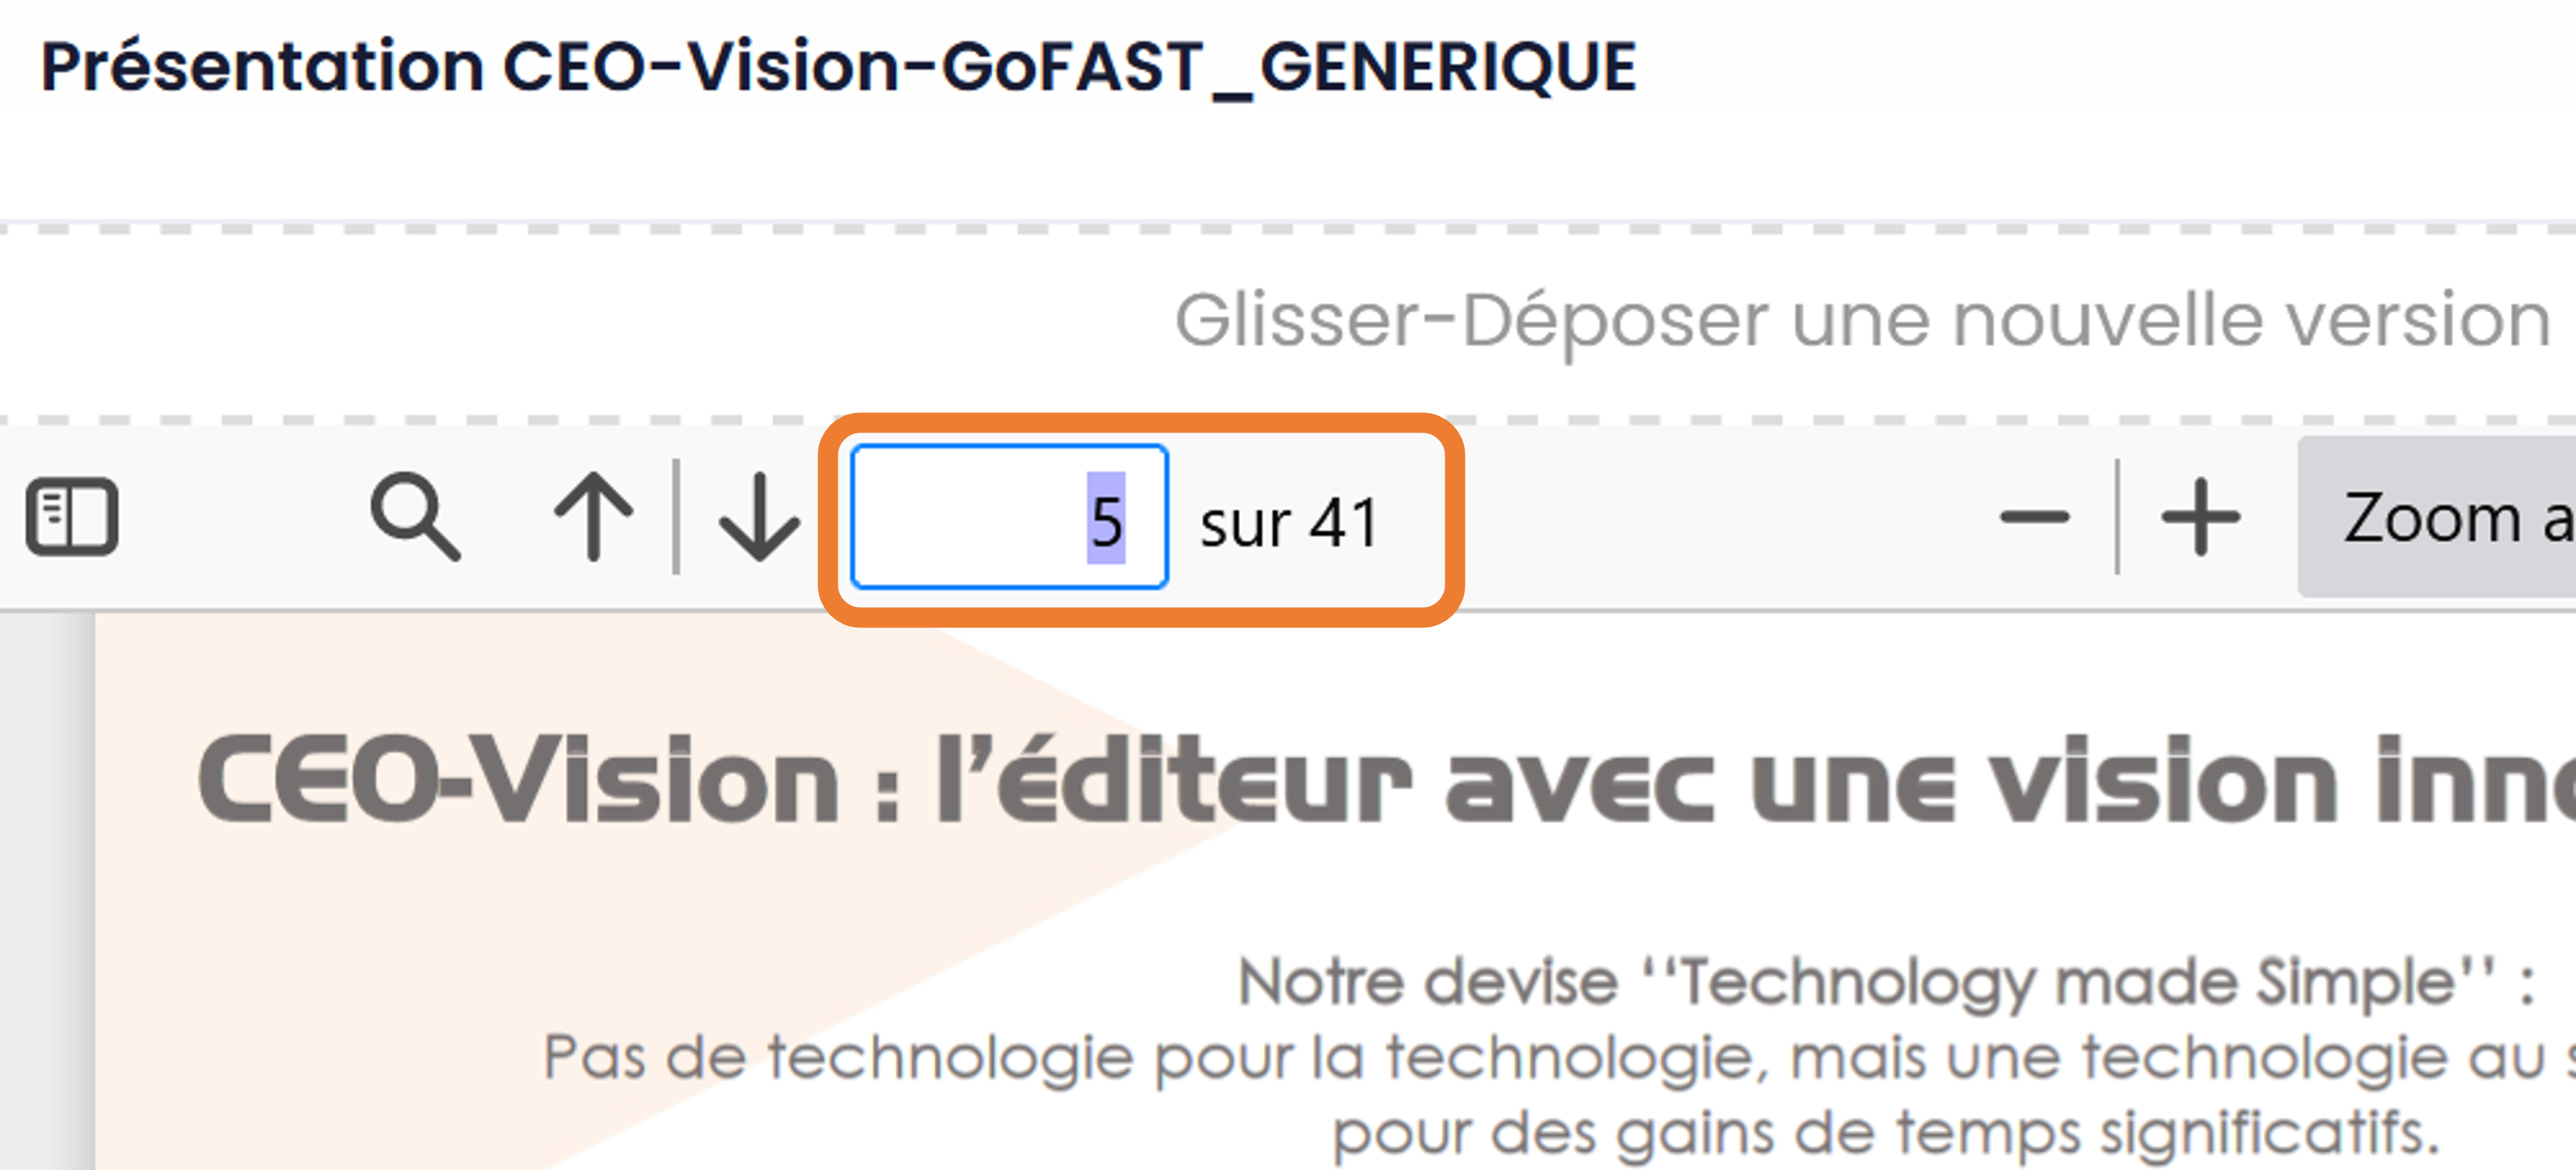
“Page” and the numbers show how many pages the document contains and you can change the number to reach the desired page.
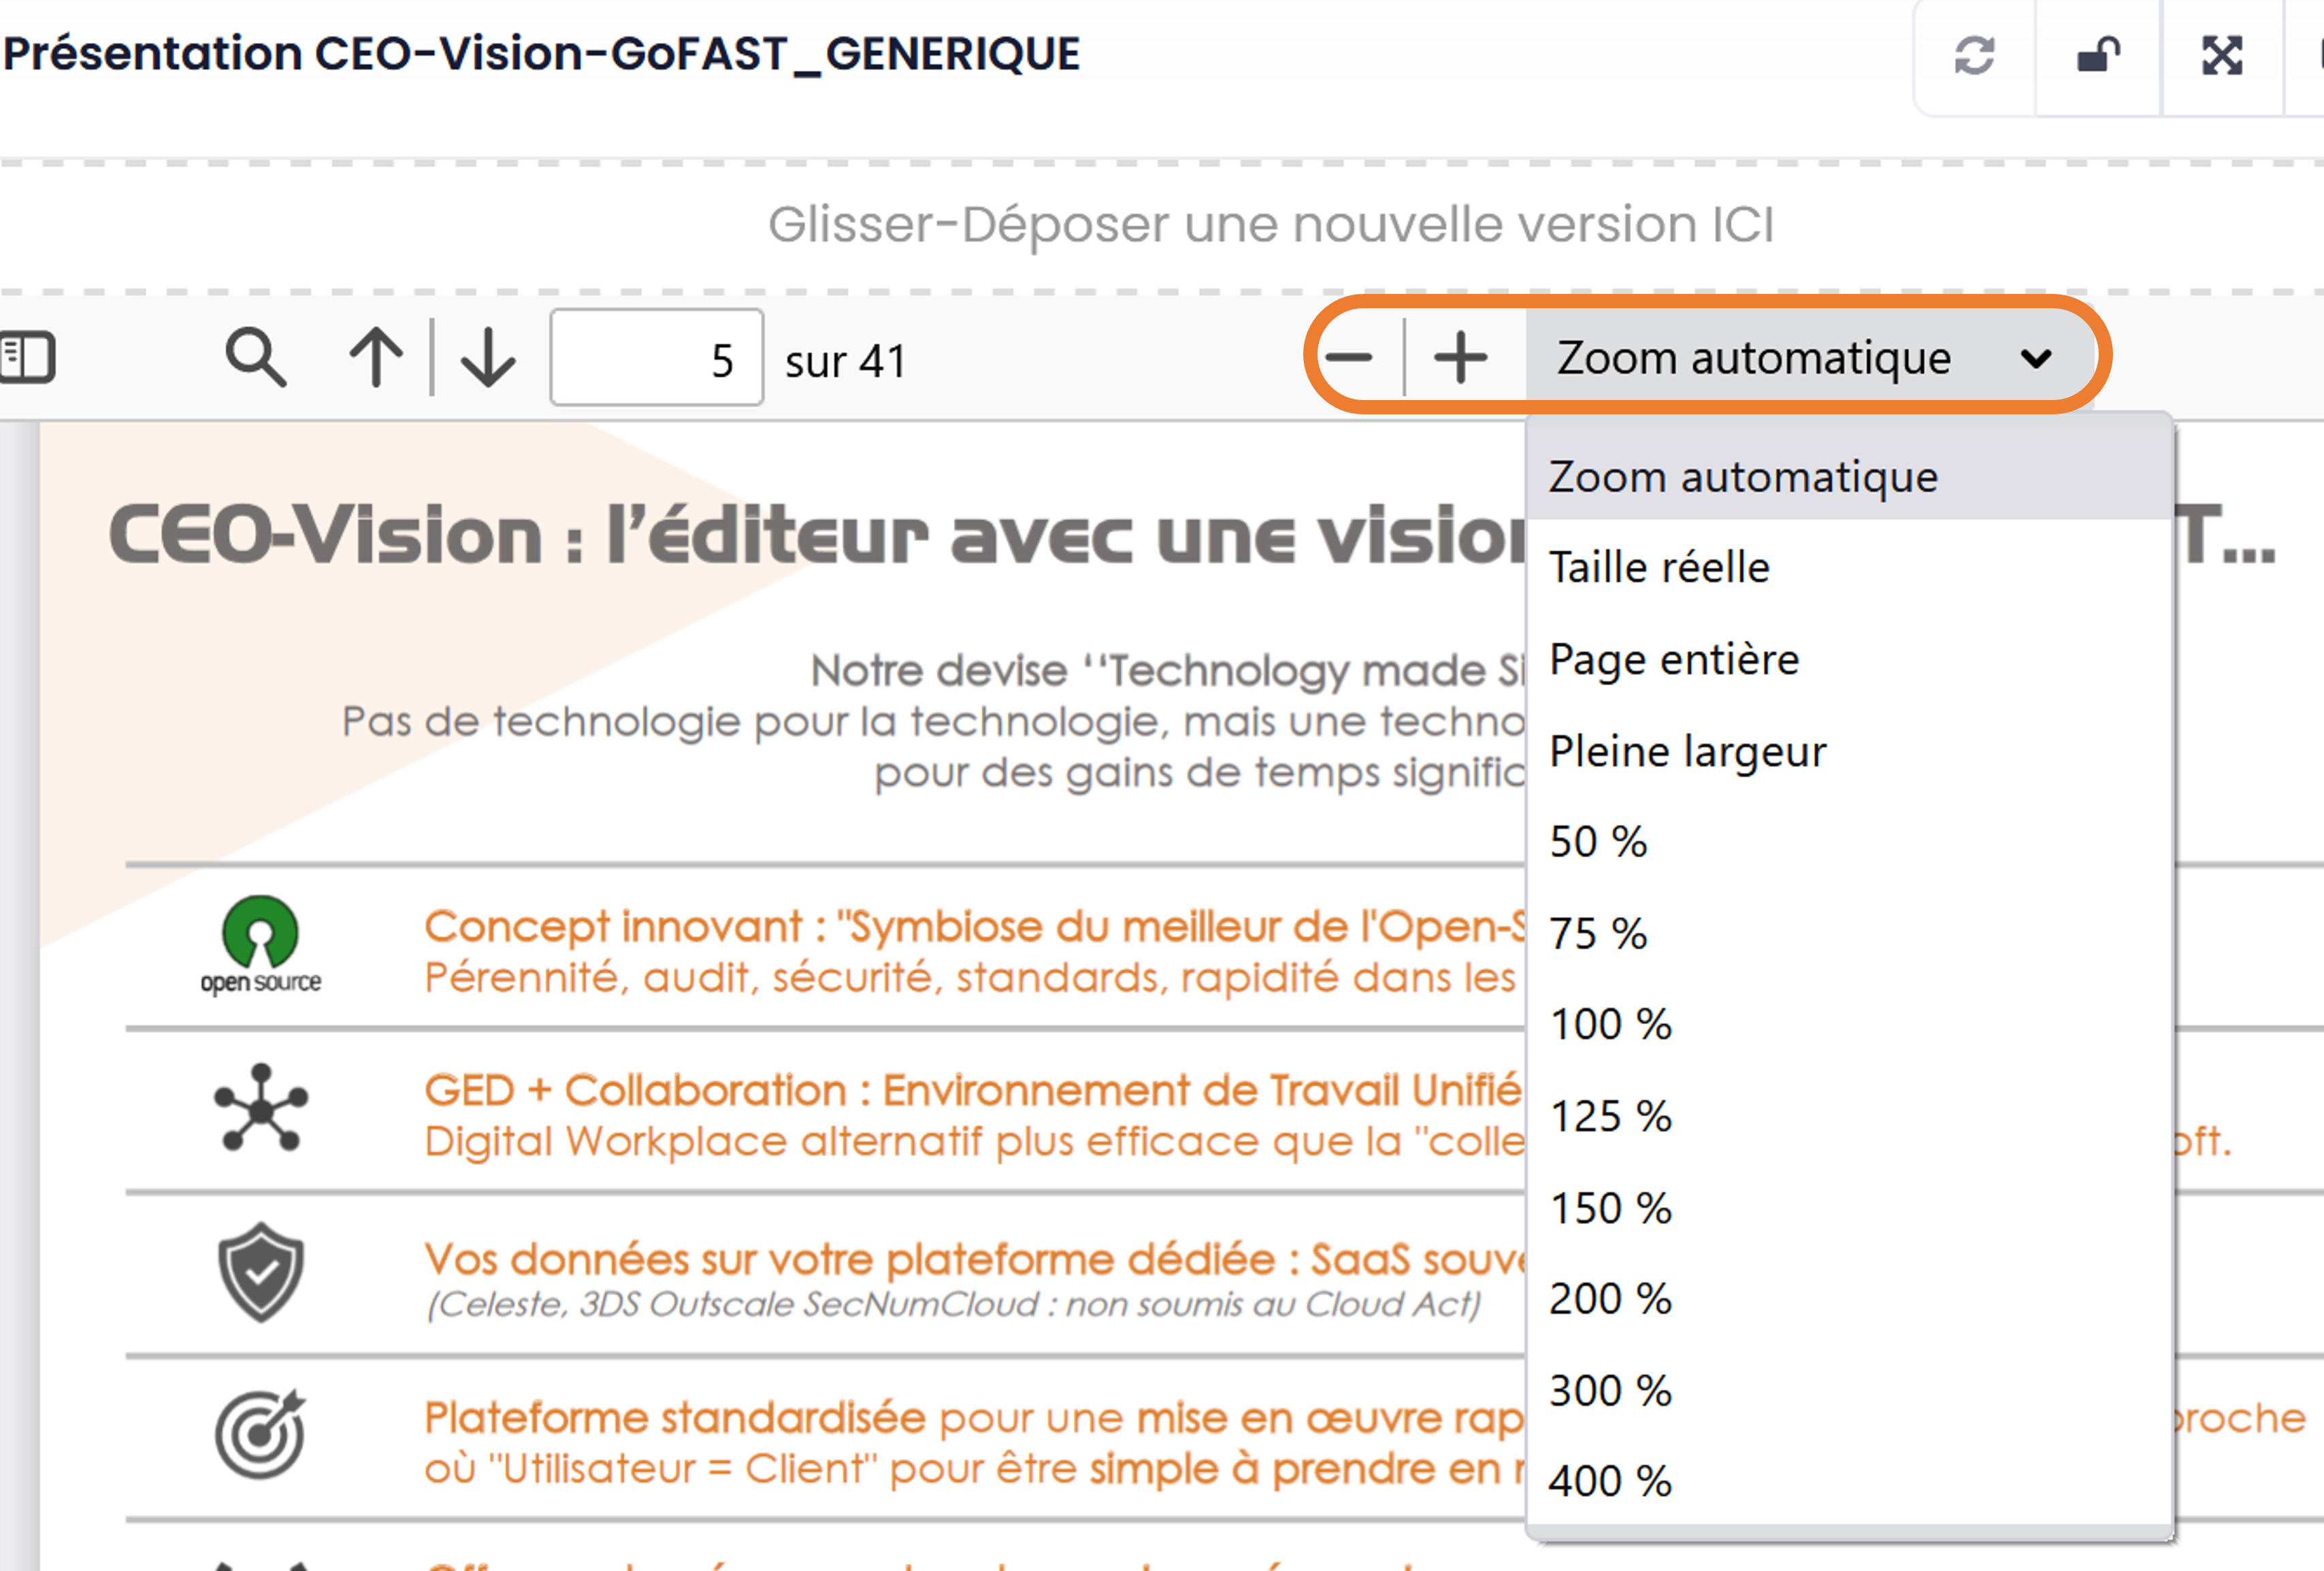
The “-” and the “+” allow you to zoom. And the “**Automatic zoom**” gives you predefined dimensions.
The “printer” icon allows you to download the document in PDF. You will find the link to open it in the lower left corner of your screen or at the top right of your browser (depending on the browser used). By default Windows classifies downloaded files in the “Downloads” folder (on your PC).
And finally, the last icon with 2 arrows to the right opens other options, including “Enable hand tool”, the little hand that allows you to move up/down in a PDF without using the cursor.

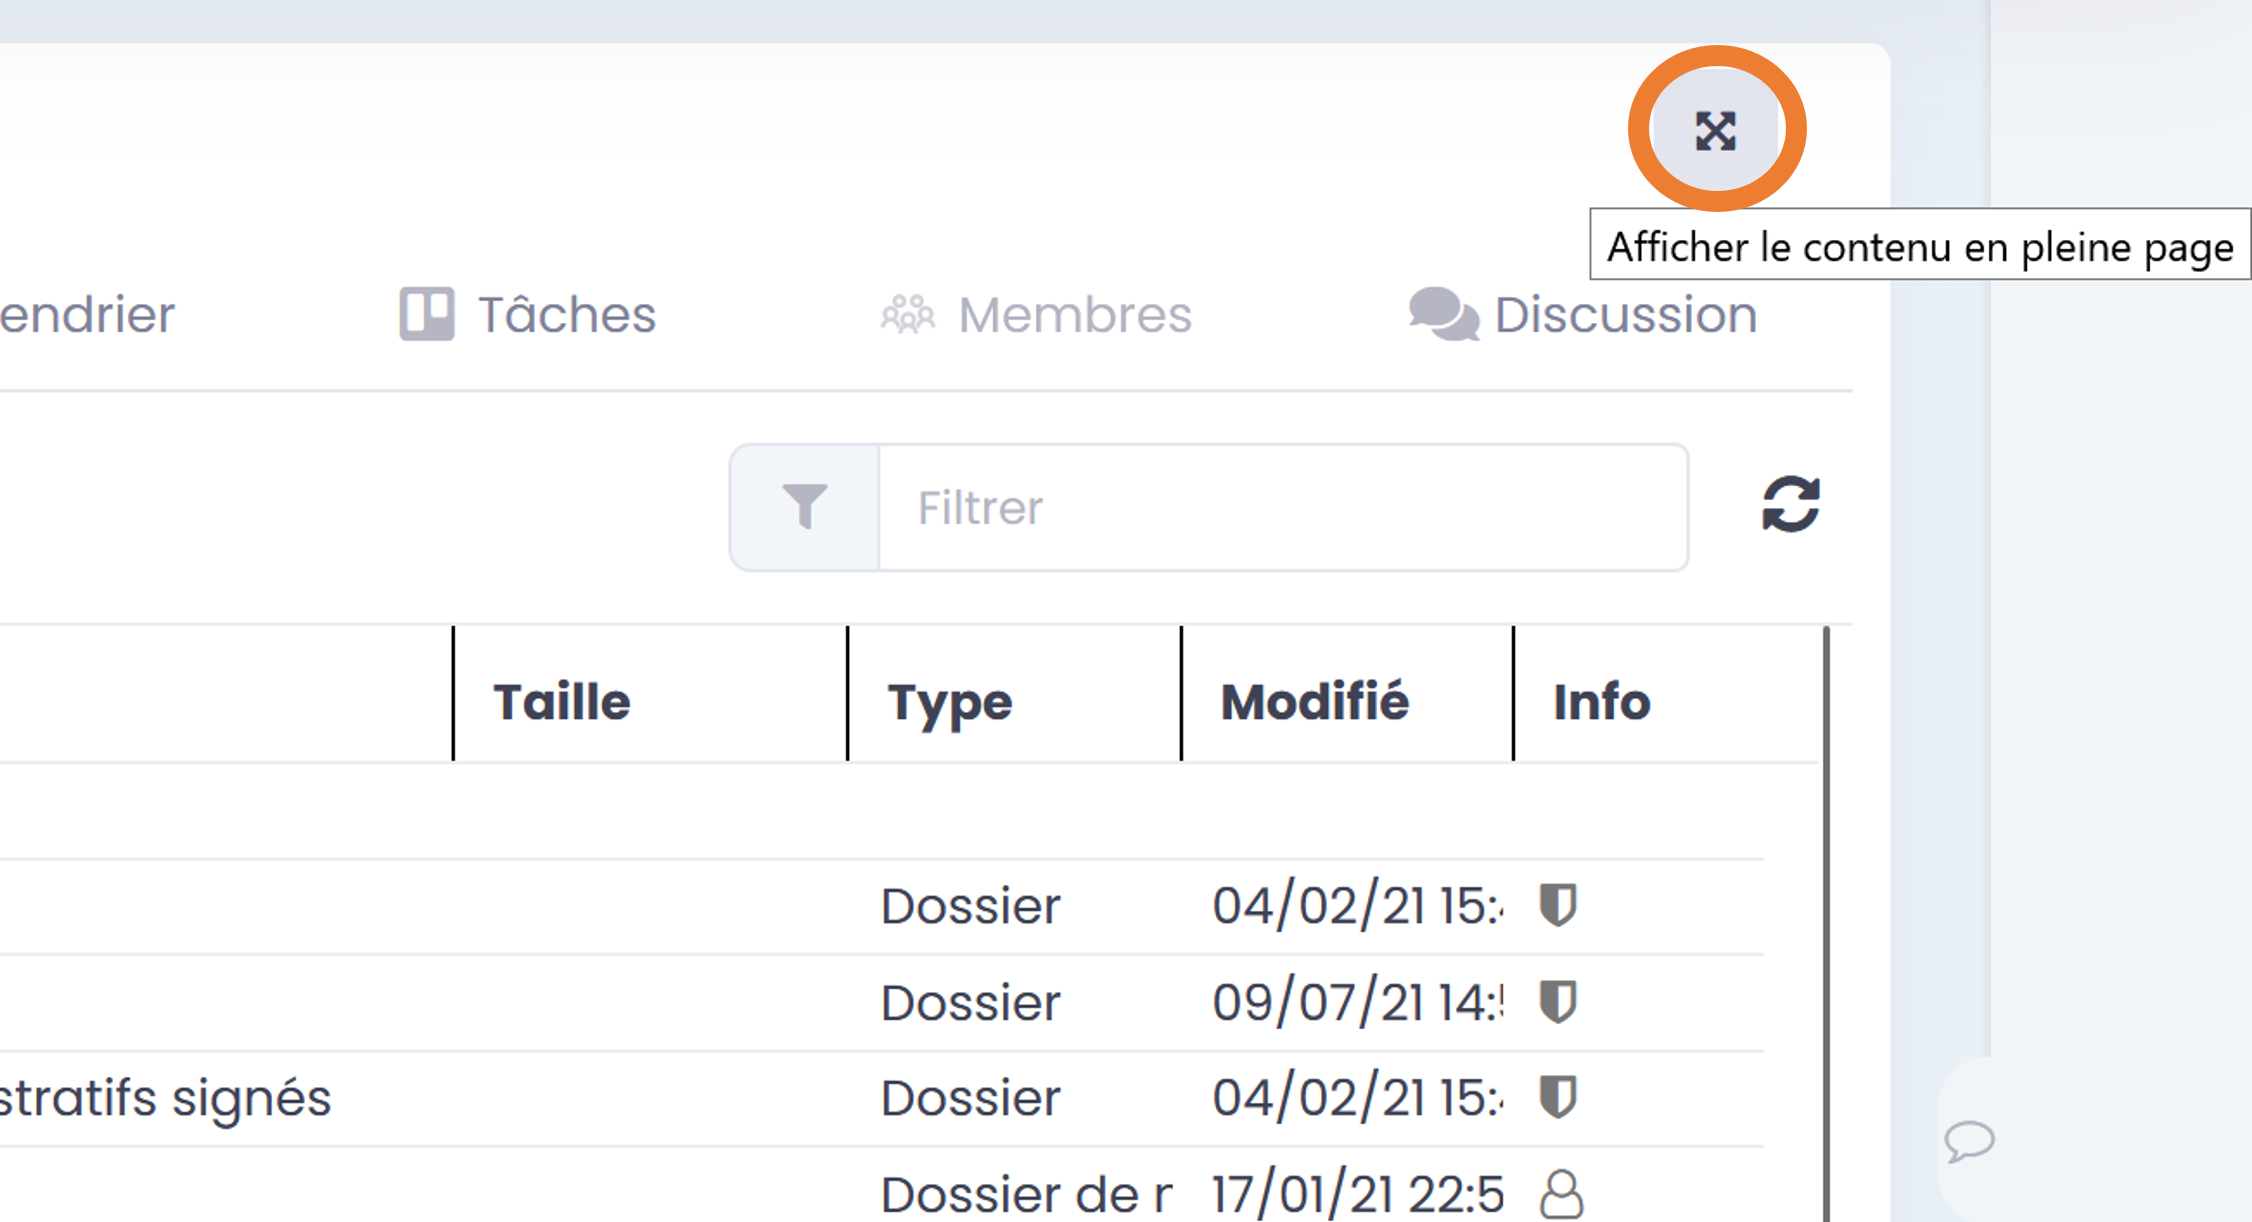
Set content to full windows size
It allows you to hide all the data around the preview and only have the document page in full screen.
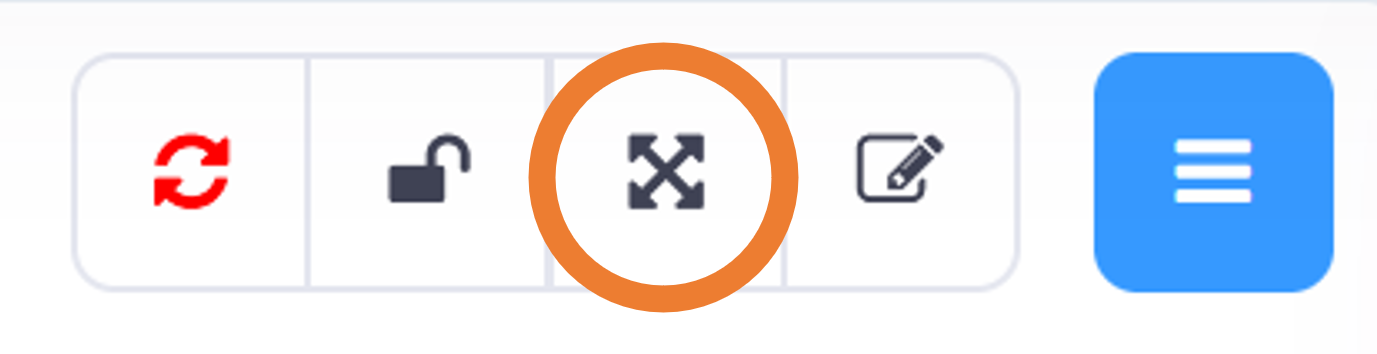
In order to return to the normal info preview, just click the two-arrow logo.

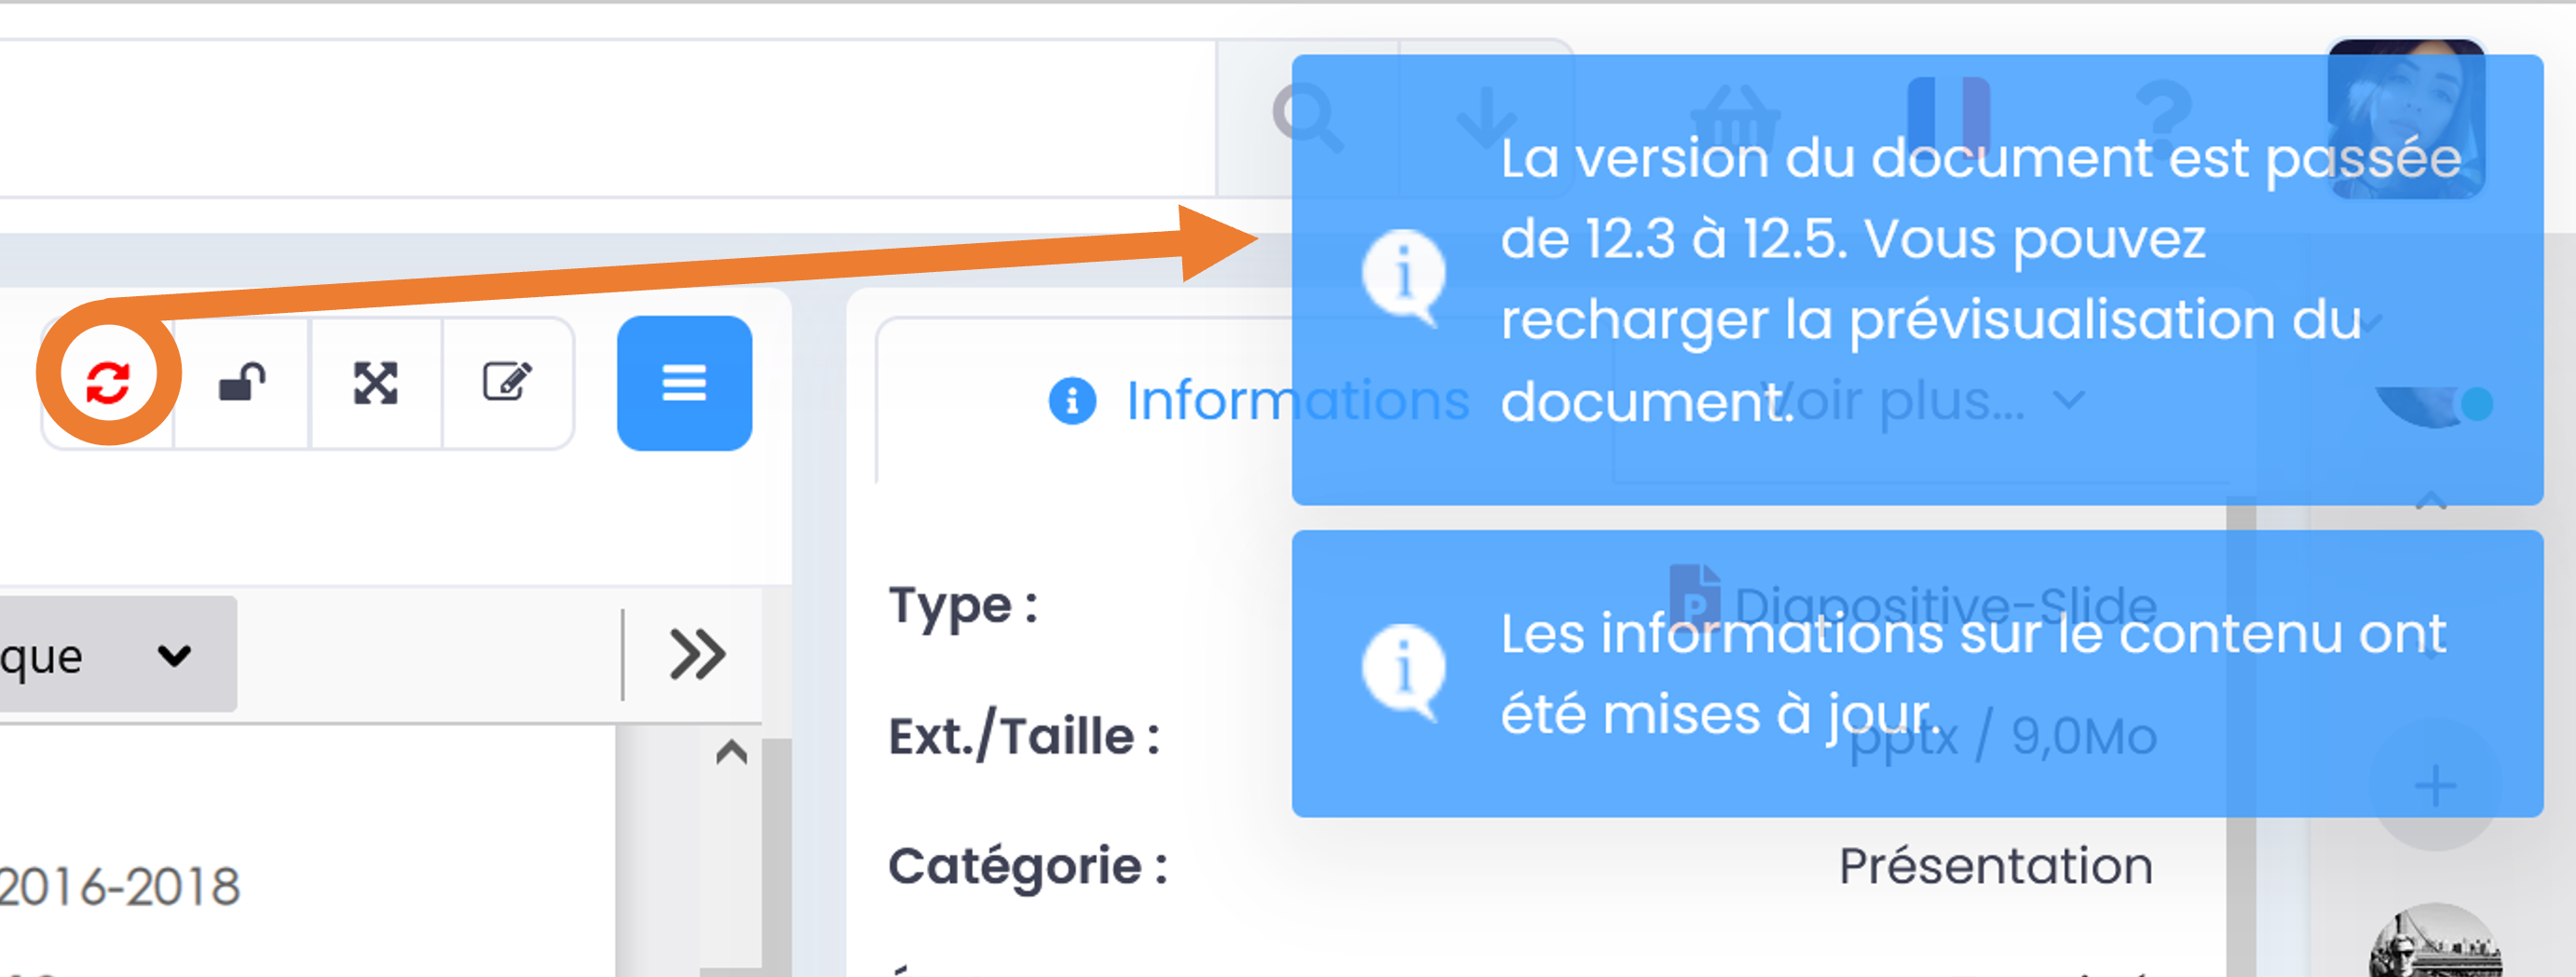
Update the preview
It allows you to refresh the preview to update it after the document has been edited (e.g. if you are viewing a document while it is being edited by another user and after a user has saved the changes).
Drag and drop new version area
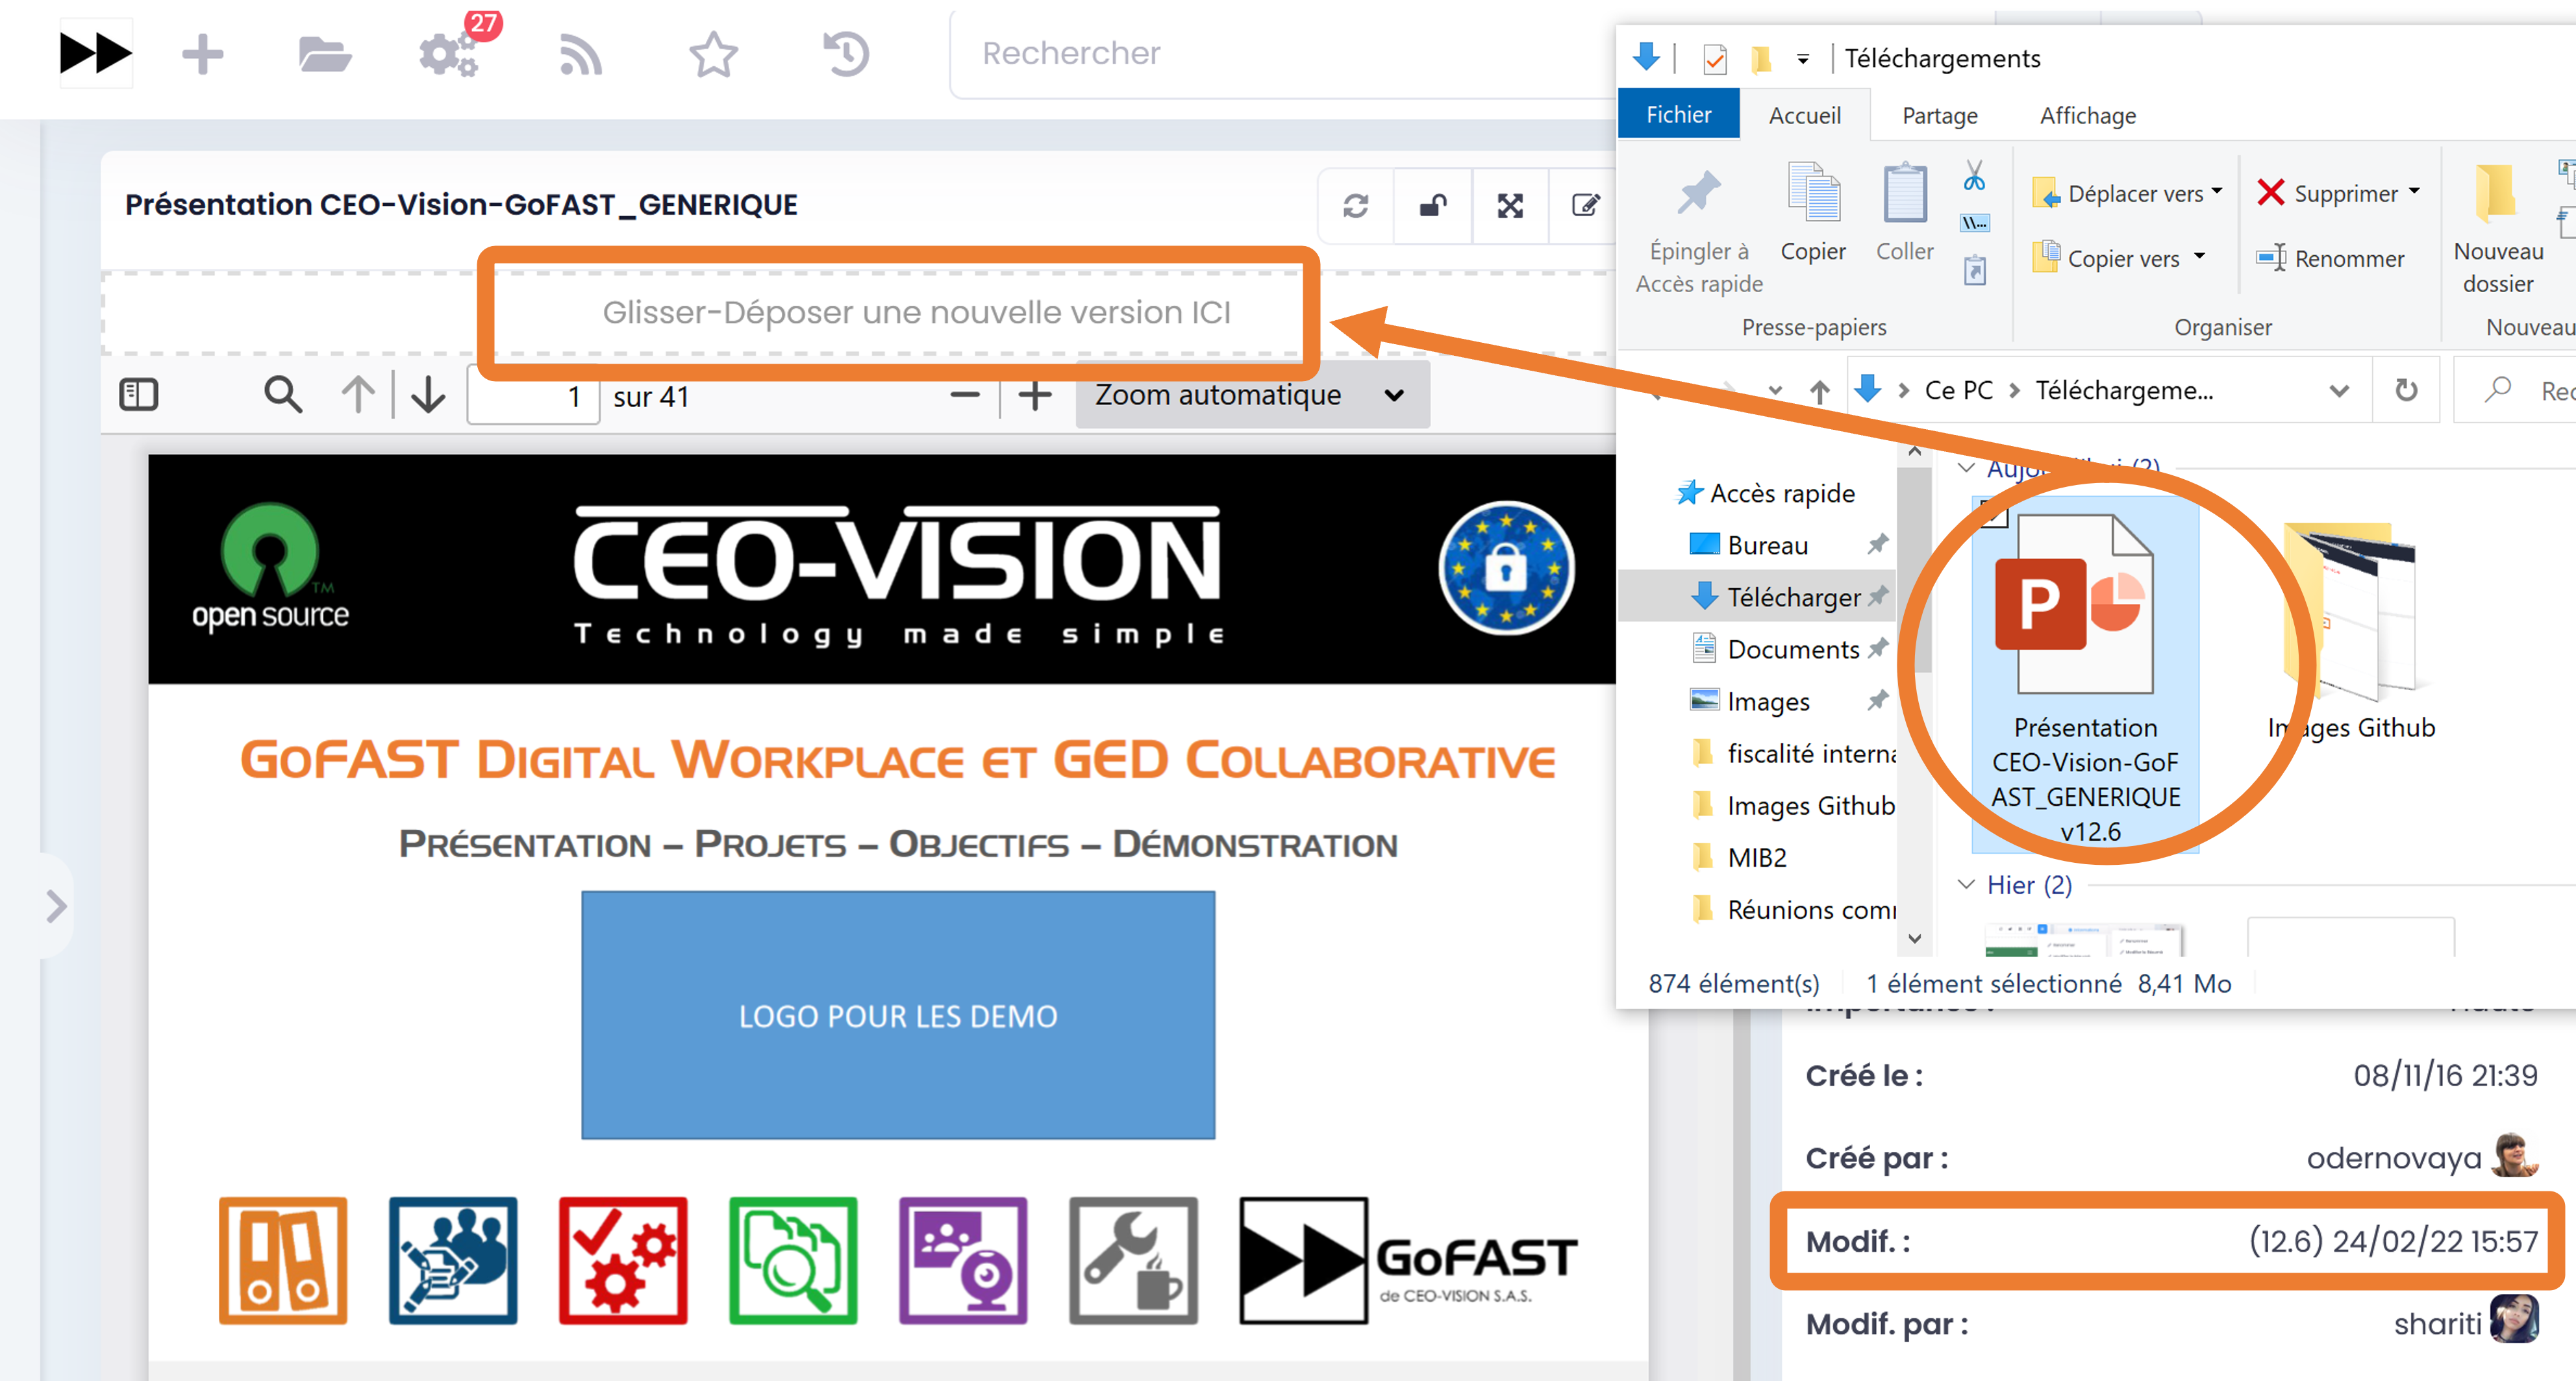
Dragging a new version of your document to this location (above the preview) will overwrite the previous version, but will always keep all old versions (accessible via the “versions” tab).
The system will then ask you if you want it to become a major version (e.g. from 1.24 to 2.0). At that time, you can also add a comment related to this new major version.
Other versions made during editing and registration via a PC application or the Office Collaborative Suite are considered minor.
Finish by clicking on “Validate”
You can find the number and the date, with the contributor of this latest version, to the right of the metadata (information block).
Note
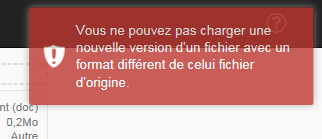
You can only drag and drop documents of the same format, which means you cannot replace the “doc” version with the “docx” version, and vice versa.
Otherwise, here is the error message you will get:
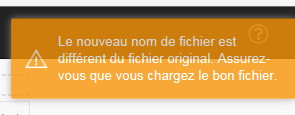
If you load a new version, but the file name is different, you will get this message (but you will not be blocked):
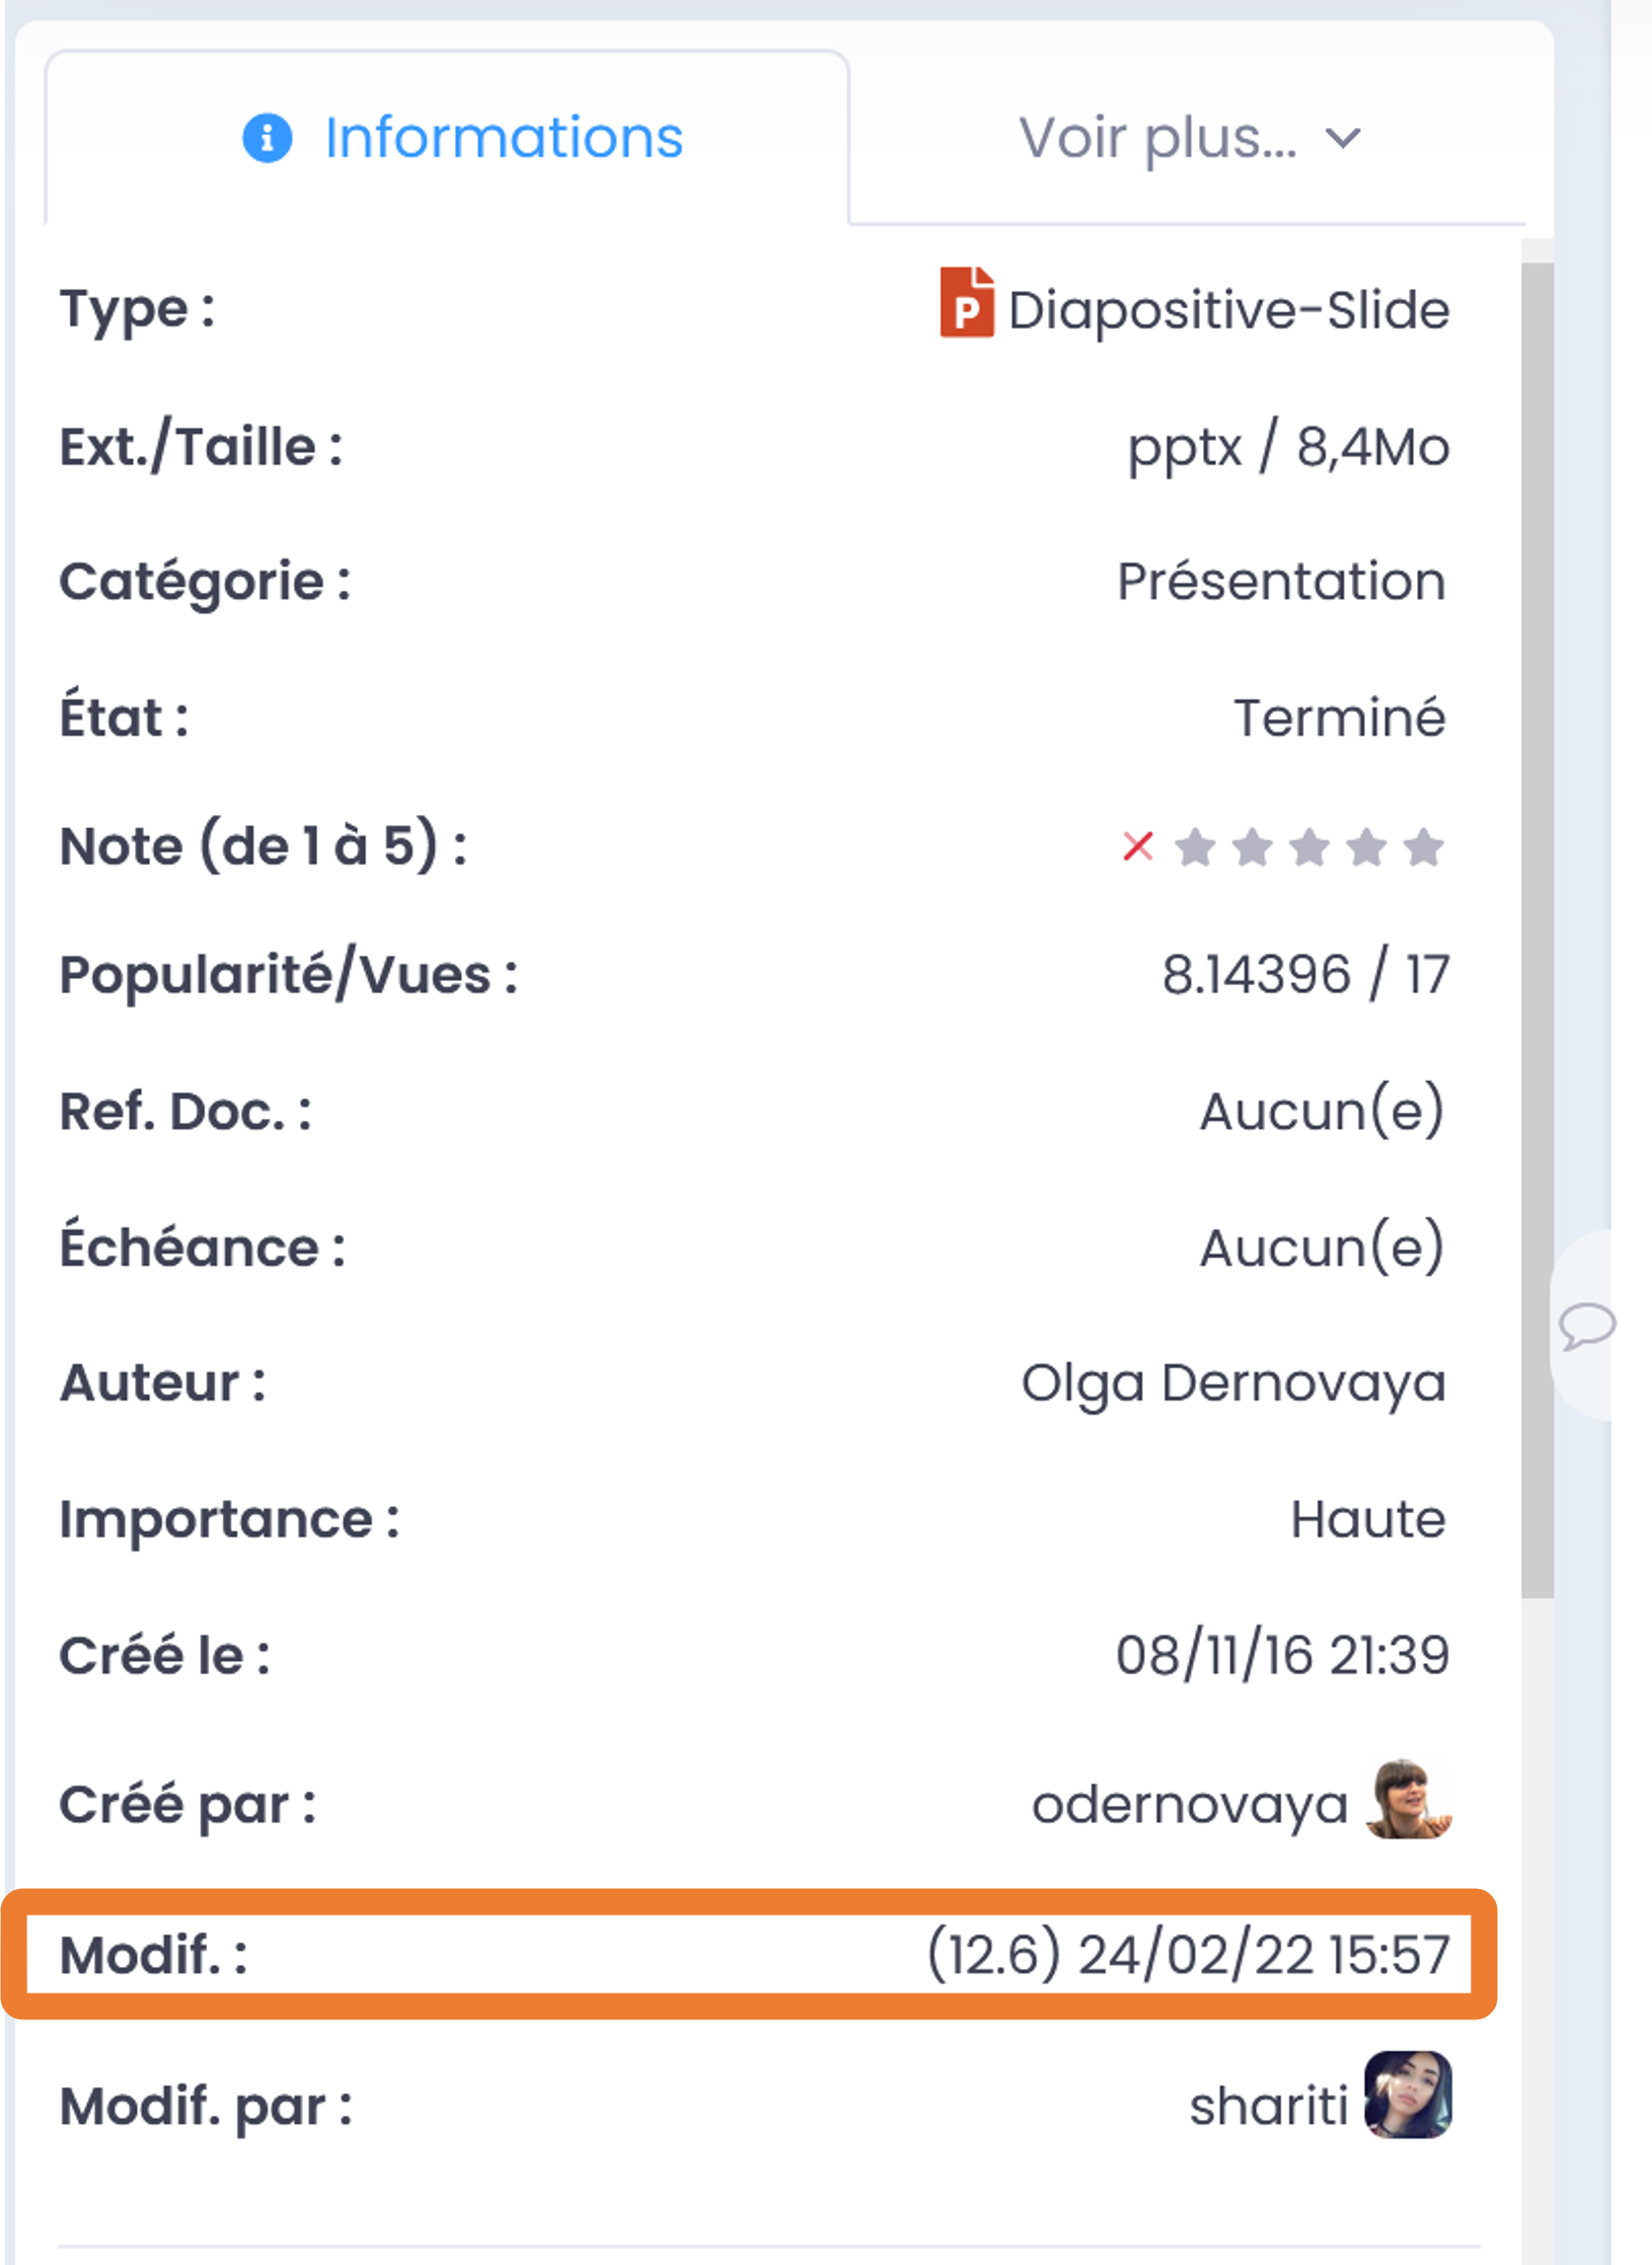
Information block (tabs: Information, Tasks, Comments, Versions, Audit)
On a document/content page, you have a block of metadata and other elements associated with the document (to the right of your preview). This block consists of different tabs:
Information
On the document page, you have various information about the document/content: document type, size, format, category, author, language, version, location, etc
This information is very useful during the automatic search because it will allow you to further filter your results.
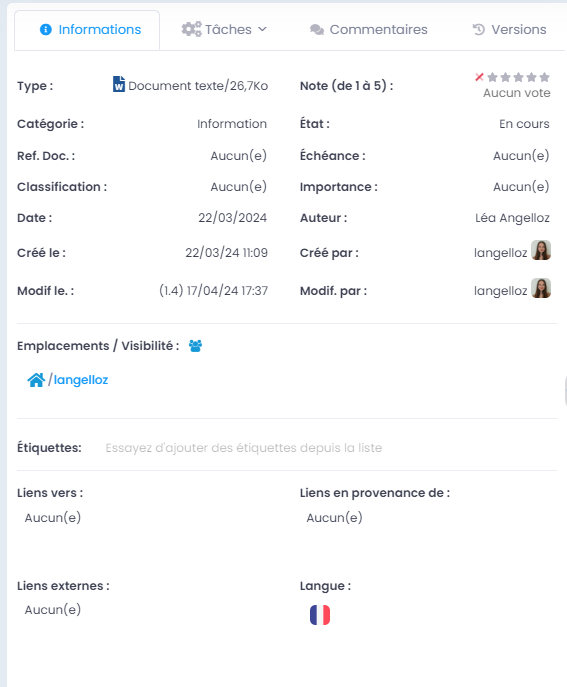
- GoFAST Standard Metadata List:
File type (depending on the format, e.g.: text, presentation, spreadsheet, image, etc.)
File extension (e.g. docx, xlsx, odt, png, mp4, etc.)
File size
Document categories (e.g. Invoice, Report, Contract, Documentation, etc.)
State (e.g. draft, in progress, pending validation, completed, etc.)
Rating (from 1 to 5 with a single vote per user)
Document reference
Deadline
Classification (used to classify documents according to different categories)
Date (custom date, field can be modified in settings)
Author (different from creator: free or recovered data from file)
Criticity (including classification by level of confidentiality).
Document creation date (audit trail)
Document creator (audit trail)
Document editing date with version number (audit trail and version management)
Edited by (user who created the latest version of the document)
Location/Sharing (link to multiple locations)
Tags (keywords to add freely)
Related content (links to/from, external links)
Languages
This metadata is largely used as search result filters (after performing a search by keywords).
For more information on the use of metadata, please refer to “How to Add/Edit Document Information (Metadata)”
Tasks
Allows you to view or assign a workflow task to another user on the document: to request a contribution, validation, etc. Or see what tasks are assigned to you on the document**.(= To Do) **
To learn more about the use of process tasks, please refer to the section: « Workflows-Tasks Processes (Entreprise Only)»
Comments
Allows you to view the various comments left by users who have access to the document or to share a new comment on the document, which will therefore be visible to the members of the Space(s) where the document is located, as soon as they arrive on the page.
To learn more about the use of comments, please refer to the section: «How to comment on a document»
Versions
GoFAST saves each new version of a document after editing, with a version number, timestamp and identity of the contributor-user. For more information on version management, please refer to the sections:
Management of document versions
How to download a new version
How to set as major version
Deletion of minor versions
Audit
GoFAST offers a large number of audit trails on actions performed on documents for security and data control issues. The audit is only accessible to users with the “user-support” profile, on the page of a document (last tab of the information block), or from the Audit page accessible via the main menu on the left. For more information, please refer to the section: “User- Support Profile”.
Direct access to co-editing
Above the document preview, you will find the “pencil on the sheet” icon which allows you to open an office file directly in the OnlyOffice Collaborative Suite, without going through the “Hamburger” menu (contextual actions menu). To find out more about editing of a document, please refer to the section: “editing/co-editing of a document”
How to deal with the edit lock
GoFAST has an automatic system for locking a document when it is being edited. This lock is also released automatically when the user has closed the application used for editing. The lock is closed red, if the document is edited by a user via an application on his PC (does not allow simultaneous co-editing). The lock is red open, if the document is edited by one or more users via the Collaborative Office Suite of GoFAST OnlyOffice (this then allows simultaneous co-editing and you can join this co-editing in OnlyOffice). To find out more about editing of a document, please refer to the section: “editing/co-editing of a document”
Collaborative Document / Content Management
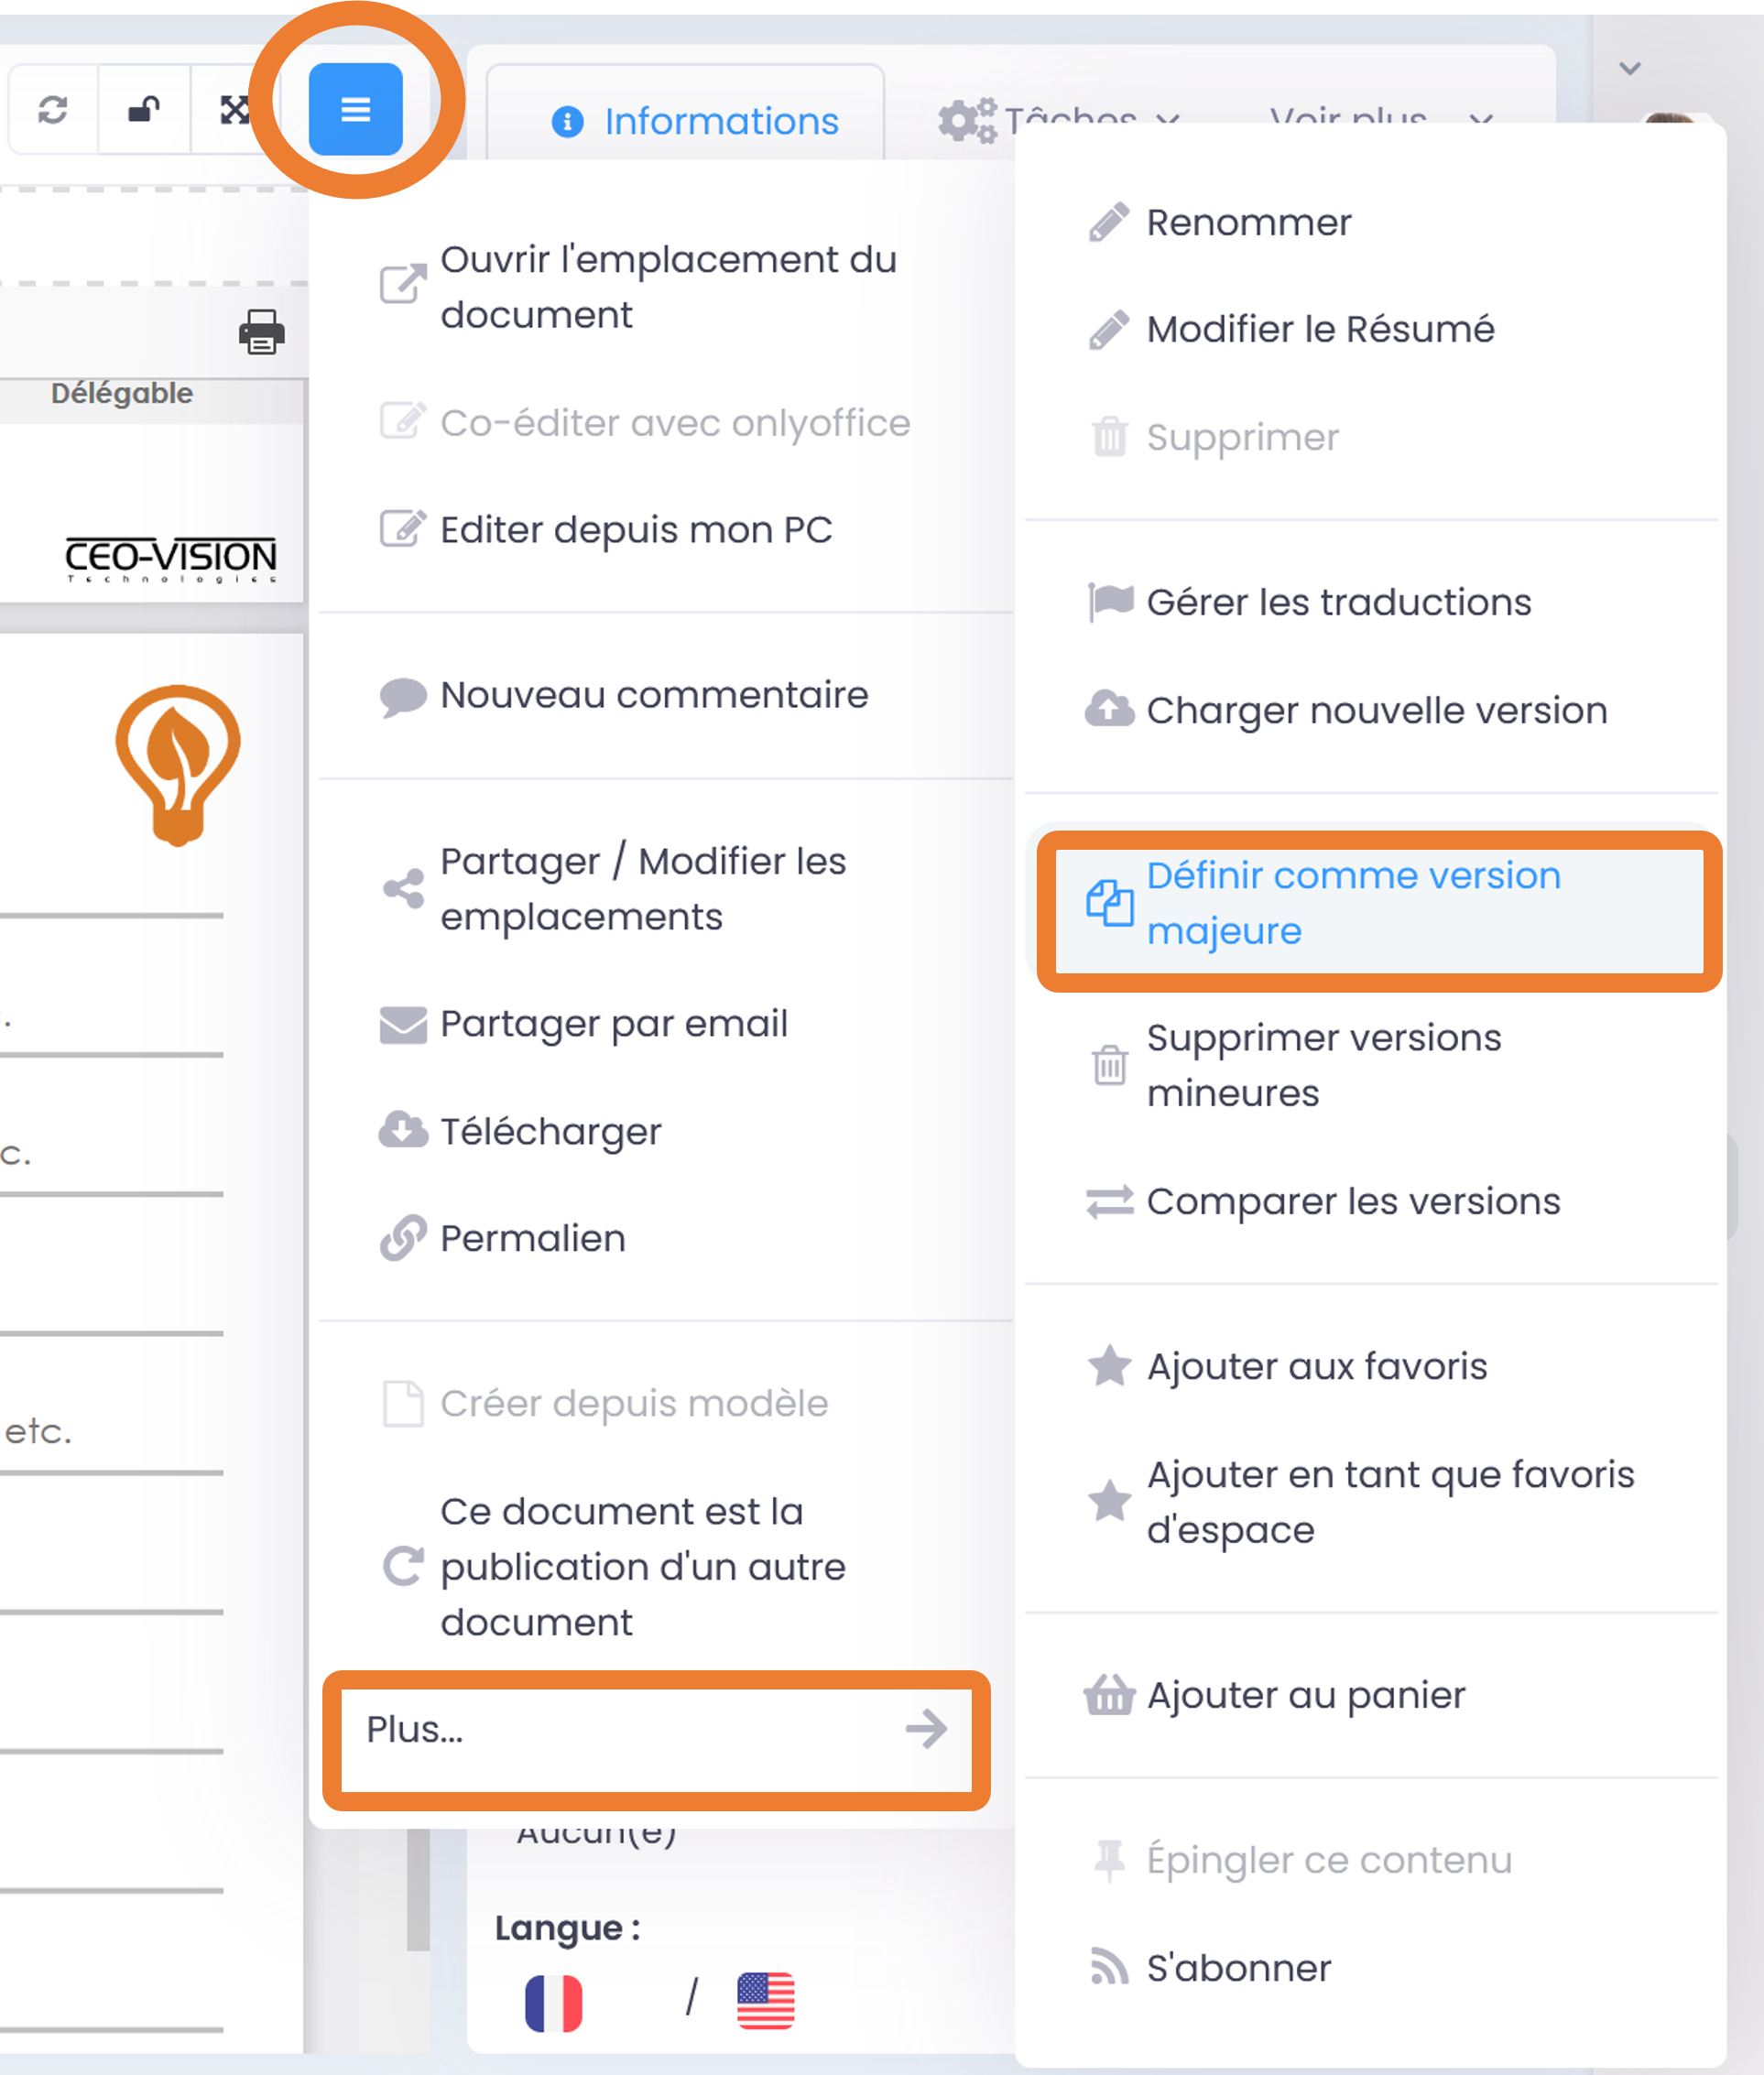
Actions on a document/content (Cf. “Hamburger” menu)
These are all the actions that can be done with / on this document: to browse, download, edit online/modify, comment, send by email, manage translations, create a publication, …
These actions, which directly related to the document you are previewing, may vary depending on the role you have in the Space(s) where the document is located (administrator, contributor, or read-only), and whether or not you are the creator of the document.
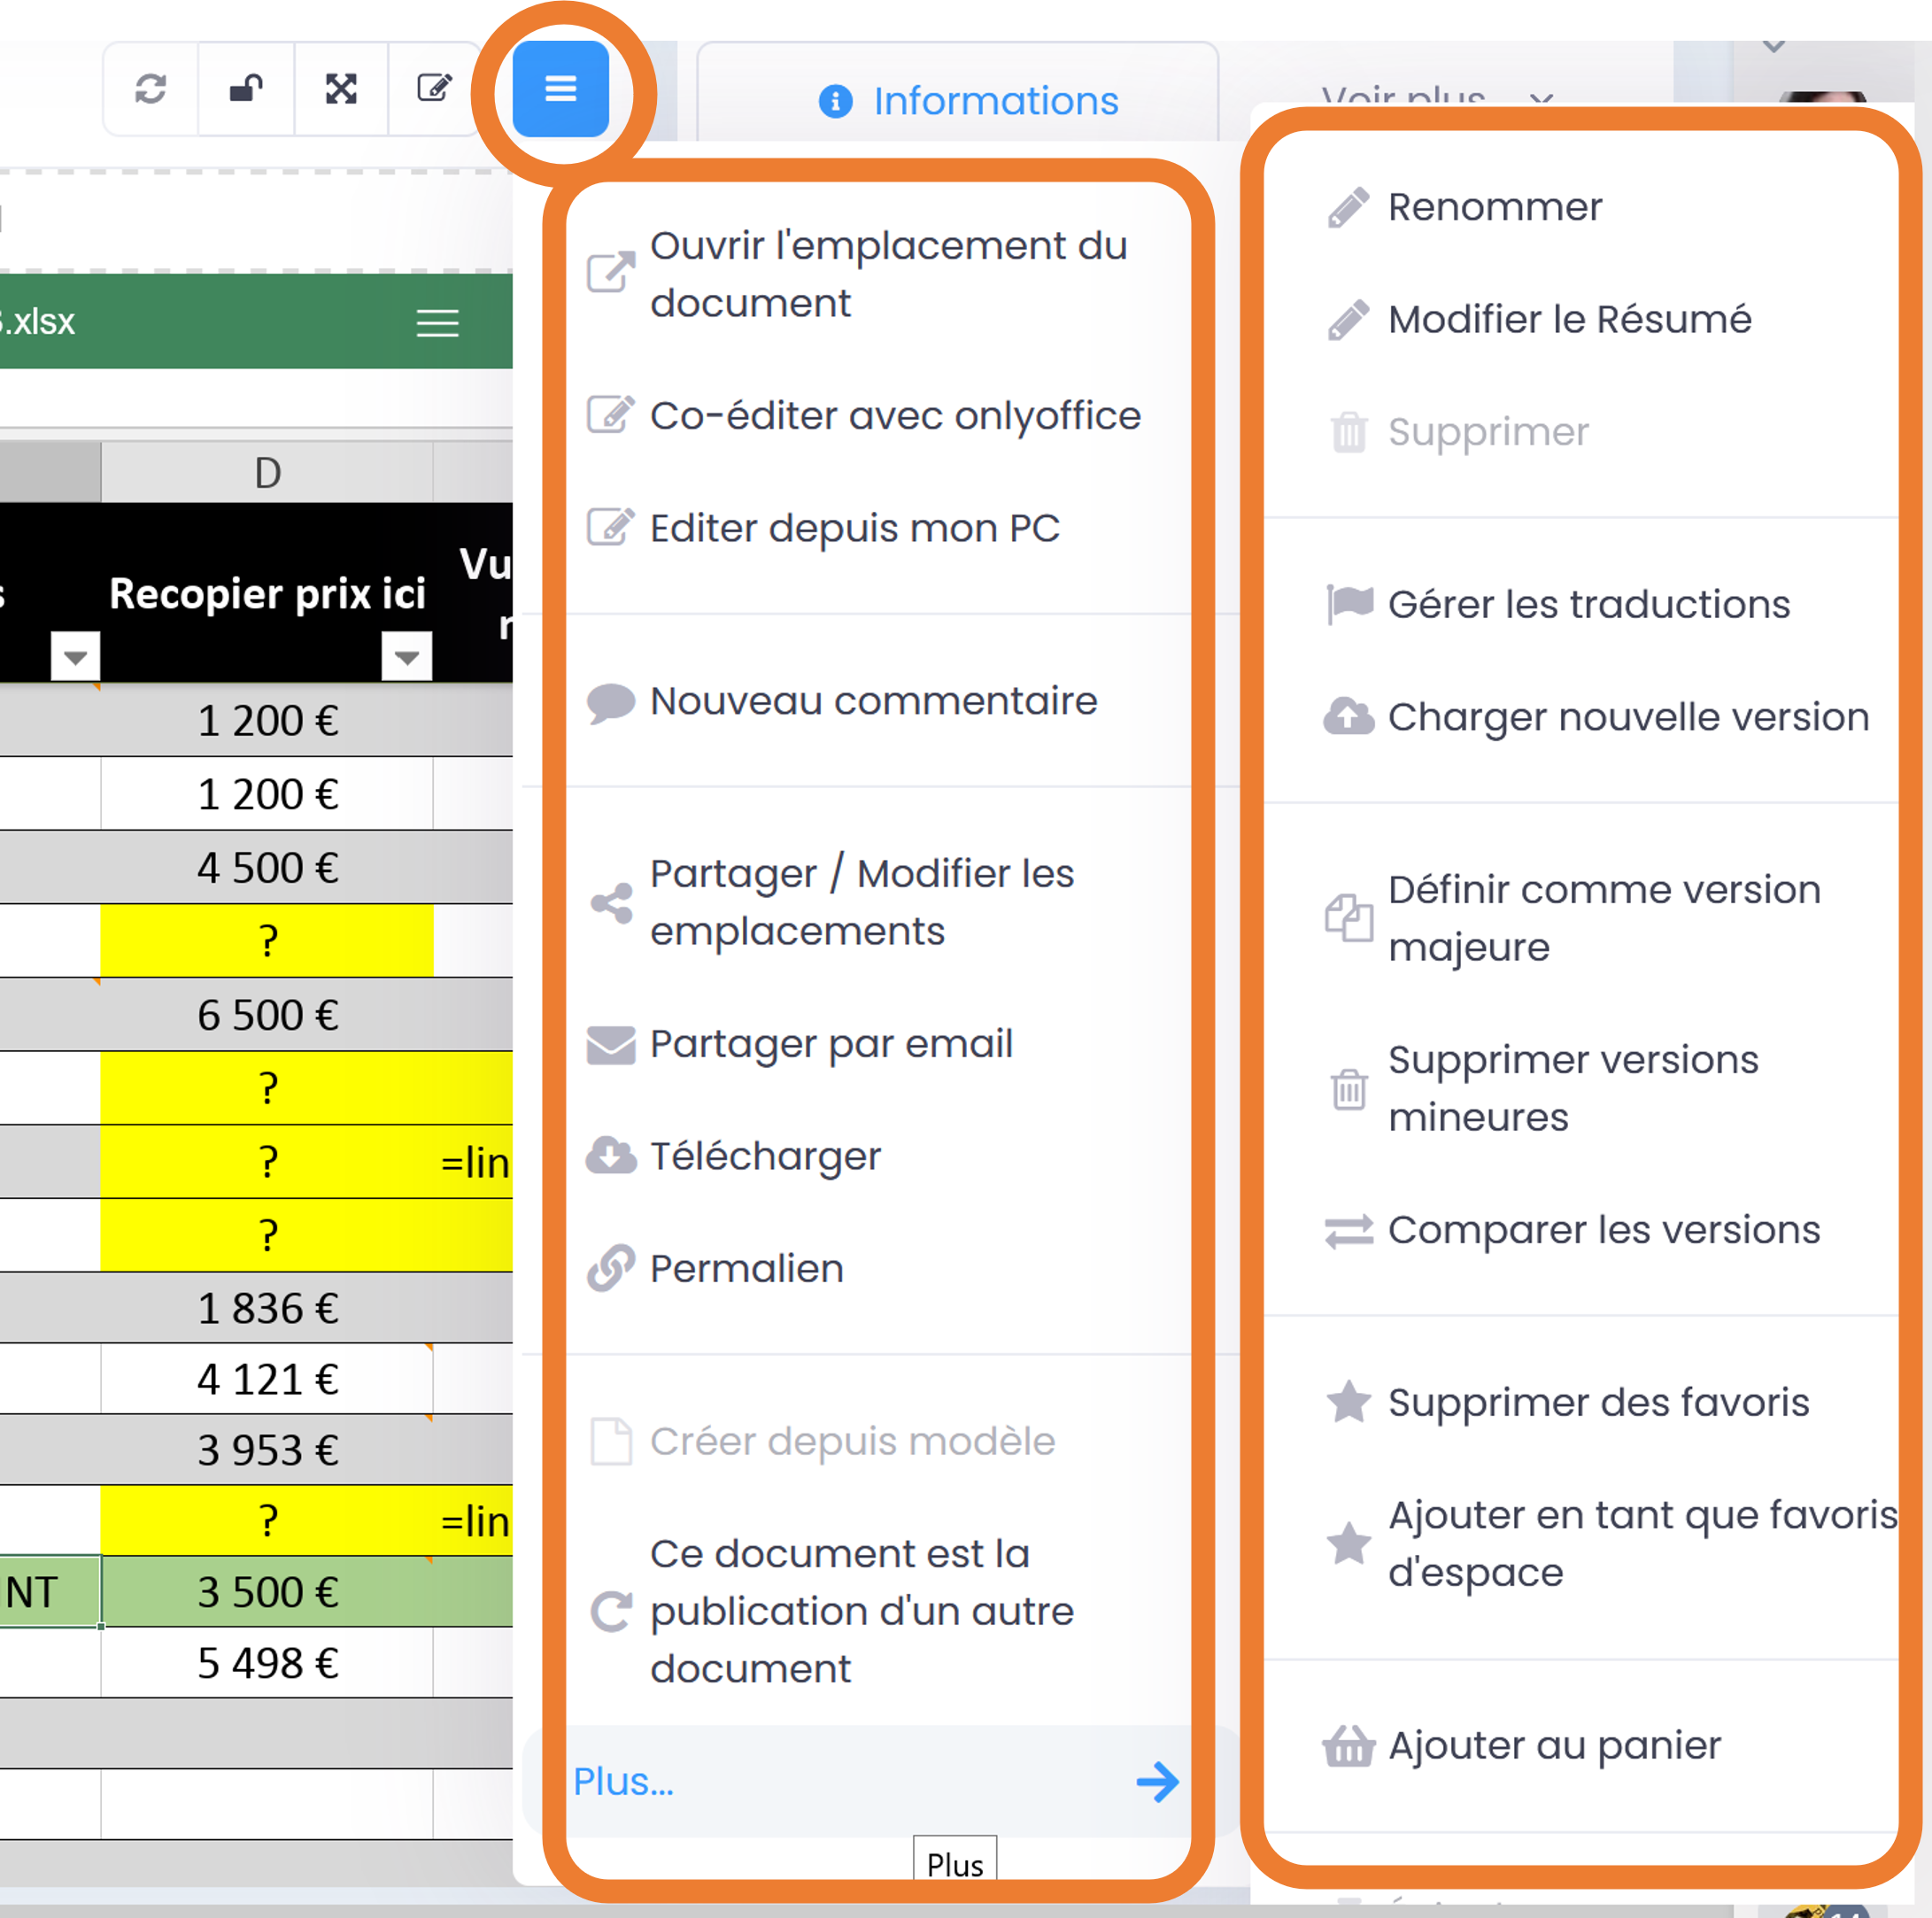
In order to see the list of possible actions from this menu, please refer to the section: “contextual actions menu Hamburger Menu”. To find out how to perform the various possible actions on a document, please continue in this section.
Open file’s location
When you preview a document, you can see the document(s) locations in the tree structure, with the top levels of folders and spaces. You can go to File Explorer from:
contextual actions (“Hamburger” menu), by clicking on “Open file’s location”.
With one click on the locations listed in the information block (“Location/Sharing” field).
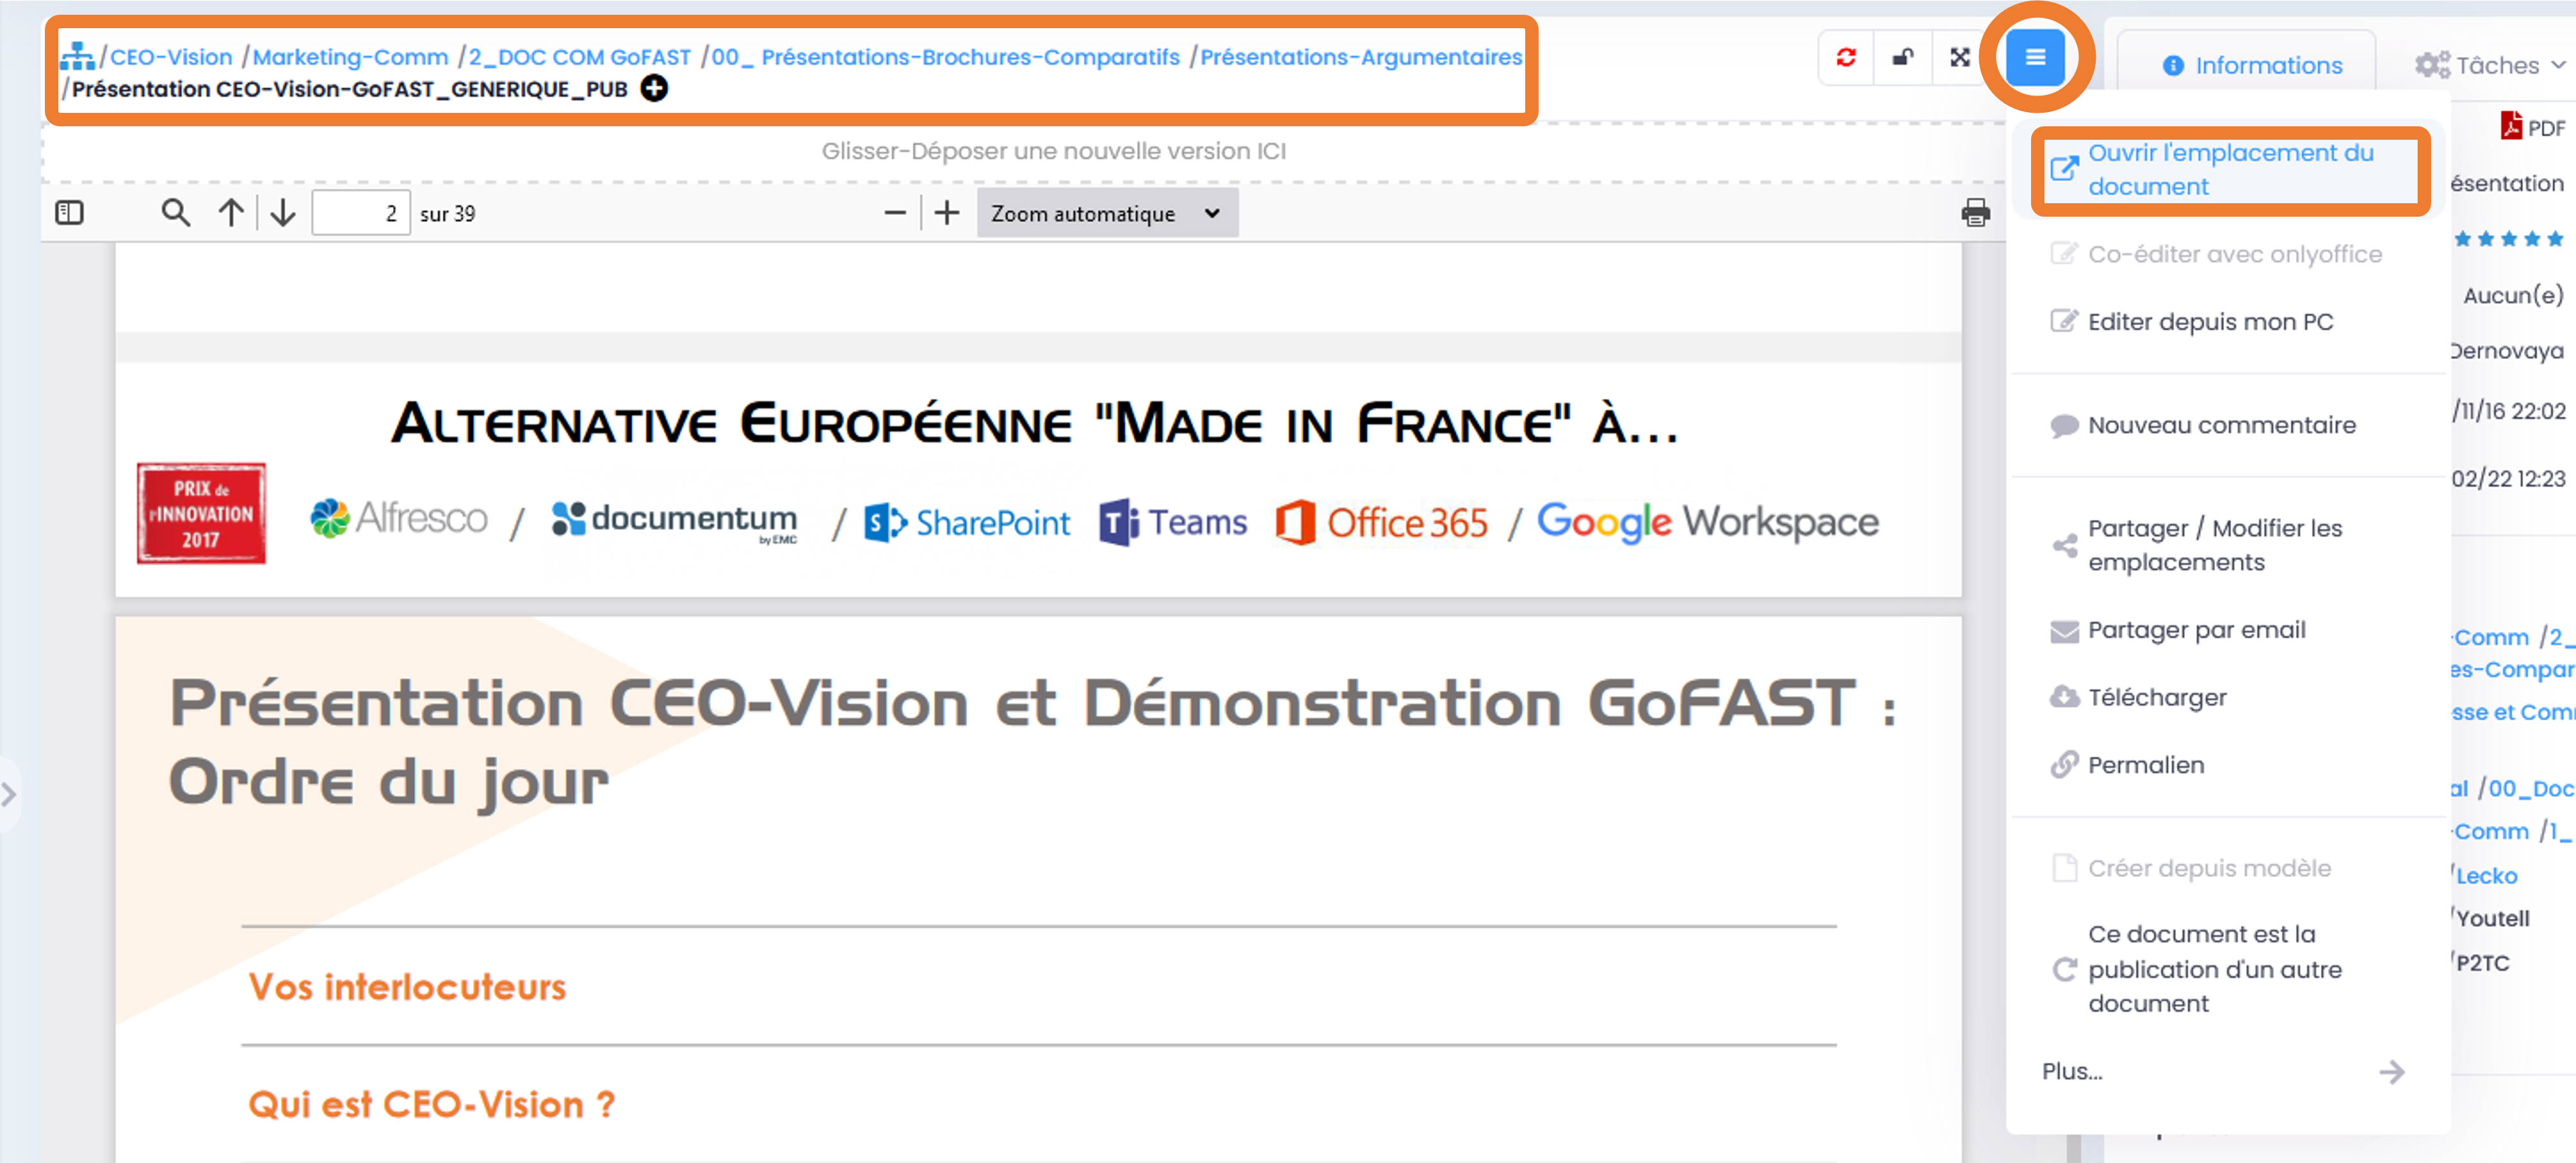
You will then arrive on the file explorer, on the page of a space (Documents tab), where you will find your document in the tree structure.
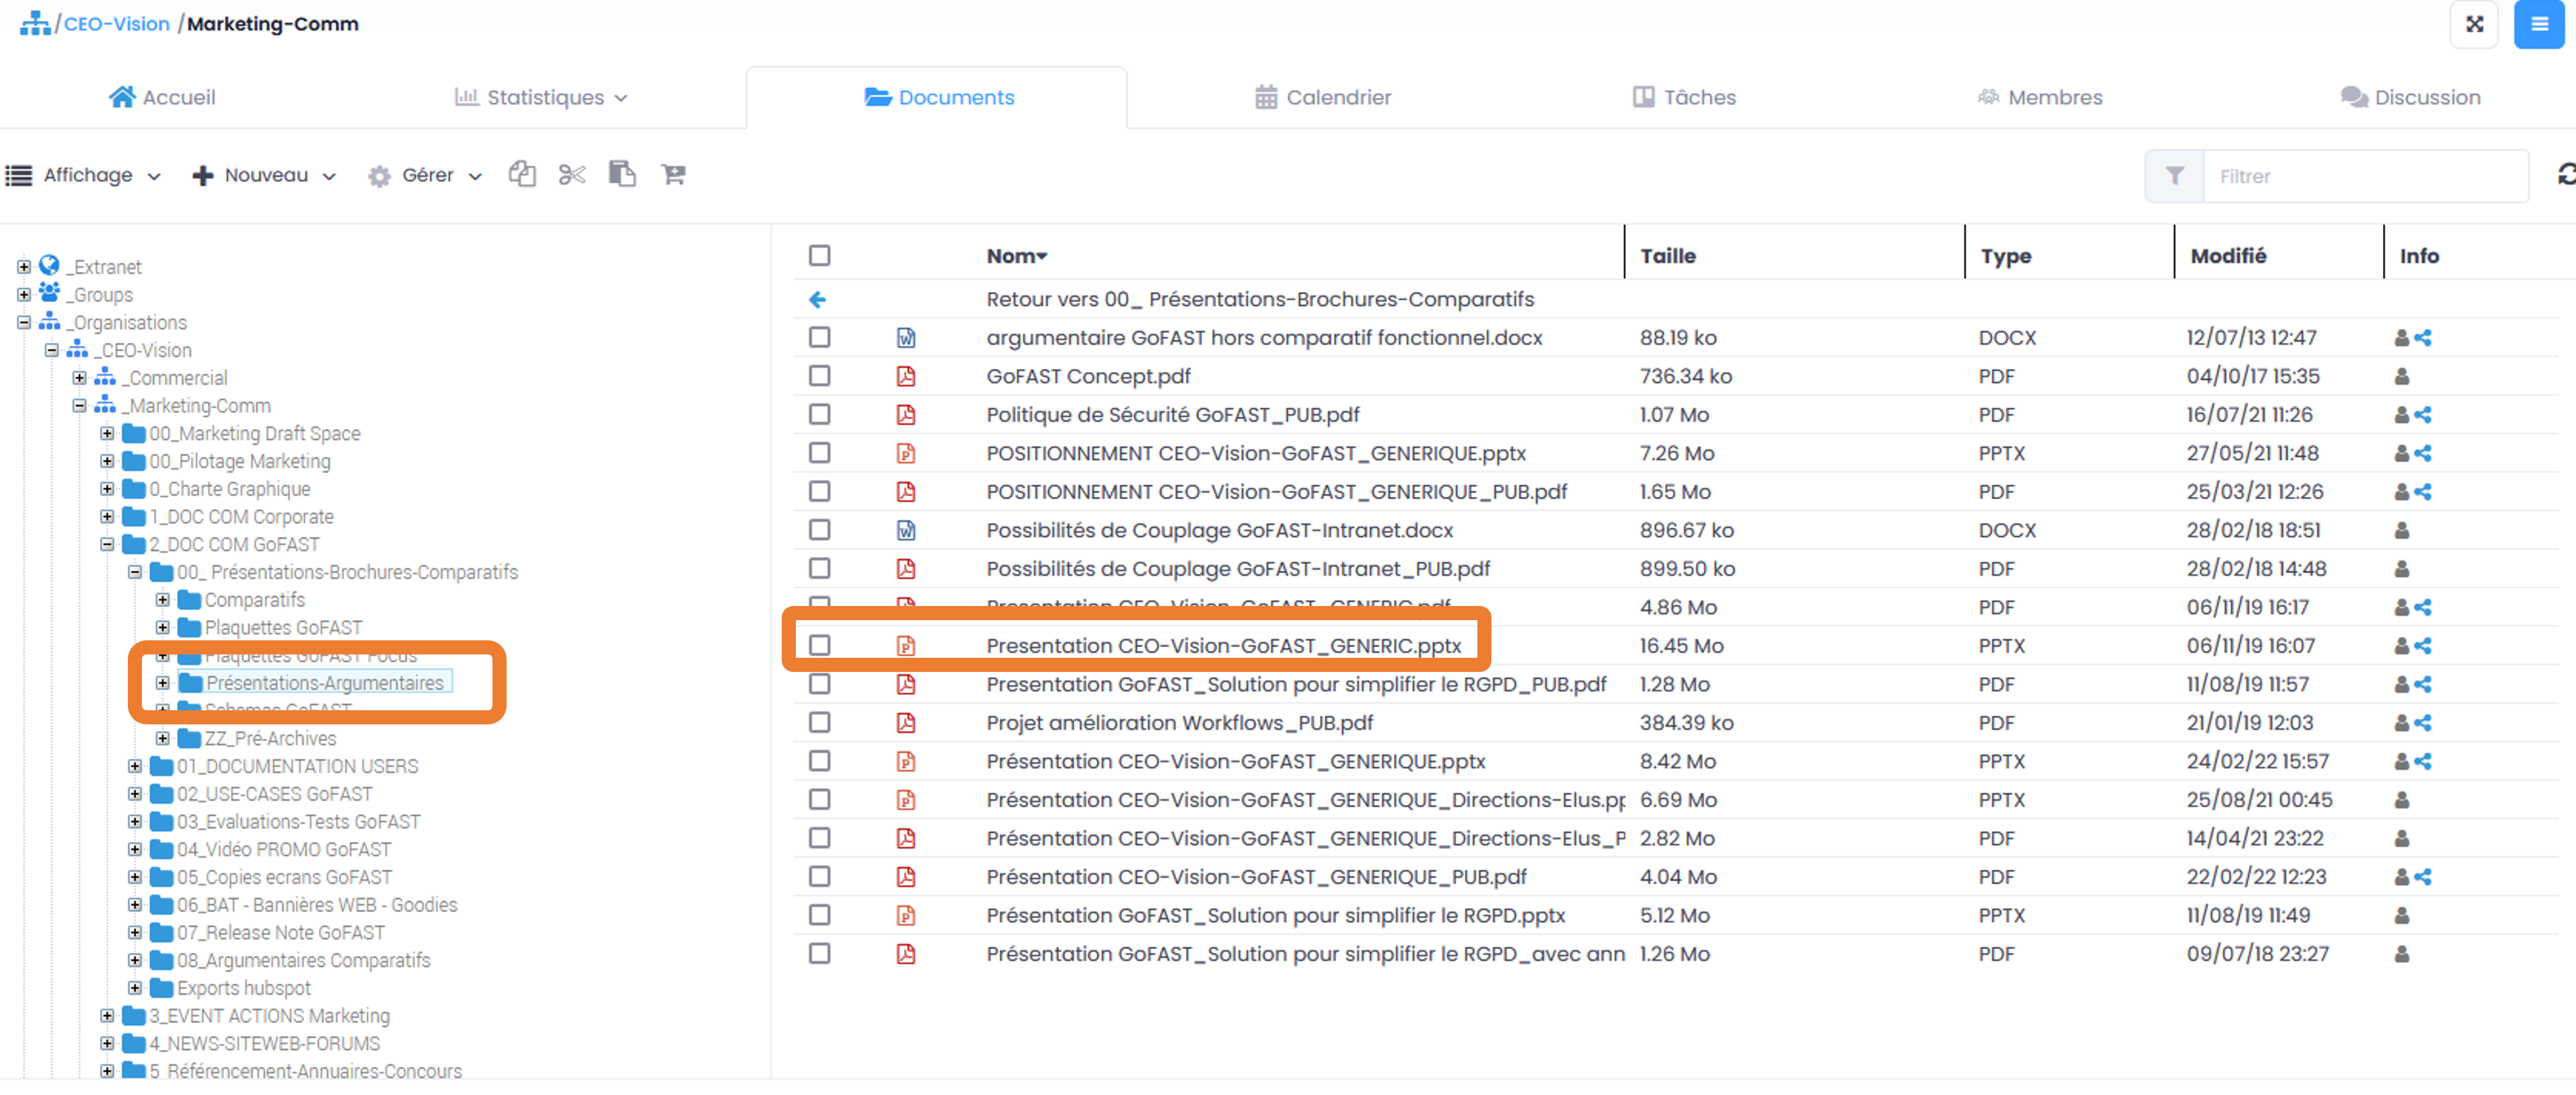
From there, you can navigate in the tree structure, search for other documents, use the filter by folder…
Co-edit with OnlyOffice
GoFAST brings a very innovative dimension and allows you to edit Office documents in a simple browser with other people simultaneously. You can work with several people at the same time on the same document. To find out how to co-edit a document, please refer to “How to co-edit a document”.
Edit from my PC
This feature allows to open a file for editing/modification via an application installed on your PC, without having to download it beforehand. To find out how to co-edit a document, please refer to the section: «How to edit a document».
New Comment
The “New comment” button allows you to add a comment on the document where you are. This comment will be visible in the “Comments” tab of the right-hand block and shared with all users who have access to this document. This avoids sending a large number of emails and also avoids sending email attachments. To find out how to comment on a document, please refer to the section: «How to comment on a document».
Share/Edit locations
This button allows to open the document location management window. It is sharing without duplication, in various Collaborative Spaces (or folders) to be able to easily collaborate with various teams and other directions. To find out how to add/remove locations to a document, please refer to the section: “How to edit Location/Sharing”.
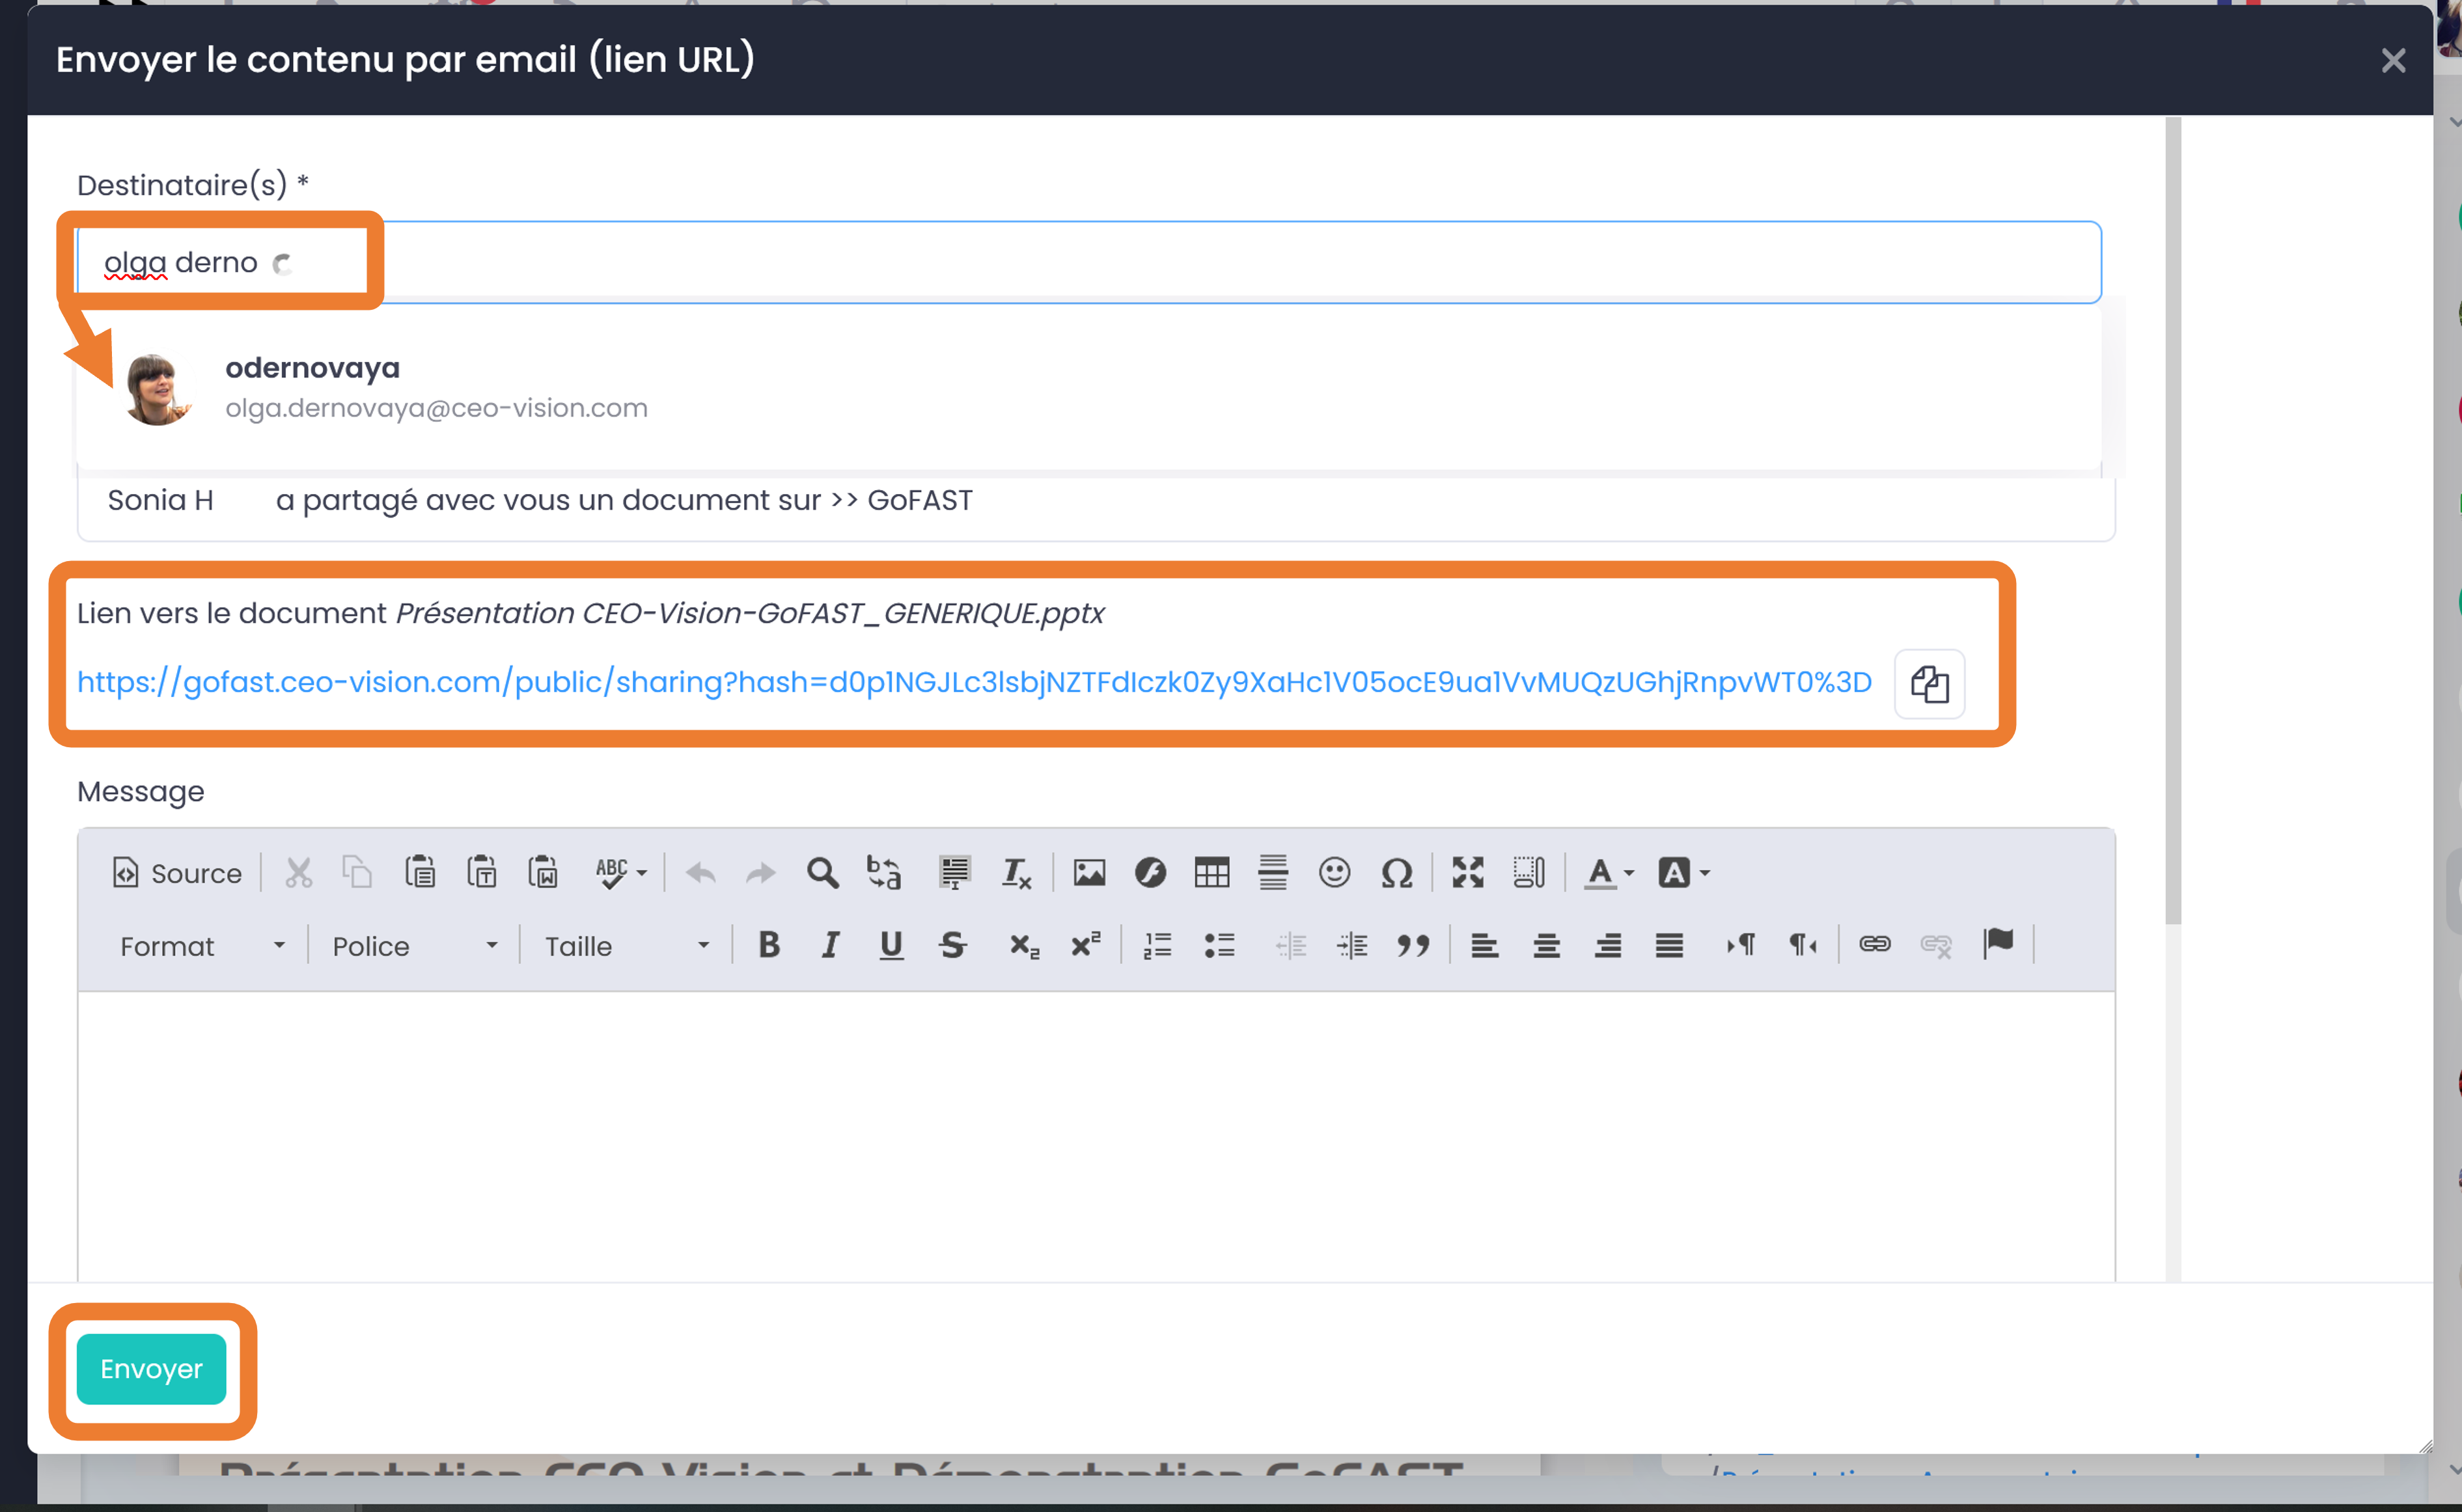
Share by email
Via the contextual actions (“Hamburger” menu) you can send a secure link via email to access (for users) or download the document (for non-users), directly from GoFAST. It is possible to enter as recipients: a user, a userlist, members of a Collaborative Space or an external email address. The link to the document is also automatically attached to your message. This link is contextual: users who have access to the document will be able to view the page with all the details, while non-users will have a 14-day download link with download confirmation, IP audit and timestamp.
Note
This method is much more secure (GDPR) and auditable than sending a classic email with attachments. In particular, this allows you to no longer overload your mailbox with heavy and quickly obsolete attachments (because collaborative work continues on GoFAST by your colleagues).
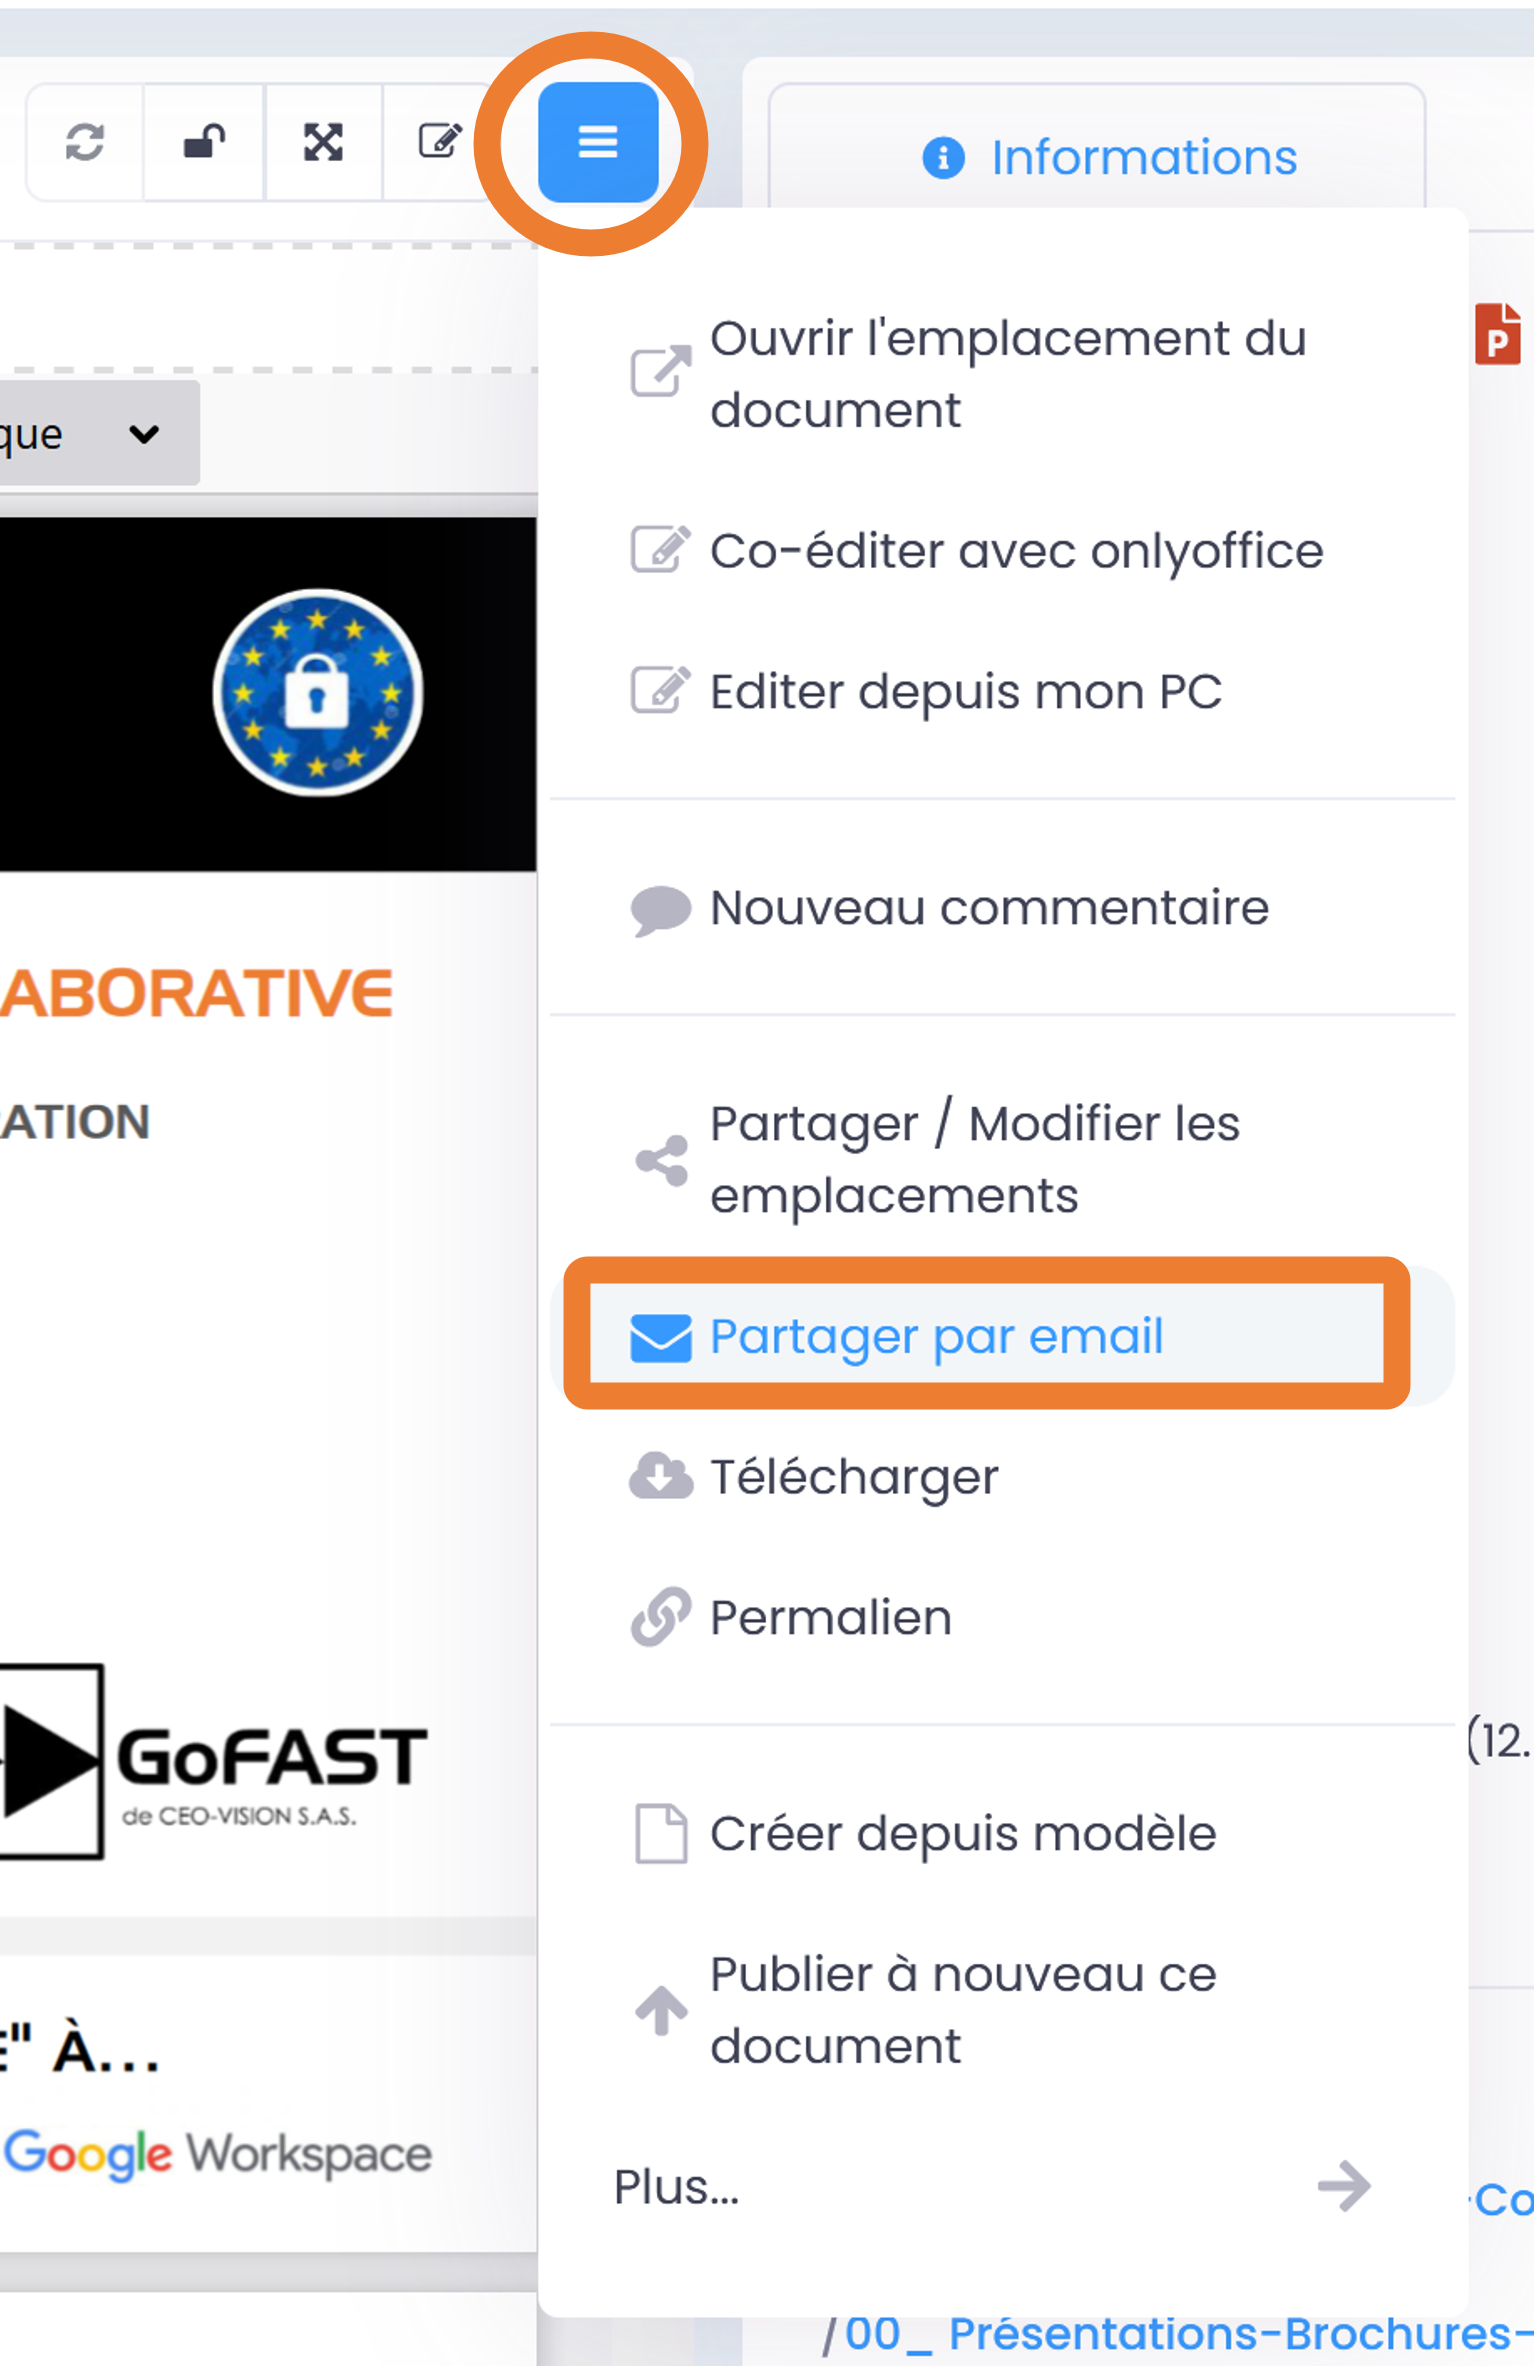
Choose the recipients by writing the first 3 letters of their last/first name (the system will suggest users); their names and photos will appear in the recipients bar. You can cancel recipients by clicking on the small cross next to their profile. The subject is automatically generated, but you can modify it.
Write your message and “Send”
The recipient will receive an email notification with the link and your comment. He can click on reply to the notification and it is the sender’s email address that will then appear in the email recipient bar. The same for you, when you receive a new message by email via GoFAST.
Note
In order for non-users of the platform to retrieve the documents, these links redirect to a page where they can download the documents within 14 days.
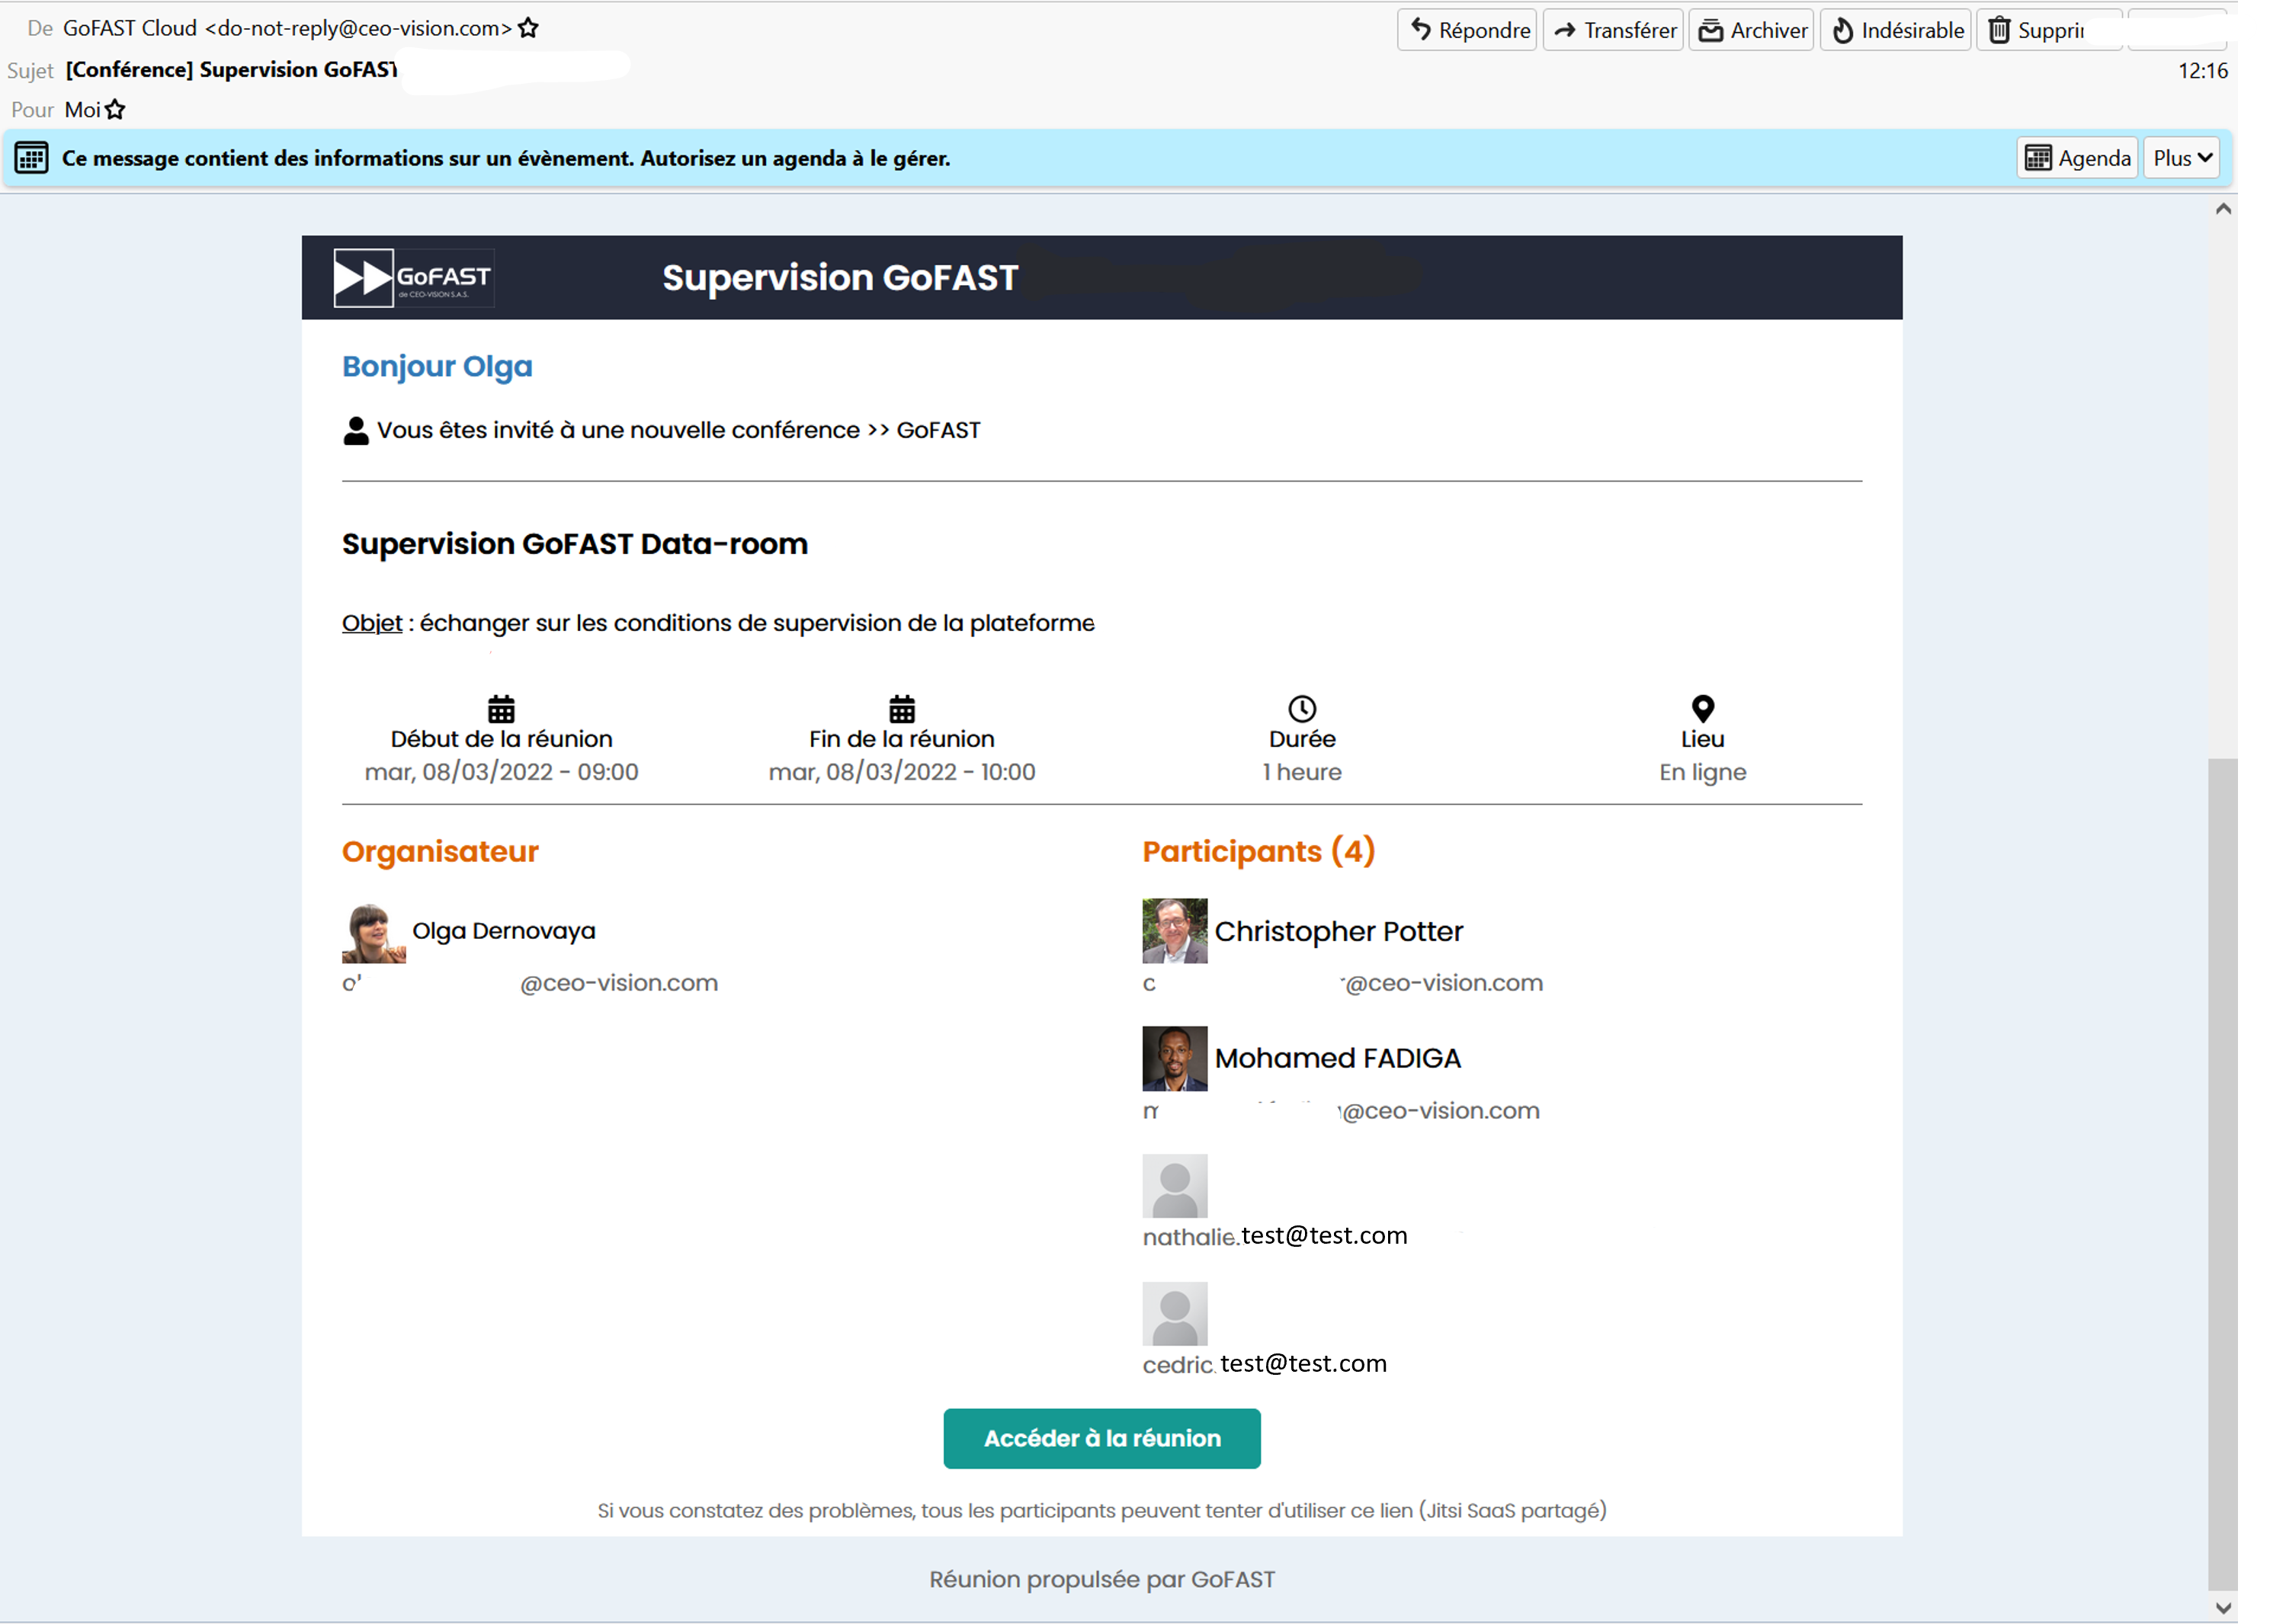
Example of mail/notification received in your normal emailbox, inviting you to click on the attached link to view a document. With the message for non-GoFAST users (who do not have a GoFAST account) indicating that this link is usable for 2 weeks from the date of sending the email.
Download a document
Via the contextual actions menu (“Hamburger” menu), you can download the document in order to save it on your computer. Note that this is a strongly discouraged practice, because a given version downloaded at a specific time quickly becomes obsolete (if the document is updated by another user).
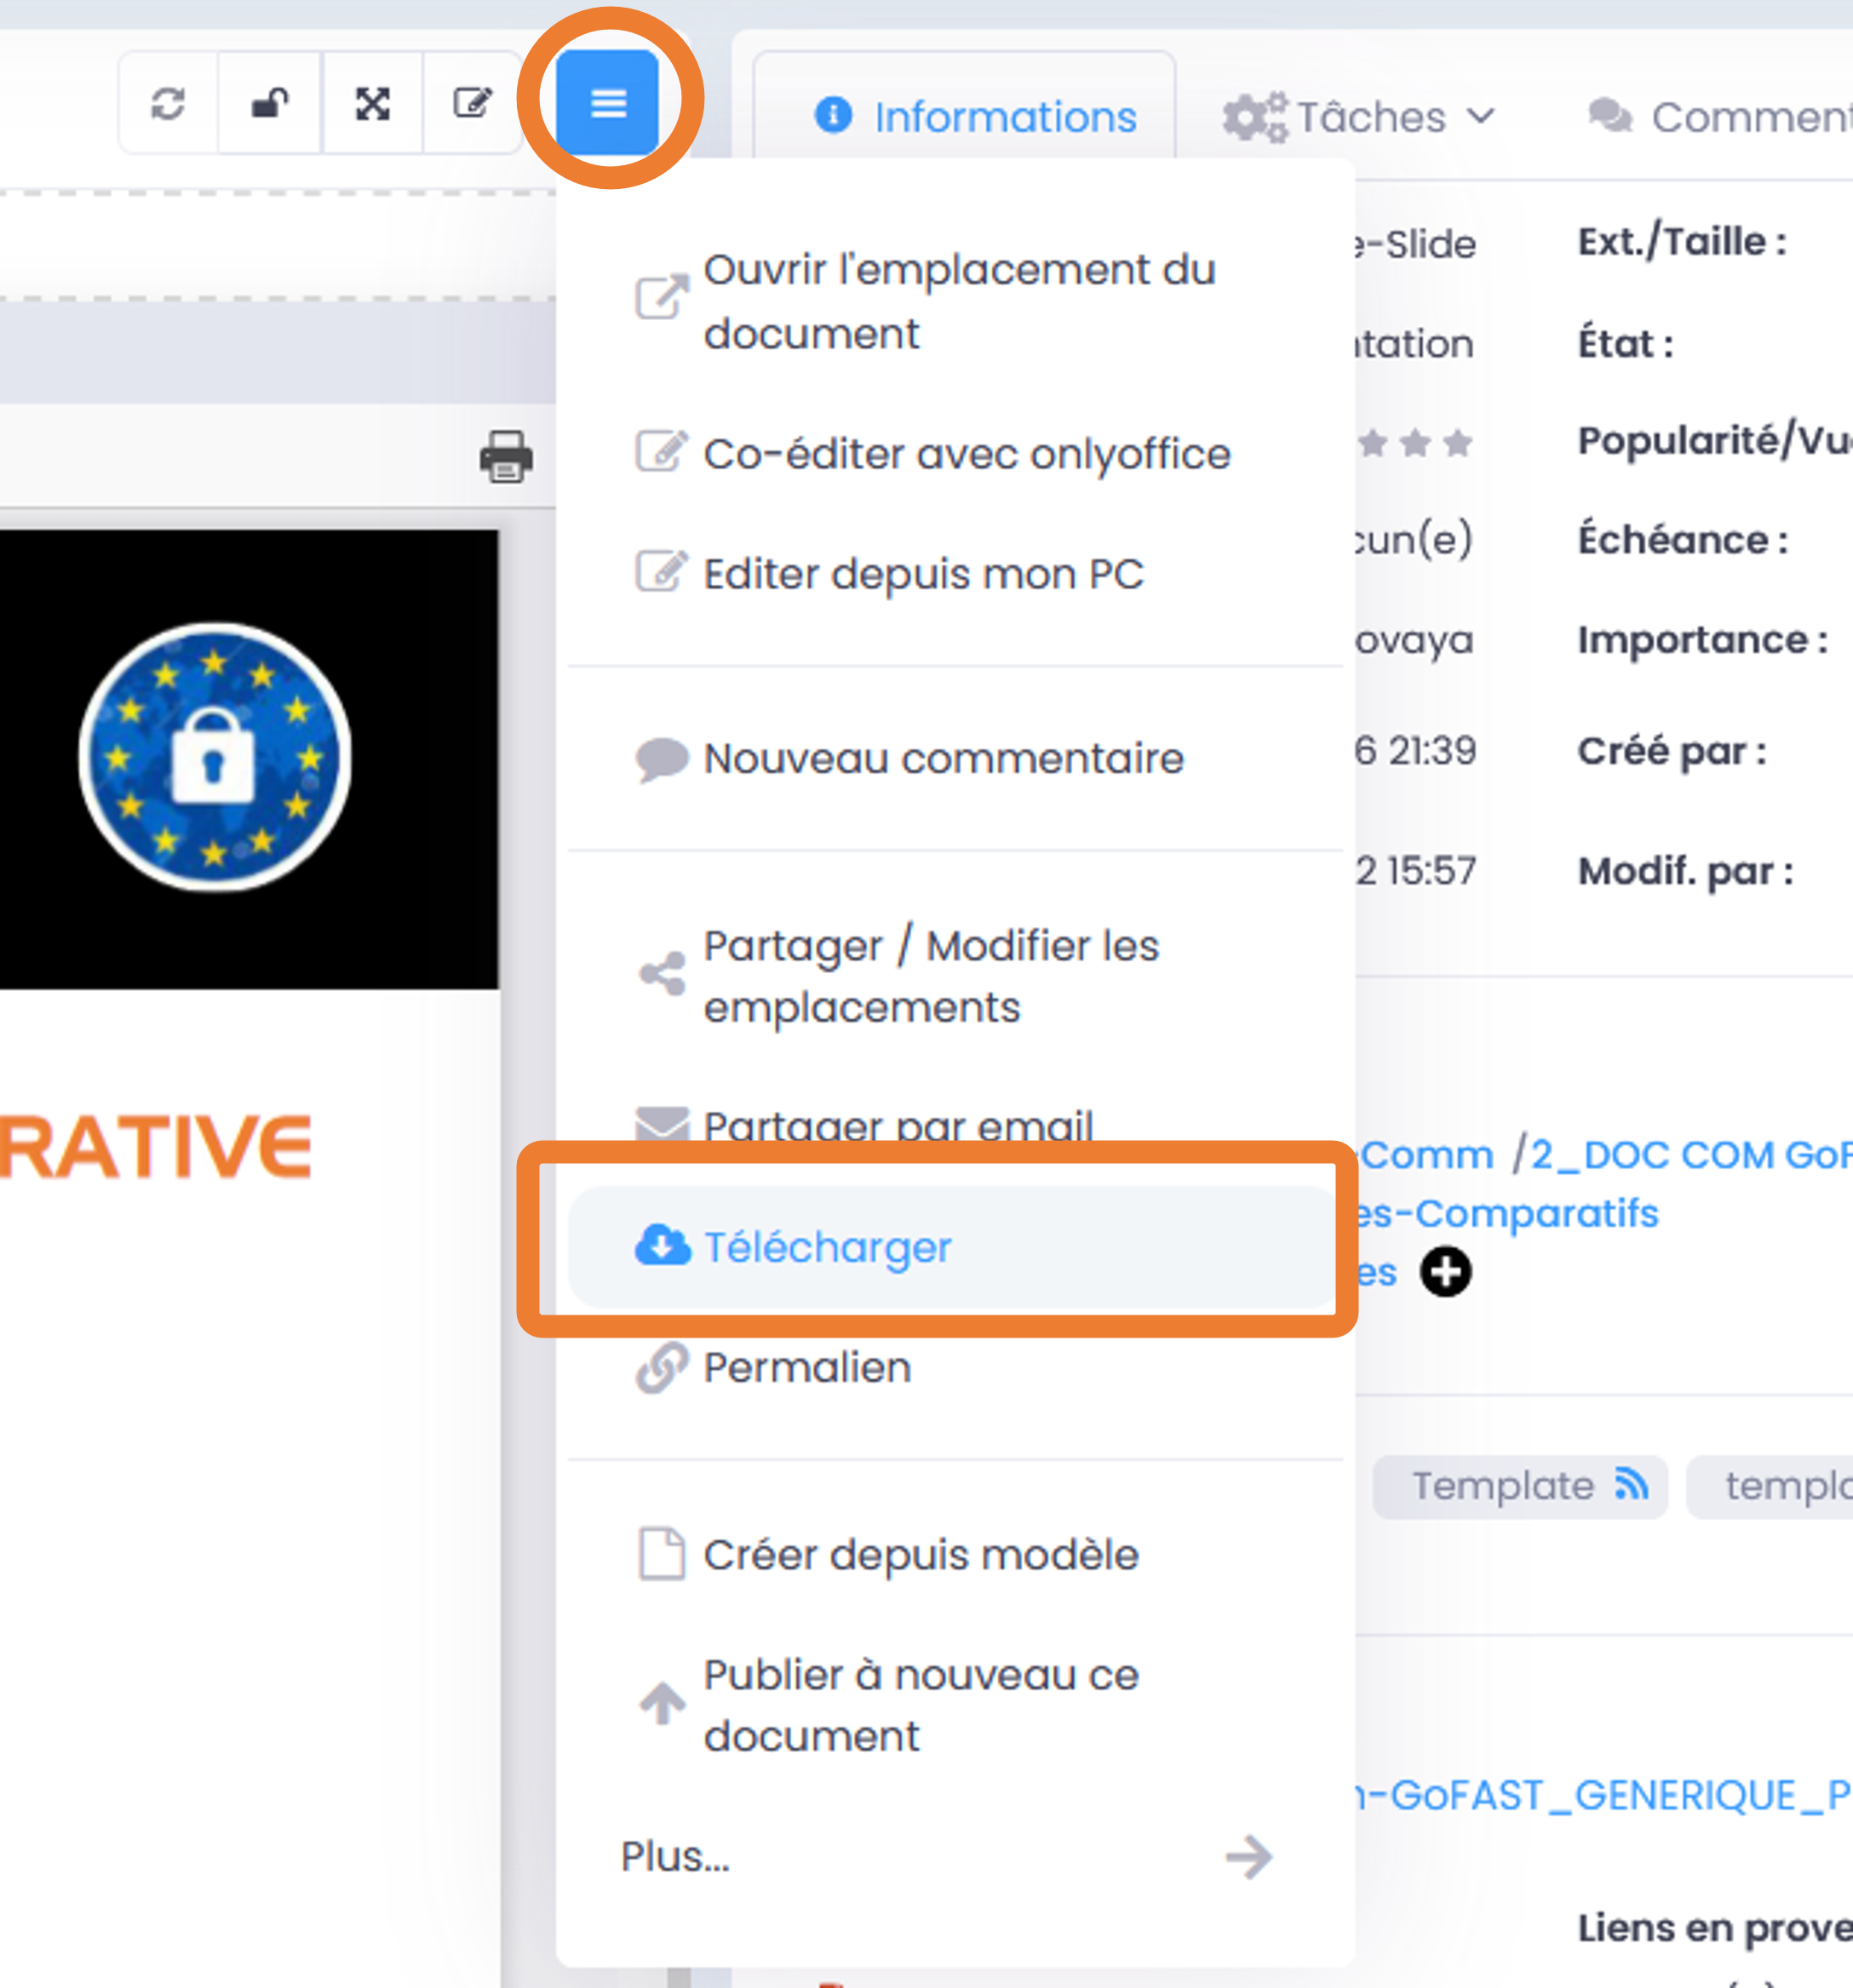
You will probably see this message asking if you want to open, save the document or cancel the action.
If you just want to open it for reading => « Open » / « Ouvrir »
If you want to save it on your PC => “Save” / “Enregistrer” and the explorer of your computer will open to be able to save this document where you want.
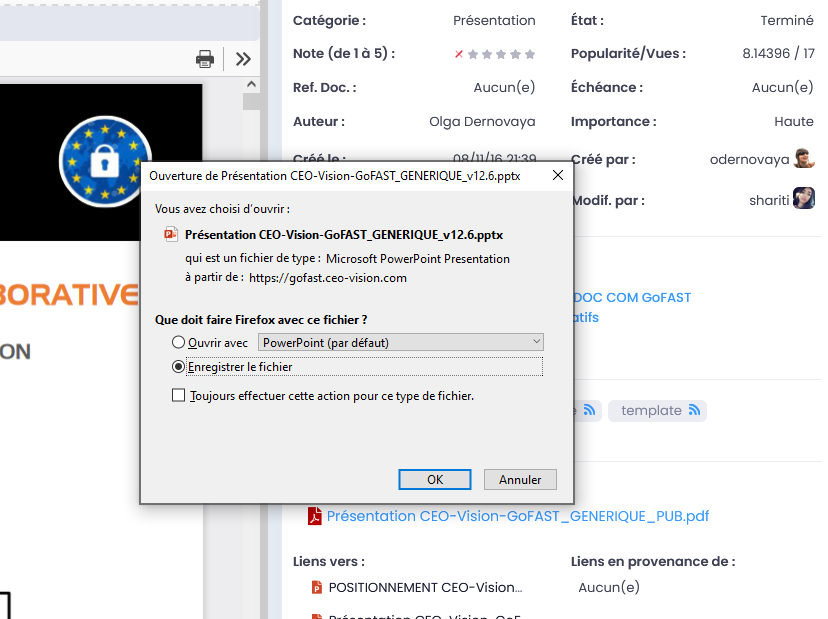
The document may be downloaded directly (depending on the configuration of your PC), and you will find it on your PC (often the “downloads” folder on Windows).

Note
If you download a document and make changes to it, they will not sync to GoFAST. You will then have to add the document in the same location (drag/drop as a new version) to share this new version on GoFAST. This creates a risk because if another colleague has made changes online in the meantime, you will overwrite their version and their changes will be lost (but recoverable by searching for previous versions in the “Versions” tab).
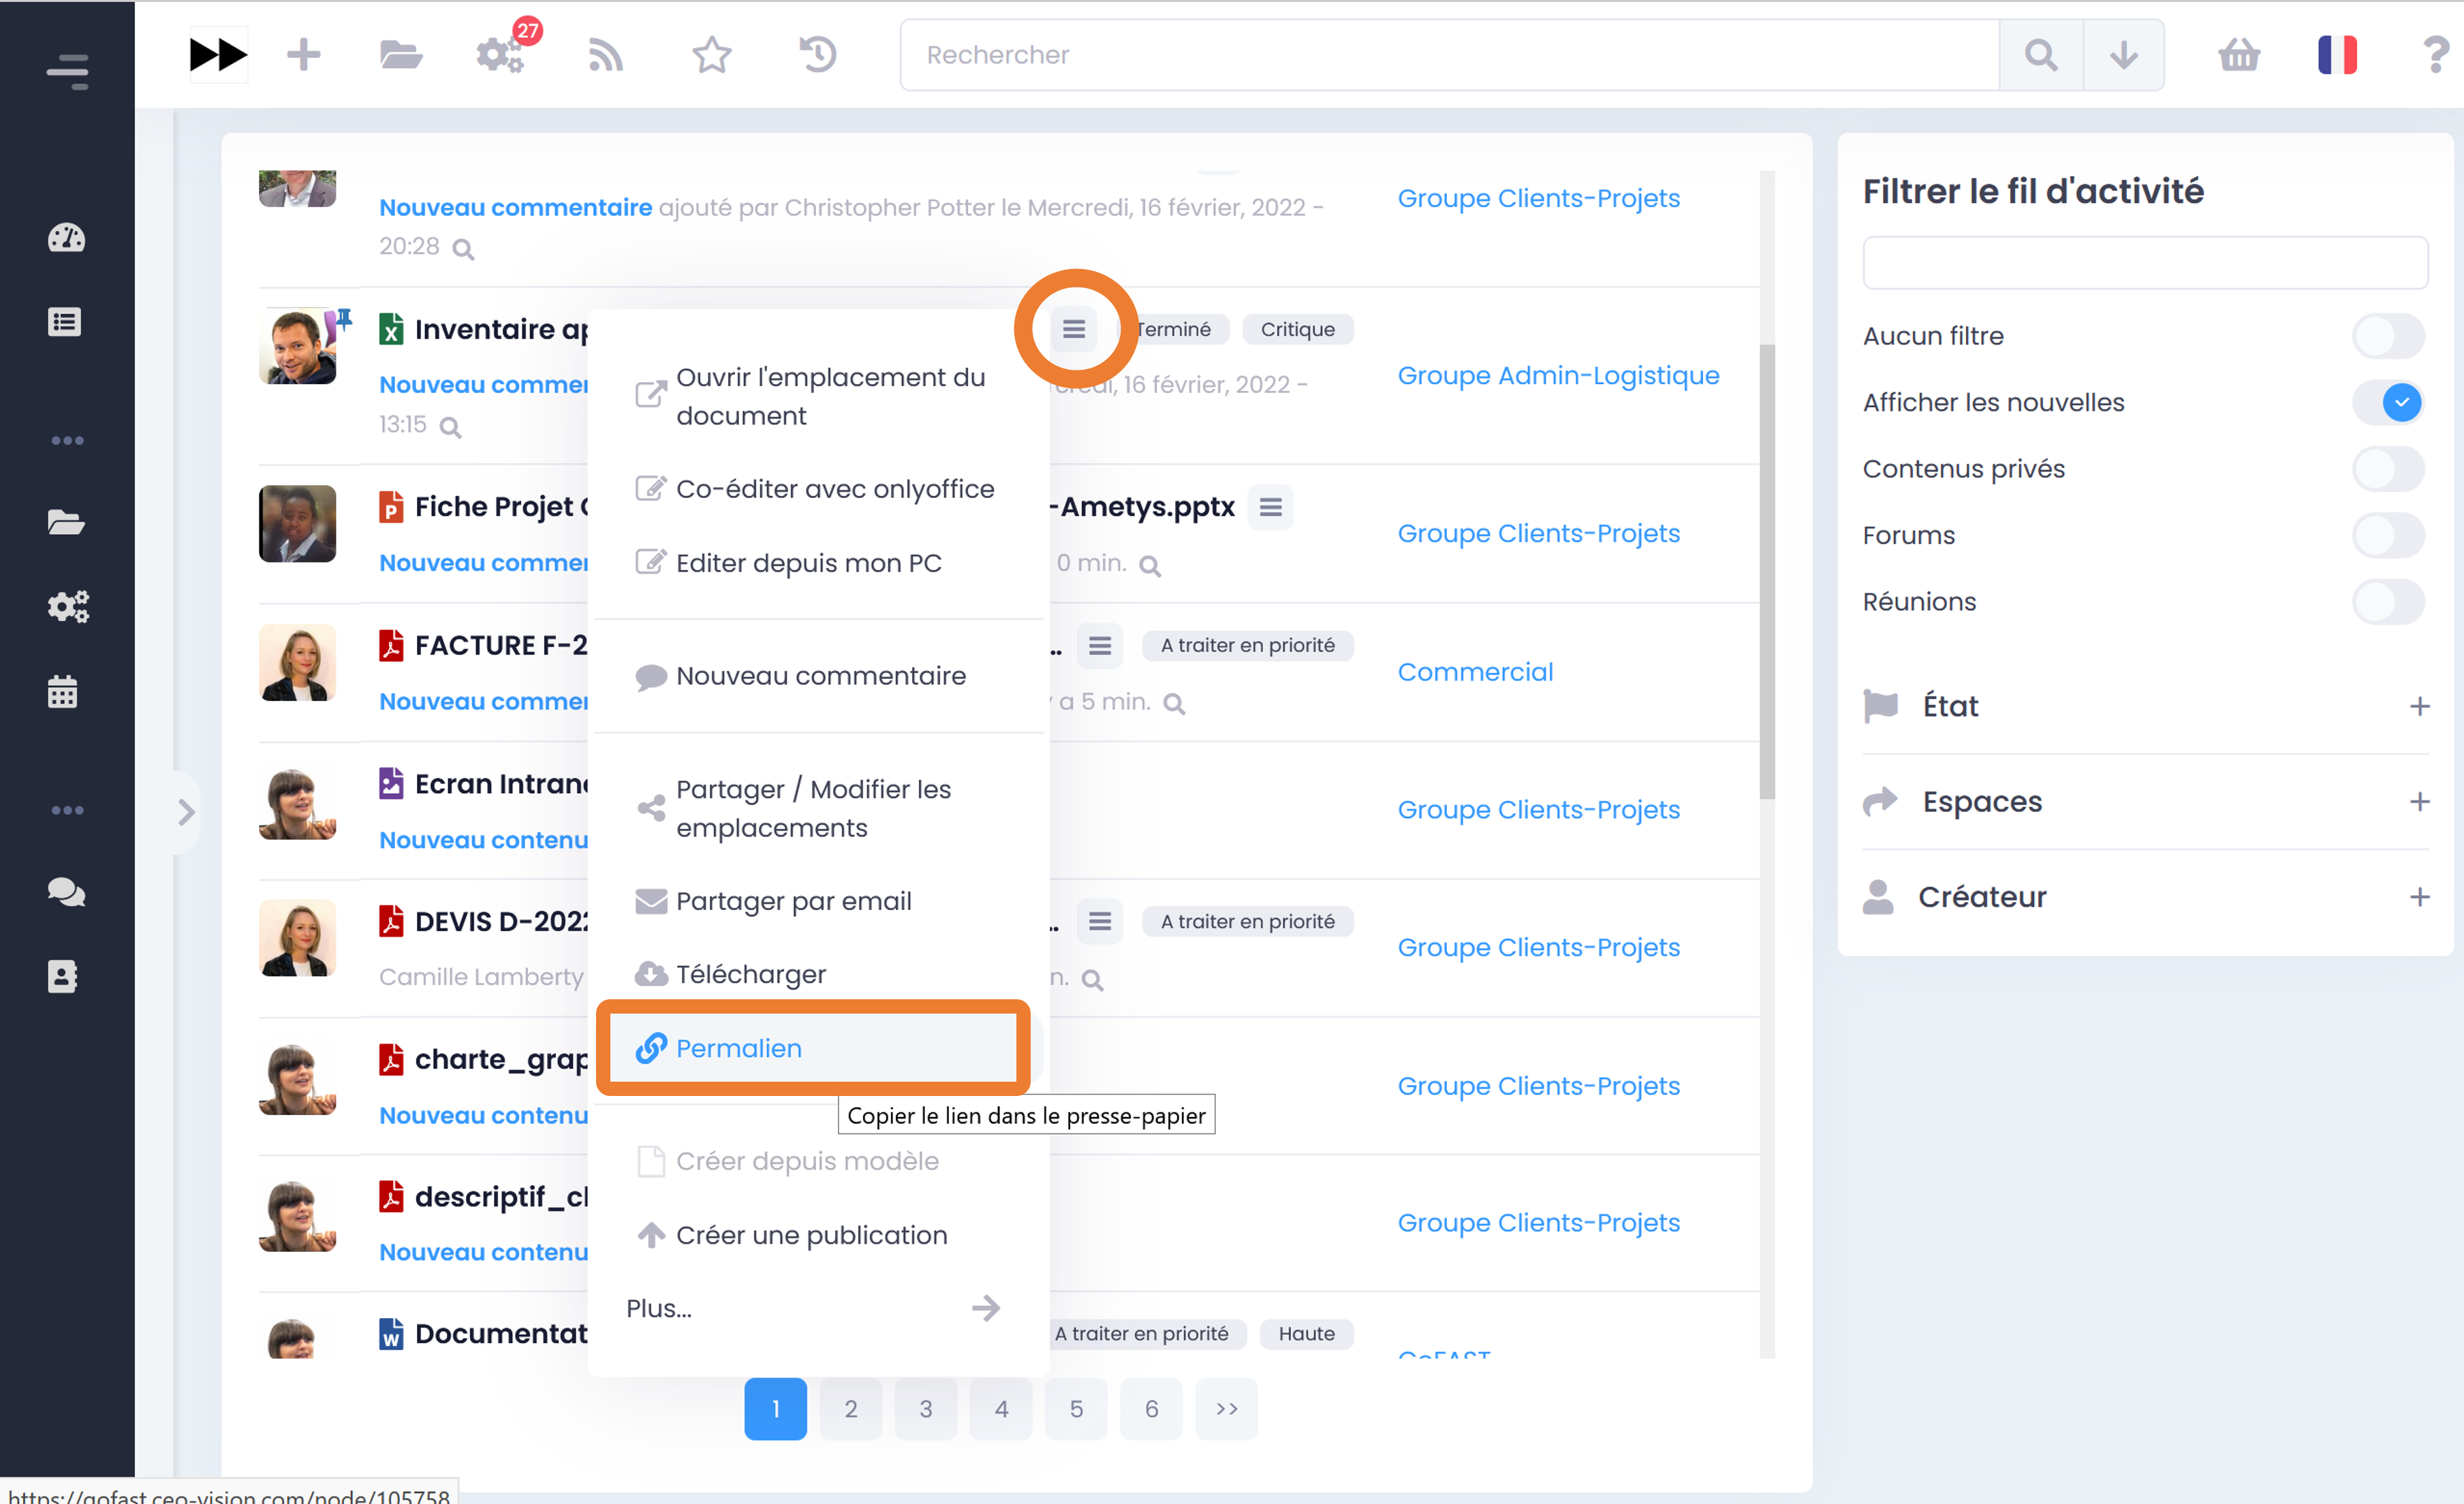
Permalink
A document permalink corresponds to the “URL” link that leads to the document page. You can copy and paste anywhere you want to return to this document with a single click, for example in a chat (instant messaging), email (so attachments are no longer sent), or in a comment for another document, etc.
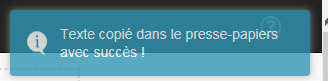
Through the contextual actions menu (“Hamburger” menu), click once on “Permalink”, you will see a blue message indicating that the link has been copied to your PC’s clipboard. Then paste it in the desired location (right click then paste).
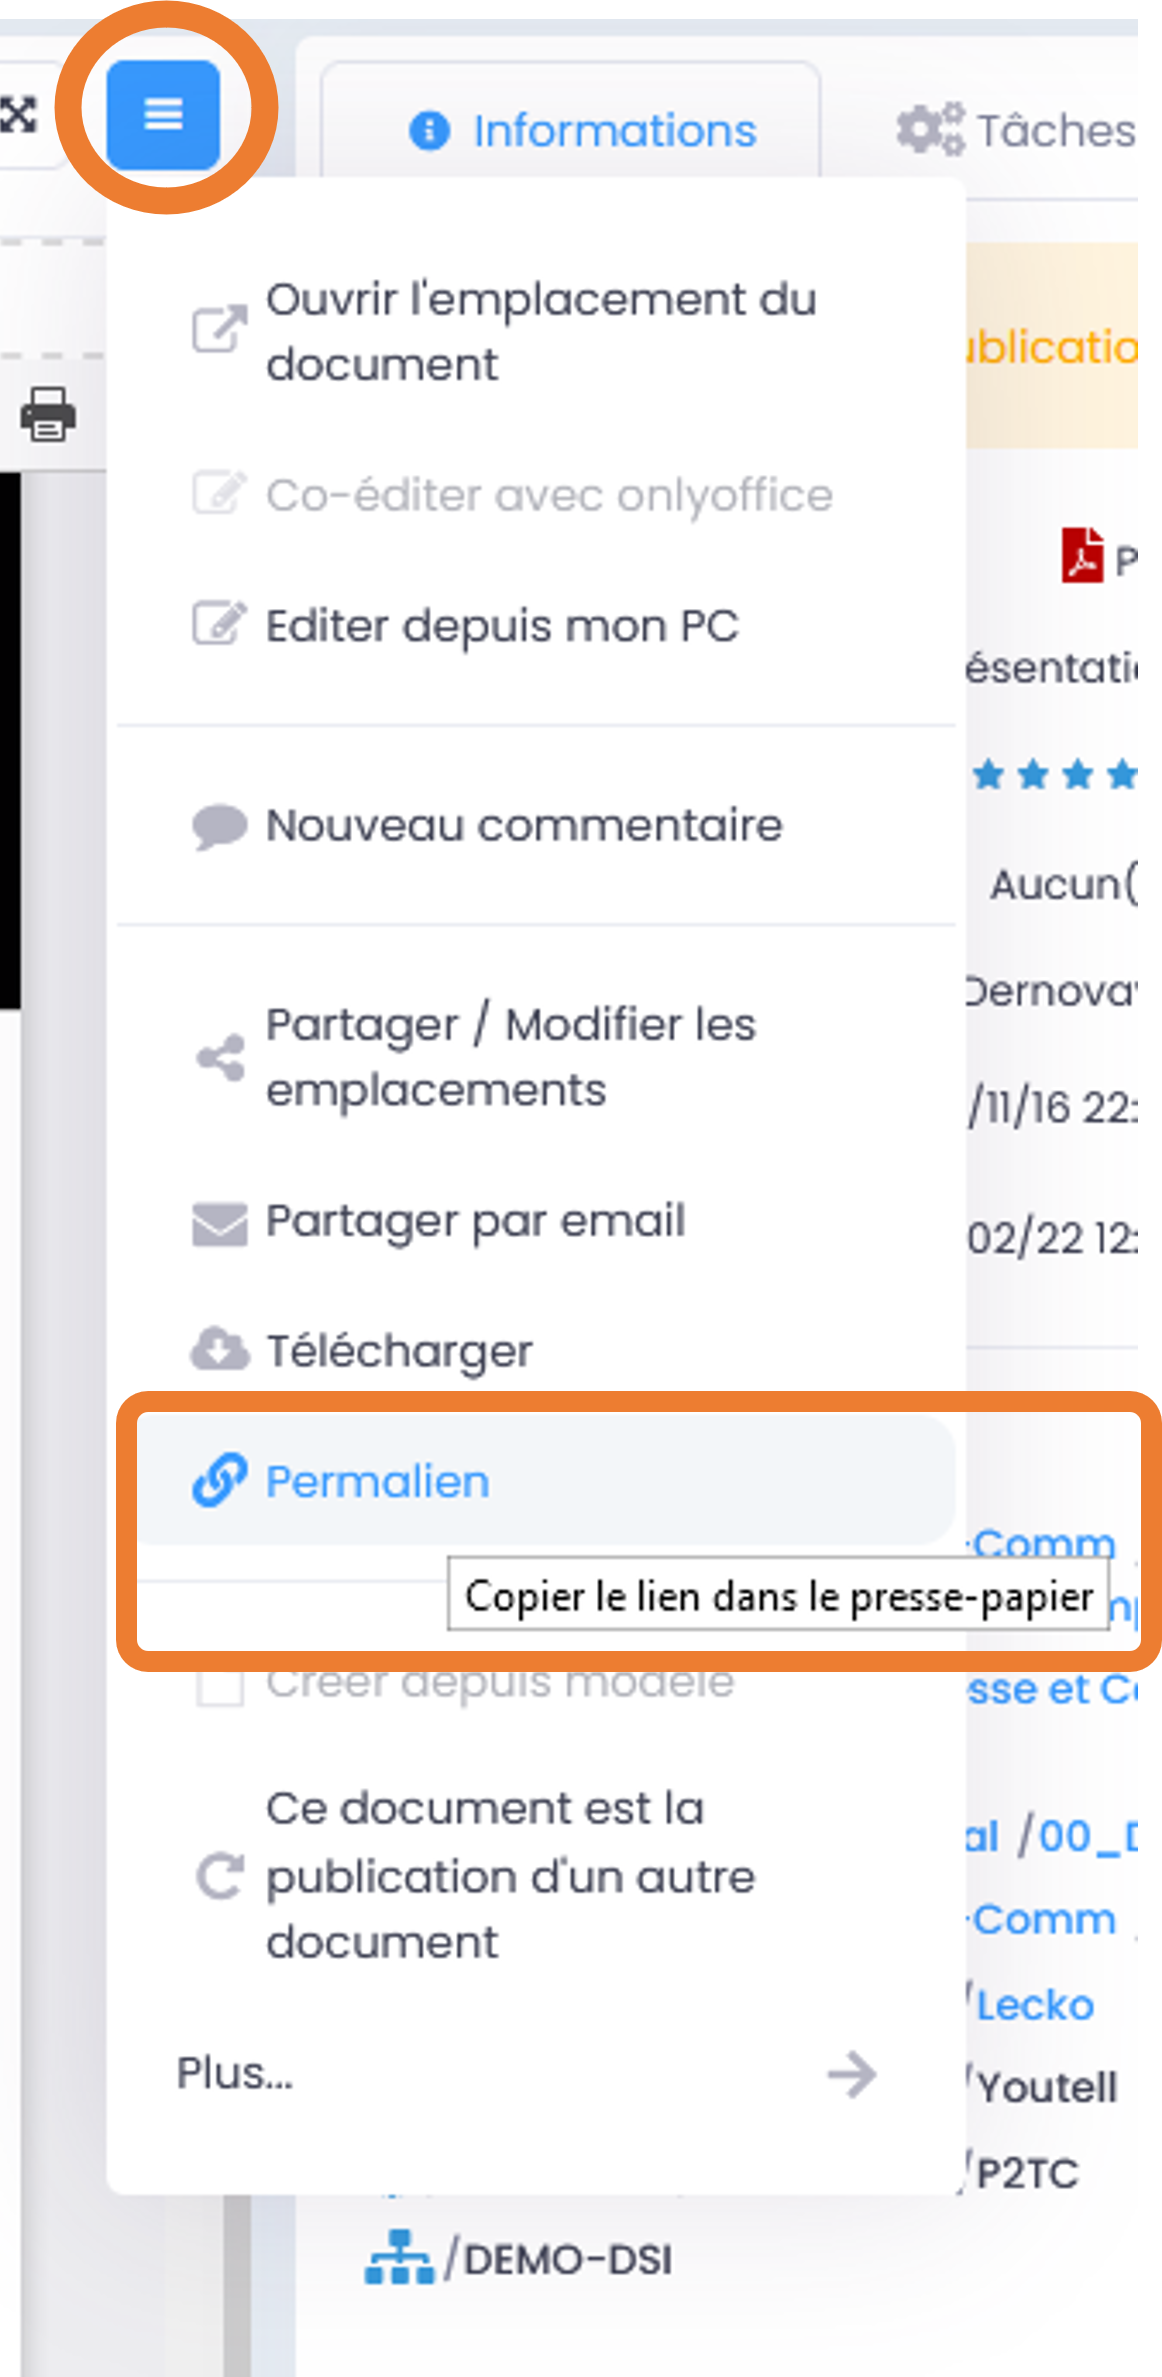
You can find the permalink also in the shortcuts from the activity feed. Always from the contextual actions menu next to the document name.
Here’s what happens when you paste it: https://gofast3-integration.ceo-vision.com/node/4551
Simply click on it to return to the document page (if you are not a member of at least one of the Spaces where this document is located, you will not have access to it). This provides more security as the risk of errors is reduced since we often have the ability to see when we share attachments via email). It is possible to get a permalink anywhere a document is cited: right-click on the document name and “copy link address” (except in File Explorer, or right-click opens a “hamburger” menu where you can click on “Permalink”).
Create from template
All documents identified as templates have a “Create from template” button via the “Hamburger” menu (contextual actions menu). If you click on “Create from template”, you will be redirected to the document creation page, “From template” tab. To find out how to create a new document from this form, please refer to the section: “How to create a new Document”.
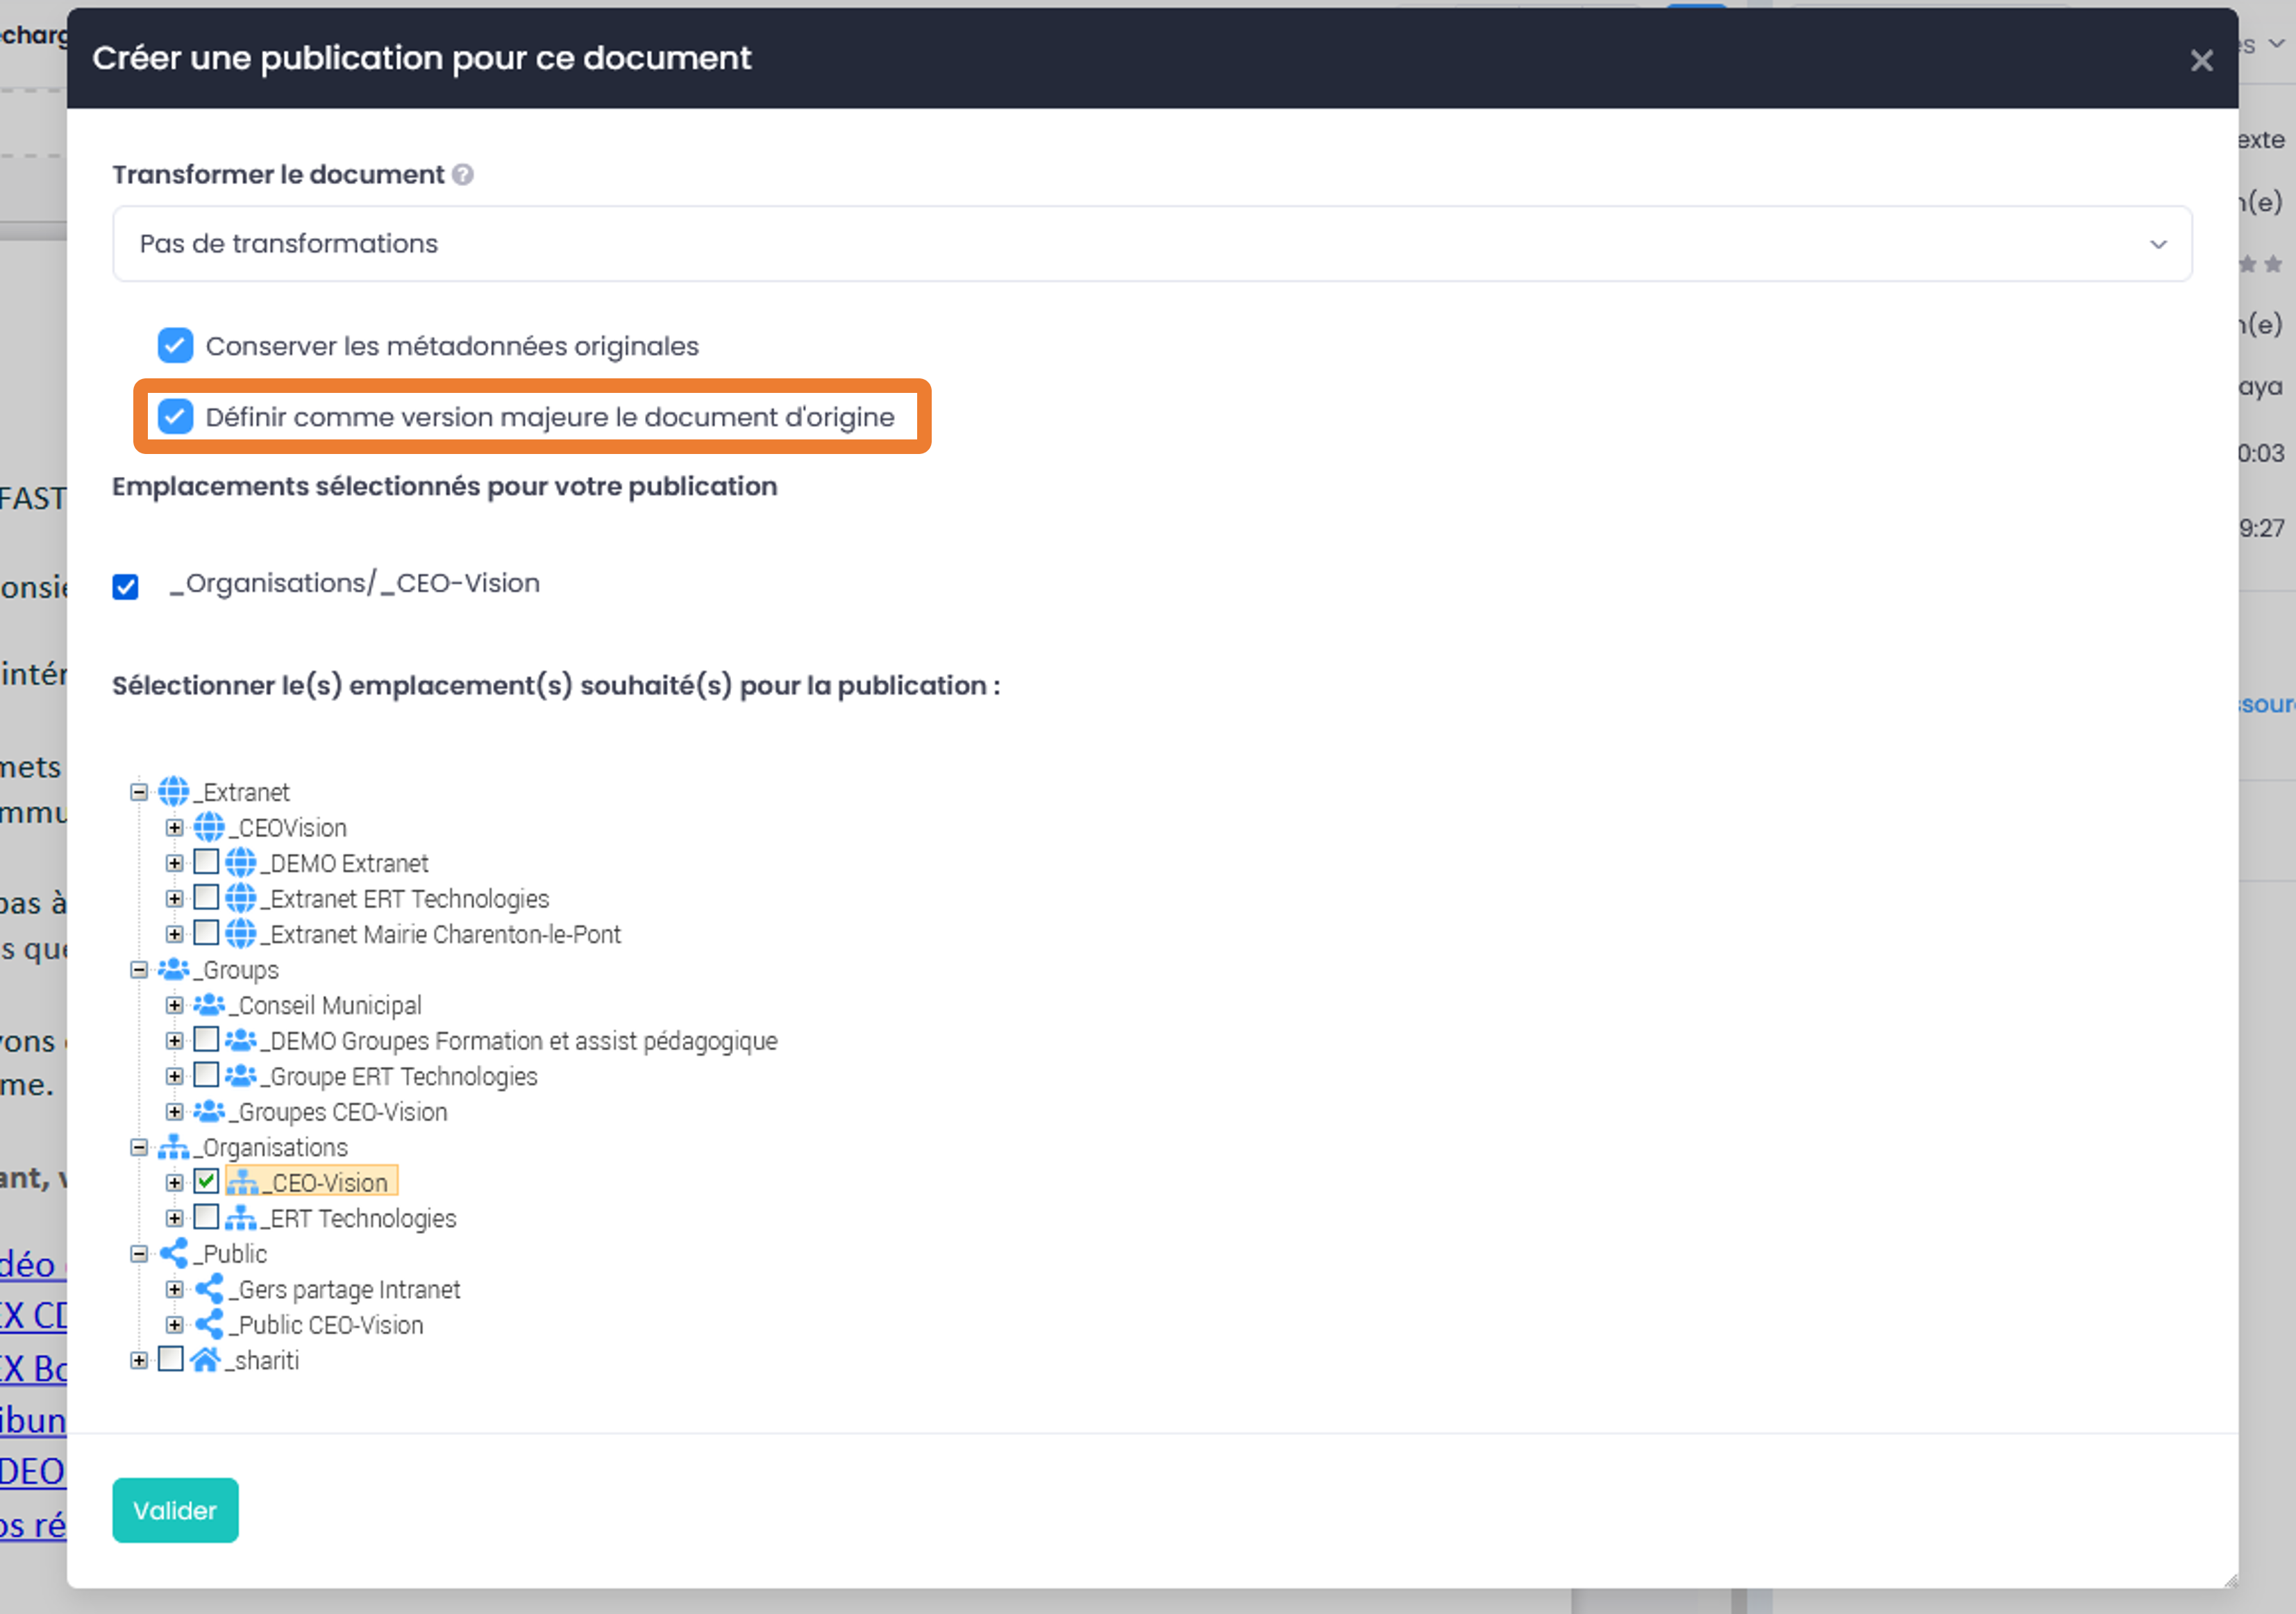
Create a publication
Objective of a publication: to share with a wider audience (e.g. DG, Partners, Knowledge Base, etc.) a completed and validated version, created from a working document. The working document remains in the Space(s) dedicated to its development, visible only to the users in charge, while the Publication is visible in other Collaborative Spaces dedicated to viewing.
- Main advantages of the Publication:
Independent management of the access/sharing of the two documents (publication and the original working document).
You can avoid sharing all the working comments made during the development of the document. The Publication then has its own comment flow.
Having separate version management (each document has its own version management)
Having a link between the working document and its publication so that you can switch from one click to the other (note: if a user with access to the Publication is not a member of the Spaces where the original document is located, they will be denied access if they attempt to view it).
Being able to update the Publication from the Working Document at any time (for example if the Working Document has been changed over time and the original publication is no longer current).
Having a separate metadata/information management between the Publication and its original working document (e.g. “awaiting signature” state for the Publication, and “done” state for the working document).
Notifying users who have access to the Publication of its updates and comments, avoiding notifying them of the activity related to the working document.
Note
You can therefore have a large number of versions of a working document within a unit, for only 1 or 2 versions of the Publication.
The creation of a Publication thus consists of creating a new document (often in PDF format) from the latest version of the existing working document (often an office file). Go through the “Hamburger” menu (contextual actions menu) available on the document page (or right-click in File Explorer) and click “Create Publication”.
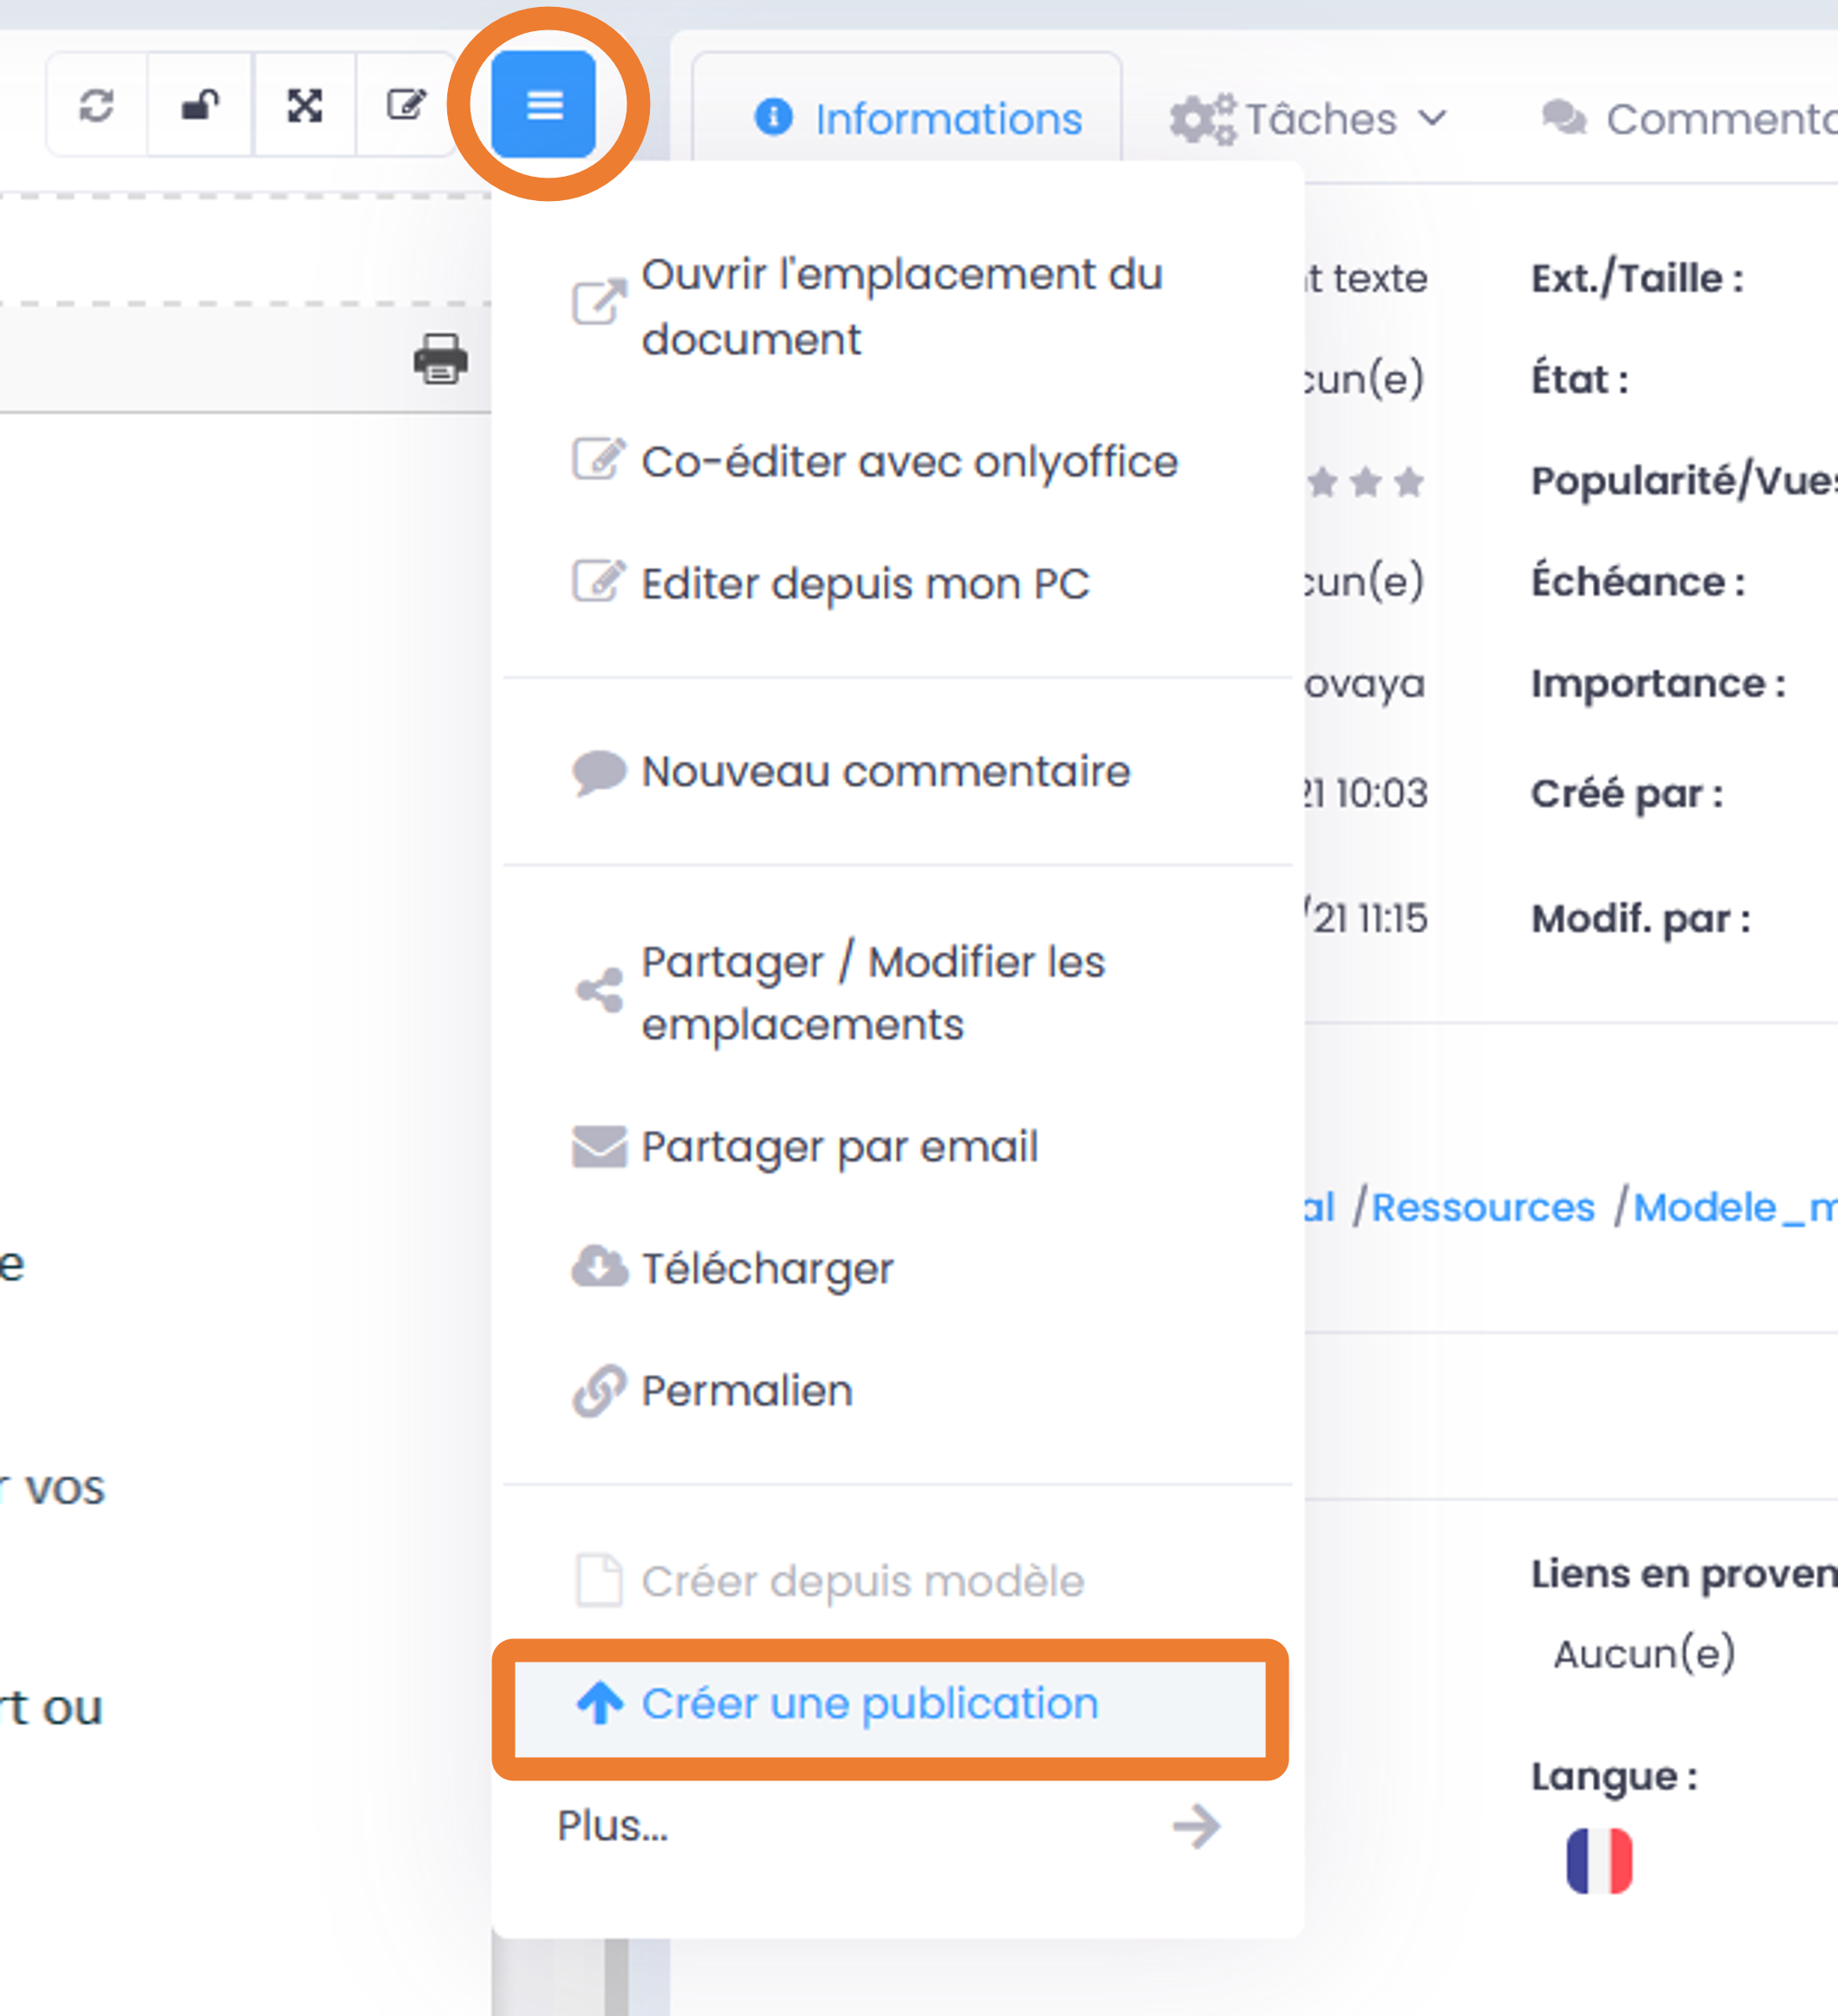
A window will open allowing you to select the desired locations for your Publication. The locations of the working document are pre-checked so that you can both share the publication in new Spaces, while classifying it in the same locations as the original document (very convenient when browsing the document tree). Once the locations are selected, click “Validate”.
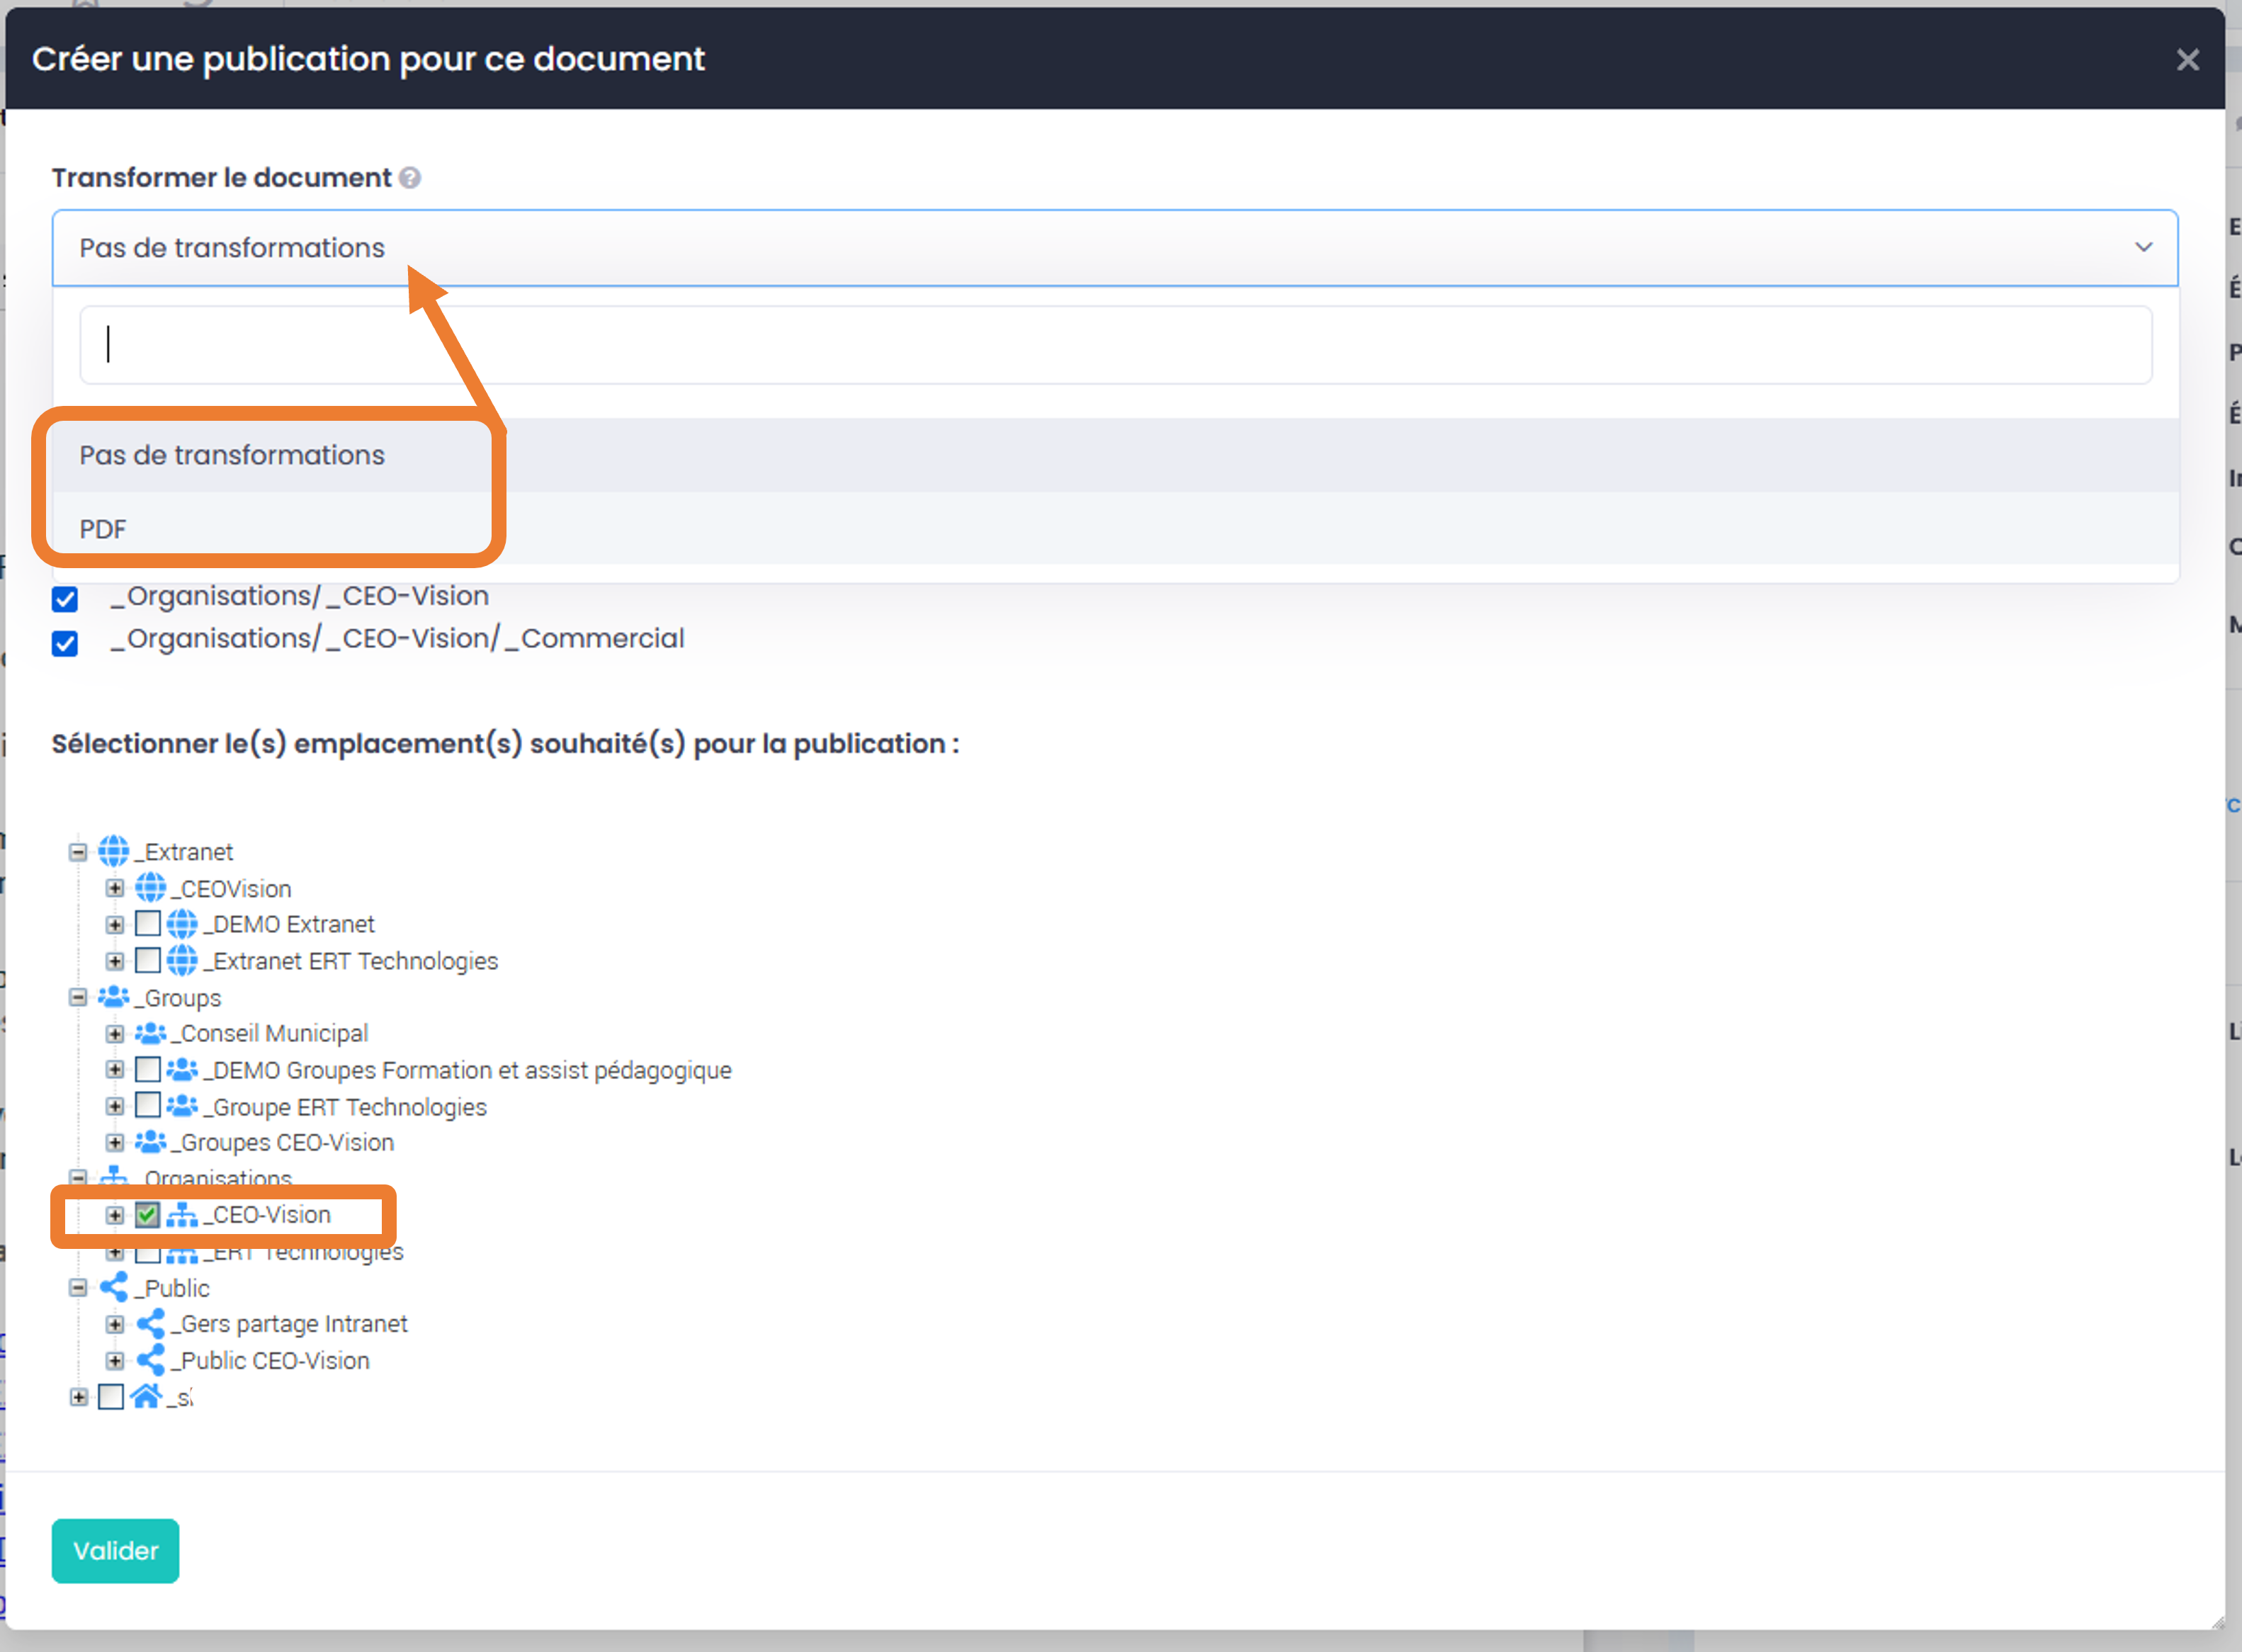
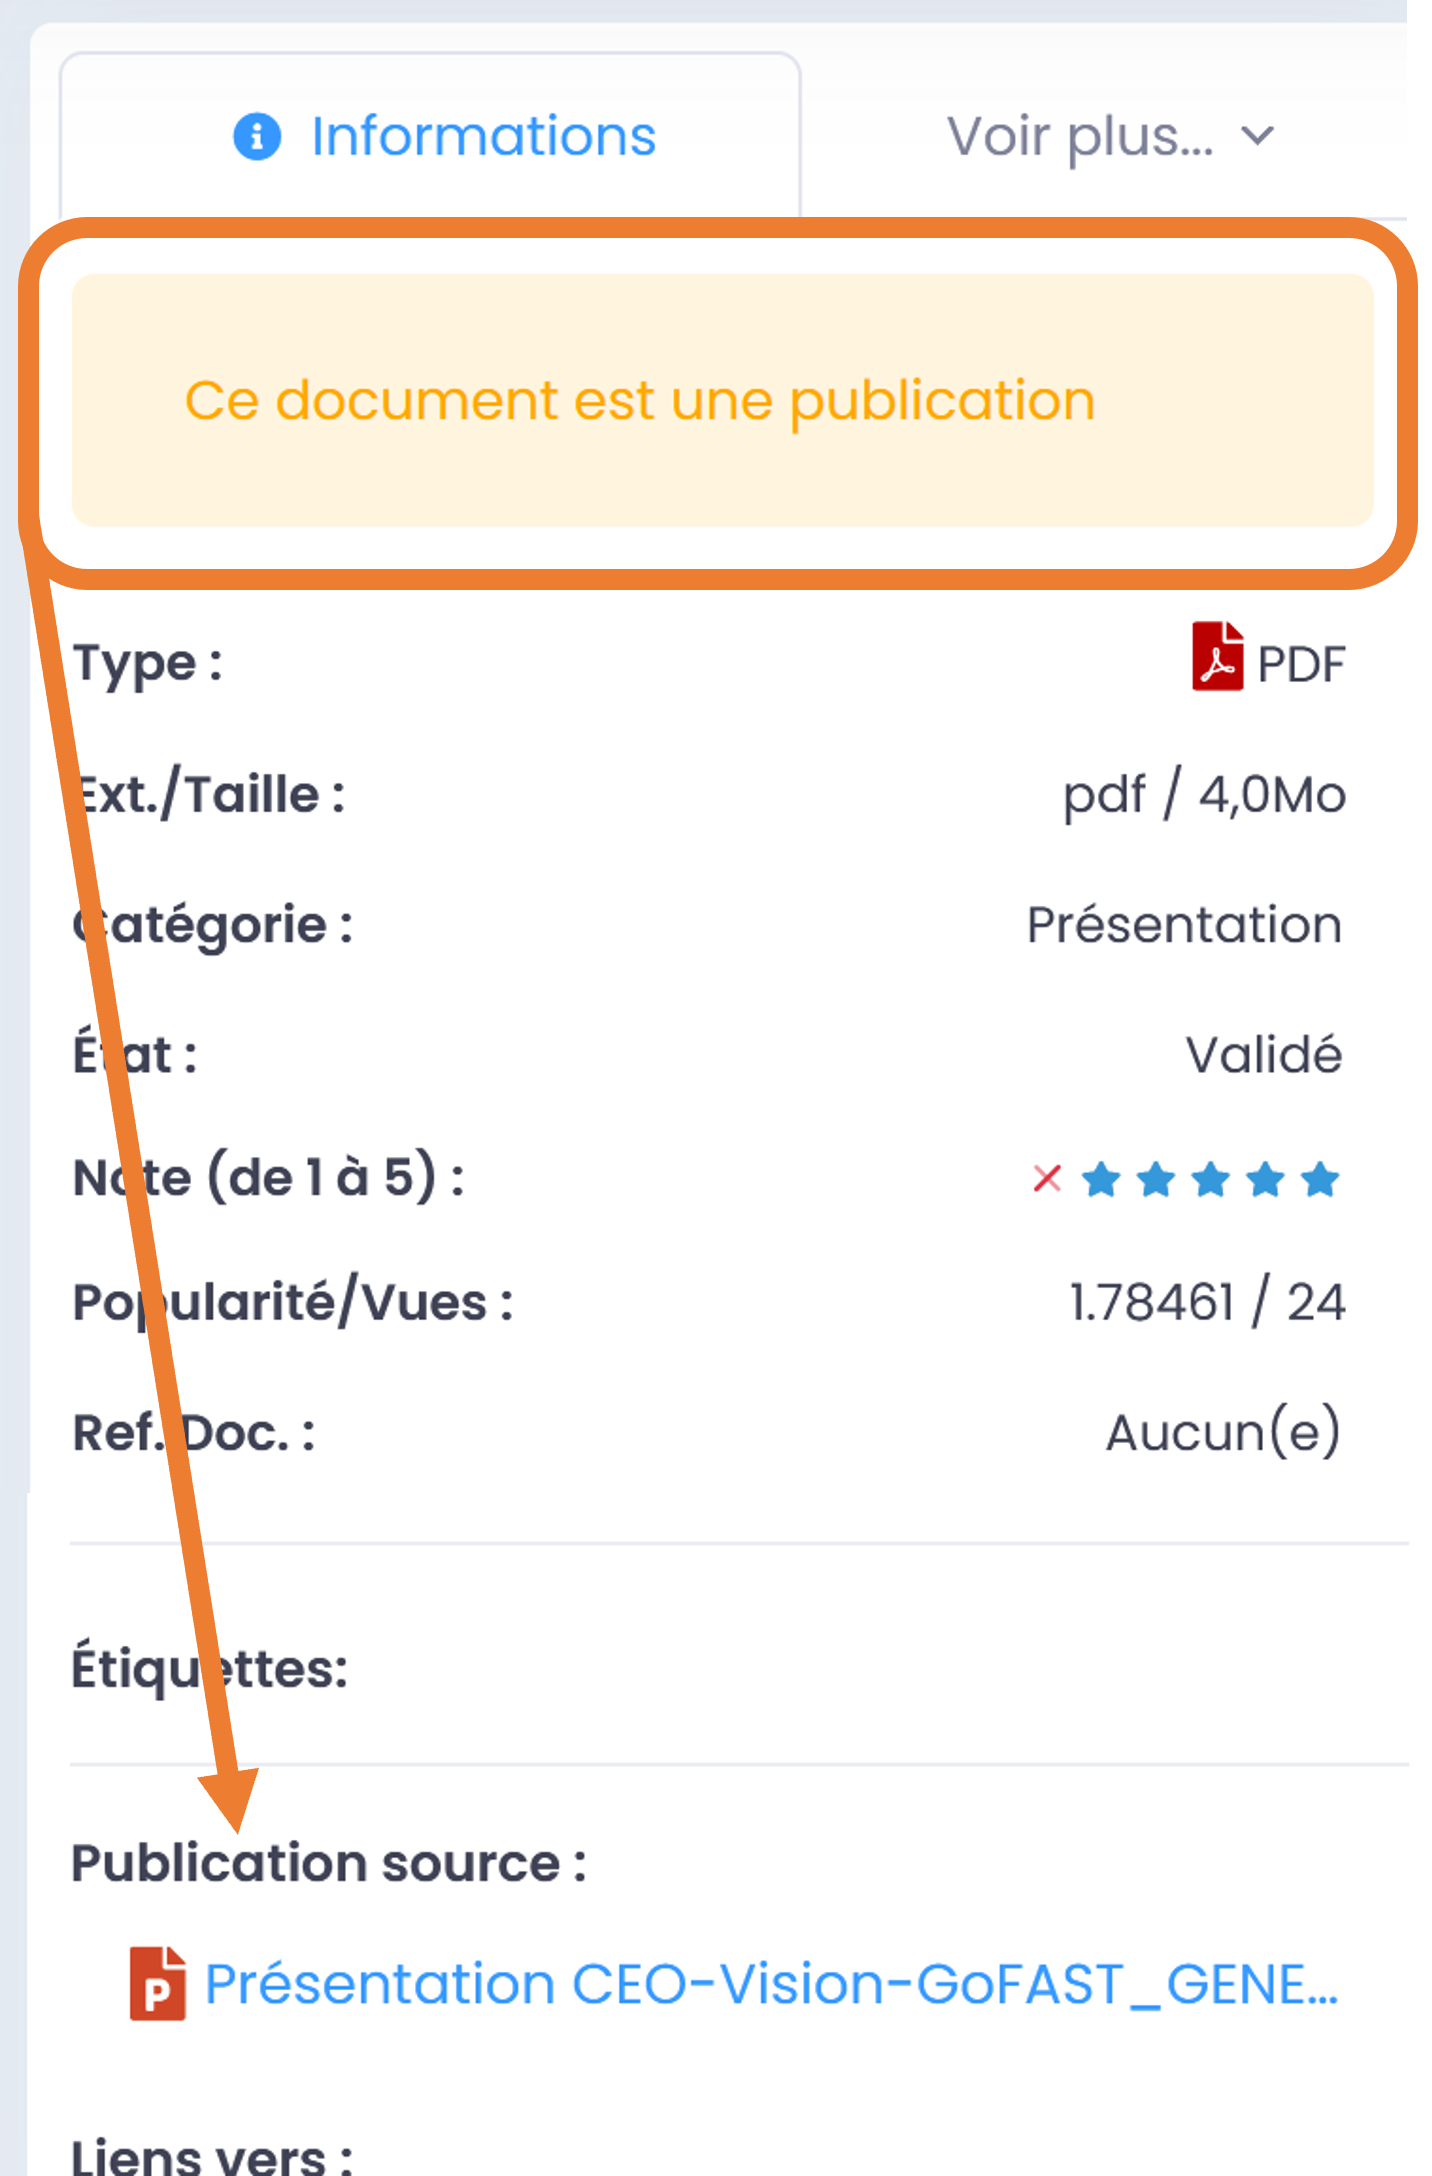
You will be redirected to this new publication page where you can check the document and its location.
Note
Publication automatically takes _PUB at the end of the title. E.g. for a file named “Contraсt-A”, the Publication will become “Contraсt-A_PUB”.
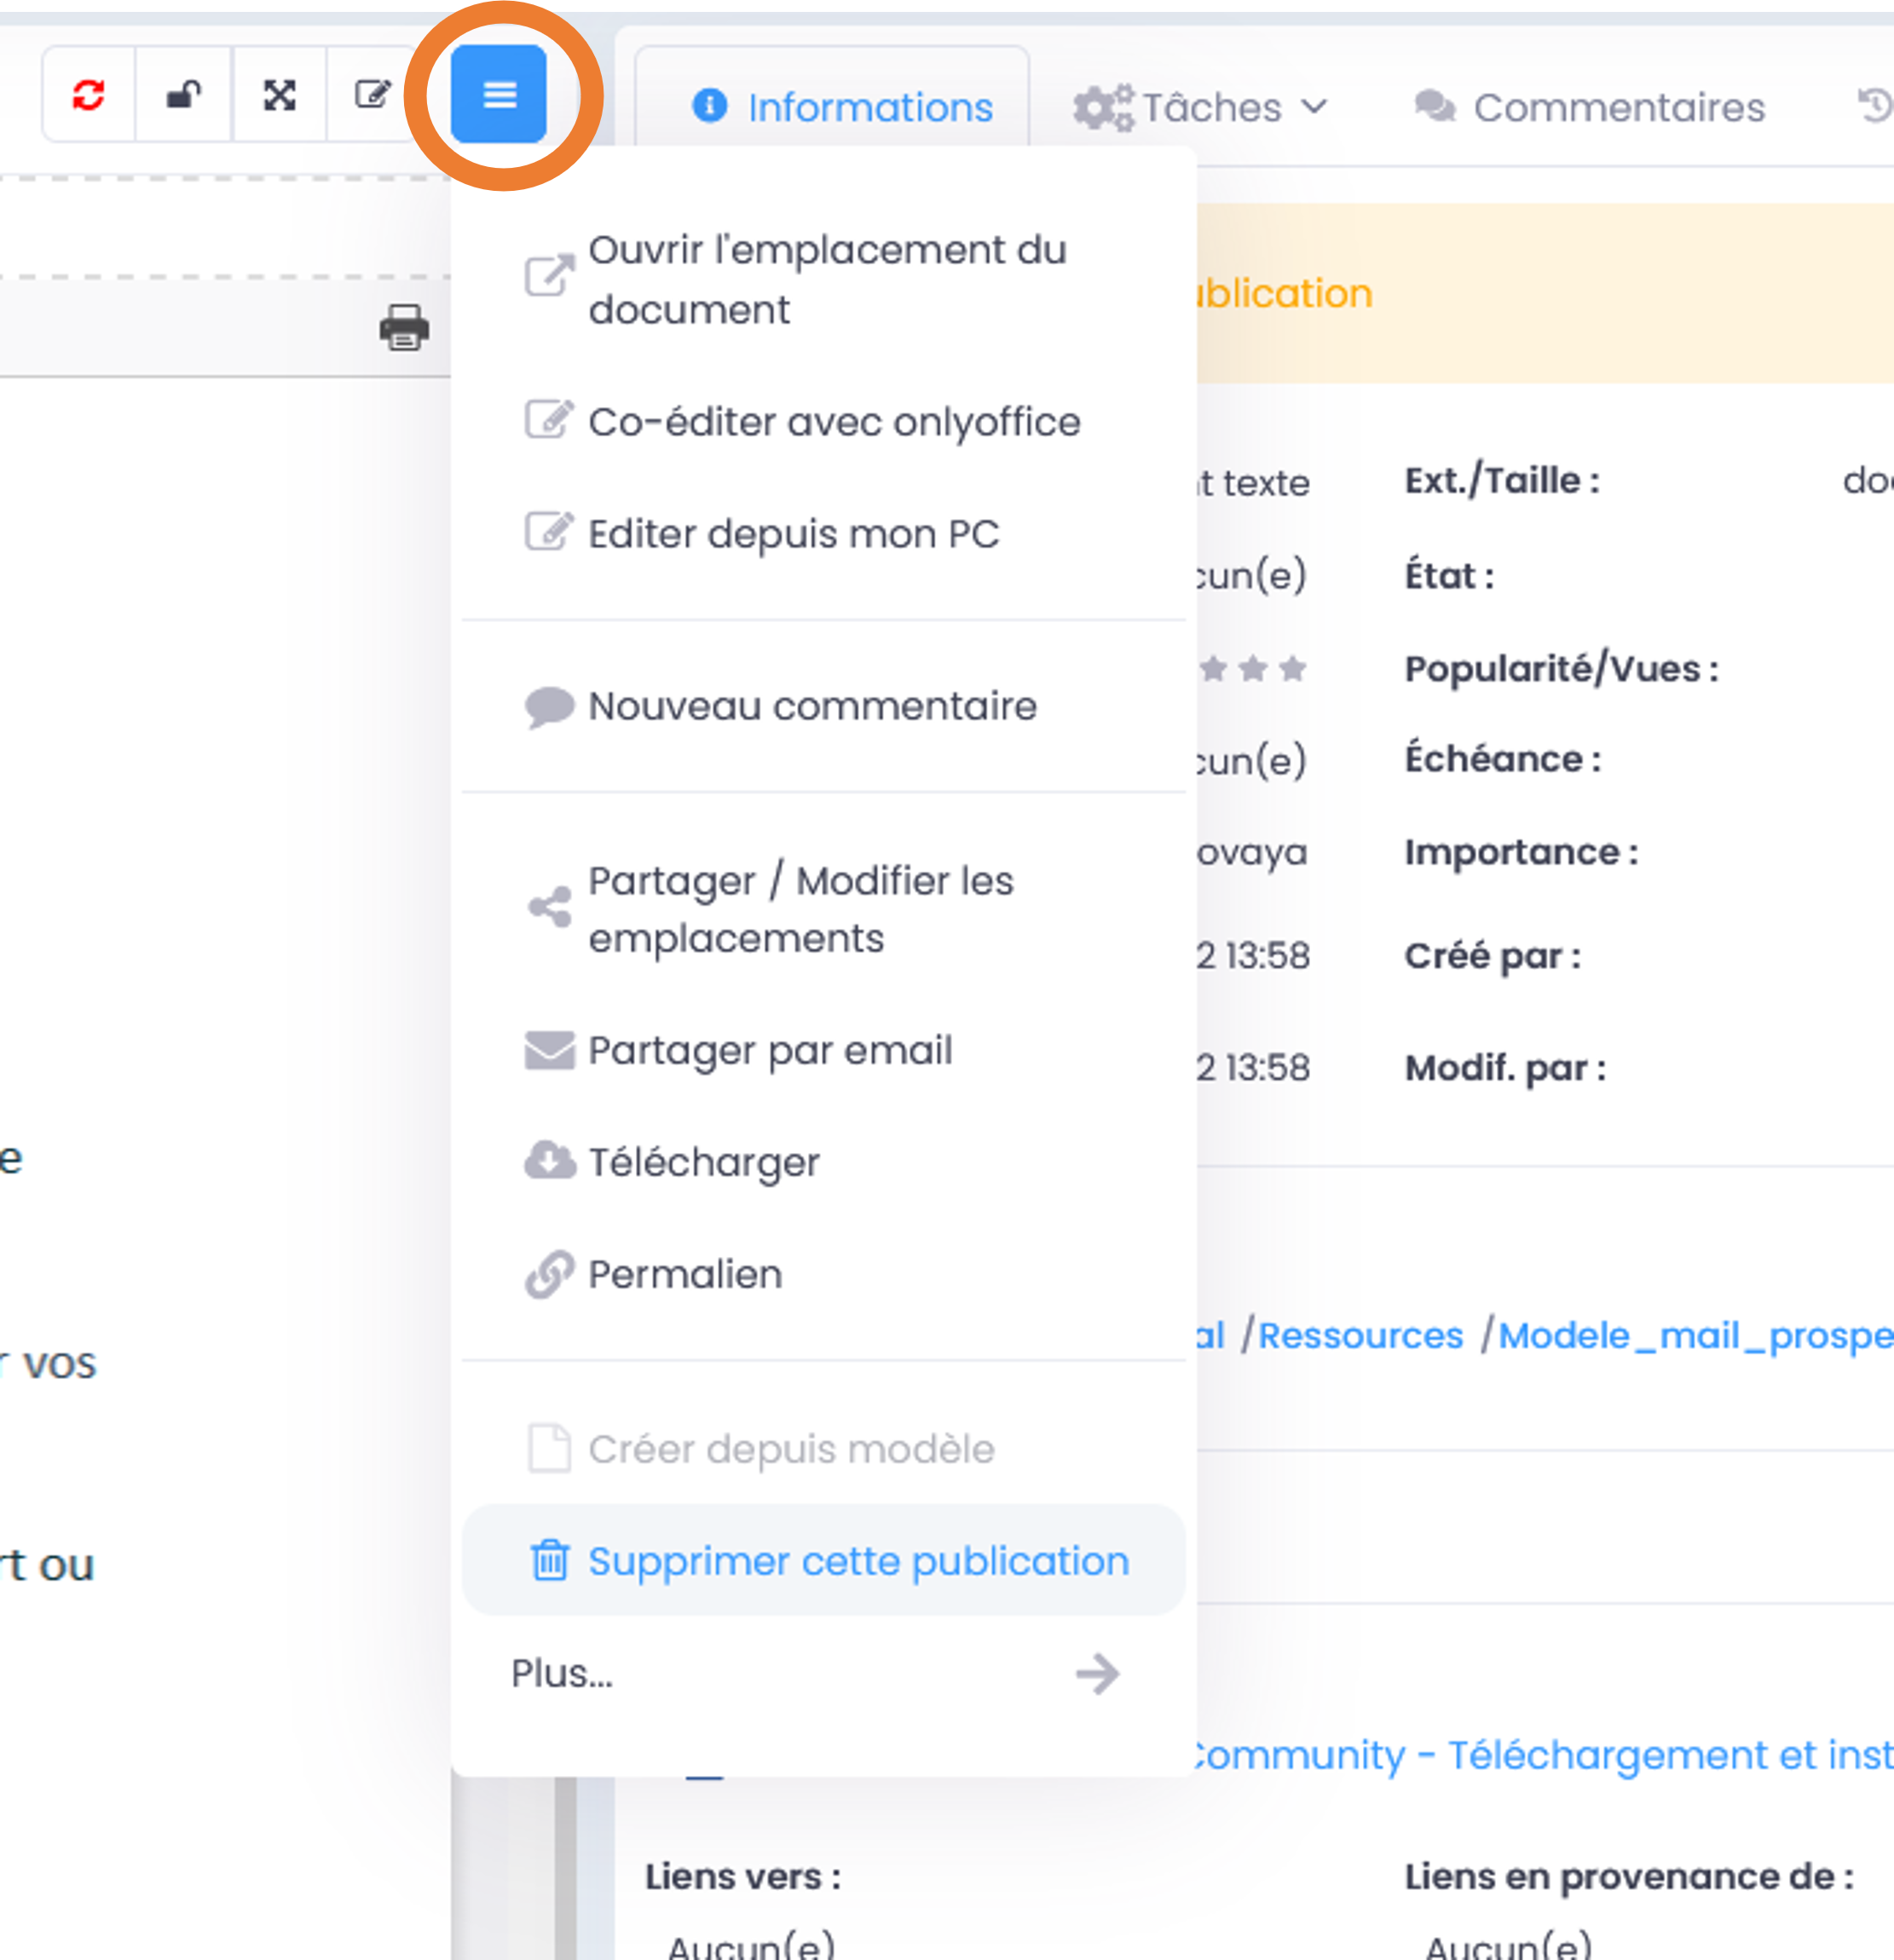
At any time, you have the option to update the Publication:
From the working document, go to the “Hamburger” menu
Click on “Publish again this document”
With each update made in this way, the Publication will take a major version number (e.g. from 1.0 to 2.0).
For each version of the working document that generated a Publication (e.g. 3.14), we can see the associated Publication number (e.g. 2.0), it takes this form: version 3.14(2.0).
You can delete a Publication from the “Hamburger” menu, in “View More” click on “Delete Publication”. This will only delete the Publication, but not the original working document.
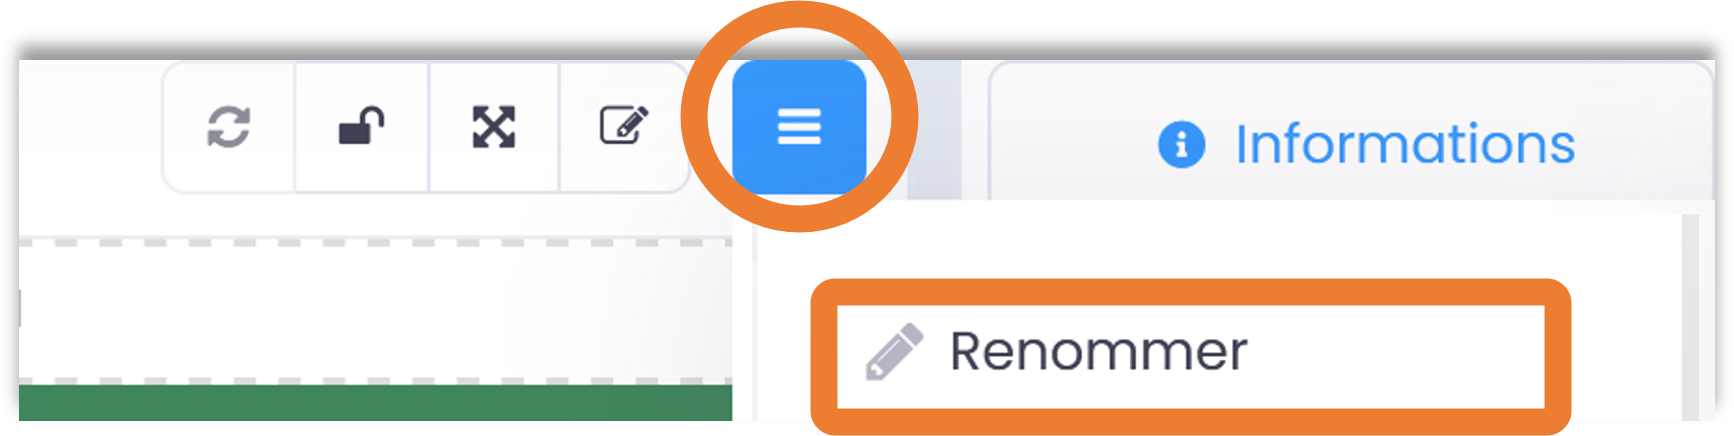
Rename
To rename a document, you must have at least the role of “Contributor” in the Space where it is located. You can rename a document from:
The file explorer: right click on the document, then in the menu click on “Rename”.
The document page by clicking on the title (above the document preview).
Change the title in the field and click on the validation icon (or just exit the field by clicking somewhere else when renaming from the document page).
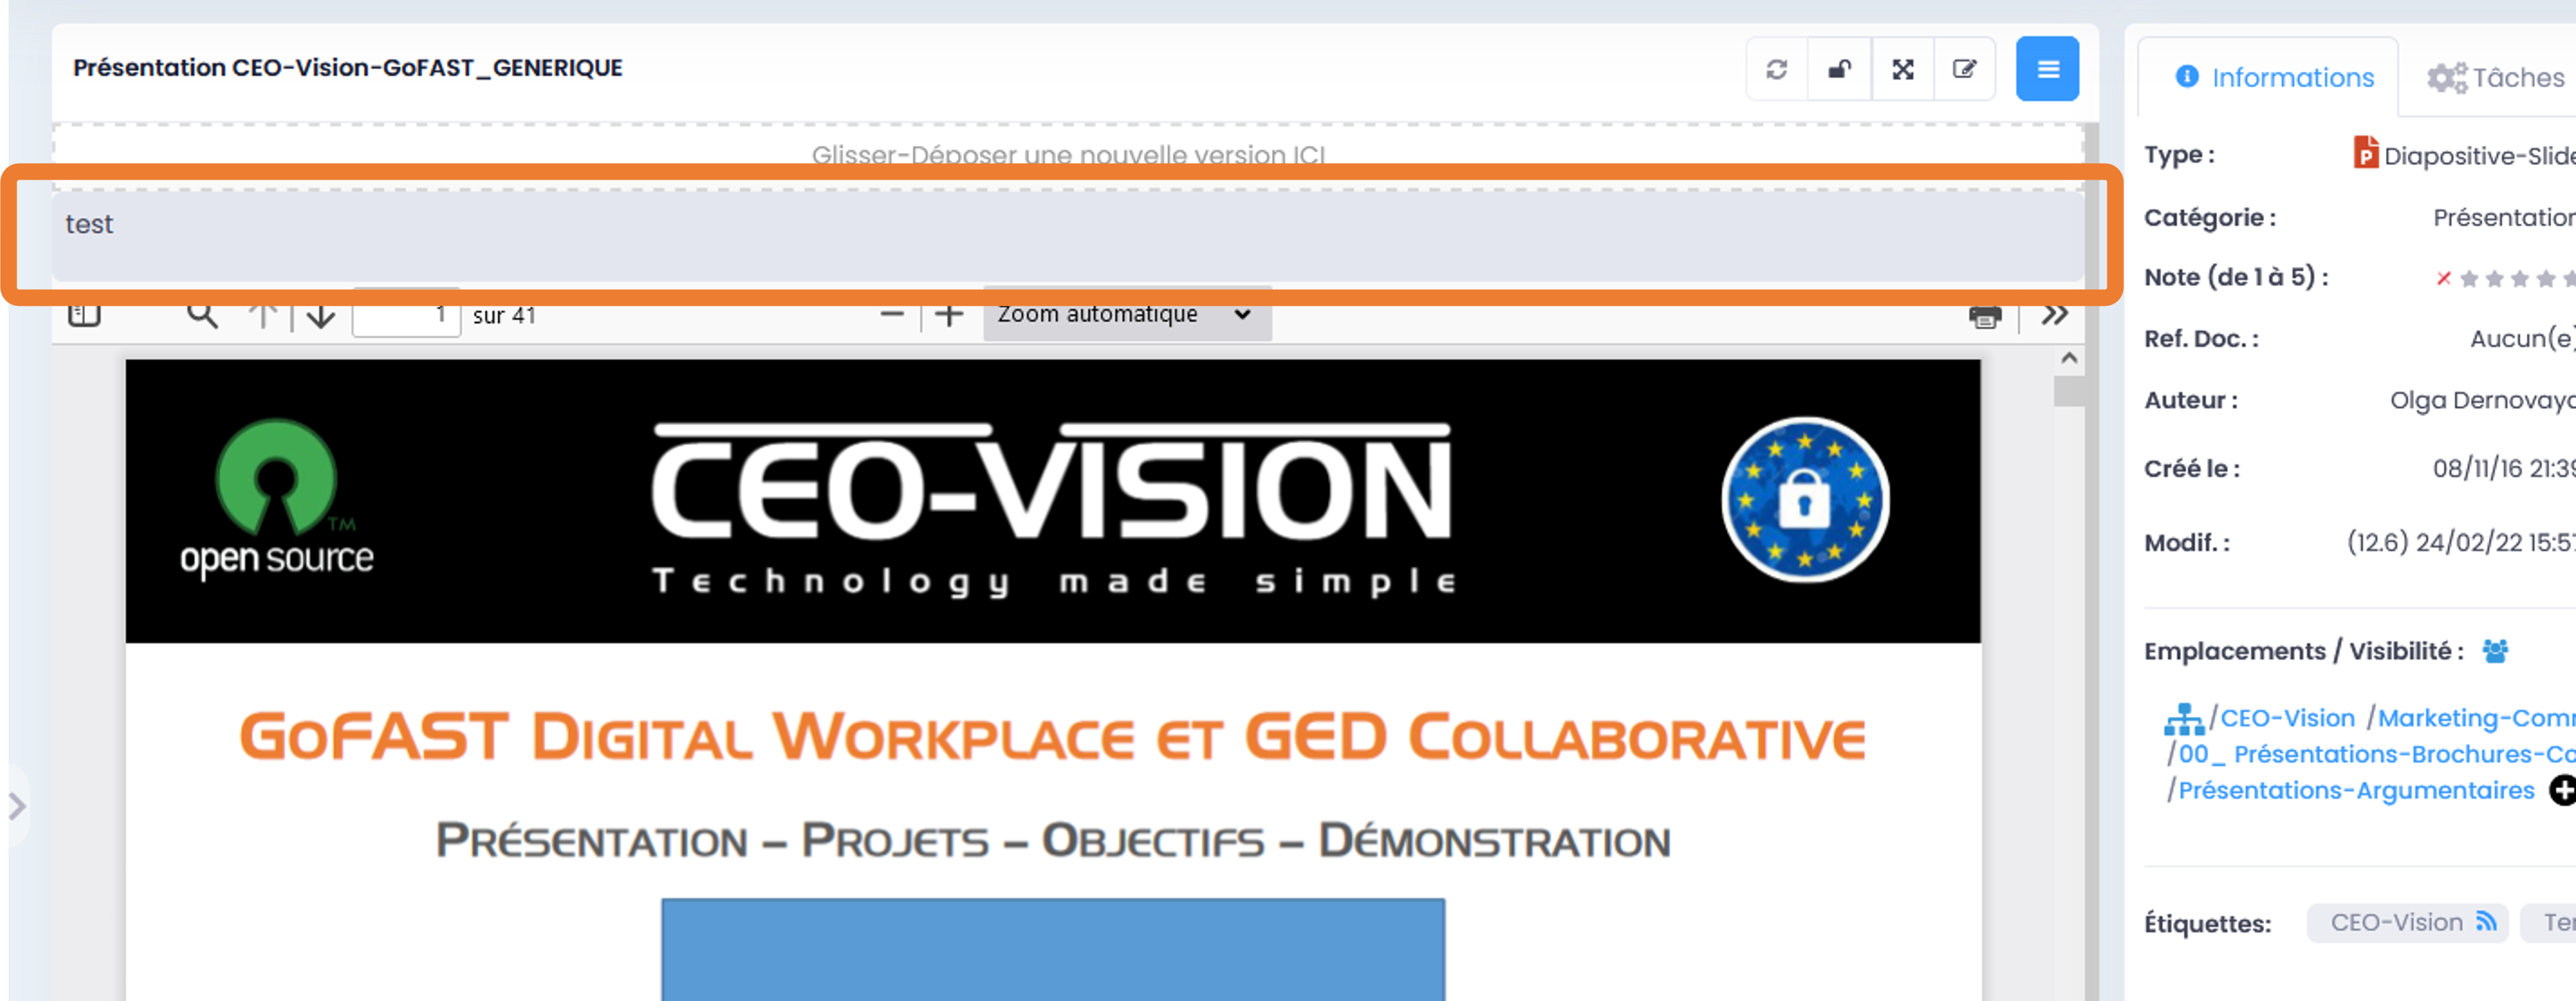
Add/Edit Resume
You can add intro or summary text to your document, which will be displayed above the preview. Thus, all those who will view the document, will see this Resume. Via the “Hamburger” menu (contextual actions), click on “Edit Resume”.
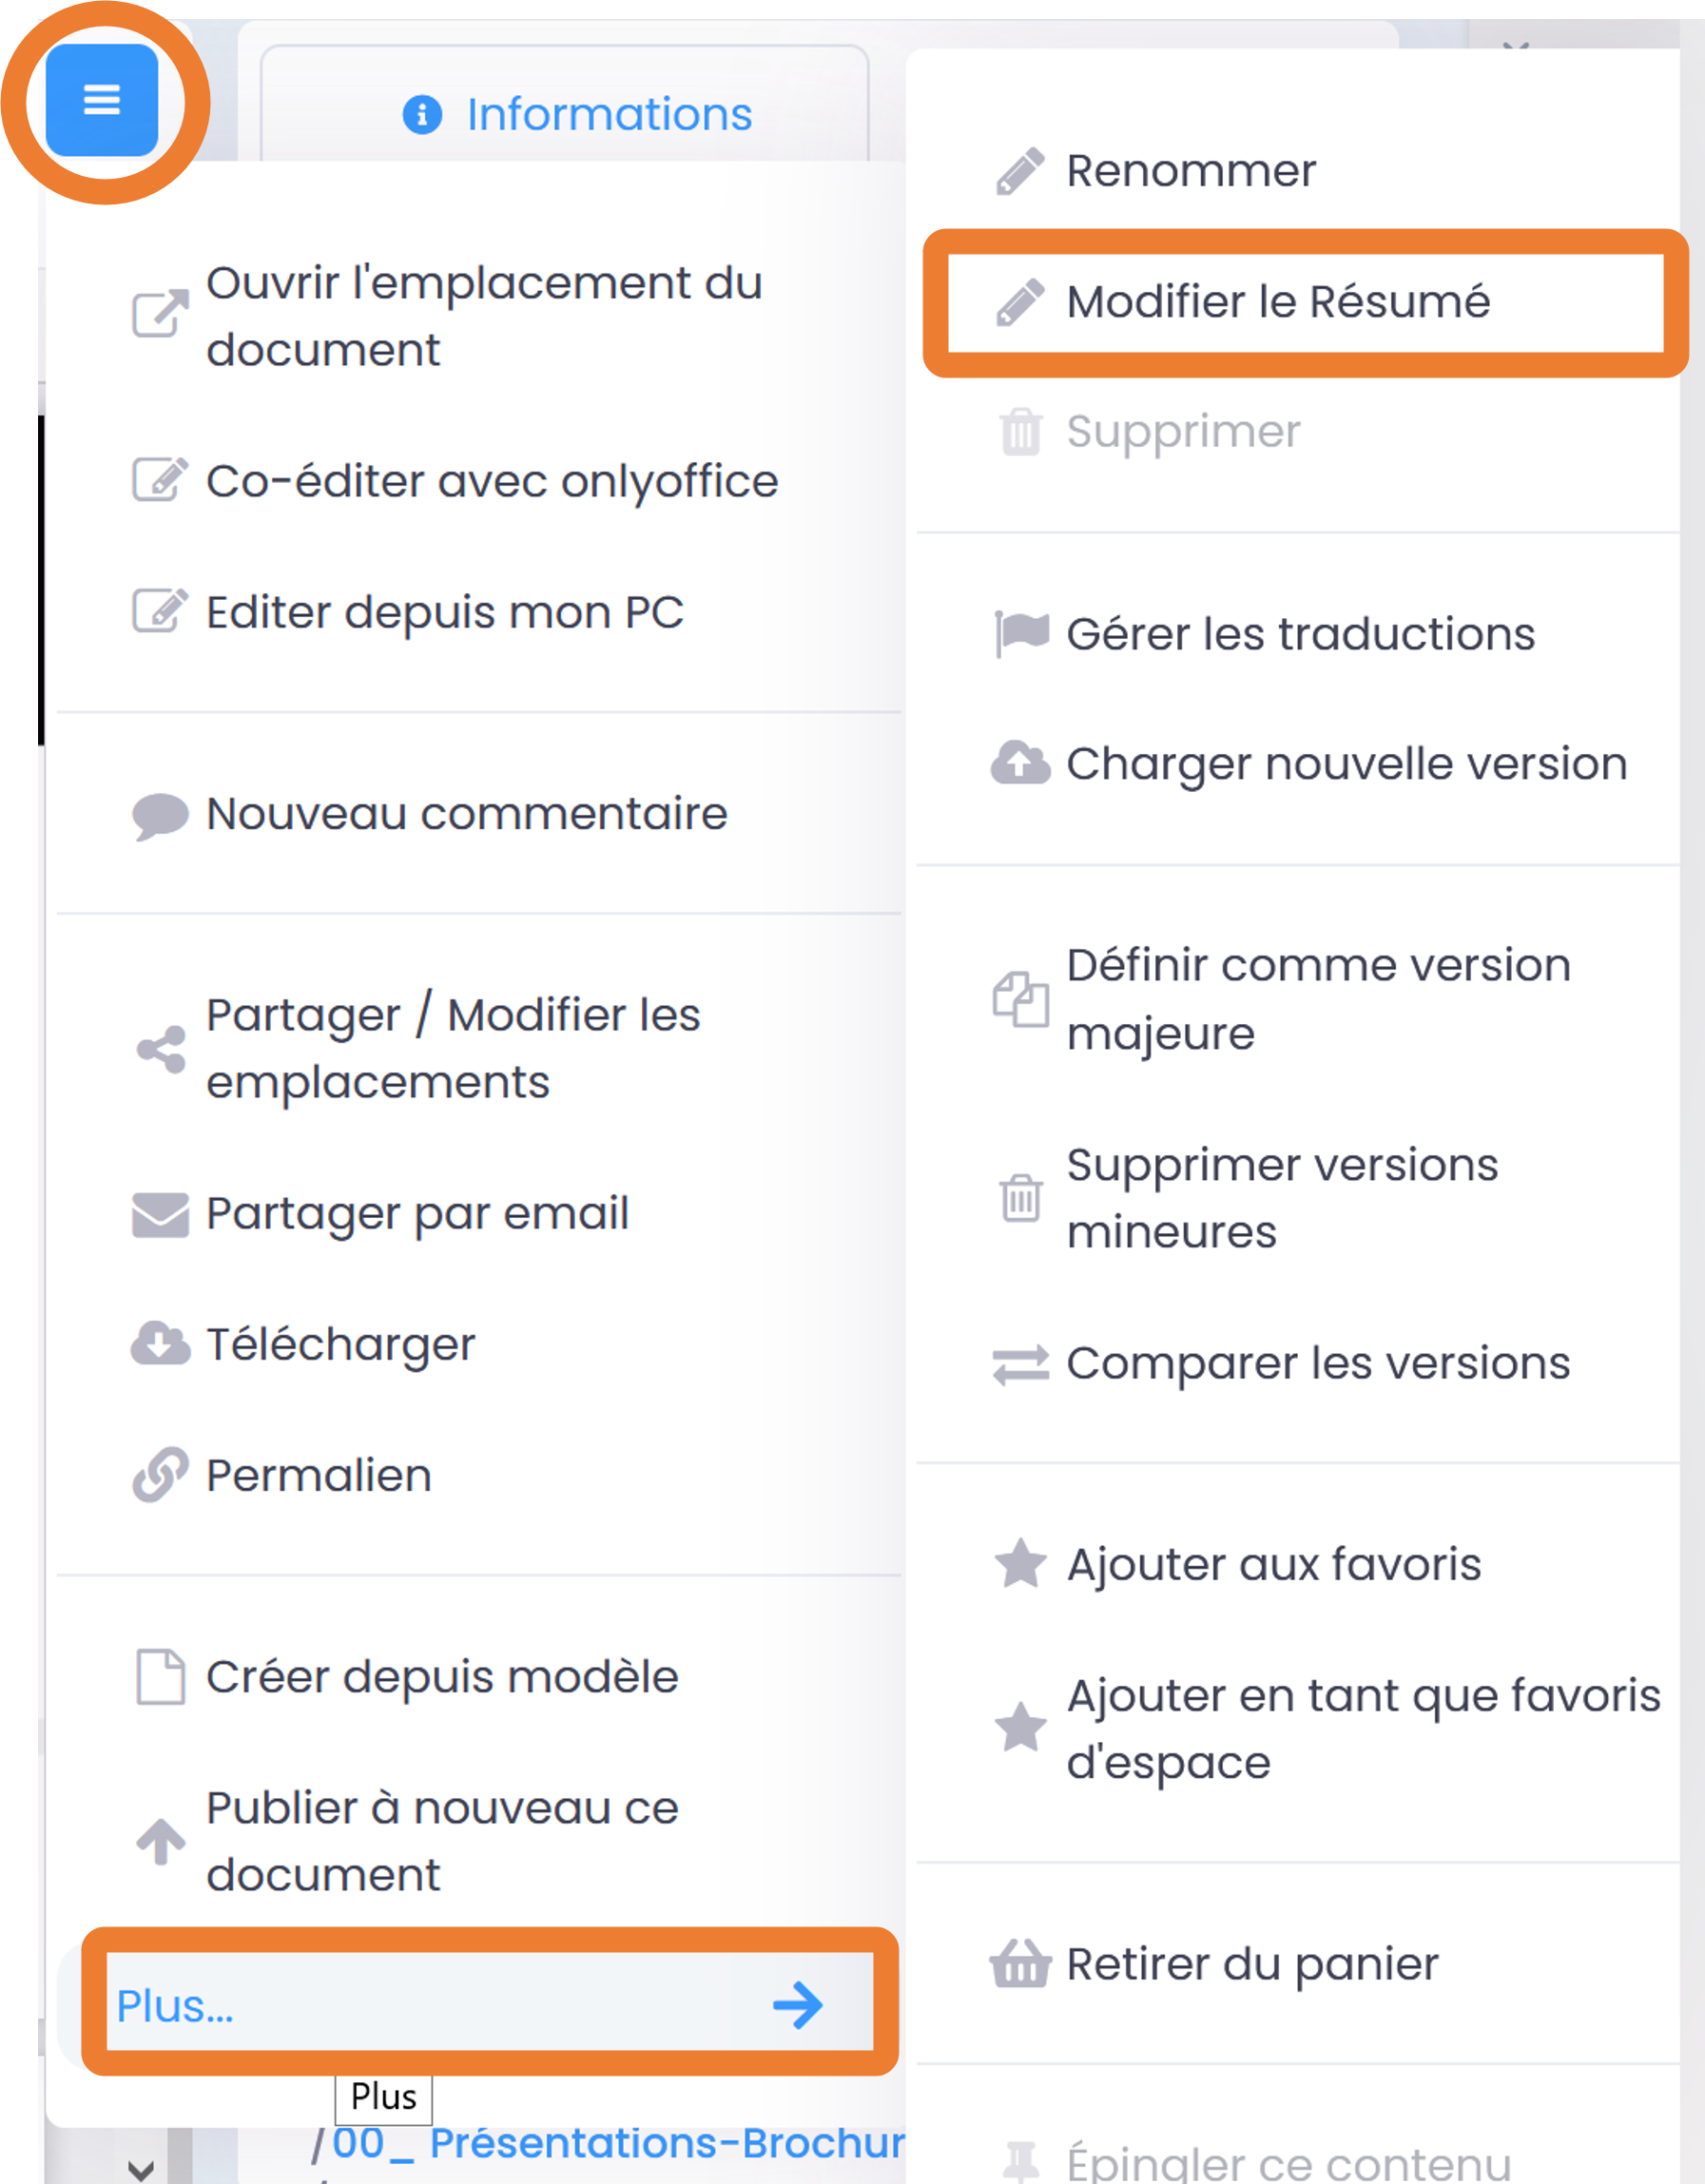
A text box opens with the same layout options as in the comments (font type/size, colors, table, images, etc.). Write your text and save by clicking on “Apply”.
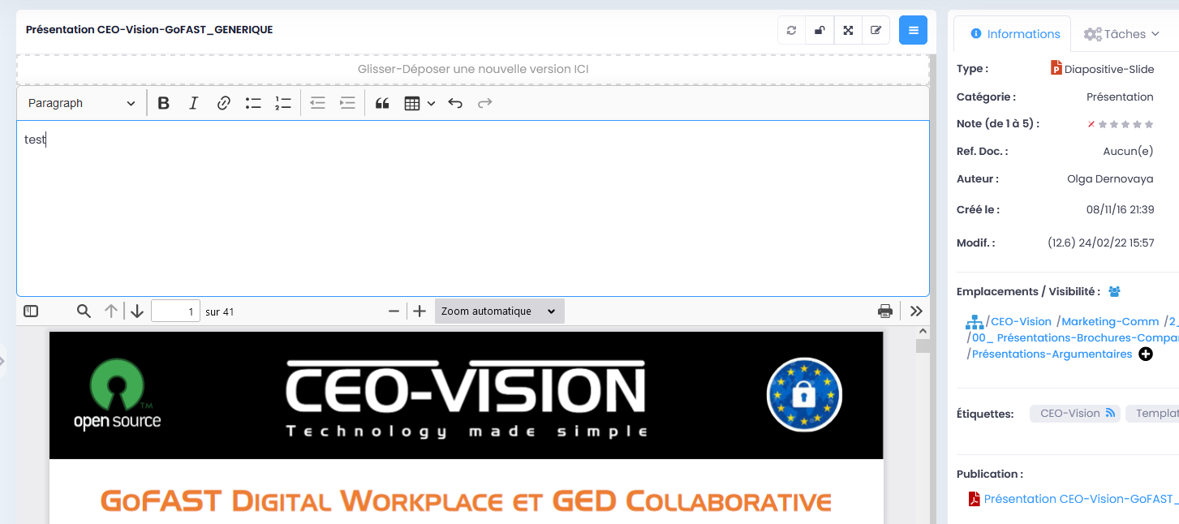
The text appears above the preview and below the document title.
You can modify the resume at any time, again via the “Hamburger” menu and click on “Edit Resume”.
All users who can edit the document (contributor or administrators) can also edit the resume, unlike comments (NB. only the author of a comment or an administrator of the space can edit it).
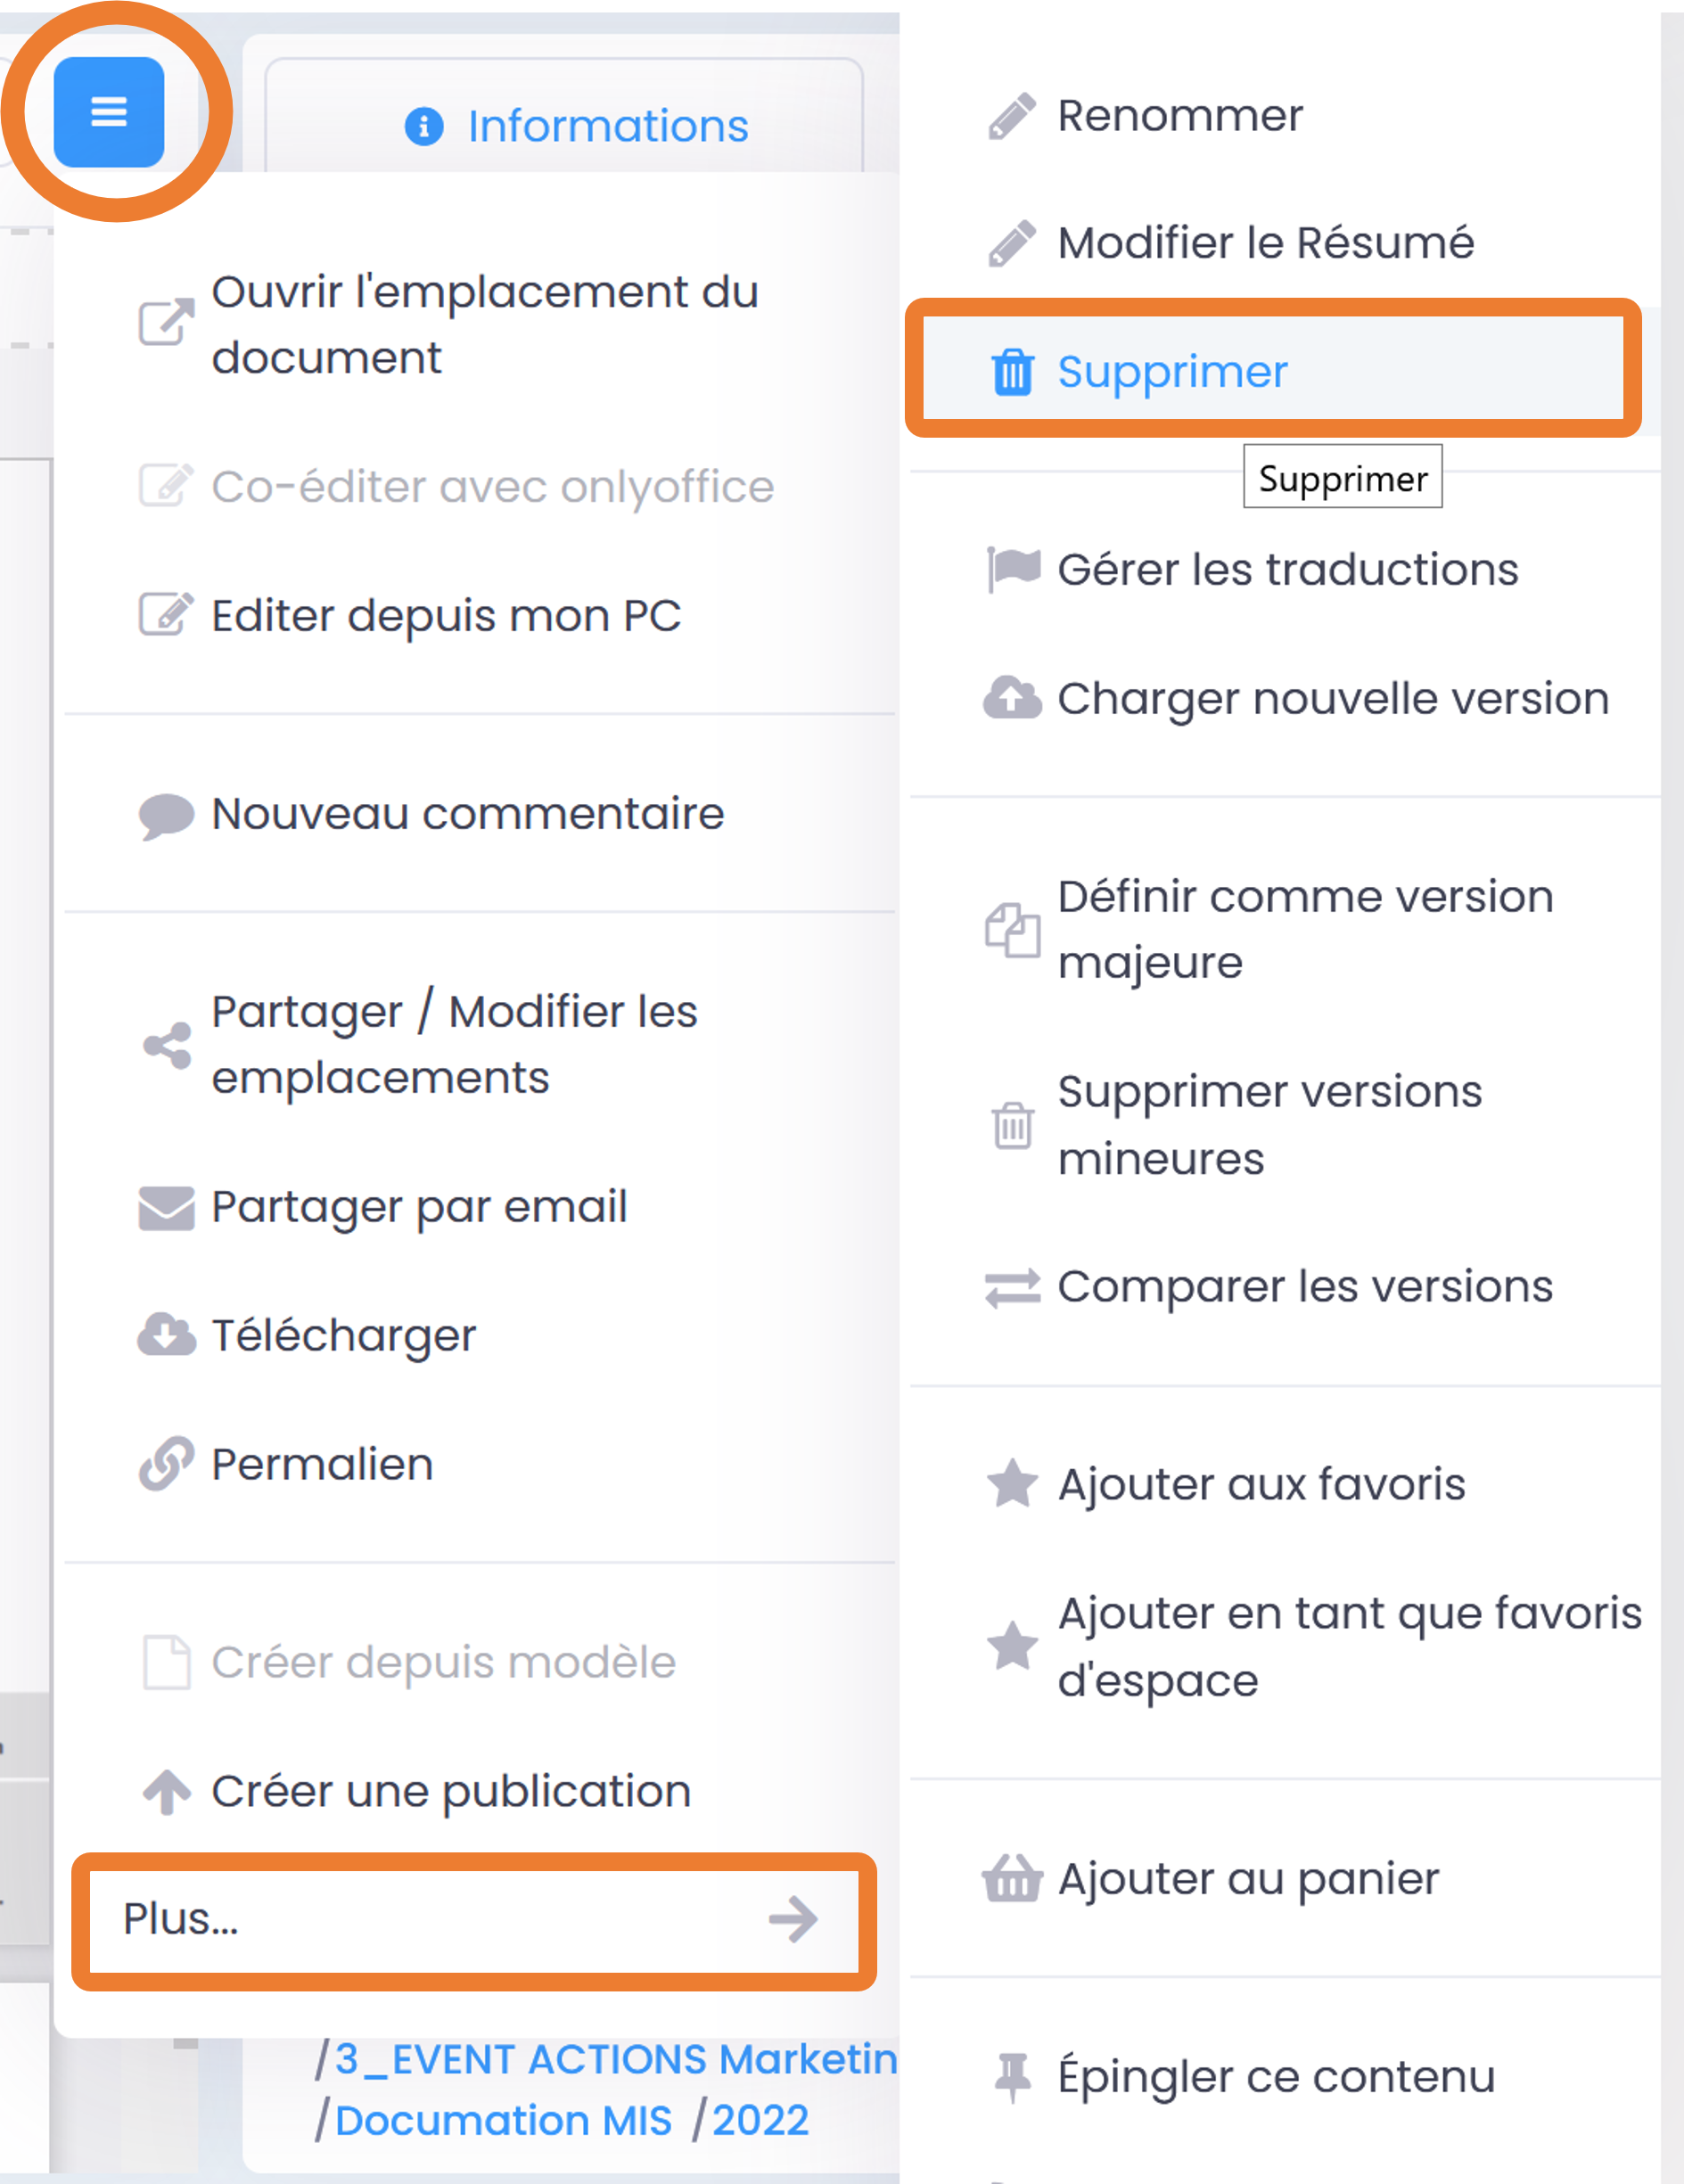
Delete/Restore
On GoFAST, the deletion of a document remains rare because there are no more duplicates and therefore, the deletion is often used following an error (eg a duplicate was created by mistake). In the event that you made a location error when creating/depositing a document, it is preferable to modify the location(s), rather than deleting.
Deletion of a document means:
deleting it from all locations (Spaces where it is).
Deleting the document page, with all its comments and versions.
Deleting links pointing to this document from other documents (see the concept of links between content).
Deleting the document from favorites (for all users who have pinned this document as favorites)
Restore a deleted document:
When a document is deleted, it is not permanently deleted and it will be possible to restore it within 90 days. Only the creator of the document or the administrators of the space where the document was located can restore it in the event of an error. In the event that you go to the page of a deleted document, instead of the preview you will see a message indicating this deletion, with the only possible action “Restore the document” (via the “Hamburger” menu).
- In order to restore a document you must:
Find the document via the search with the option «Search in Recycle bin»: possible only for users who had access to the document before its deletion.
Find the document via the audit trail: only possible for users with the “User-Support Profile” (the others do not have access to these audit trails).
Once on the document page, go to the “Hamburger” menu and click “Restore Document”. The page will then reupload, displaying the preview, metadata and all comments associated with the document. The document will be restored to all locations where it was before deletion.
Note
Once the 90-day period has passed, it will no longer be possible to restore the document.
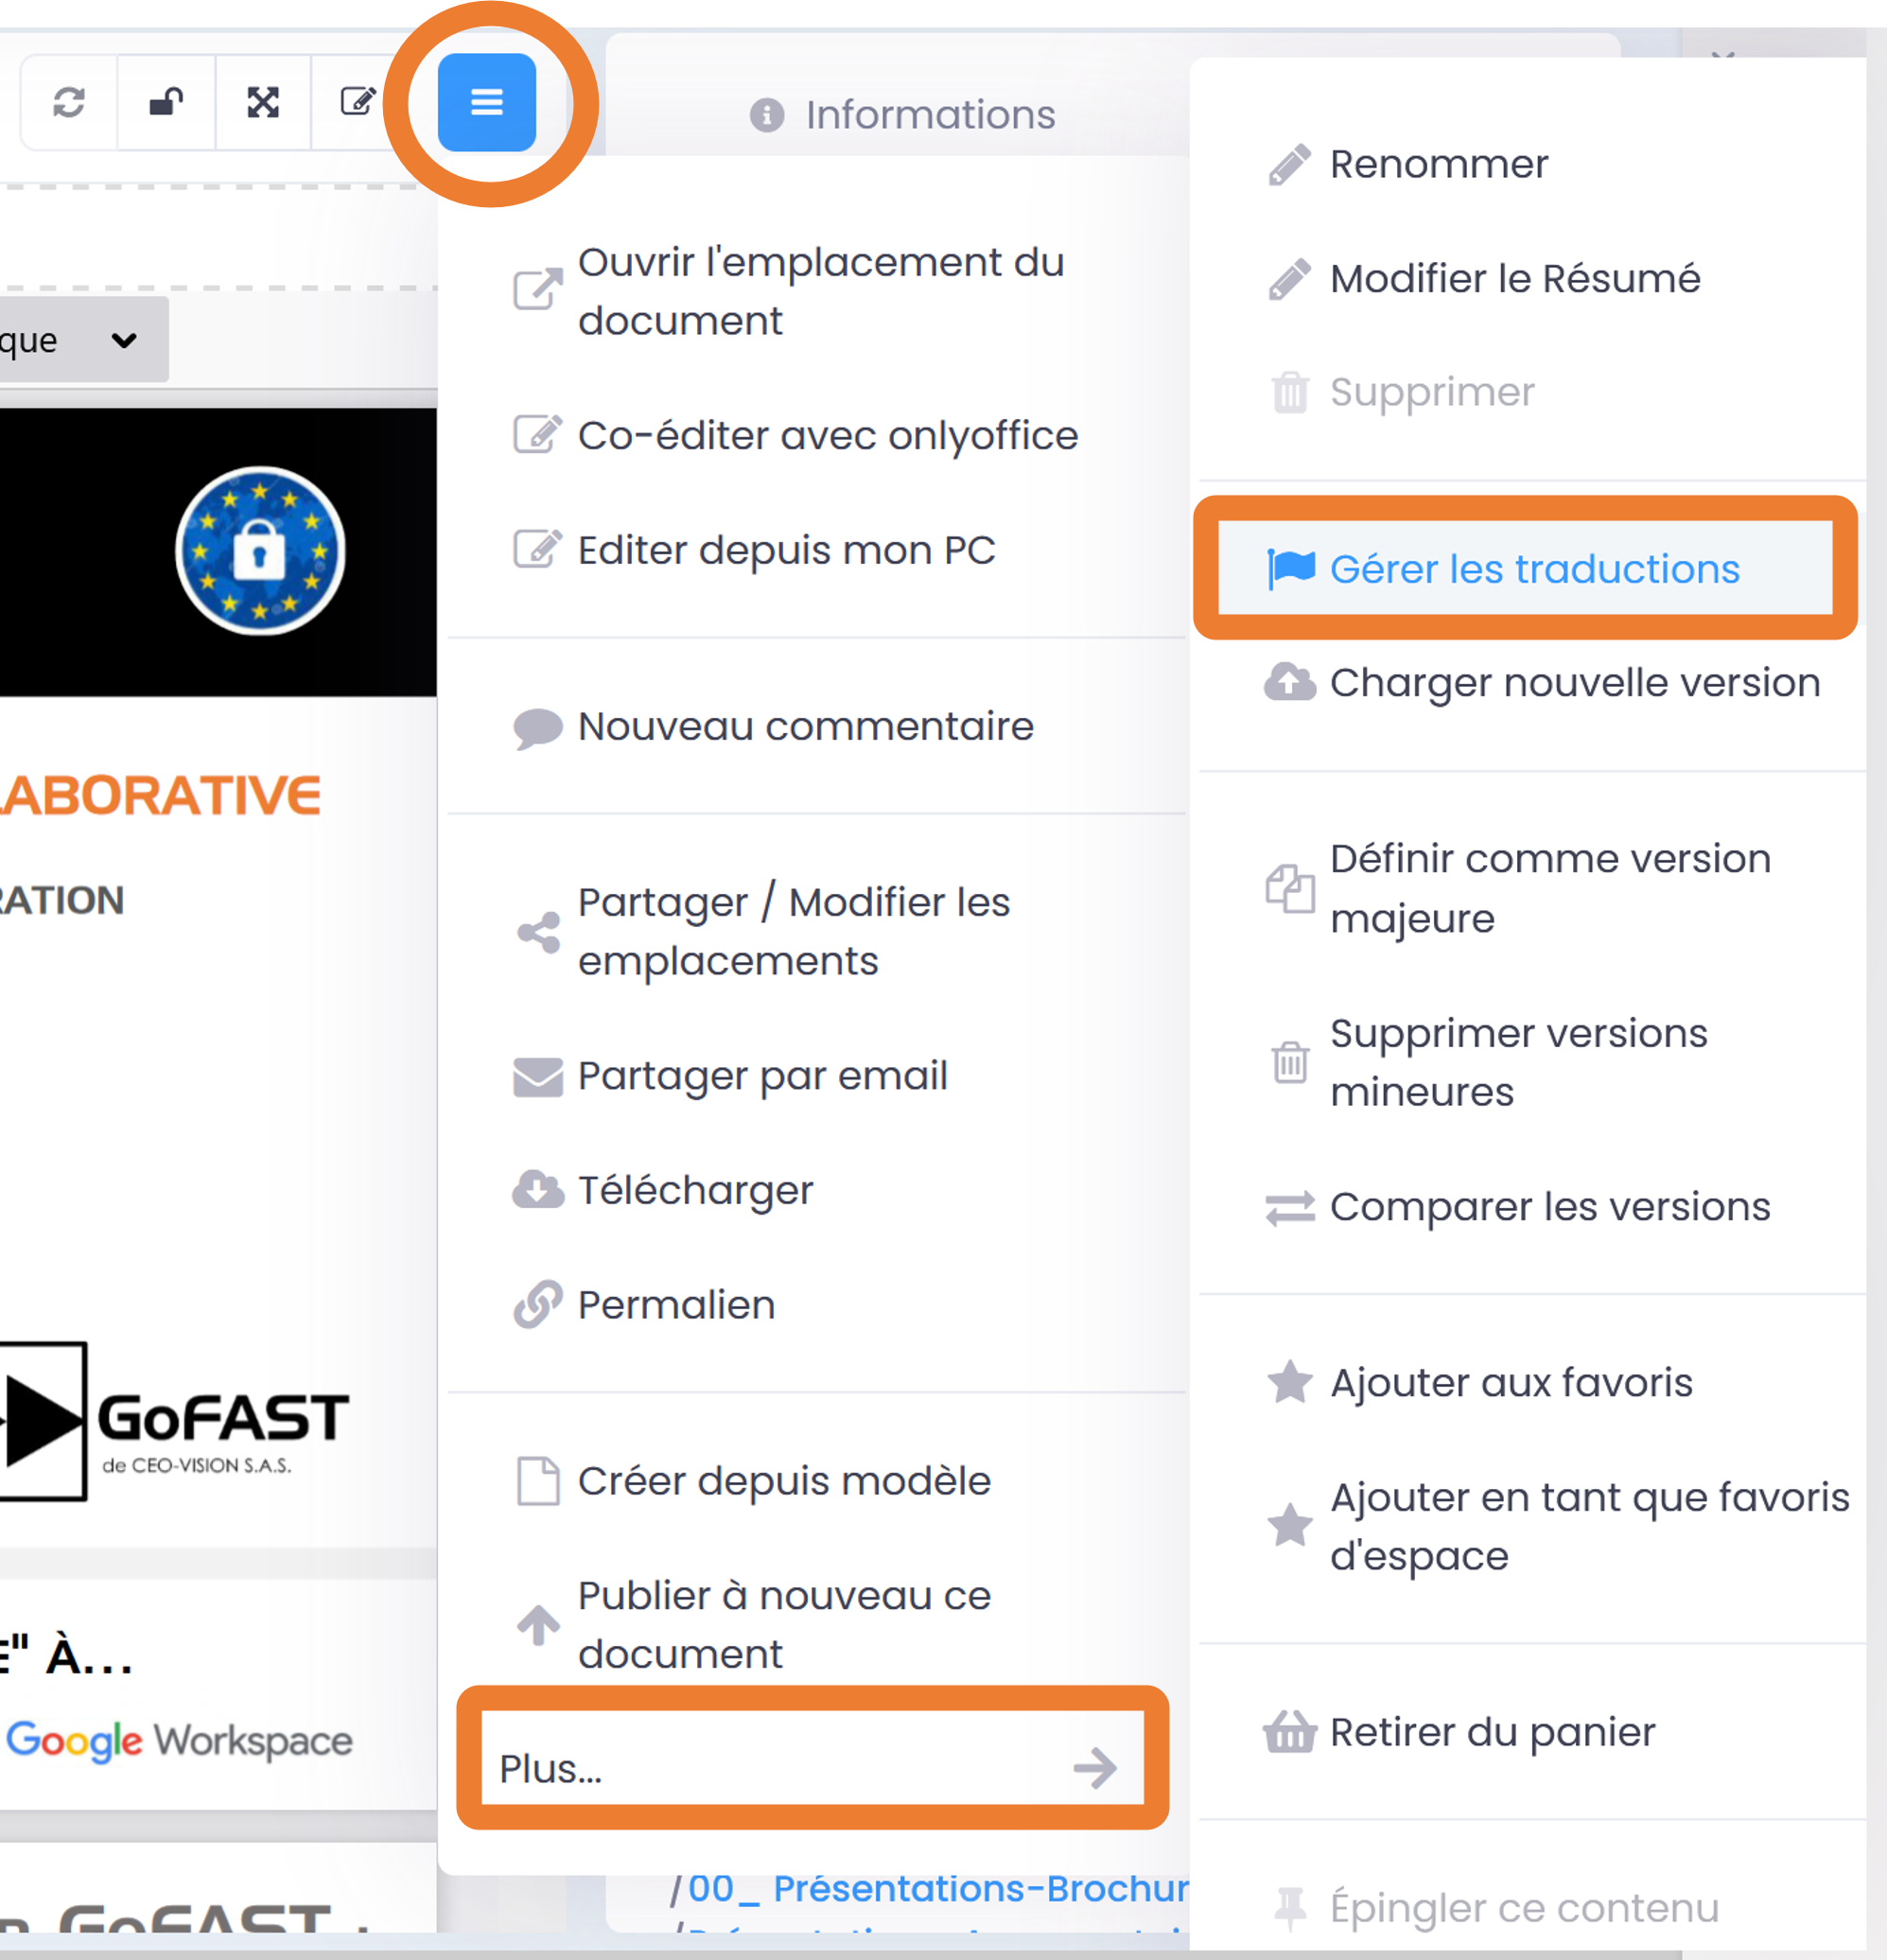
Manage translations
If a document exists in several languages, you can link together the various files considered to be translations. You will be able to switch from one translation to another in one click, no matter in which folders these documents are located. The language of a document is displayed in the form of a flag in the “Information” tab, in the block to the right of the document preview (at the very bottom of the metadata list).
How to manage translations :
- On a document page, via the “Hamburger” menu (contextual actions):
go to “see more”,
click on “Manage translations”.
a window opens with several fields that correspond to possible translations.
Note
The same action is possible via a right click on a document from the file explorer.
How to link multiple existing documents on the platform as translations:
- In the translation management window, go to the field that corresponds to the language of the target document. Languages are indicated by a flag.
You must enter at least the first 3 letters of the title of the target document (here the document in English).
The list will display suggestions based on the title (you must start at the beginning of the target document’s title to have matching suggestions, or copy and paste the title into the field).
Select your target document from the list of suggestions.
Click on “Update Translations” to save your translation links.

Link an existing document to a translation document to upload from your PC:
In the translation management window, click on the “+” button next to the flag that corresponds to the language of the target document.
You will then be redirected to the document creation form.
The title of your document will be pre-filled and the title will end with letters corresponding to the target language (for example, ./_EN)
Depending on the target language chosen, the language of the target document will be pre-filled.
Click “Choose File” and your local file manager (the one on your PC) will open.
Find the desired document in the tree structure and click Open (or double-click the document).
Select the desired locations in the document tree structure.
Click “Save” to upload a new document and save the translation link.
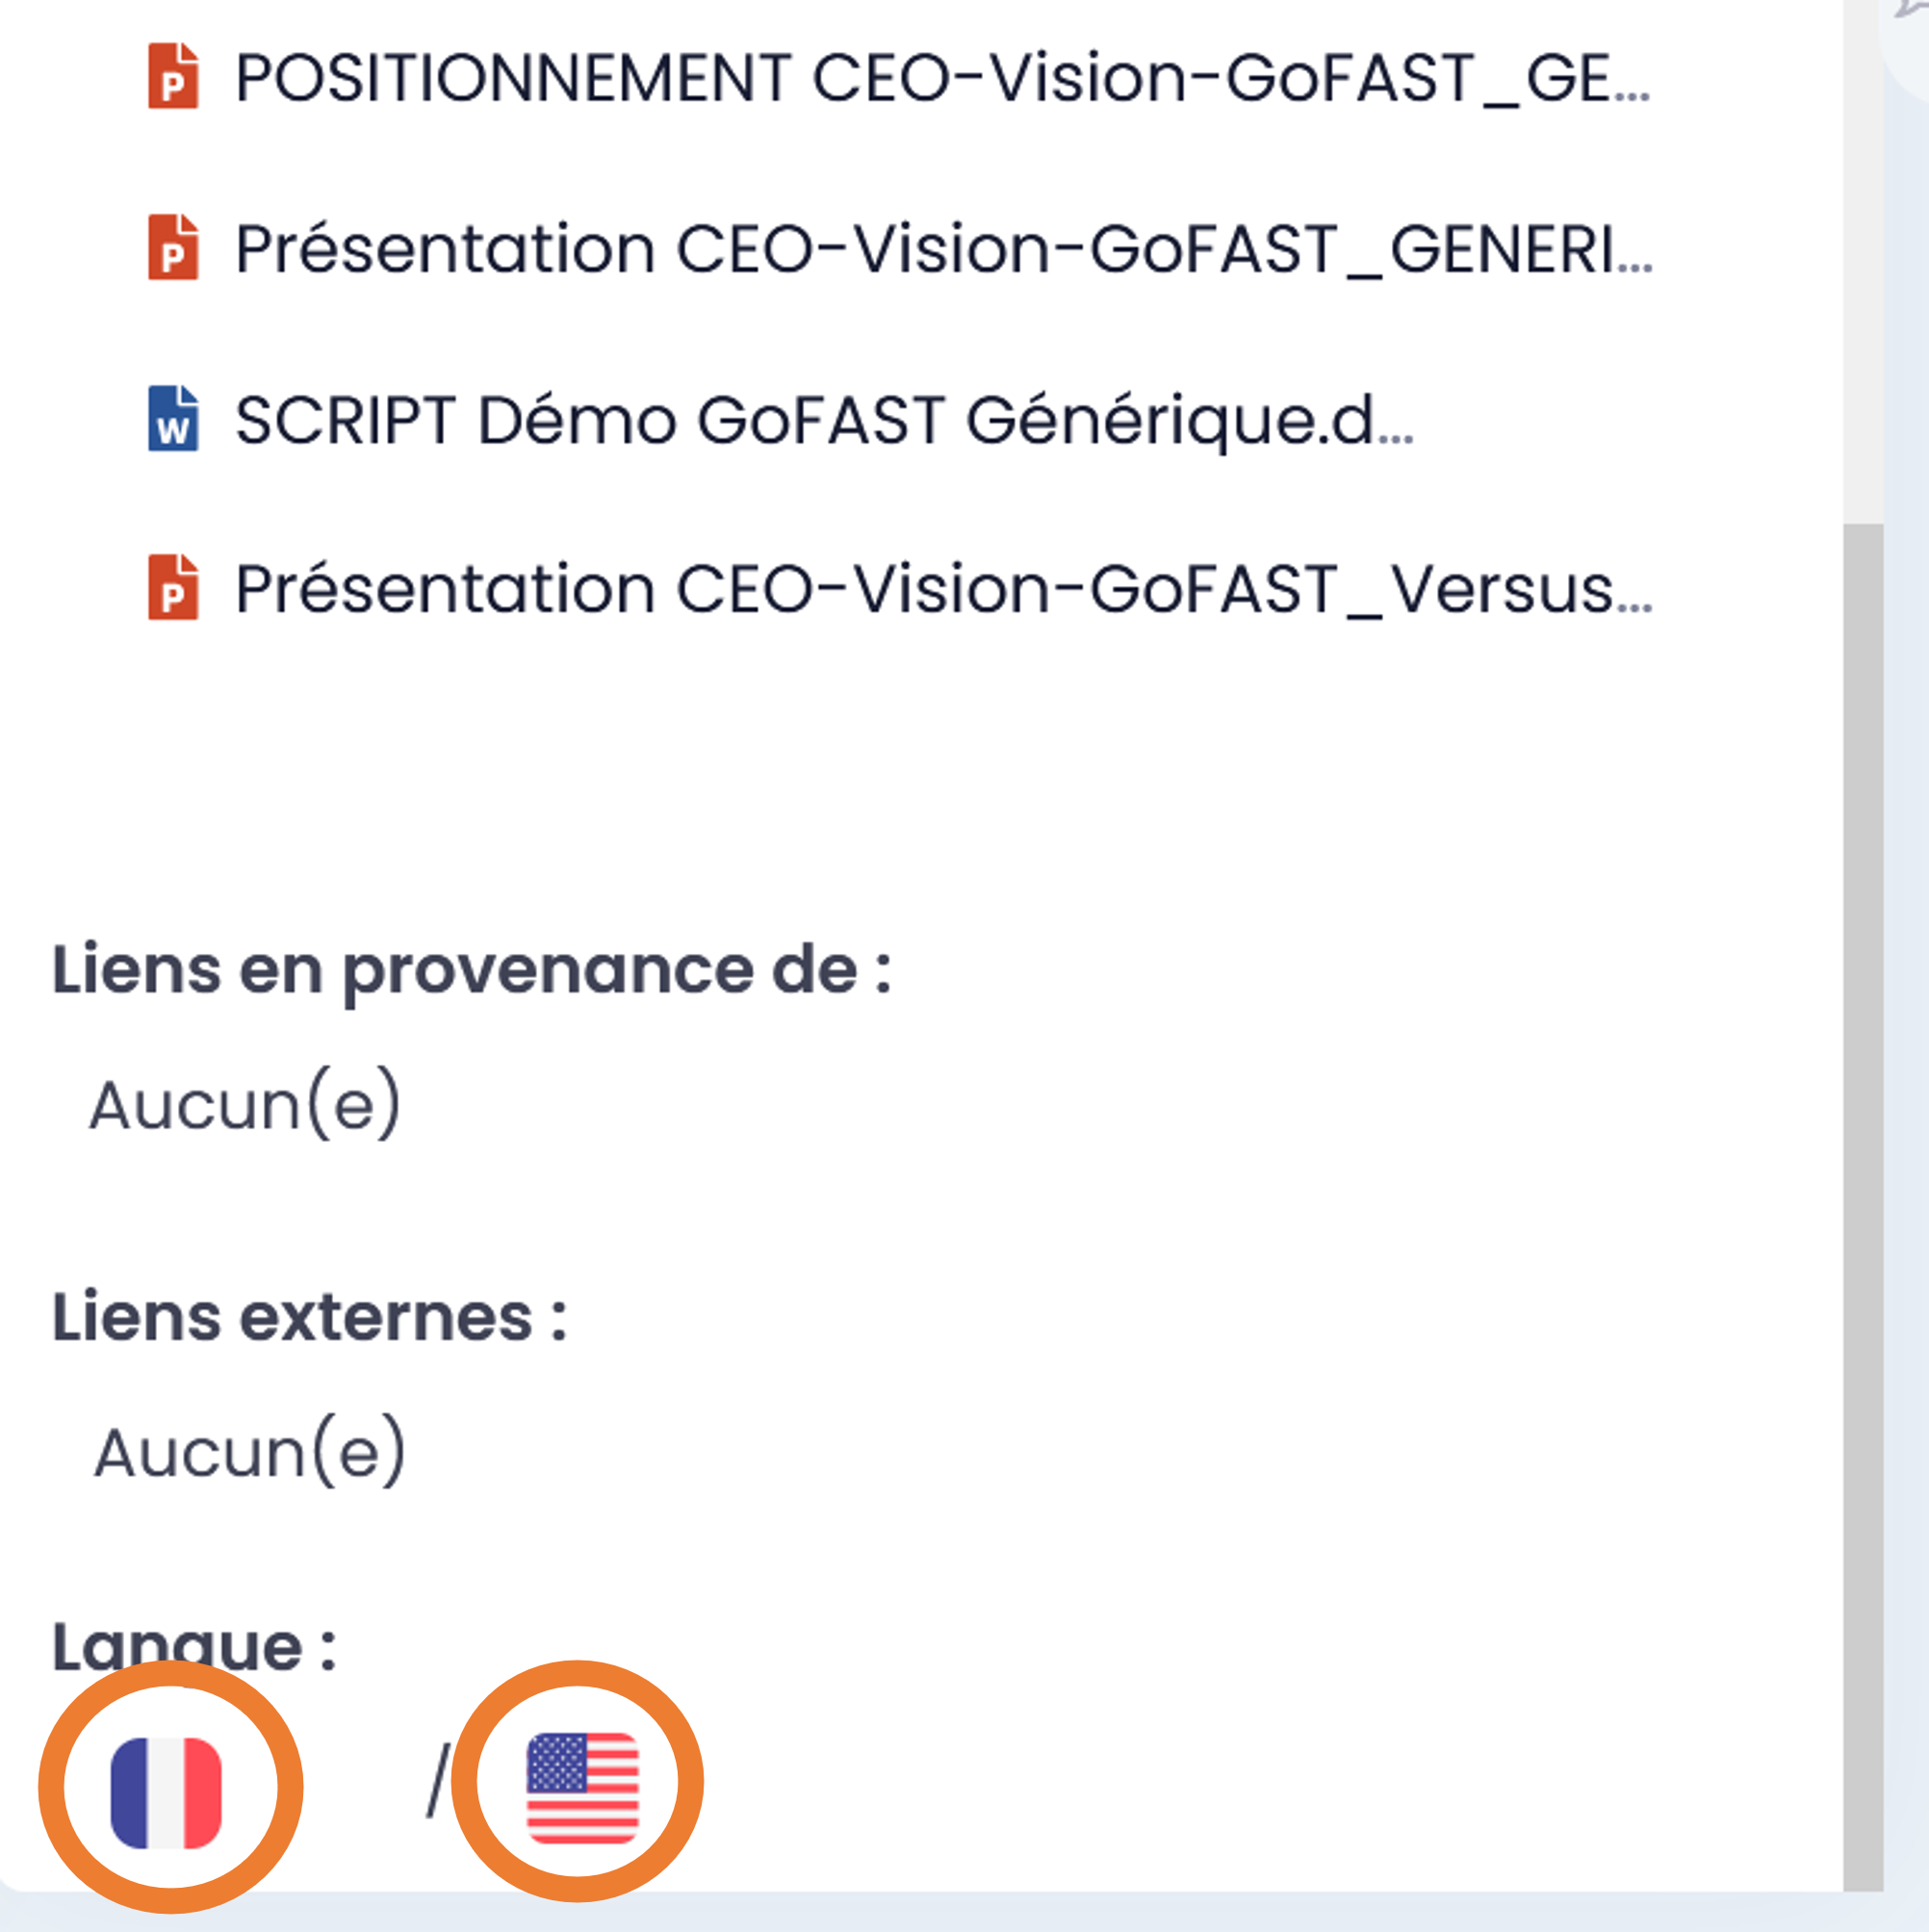
In the information block (metadata), the various translations available for your document will be linked and indicated in the form of the flag:
The 1er flag is displayed - the document that you are on.
The following flags are related translations.
Just click on one of the flags to go to one of the related translations.
Note
GoFAST does not automatically translate document content. These are documents that already exist in different languages and that we want to link in order to be able to switch from one to another in one click. However, when a new document is uploaded to the platform, the language is detected automatically (determination is based on content extraction, which is performed automatically after the new document is posted to GoFAST). To change the language of a document, simply click on the checkbox indicating the language of the document you are in. After that, a list will be displayed where you can select the desired language.
Upload new version
- Before updating a document on GoFAST by uploading a file located on your PC, it is imperative to check the document’s update date (on the document’s page in the Information Block, or in the file explorer, “Edit. by” column).
If the “Edit. by” date is later than the version on your PC, it’s best not to overwrite the version on GoFAST.
In this case, it is recommended to contact the user who created the latest version (for example, via chat or “Share by email” available in the “Hamburger” menu). The last contributor is indicated in the “Edit.by” field in the Information block (on the document page).
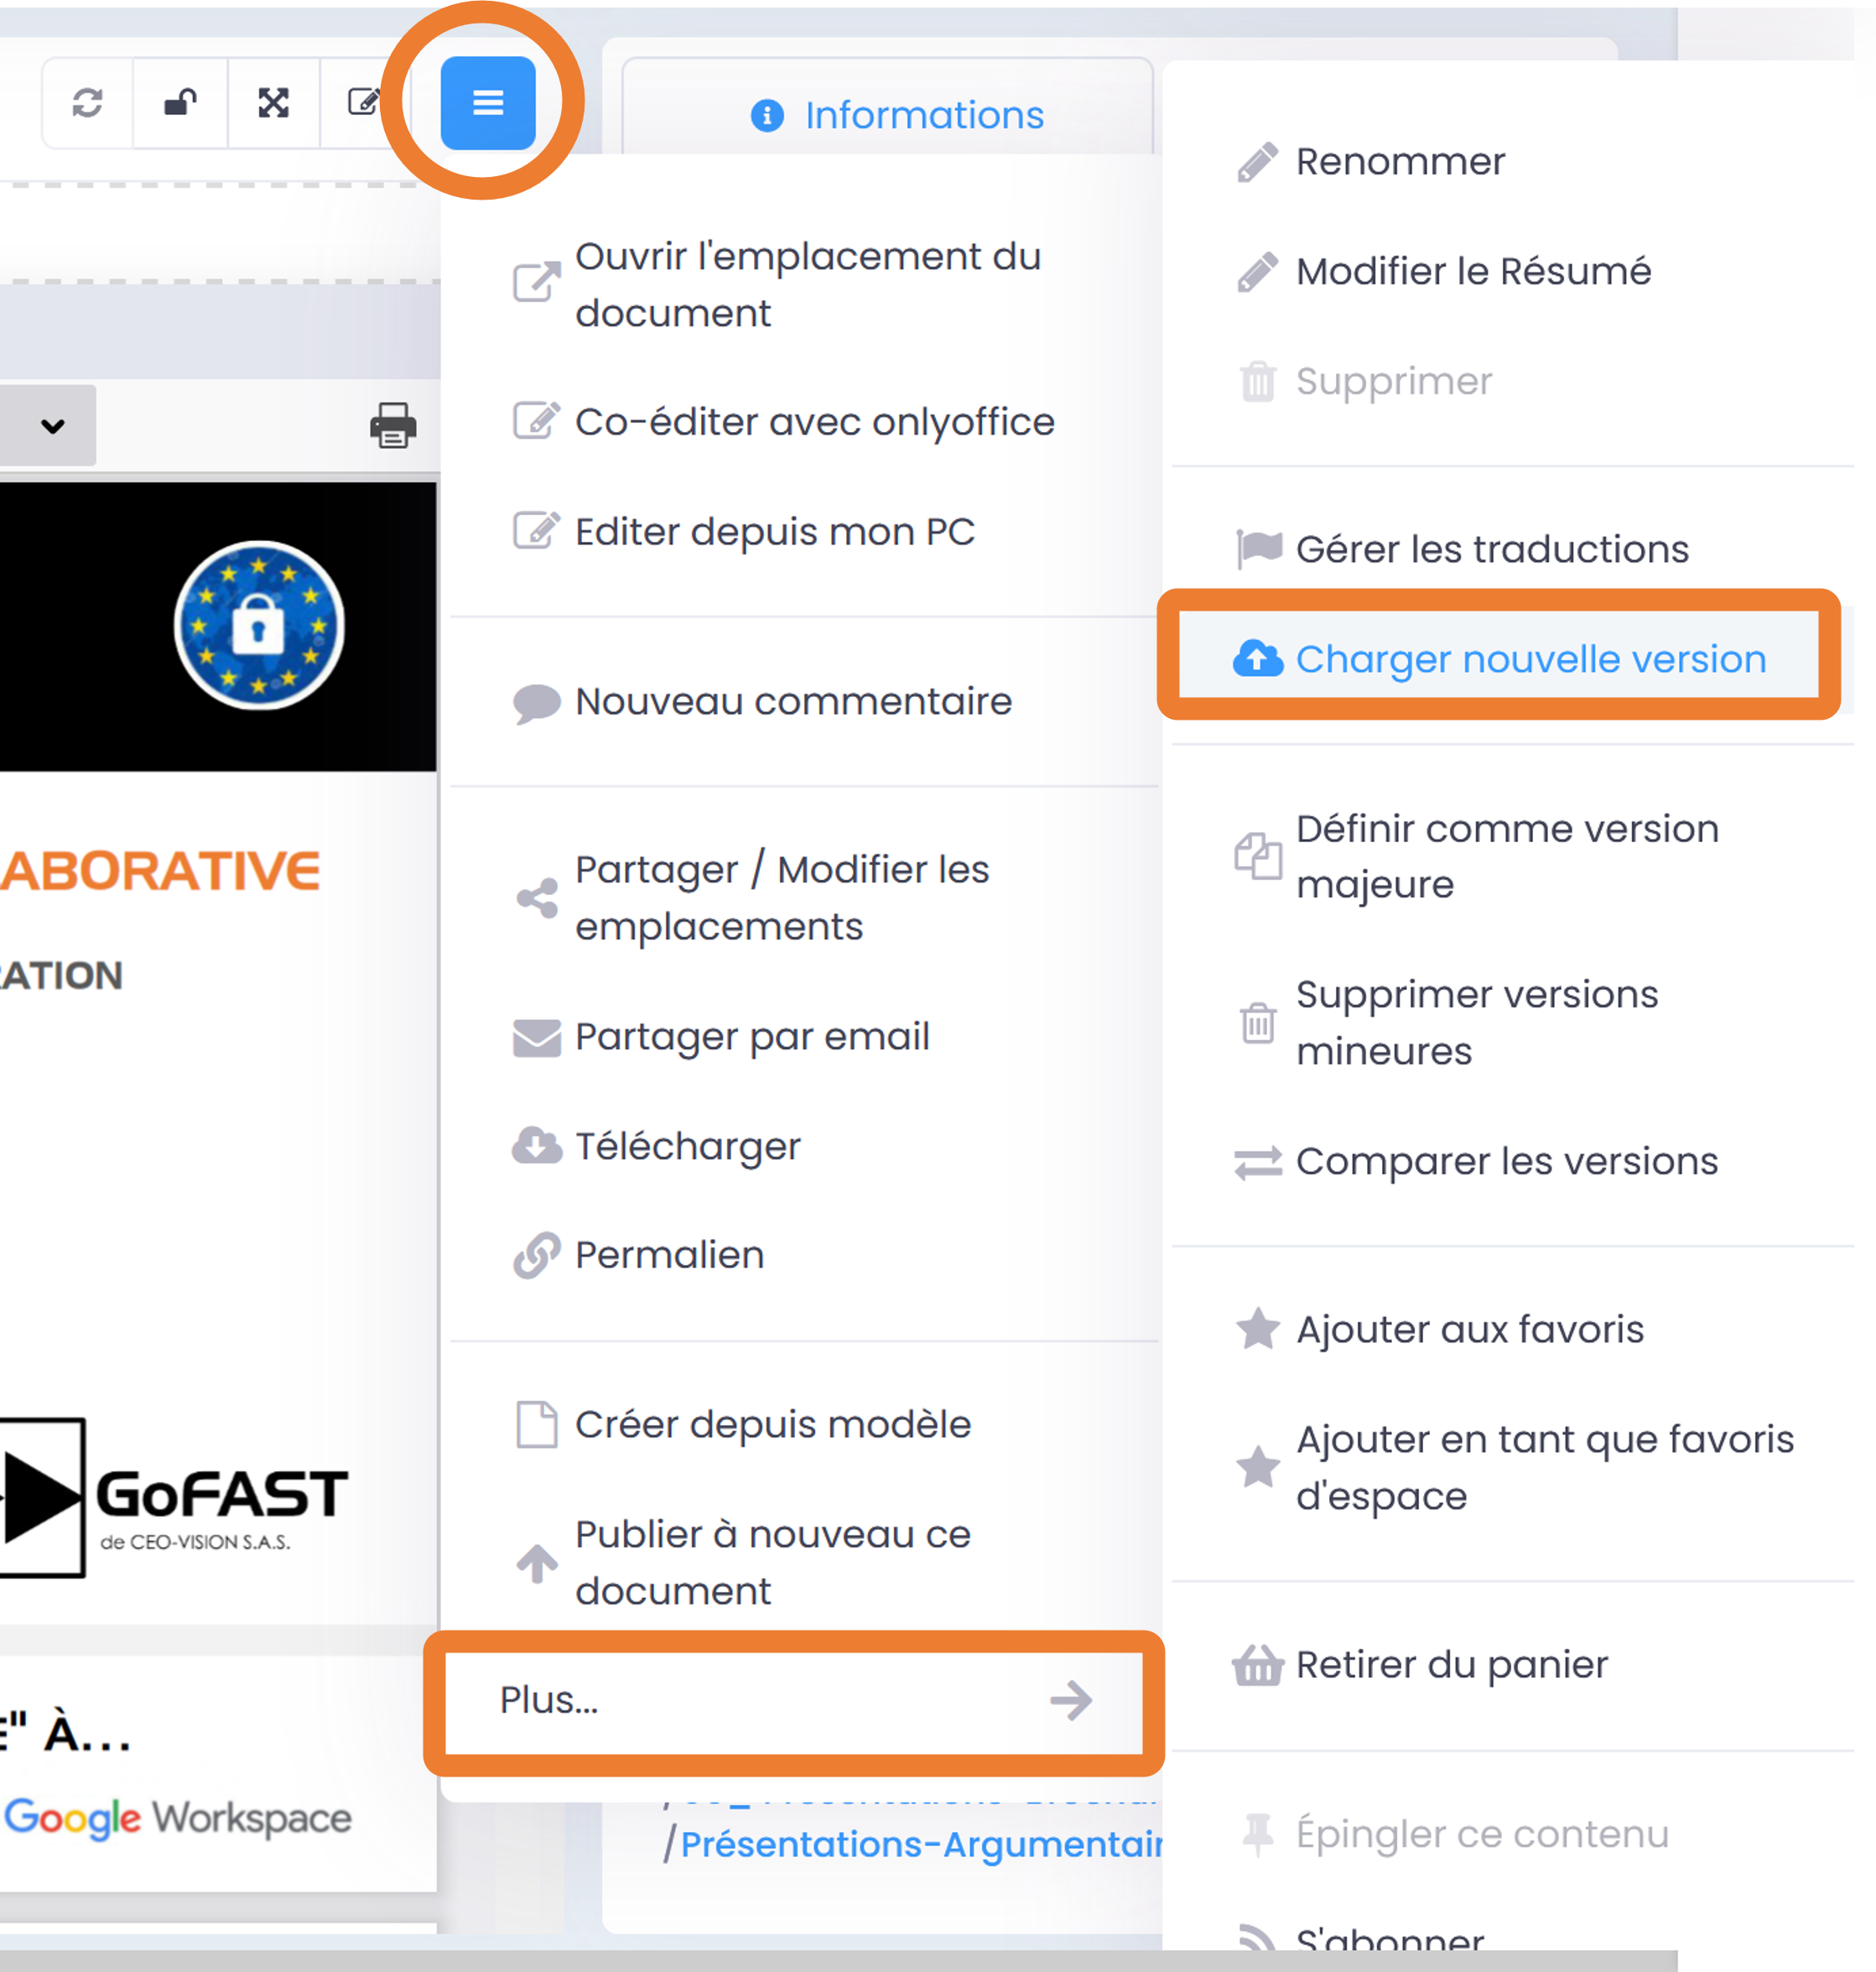
How to upload a file from your PC to update a document on GoFAST:
Go to the document page.
Drag the file from your PC to the “drag&drop” area above the preview window.
- OR
Go through the “Hamburger” menu, then in “More…” click on “Upload New Version”.
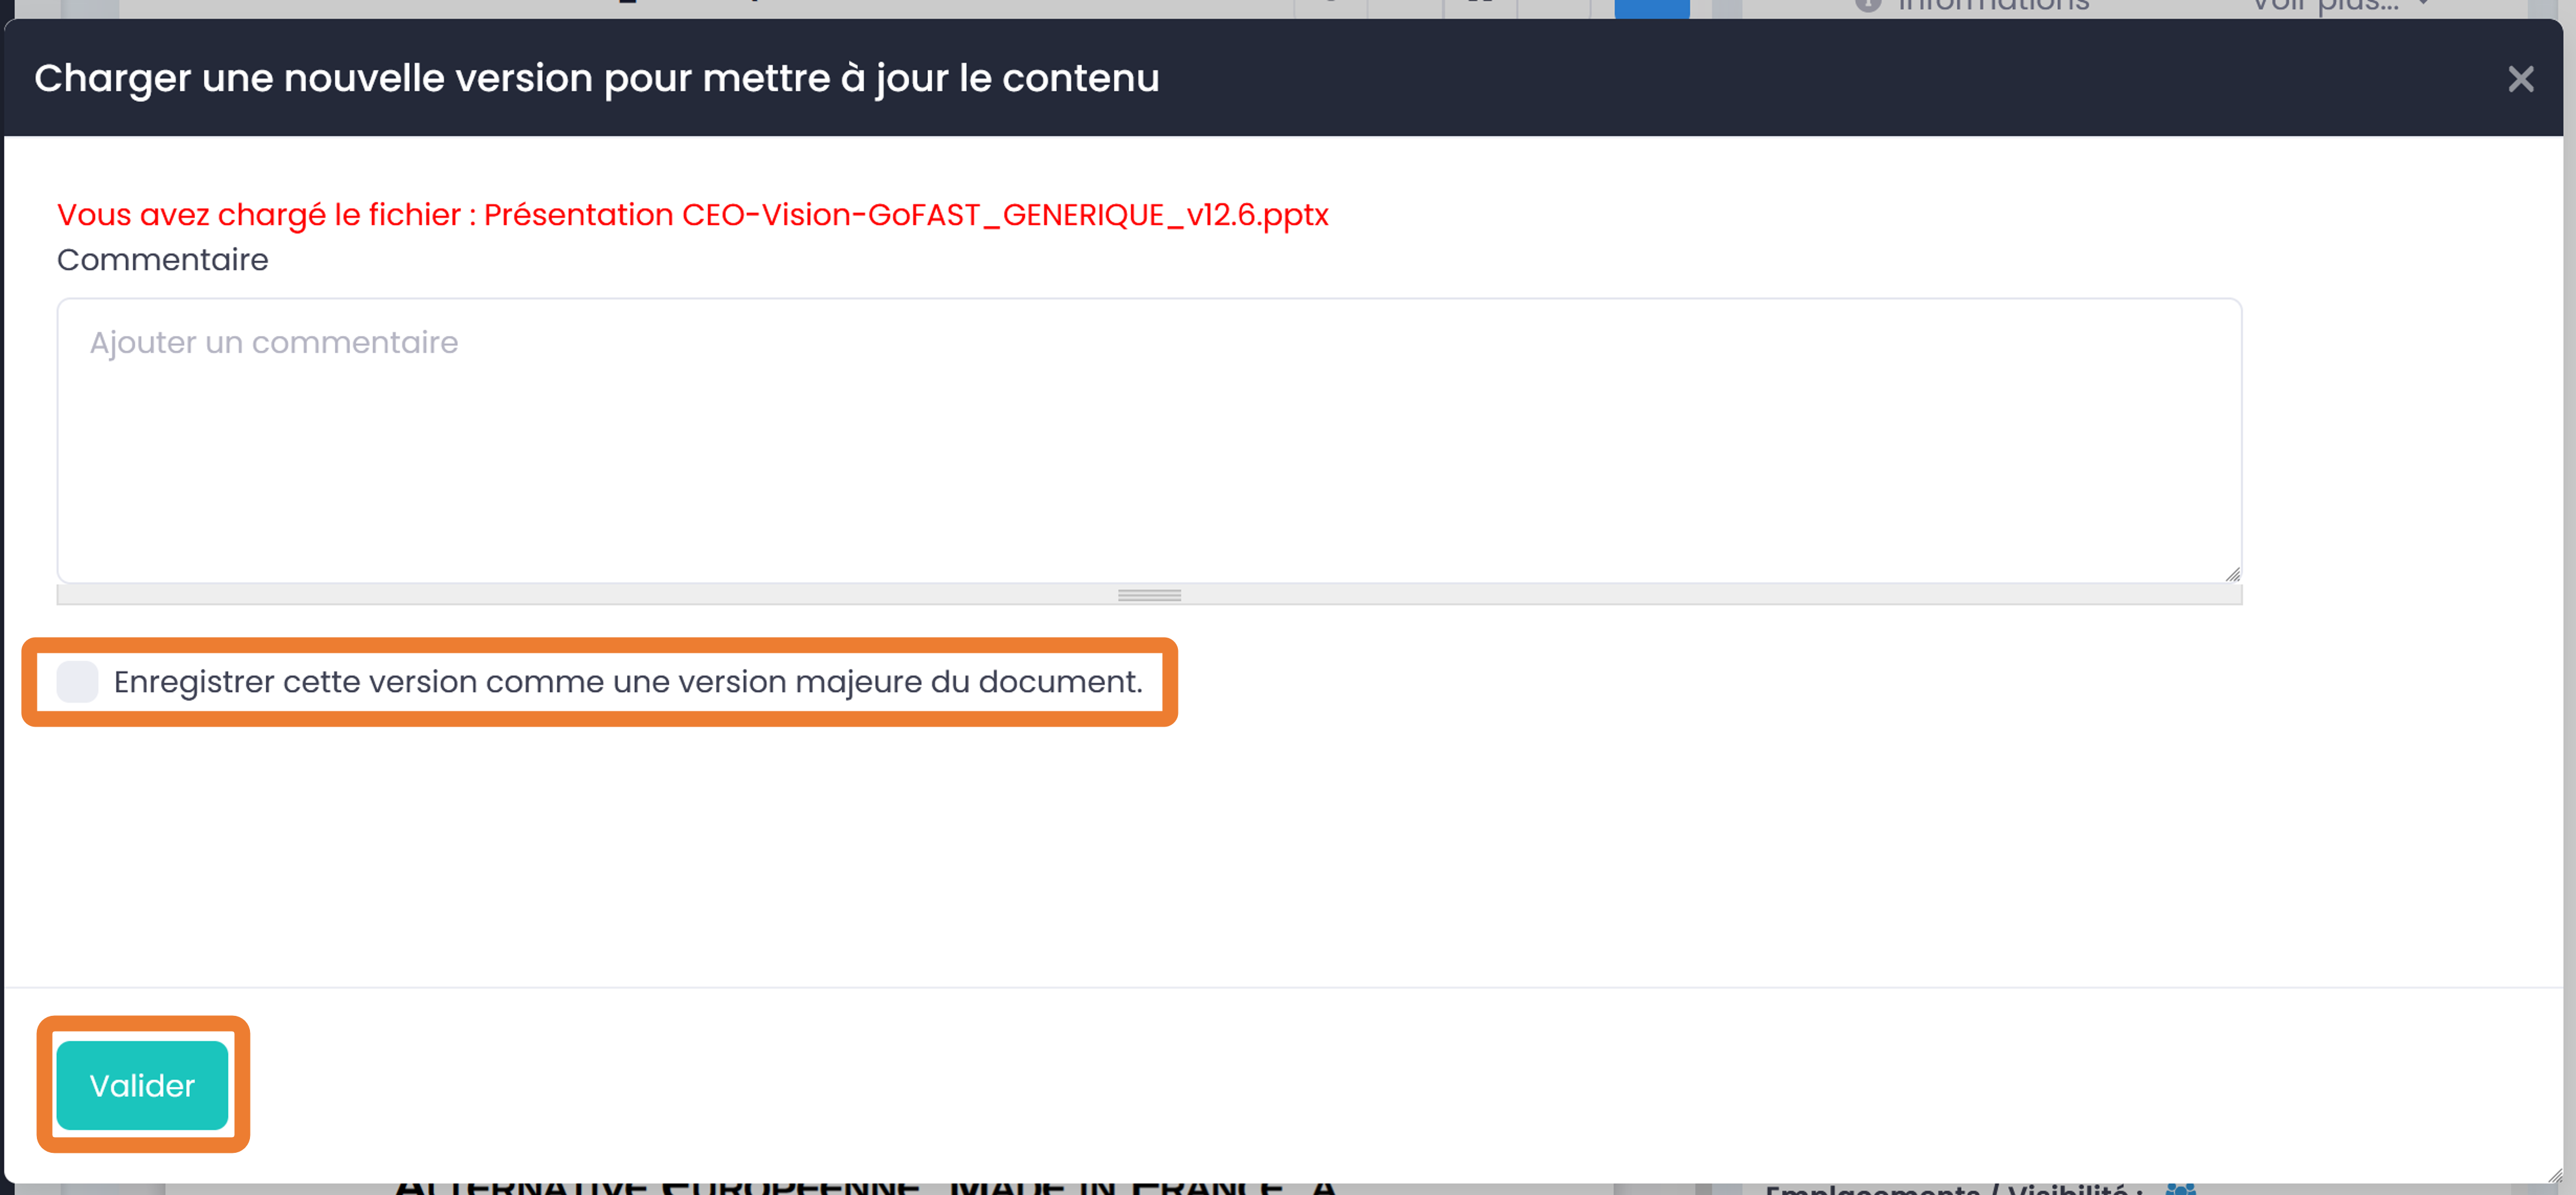
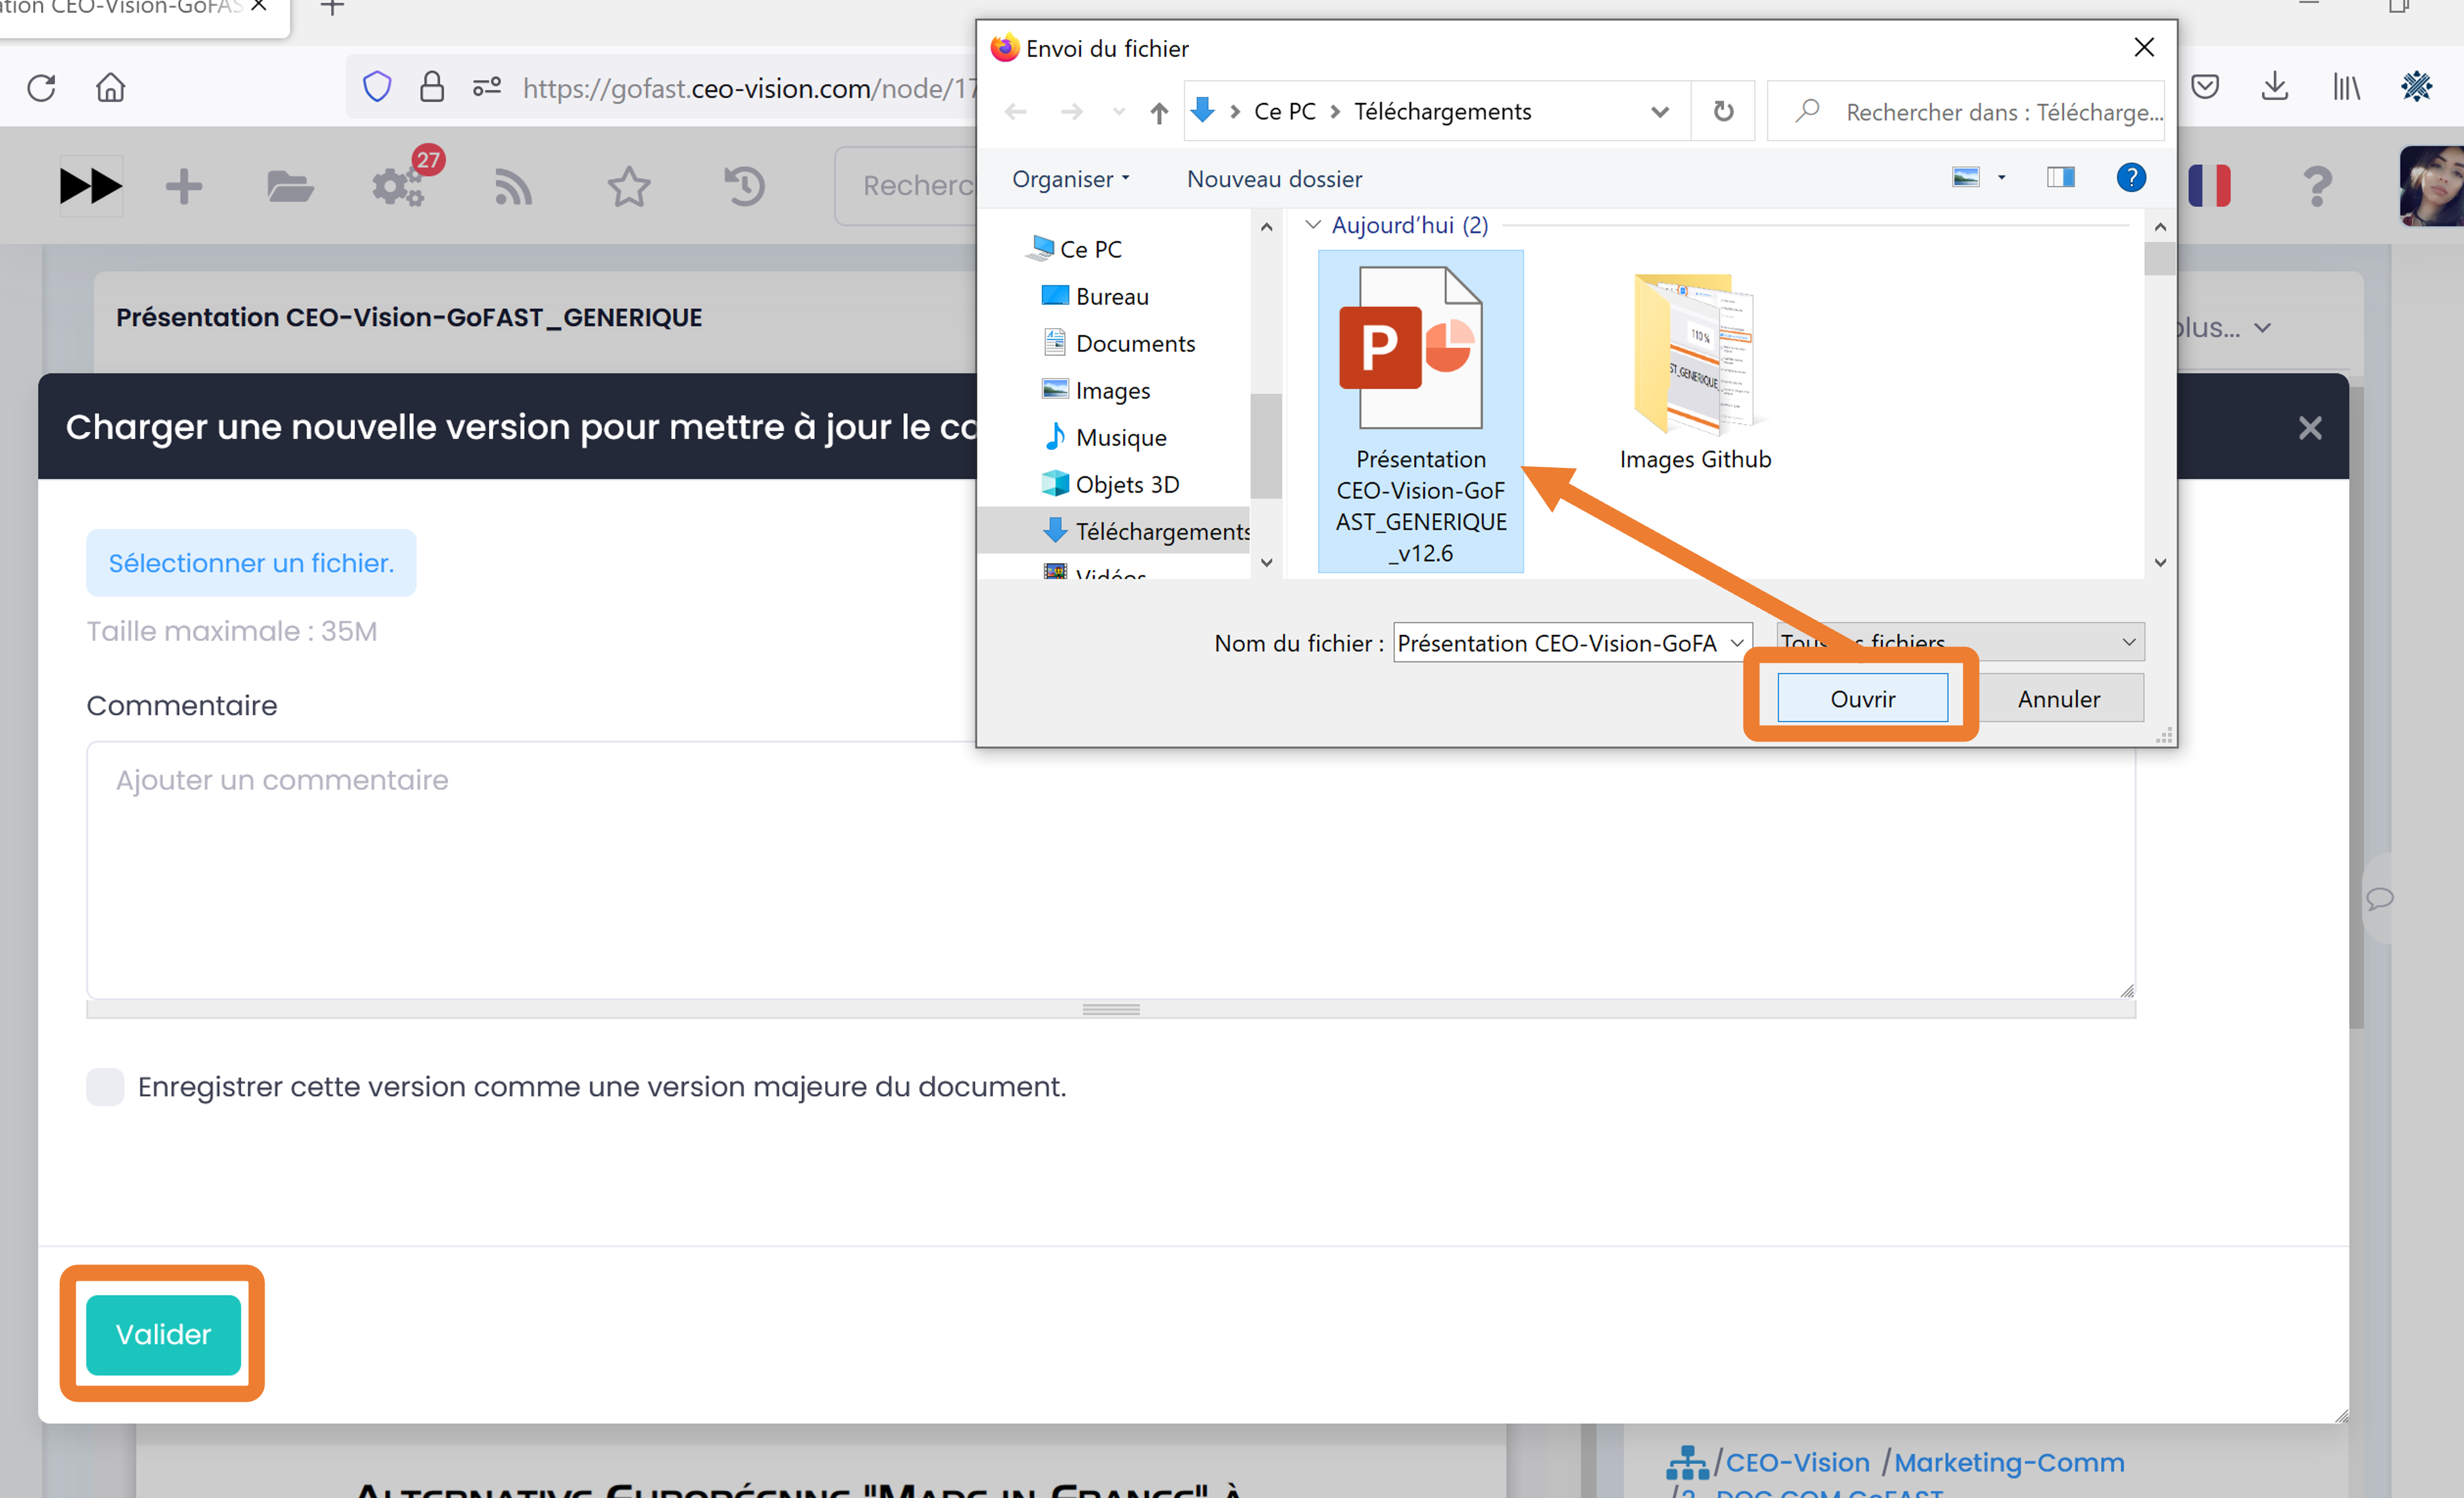
Note
Once your file has been uploaded, a window opens so that you can leave a comment related to your new version. You can also check the “Major version” box (recommended if you consider that the modifications made are important).
The version of the document on GoFAST will be overwritten by the one you just uploaded:
If you left a comment, it will be available for review through the “Comments” tab of the information block.
If you ticked “Major version”, the version number will change to major version (eg from 1.4, you will change to 2.0).
How to set as major version
As soon as you edit a document using the “Co-edit with OnlyOffice” or “Edit from my PC” functionality and you save, a new minor version of the document is generated (1.0=>1.1, 1.2, 1.3, etc.). If necessary, you can transform the current version of the document into a major version, i.e. a new working base (e.g. version 1.11 becomes version 2.0).
You can tag the version of a document as major at any time:
On the document page, go to the “Hamburger” menu (contextual actions)
Go to “More…”
Click on “Tag this version as major”.
How to switch a source document to major version during a Publication:
On the document page, go to the “Hamburger” menu (the contextual actions).
Click on “Create a publication” (or “Publish again this document” if a publication already exists and you want to update it).
Tick the box “Set original document as major version”
Click on the “Validate” button to save.
Importance of major versions:
If you pre-archive a document (see the “state” fields of a document), its minor versions will be deleted and therefore only the major versions (e.g. 1.0, 2.0, 3.0, etc.) and the last current version before the prearchive will be kept.
How to comment your major version:
You can add a comment to this new major version on the occasion of this update. This will be visible in the “Comments” tab to the right of the document preview, by all users with access to the document.
Finish by clicking on “Validate”.

In the metadata, you will see the version number change (for example, version 1.2 has changed to 2.0). When the digit 1er changes, it is a major release, otherwise it is a minor release.
See also “How to drag and drop new version”
Deletion of minor versions
The main purpose of deleting minor versions is to free up space on the platform. In the case where a document has many minor versions, this also allows you to reduce the list in the “Versions” tab.
Before deleting minor versions, it is recommended to check if the document has major versions:
If so, the major versions will be saved and you can download them as needed.
If the document has no major version apart from the very first one (1.0), only this first version and the last current version will be kept.
How to delete minor versions:
On a document page, go to the “Hamburger” menu (contextual actions) or from the file explorer, right-click.
In “More…”, click on “Delete all minor versions”.
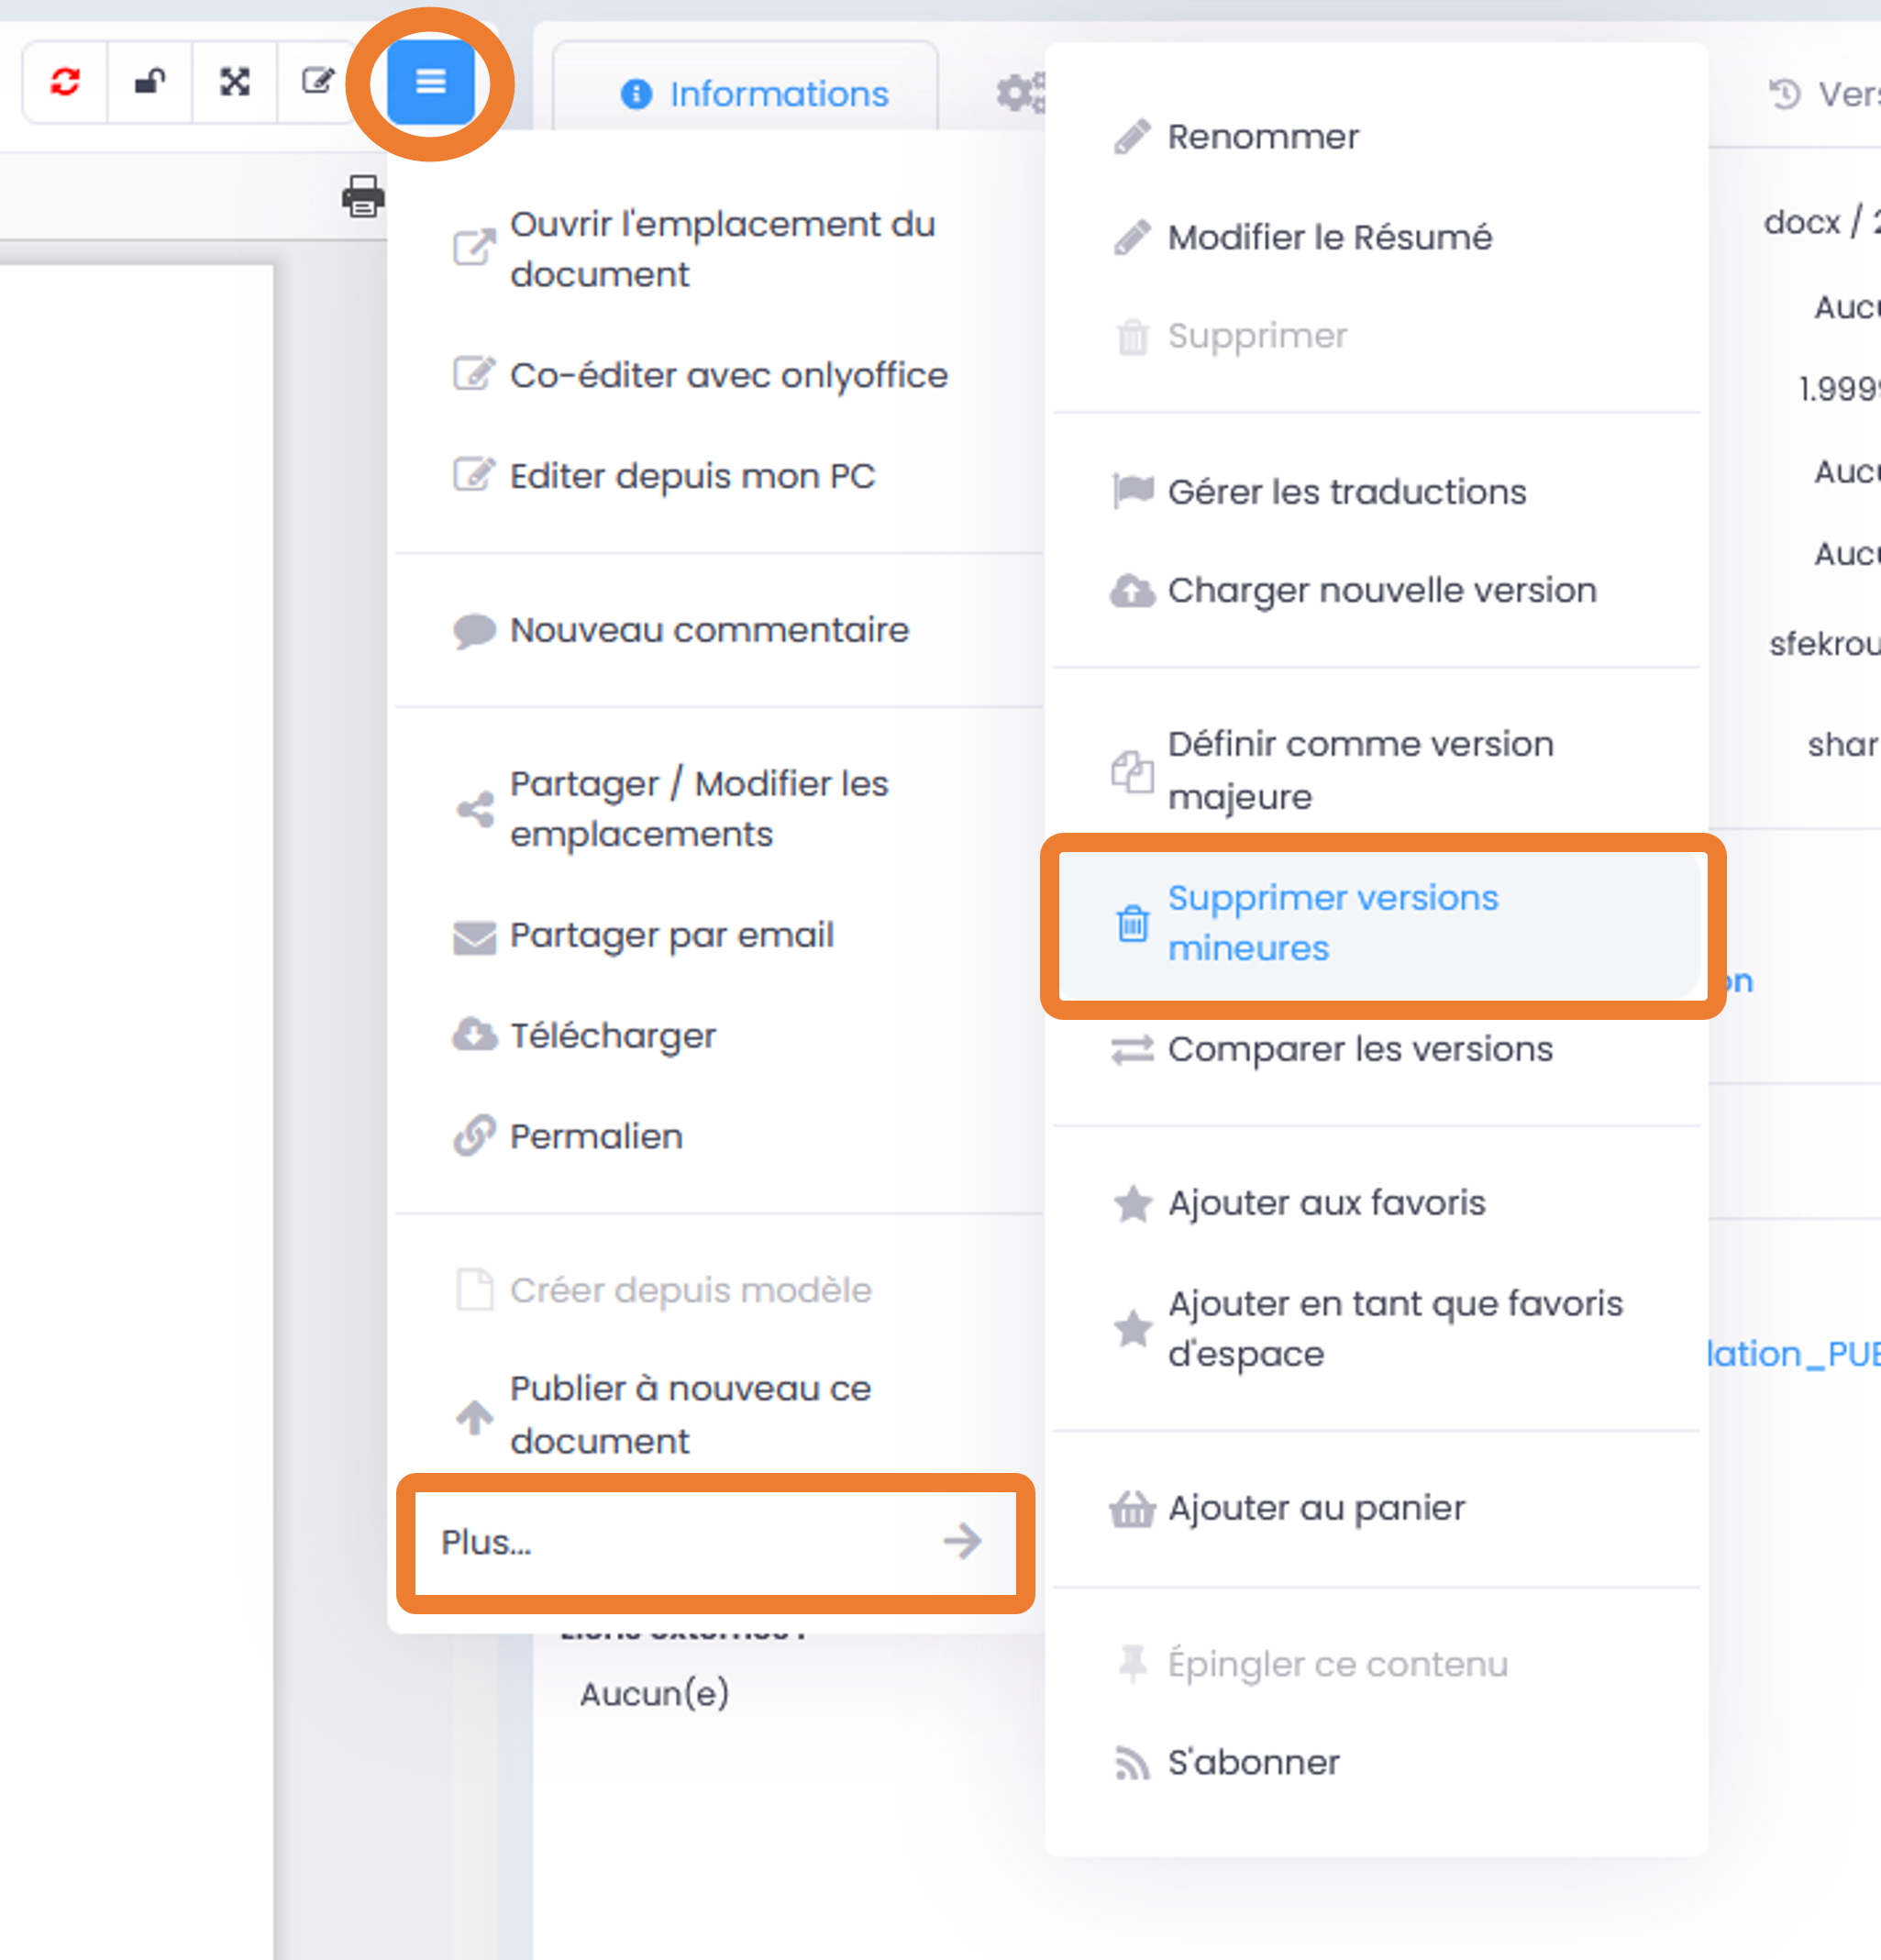
A message warns you of the permanent and irreversible deletion of minor versions. If you agree, click “Delete”.
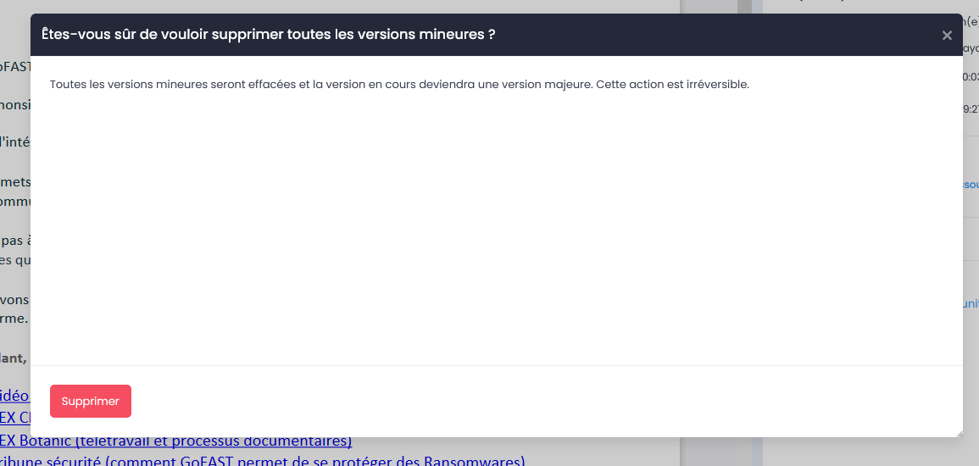
The current version of the document then becomes a major version. In the metadata block, “versions” tab, you will now only see the major versions of the document.
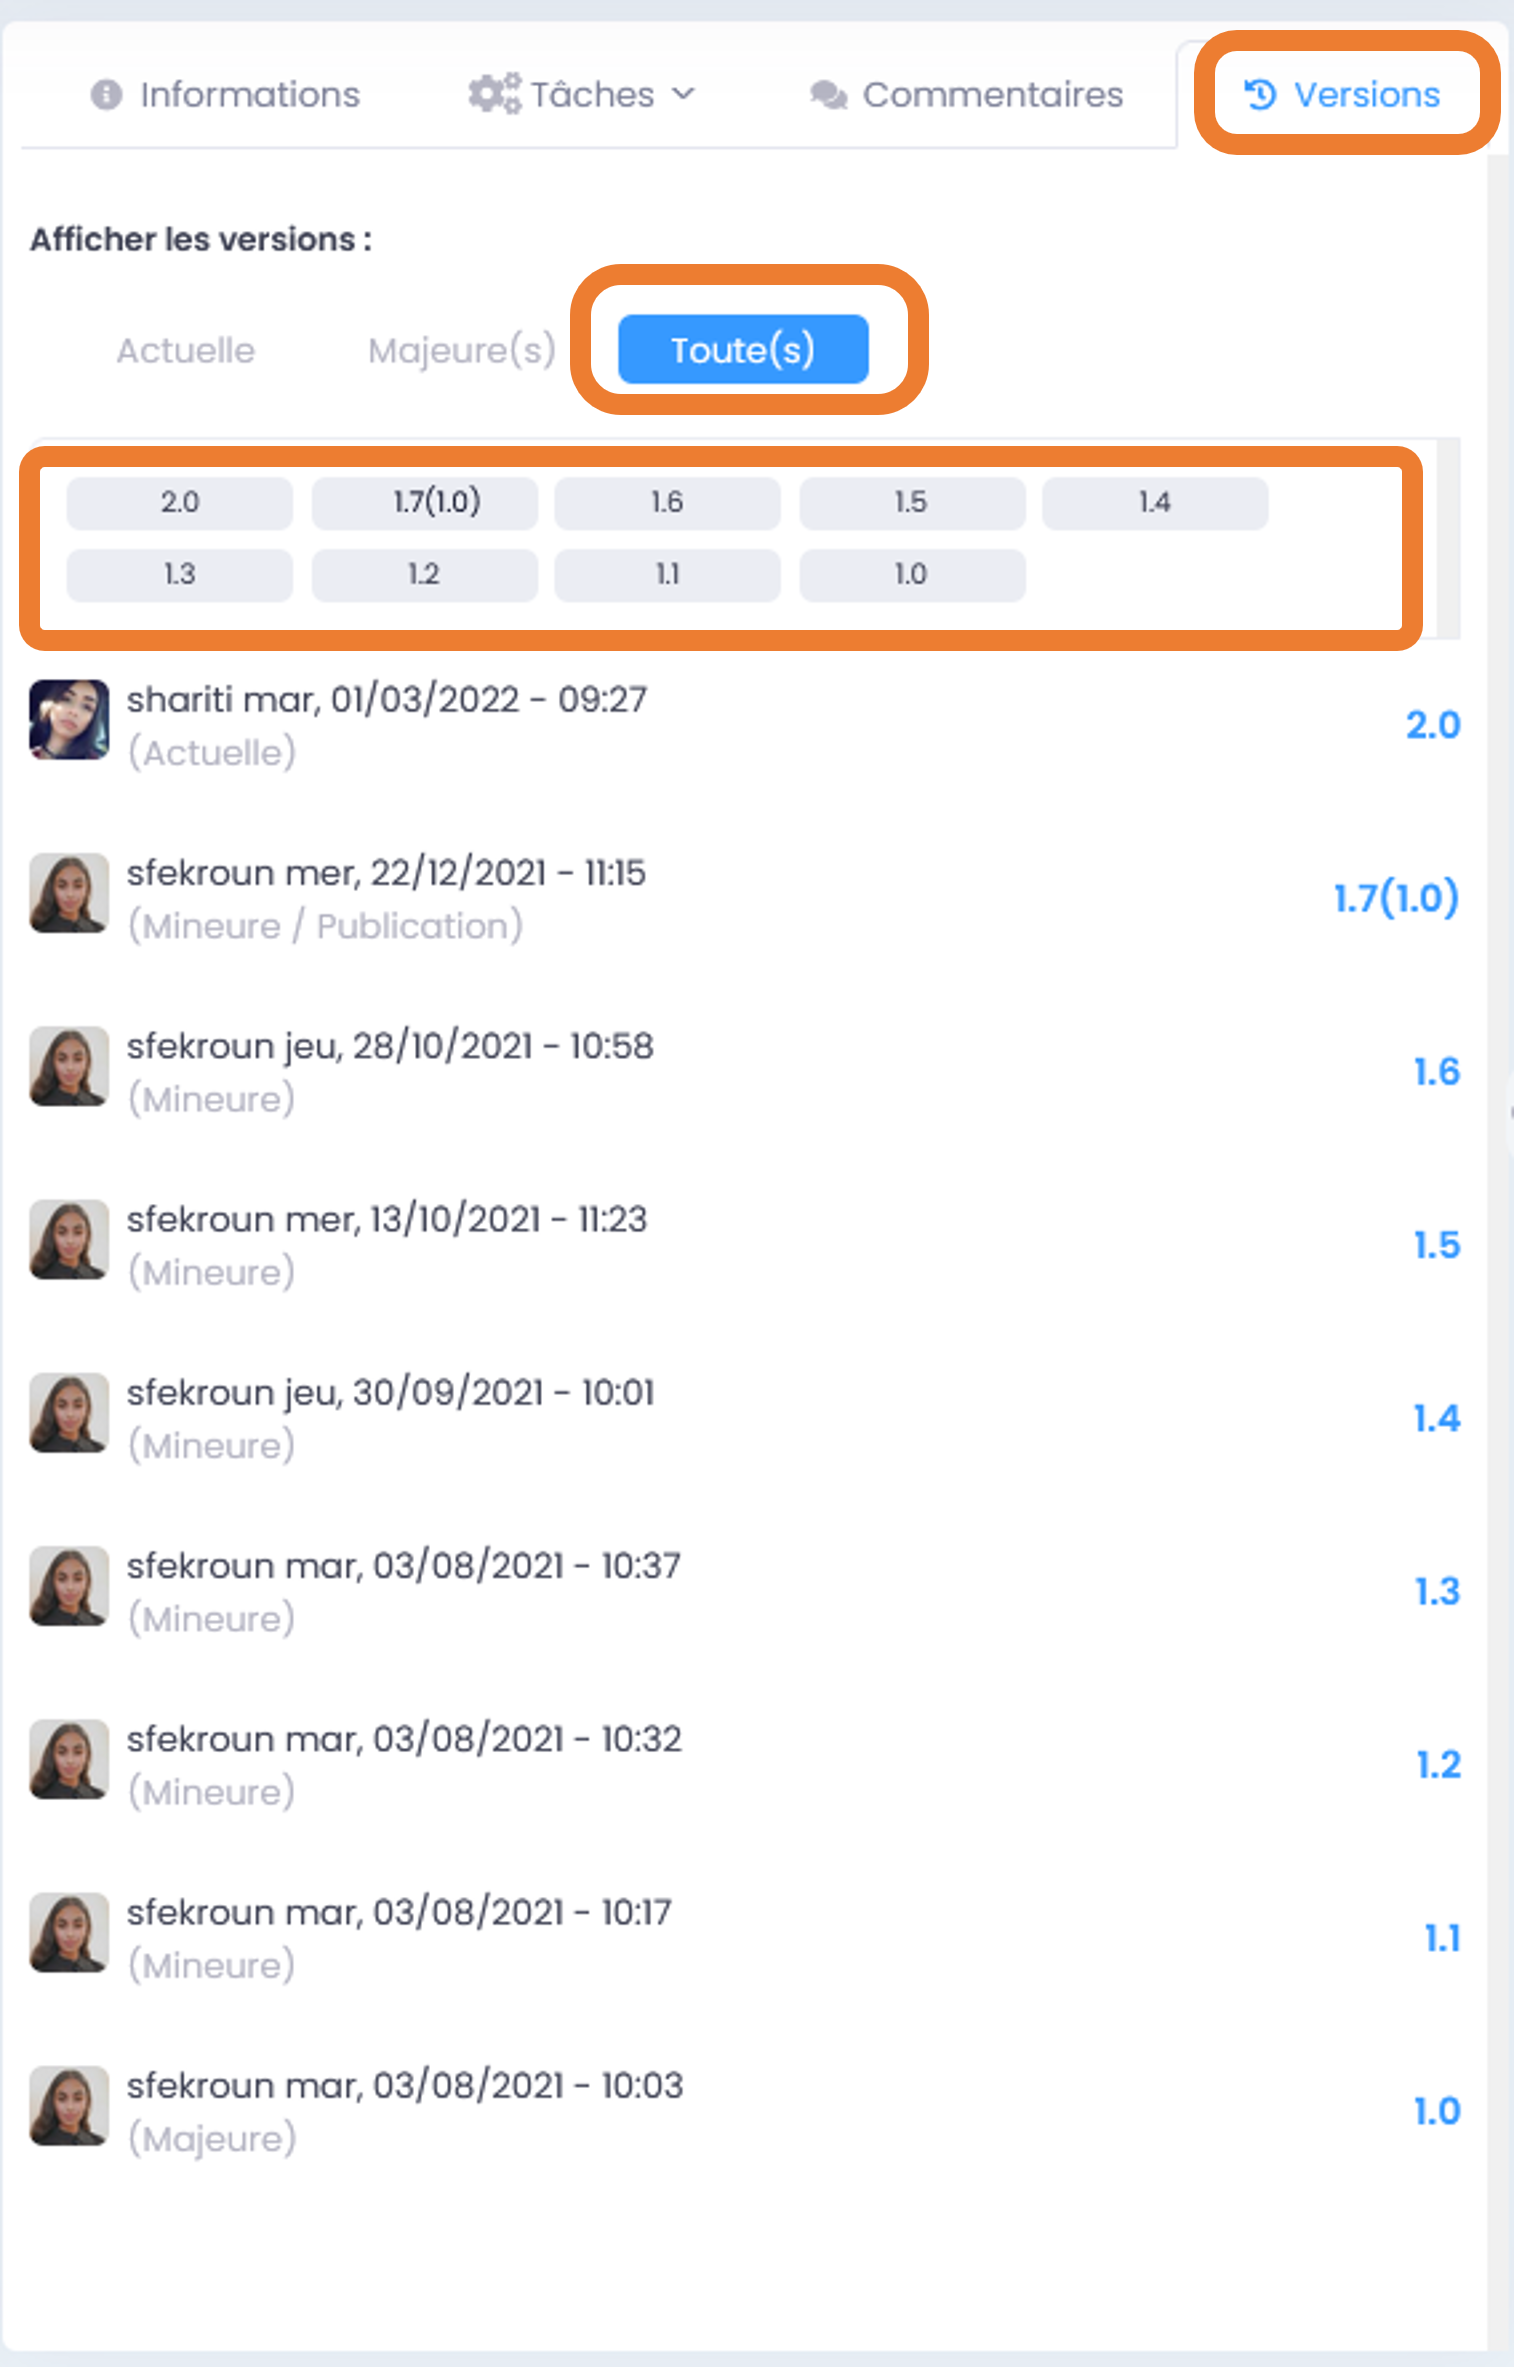
Note
For good version management, it is advisable to regularly “transform into a major version” the latest available version of the document. Thus, in case of deletion of minor versions, we keep some versions tracking the history of the document.
Compare versions
To display the differences between two versions of the same document, you can launch a comparison:
From the document page, go to the “Hamburger” menu (the contextual actions).
Go to “More…”.
Click on “Compare versions”
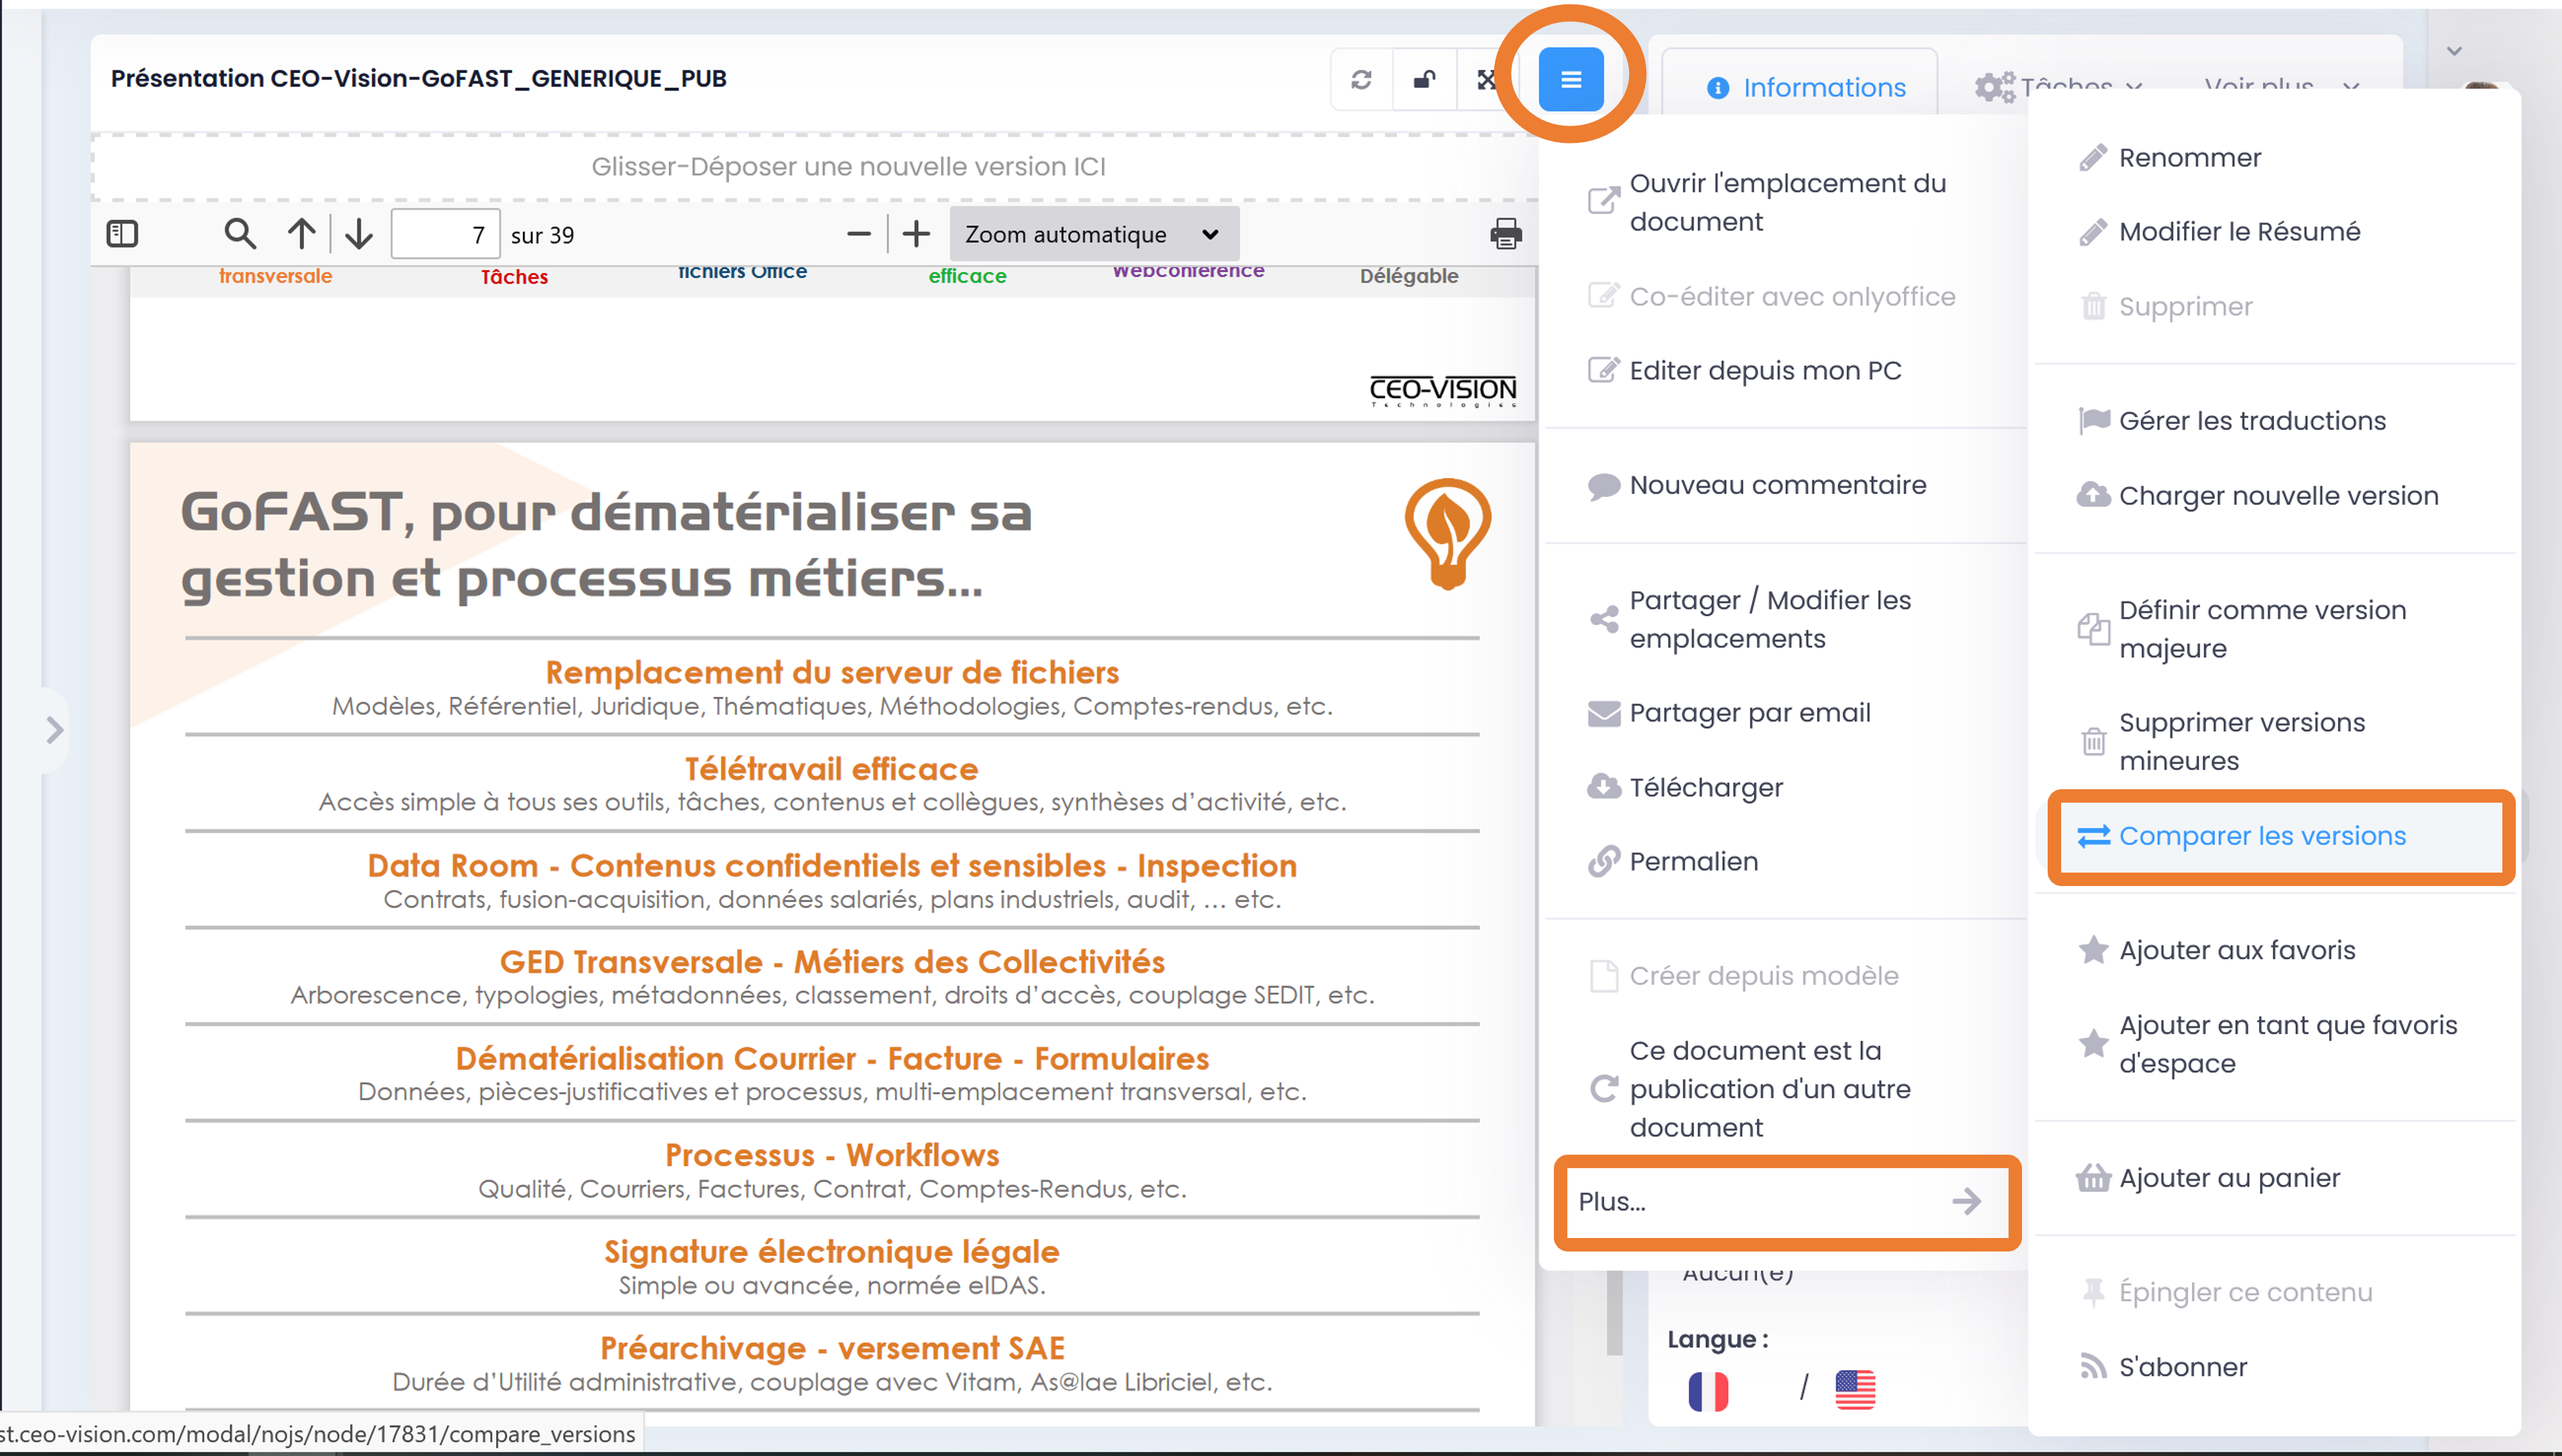
Select two versions you want to compare in two fields:
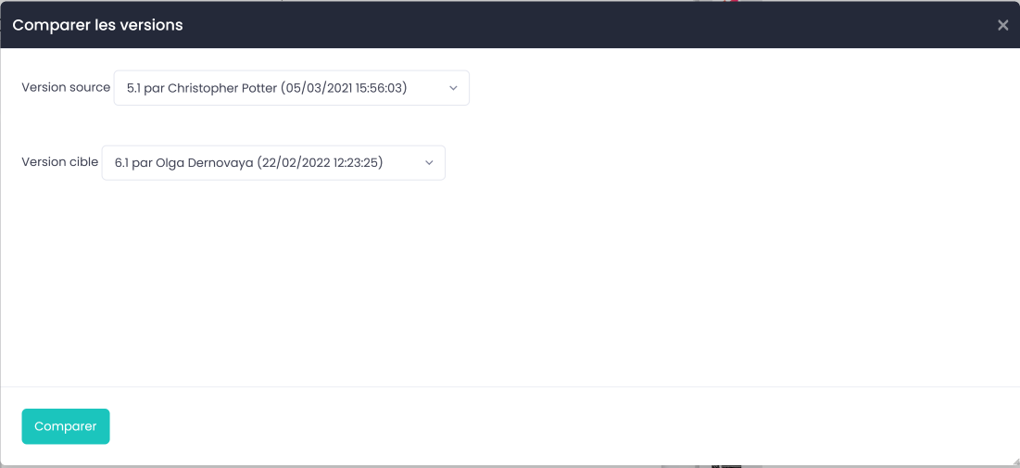
Everything crossed out has been deleted and everything underlined has been added. But by clicking on a modification you can see the details, what was added and who made the change.
How to add to favorites
Ajouter un document aux favoris permet d’y accéder très rapidement par la suite, depuis la barre des accès rapides icône « étoile » (menu du haut) ou depuis son tableau de bord (page d’accueil, si on dispose du bloc « Contenus favoris ». Mais il est aussi possible d’ajouter un formulaire aux favoris.
Adding a document/content to favorites is possible from:
the document page, via the “Hamburger” menu (contextual actions)
the file explorer by right-clicking on the document to open the menu
wherever you have the “Hamburger” menu of a document (ex. activity feed, search result…)
When you click on “Bookmark this”, a message appears at the top right of the screen to confirm that the content has been added to your bookmarks.
The next time you want to access this document, simply go to the “star” icon in the quick access bar (main menu at the top) and click on the document in the list of your favorites.
- You can remove the favorite document/content:
in the same way as for adding (via the contextual actions menu)
from the list of favorite content, click on the recycle bin to the right of the document title.
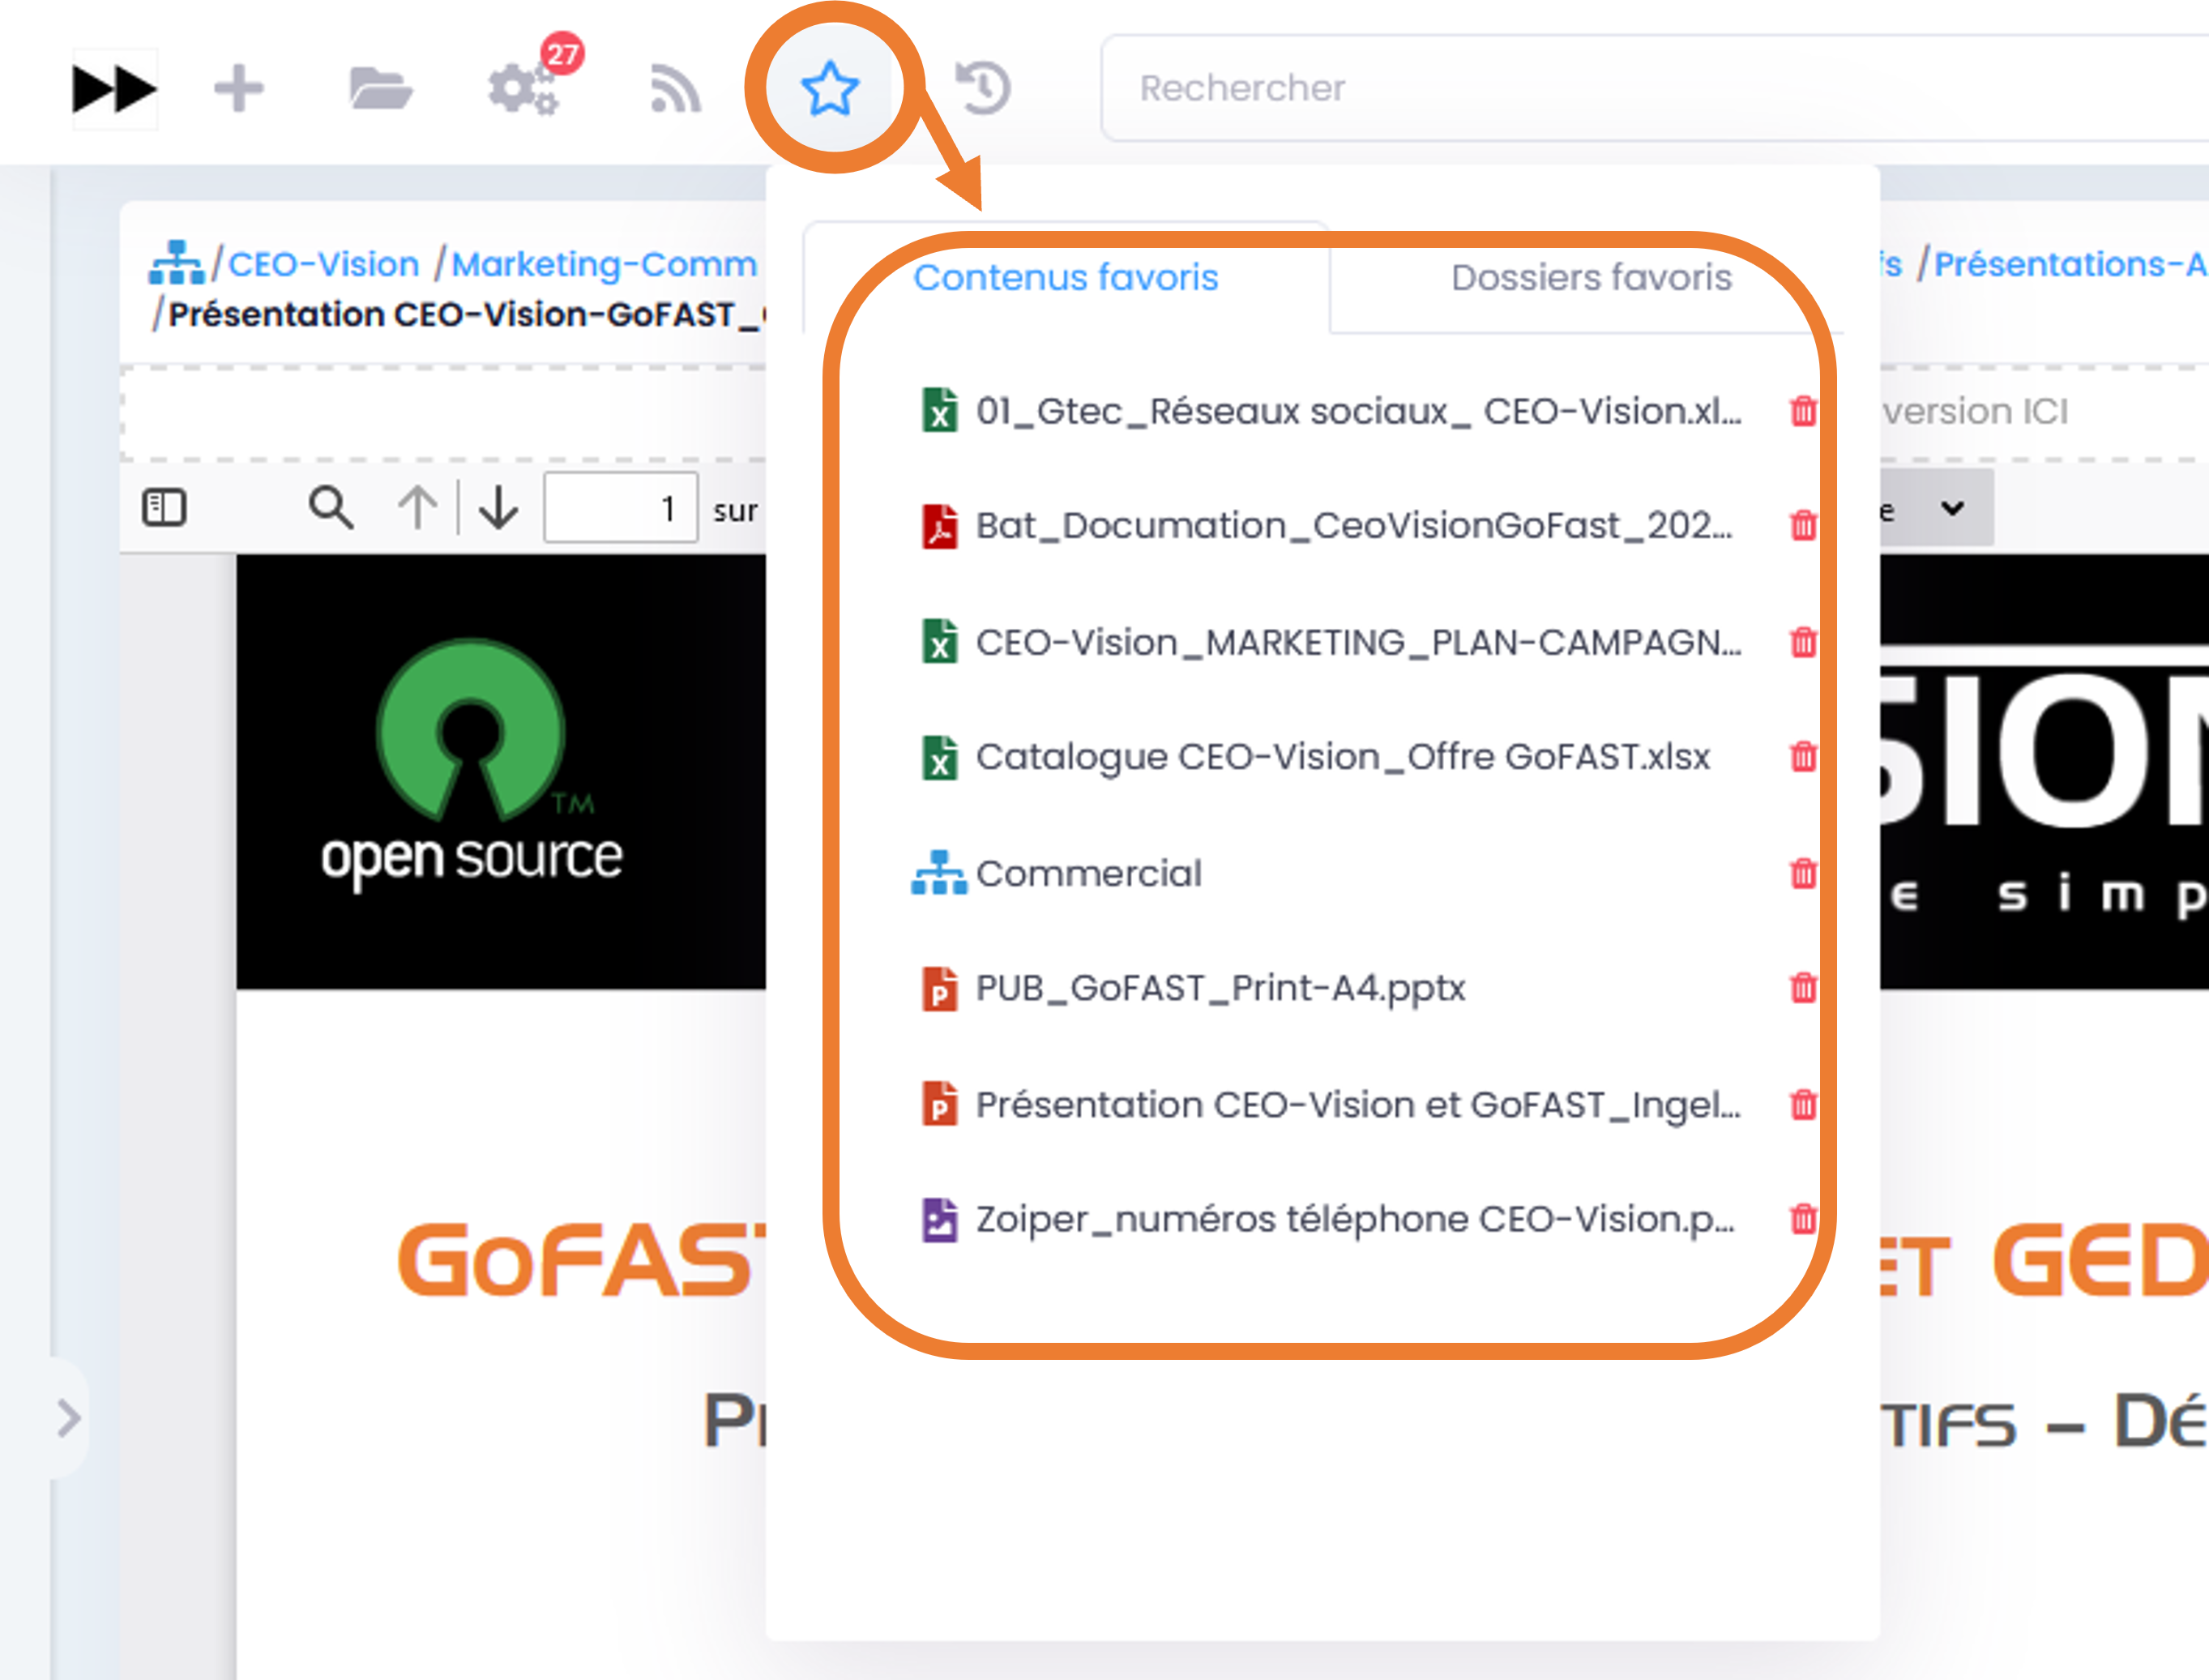
A message at the top right of the screen will confirm that the document has been successfully removed from your bookmarks.
Additon of documents to cart
Objective of the cart : Brings together several documents that can be found in different folders in a tree structure in order to be able to perform actions on all of these documents.
- How to add documents to the cart:
On a document page, via the “Hamburger” menu, go to “More…” and click “Add to cart”.
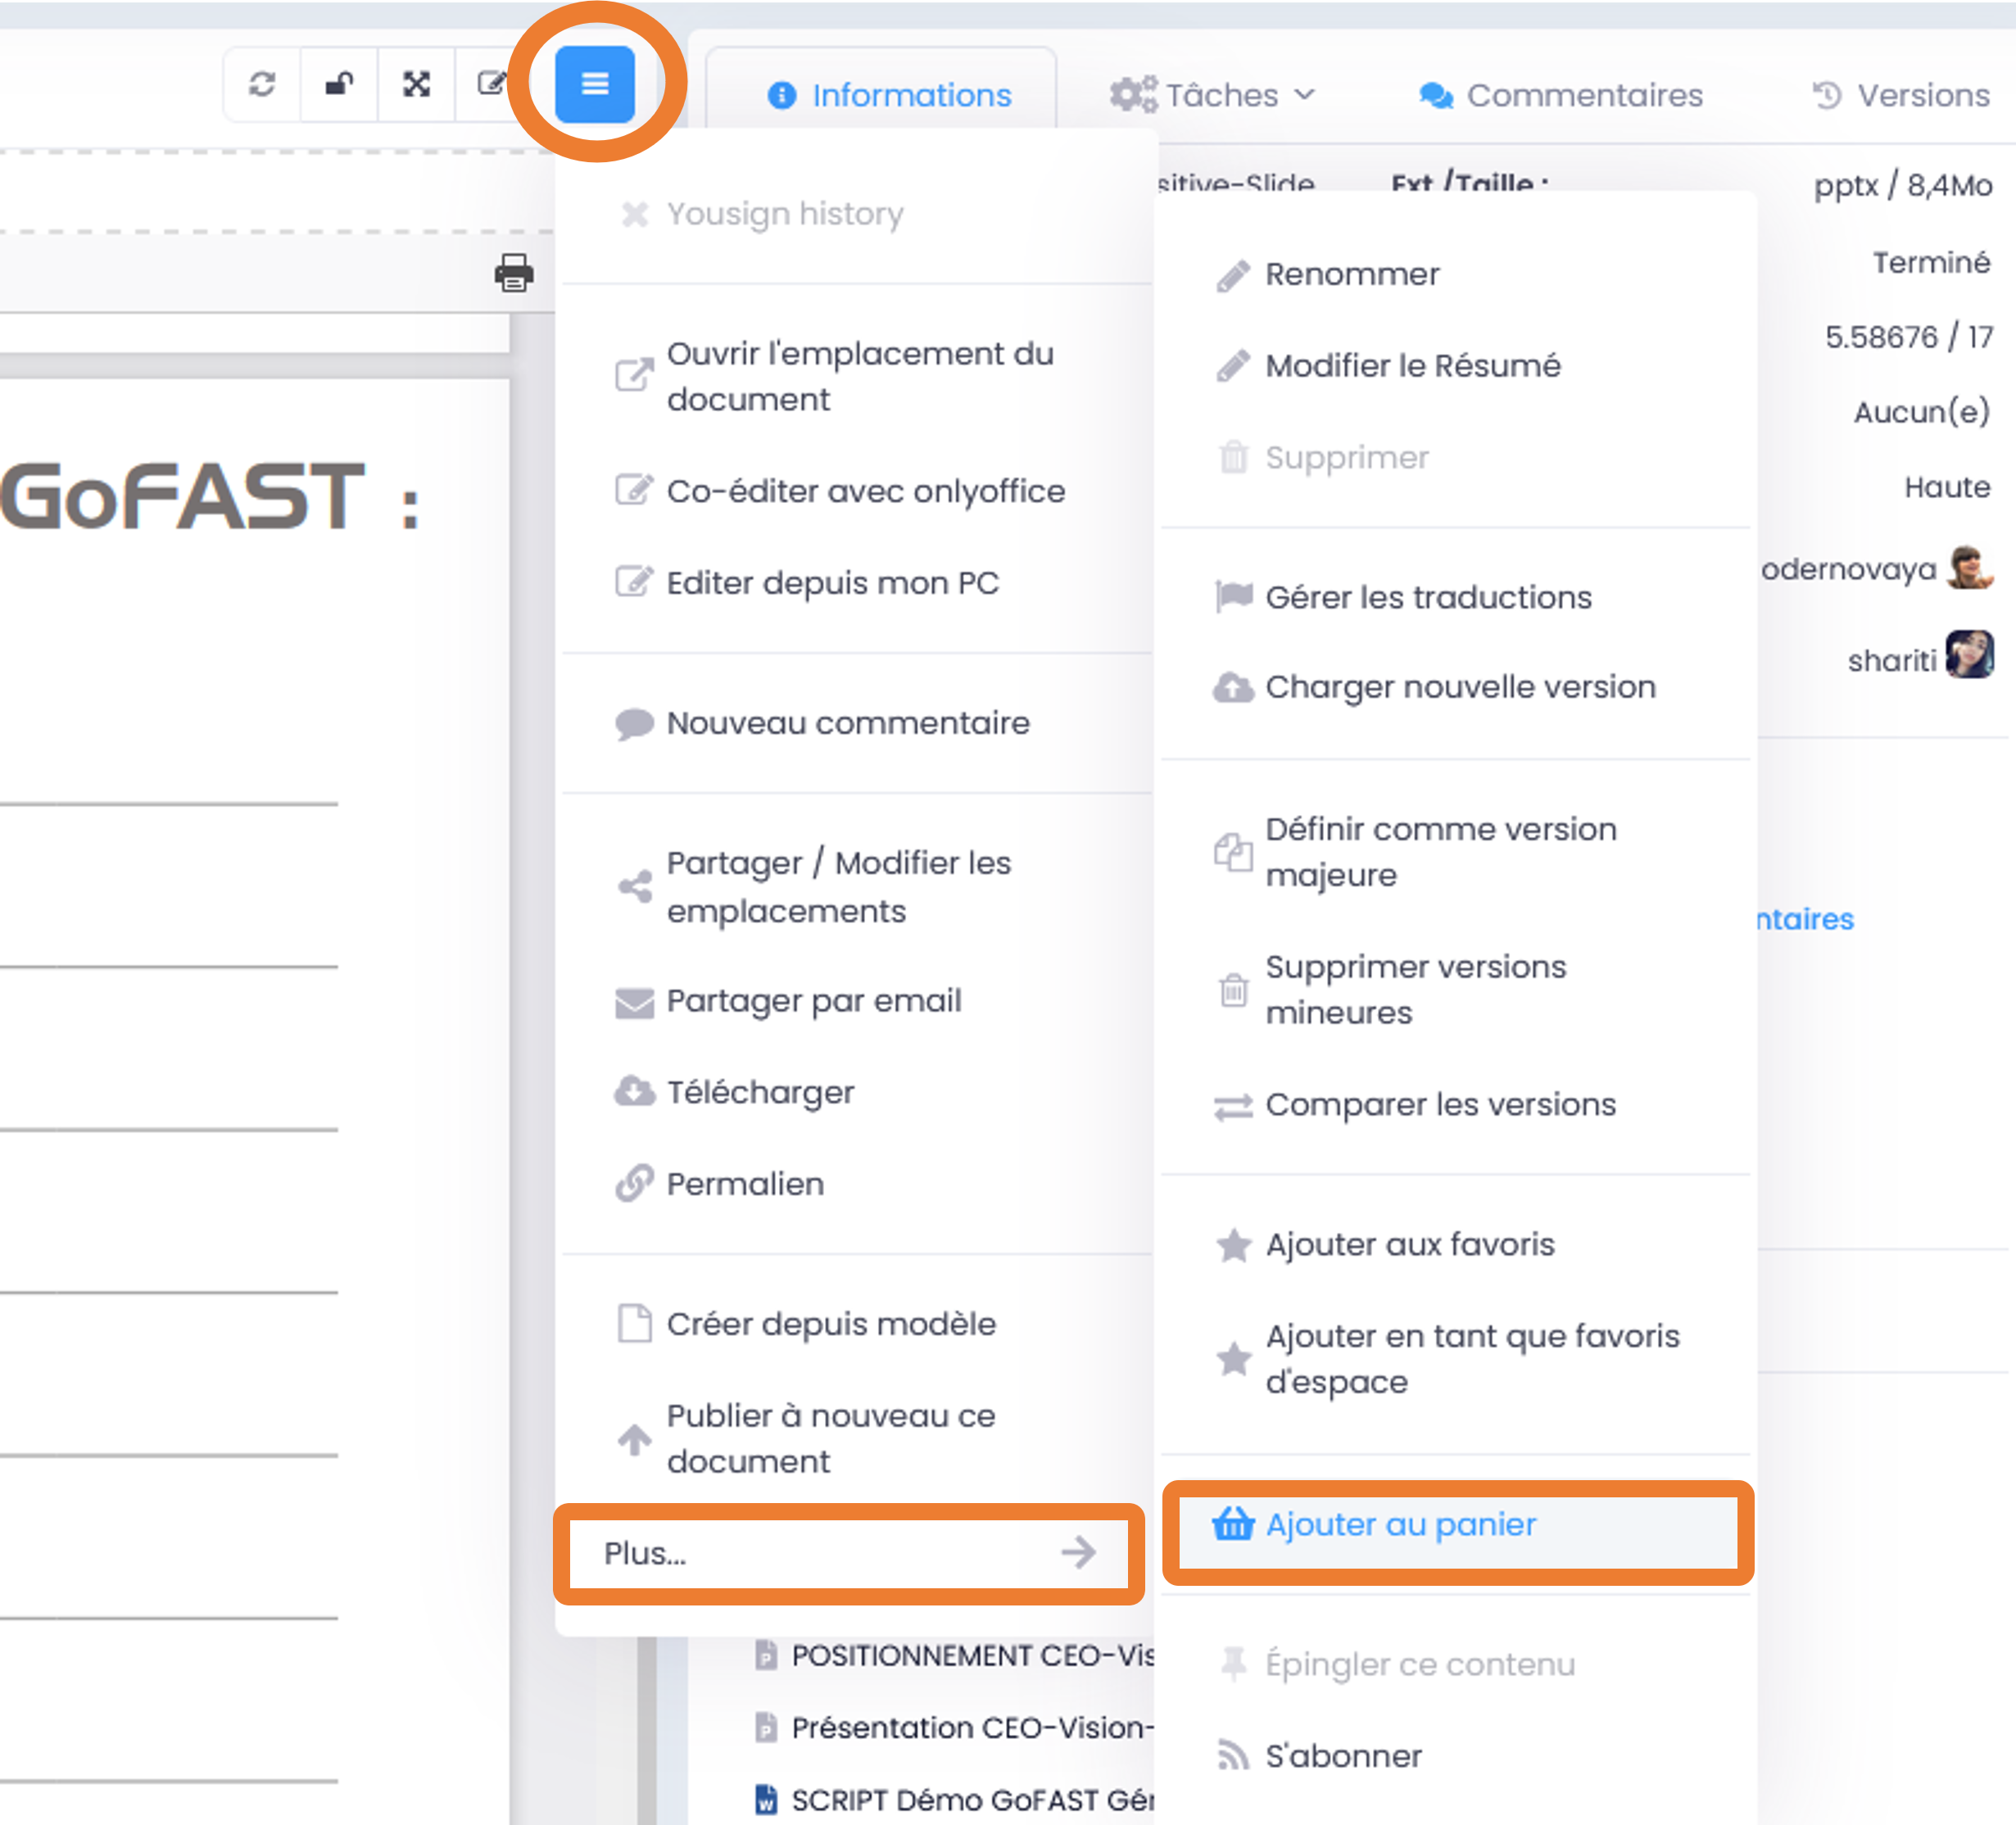
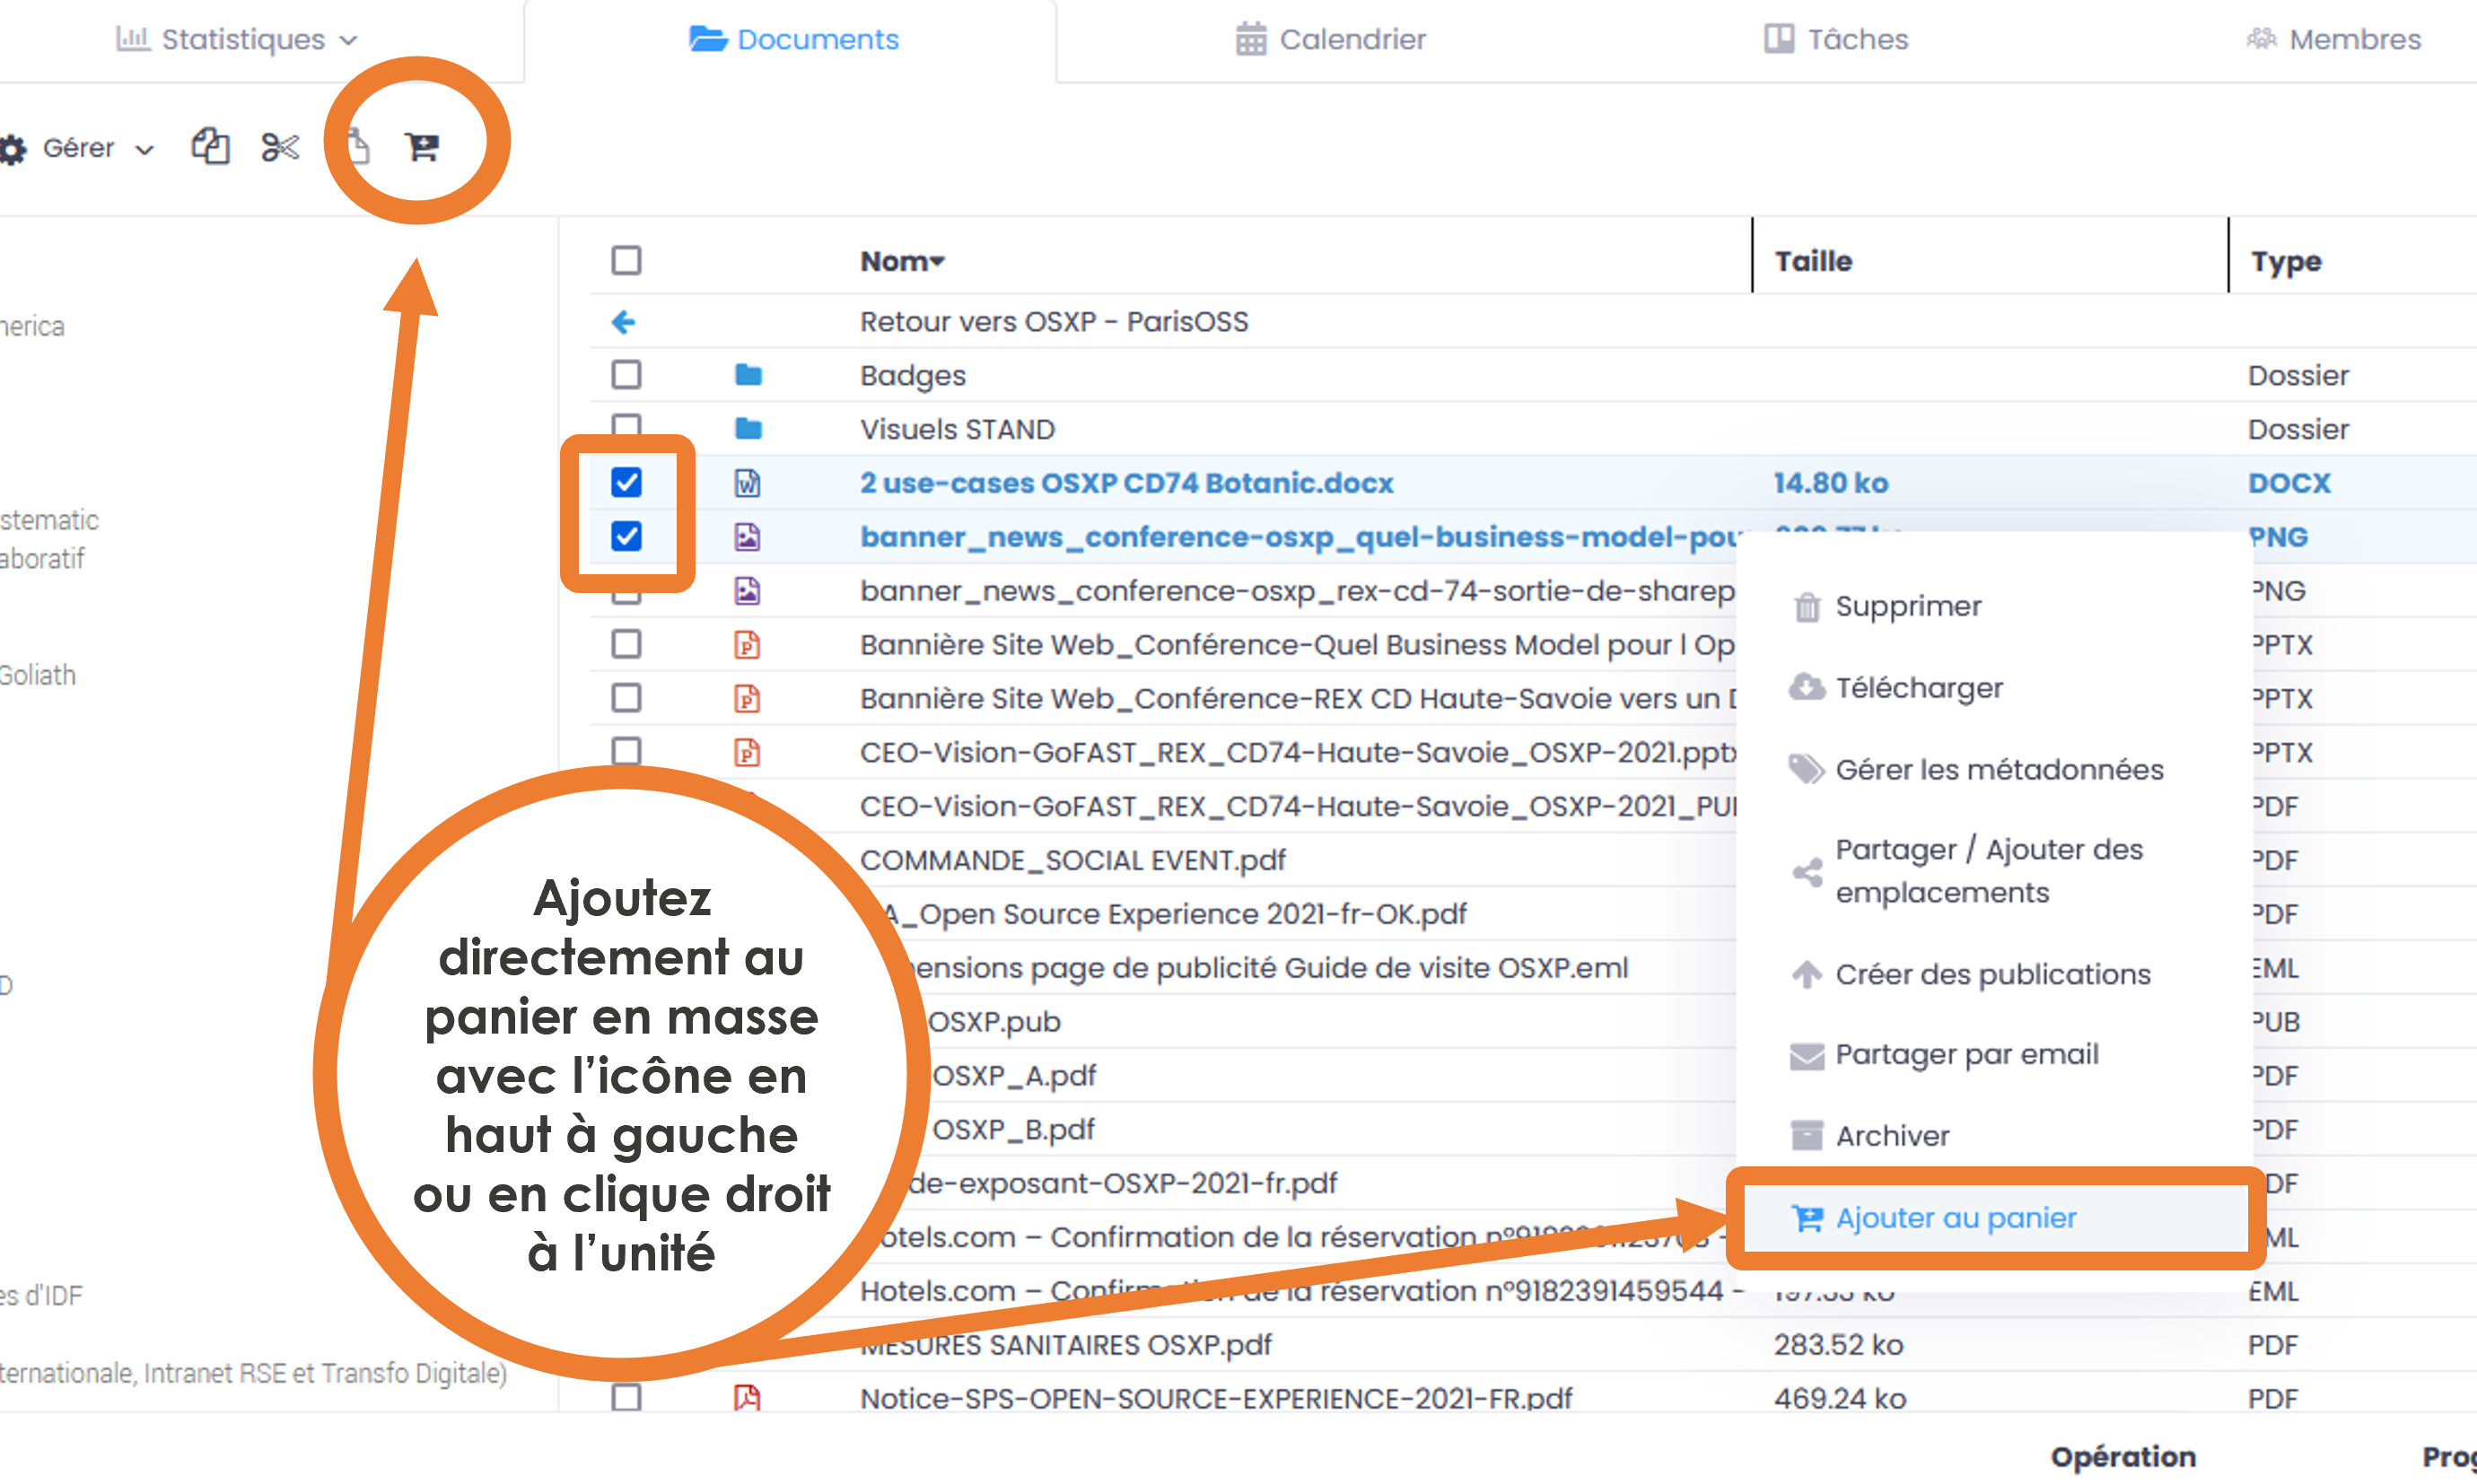
It is possible to remove documents from your cart:
Individually, by clicking on the icon to the right of the document in the cart.
All documents at once, by clicking on “Remove all documents” at the bottom of the cart window.
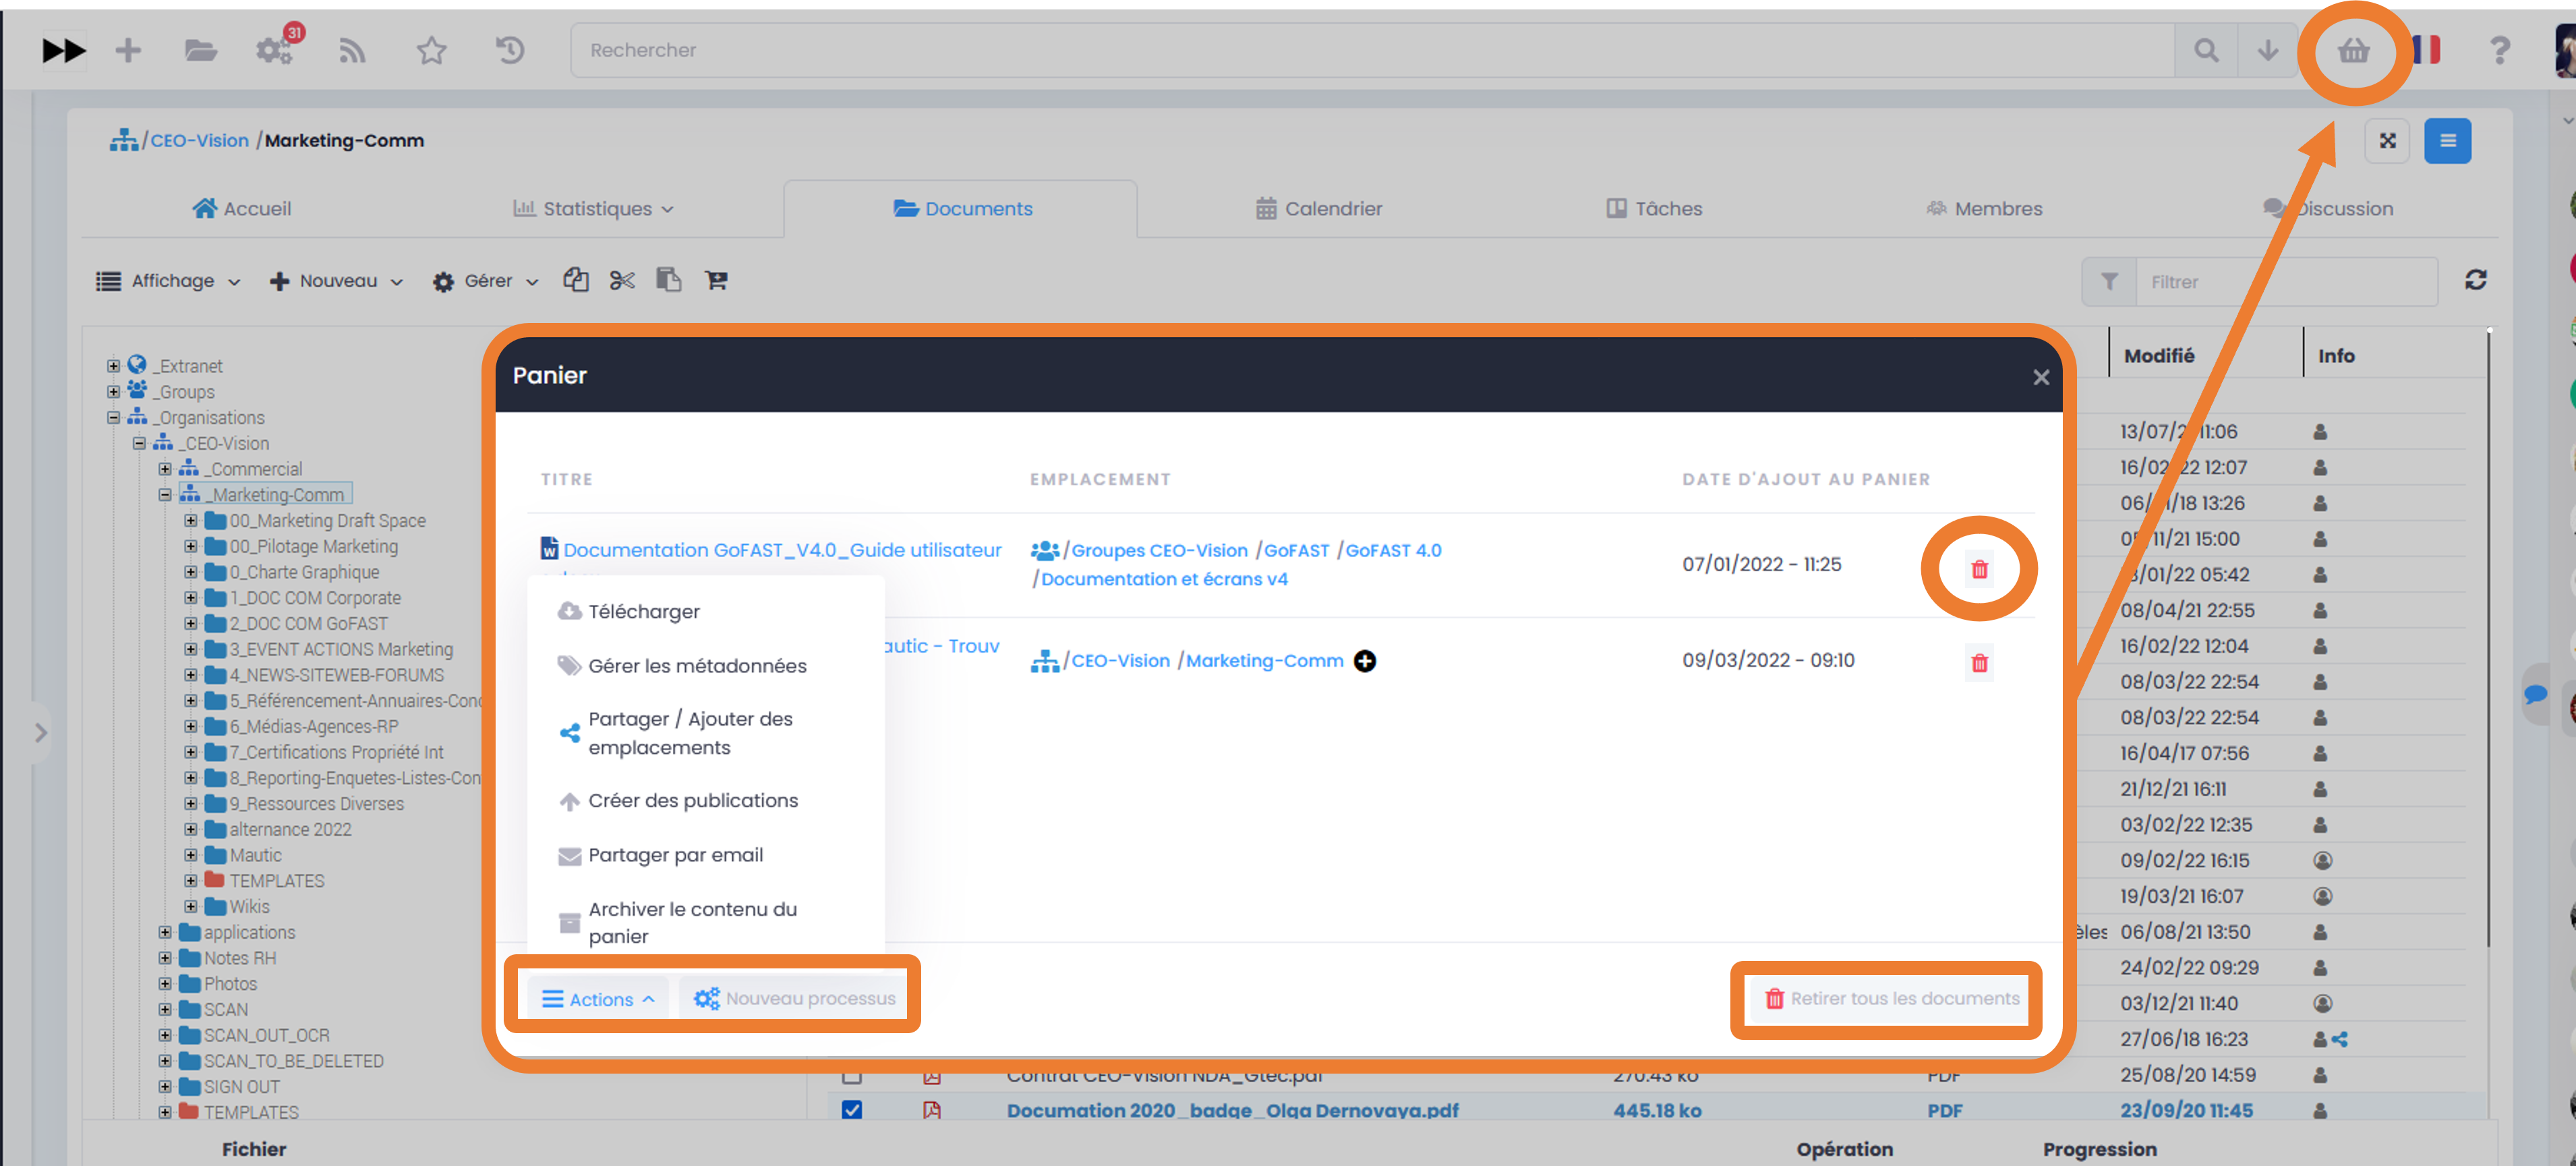
To find out more about the possible actions from cart, please refer to the section: “Cart”
Gestion des favoris
It is now possible to create folders in favourites, and there are two ways of doing this:
-In ‘My Favourites’, press ‘+ New’ in the top right-hand corner.
-In ‘My favourites’, right-click, then press ‘Add a collection of favourites here’
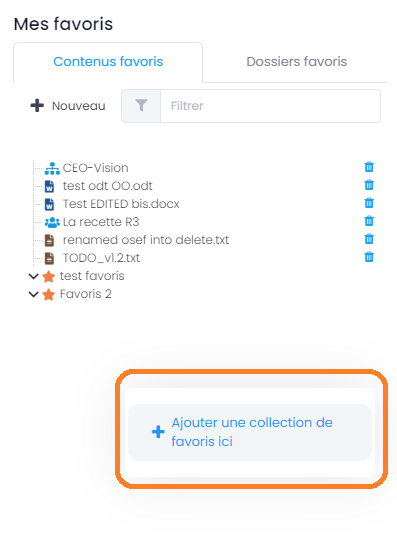
Then, to add favourites, go to the file explorer, click on a document, go to ‘More’, and click on ‘Add to favourites’.
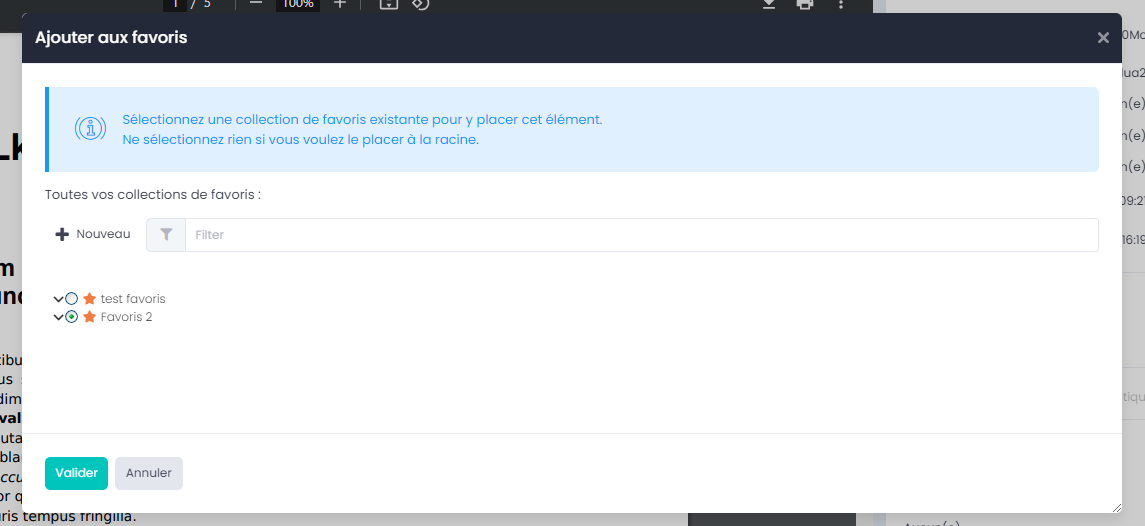
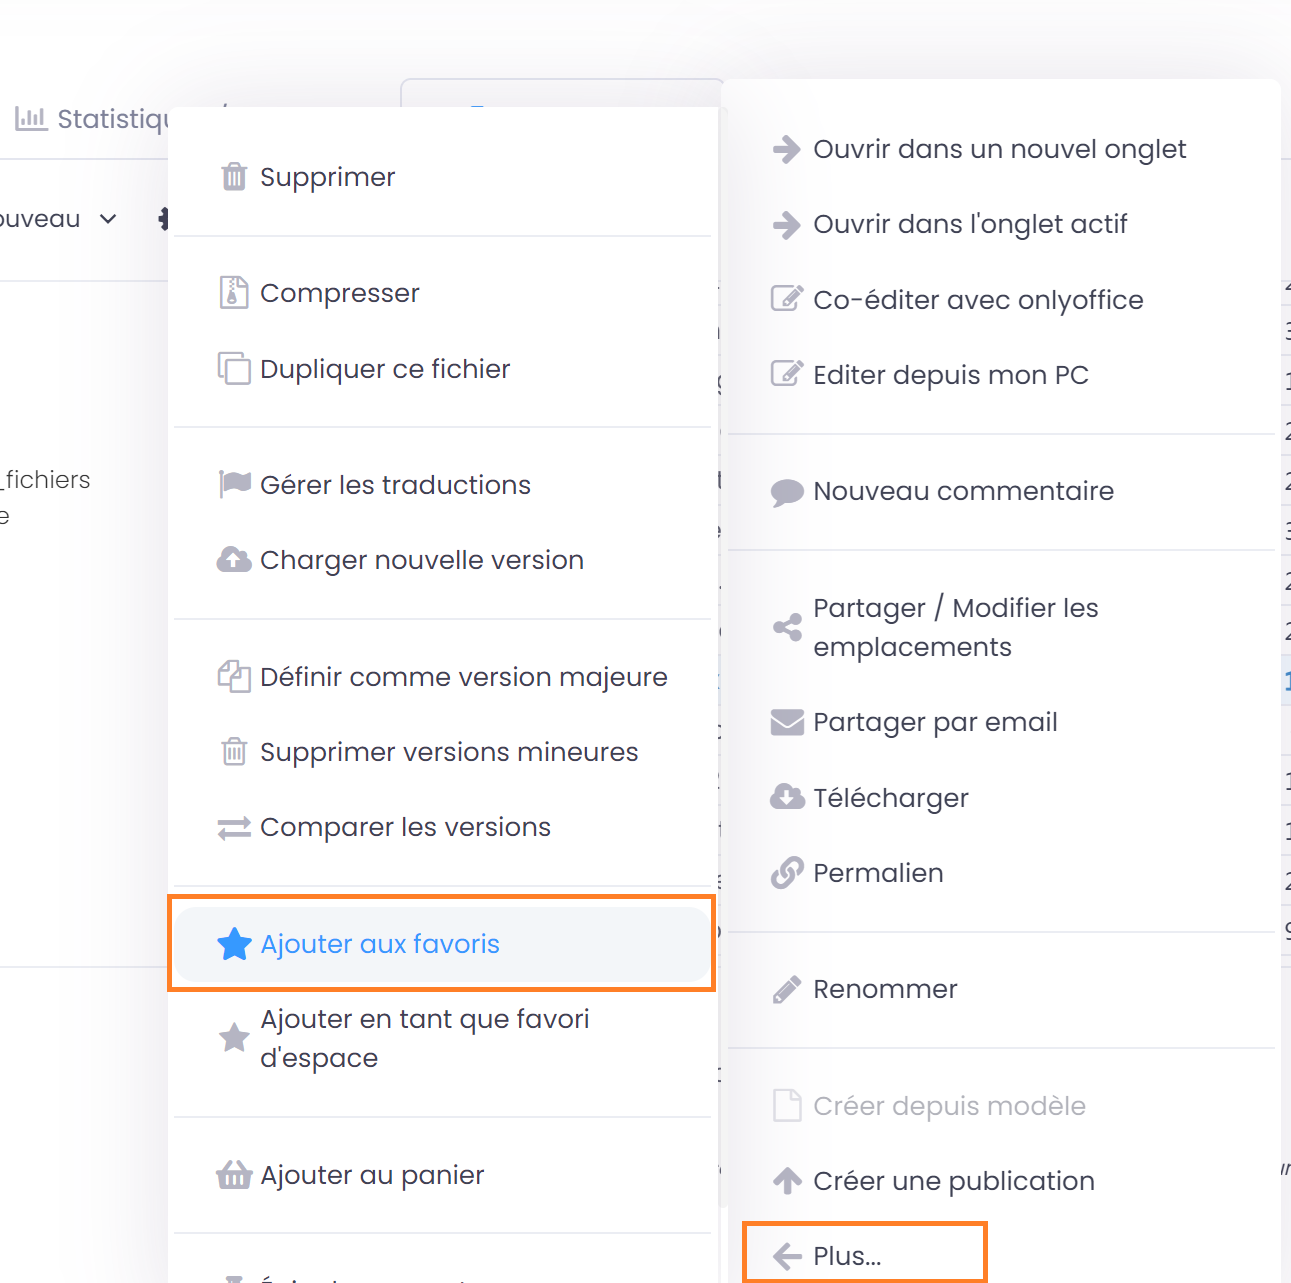
Pinning the content
Objective of “pinning content”: displaying a specific document at the very top of the activity feed. So regardless of the activity on the platform, all users with access to this document will see it pinned to the top of the feed. Only the “User-Support Profile” or “Super-Administrator” allow you to pin a document on the activity feed.
How to pin a document/content to the top of the activity feed:
On a document page, via the “Hamburger” menu (contextual actions menu), go to “More…” and click on “Pin this content”.
Wherever you see a document’s “Hamburger” menu, you can perform the same action.
From the file explorer, right-click on a document to open the same “Hamburger” menu.
To learn more about profiles with advanced permissions, please refer to the sections “User-Support Profile” and “Super-Administrator Profile”. You can also view the “Activity Feed” section;
Subscribtion
Objective of subscribtion: manages the frequency of notifications related to the activity of a specific document. For example, you can have an activity report on all the contents of spaces where you are members twice a day, but be notified immediately when this specific document is modified or commented on.
How to subscribe to a content/document:
On a document page, via the “Hamburger” menu (contextual actions menu), go to “More…” and click on “Pin this content”.
Wherever you see a document’s “Hamburger” menu, you can perform the same action.
From the file explorer, right-click on a document to open the same “Hamburger” menu.
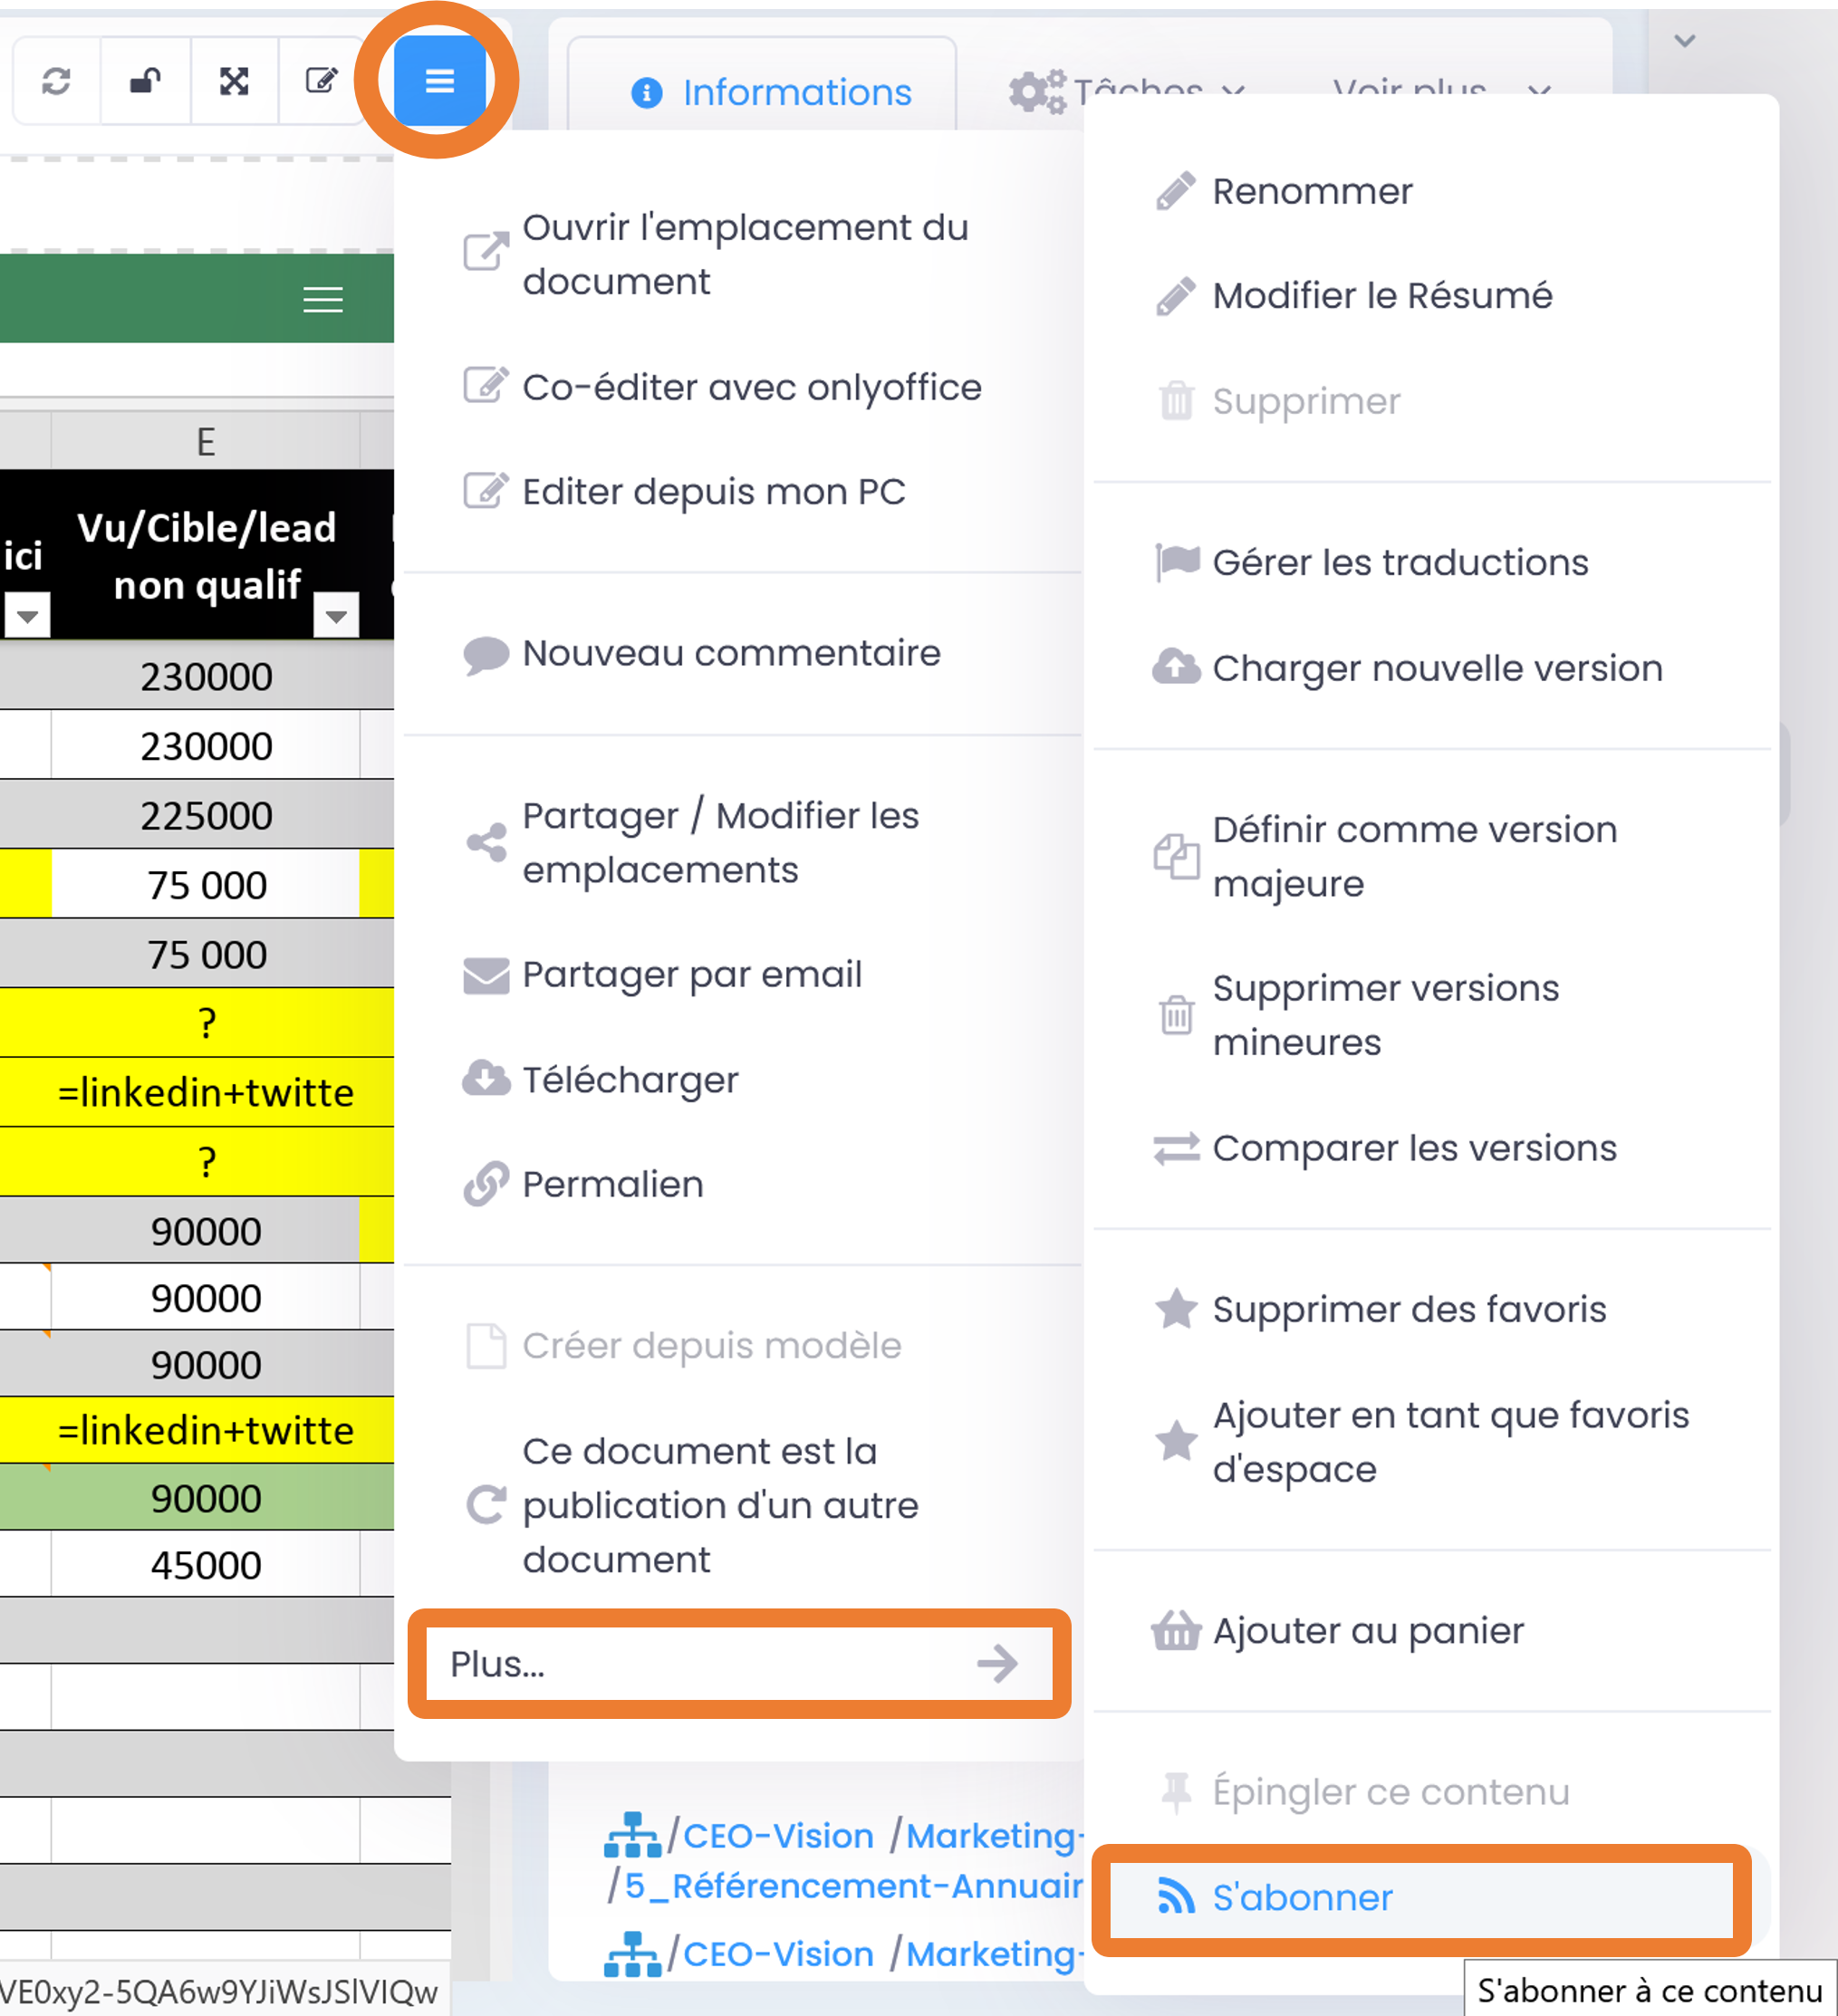
A message at the top right of your screen confirms that the subscription to this content has been taken into account.
To see your subscriptions and manage their intervals, click on the arrow next to your profile name and then on «Subscriptions»
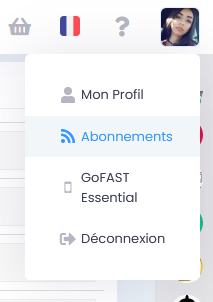
You can find the whole list of your subscriptions by going through the user profile menu (quick access bar / main menu at the top), in the “Subscriptions” sub-menu.
To find out more about subscriptions to the documentary activity, please refer to the section: “Management of your subscriptions”.
Other possible actions
In addition to the “Hamburger” menu (contextual actions), on the document page it is possible to perform other actions, including:
Editing information (=metadata), see: Adding/Editing document information (metadata)
Pre-archiving a document (via editing the “State” metadata), see: Pre-archiving documents and retention period
Editing location/sharing (in Collaborative Spaces), see: “Editing Location/Sharing”
Update the document by uploading a file from your PC, see: “Drag and drop document”
Sharing comments (“Comments” tab), see: “Comments tab”
Assigning process tasks (“Tasks” tab), see: “Tasks tab”
Editing Location/Sharing
The location corresponds to the Spaces and folders where your document is on GoFAST (ex: in a group or an organization or your private space and/or a directory). The same and unique file can be classified in several locations thanks to Multi-location. You thus avoid having duplicate files and therefore no longer make version errors.
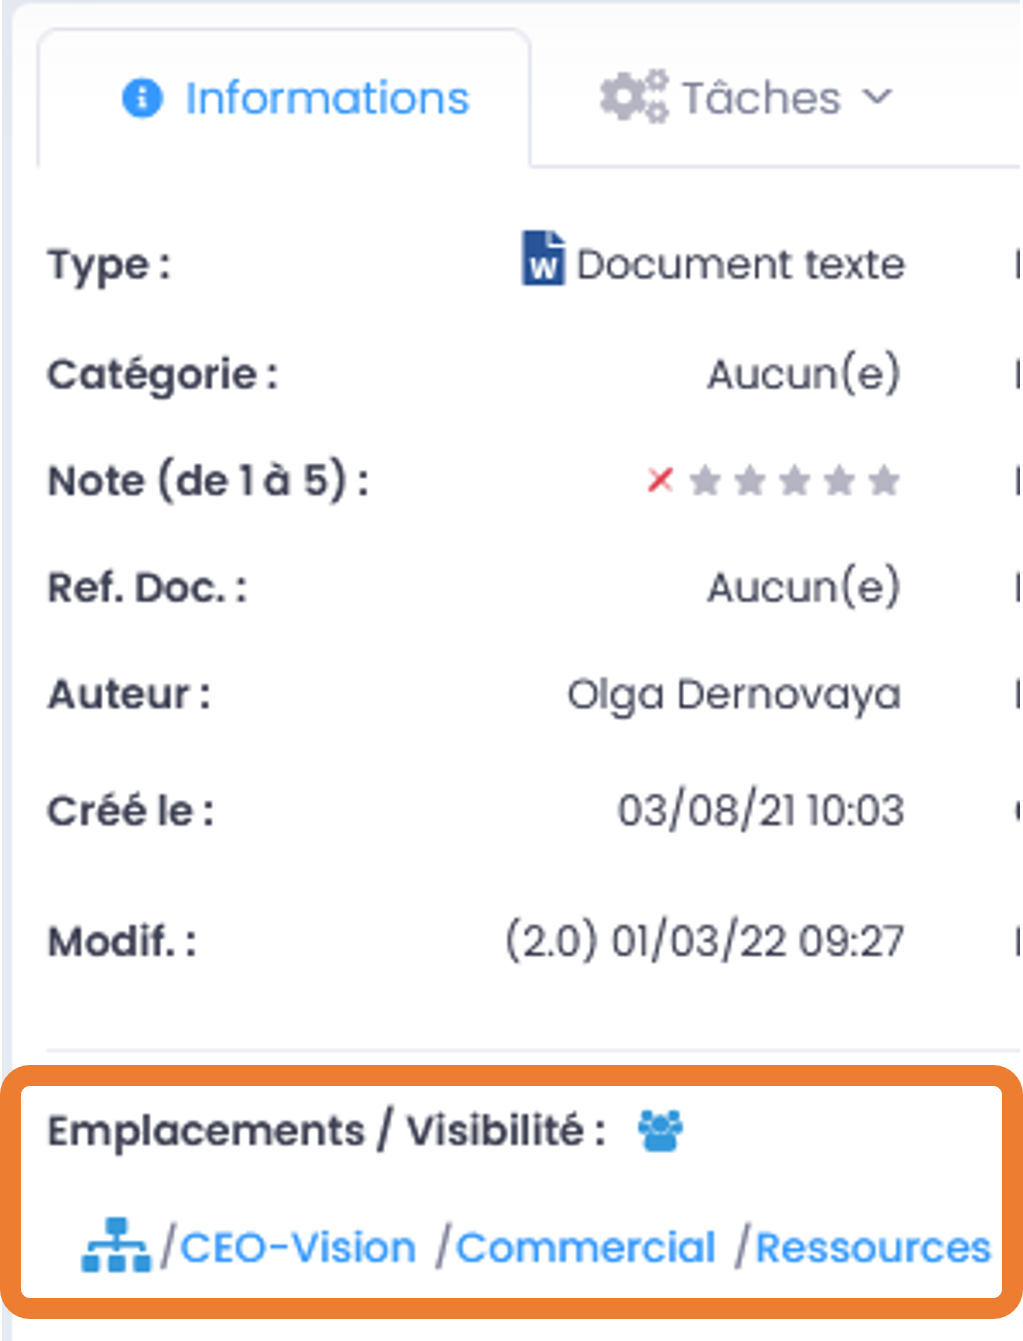
Adding or removing locations depends on the roles you have in the various Collaborative Spaces. For more information, please refer to the section: «Collaborative Spaces»
Adding/Editing document information (metadata)
In order to edit the information related to a document, you must go to the document page or go through the file explorer, then click on the button to manage once you select the documents that you want to qualify. On the document page in the “Location/Sharing” field, click on the “Edit” button, a window opens and displays the tree structure where you can share the document. You can then tick or untick the locations and click the “Save” button. The document is shared in the selected locations, without any duplicates. You can view the entire list of users who have access to the document via the icon just to the right of “Location/Sharing” (icon representing a set of users).
Categories and States
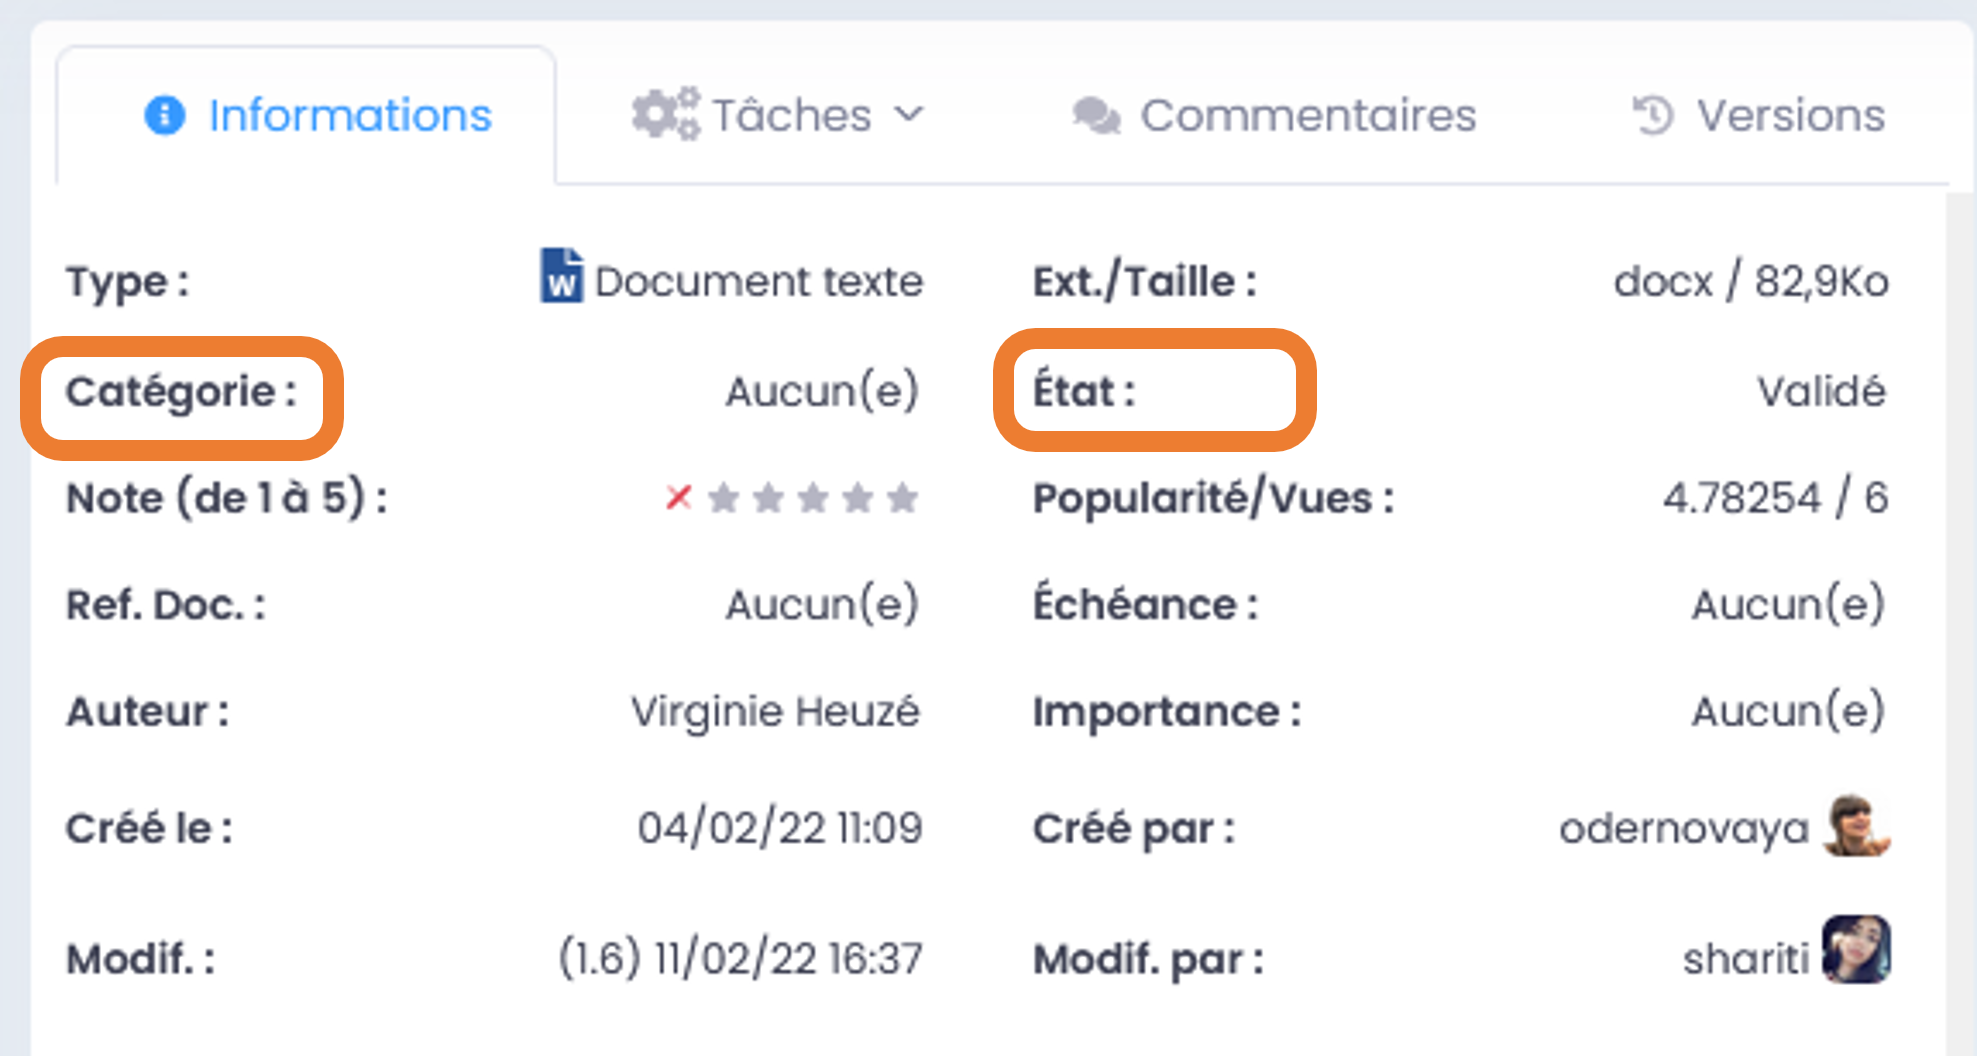
Categories correspond to the nature of the document: invoice, email, contract, report, article, etc. Categories can be managed by users with a User Support profile (see the User-Support Profile section for more information).
Thestate corresponds to the “life stages” of the document: draft, in progress, pending charge, validated, awaiting signature, obsolete, pre-archived, etc…
In order to edit them, go to the “Category” or “State” field, this field may or may not be filled in and in this case it is displayed “None”. Click this box and choose the appropriate proposal from the drop-down list. You can also start typing a few letters to filter this drop-down list. Exit the field to validate (click elsewhere on the page).
Examples of categories and states:
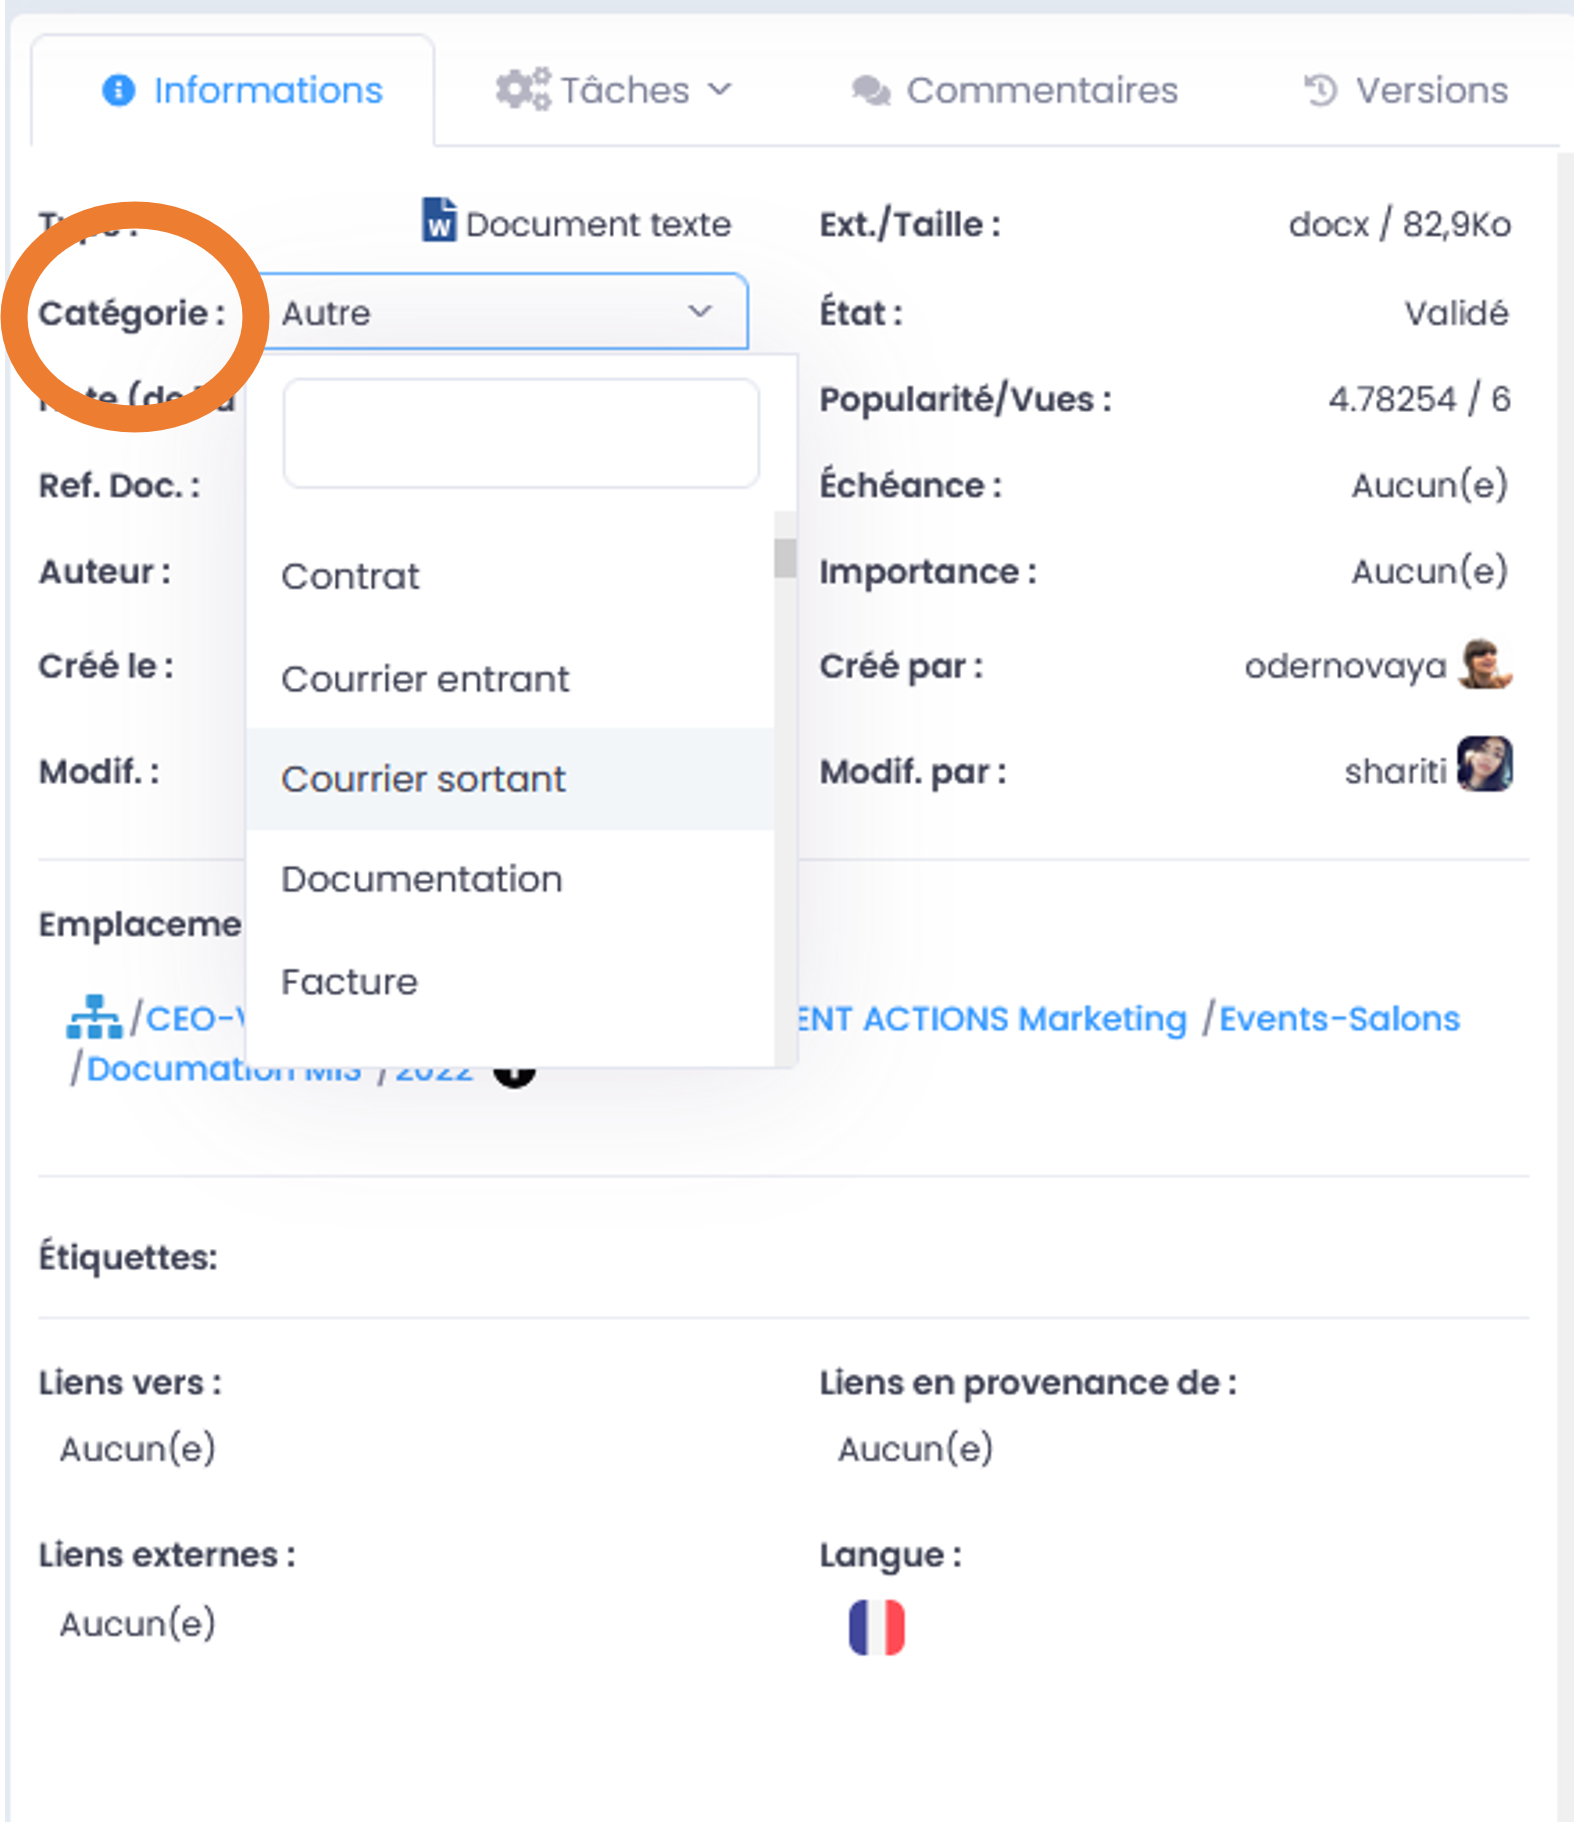
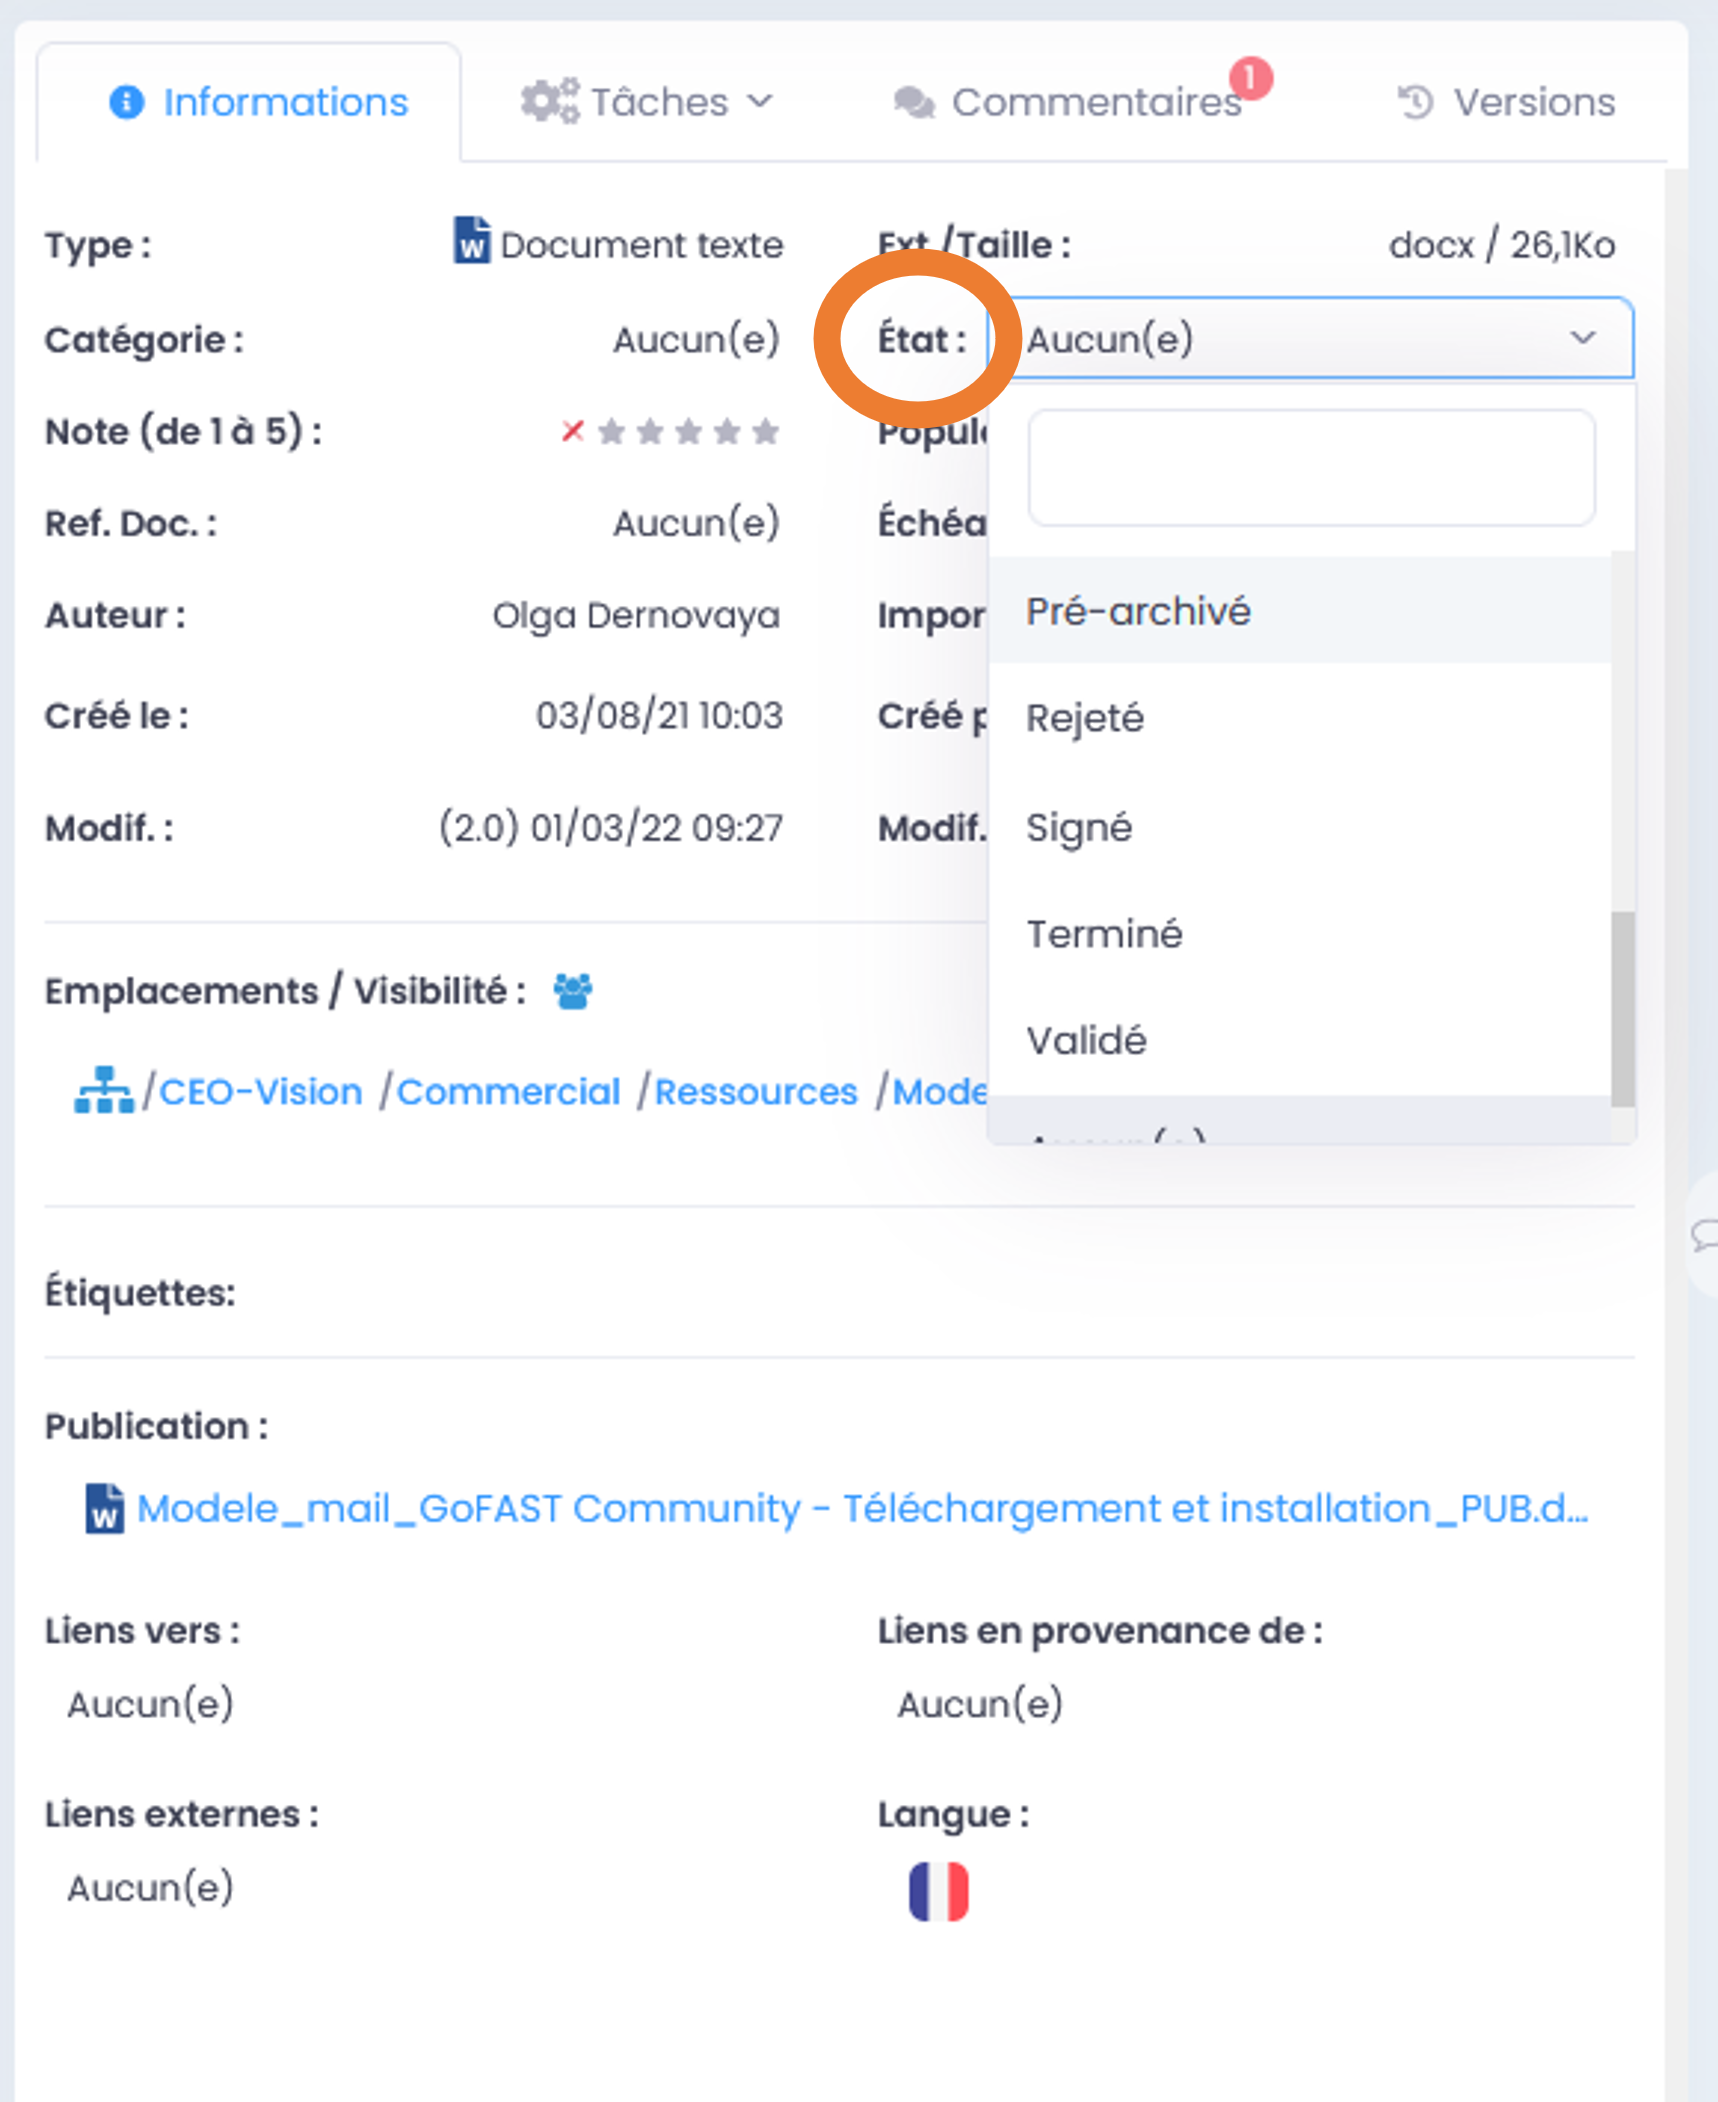
Giving a rating
You can share the rating of a document by clicking on the points (from 1 to 5). You can only rate a document once, but you can change your rating at any time by clicking on it again.
Document reference
This is a free-form field for entering a code or number designated as the document reference. Exit the field to validate (click elsewhere on the page). It is possible to set up an automatic system based on a naming model, but this implies support for implementation. Feel free to ask your questions on the user community forums.
Deadline
Consists of applying a deadline to the document so that the reminder is sent 24 hours in advance. You will need to find this document in the emailed deadline summary listing all content that is nearing the deadline. This can be used for a contract with a deadline, a document that must be completed by a certain date…
In order to add a deadline, click on “None” next to “Deadline” and choose the date. Leave the field to validate (click elsewhere on the page).

Author
The author of a document (free field) is a different concept from the document creator (automatic meta-data and not editable by hand). So there may be two different people between those two fields. By indicating the author of the document, it is possible to know who created the initial file (e.g. if created on a PC before the deposit on GoFAST). This allows, for example, to know who to contact in case of questions, but above all to use it as a filter when searching.
If the file uploaded to GoFAST contains “author” metadata (ex: a Word file indicates in the document information that the author is “Christopher”), it will be automatically retrieved from the file by GoFAST and displayed on the document page .
To modify this field, click on it and enter a last name and/or first name, or type in the first letters of the last name and the system will offer you a list of authors already entered by you, select the desired name.
Leave the field to validate (click elsewhere on the page).
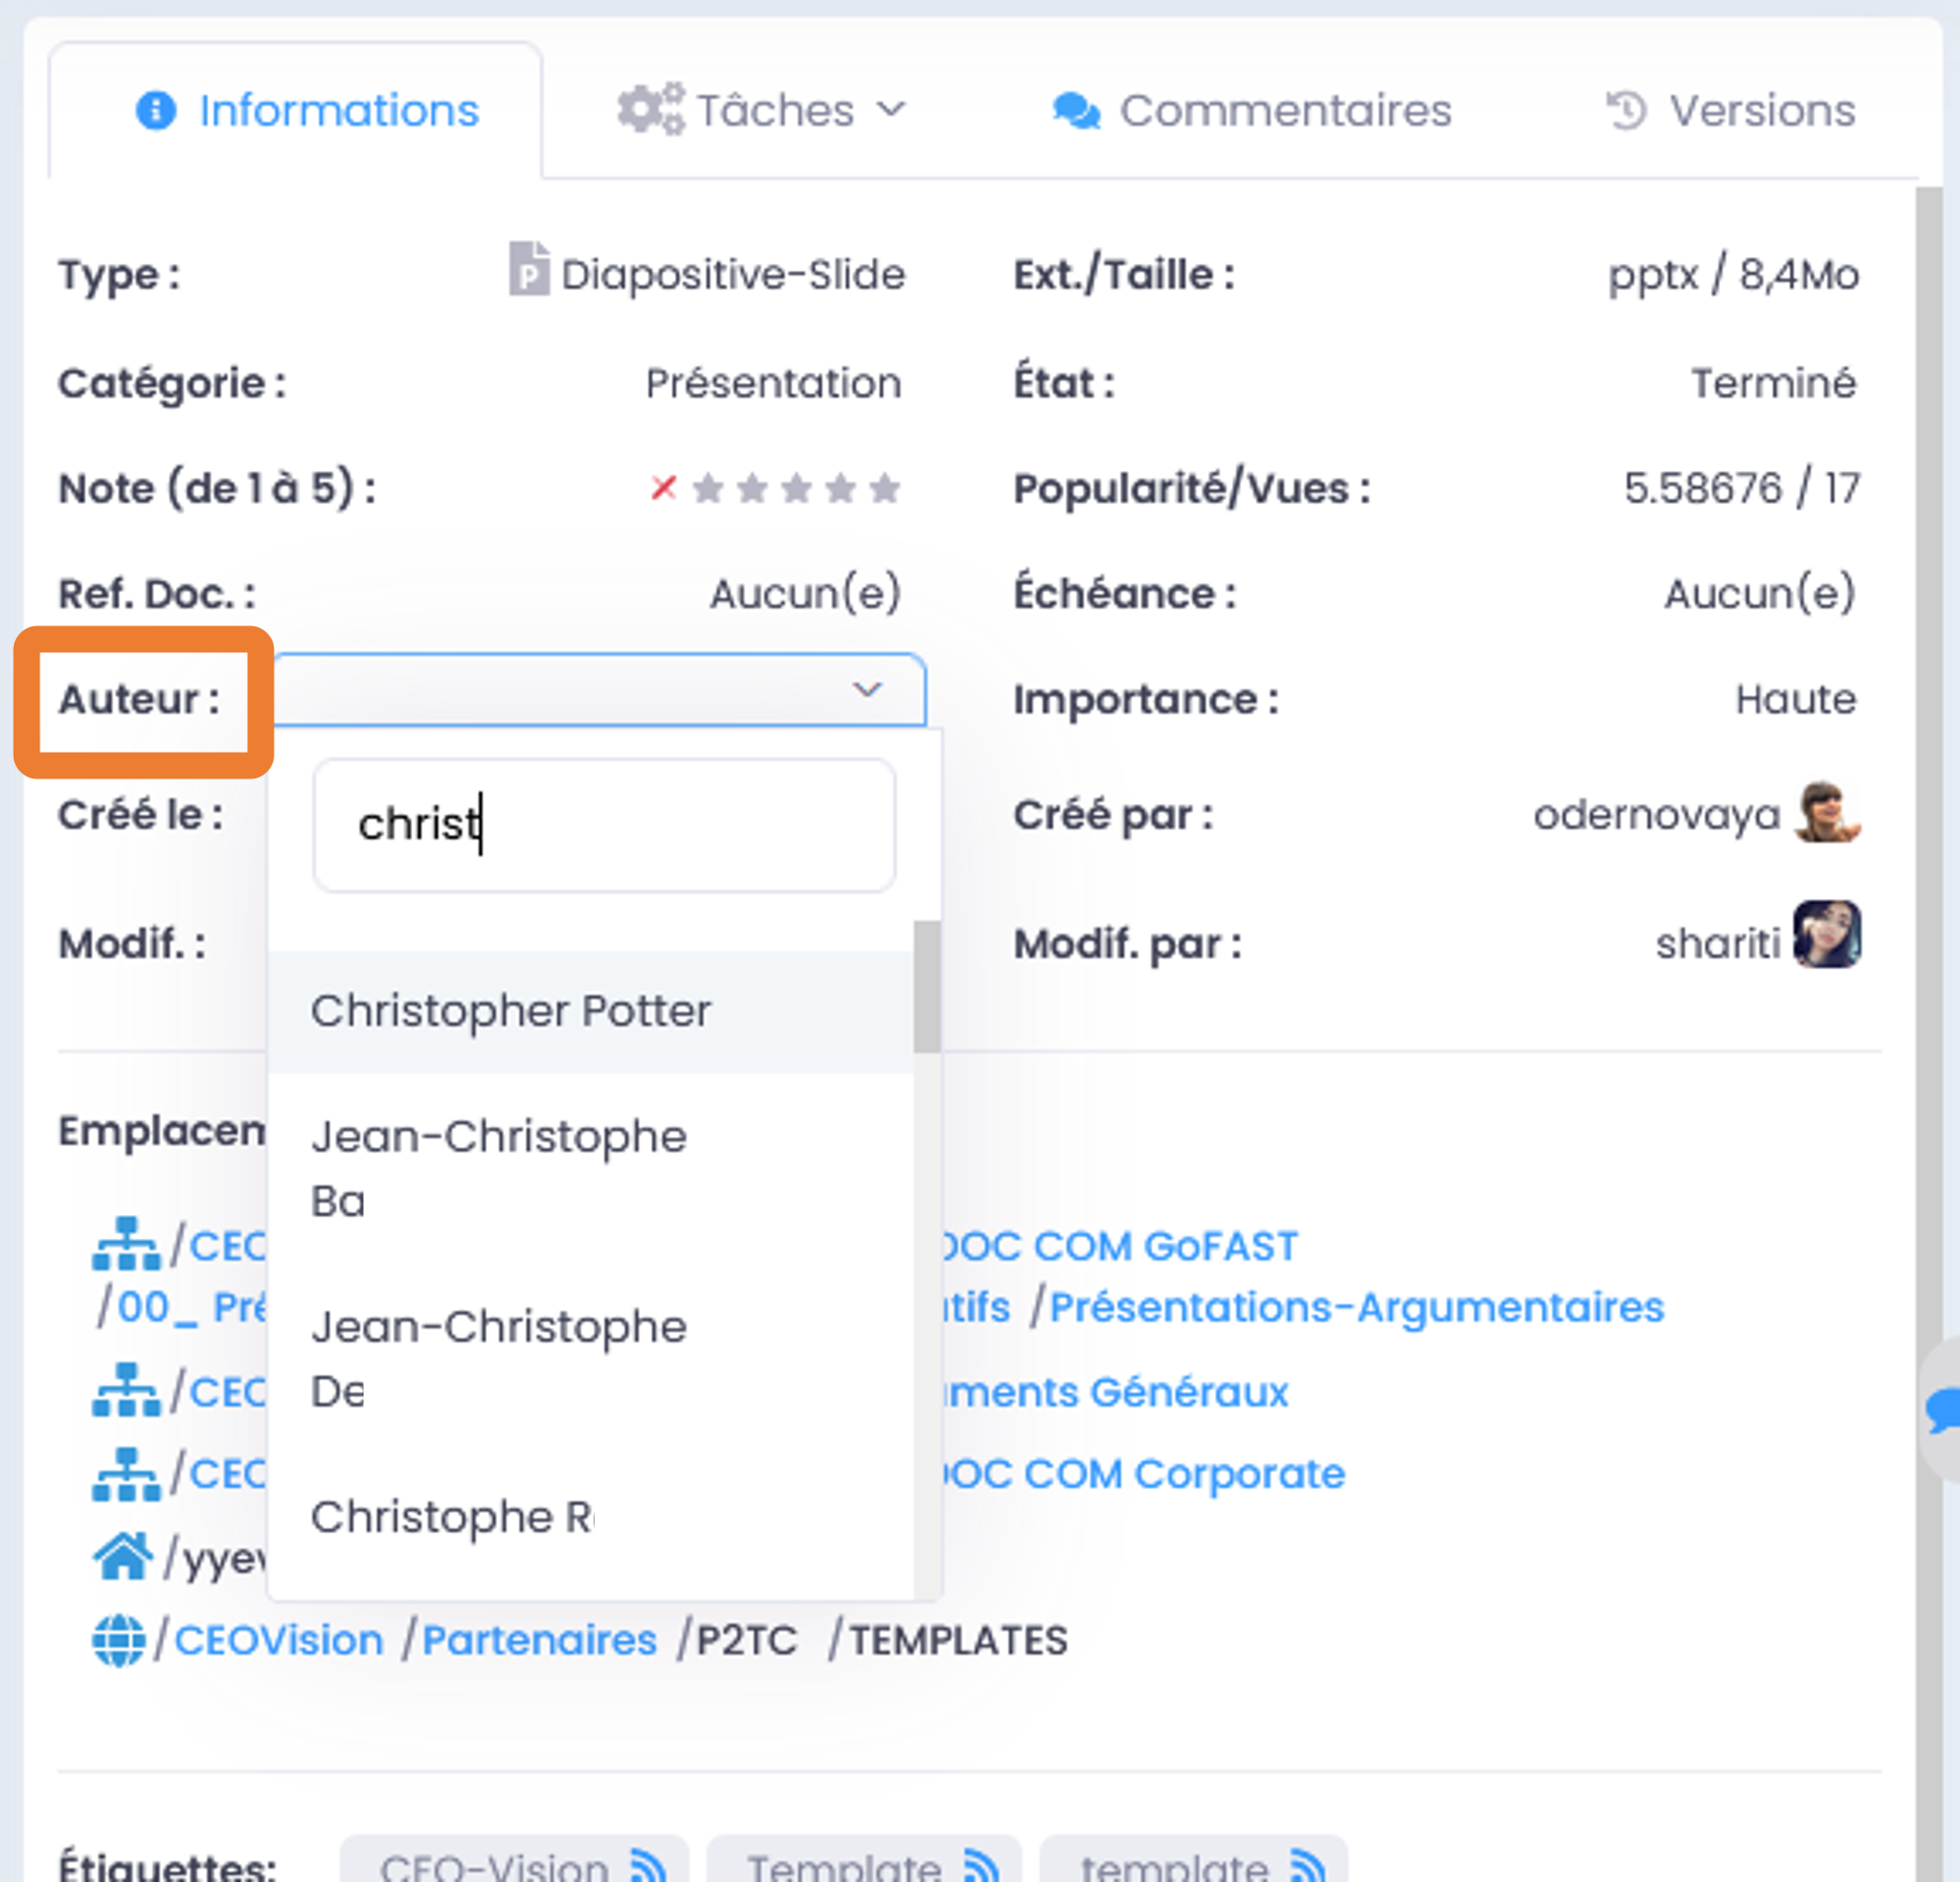
Criticity
You can report the criticity of the document in the metadata and its level: critical, high, normal, low, and other levels of confidentiality. Certain levels allow you to limit the sharing and download of the document to guarantee a higher level of data security.
“Confidential Data” level, the document associated with this criticity type cannot be downloaded or distributed.
“Internal distribution” level, the document cannot be shared or downloaded in an Extranet Space.
Go to the “Criticity” level in the document metadata, click on the field then choose the level of criticity. Leave the field to validate (click elsewhere on the page).
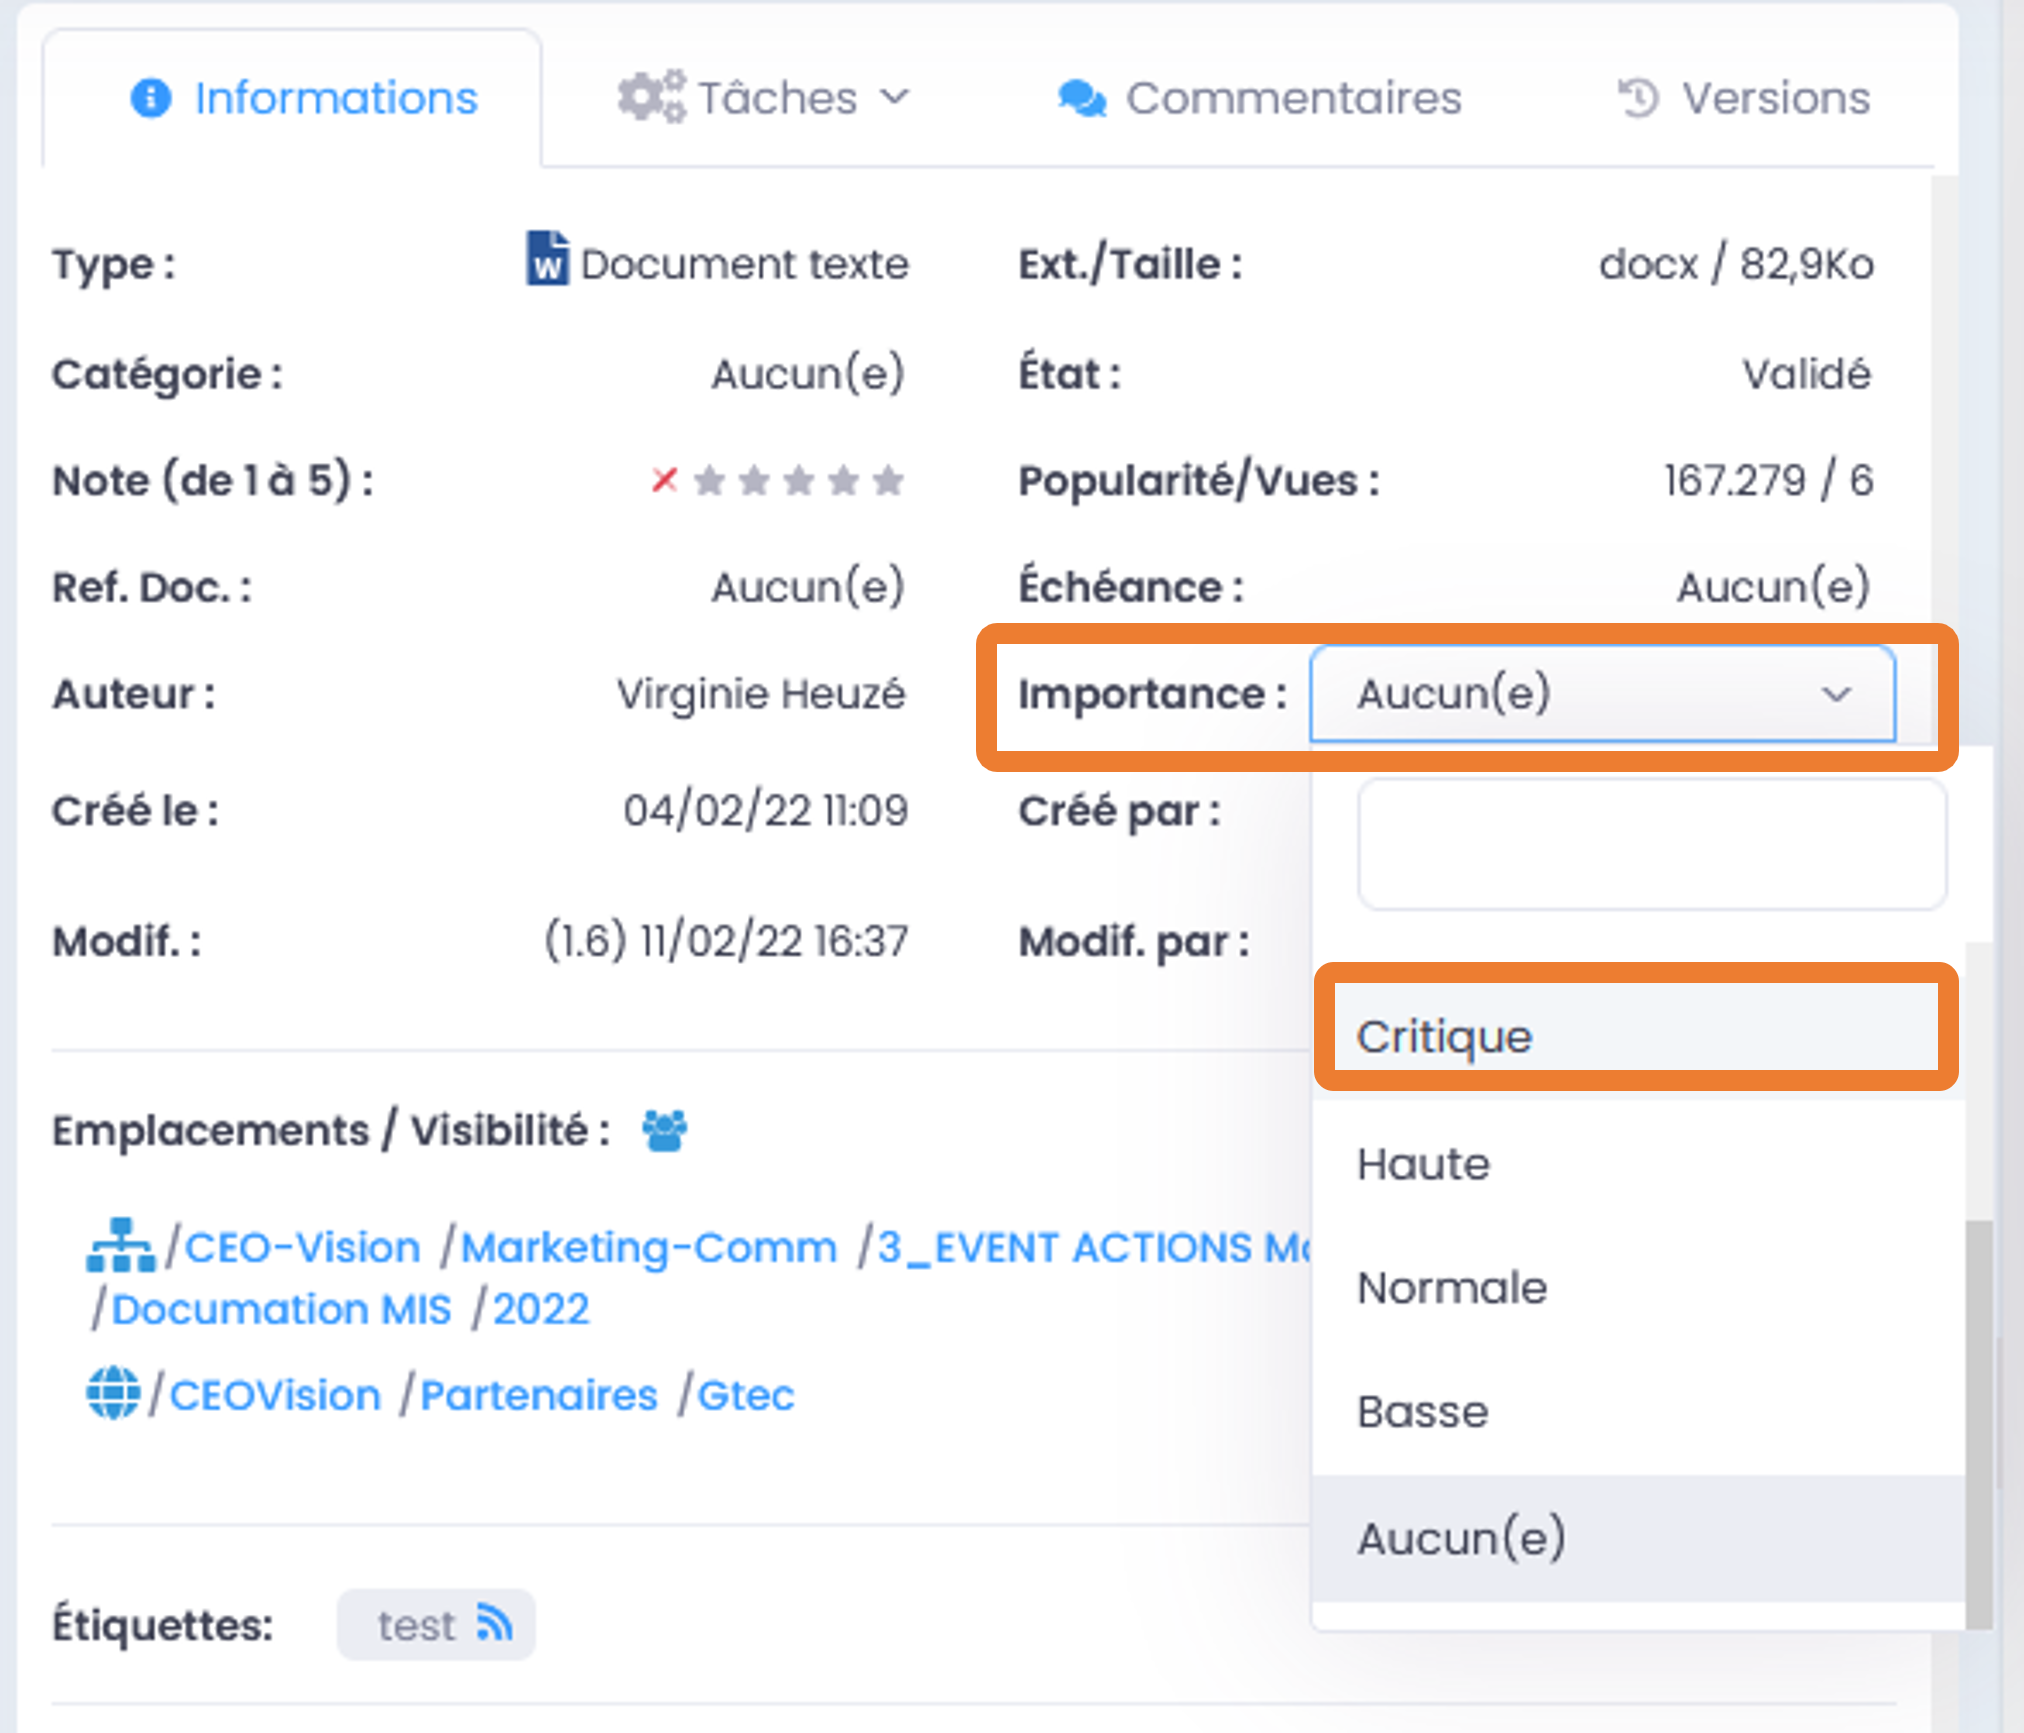
This metadata can also be used as a filter for a search result.
Tags (keywords)
“Tags” are keywords that users can add to documents at any time.
These tags are useful:
you can inform other users who view the document on the topic or a specificity related to the document,
it is easier to find content because the tags are indexed by the search engine and give an additional weight that brings these contents in the result,
you can filter a search result by “tag” (ex: we search for “documentation” and we filter with the tag “GoFAST”),
you can subscribe to these tags to be notified of the activity of documents with this tag (each subscription to a “tag” can be configured by the user for its frequency).
you can find files in non-text formats (e.g. images, videos, PDF images, etc.)
How to add or remove a “tag”:
Go to the level of “Tags” and click in the gray area (not on the already placed tag, but next to it),
In order to add a tag, start typing the desired word and you will be offered suggestions. Click on one of the suggestions. If none of the suggestions suit you, enter the desired word or words.
Leave the field to validate (click elsewhere on the page).
In order to remove an existing tag, simply re-enter the field and click on the small cross next to the tag.
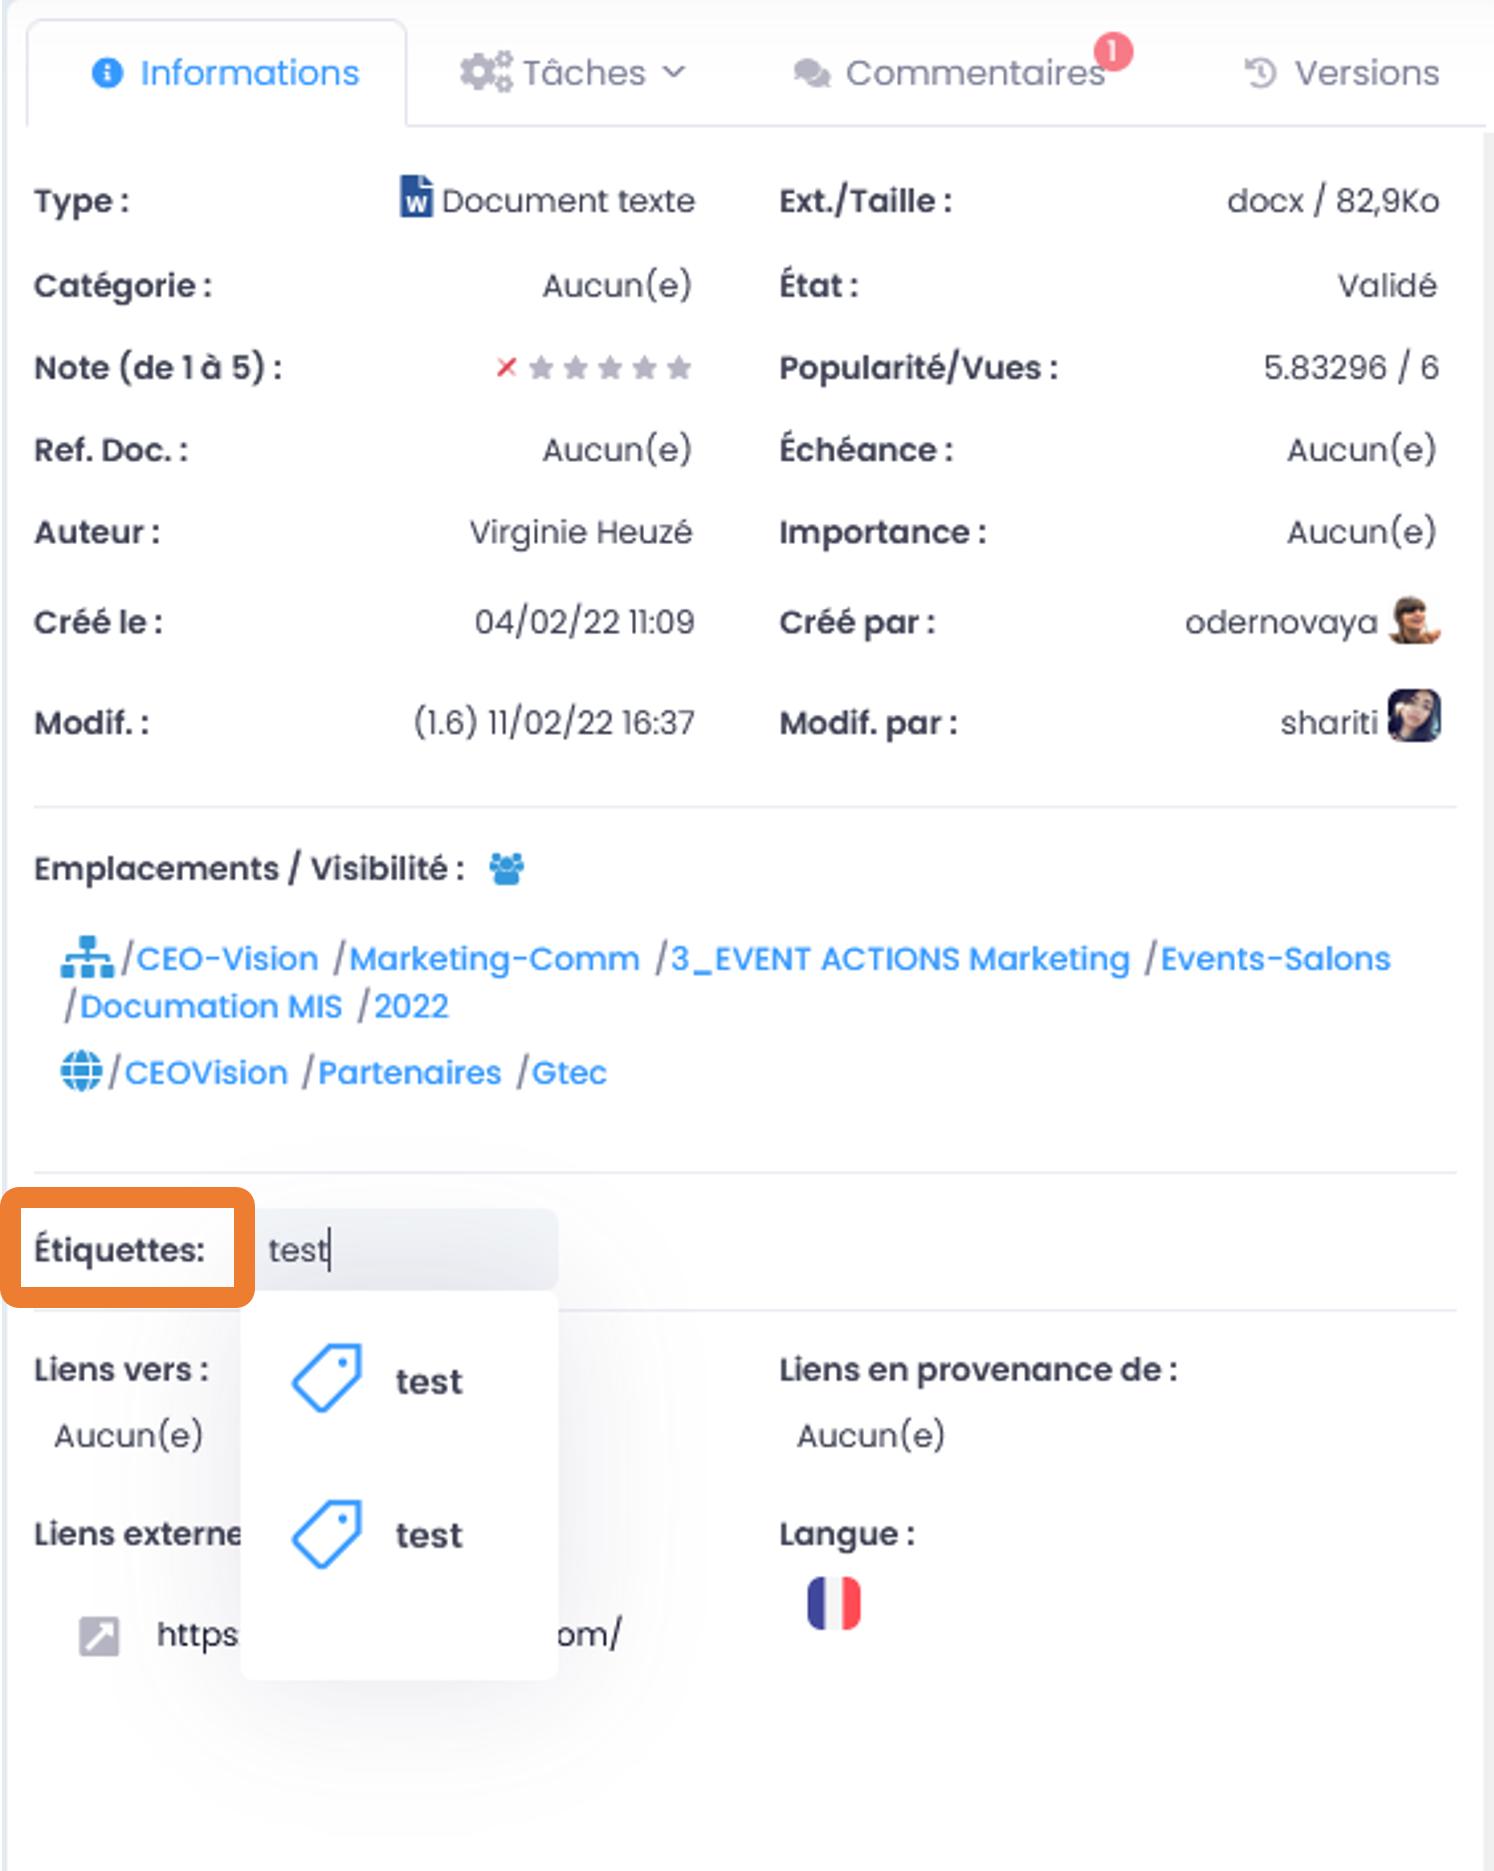
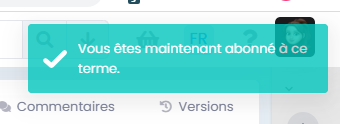
Subscribing or unsubscribing to “Tags”:
The subscription to tags allows to be notified on the activity of the contents according to a specific theme or a specific subject (e.g. you are a member of a workspace, but rather than being notified about the entire activity of that workspace, you choose to be notified on documents with a specific tag). On the page of a document, to subscribe or unsubscribe to a tag: click on the small subscription icon at the tag level. Then, it is possible to set the frequency of its notifications by tag or unsubscribe (in the user profile menu, enter “Subscriptions”).
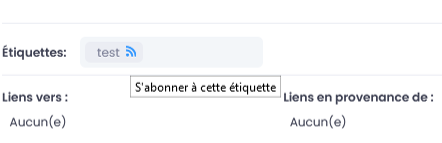
A message appears in the upper right corner, to confirm that the subscription or unsubscription has been taken into account.

Related content (links to/from, external links)
If documents have a link to/from, it is possible to switch from one to the other in one click, no matter where these documents are, but according to their access rights (if you don’t have access to one of the linked documents, you will have an access denied page).
It’s a bit of a different way of looking at hyperlinks in a document. Here you do not have to open the document where there are hyperlinks, you can directly click on the linked document in the metadata.
Links to / Links from
A “link to” means an added link from the document to other content. * A “link from” means a link added from other content to the document you are in.
The link to a document can be edited from this one, however a link from another document can only be edited from the latter.
In order to add linked documents/content, click on the field, then type the first letters of the name of the document you want to link (at least 3 characters). The system will automatically suggest it to you (list of suggestions). Then, click on the desired document in the suggested list to select it. Leave the field to validate (click elsewhere on the page).
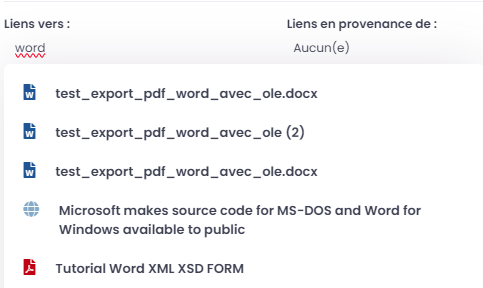
Thus, the documents will have a link between them and you can click on these links to switch from one document to another in one click to save precious time.
External links
Allows you to add a link to an external web page by putting URL.
Thus you can in one click open this external web page in a new tab of your browser.
It’s the same principle as for the other metadata: click in the “External links” field, and paste the desired URL. Leave the field to validate (click elsewhere on the page).
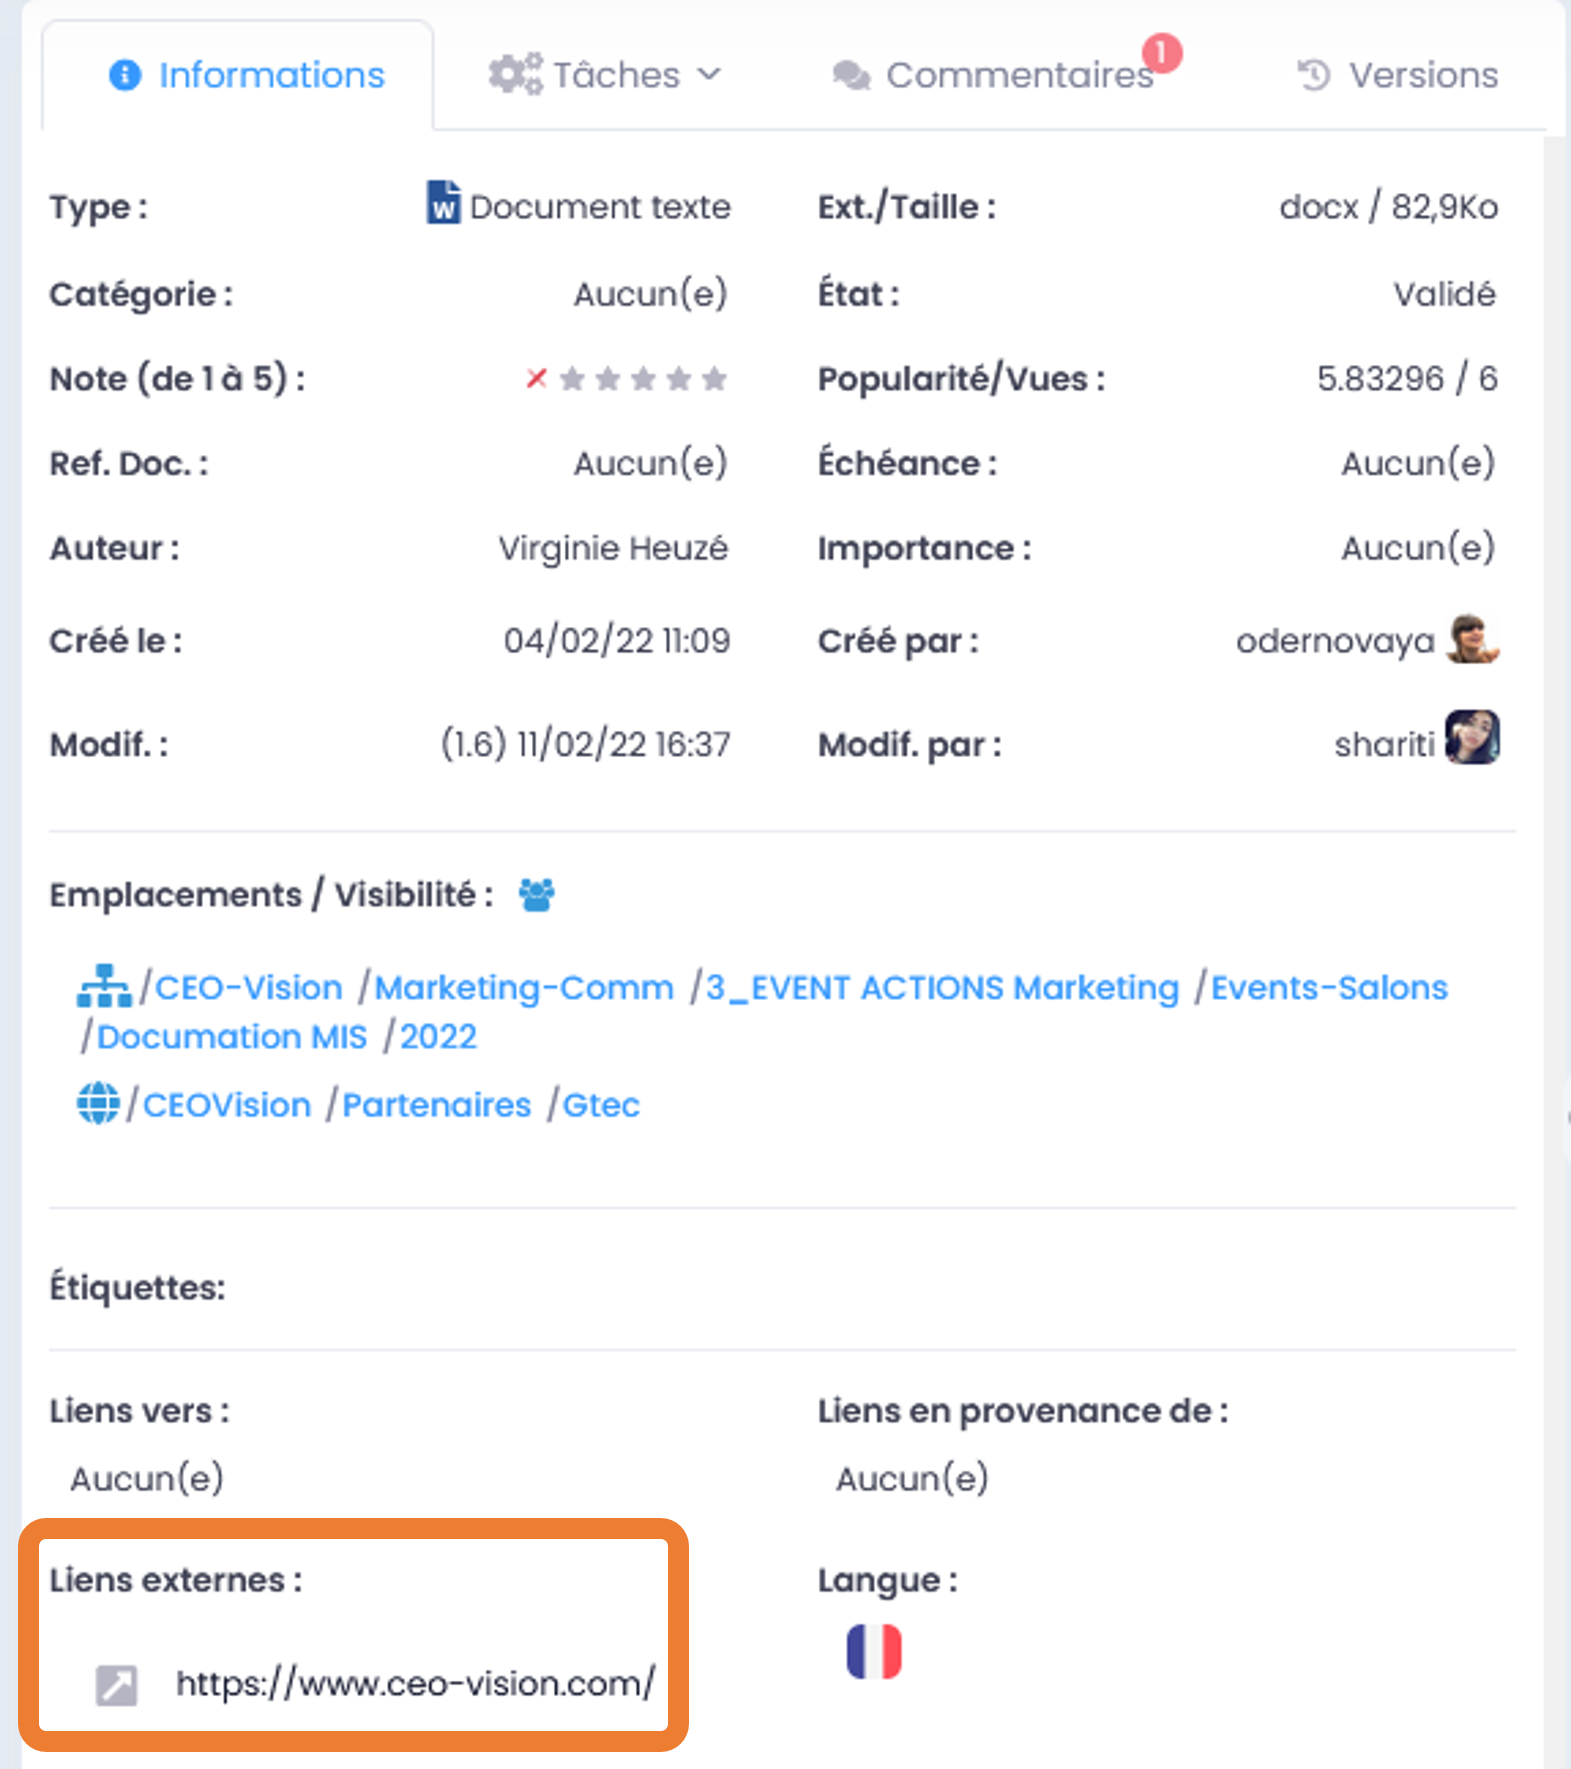
Document history and versions
The history indicates the actions that have been performed on the document, by whom and when: creation, editing, …
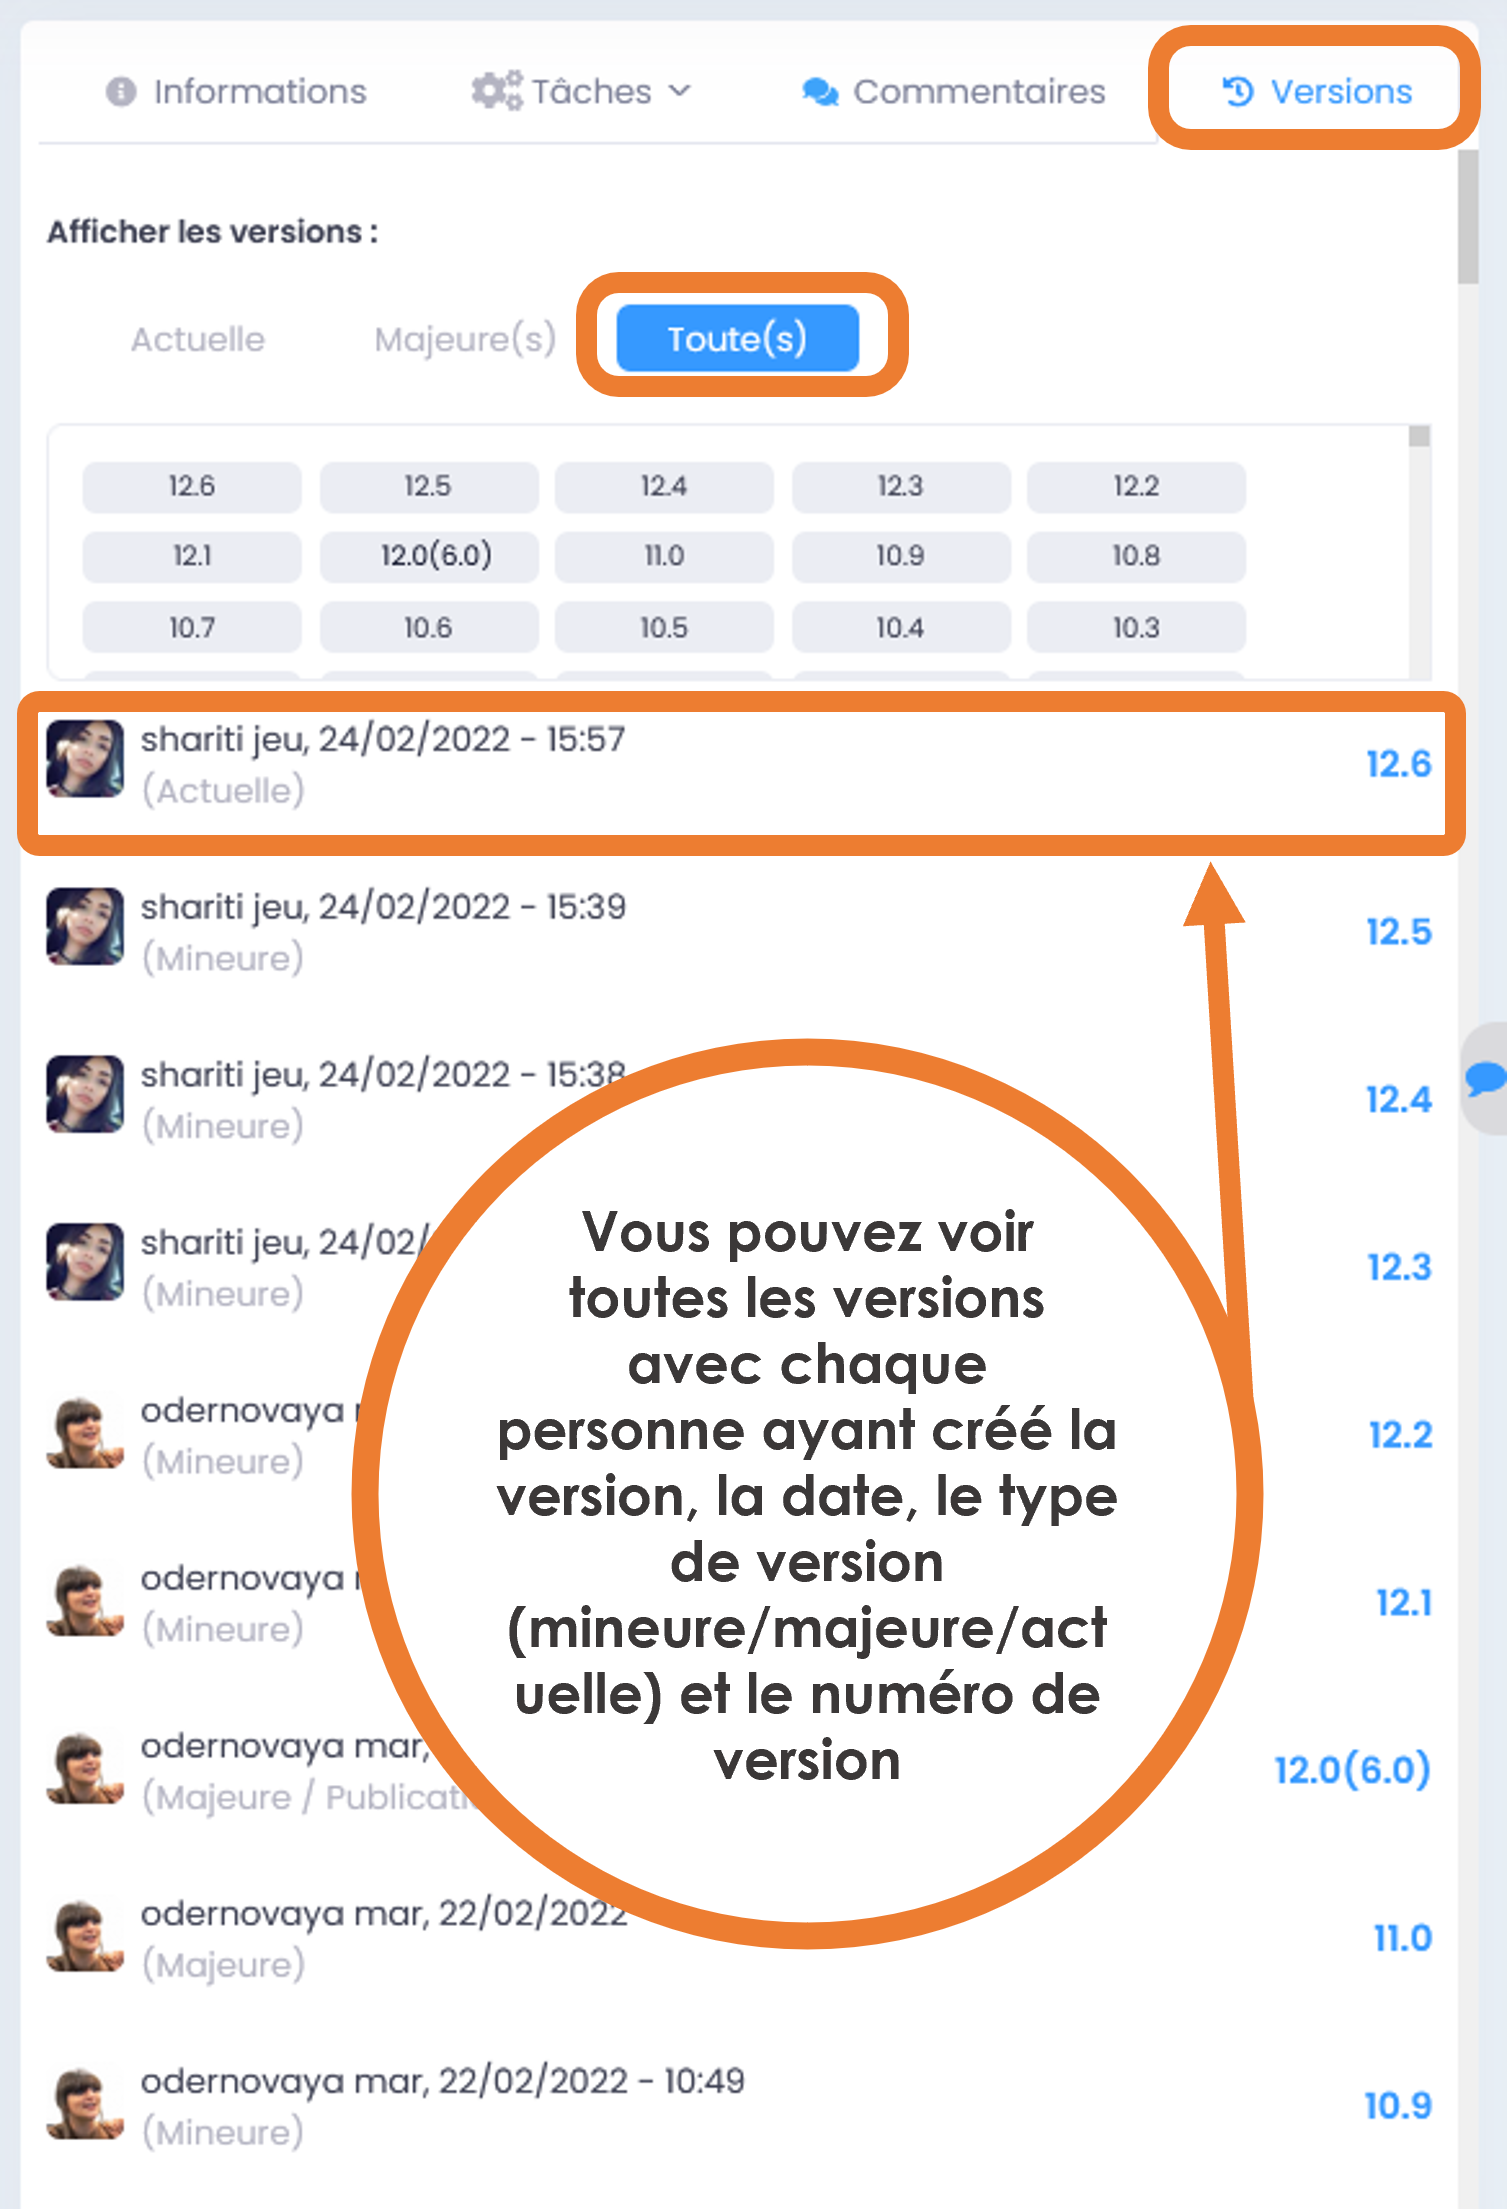
- Just below the history, you can also see the versions of the documents, i.e. the number of current versions and how many there were before. Knowing that each saving of the document is considered as a new minor version (1.0 => 1.1, 1.2, 1.3,….) .
On the other hand, if you overwrite the last minor version with a new version of the document (with drag and drop for example), the system will ask you if you want it to become a major version (1.3 => 2.0) and therefore a new working base.
The 1st version you create or migrate to GoFAST starts at 1.0.
Click on “Show versions list” to see previous versions, you can even choose the type of versions (current, major or all), then click on the version number you want to open.
See also the section: “Version management”.
Languages
You can add the document language in the metadata, so you no longer need to specify the language in the file name or add an “EN” or “FR” etc. This also gives an additional filter level in the document search.
If the document exists in different languages, you can link the translations of this document to each other: simply press the flag corresponding to the desired language to go to the page of the document considered as the translation.
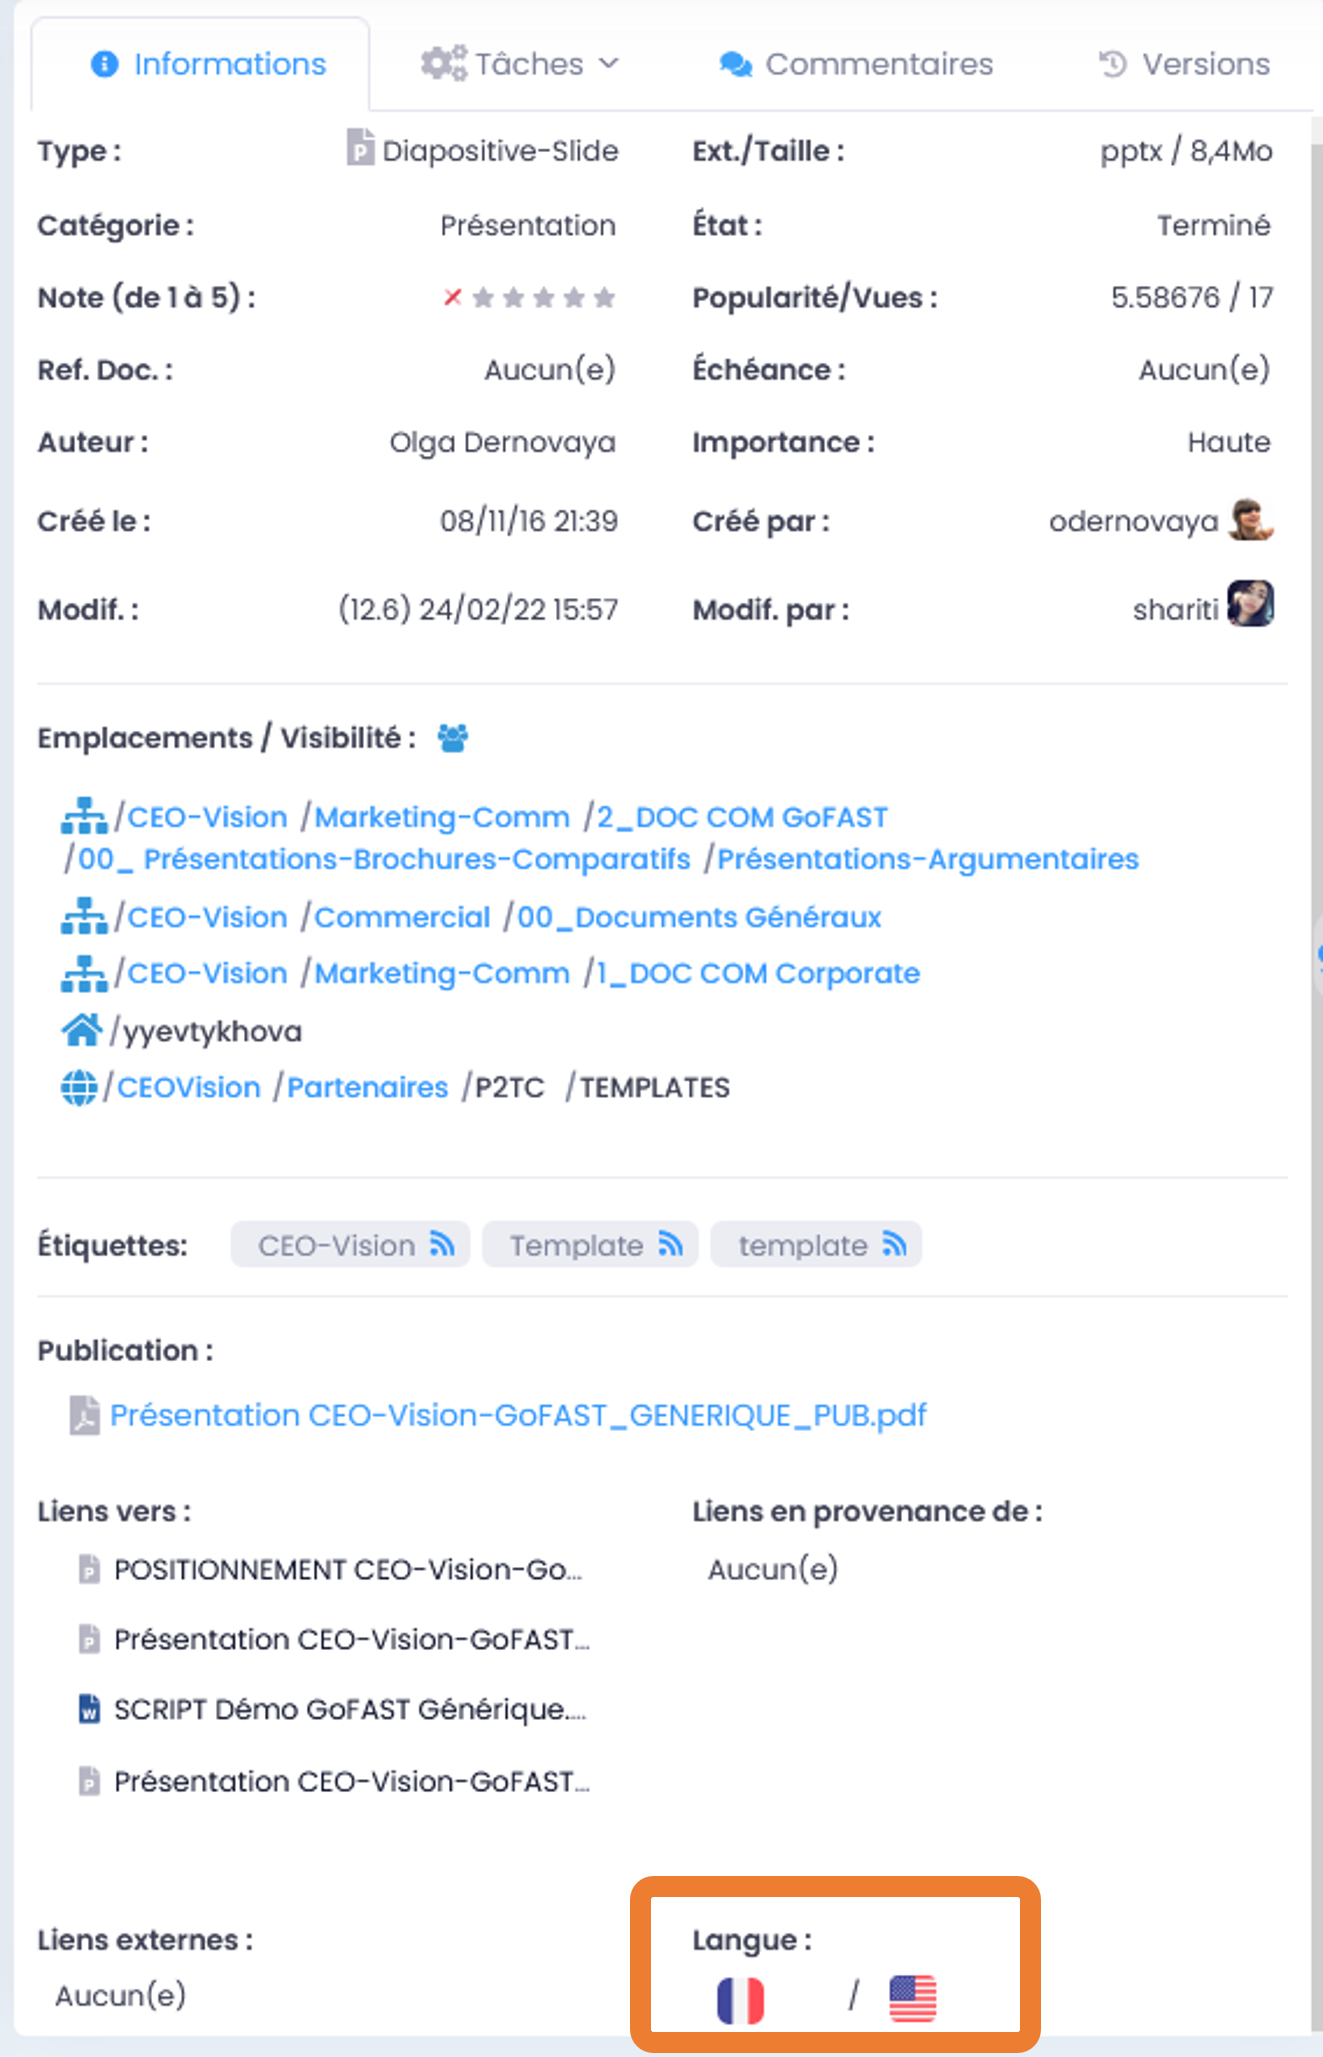
The first flag corresponds to the language of the document where you are, the others are the available translations. So in the example above the document is in French (we see the flag) and there is an English translation (we see the other flag).
To link 2 documents of different languages you have to go through the menu «Hamburger» (contextual actions menu), in «More…» click on «Manage translations».
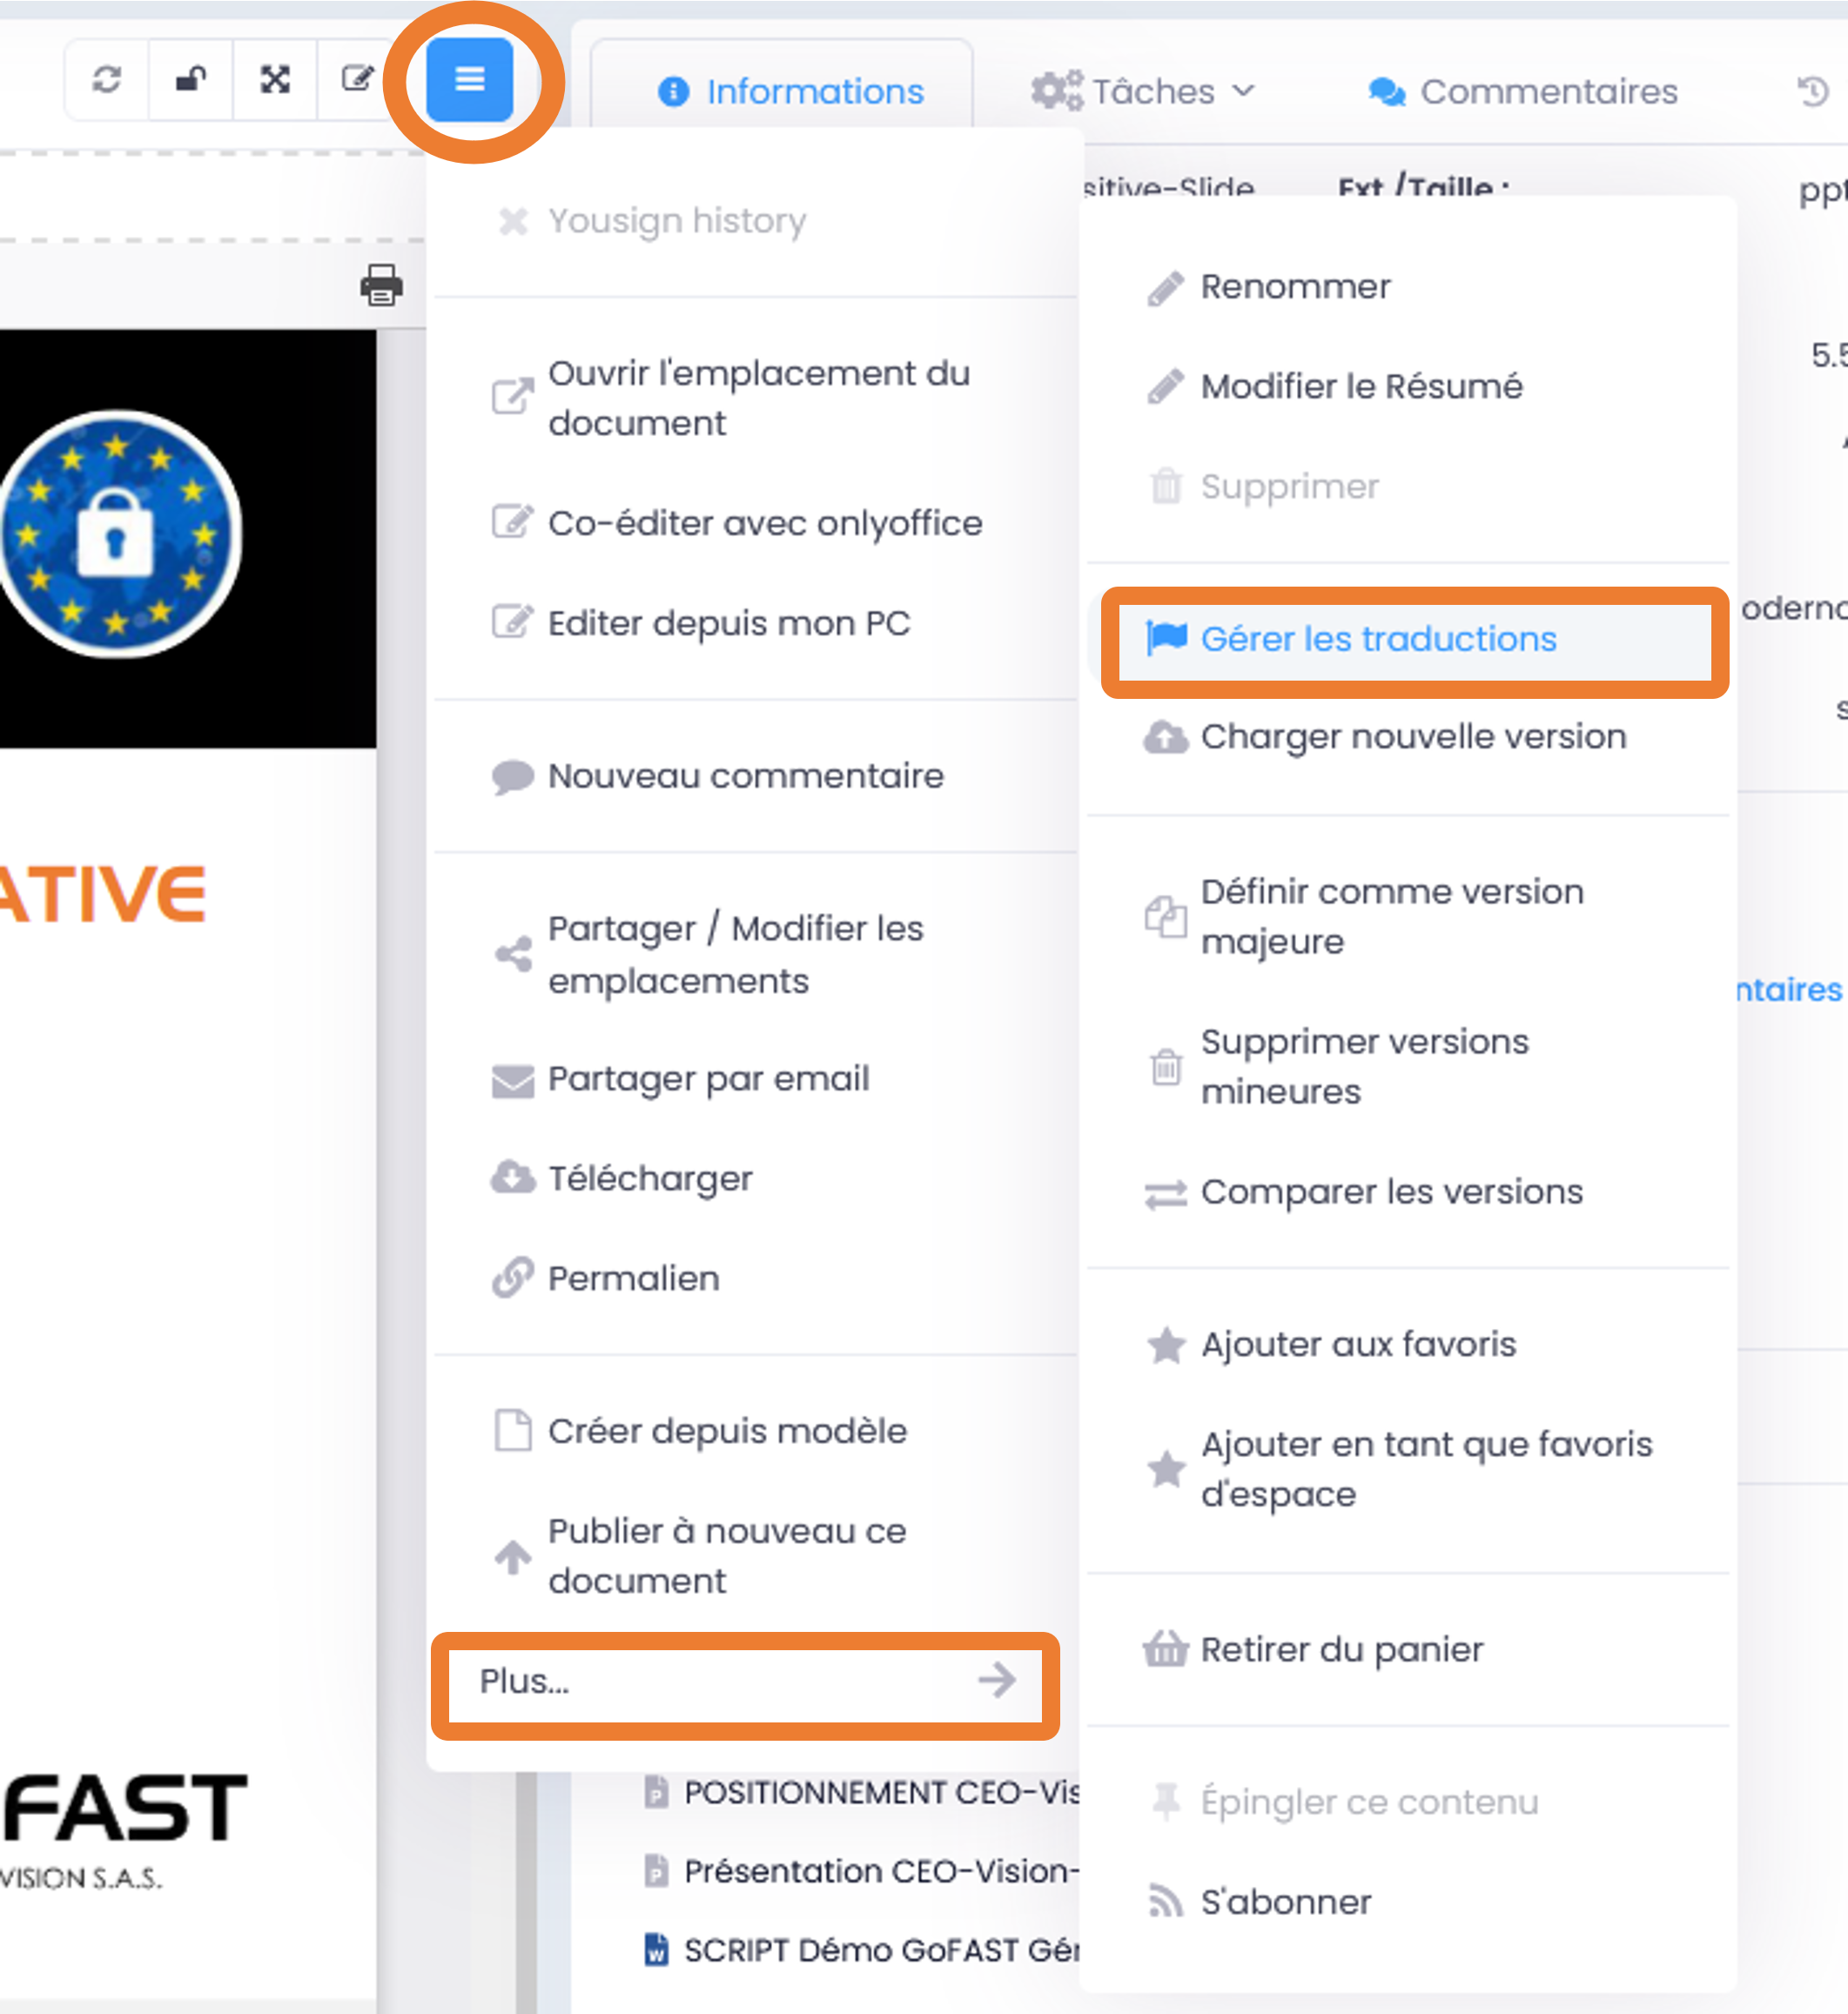
See also: Contextual actions on a document
You arrive on a form where you can type the first letters of the document (at least 3) that you want to link, in the field of the desired language. Finish by pressing the “Update translations” button
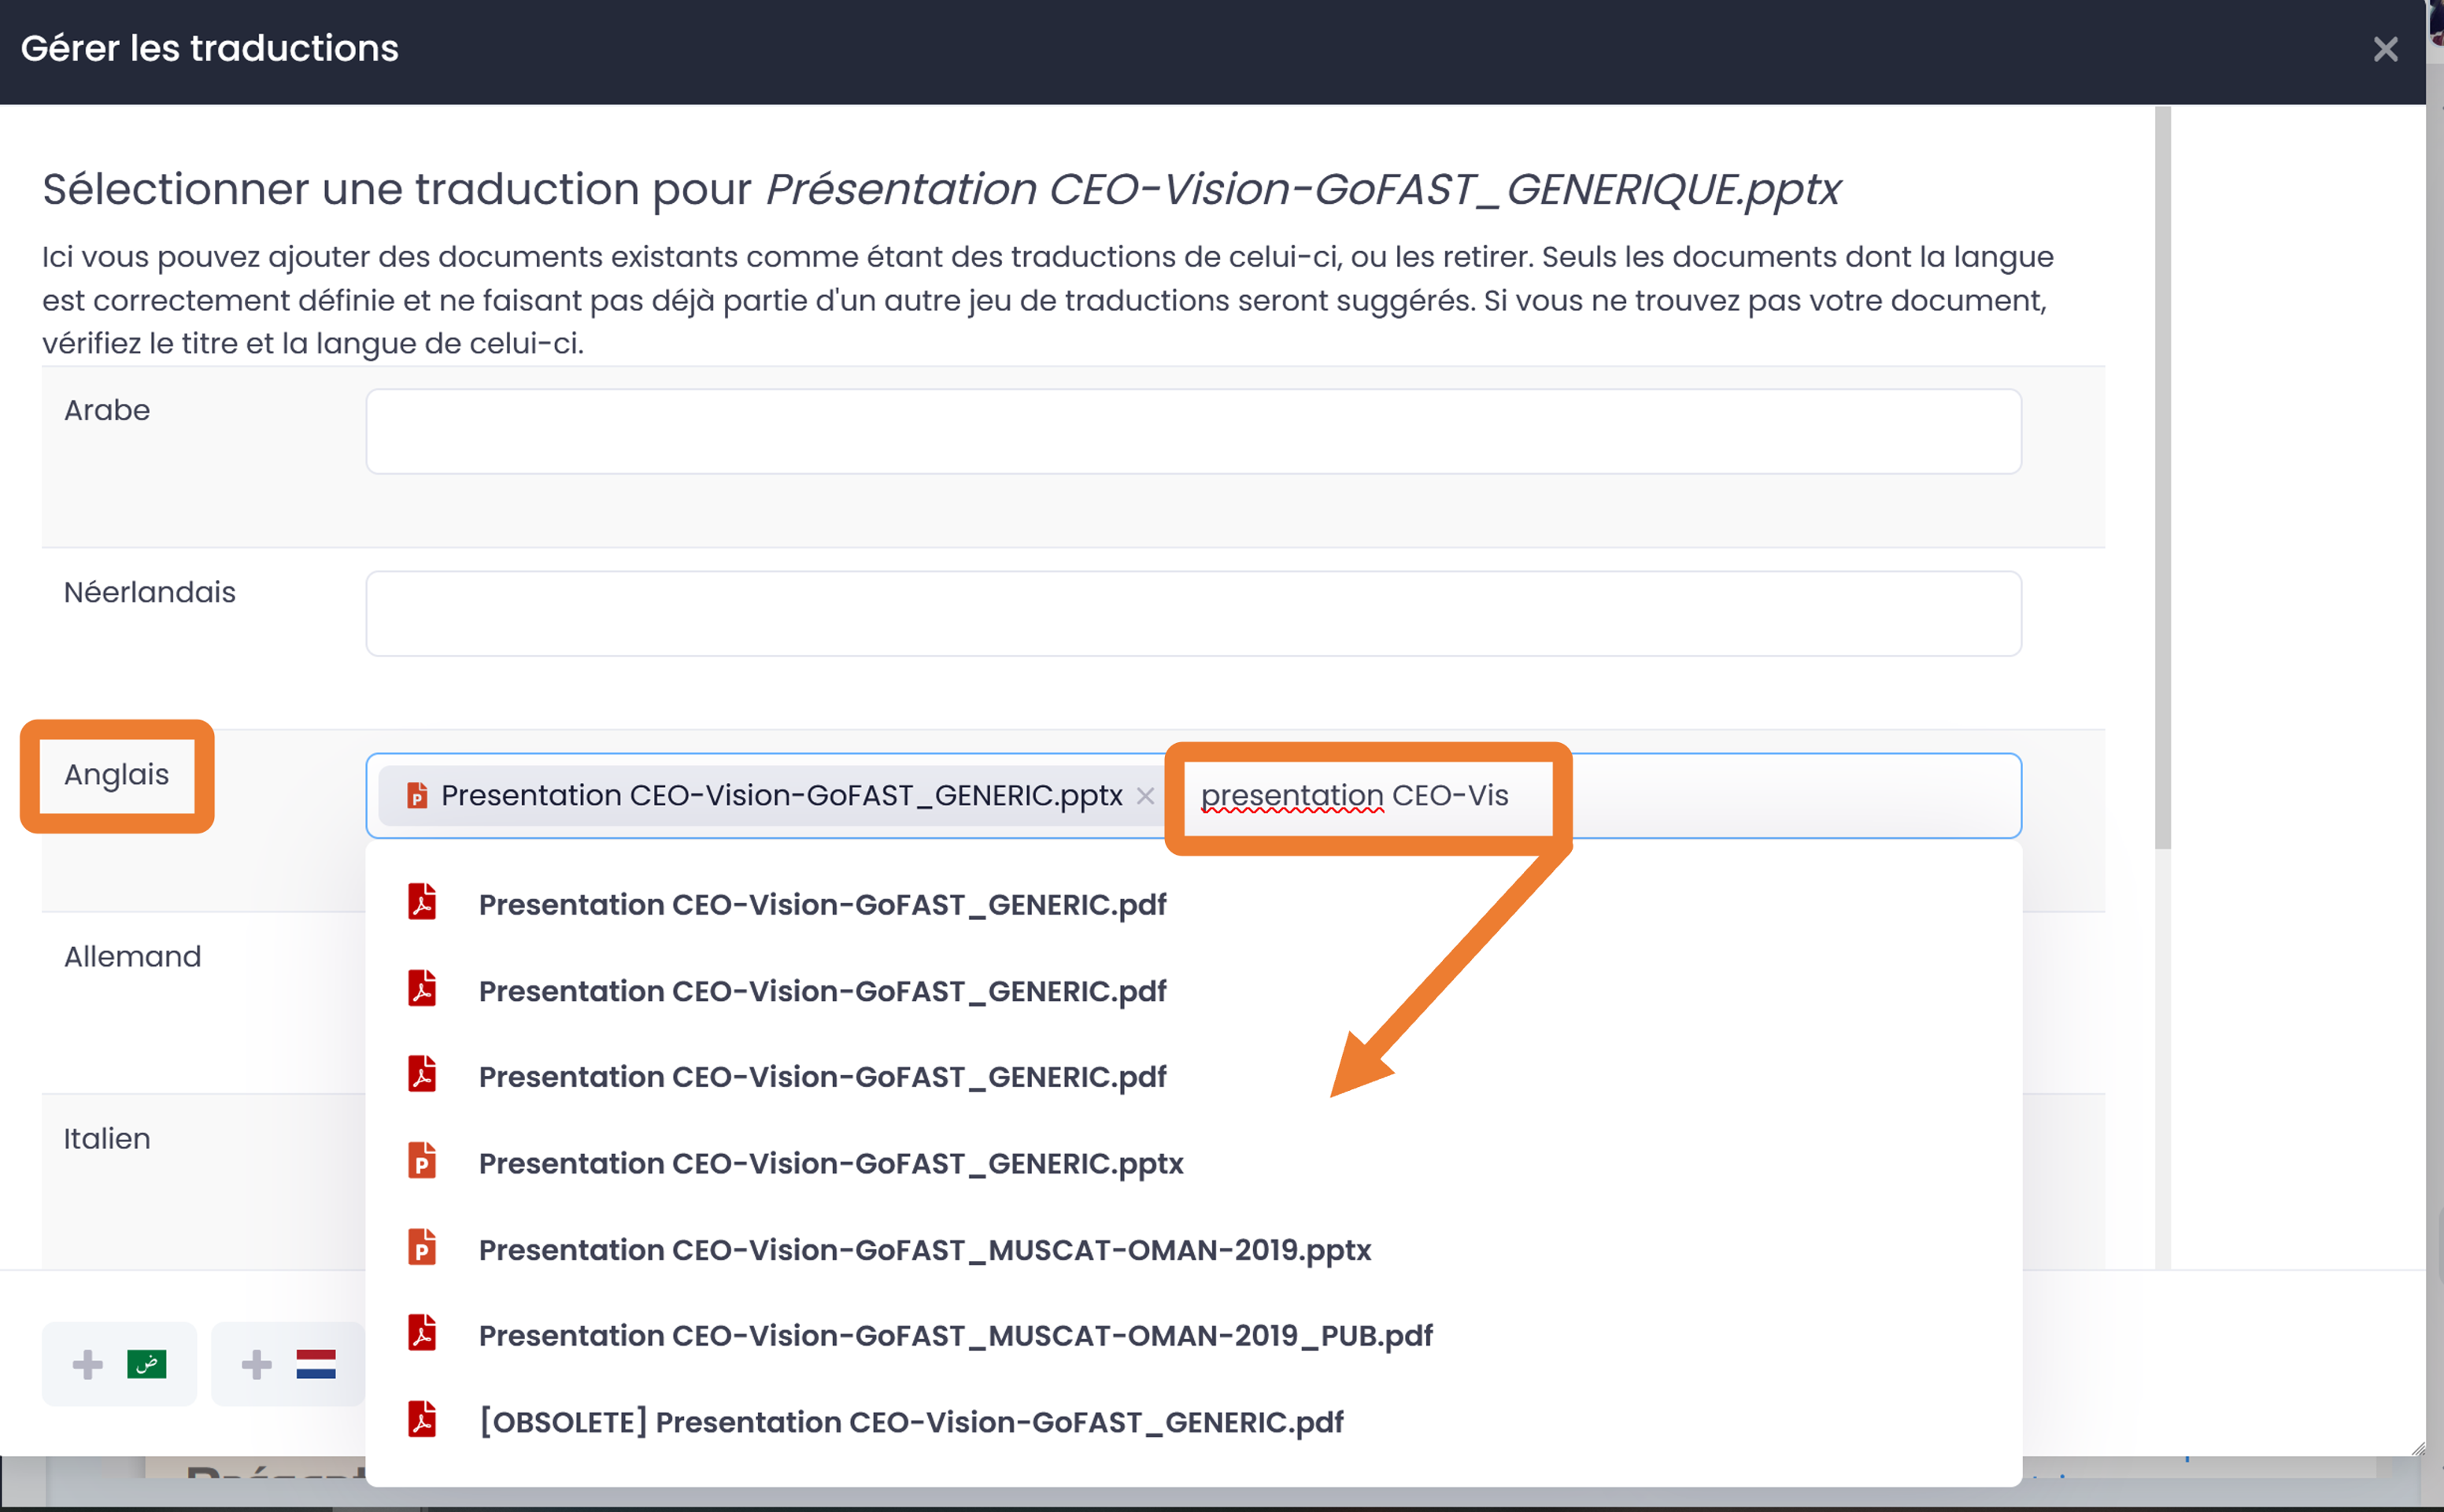
You can thus link documents that exist in several languages and the flags corresponding to these languages will be found in the metadata of the document.
Commenting/Annotating Documents/Contents
Commenting on a document
Objective of comments and annotations: To centralize all exchanges related to a document, on the page of this document in order to guarantee that all those who must work or view this document, are aware of the questions, answers and other remarks made on the document. This makes it possible to drastically reduce the number of emails between colleagues, but also to never send an attachment again. Finally, it avoids losing the exchanges and perpetuating the information. Comments are displayed to the right of the preview and visible to those who have access to the document. So there is no need to open the file to read them. Not to be confused with comments made directly in the file during editing (e.g. in an Office file), which are found in the content of the document itself.
- How to add a comment:
Go to the “Comments” tab and click on “Add a new comment here”
- OR
Go to the “Hamburger” menu (contextual actions) and click on “New comment”.
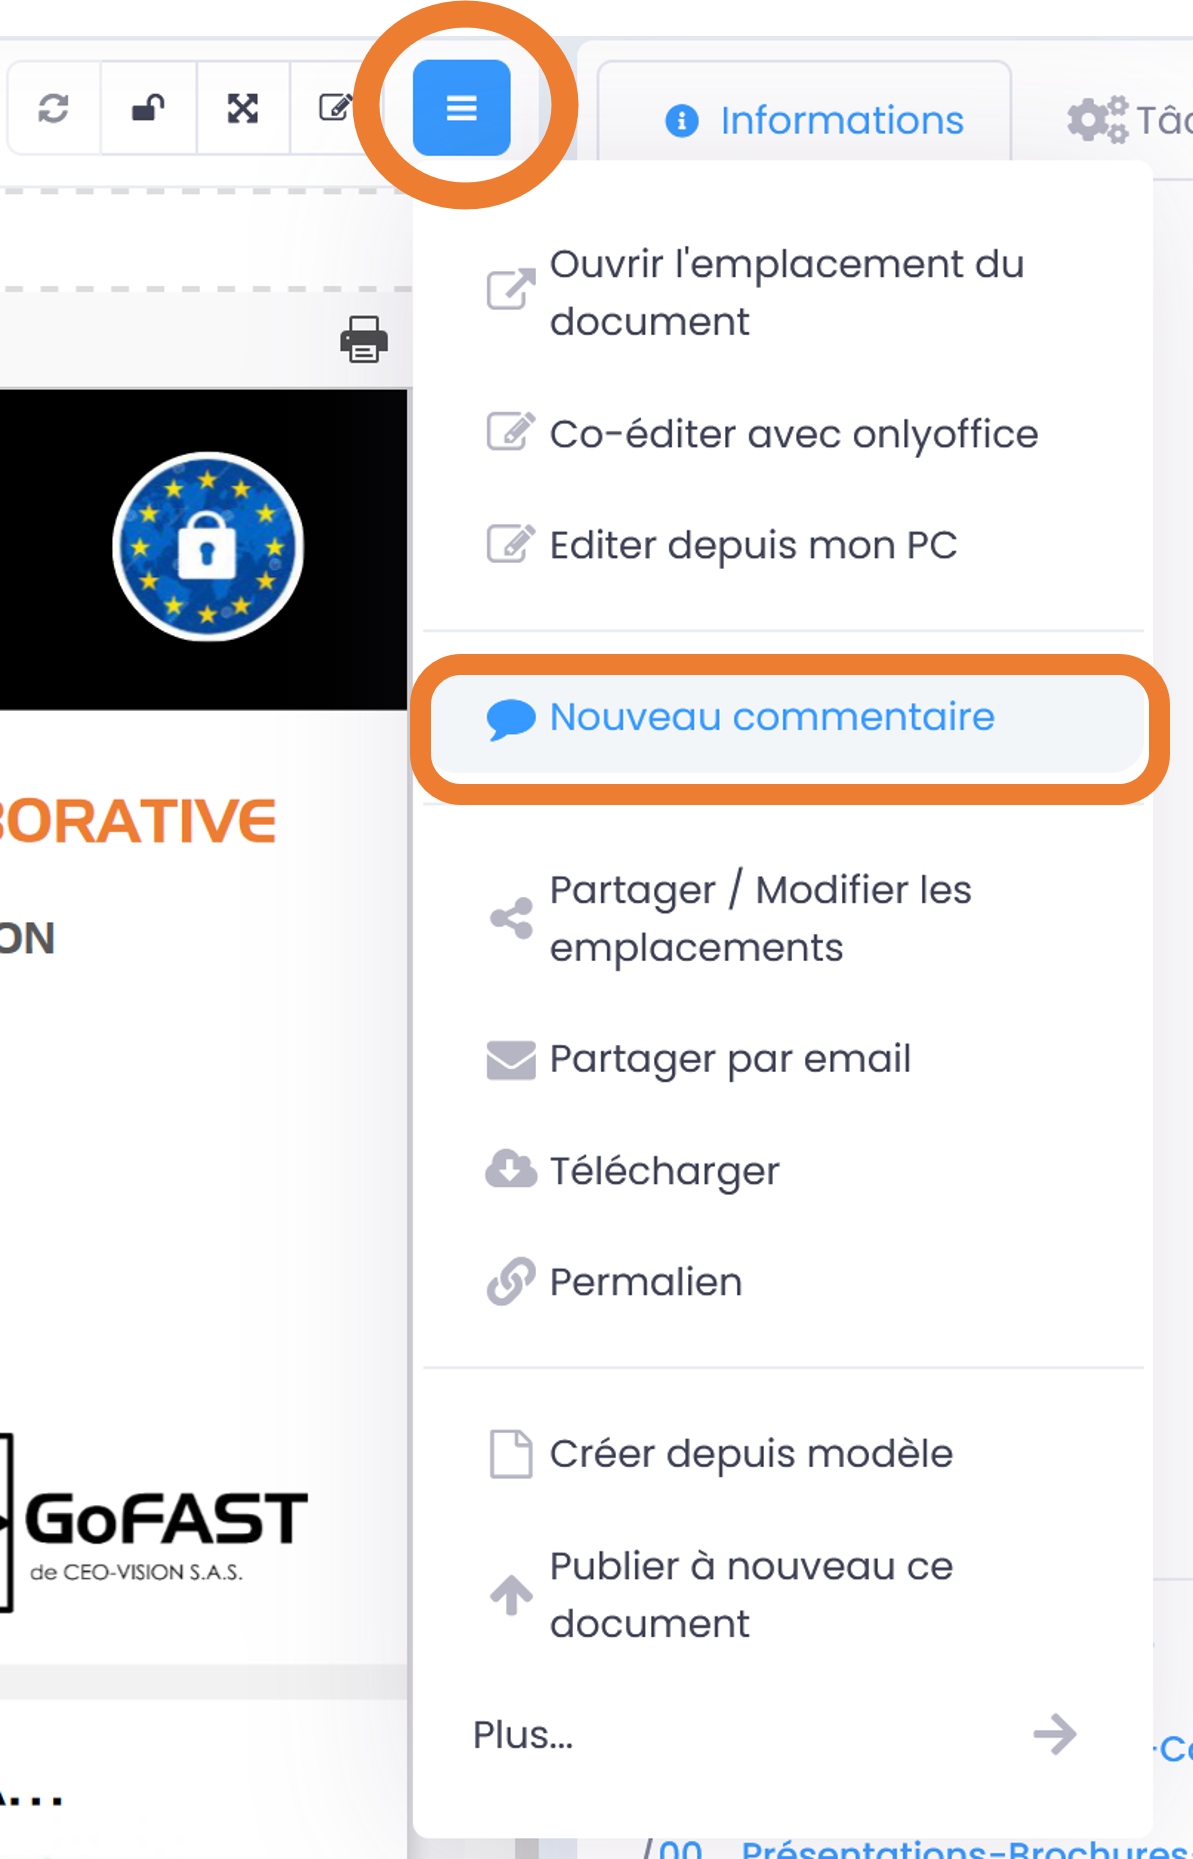
A window will open where you can write the title of your comment and its contents and click “Save”.
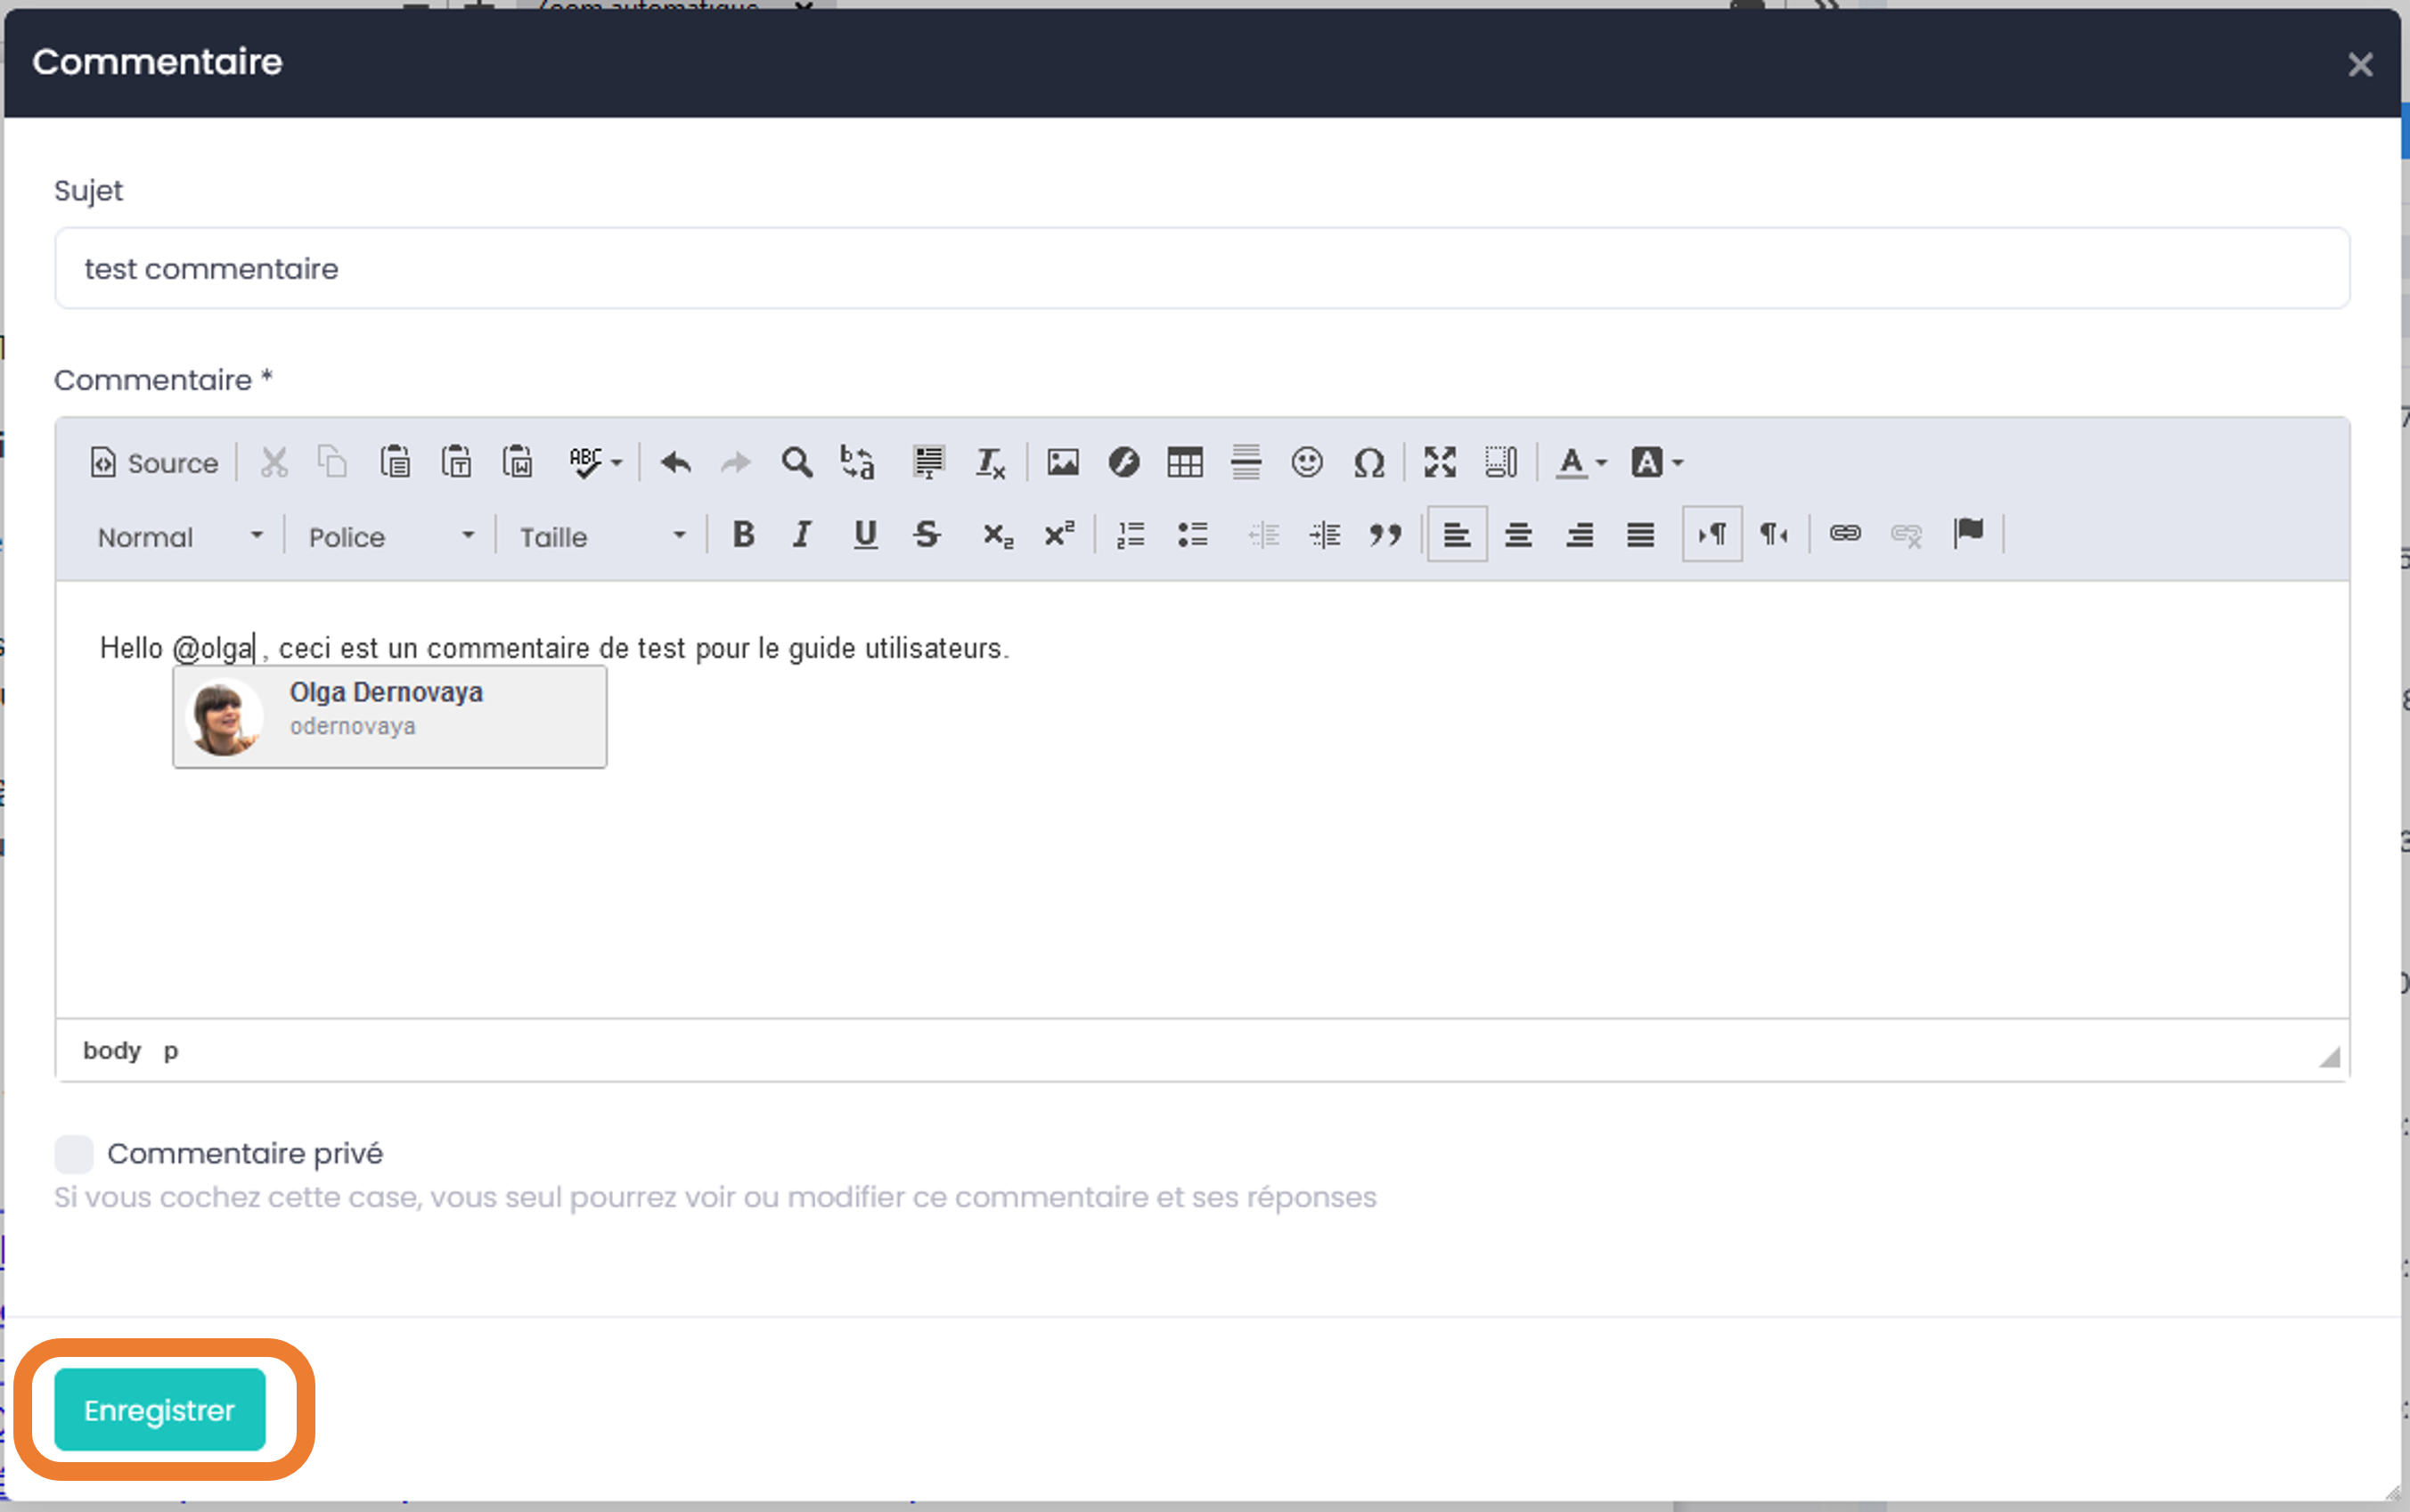
The comment is found in the block to the right of the preview, in the “Comment” tab. You can modify or delete your comment at any time, via the icons under the comment. Similarly, you can reply to another comment by clicking on the “left arrow” icon.
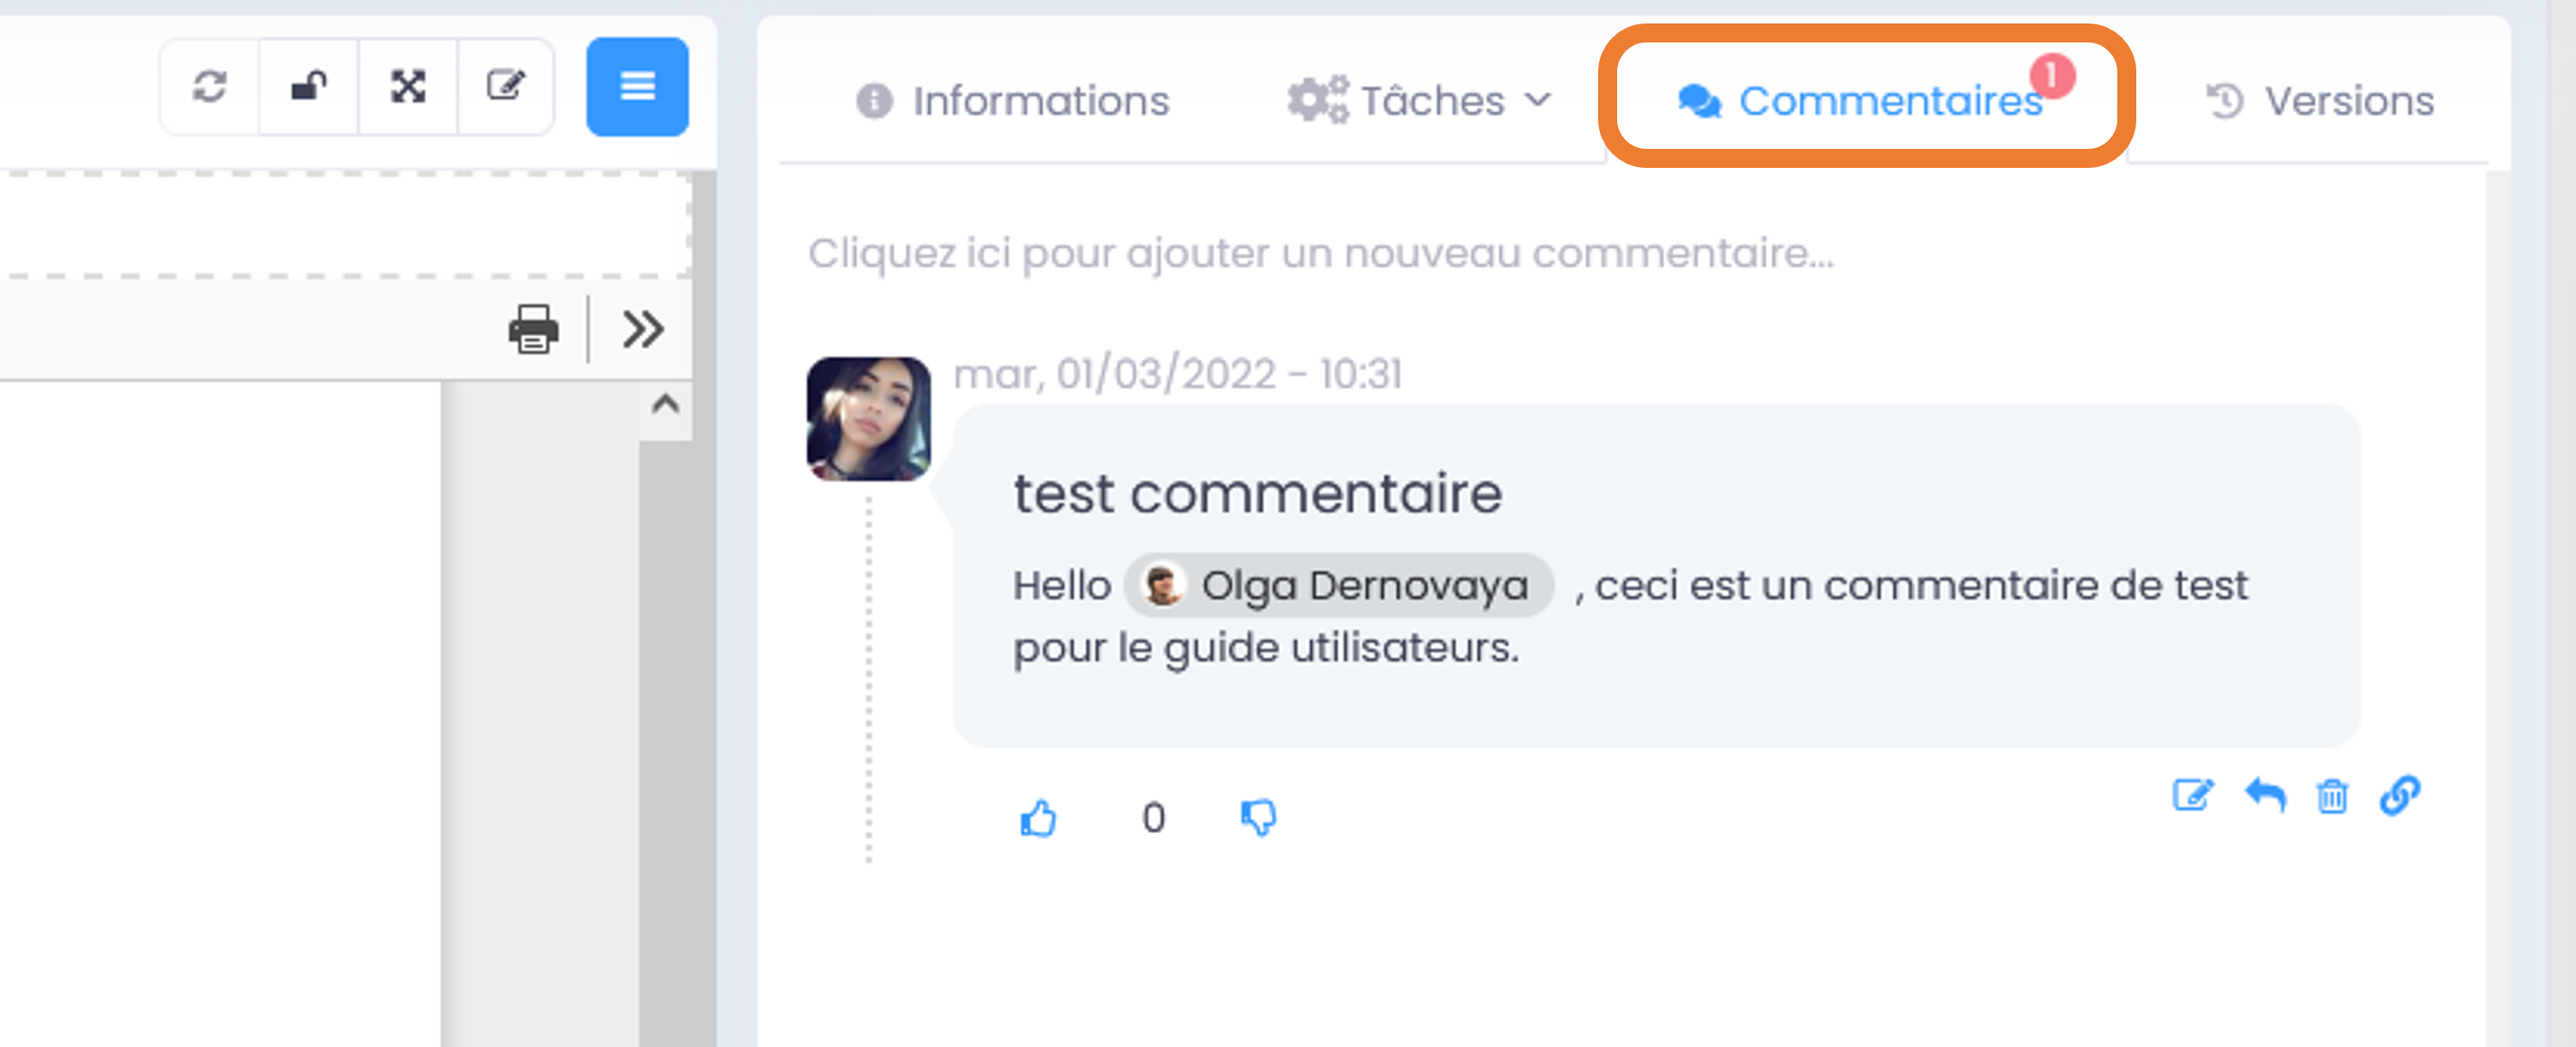
Note
In the case of a reply to a comment, the title is prefilled from the title of the original comment prefixed with “Re:” (for reply). However, it is possible to modify it.
Users who have access to the document will see an alert (red bubble) in the “Comment” tab (in the information block) with the number of unread comments.
Shared or private comments
When you make a comment, you have the choice between “private” or “shared”. Warning: by default, the comment is shared.
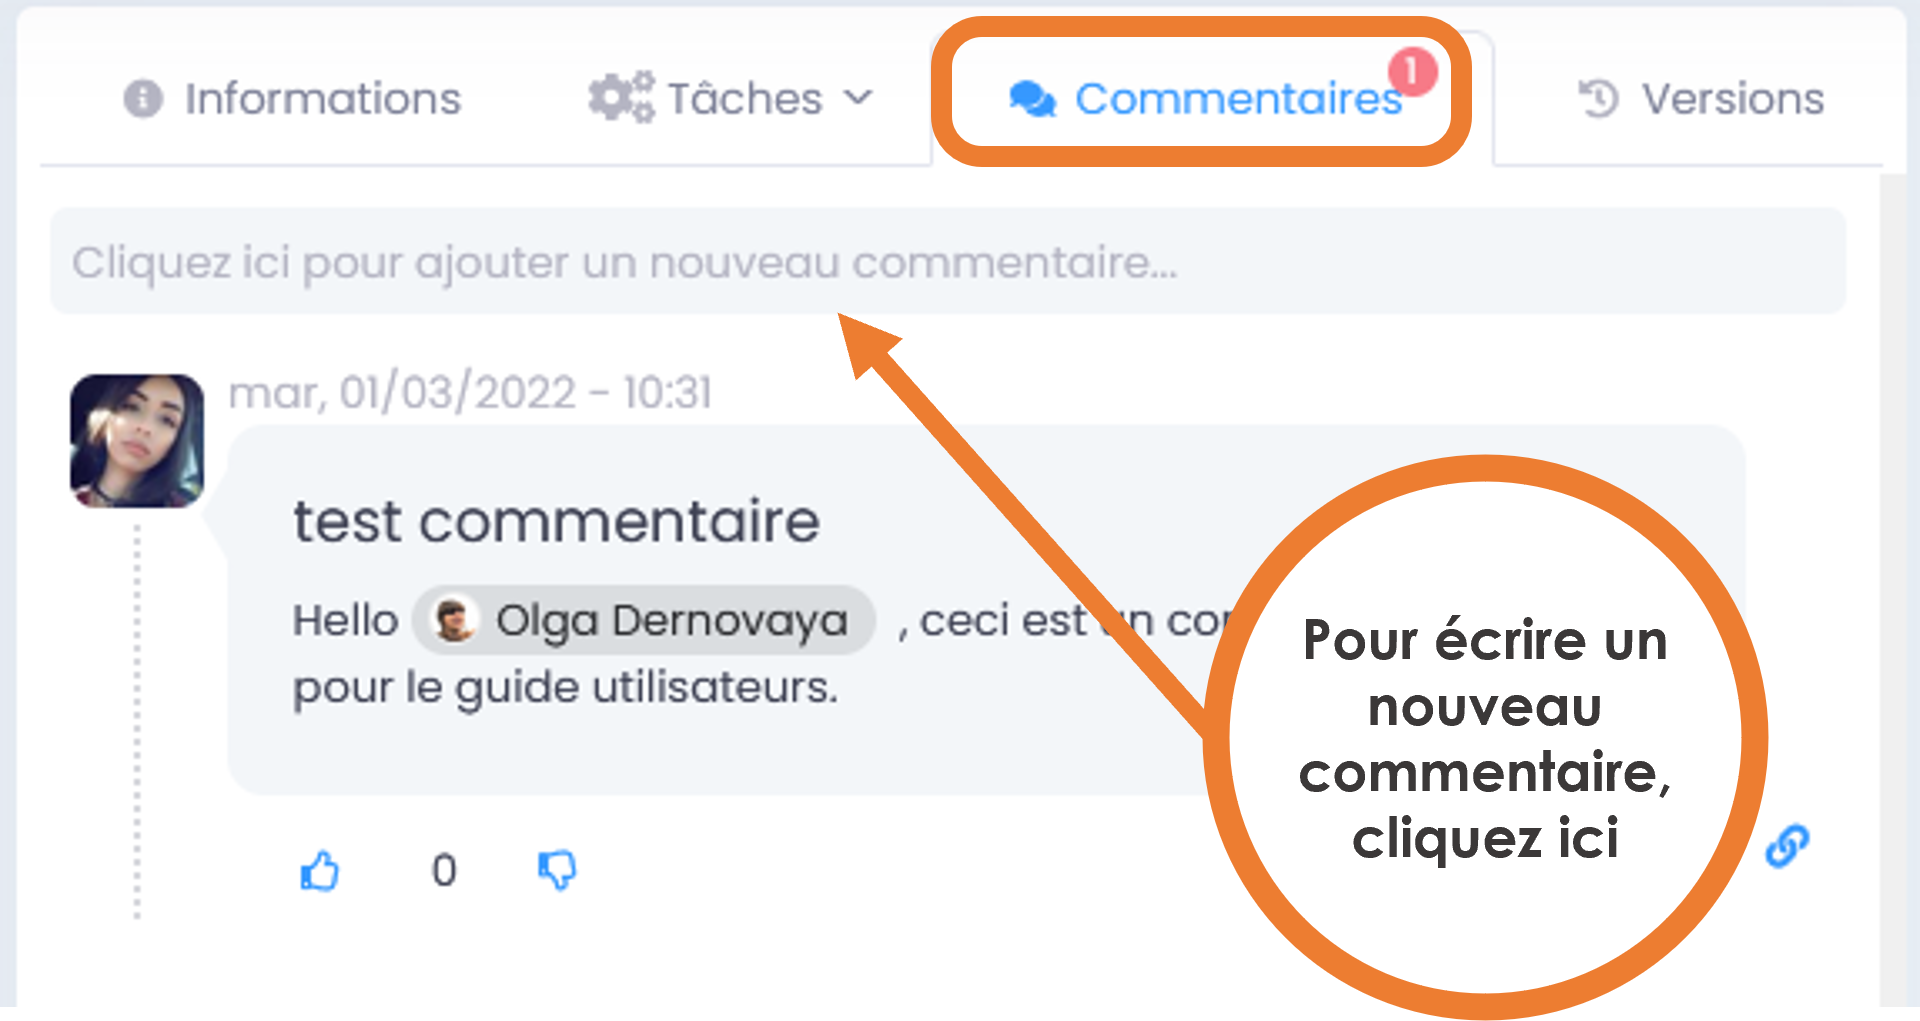
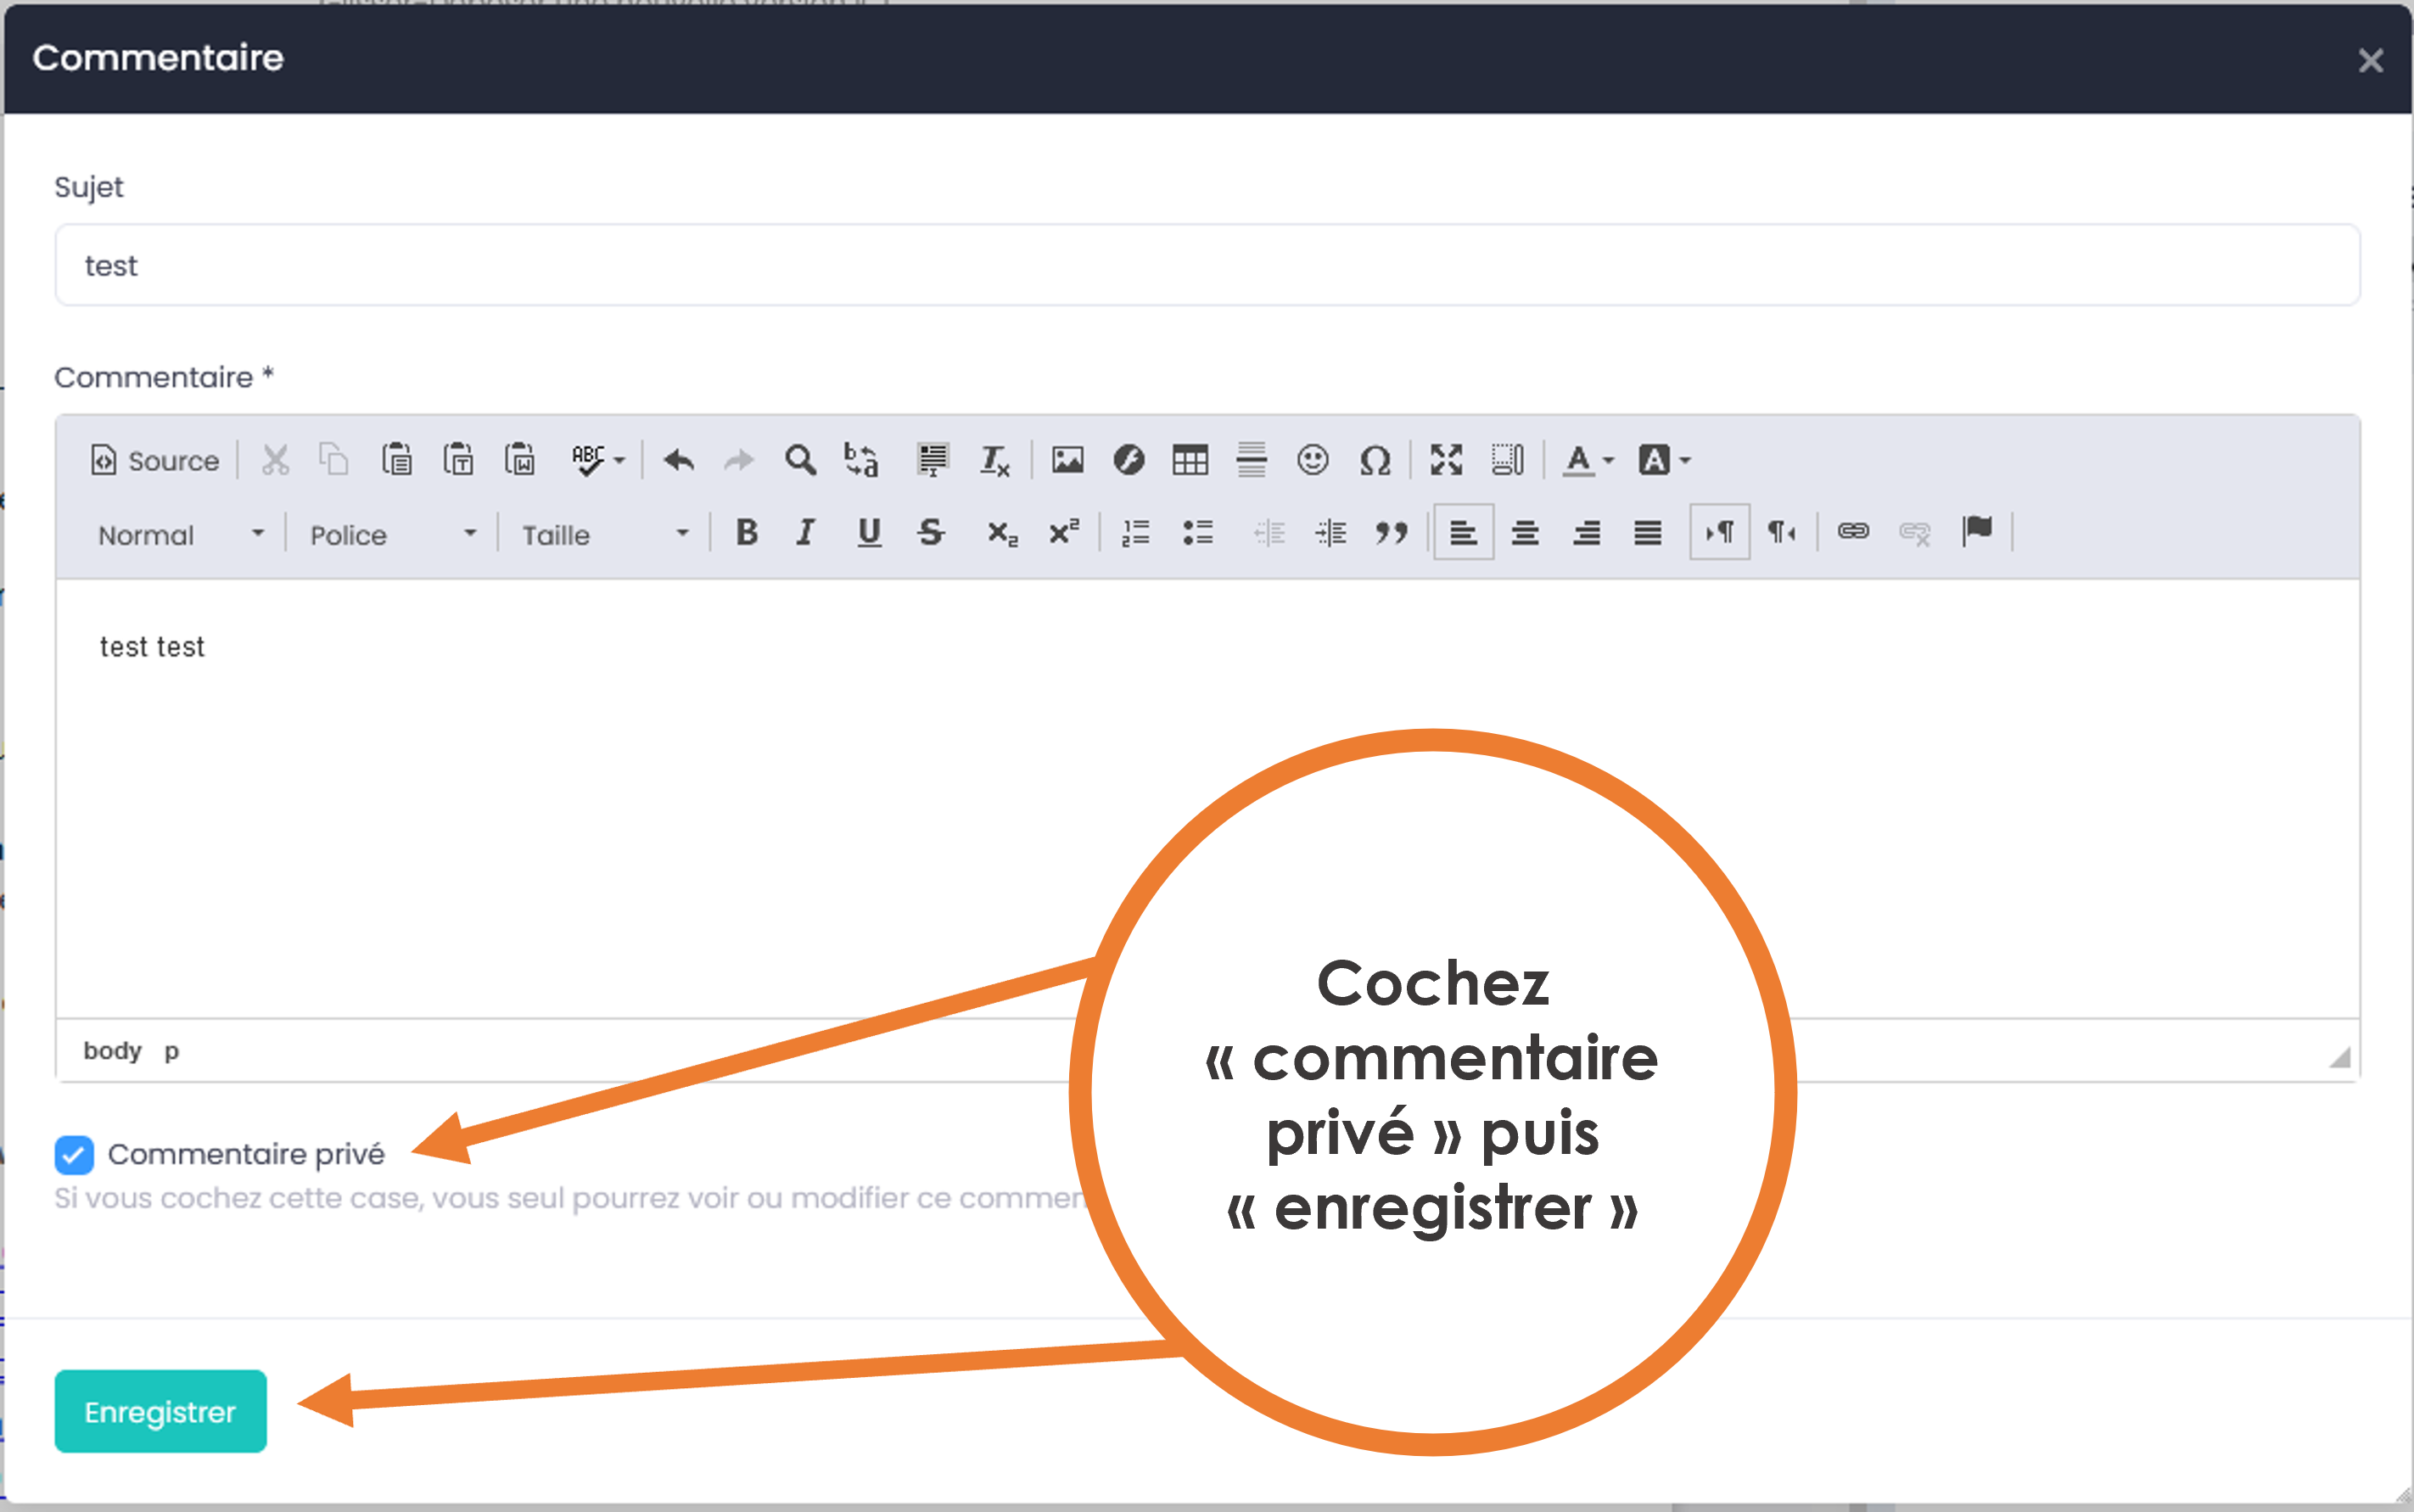
The private comment is visible only by the user who wrote it. The shared comment is visible to all users who have access to the document.
You can change the visibility of your comment at any time by clicking on the icon to change the comment.
If the comment is “shared” and you want to make it “private”: the comment and any responses to the comment left by other users become private.
If the comment is deleted, the replies to that comment are deleted as well.
Note
The super administrator profile has the ability to tick/untick a box on a user’s profile to disallow/allow shared comments. In this case, the user will only be able to make private comments.
Note
There are no email or activity feed notifications when it comes to private comments.
Since version 4.2, a pictogram is displayed when comments are shared with external users:
Contextual annotations (shared or private)
Annotations allow you to comment on a part of the text on the preview, rather than making a general comment. Very practical in the context of re-reading/correcting working documents.
In order to annotate a word or paragraph simply select the desired text: a pencil icon appears, click on it to open the annotation window, write your annotation, and save.
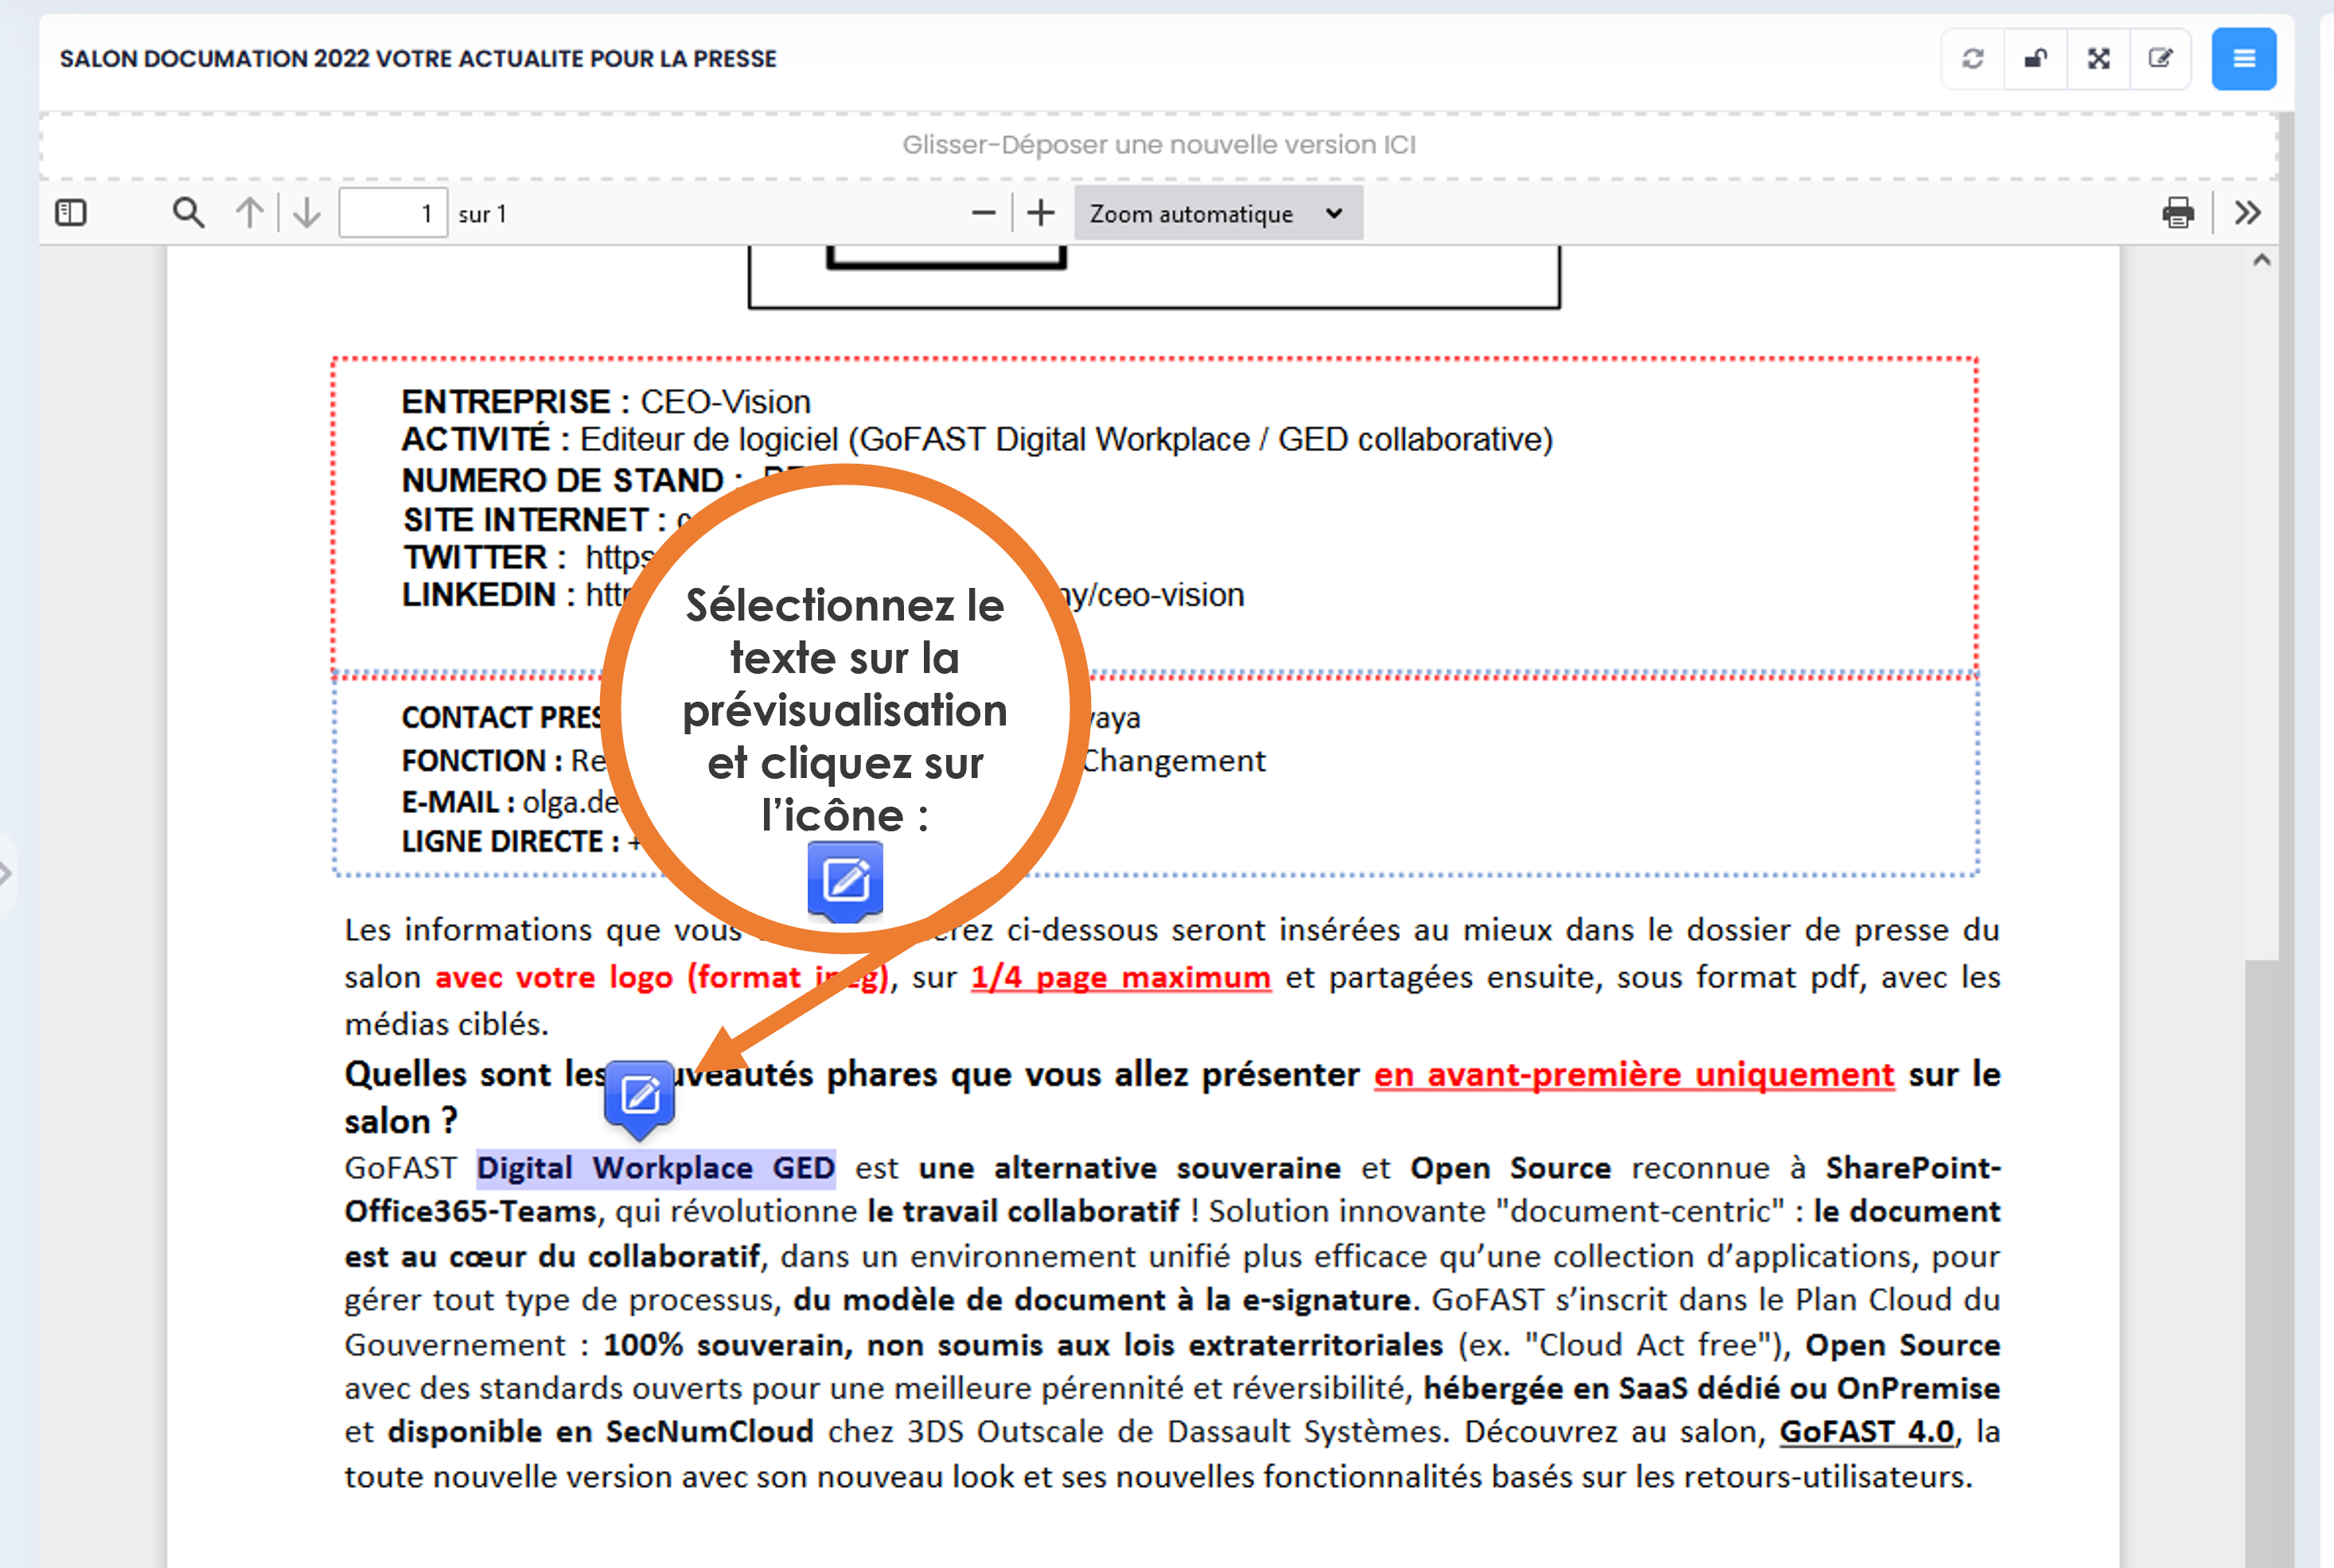
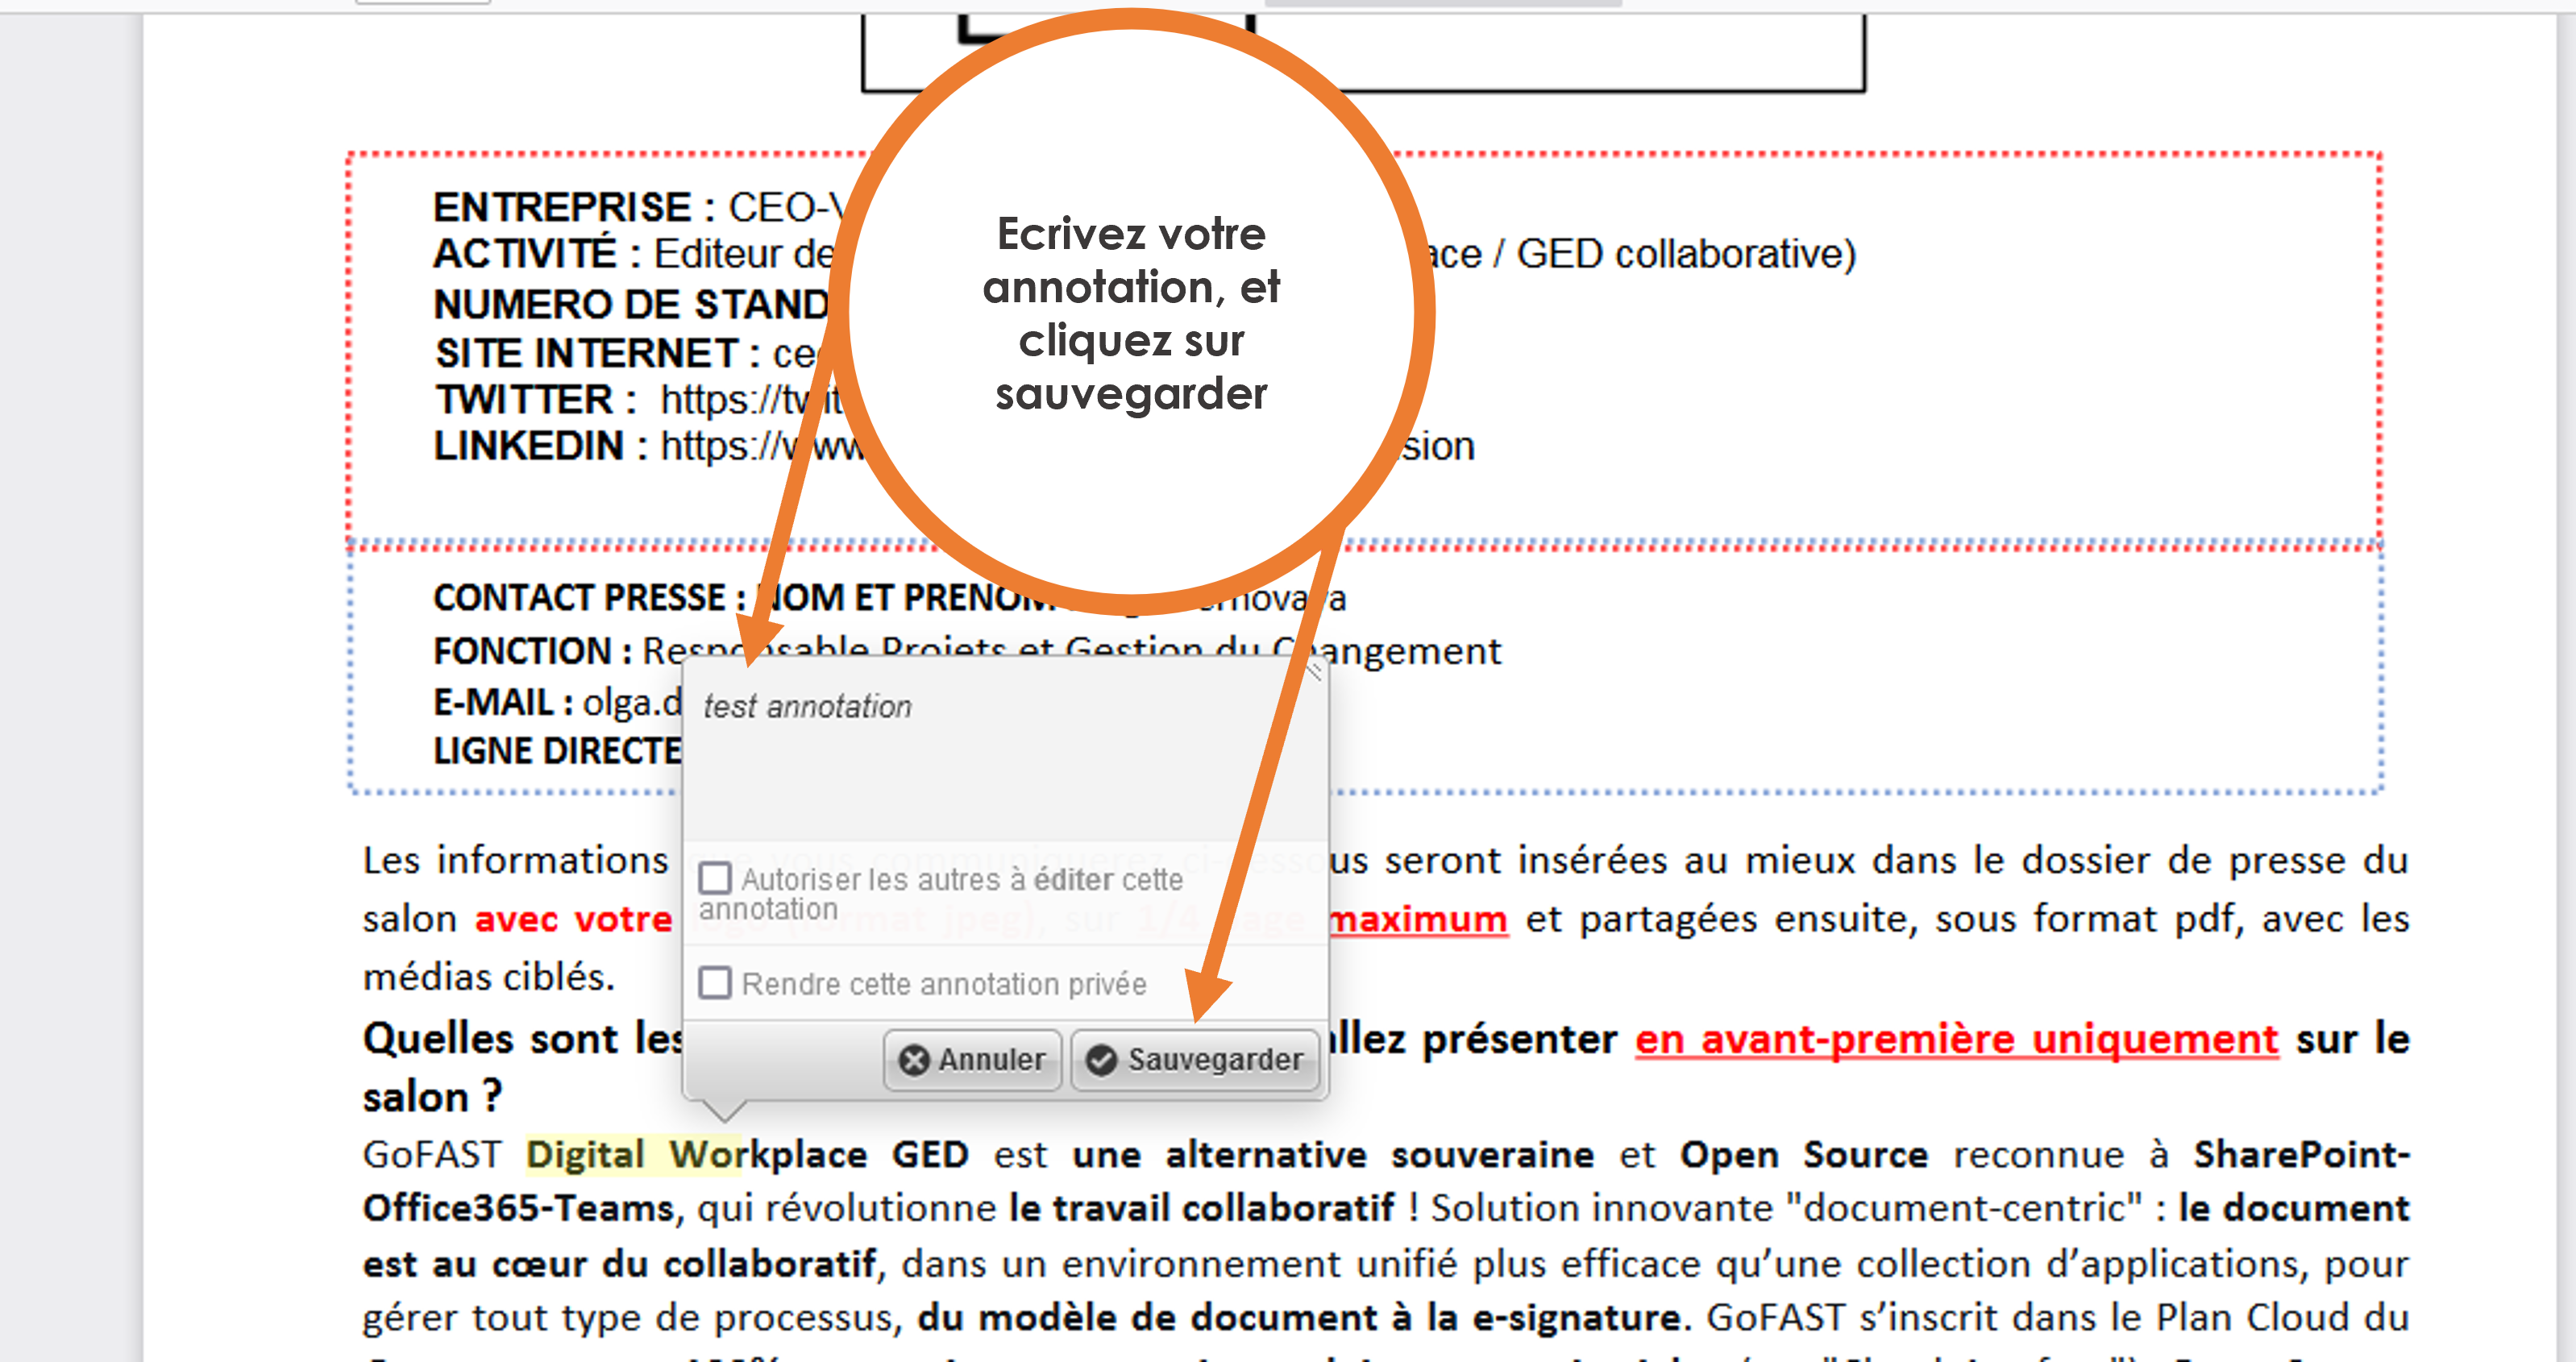
You will see where you have highlighted in yellow in the preview and by clicking on it you will see the content of the annotation.
Attention
Annotations are only on a given version of the document, if the version is updated, you will no longer see the annotation in the preview, but it remains in the comments in the metadata block.
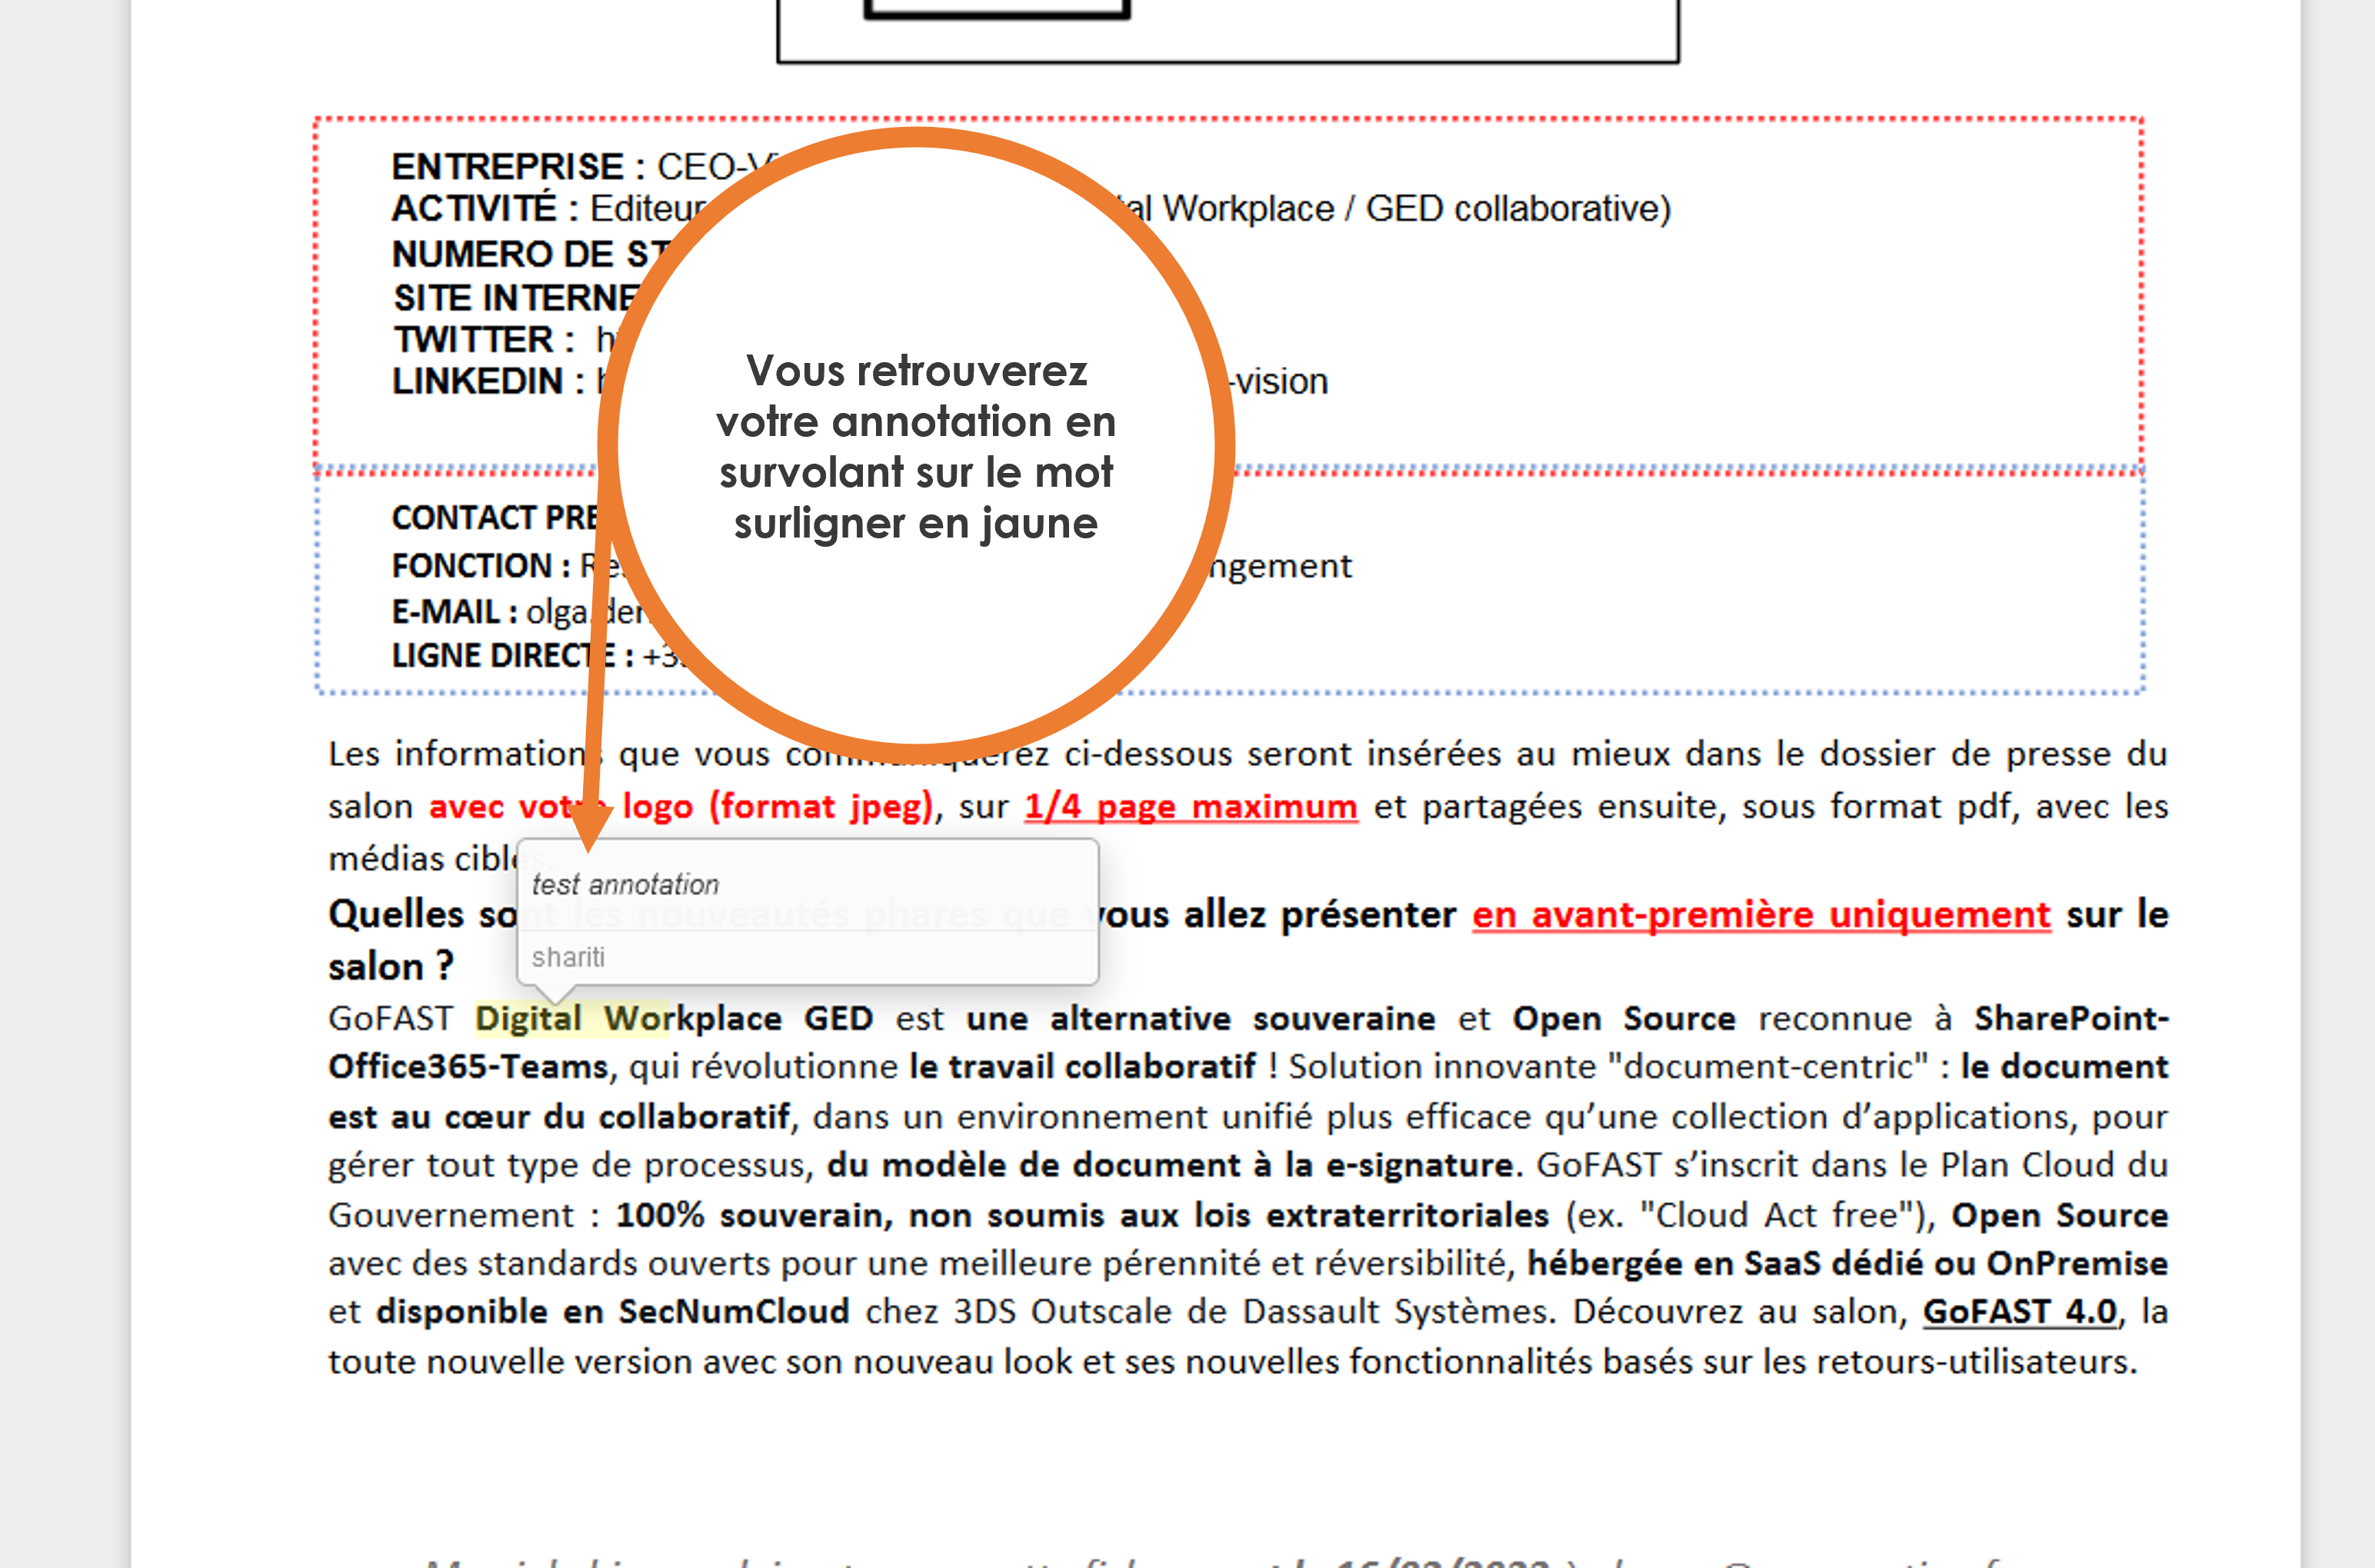
You can also find your annotation under the preview, like the comments, with the precision of which version has been annotated.
Shared or private annotations
When you make an annotation, you have the choice between “private” or “shared”. Warning: by default, the annotation is shared.
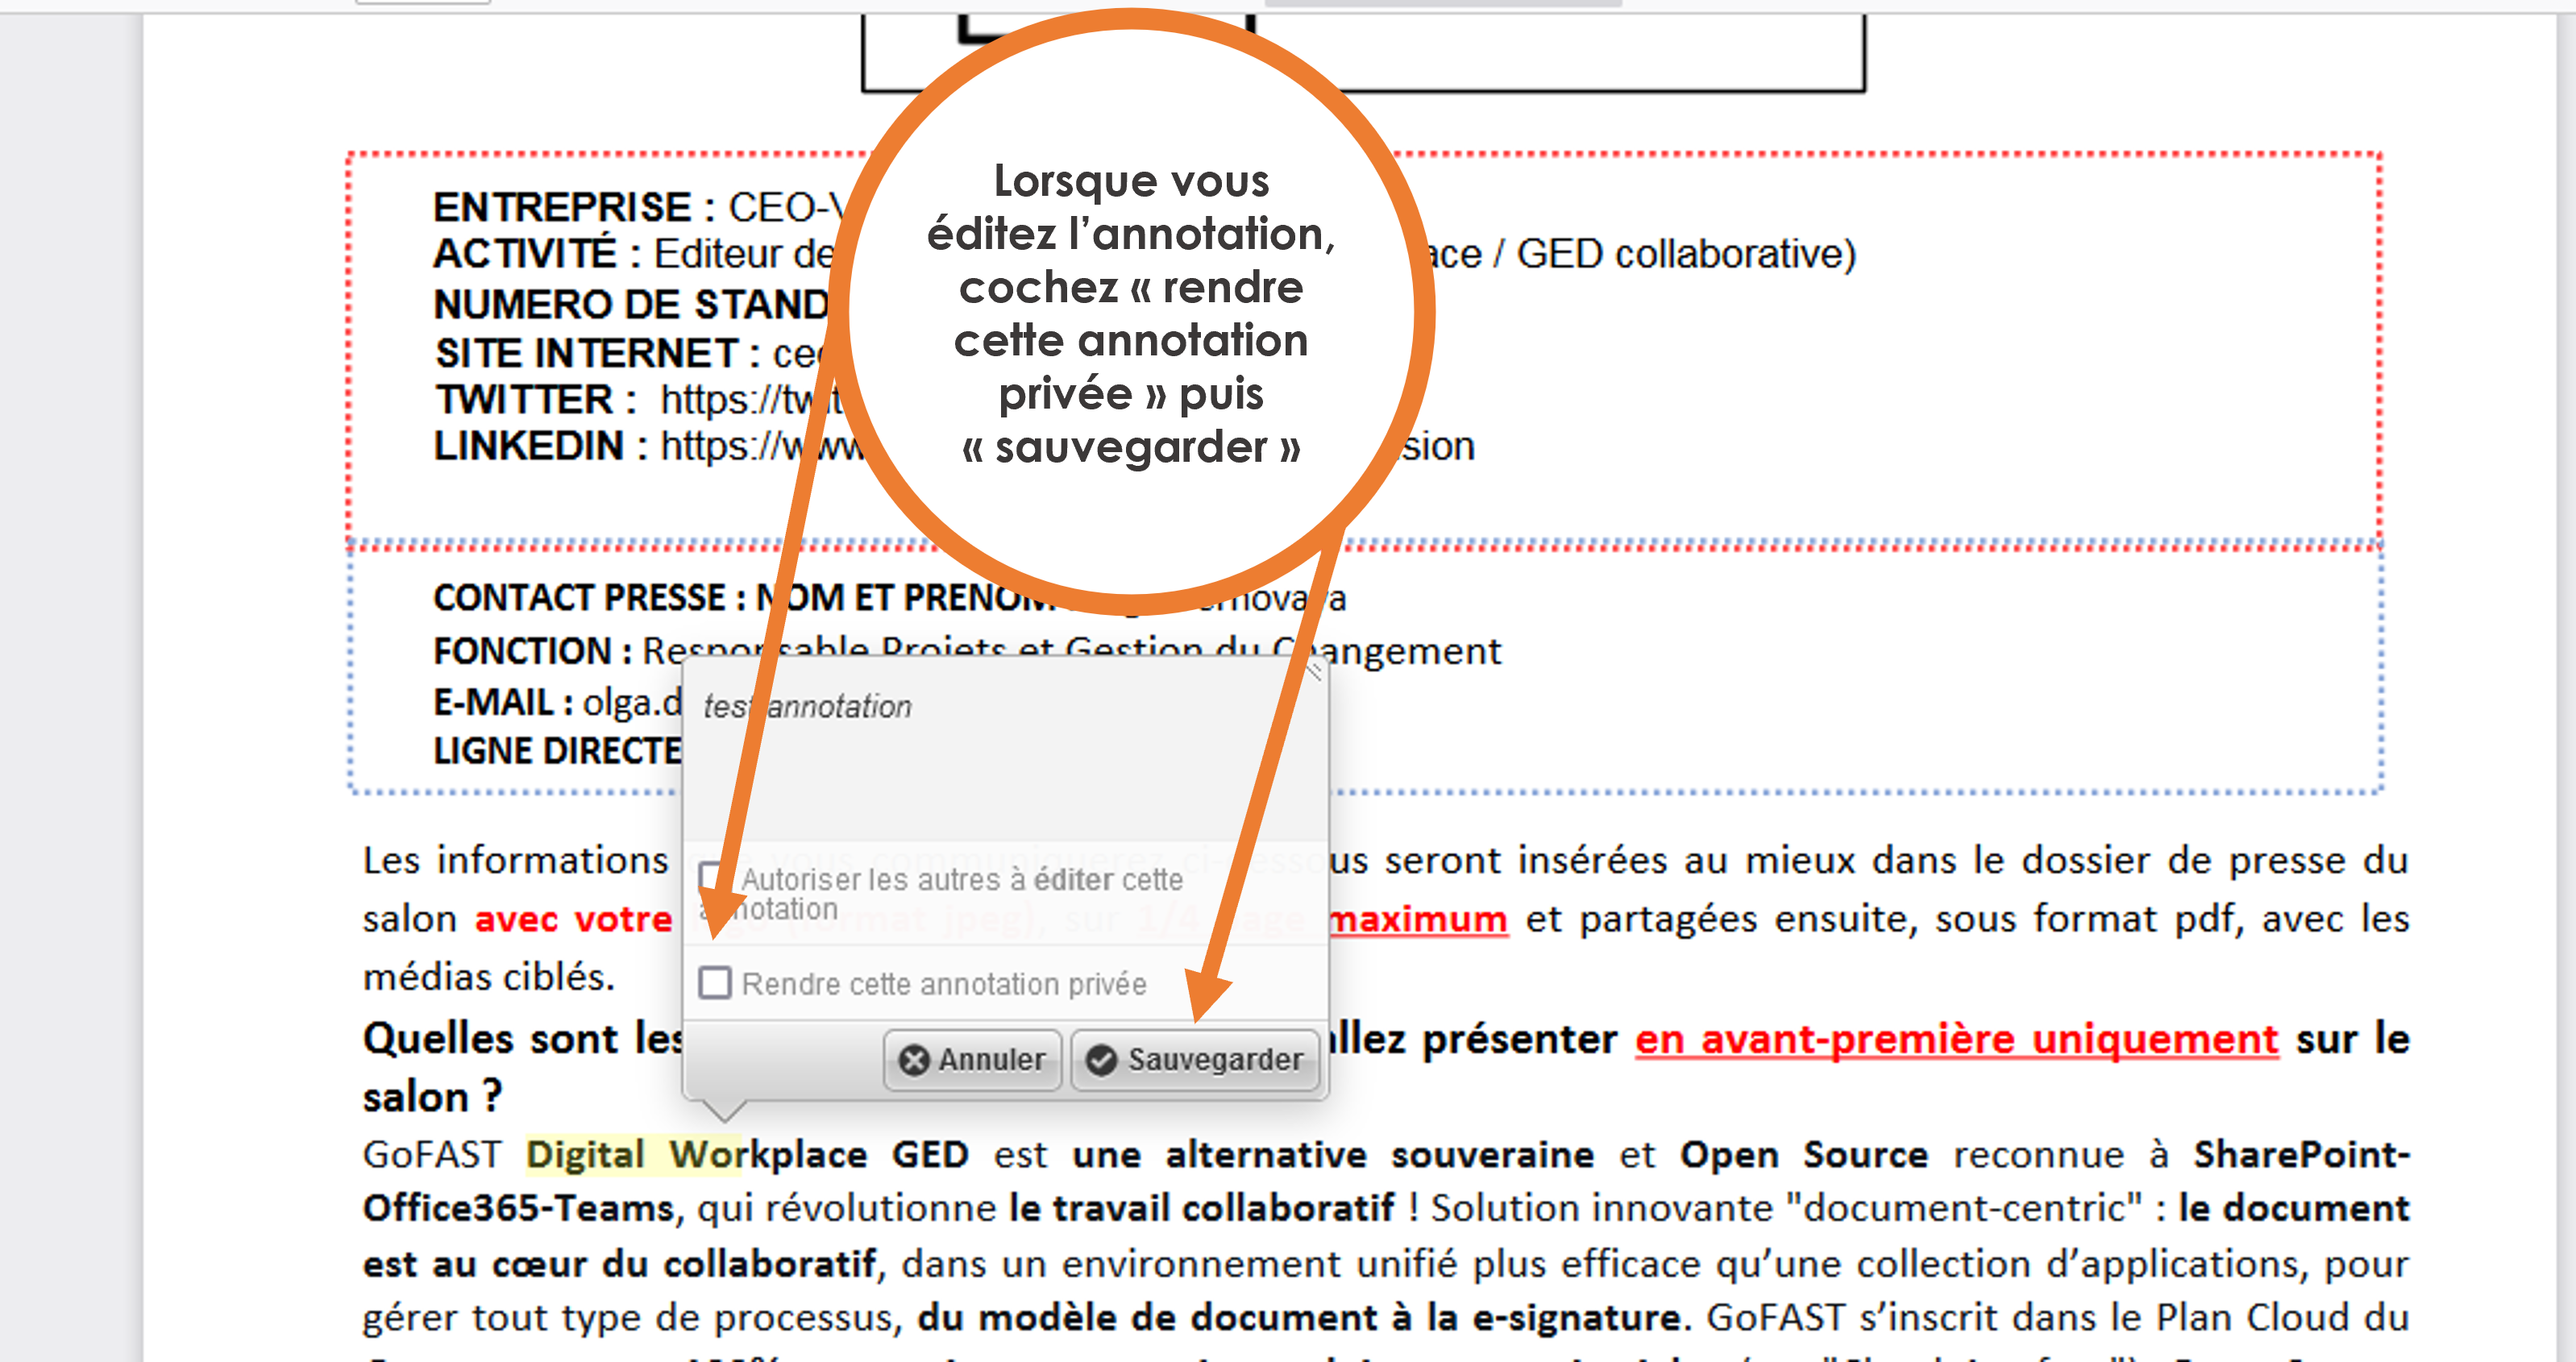
The private annotation is visible only to the user who wrote it. The shared annotation is visible to users with access to the document.
In the case of a private annotation, this generates a comment which is also private.
You can change the visibility of an annotation by returning to it and ticking the “private”. The same applies to the associated comment.
If the annotation is “shared” and you want to change it to “private”: the annotation and the associated comment become private, including any responses to the comment left by other users.
If the original annotation is deleted, the associated comment and replies to that comment are deleted as well.
Note
The super administrator has the option to tick/untick a box on a user’s profile to disallow/allow shared annotations. In this case, the user will only be able to make private annotations.
Note
There is no notification by email or in the activity feed for private annotations.
Pre-Archiving Documents and Retention Period
“Pre-archived” state
Pre-archiving a document makes it invisible in search, unless you specify the “include pre-archived content” option without completely removing it from GoFAST. And because of this, it is no longer possible to work on it.
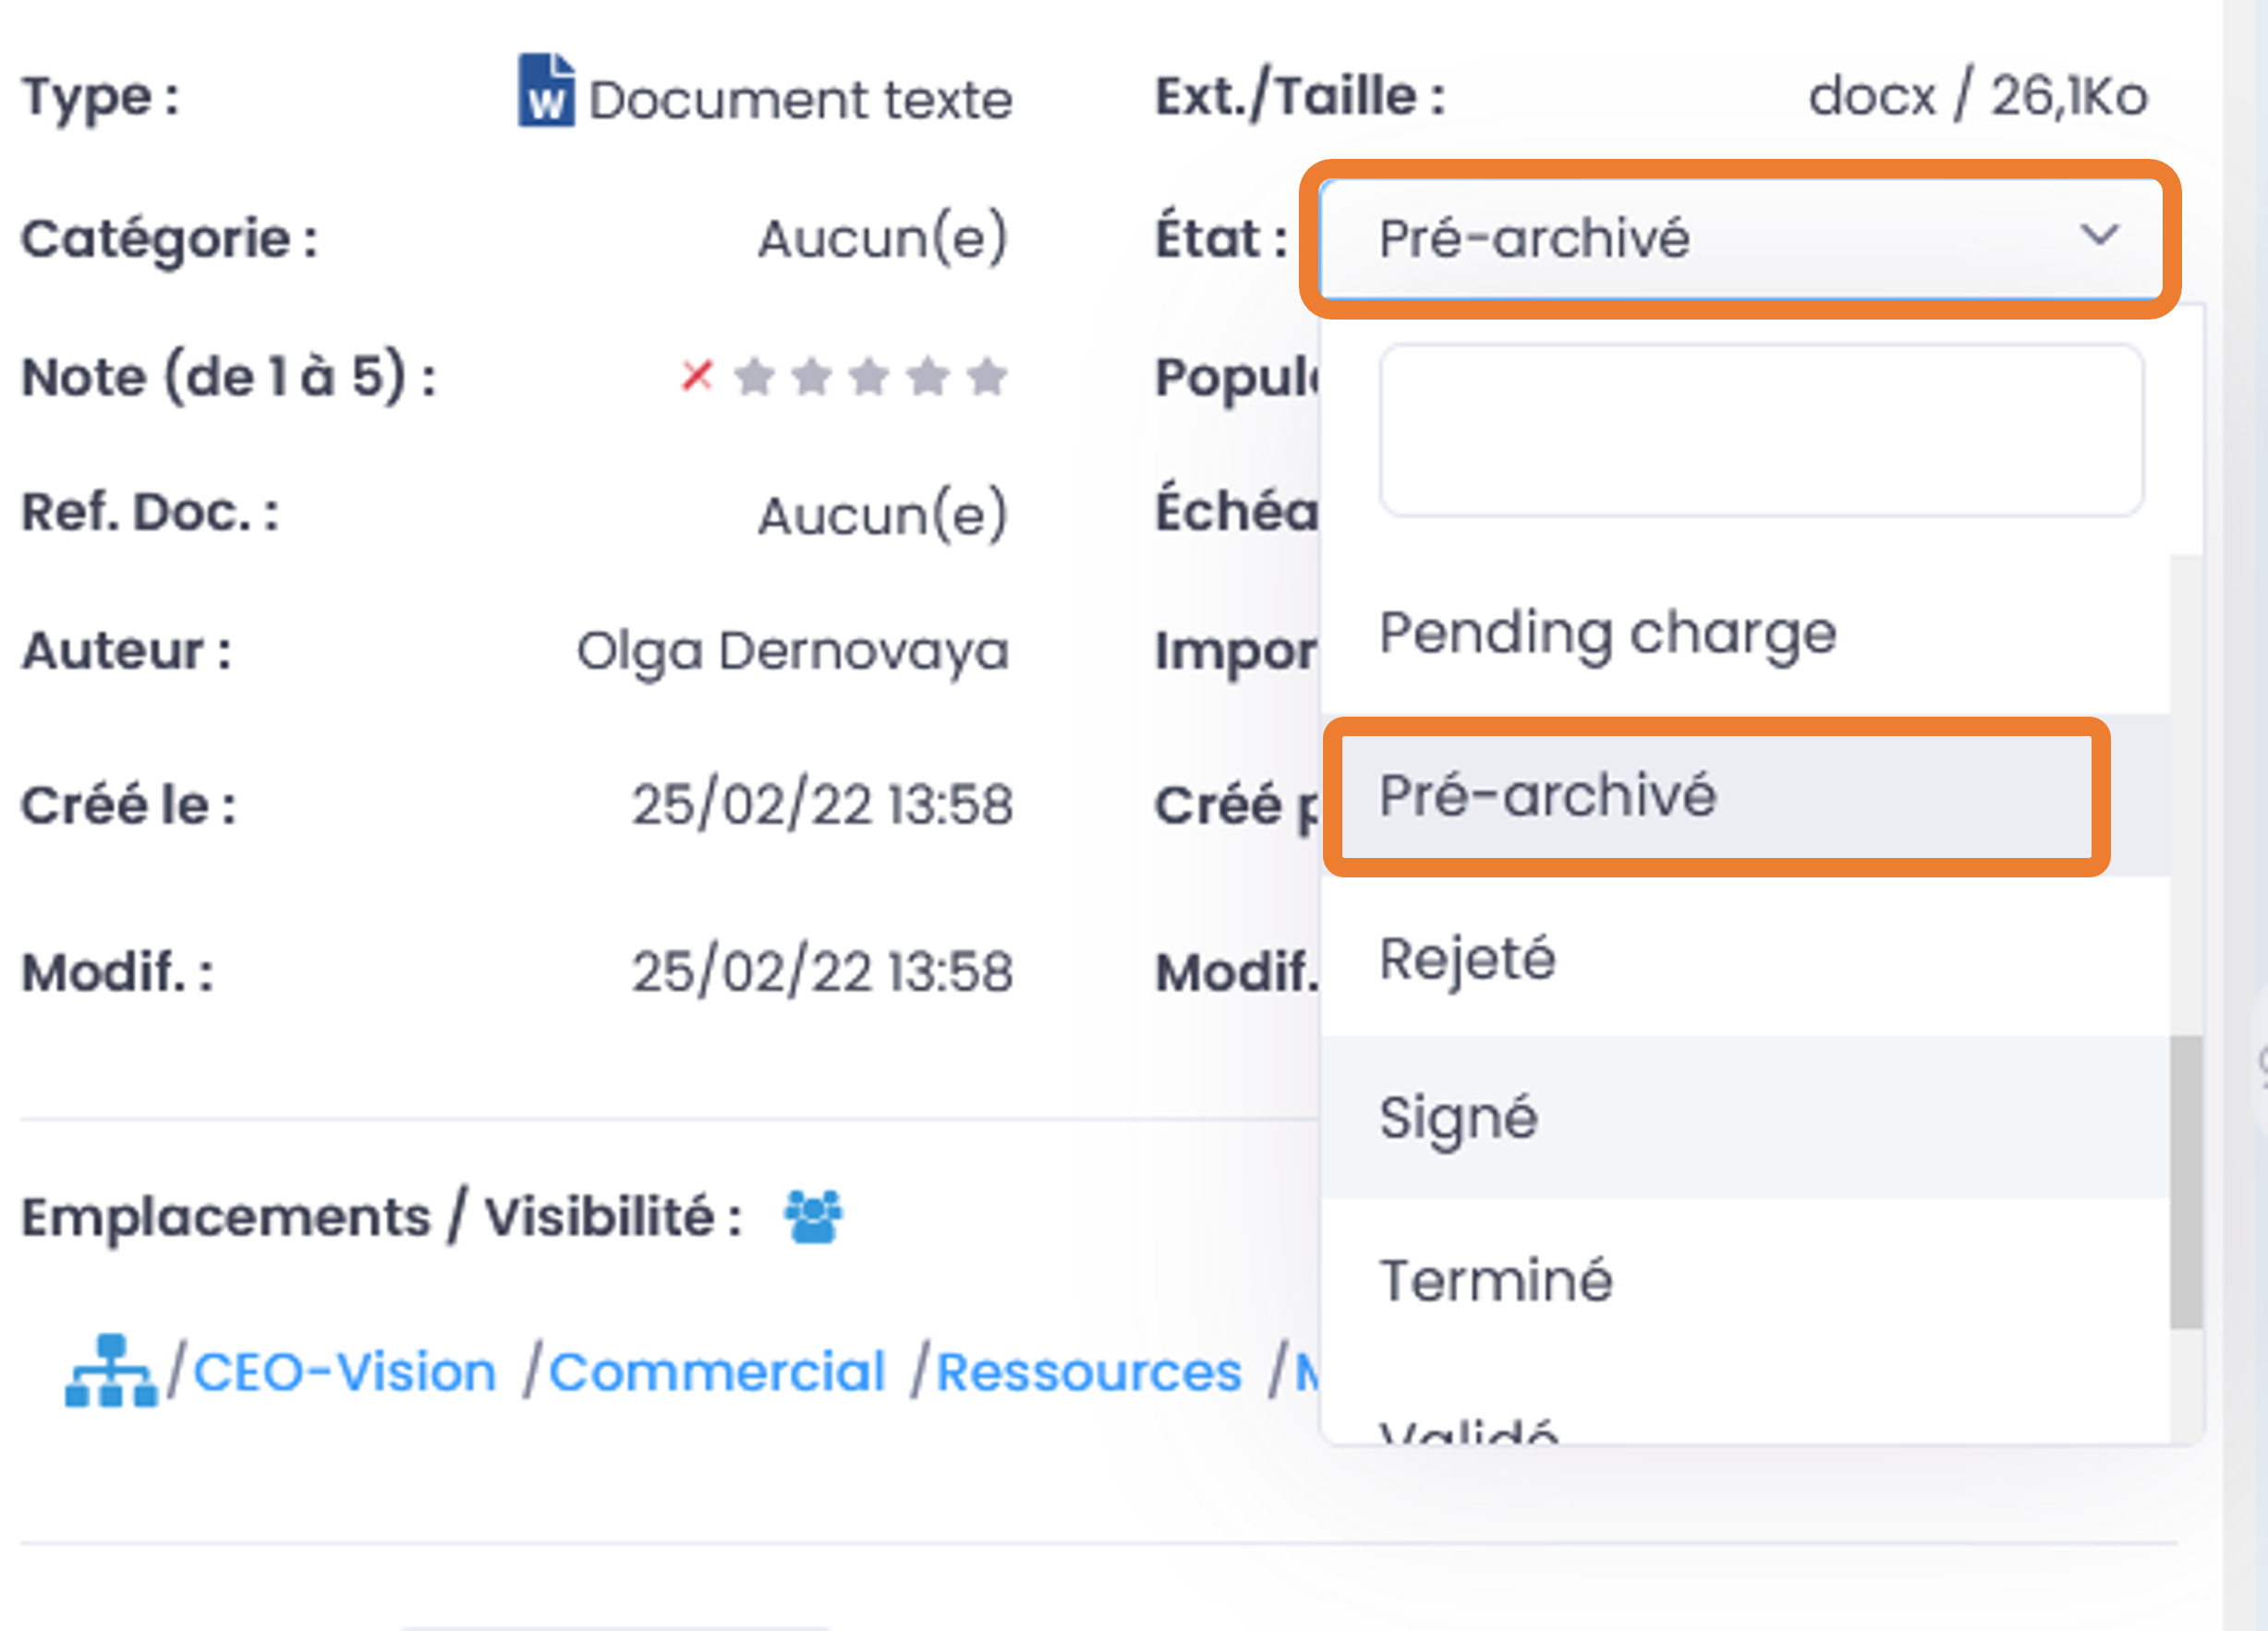
Le document aura désormais le statut « pré-archivé » et toutes ses versions mineures seront effacées.
Une fois le document pré-archivé, il apparaîtra dans les métadonnées que vous pouvez juste le lire => « en lecture seule », et son état est « pré-archivé ». Plus aucune modification n’est donc possible sur un document « pré-archivé ».
Il se peut aussi, lorsque vous voulez visualiser un document, que vous voyez un message orange vous signalant qu’il est en statut « pré-archivé » et que si vous voulez retravailler dessus, il faut demander à l’administrateur du groupe de le désarchiver.
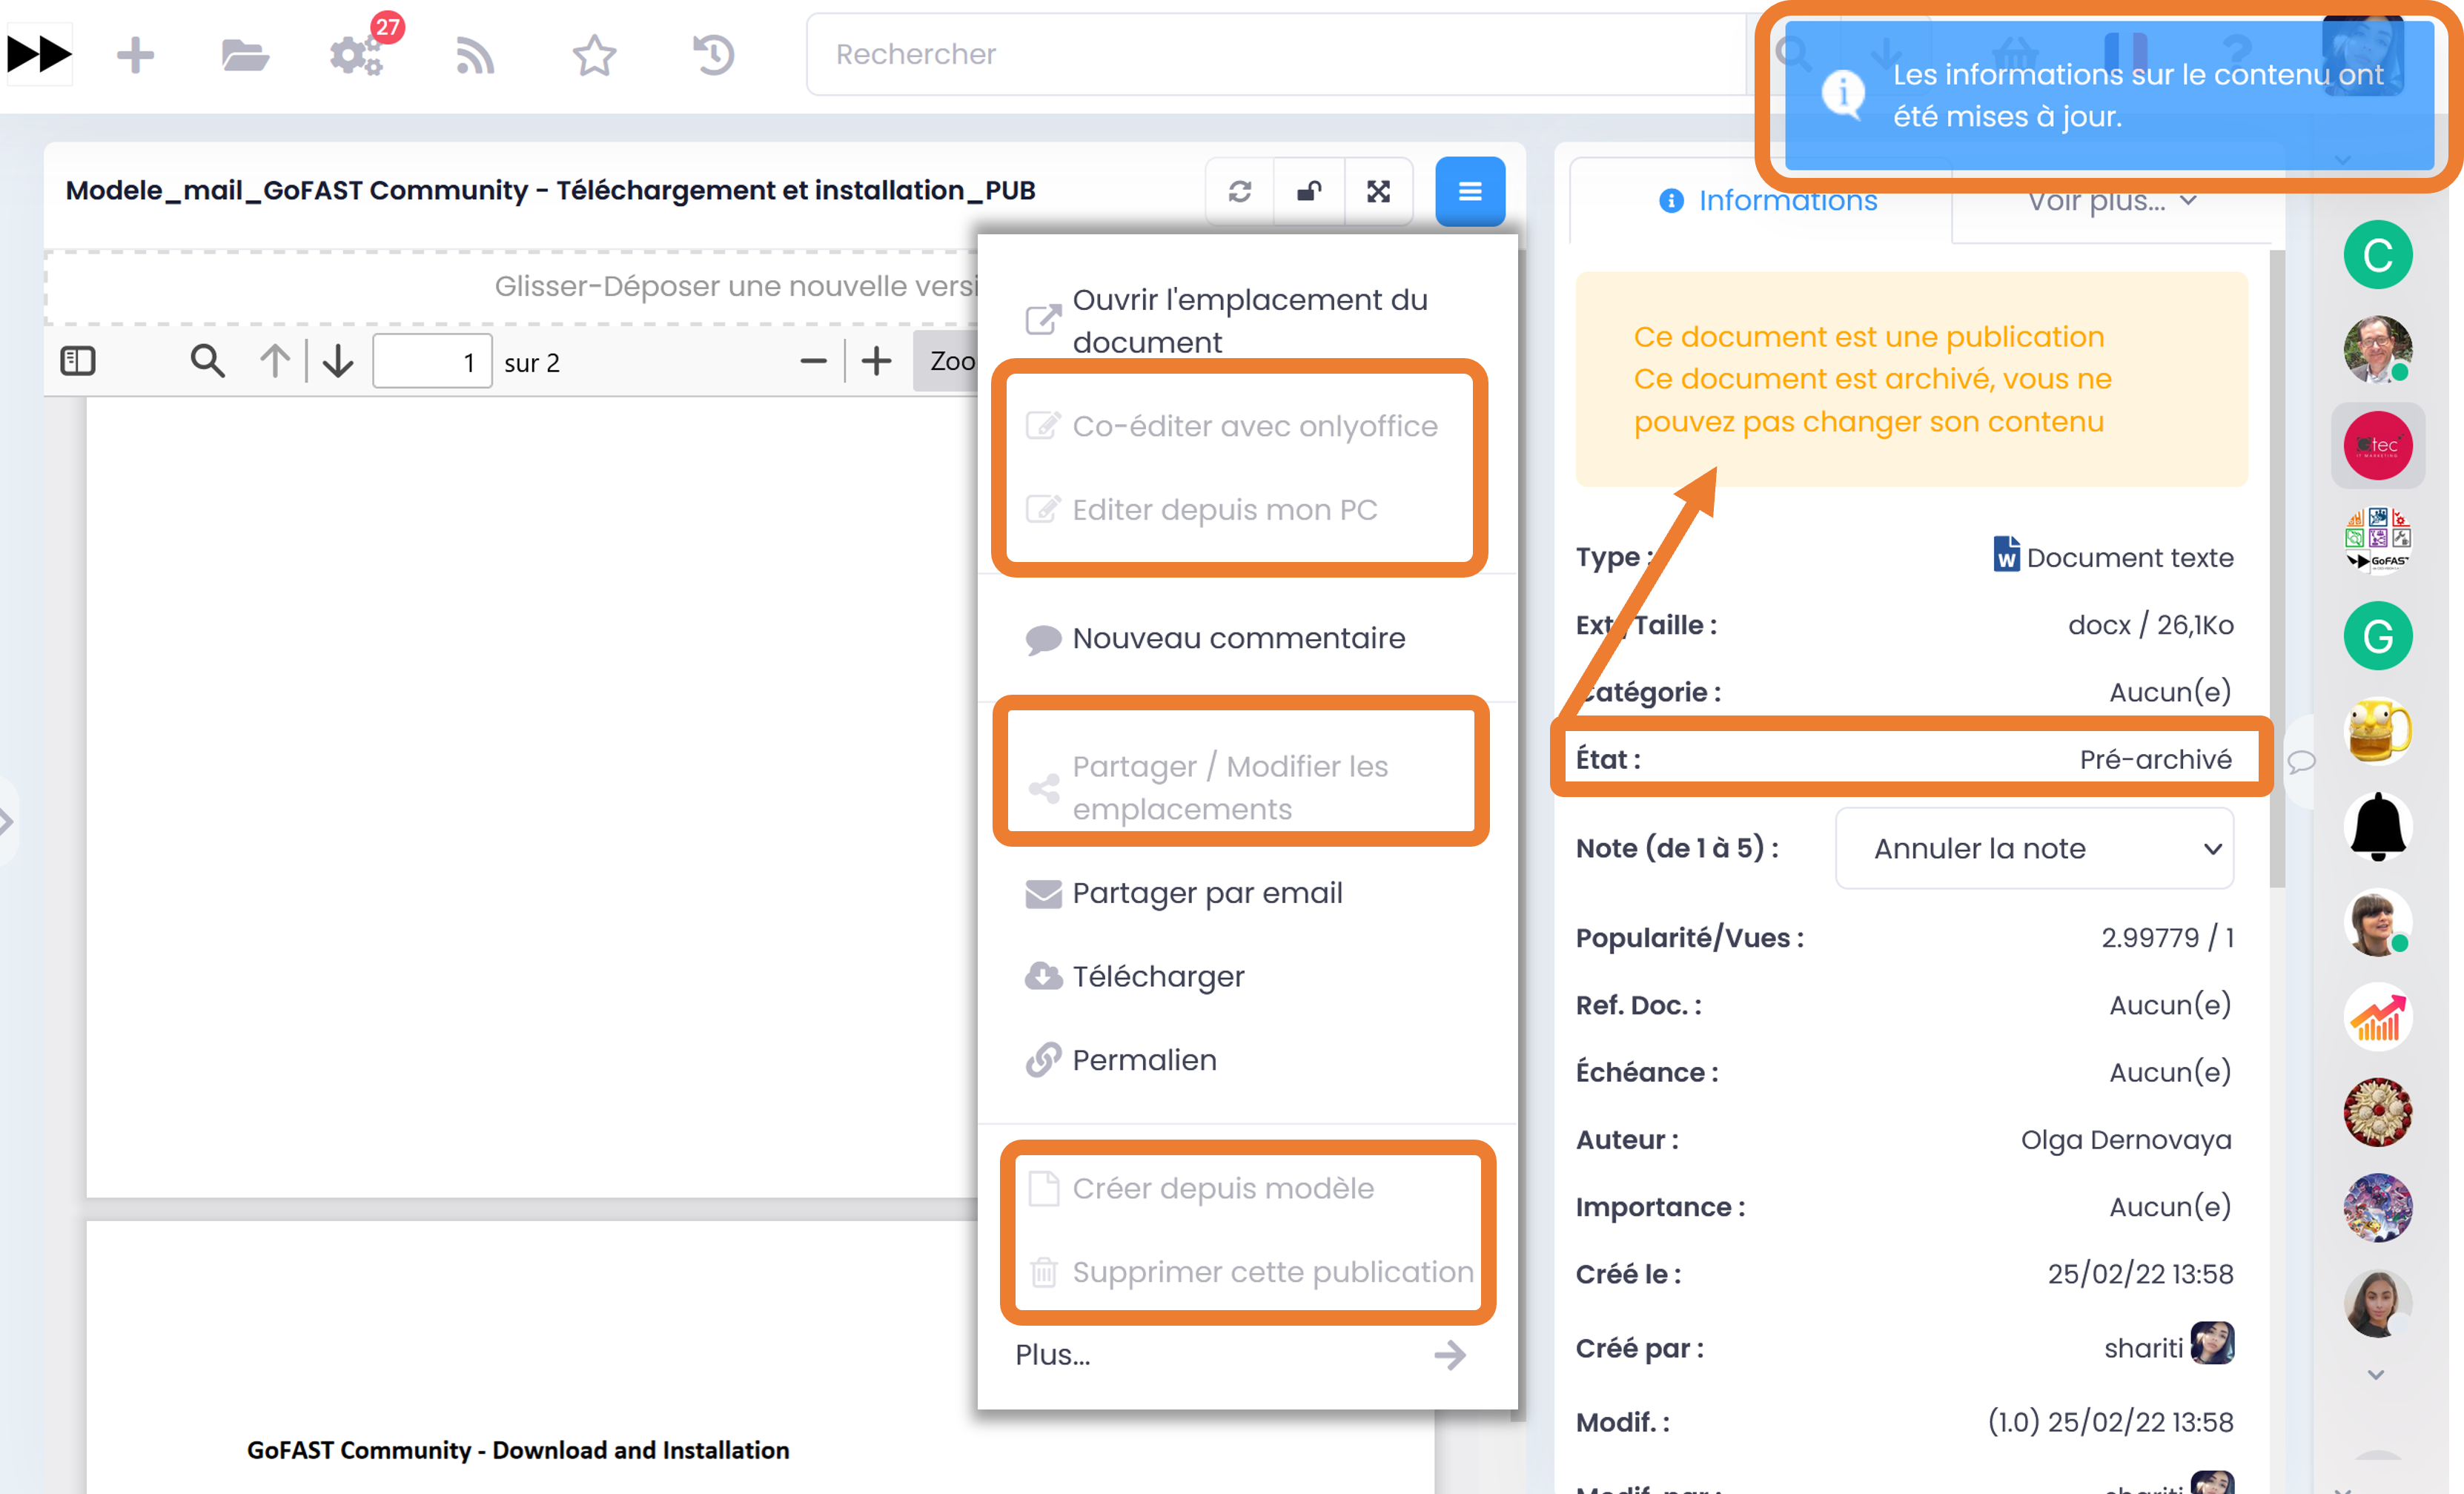
You can reverse the workflow and unarchive the document to make it active again.
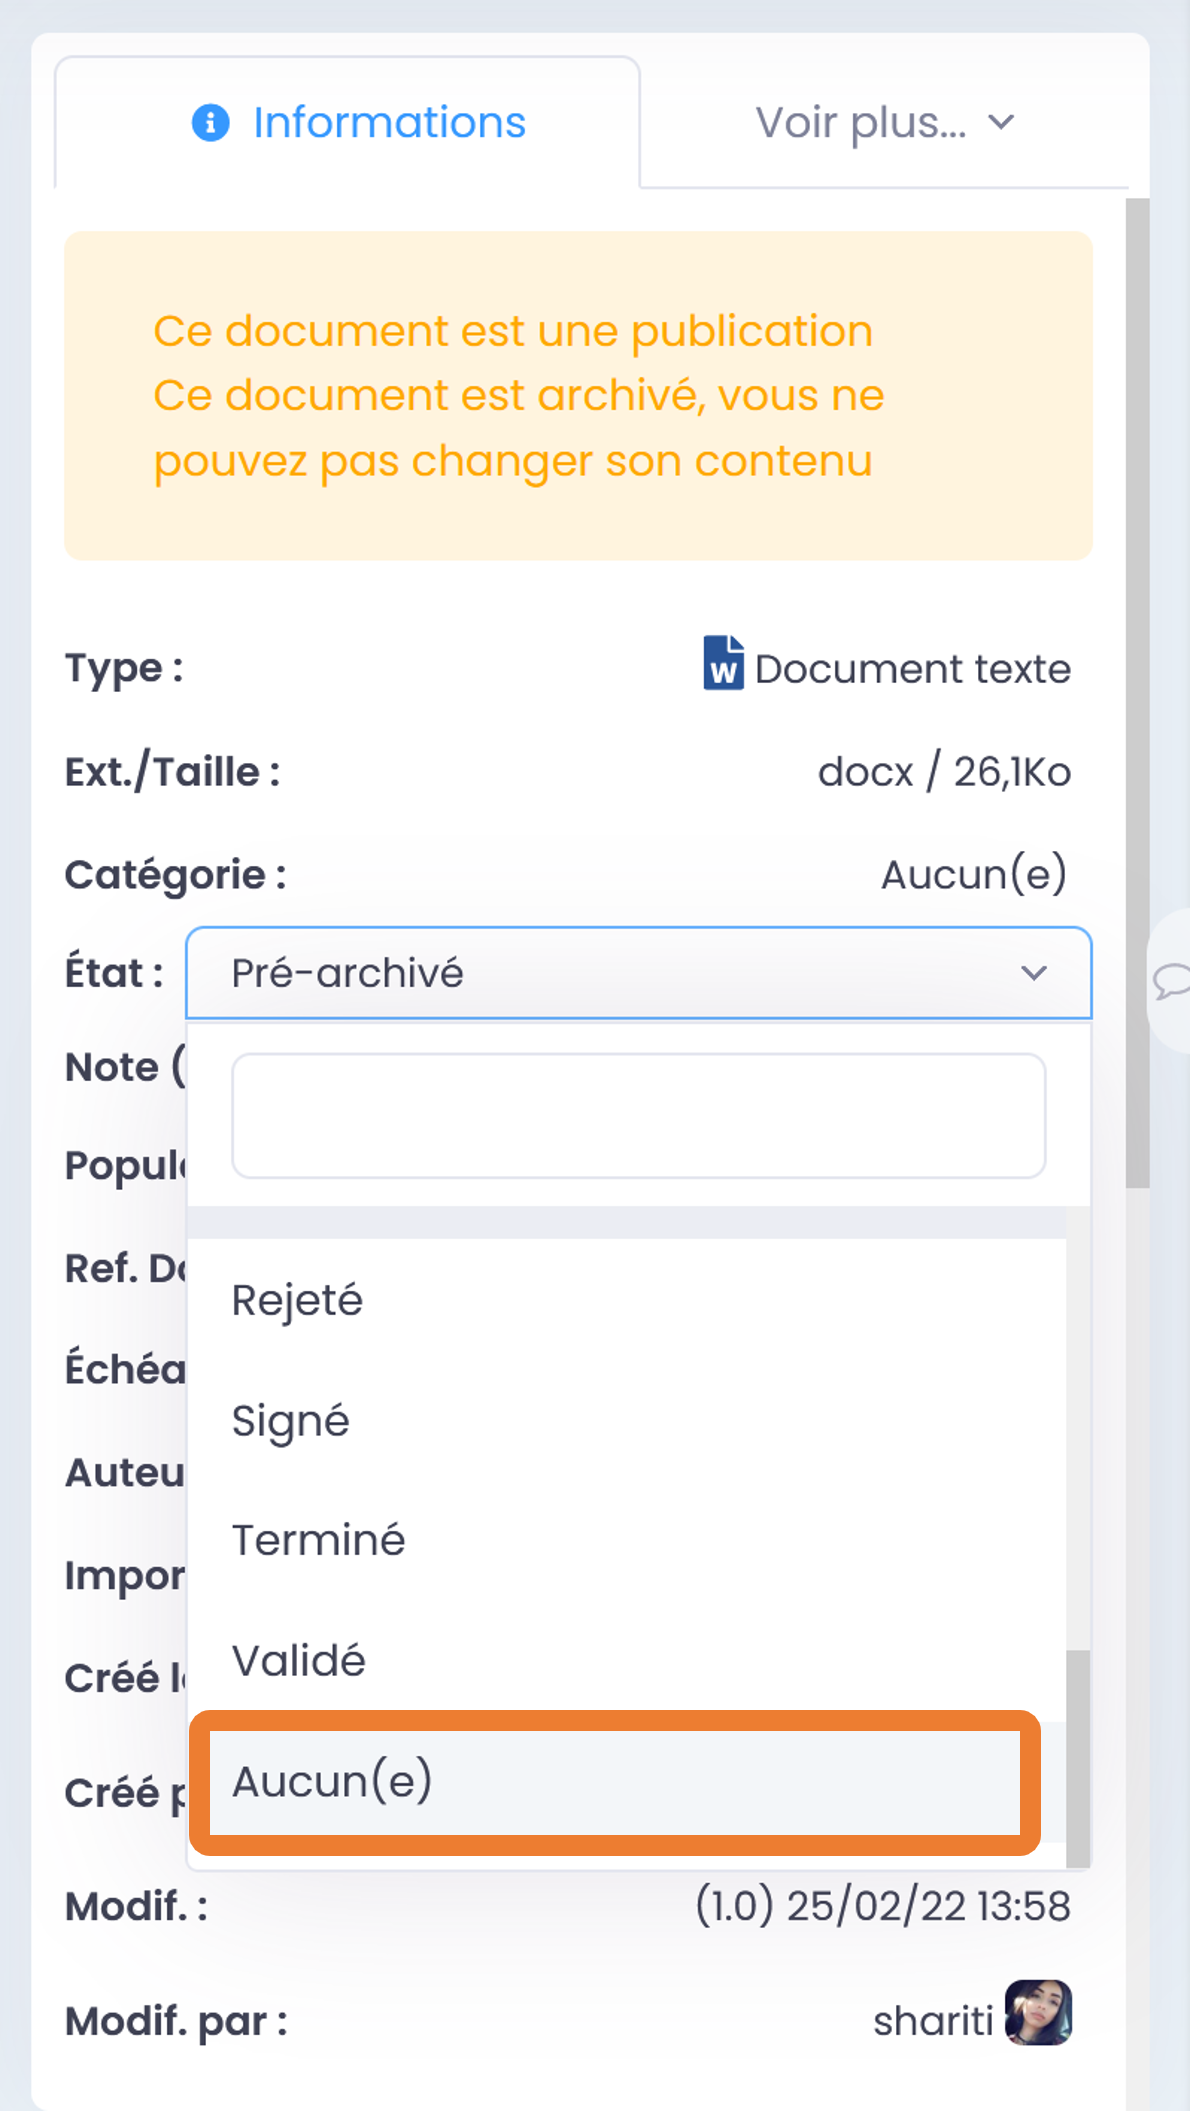
Click on “Unarchive”
There is now no message in the metadata and the state is back to normal or as originally.
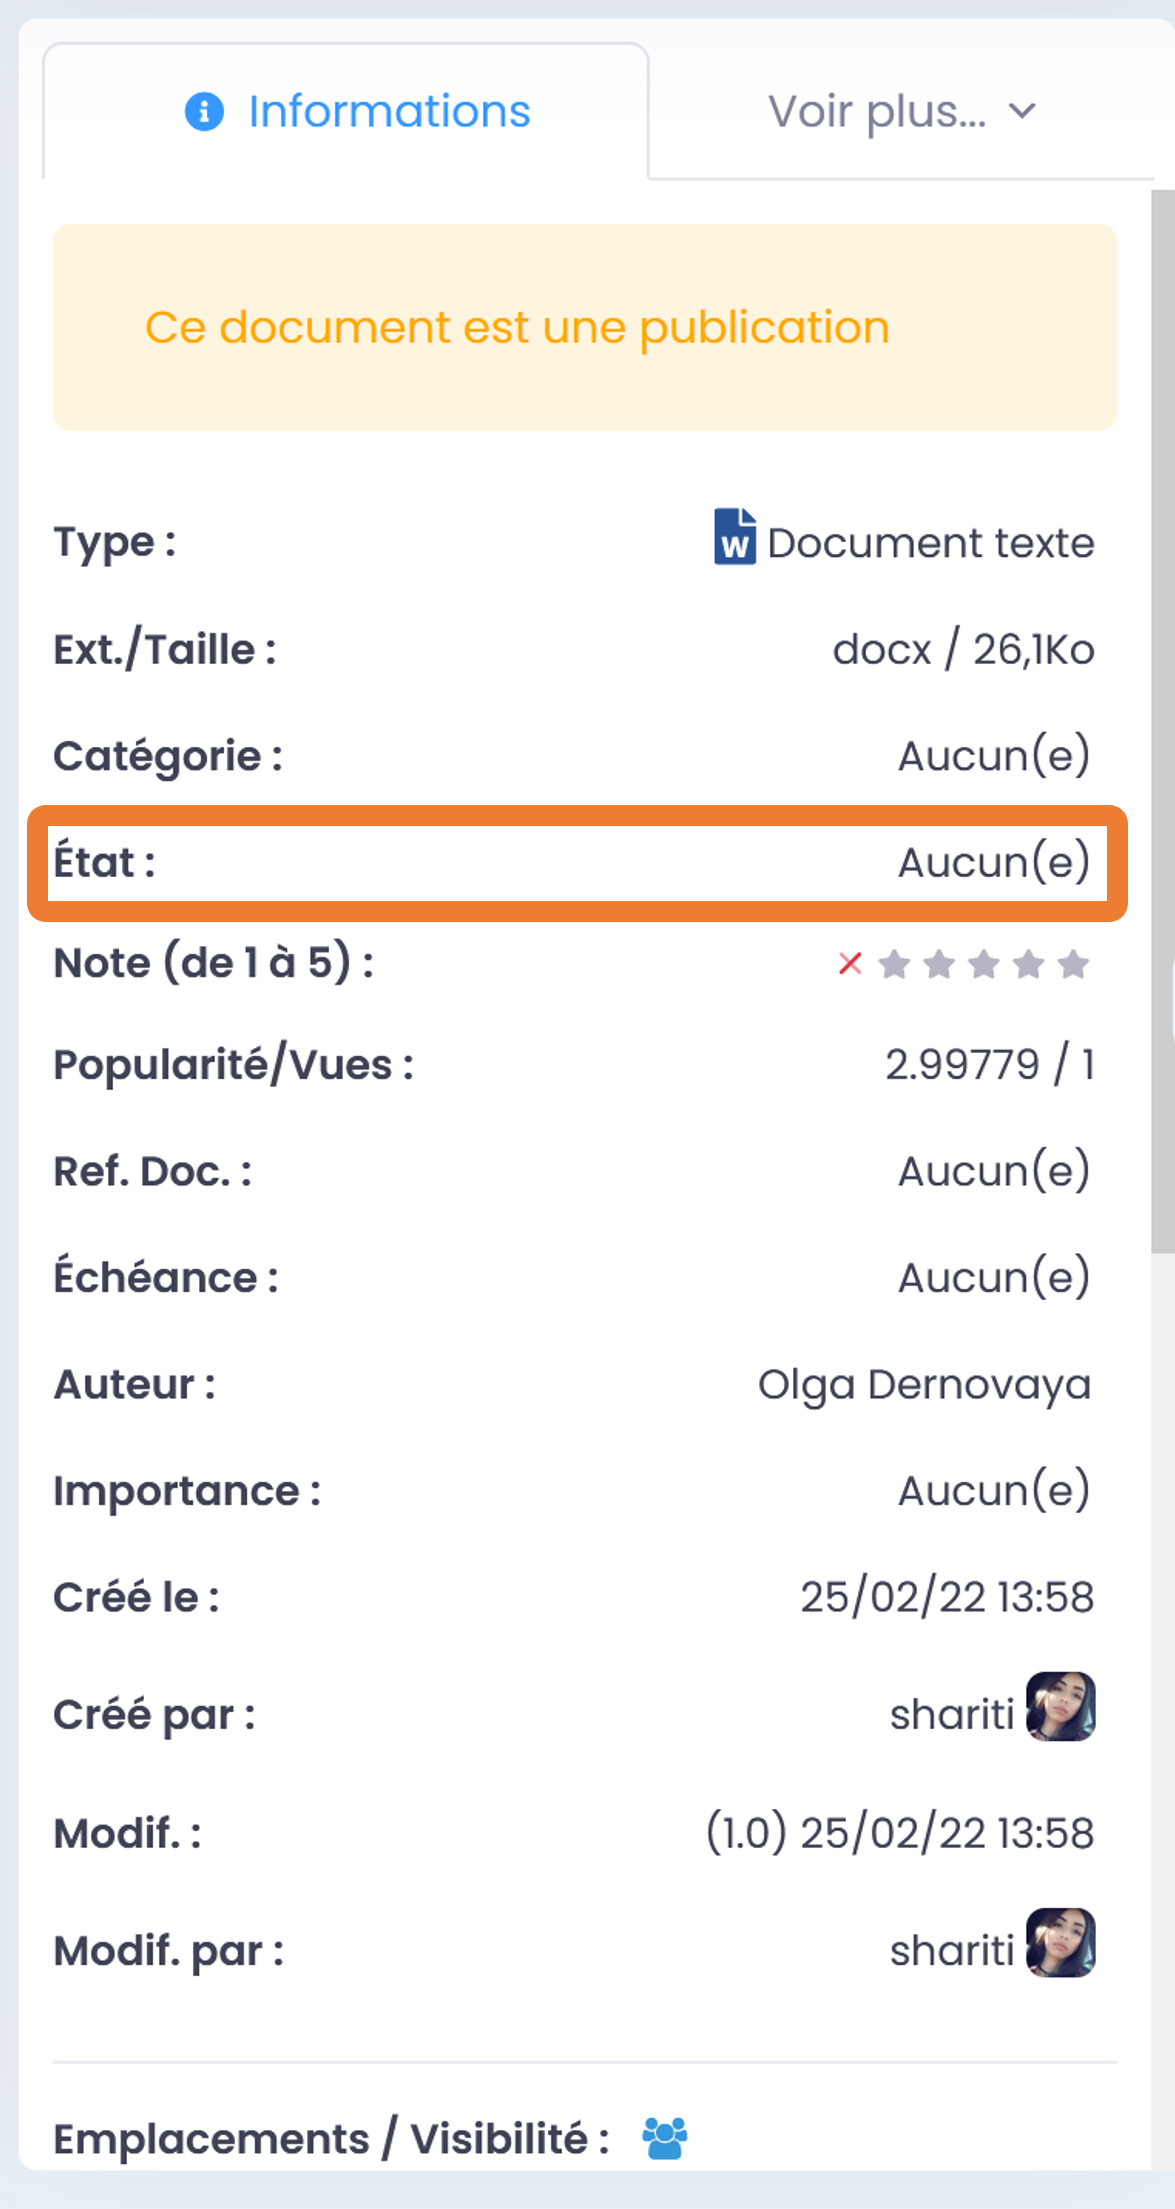
You can also see the state of your documents in the “Activity” tab of the group, in the “Content with state” field, provided that its state is fixed in the metadata (see § about document metadata p.106)
Applying retention
The Retention Period, or period of administrative use, is the length of time a document is kept for review or use during file management or for legal purposes. After this time, it will be irretrievably archived or destroyed. This workflow is necessary for the continuity of administrative activities. Therefore, it is extremely important for the company to properly control the life cycle of each document and optimize its archiving. GoFAST offers this important feature and offers the ability to customize a retention period according to the category of the document, the duration of the processing workflow and the final step. It is also possible to define a list of users who wish to be notified when the Retention Period is reached. The Retention Period will be activated when the “Pre-archived” state is applied to a document, provided that it has a category associated with a Retention period. A Retention Period can be applied to a document or multiple documents of one or more spaces(s).
In order to activate Retention Period for a document, in the document’s metadata block, go to the “Category” field, then click “Edit”.
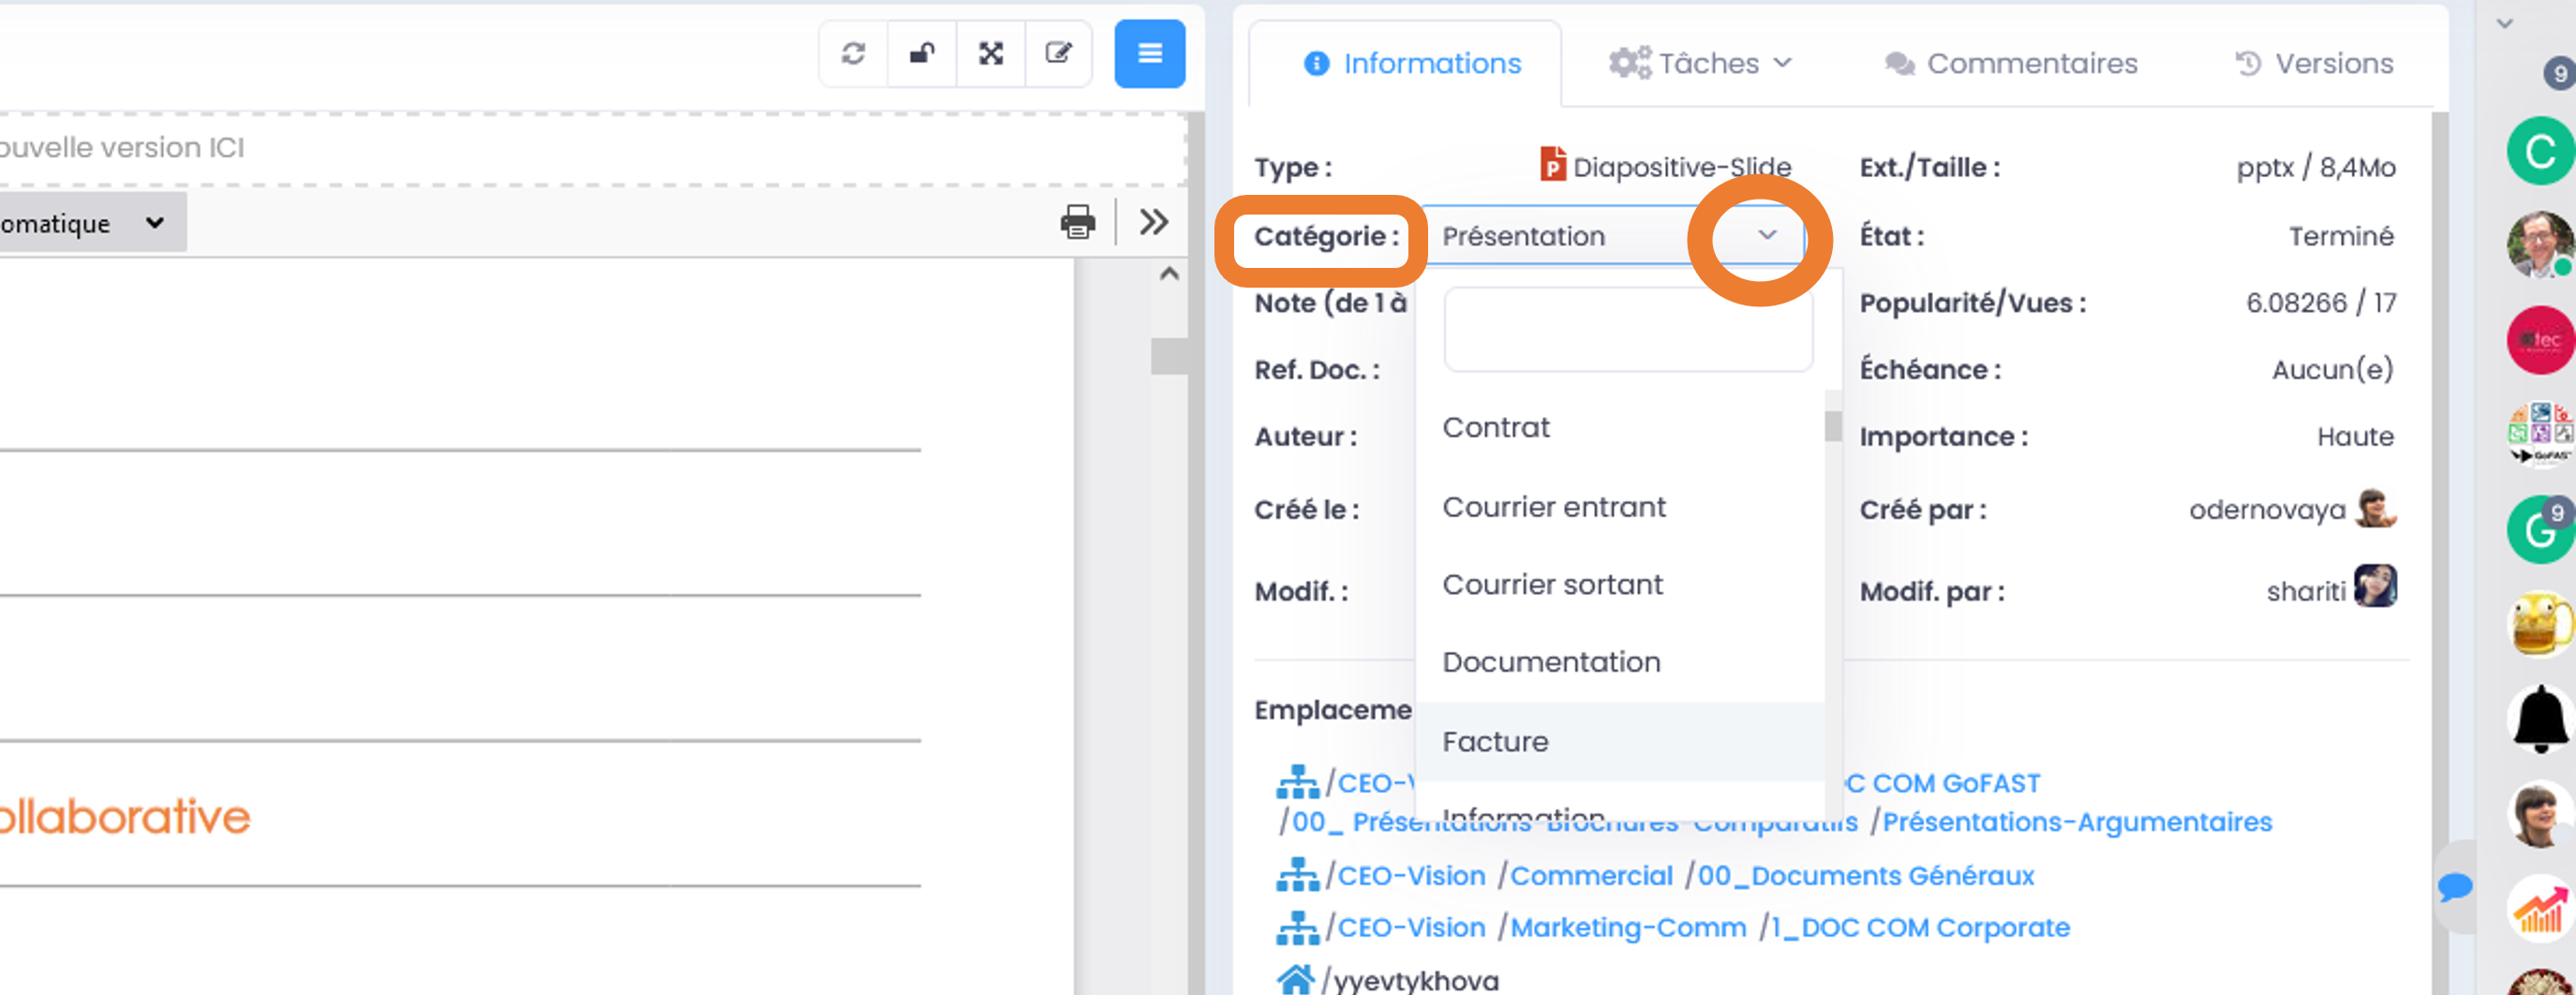
Then, go to the “State” field, press “Edit”, select “Pre-archived” and click the “Apply” button to save.
Once this document is in a pre-archived state, its content and category are no longer edited, and Retention Period is activated from the date this document was last edited.
When a Retention Period is reached, the various users associated with it will be notified.
Note
It is important to tell the pair (Category, State: Pre-archived) if one of the two is empty, the Retention Period will fail.
Note
Only platform administrators are authorized to configure Retention Period. See documentation: https://gofast-docs.readthedocs.io/fr/3.8.0/docs-gofast-users/doc-gofast-administration-platform.html #configure-a-dua-duration-of-the-administrative-utility
The cart
Objective of the cart:
It gathers several documents, which can be found in various folders of the tree structure, to be able to perform actions on all of these documents.
The cart can be accessed from the Quick Access bar (top main menu), on the right of the search bar, in the “Cart” icon.
Adding/Removing Documents to/from your cart
For information on how to add documents to your cart, please refer to “Adding/Removing Documents to/from your cart”.
Possible actions from the cart
Bulk management of the cart:
Downloading
Metadata management (category, tags, state, language, etc.)
Sharing / Editing Locations
Creation of posts
Sharing by email
Pre-archiving
Bulk Download from the documentary cart
You can bulk download documents from the documentary cart.
After adding the desired documents to the documentary cart, click on “Download” in the available actions. This will upload a ZIP file to your computer.
How to start a task workflow from the cart (Enterprise only):
The documents in the cart are offered when starting a new workflow, via the main menu.
This allows all the documents to be associated with the workflow at once, which can then be removed individually in the workflow form.
To learn how to start a new task process, please refer to the documentation: https://gofast-docs.readthedocs.io/en/latest/docs-gofast-users/doc-gofast-guide-utilisateur.html#workflows-process-of-tasks-enterprise-only
Editing/Co-editing Documents/Contents
Who can edit a document:
All users who have the role of “Contributor” or “Administrator” of at least one of the Spaces where the document is located. So, if you are a contributor-member in a Space, you can edit the documents in that Space, either via the «edit online» feature or «Co-edit with OnlyOffice». For other types of content, such as forums or Wiki pages, the button will be “Edit”.
Editing a document from PC (via an application installed on PC)
This function allows you to open a file to edit it with a PC application, without having to download it locally (on your PC), or having to upload it on GoFAST after editing.
Types of concerned files
The “Office” type Document:
Will be opened with the default application installed on your computer (e.g. Office, LibreOffice, WPS). Please note that depending on the browser and your PC configuration, you have the option to select the desired application when you open it, or automatically open the default application.
Other type of files:
For files of type PDF, Images, etc. a module named «ITHIT» must be installed beforehand on the computer and activated in your browser. You can then open the file in editing (e.g. a PDF with Adobe or Foxit) to edit or sign it, then save it directly on GoFAST (click on the «save» button of your application).
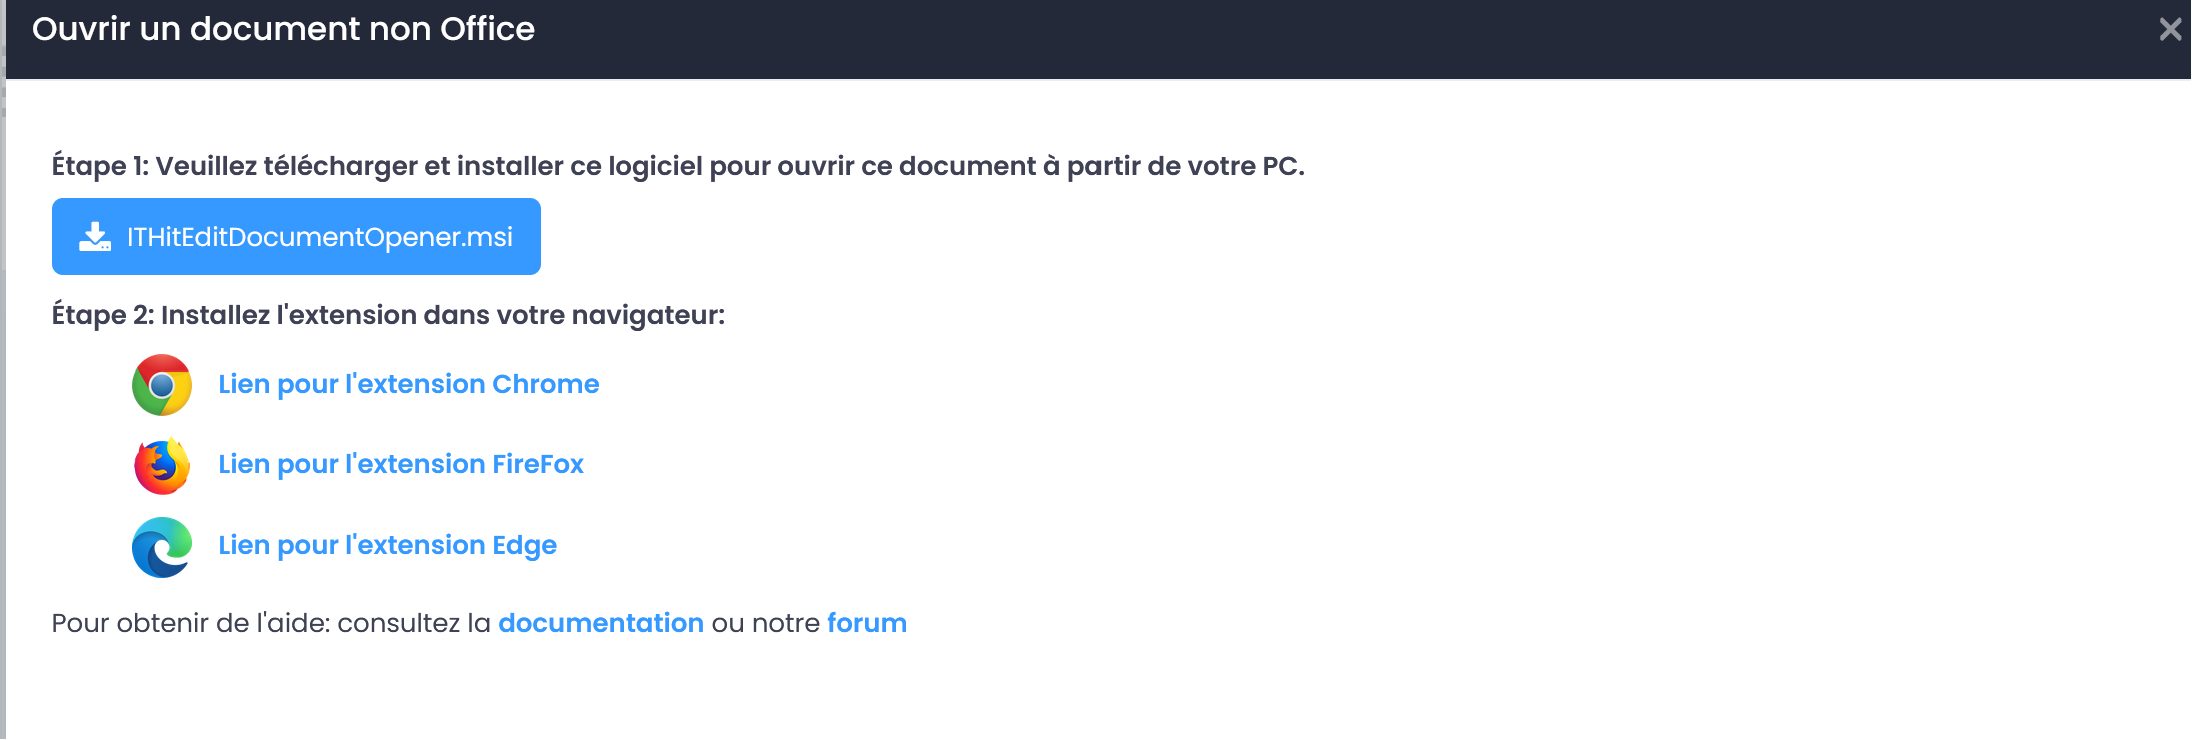
Editing lock
When a document is being edited by you or another user, a lock is applied automatically.
This lock will appear “red” and “closed” on the document page and in File Explorer. This means that no one else can open the document for editing until you are done. This therefore avoids versioning errors and wasted time consolidating several versions into one (e.g. if three people each edit the document on their own without taking into account the work of their colleagues).
Next to the lock you will see the photo of the user editing the document. By hovering over it, you will see the user’s name. If necessary, do not hesitate to contact him via the chat or quote him in a comment on the page of the document (to quote, start by entering @ then the first or last name of the user. He will then be alerted automatically in the chat).
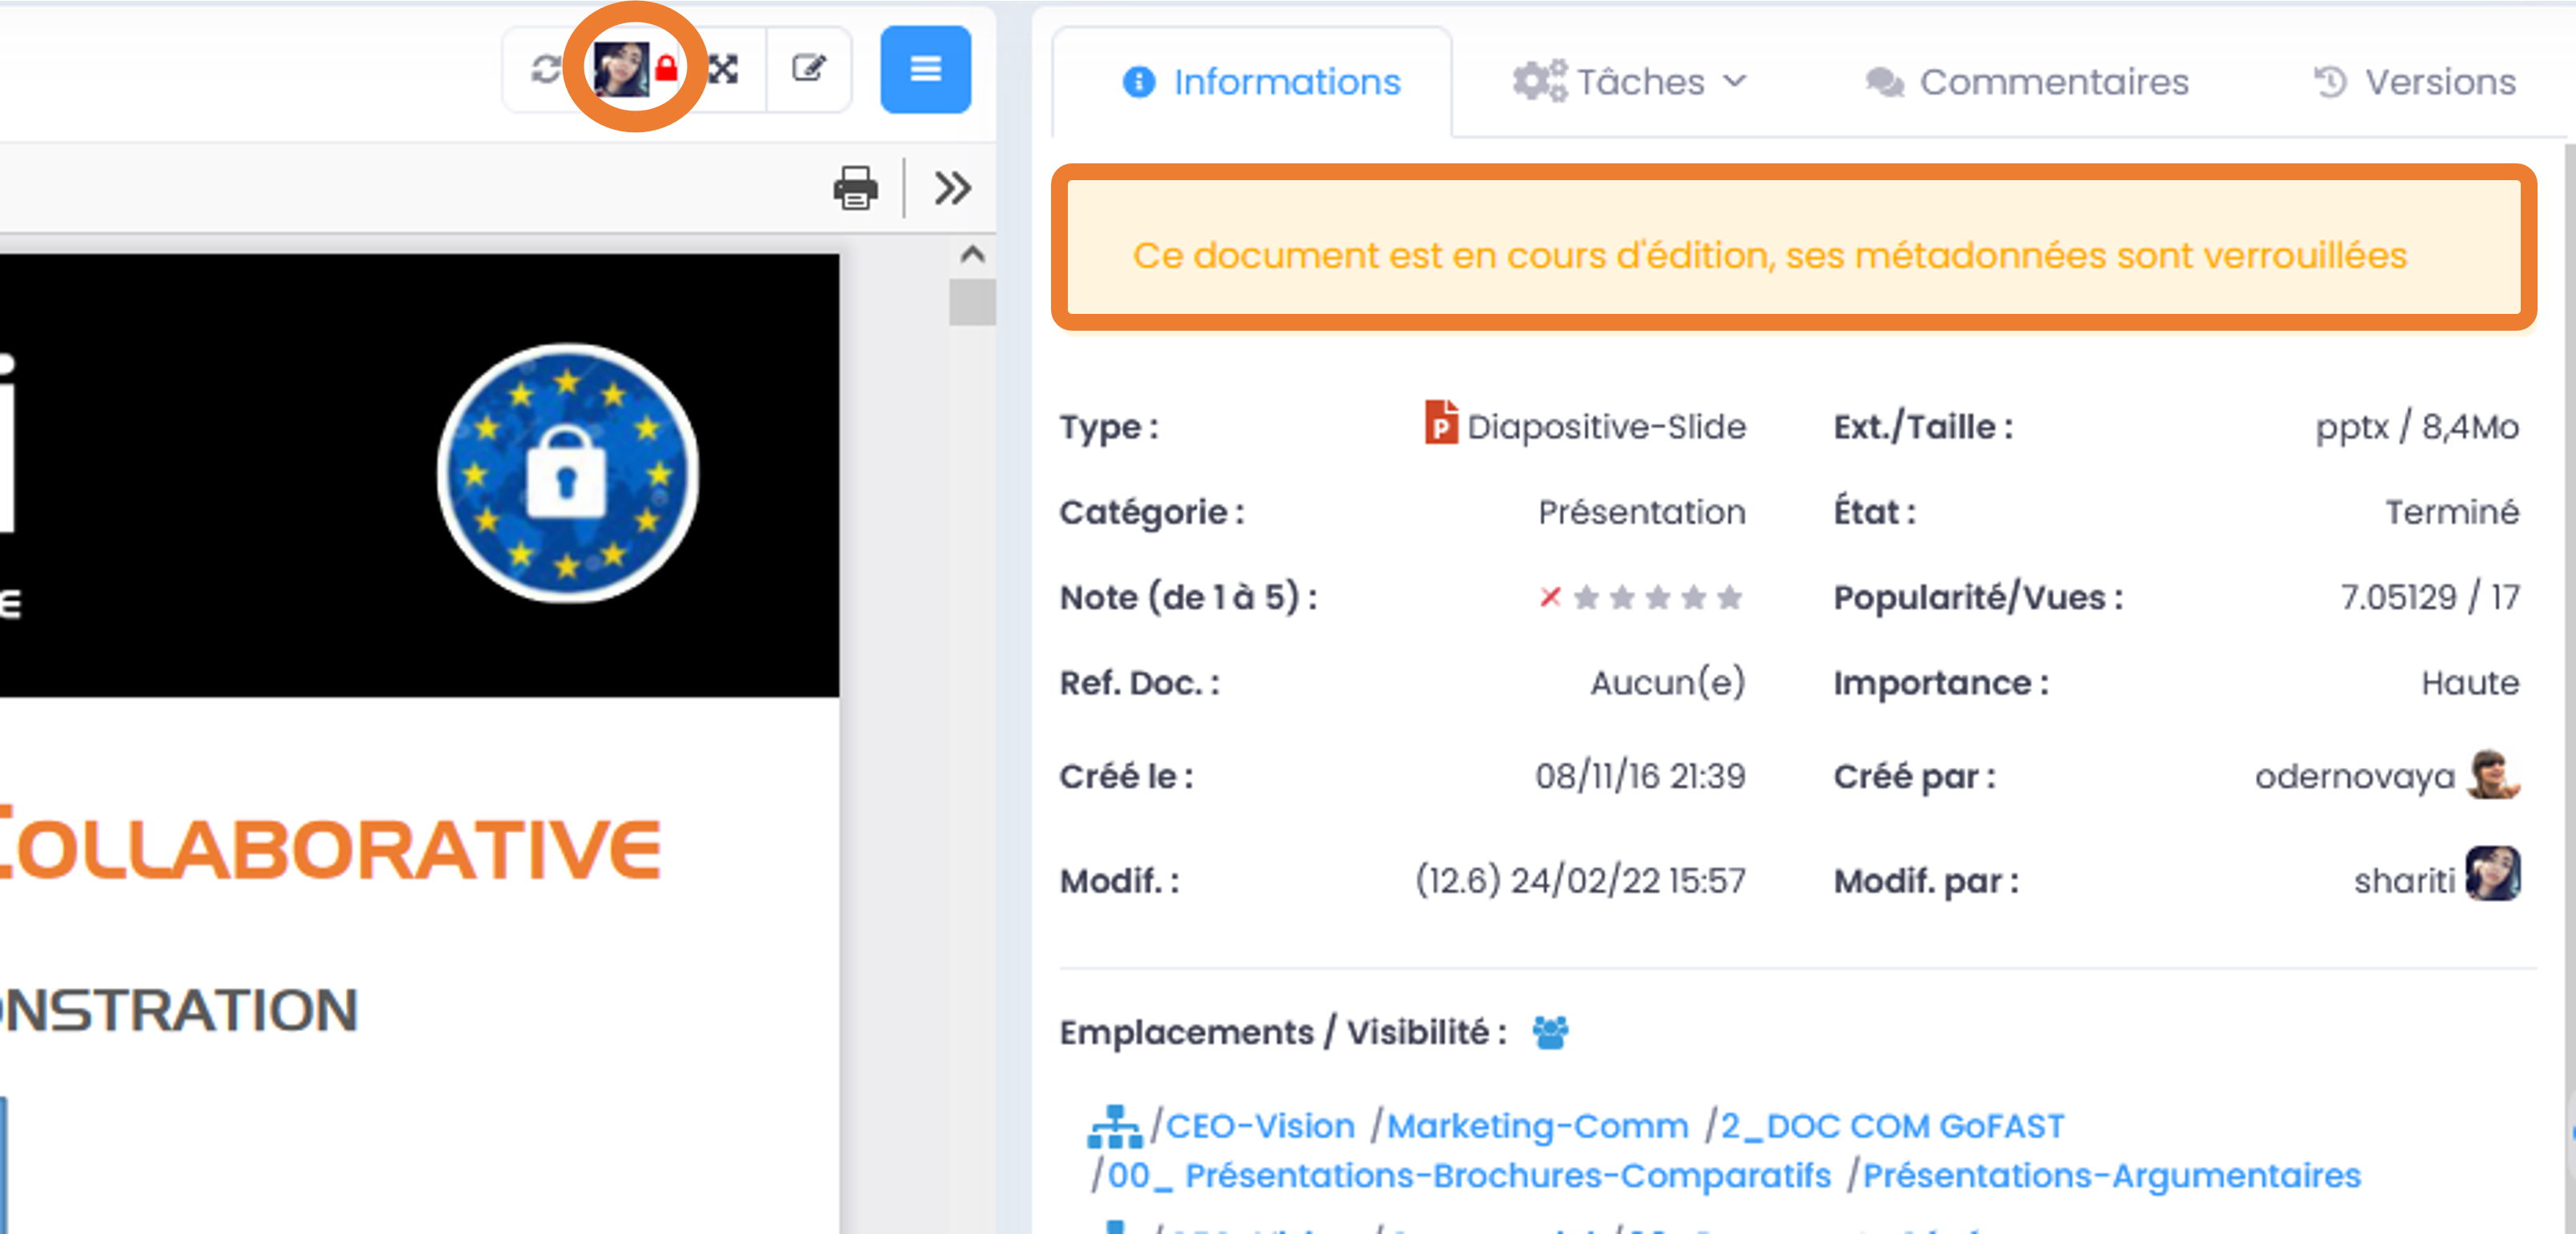
Note
While editing a document, a message is displayed on the document page, at the top of the information block to the right of the preview: “Document being edited, metadata is locked”.
The lock automatically jumps out as soon as one leaves the edition by closing its application.
Refreshing document preview
In order to facilitate the reading of the document while another user is editing it, the preview (on the document page) does not update automatically, but a “refresh preview” icon turns red and you can click on it to refresh.
Once you refresh the preview, you can see the new version of the document, with the changes just made.
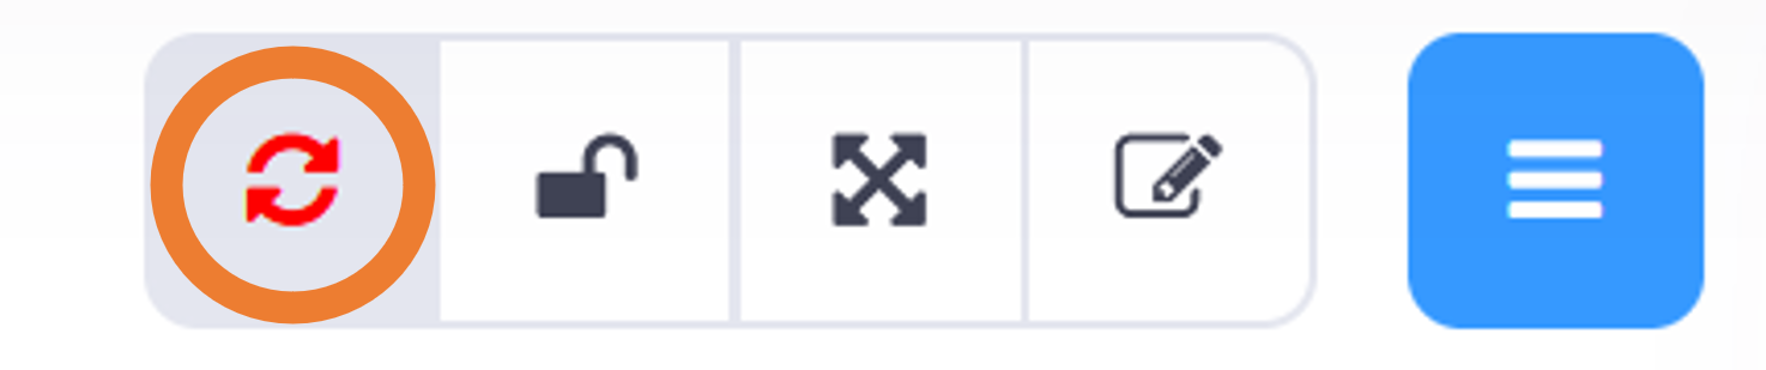
You can see who took action on this document in the info block (to the right of the preview).
You can also see previous versions, by going to the “versions” tab.
Editing/Co-editing a document via the OnlyOffice Collaborative Suite (Enterprise only)
GoFAST brings a very innovative dimension and allows you to edit documents in a simple browser with other people simultaneously. You can work with several people at the same time on the same document for significant time savings.
Caution
This section describes how to edit/co-edit an office file via the OnlyOffice Suite on GoFAST (open, close, lock system, etc.). However, to find out about many features of this collaborative Suite, please refer to the OnlyOffice documentation, here: https://helpcenter.onlyoffice.com/fr/userguides.aspx
Types of concerned files
Editing and co-editing via OnlyOffice is only possible for Office type files (e.g. docx, xlsx, pptx).
Note
Unlike GoogleDocs/Drive, you save your Office formats and can then open the file with Microsoft Office Suite or LibreOffice without changing the format. The OnlyOffice Collaborative Suite is fully integrated with GoFAST and therefore hosted either in an independent SaaS or in your data center, which in this case limits bandwidth requirements and guarantees complete privacy.
Convert files to other formats
To convert a file to another format, click on the GoFAST burger menu, then on “Convert”. Then select the desired format (DOC, PDF, XLSX or PPTX).
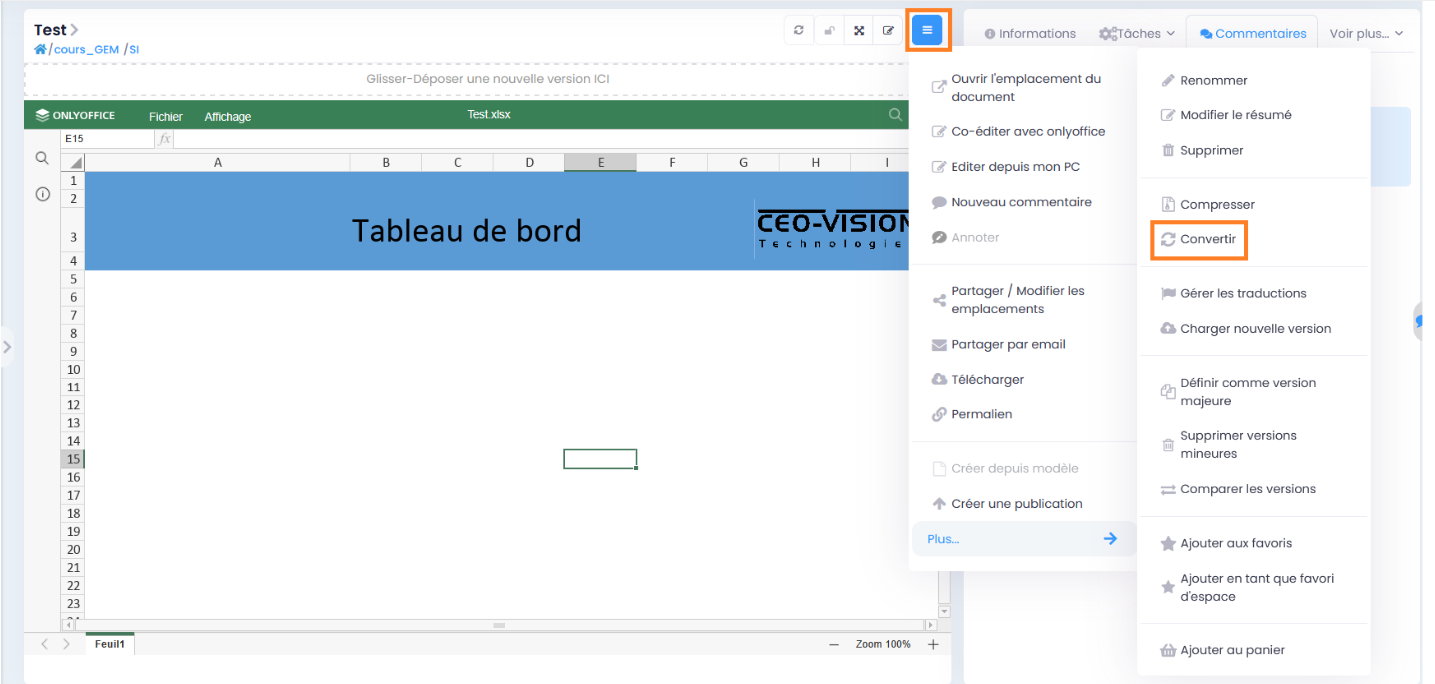
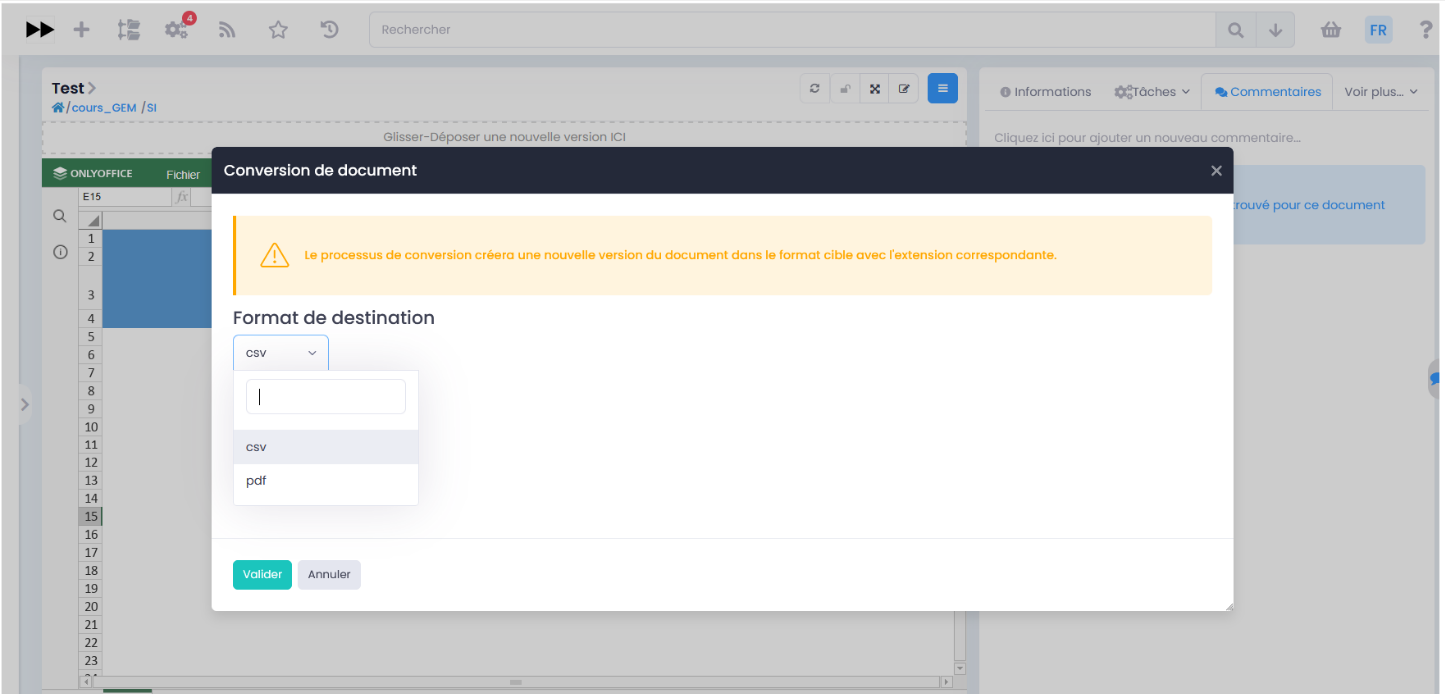
How to “co-edit with OnlyOffice”:
From a document page:
Go to the “Hamburger” menu (the contextual actions).
Click on “Co-edit with OnlyOffice”.
The Collaborative Suite opens in a new tab of your web browser.
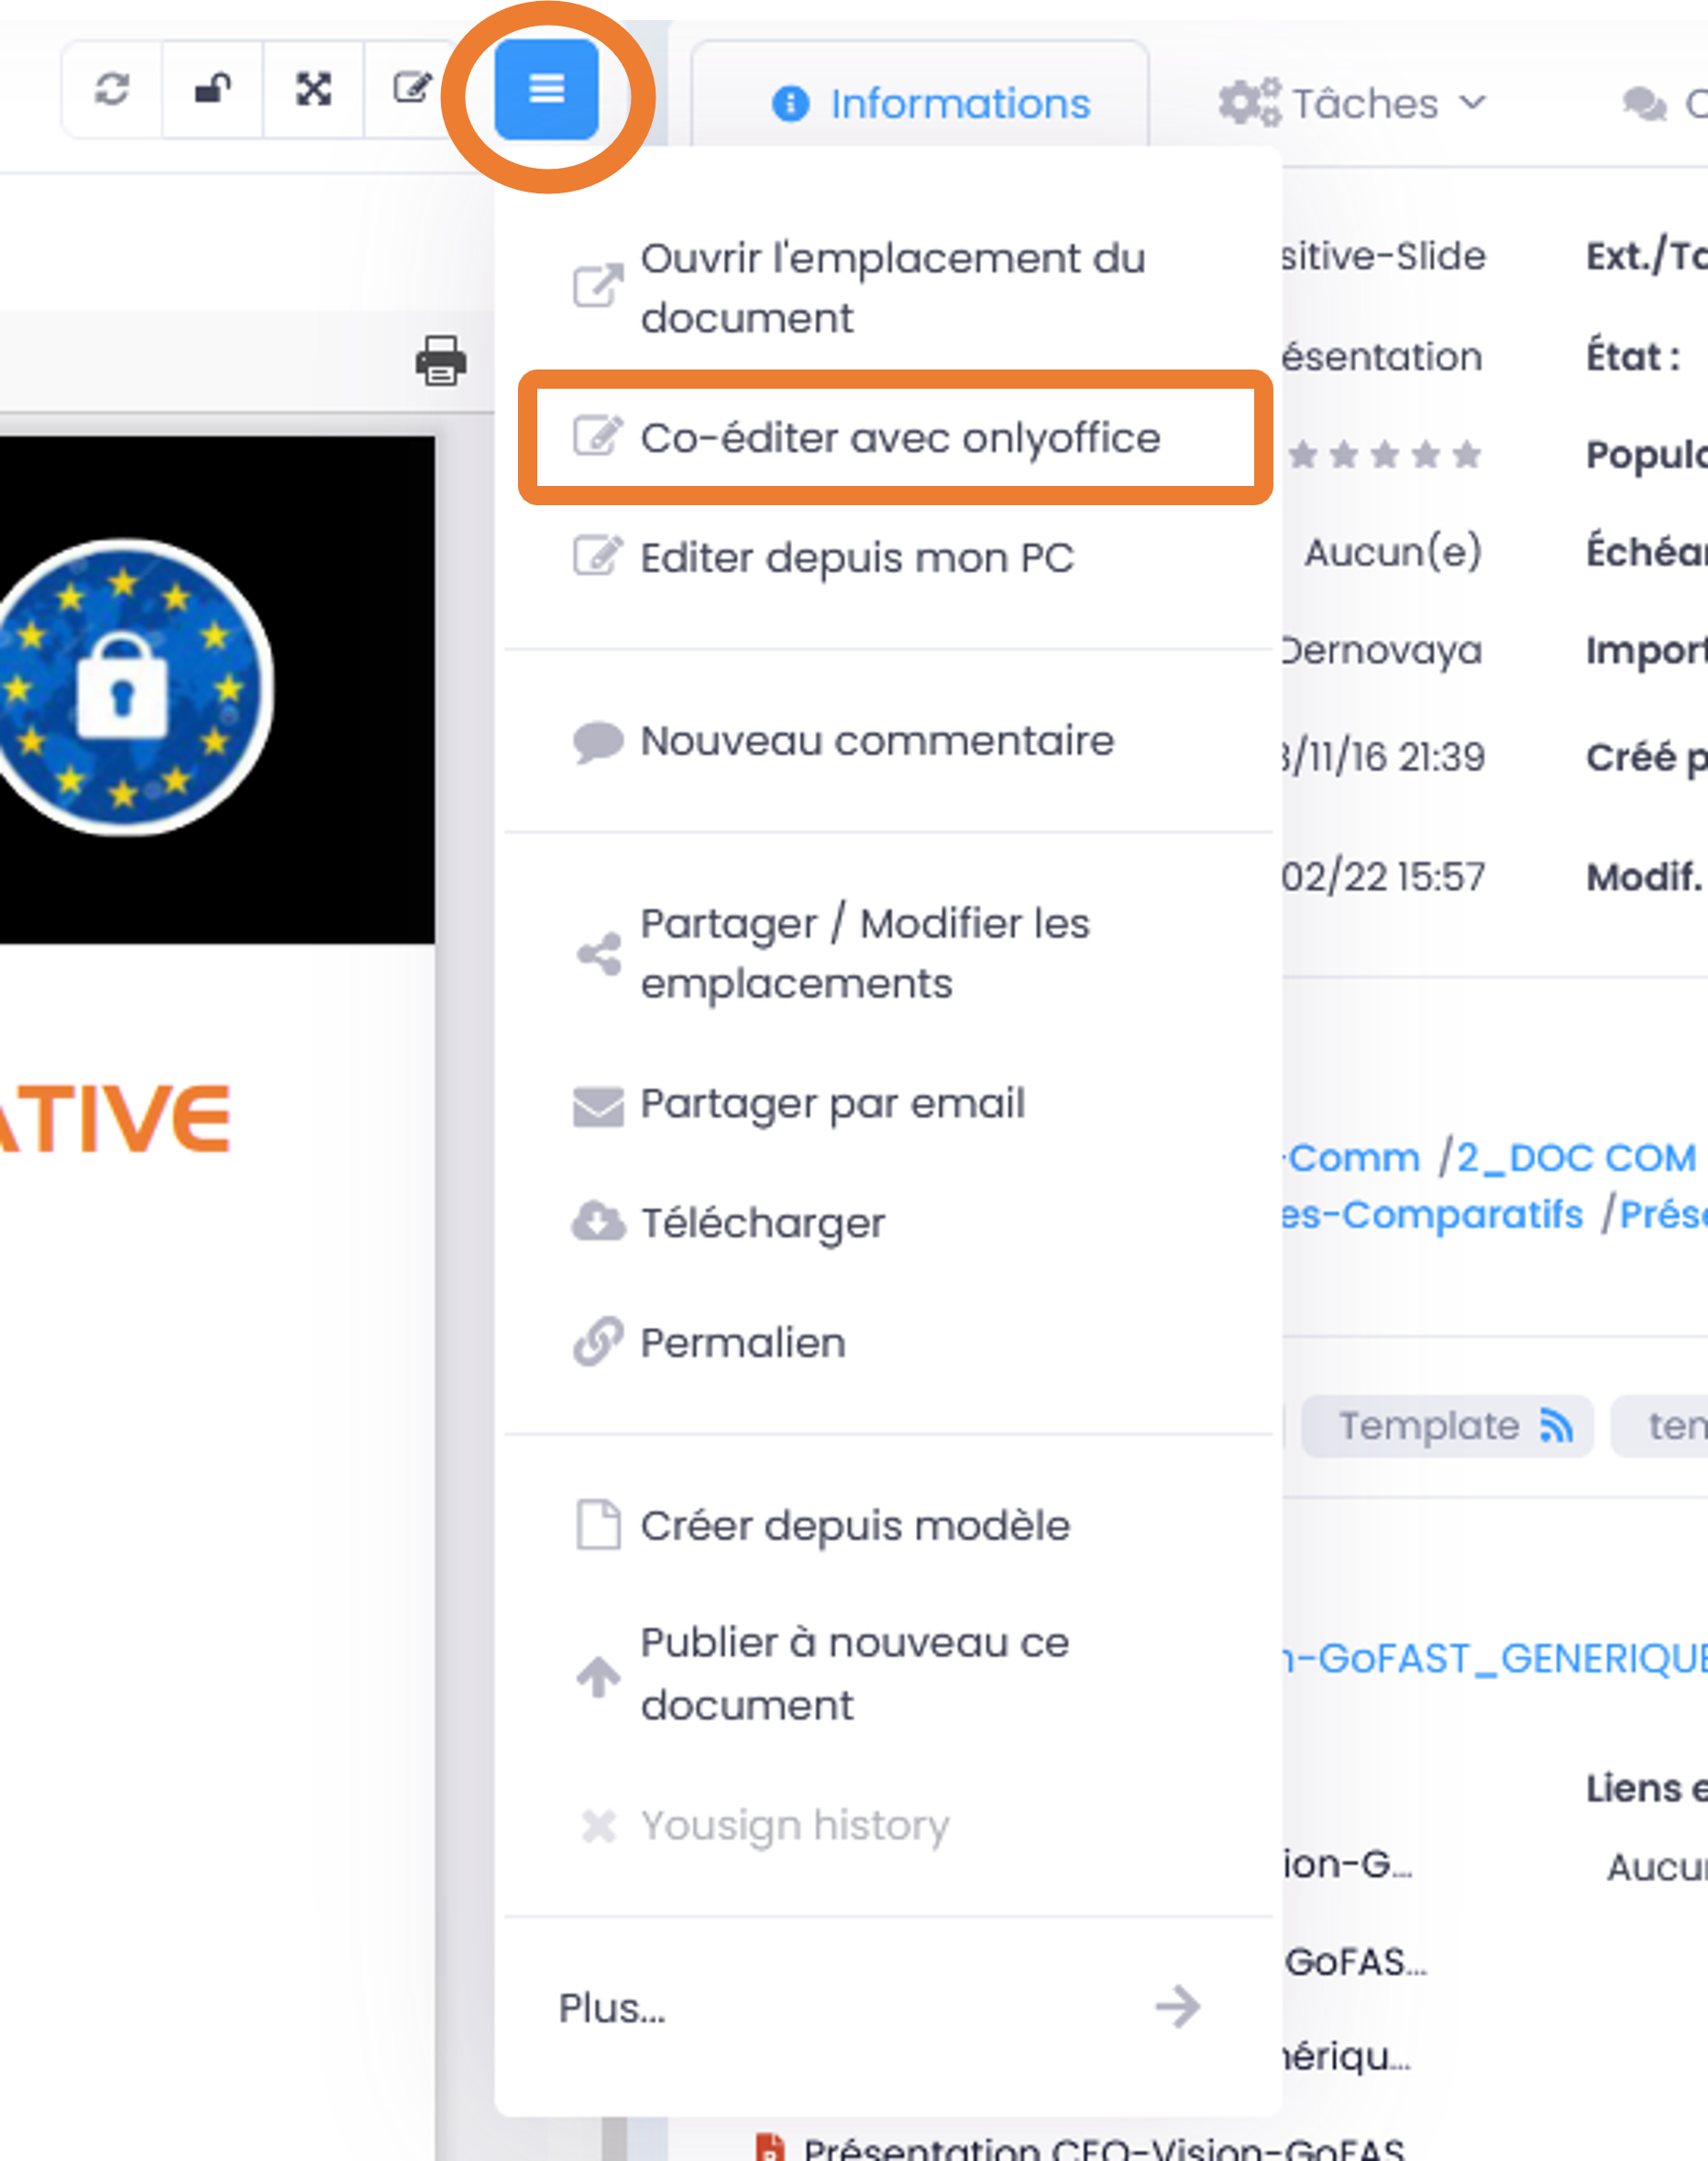
This action is also possible from other GoFAST pages where a document is cited and where there is a “Hamburger” menu for that document (e.g. Activity Feed, search results, etc.).
From File Explorer:
Right-click on the document to open the contextual actions menu
Click on “Co-edit with OnlyOffice”
Important
If you want to co-edit older Microsoft formats (e.g. .doc, .xls, .ppt) or LibreOffice formats (e.g. an .odt), these will be converted to newer formats (.docx, .xlsx, .pptx). Depending on the layout of your document, there may be some inconsistencies in moving from the Microsoft Office Suite or LibreOffice to OnlyOffice. However, OnlyOffice has high compatibility with the Microsoft Office Suite, which limits the risk of formatting incorrectly.
Depending on the file format, this message may appear:
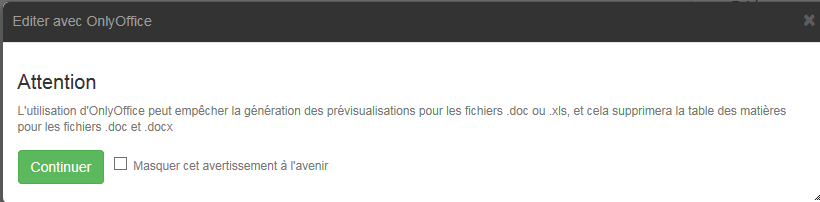
Click on “Continue” if you want to continue opening with OnlyOffice.
Here is an example of a text document opened with OnlyOffice, for co-editing. Note that another user is editing the document at the same time.
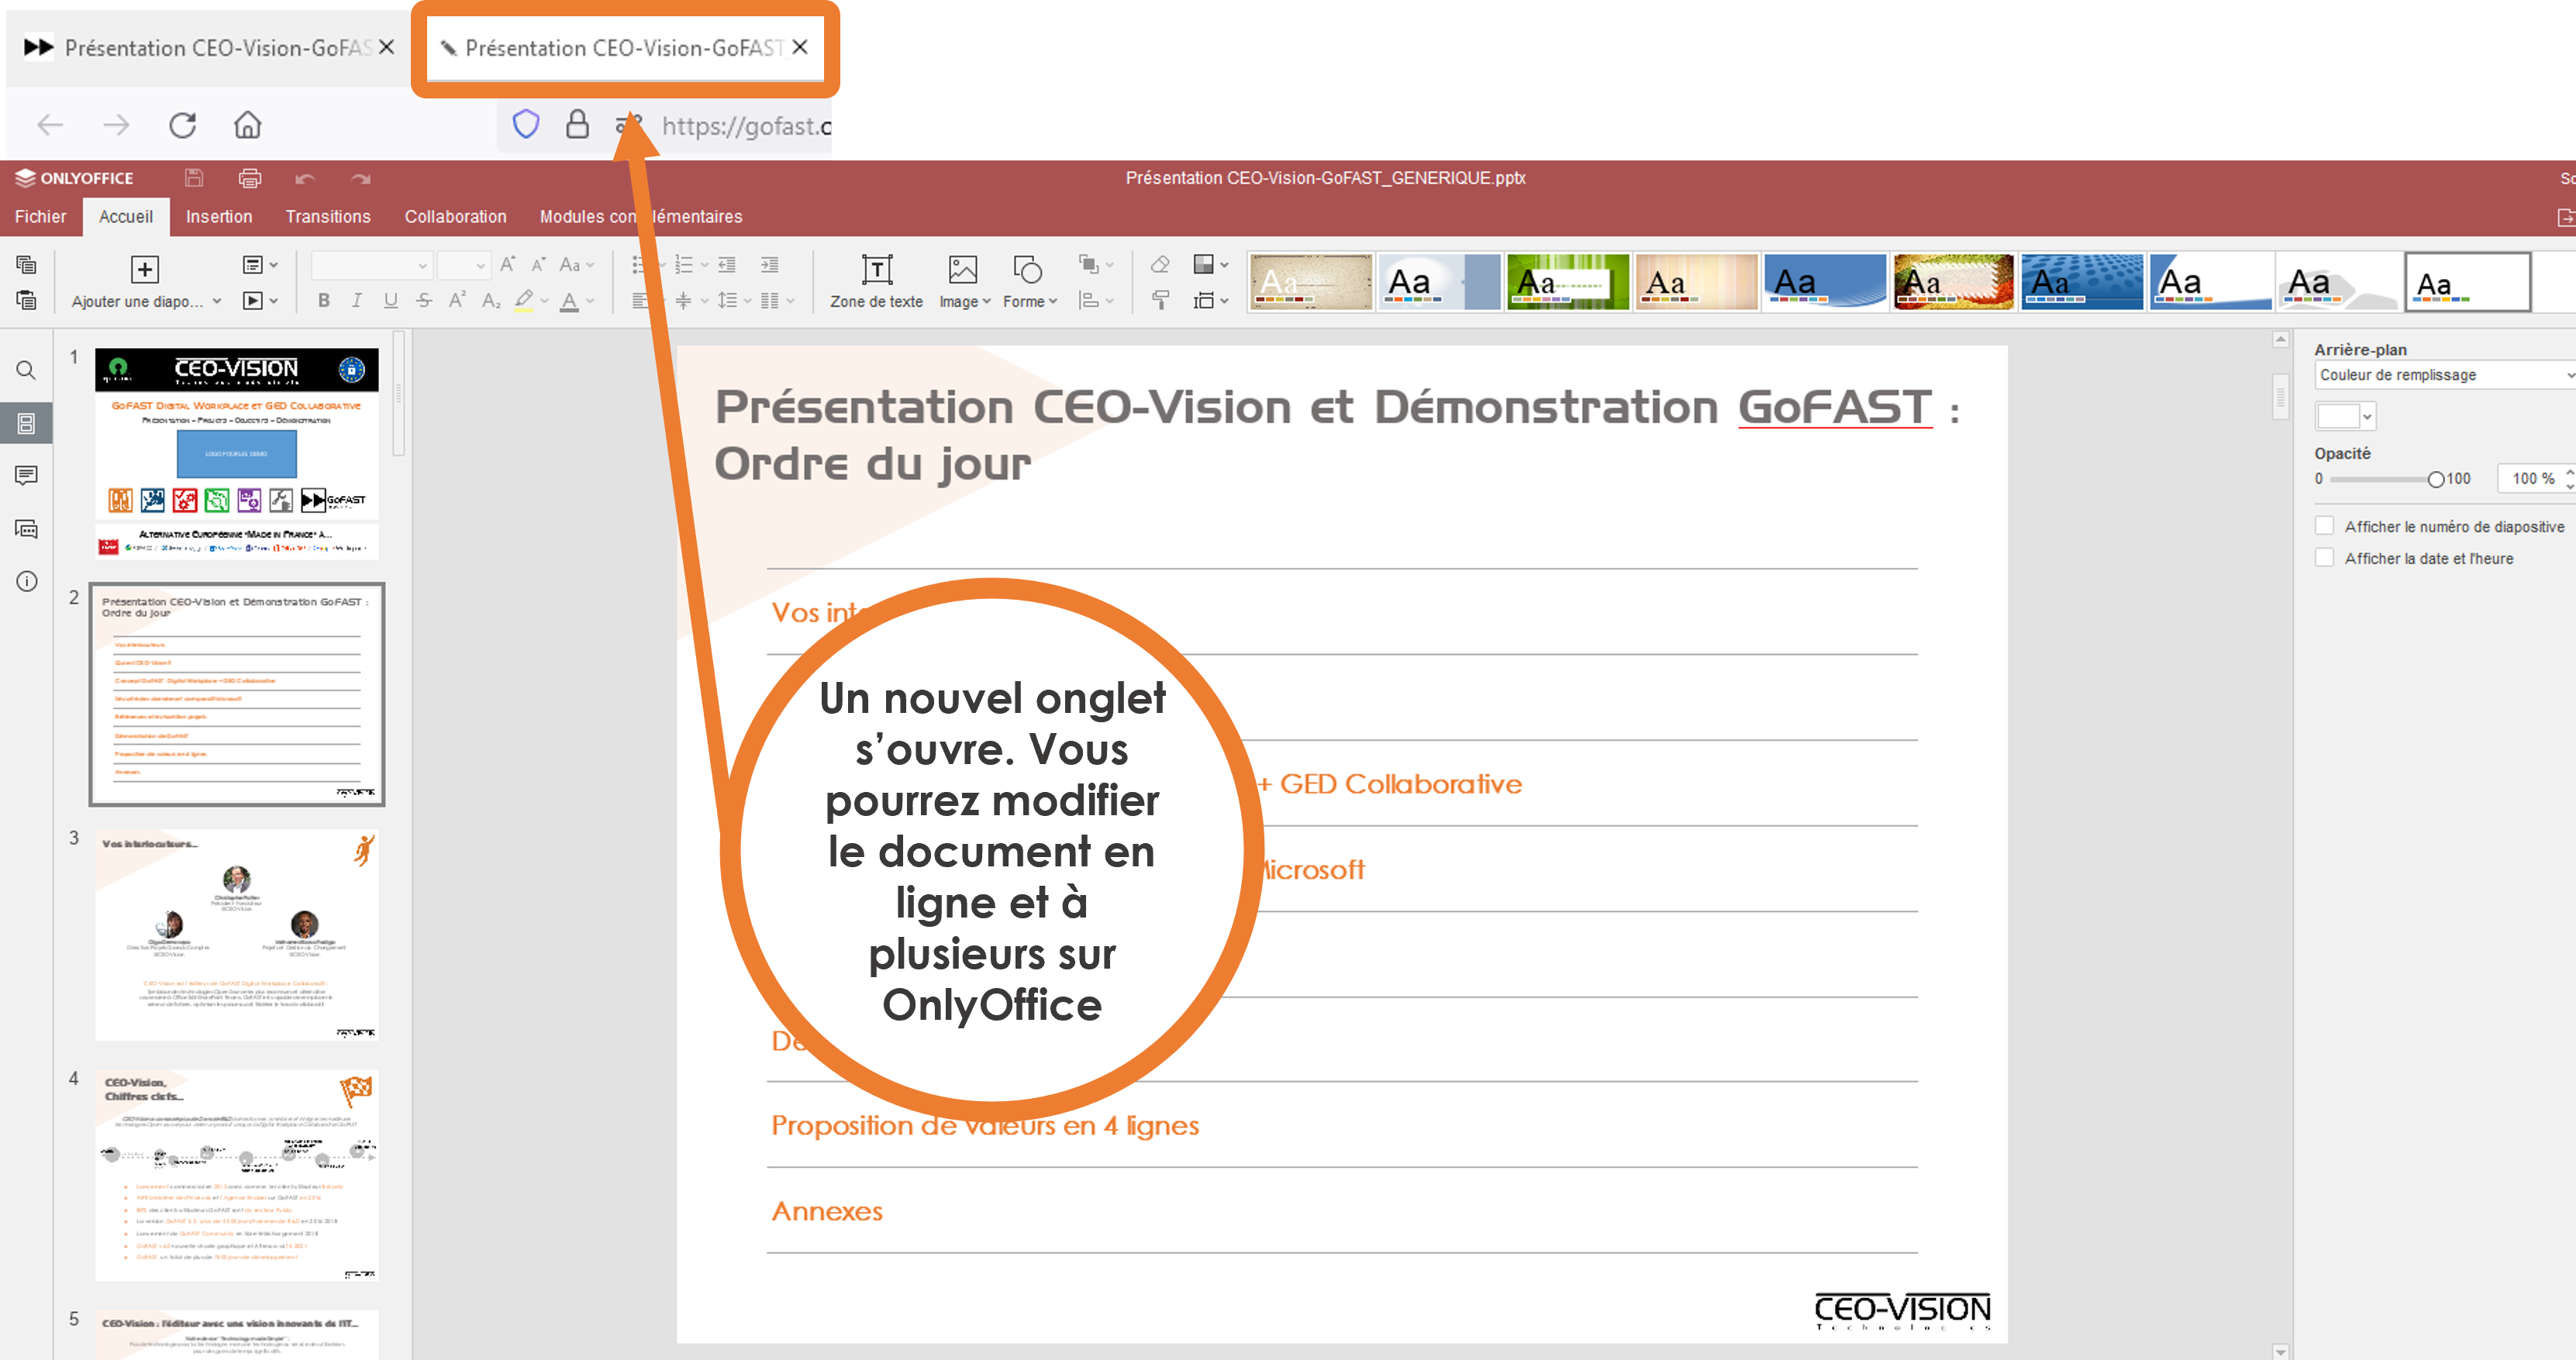
Add a stamp or image signature without using Adobe Reader
To add an image signature to a PDF file, open it in edit mode, click on “Edit PDF”, then insert your image from the “Image” tab in the desired location.
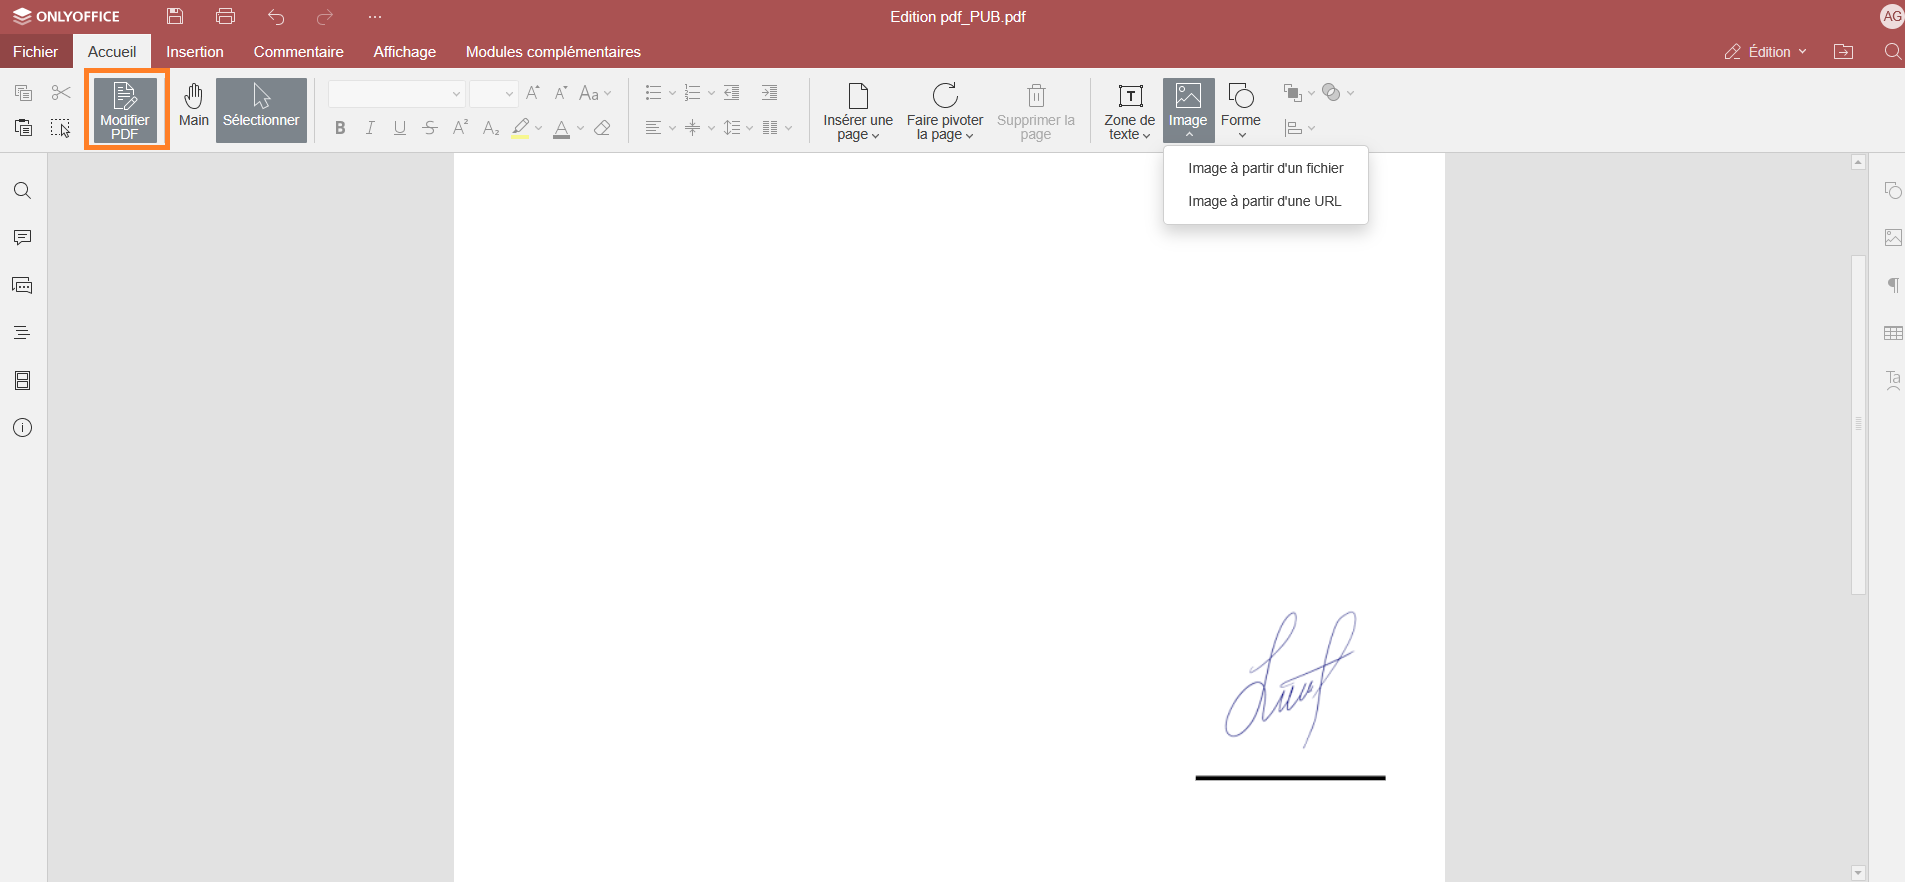
Adding a stamp without using Adobe Reader
To add a stamp, go to “Comment”, then “Stamp” and choose the desired stamp, click on it, then drag and drop it to the desired location.
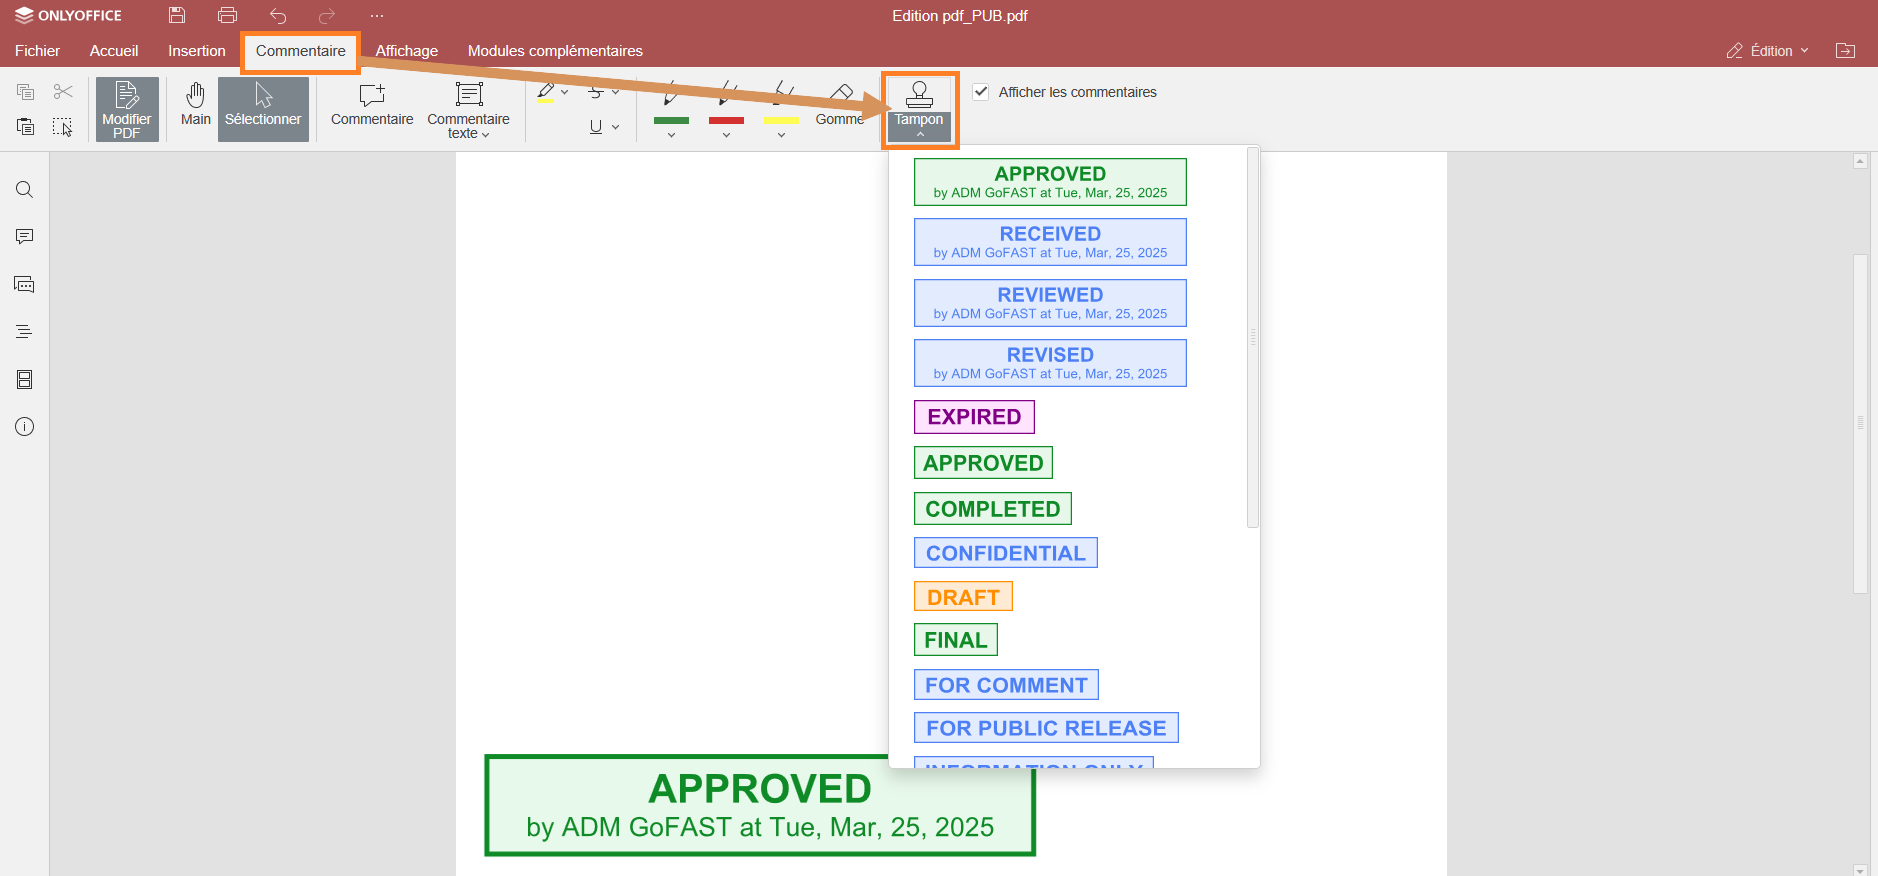
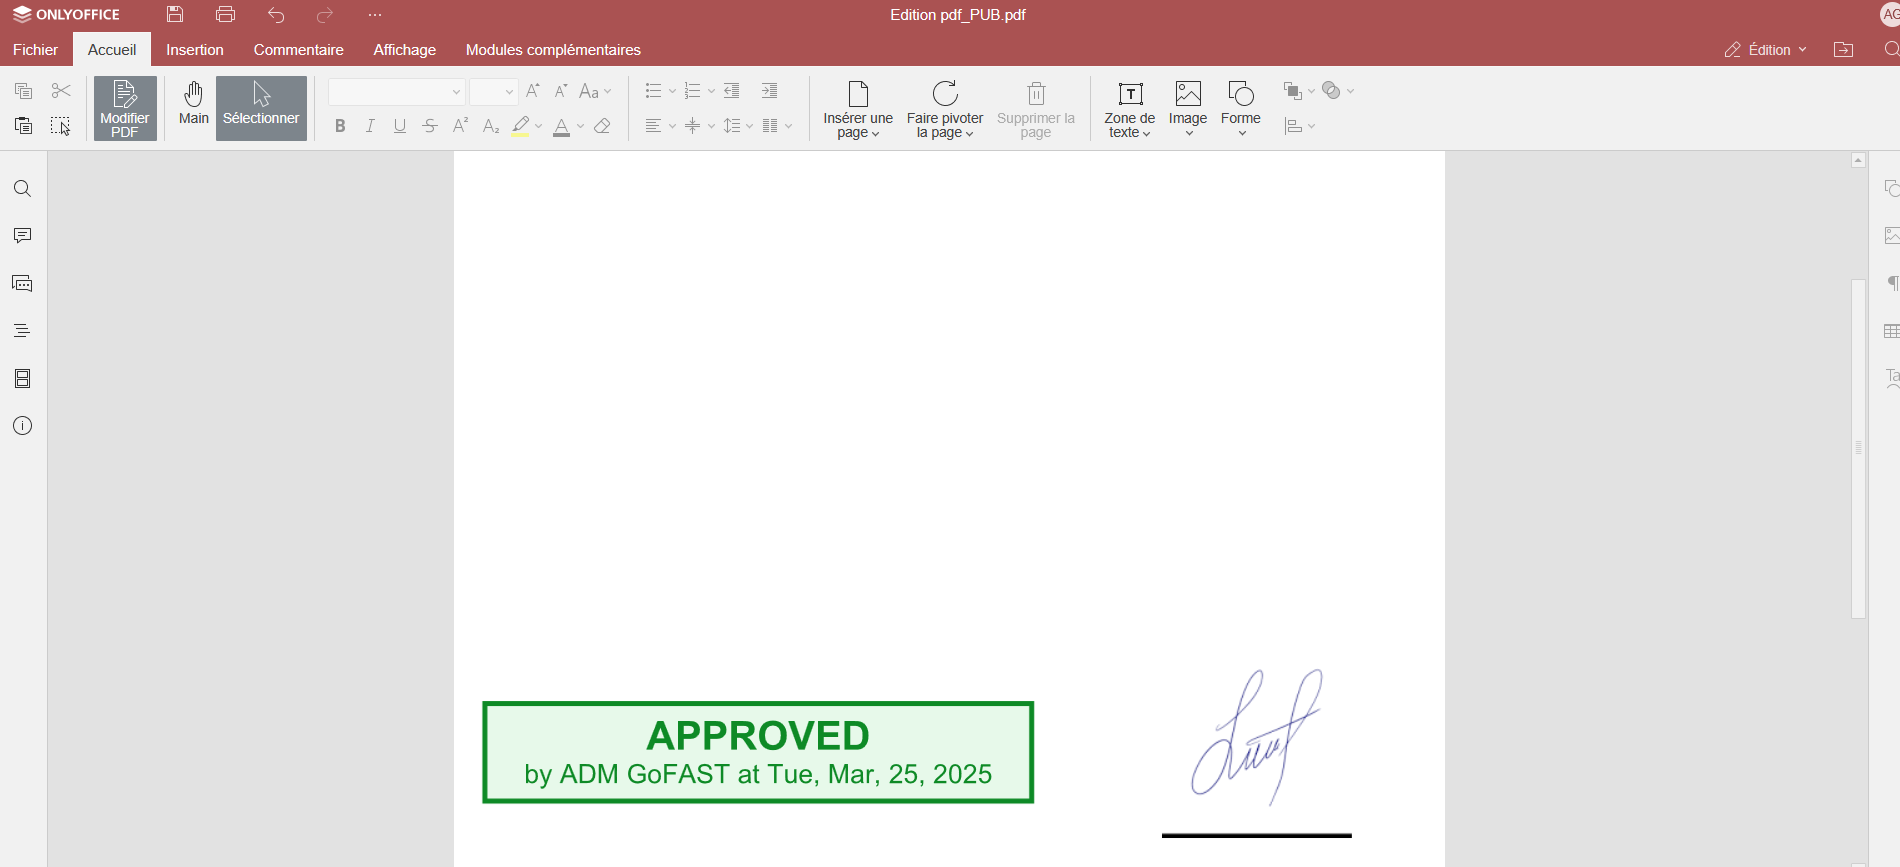
Customizing the OnlyOffice interface
To change the OnlyOffice interface theme, go to “View” then “Interface themes” or “File” then “Advanced settings”.
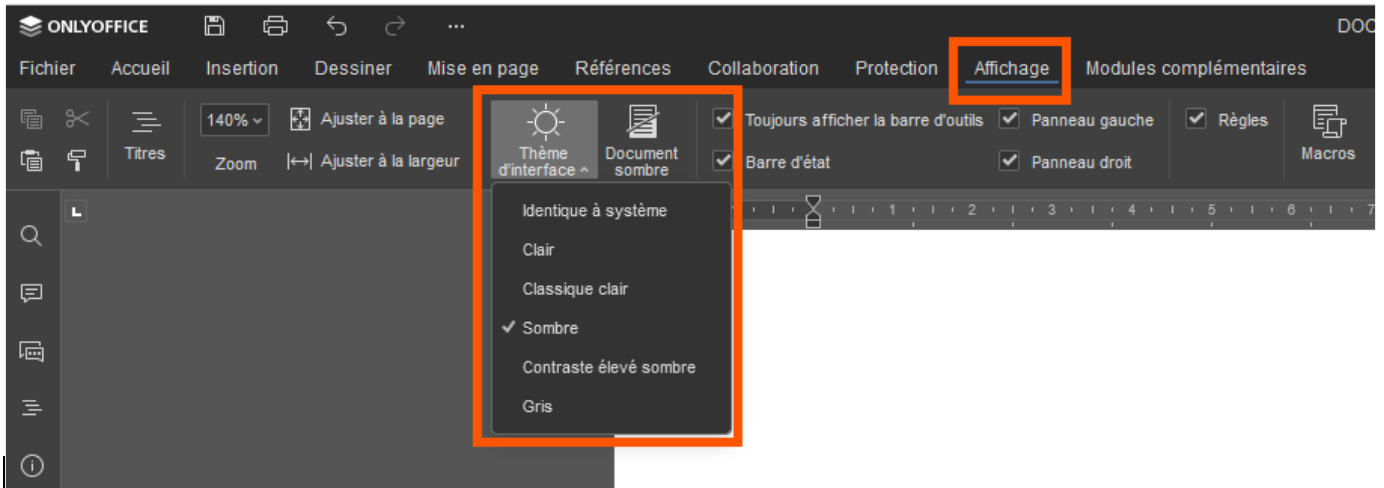
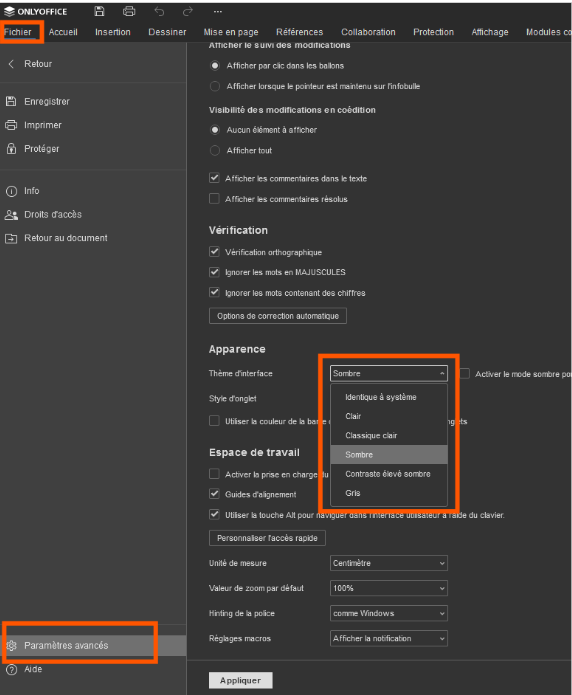
Previewing a CSV file in a spreadsheet program
To preview a local CSV file directly in a spreadsheet, access the “Data” tab, then click on “Get data” and select the data source
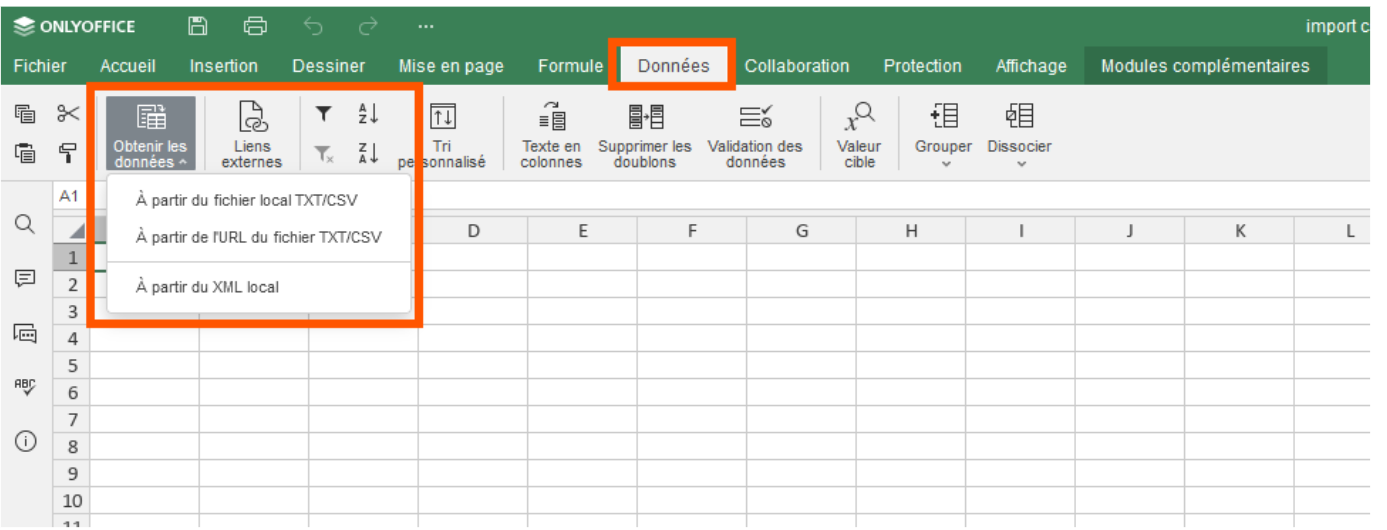
Preview a local csv file directly in a spreadsheet program
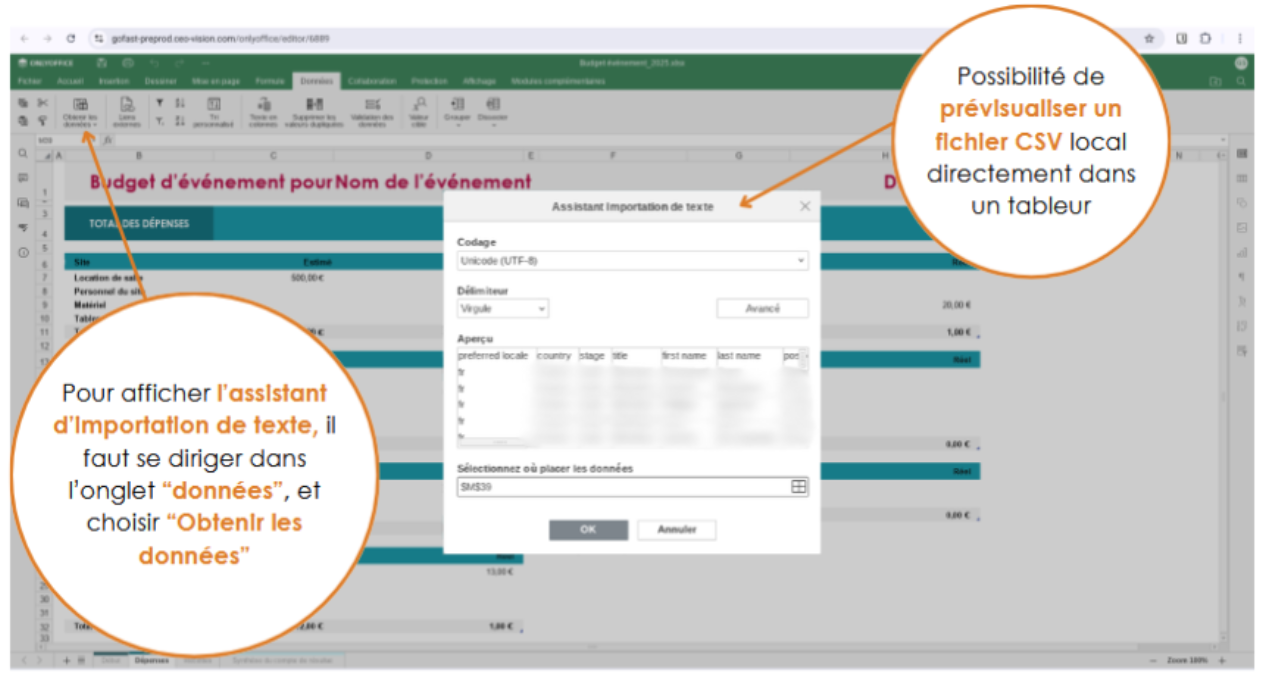
Adding external data links to Onlyoffice Spreadsheet
To add external data links, open a co-edited document, copy a cell from it, then perform a “Paste with link”. Next, access the “Data” tab, click on “External links”, then select “Update values”. Finally, click on “Open source”: the document will then open in a new tab on GoFAST.

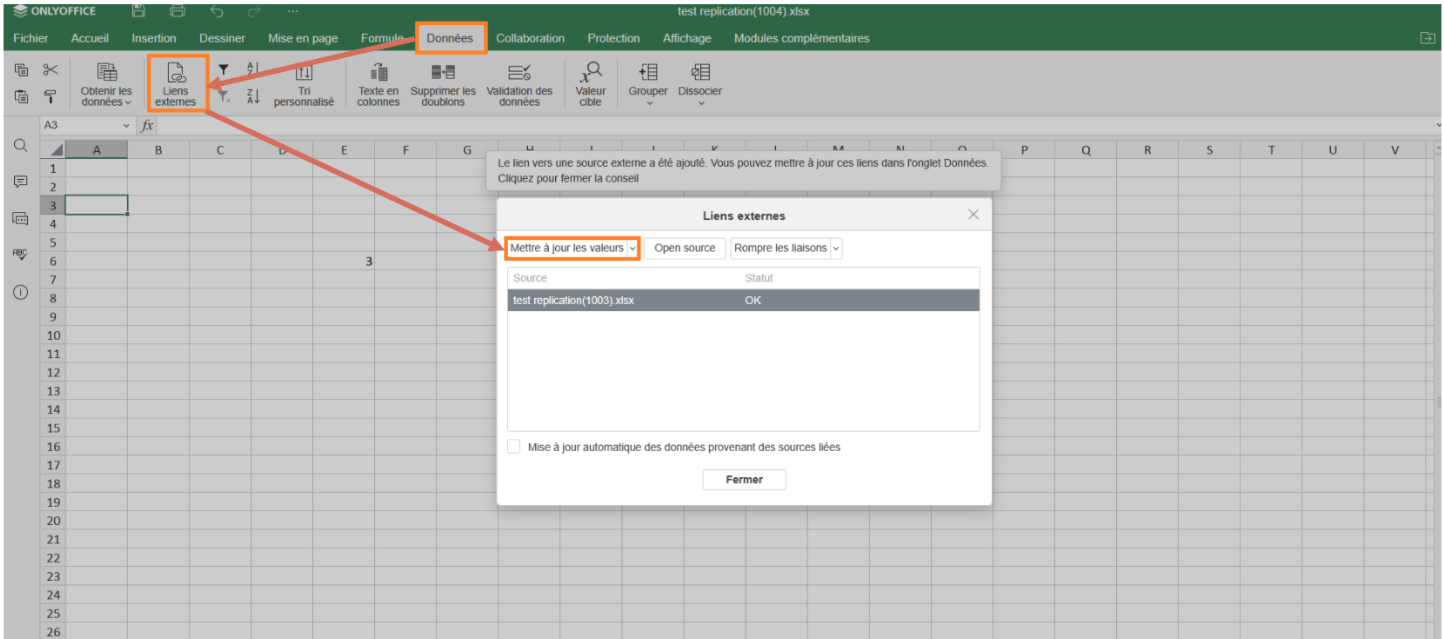
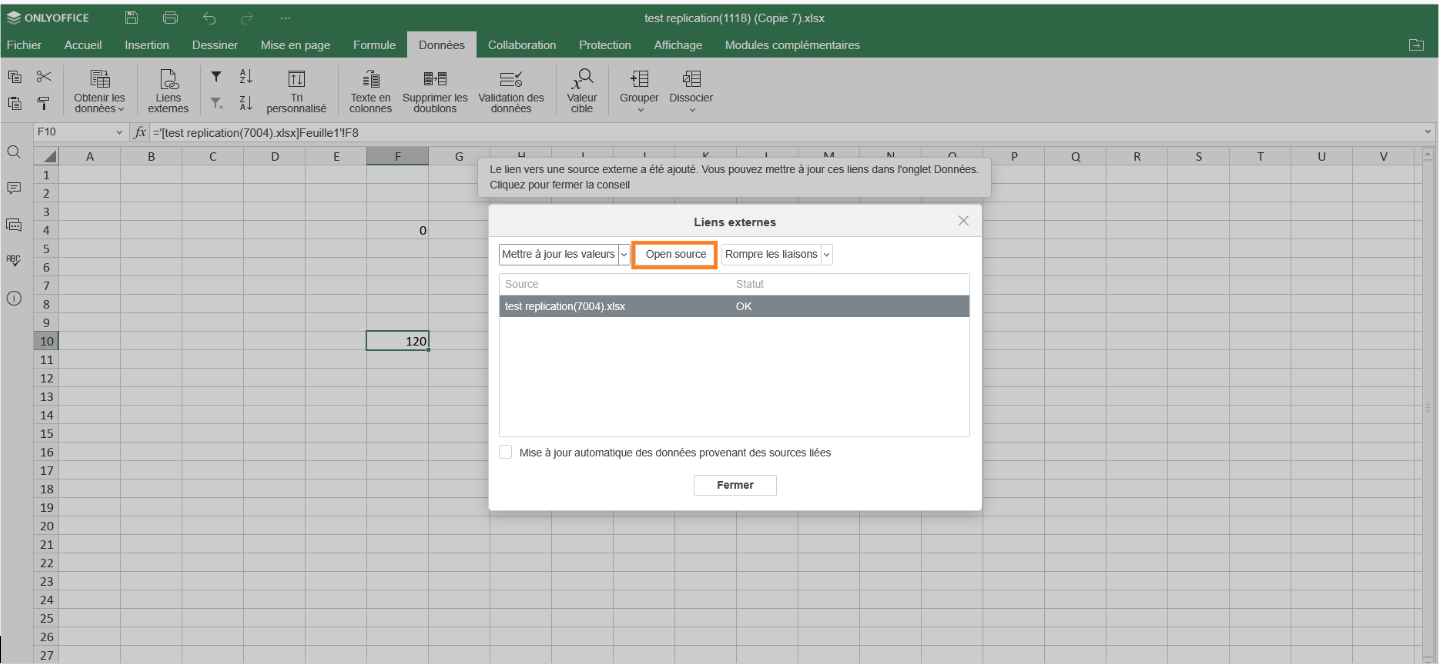
Editing lock
When a document is edited through OnlyOffice Suite, the lock is applied automatically. This lock will appear “red” and “open” on the document page and in File Explorer. Next to the lock, you’ll see a photo of the user who first opened the document for co-editing. Hovering over it will reveal the username.
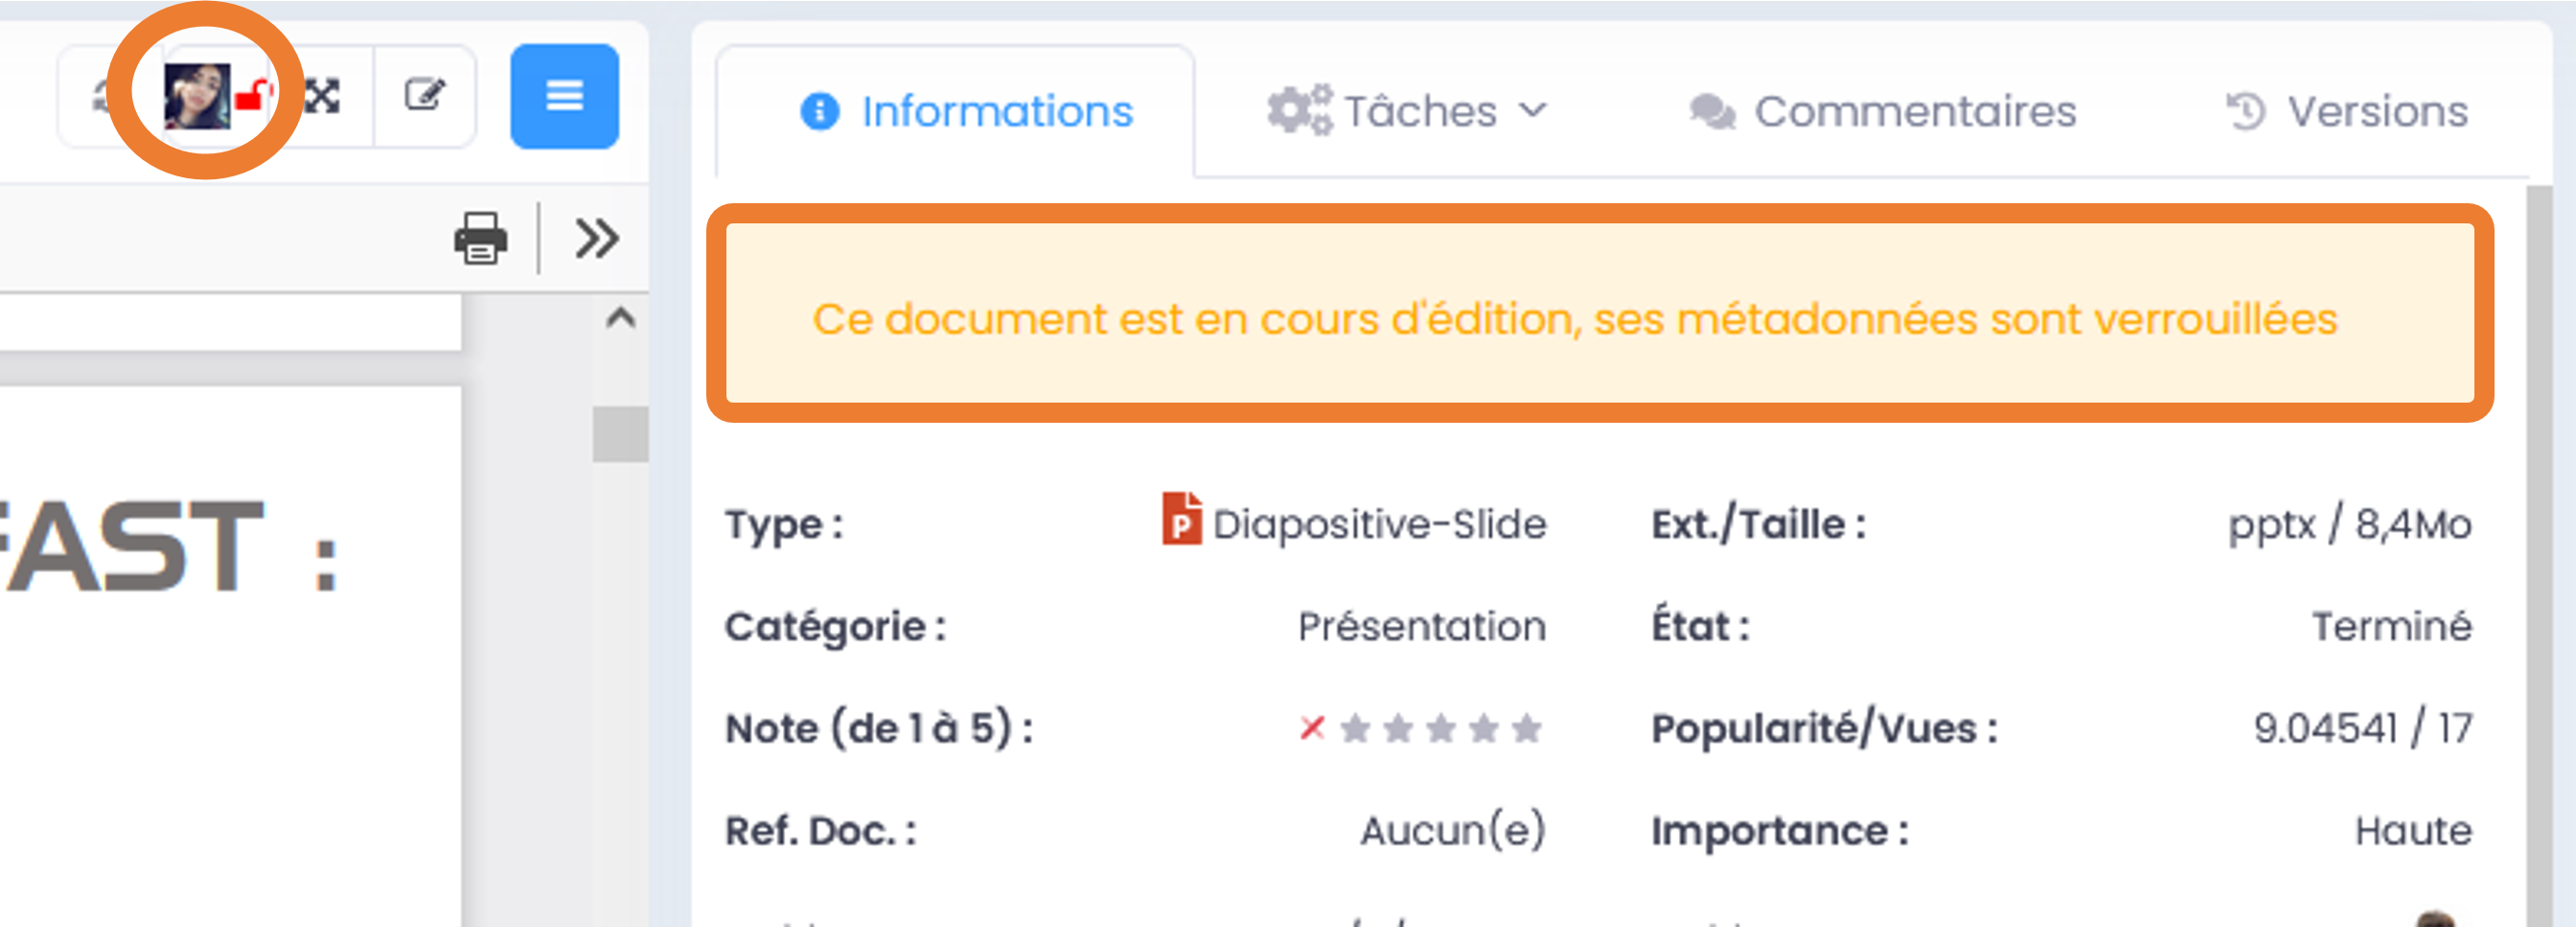
Note
You can use the usual features of an Office Suite. In particular, it is recommended to activate the review mode (bottom right in OnlyOffice), other users who have to edit/co-edit this document will better identify your modifications.
Note
When co-editing a document, a message is displayed on the document page, at the top of the information block to the right of the preview: “Document being edited, metadata is locked”.
Make your modifications, then close OnlyOffice and you will be redirected to the document page. The lock automatically breaks once all users have exited co-editing, closing OnlyOffice. Once all users have closed the OnlyOffice Suite, a new version is created. For more information, please refer to the “Version management” section.
Note
OnlyOffice allows you to co-edit contracts, budgets, powerpoint presentations in a much faster way than traditionally, that is, each in turn.
Caution
A network connection of sufficient quality is necessary to avoid possible connection loss or delay during co-editing.
Refreshing document preview
The operation of the preview is the same whether you “edit from my PC” or “co-edit with OnlyOffice”. Please view the sub-section “Refreshing the document preview” in the section “Editing a document from PC (via an application installed on PC)”.
Editing other types of content (forums, Wiki, etc.)
Actions for editing other types of content (e.g. Forums, Wiki page) follow the same logic as for classic files: the actions are listed in the “Hamburger” menu of the content. The abilities are dependent on the type of content and your rights to this content (cf. role you have in the Space(s) where the content is located). To find out how to modify the other types of content, please refer to the following sections:
“Meetings / Web conference (Enterprise only)”
“Forums and Wiki Pages”
“Forms”
Version management
GoFAST has a document version management. It consists of numbering and timestamping each new version of the document after editing (for example, editing from a PC or collaborative editing through OnlyOffice).
Main objectives of version management:
Having a backup point of all versions to be able to recover an older version if needed.
Timestamping each version so you know when the latest version is.
Identifying the users behind each version
How to get the old version:
If the current version of the document is not correct, for example if a colleague deleted some parts by mistake, you can restore the previous version or any other old version.
On the page of a document:
Go to the “Version” tab of the information block (to the right of the preview).
Choose whether you display all versions or only so-called “major” versions.
Click on the desired version number to start downloading.
The document will be downloaded to your computer (often in your Windows Downloads folder) with the downloaded version number at the end of the file name.
If you need to overwrite the document on GoFAST to update it (= overwrite the current version), drag and drop in the area provided for, on the document page, above the preview.
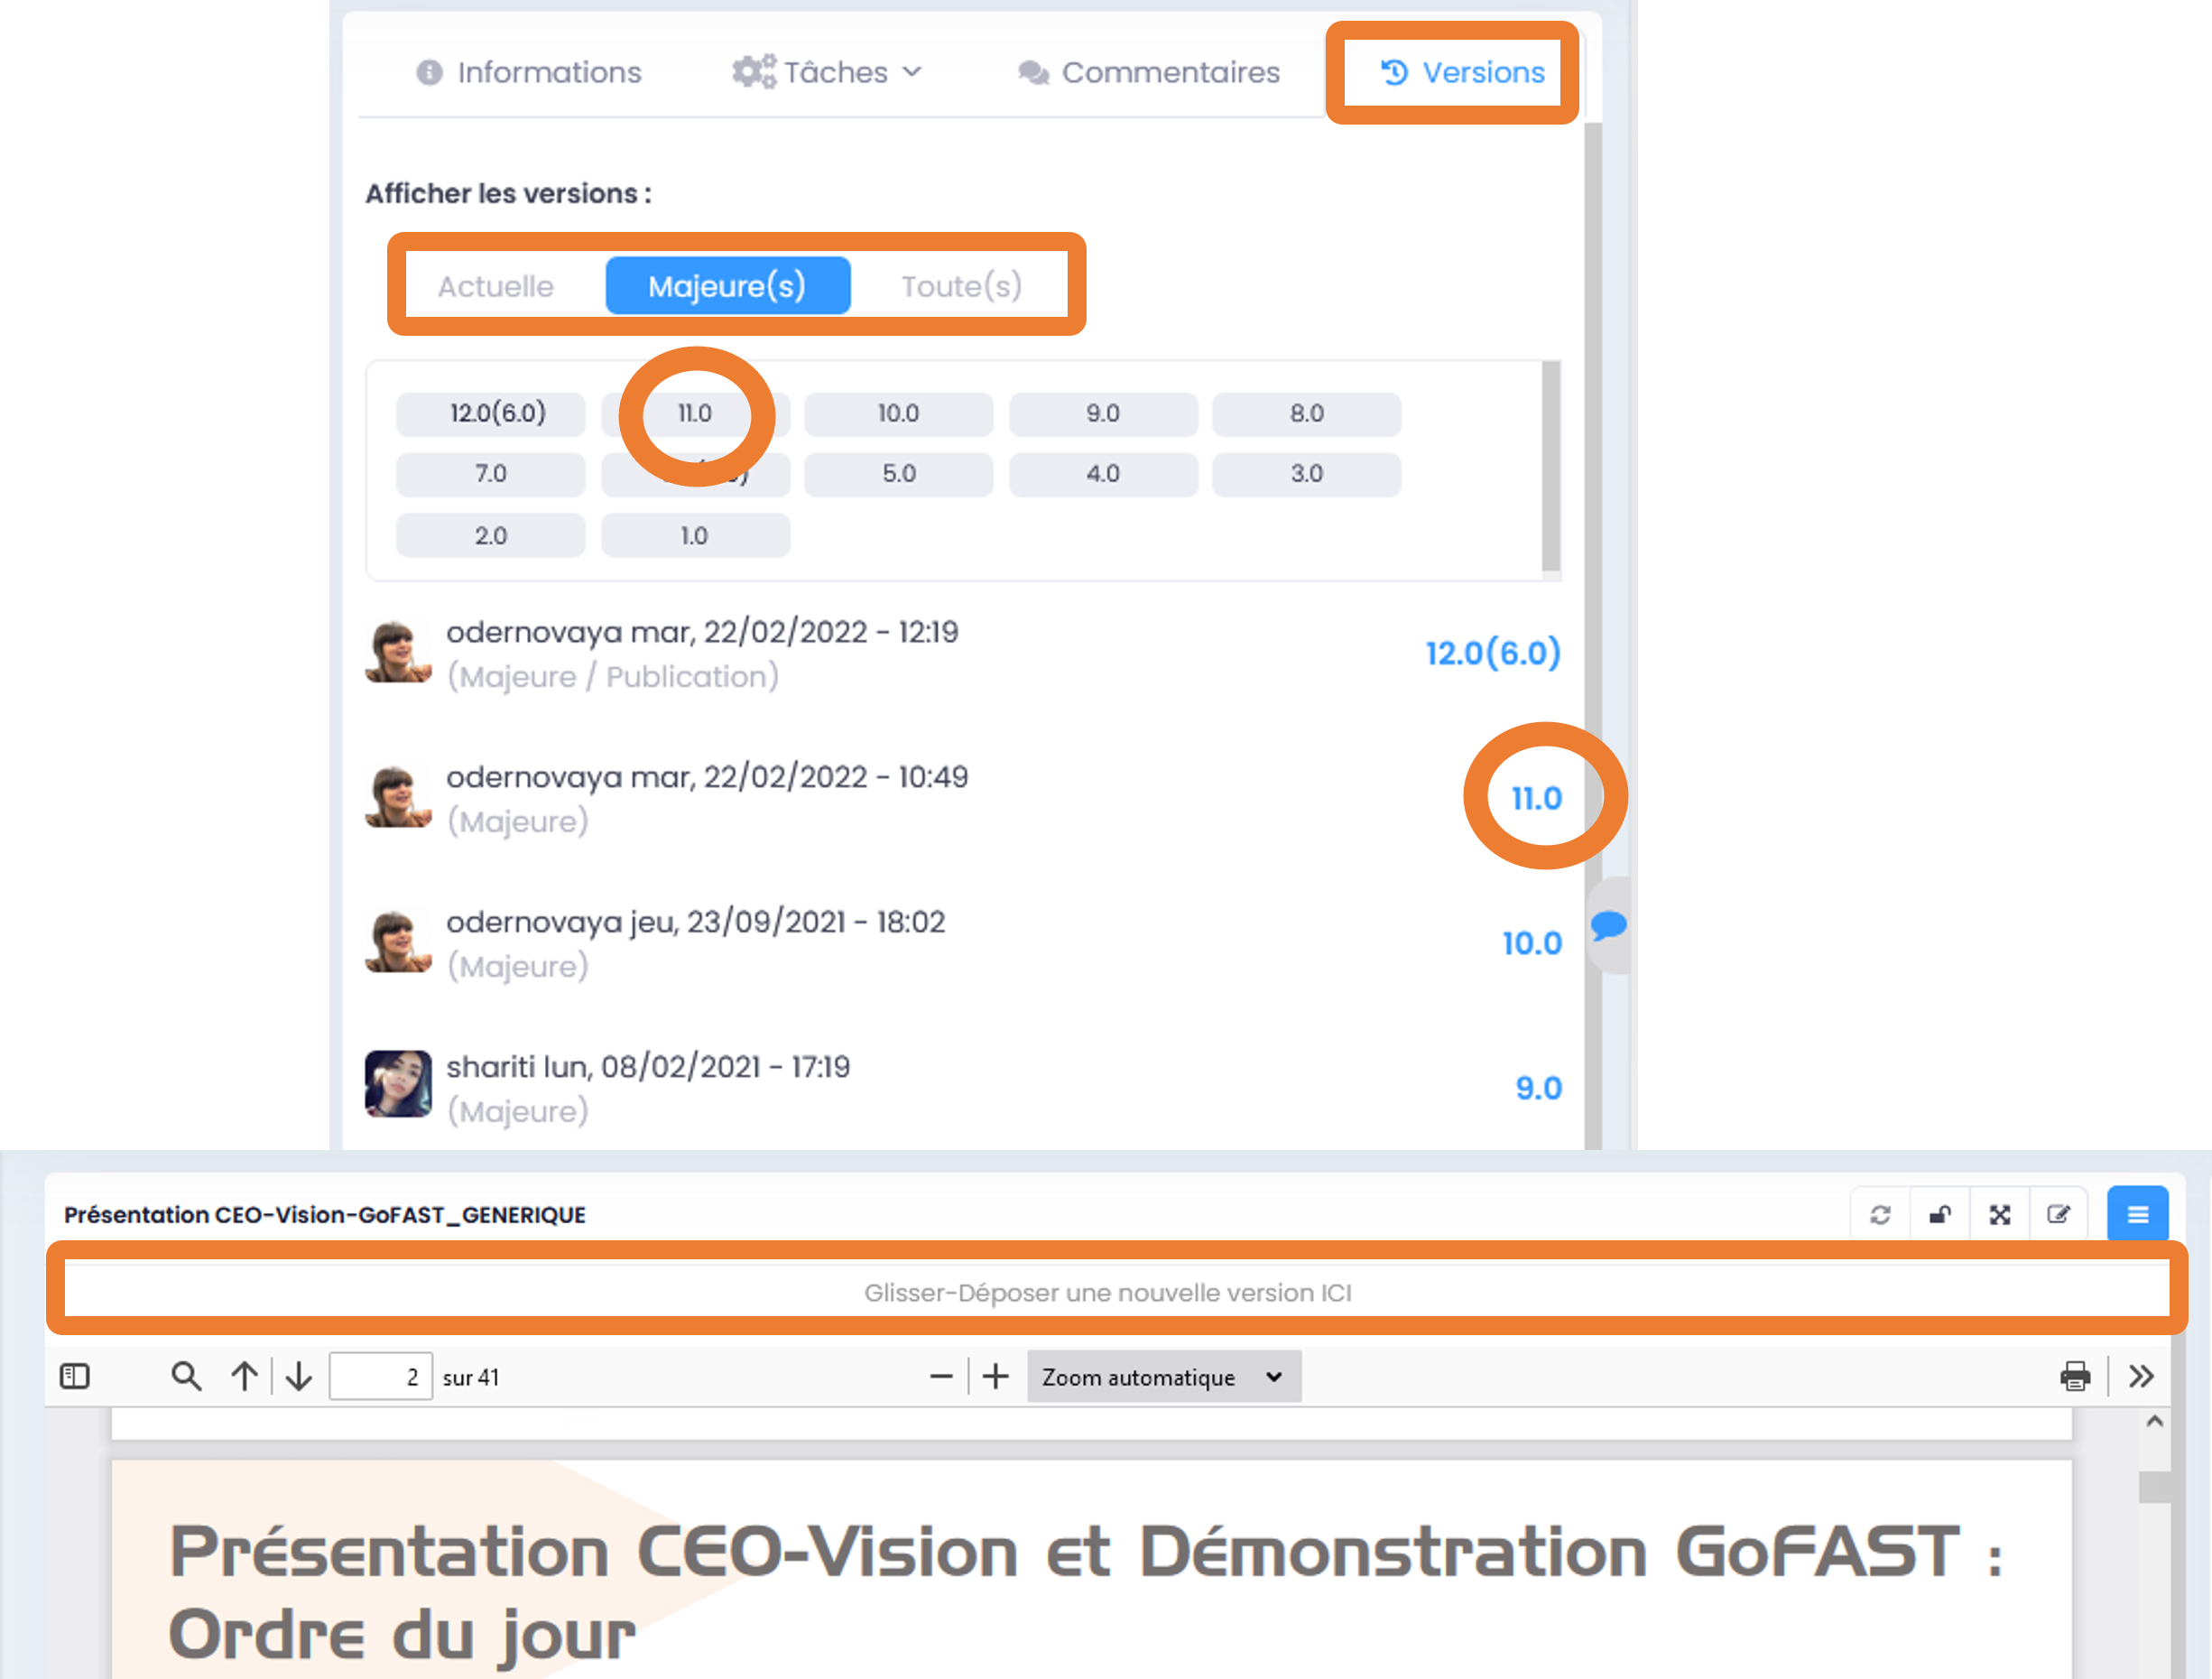
Note
Version numbering allows you to use the concept of “minor version” (for example, 1.39, which is automatically generated when you save the document during editing / co-editing) and “major version” (for example, 3.0, which can be created during drag and drop). - drop the update on the document page when creating a Publication from a working document or at any time through the document “Hamburger” menu ).
Note
When creating or uploading a new document to GoFAST, the version number will always be 1.0.
For more information on version management, please refer to the sections:
“Upload new version”
“Tag this version as major”
“Delete all minor versions”
Search for Documents/ Contents
Introduction to Search Engine
Functioning of the Search Engine:
All the text content of documents (Word, Excel, PDF, email, web pages, wiki, etc.) and their characteristics (metadata) are indexed. You find specific information or a file by keywords, even approximate ones (plural vs singular, typos, etc…) and without having to know the title. Similar keywords are proposed in the event of an unsuccessful search.
Main formats supported by indexing
HyperText Markup Language (HTML)
Vector files (SVG, VSD)
XML and derived formats (XHTML, OOXML, ODF)
Microsoft Office documents (DOC, PPT, EXL, DOCX, PPTX, PPSX, EXLX, etc.)
OpenDocument Format (ODF)
iWorks docs
Portable Document Format (PDF)
Electronic publication format (EPUB)
Rich Text Format (RTF)
Compression and packaging formats (Tar, RAR, AR, CPIO, Zip, 7Zip, Gzip, BZip2, XZ and Pack200)
Text formats (TXT)
Feed and syndication formats (RSS, Atom)
Help Formats (CHM)
Audio formats - if there is embedded text, such as lyrics (mp3, mp4, Vorbis, Speex, Opus, Flac, etc.)
Java class folders and archives
Source code (Java, C, C++, Groovy, etc.)
Email formats (e.g. eml, PST, MSG, TNEF)
Search by keywords
Enter keywords in the search bar (entry/suggestions)
The search is located in the quick access bar (top menu) to be accessible at any time, from all pages of GoFAST. To search, simply enter the desired keywords and click on the “magnifying glass” button or press “Enter” on your keyboard.
Note
A search with 1 or 2 keywords will be expanded, while a search with 3 or more keywords will be more restricted. Indeed, with 2 keywords the search engine will propose contents that have either the 2 keywords, or one of the two keywords. While with more than 3 keywords the search engine will offer content that meets at least 75% of your search. So, the more keywords there are, the more the search is restricted. It is therefore advisable to enter few keywords if you are not sure of the terms you are looking for and, on the contrary, to enter more than 3 keywords if you know exactly what you are looking for and are sure of the keywords you have entered.
Use of Boolean operators
By default, the search engine works with the notion of “OR”: when entering 2 keywords, the engine will propose the contents with the 1st keyword OR the other keyword OR the 2 keywords. This allows a very wide search result, but sometimes it is necessary to restrict the search. It is then possible to use the «Boolean operators» which are symbols to be put before or after the keywords, to tell the search engine how to treat these keywords in particular (e.g.: mandatory word, to be excluded, exact string of words, etc.).
Main Boolean operators:
*+: added in front of a keyword makes it mandatory (eg: Technical Memory + Functionality) to indicate to the search engine that among the terms entered, some must be present in the document search.
*-: added in front of a keyword exclude it (eg: Technical Memory -Functionality) to indicate to the search engine that among the terms entered, documents containing the keyword "Functionality" must be excluded.
‘…’ applied to a series of words allows you to search for an exact expression (e.g. ‘Technical Brief and GoFAST Features’) and therefore to tell the search engine to exclude documents containing these keywords if they are not exactly as in the expression entered.
****: added at the end or at the beginning of a keyword makes it approximate (e.g.: Function*) and thus tells the search engine to display the documents containing all terms rooted in the entered keyword.
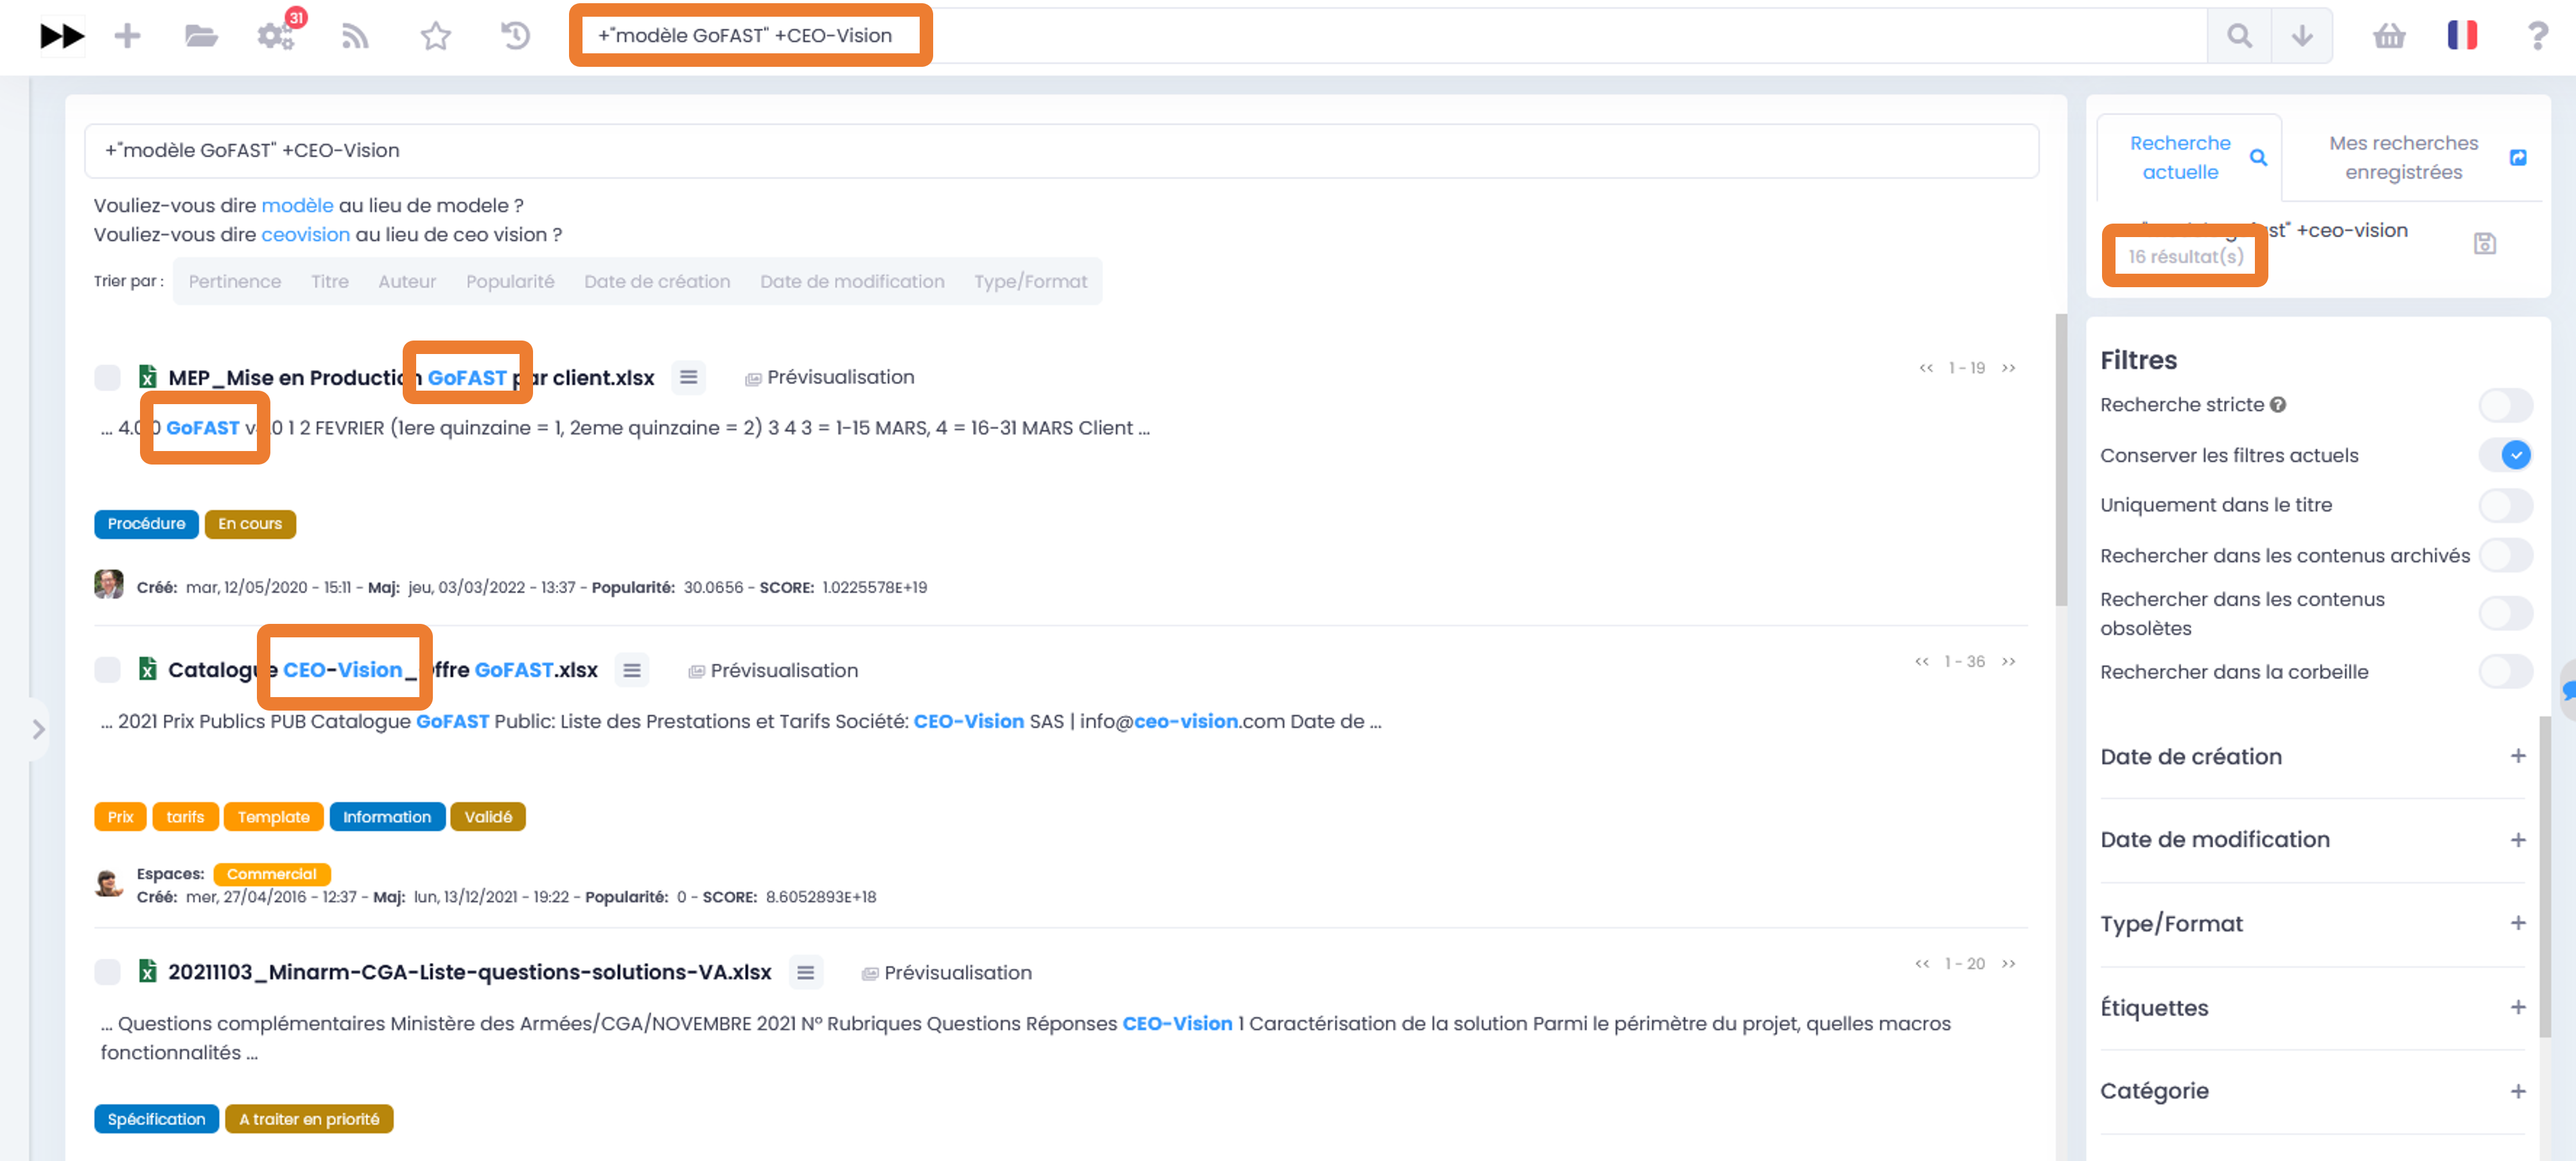
Search result
Display of the result by relevance
- A whole set of criteria is taken into account in the calculation of this relevance, including:
the number of occurrences of the searched keywords,
the locations of the keywords (e.g.: file title, a paragraph in the document, etc.),
creation and modification dates (for example, recent content would be preferred over an old document),
the popularity of the content (e.g. a document viewed often will be favored over a document which has not been viewed for months).
Actions from the search result
- For each document displayed in the search result, you can view:
The icon indicating the type of document (text file, spreadsheet, PDF, image, video, etc.) or other content (forum, Wiki page, user profile, Collaborative Space, etc.),
The title of the file (a click on it allows you to go to the page of the document),
The “Hamburger” menu (contextual actions) on a document (icon with 3 small bars to the right of the document title),
“Fragments” of text that are excerpts of the content with the keywords searched and that allow to check if the document is the one we are looking for without having to open it (if multiple extracts are found, they can be viewed one after the other using pagination),
A “preview” button that allows to display a preview of the document in one click (NB: some contents do not allow it because do not benefit the preview)
Key information about the content (including date of creation/last editing and the Space(s) where the document is located)
Metadata associated with documents, including: tags, categories, criticity and state of documents.

Contextual search in a document
The search result allows you to click on the keywords highlighted in bold in the extracts of the found content. These words in bold allow a contextual search in a document: by clicking on a keyword in bold, you access the document page with a preview, highlighting the keywords you are looking for and the ability to pass them one by one. This contextual search saves a lot of time when you need to find a specific element in a particular document or to read it quickly.
Search Options
Normal or strict search
Strict search is an option that means that all keywords entered in the search bar are required and must appear in the documents listed in the search results. For each indexed document, these keywords are found either in its title, or in its content, or in comments and metadata. To activate/deactivate this option, on the search results page, go to the “Search Options” block and click the “switch”. It is colored when activated, or gray when not activated.
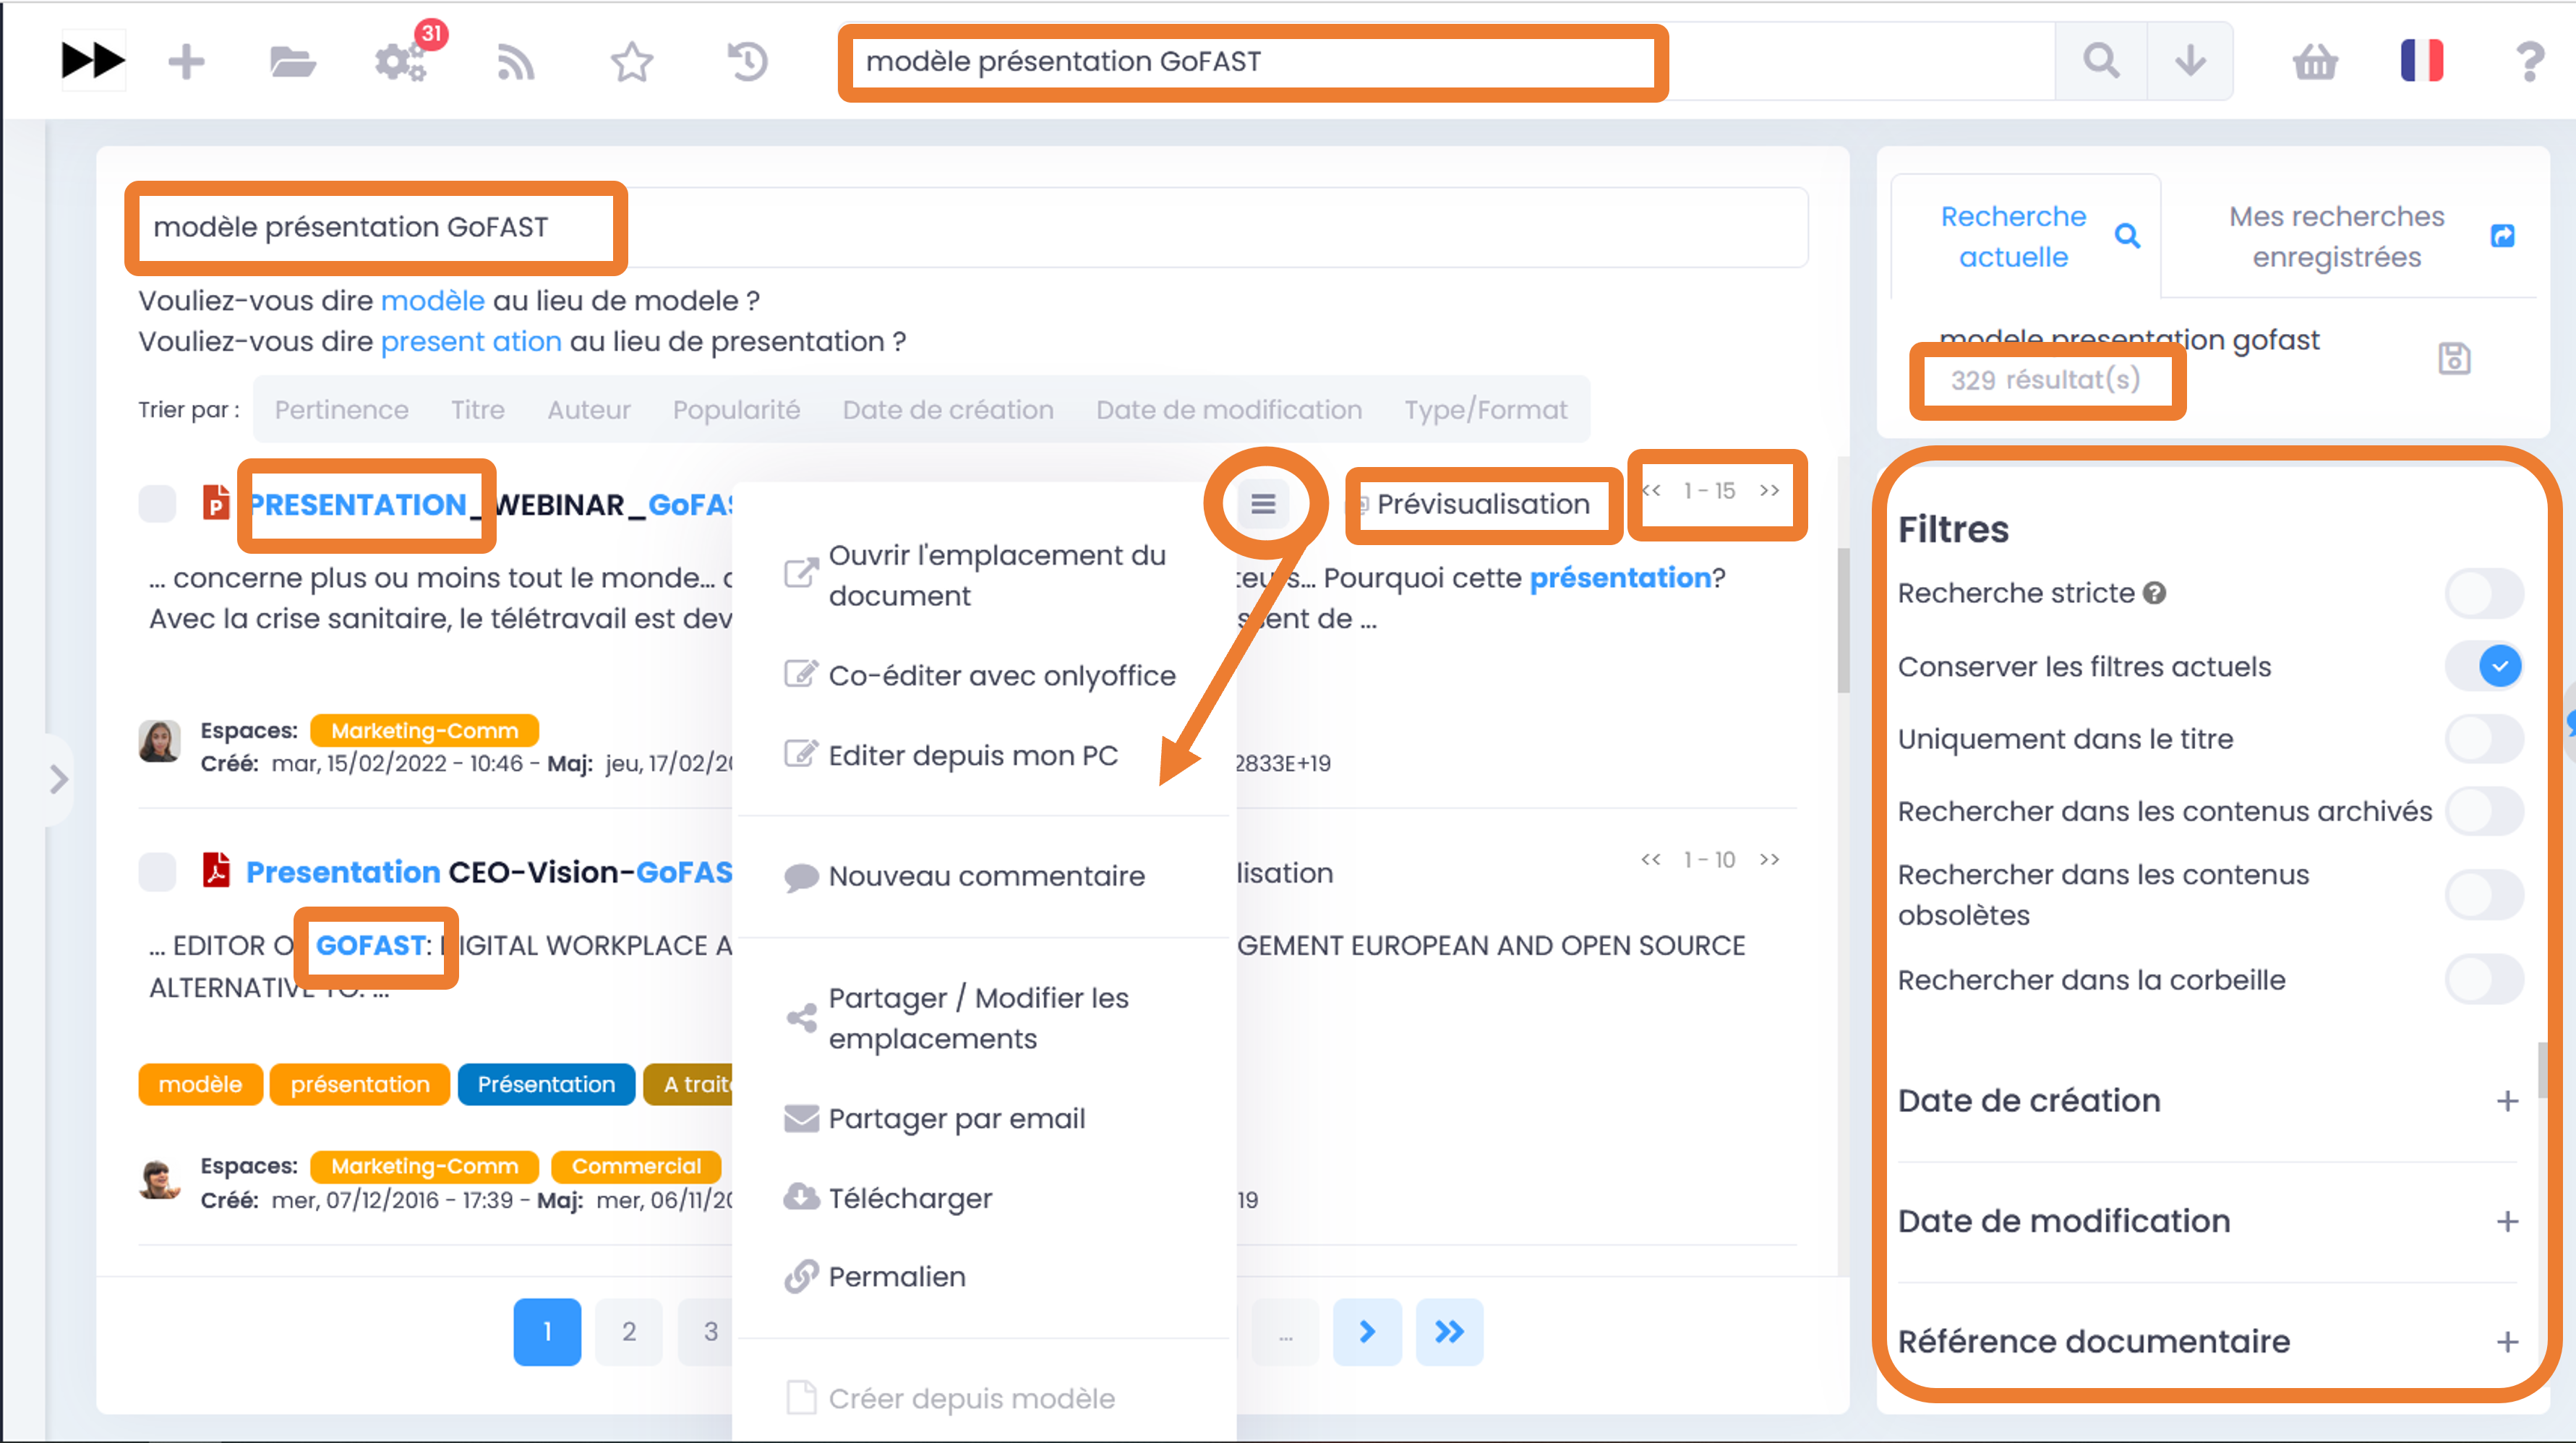
Important
If you use “boolean operators”, note that keywords preceded by a hyphen “-” are excluded from the search. Example: “Meeting February 2019 - Tuesday” (all documents containing the keyword “Tuesday” will be excluded from the results).
Other available search options
Keep filters (allows you to change the keywords entered in your search, without having to put your filters back between two searches)
Search in title only
Search for archived content (“pre-archived” state)
Search for obsolete content (“Obsolete” state)
Search in Recycle Bin (to find a deleted and restorable document)
How to filter the search result
In the event that the entered keywords do not allow you to quickly find the document you are looking for, GoFAST offers many filters. To apply filters, go to the filter block to the right of the search result, then expand the desired filter types (for example, Categories, State, Creation Date, Type, etc.). The list of filters depends on the search result, for example, if there is no PDF document for the entered keywords, this format will not be offered in the filters.
Note
Most of the metadata that you can associate with a document or that is automatically generated (such as creation date) can be used as a search result filter.
Available filters:
The number of documents available when adding this filter is shown in brackets)
Creation date,
Editing date,
Document type (depending on the file format),
Tags,
Category,
Collaborative Spaces,
Creator,
Last contributor,
Author,
State,
Criticity,
Language,
Deadline.
It is possible to clear the search filters one by one, by clicking on the corresponding red cross, in the block to the right of the search result.
How to sort the search result
By default, search results categorize documents by relevance according to searched keywords (see “Search engine operation”).
It is possible to edit the sorting to classify the contents by:
Title (alphabetical order)
Author
Popularity
Creation date
Editing date
Type/Format
sorting search results by a criterion other than relevance may display content at the top of the list that matches the keywords entered less closely, because the criterion selected for sorting takes precedence. Therefore, to refine your search, it is recommended to use the filters located in the block to the right of the search result.
How to save your Search
With GoFAST, you can manually save multiple predefined searches and restart them with one click at any time. This saves a lot of time.
Once your search is complete (with or without keywords, with your filters), simply click on the floppy disk in the right box (above the search options), give your search a name, then click “Save”.
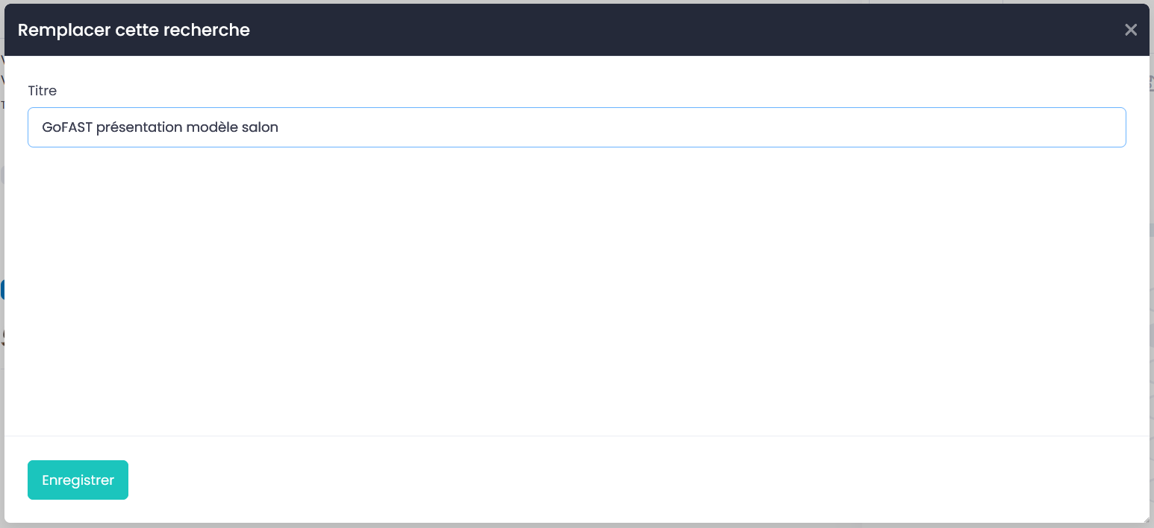
To access saved searches, you have two options:
In the search bar, on the right, just click on the down arrow.
From the search block on the right, “My saved searches” tab, at this level you can:
Run a saved search by clicking on it,
Replace “overwrite” the saved search with the current search by clicking on the “Floppy disk”, Delete this search by going to the “Recycle Bin” button,
Delete a saved search by clicking on “Recycle Bin”.
Advanced search
The advanced search allows you to combine different criteria for a targeted and precise search.
In the left-hand navigation panel, click Advanced search to open the search options.
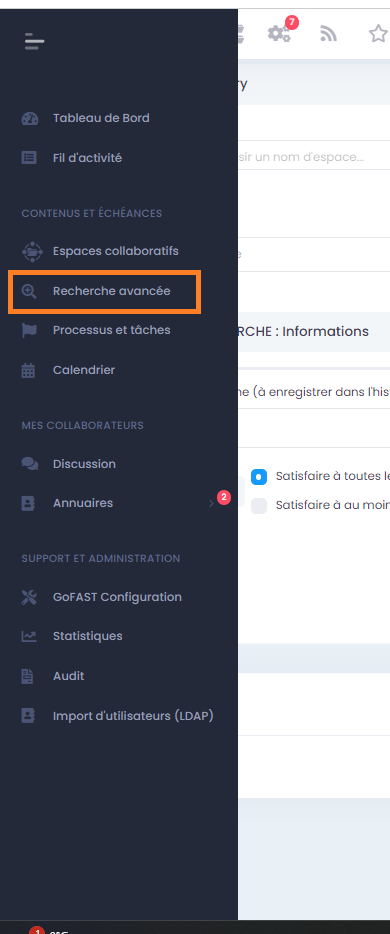
In the Advanced search section, specify your criteria: -Space(s): Enter and select the space or spaces in which you wish to search for documents. -Search: Enter the name of the document or relevant keywords. -Search Area: Expand this section to access more specific criteria such as: -Content Categories: Select specific categories to refine your search. -Status: Filter documents according to their status (draft, published, archived, etc.). -Criticality: Specify the priority or importance of documents. -Date created: Search for documents created on a specific date. -Due date: Search for documents by their due date. -Language: Filter documents by language. -Select content category(ies): Select the category(ies) you require.
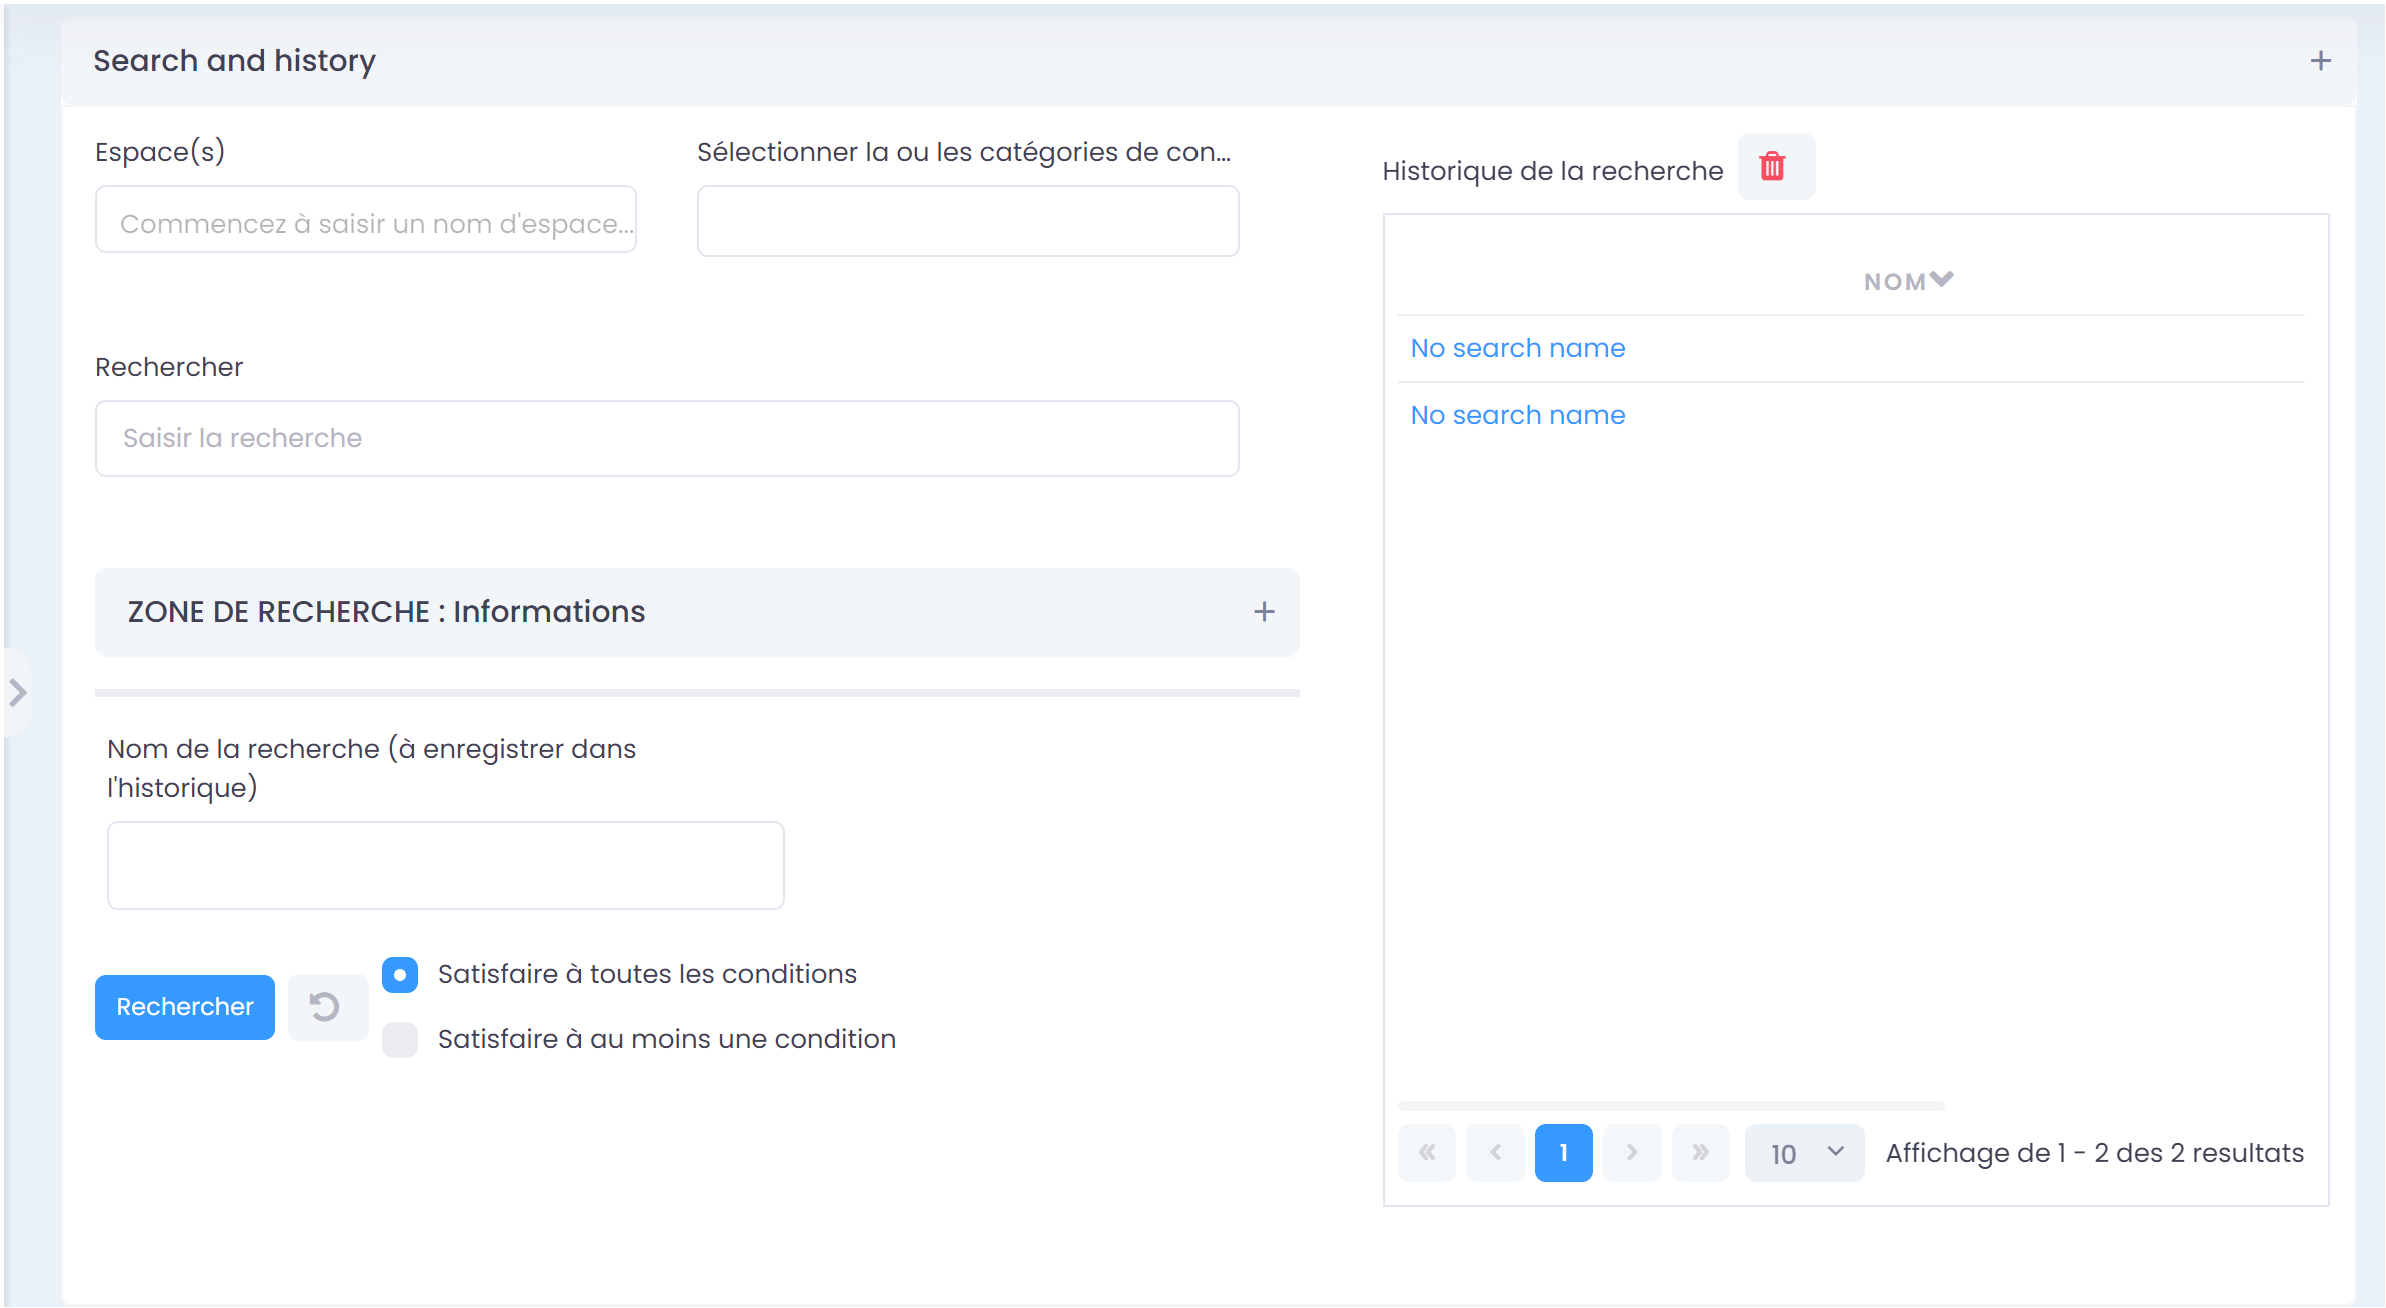
Naming and saving searches
Search name: Give your search a name to save it in the history, allowing quick access for future searches.
Search Options
Choose between Satisfy all conditions or Satisfy at least one condition to adjust the rigour of your search.
Lancement de la Recherche
Click on the Search button. The results will appear at the bottom of the page. You can adjust the number of results displayed and navigate through them using the pagination controls.
Gestion de l’Historique de Recherche
Your search history is accessible in the right-hand panel. To delete a specific history, click on the bin icon next to the corresponding entry.
GoFAST File Browser File Explorer
Accessing the GoFAST file explorer
There are 4 ways to access the GoFAST File Browser:
On the quick access bar (main menu at the top), by going to the “Folder” icon, then select the type of space and in the displayed menu you can navigate through the tree structure of spaces to go to the one you wish. You will be redirected to the Space page and arrive by default on the “Document” tab where the file explorer is.
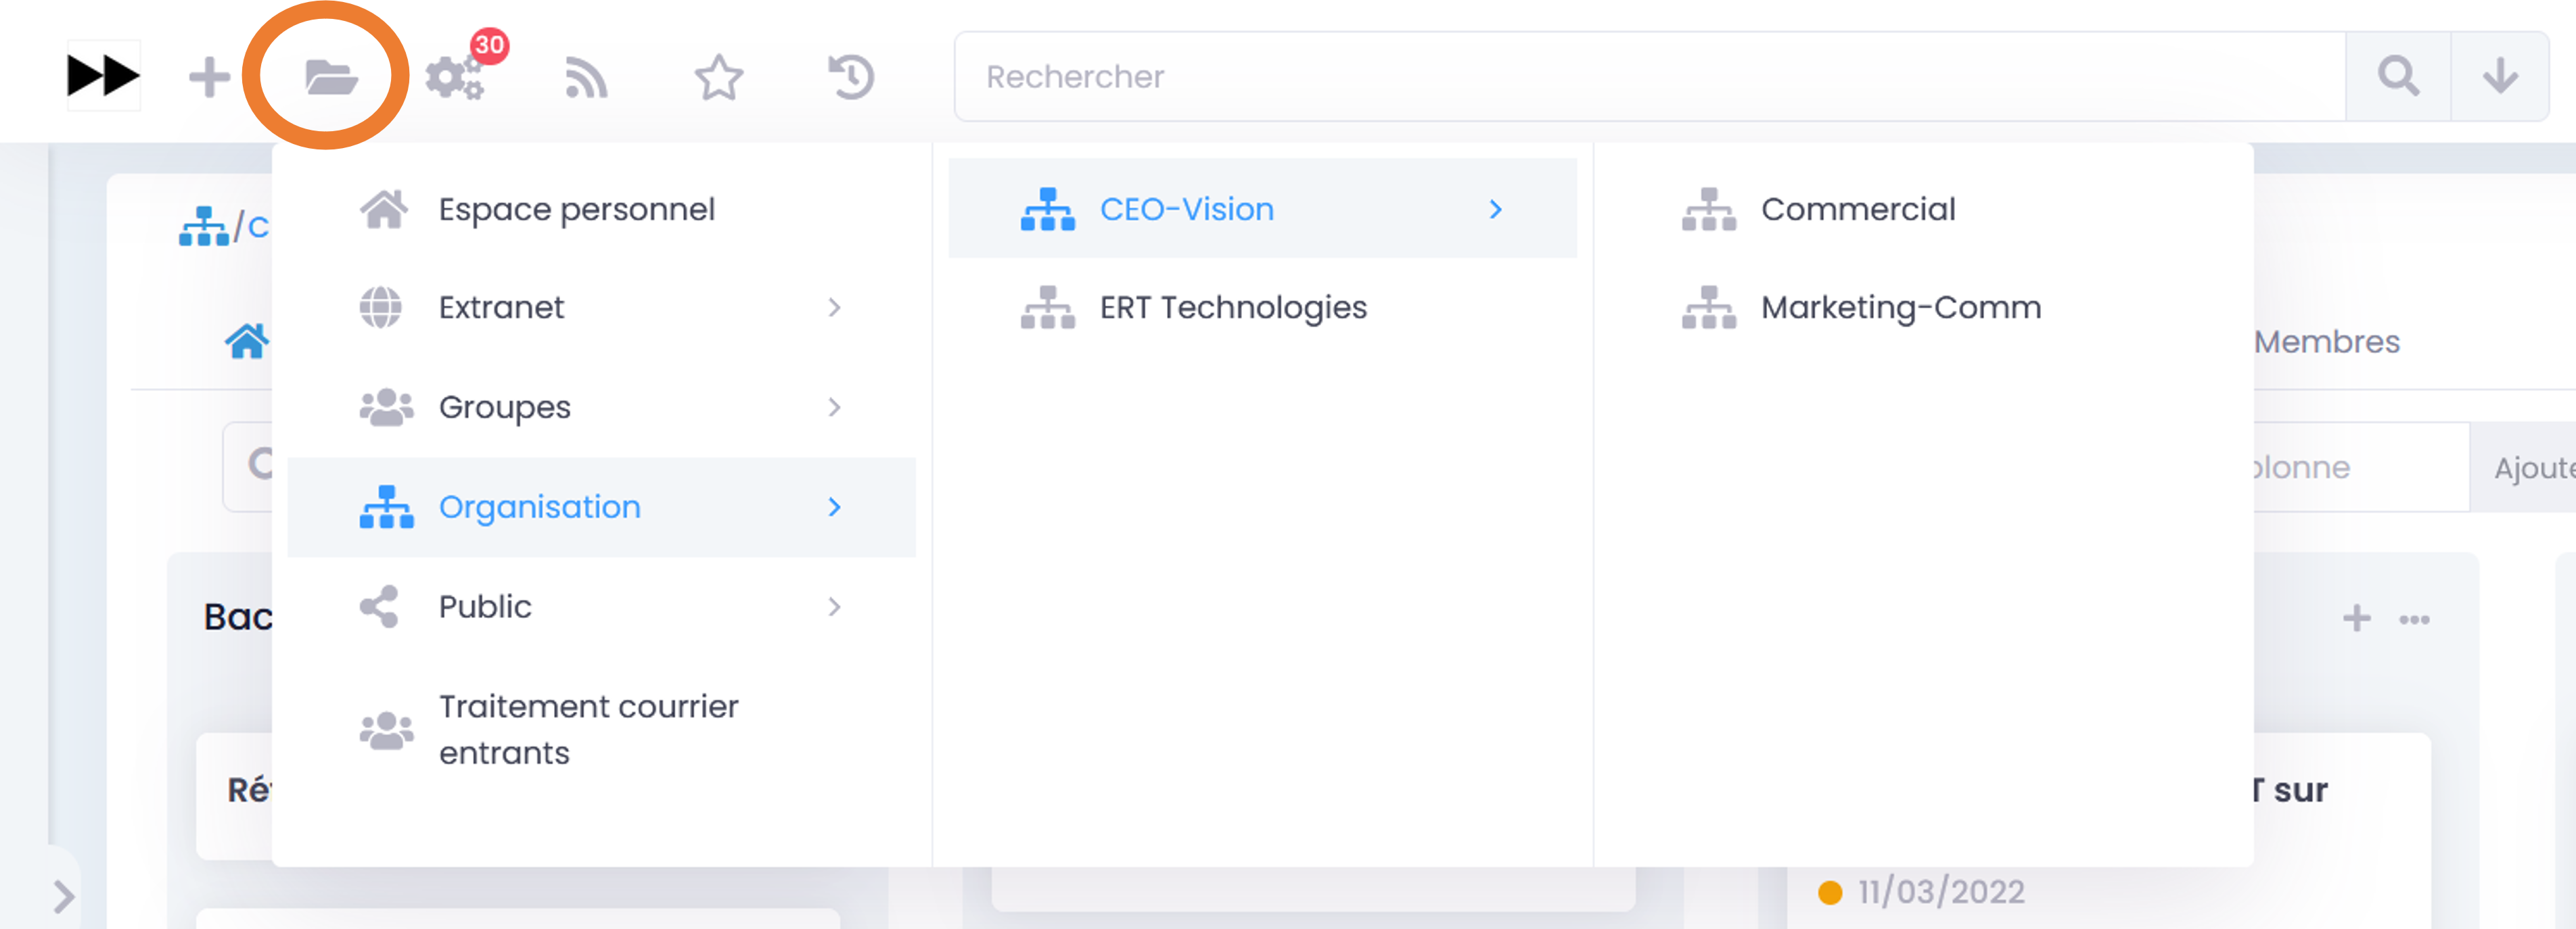
If you are on a Space page, click on the “Documents” tab.
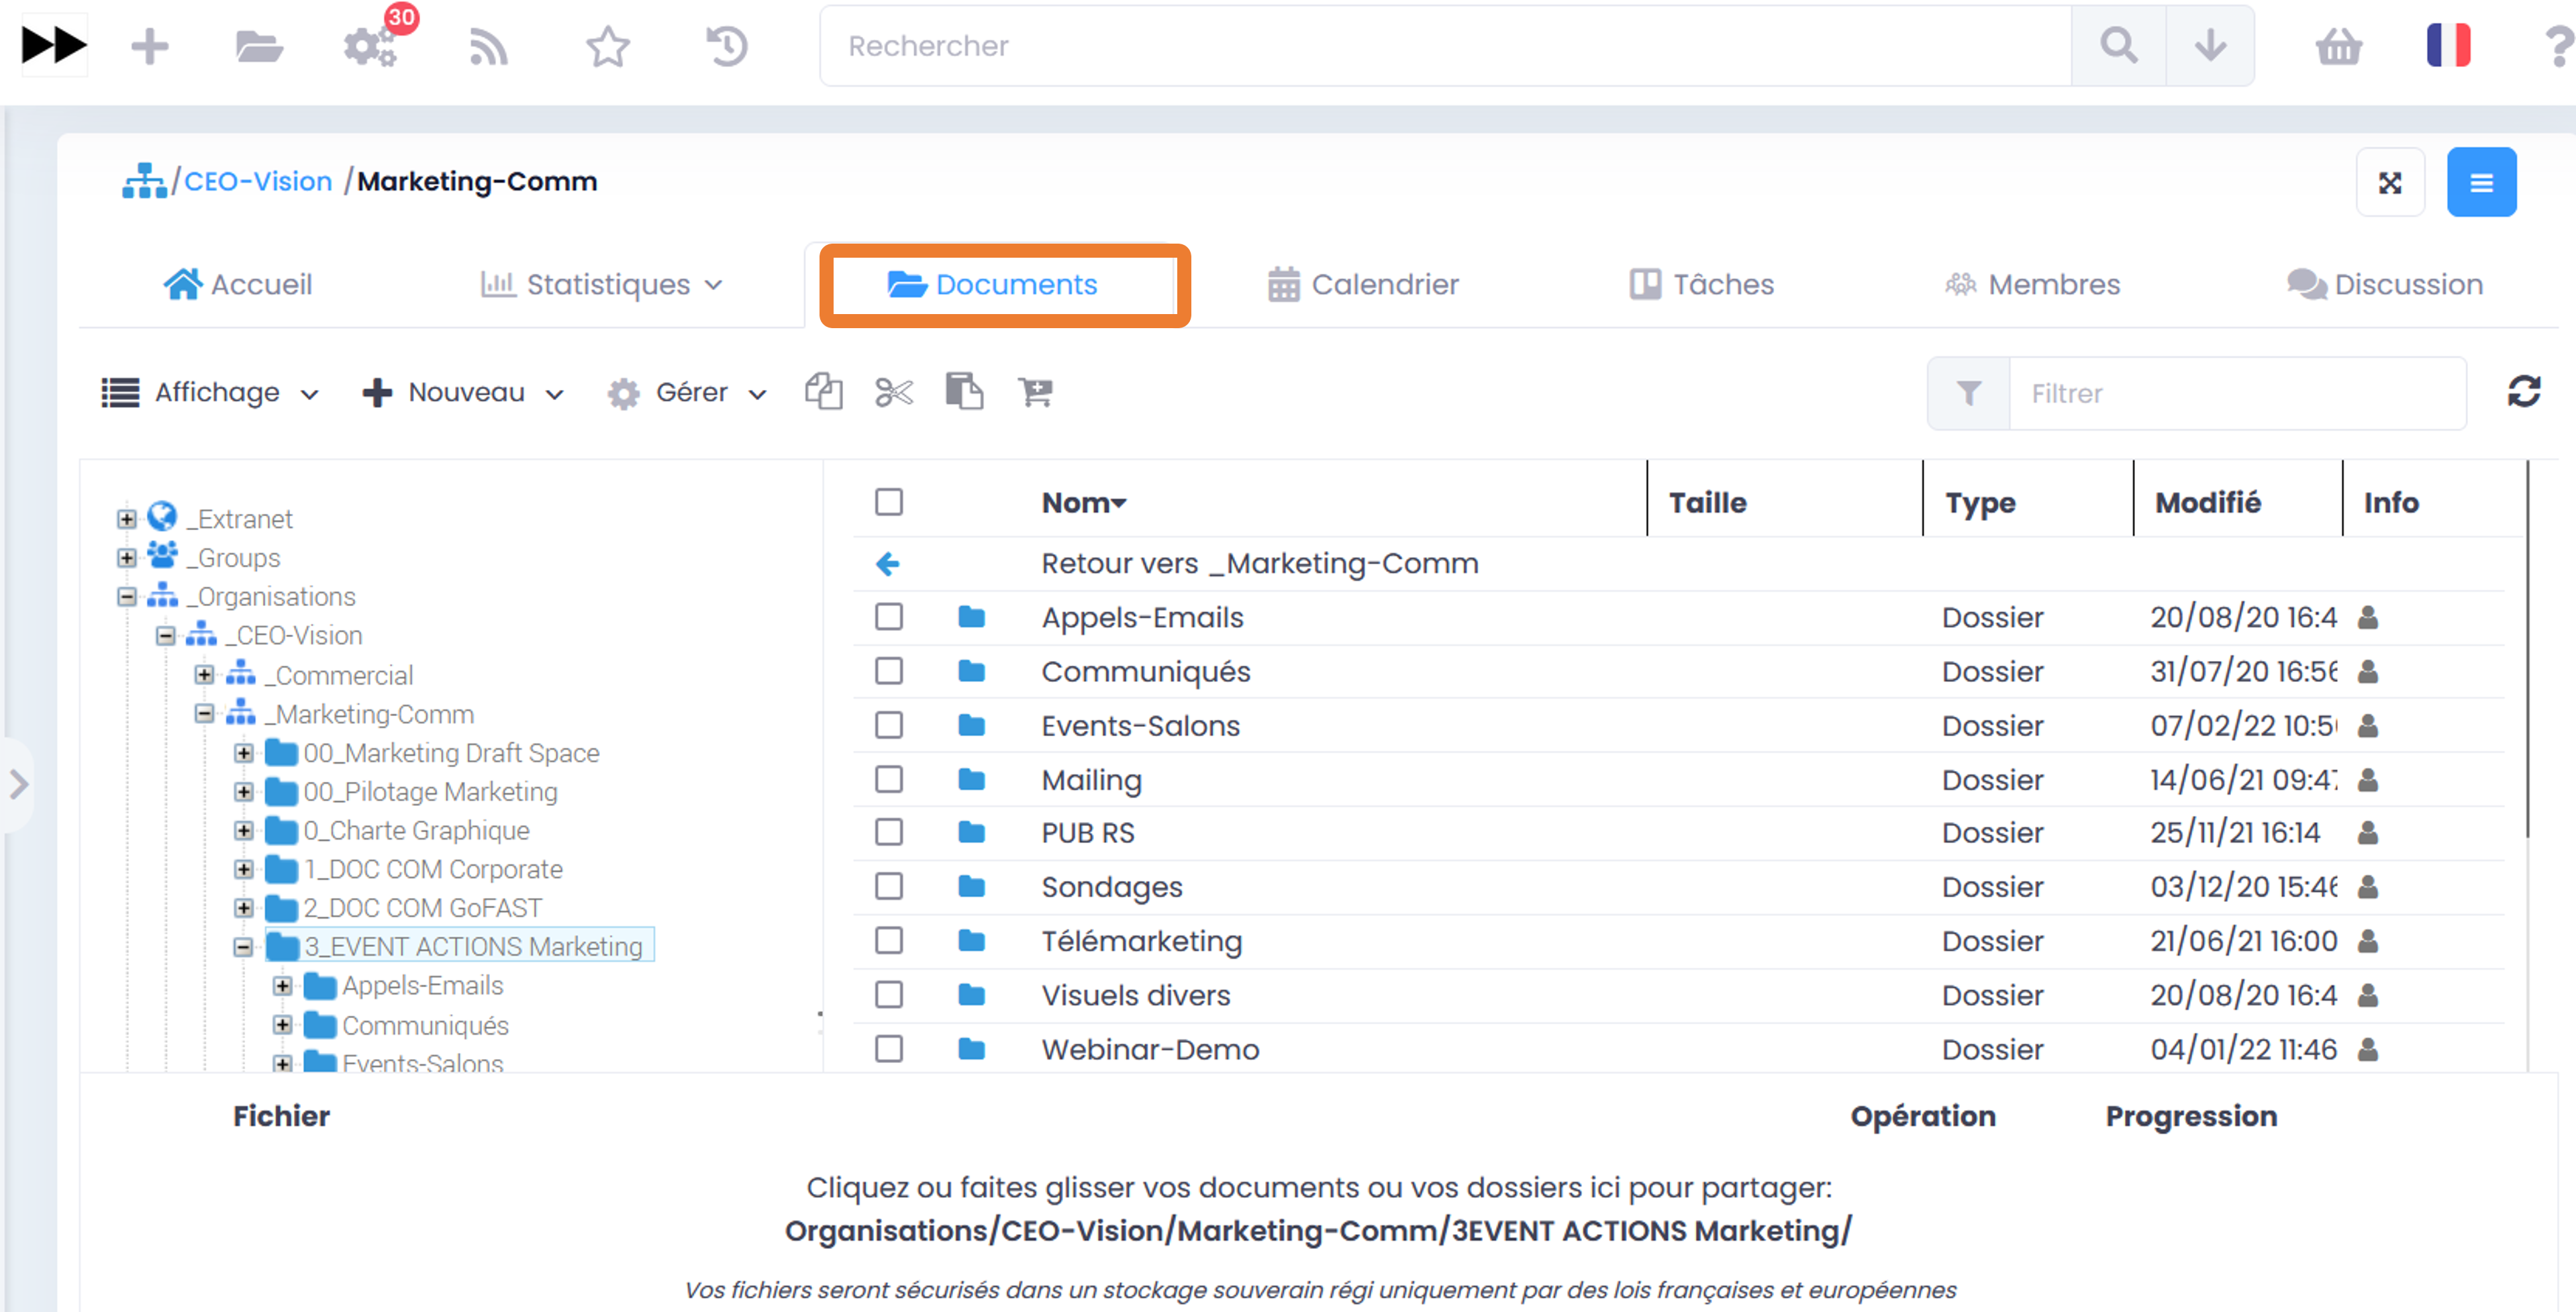
From the main menu on the left, go to “Collaborative Spaces” and you will then be redirected to the Space page, “Documents” tab.
You can at any time unfold the file explorer block that is hidden on the left (small icon before the left main menu). This explorer is available on almost every GoFAST page, including a document page.
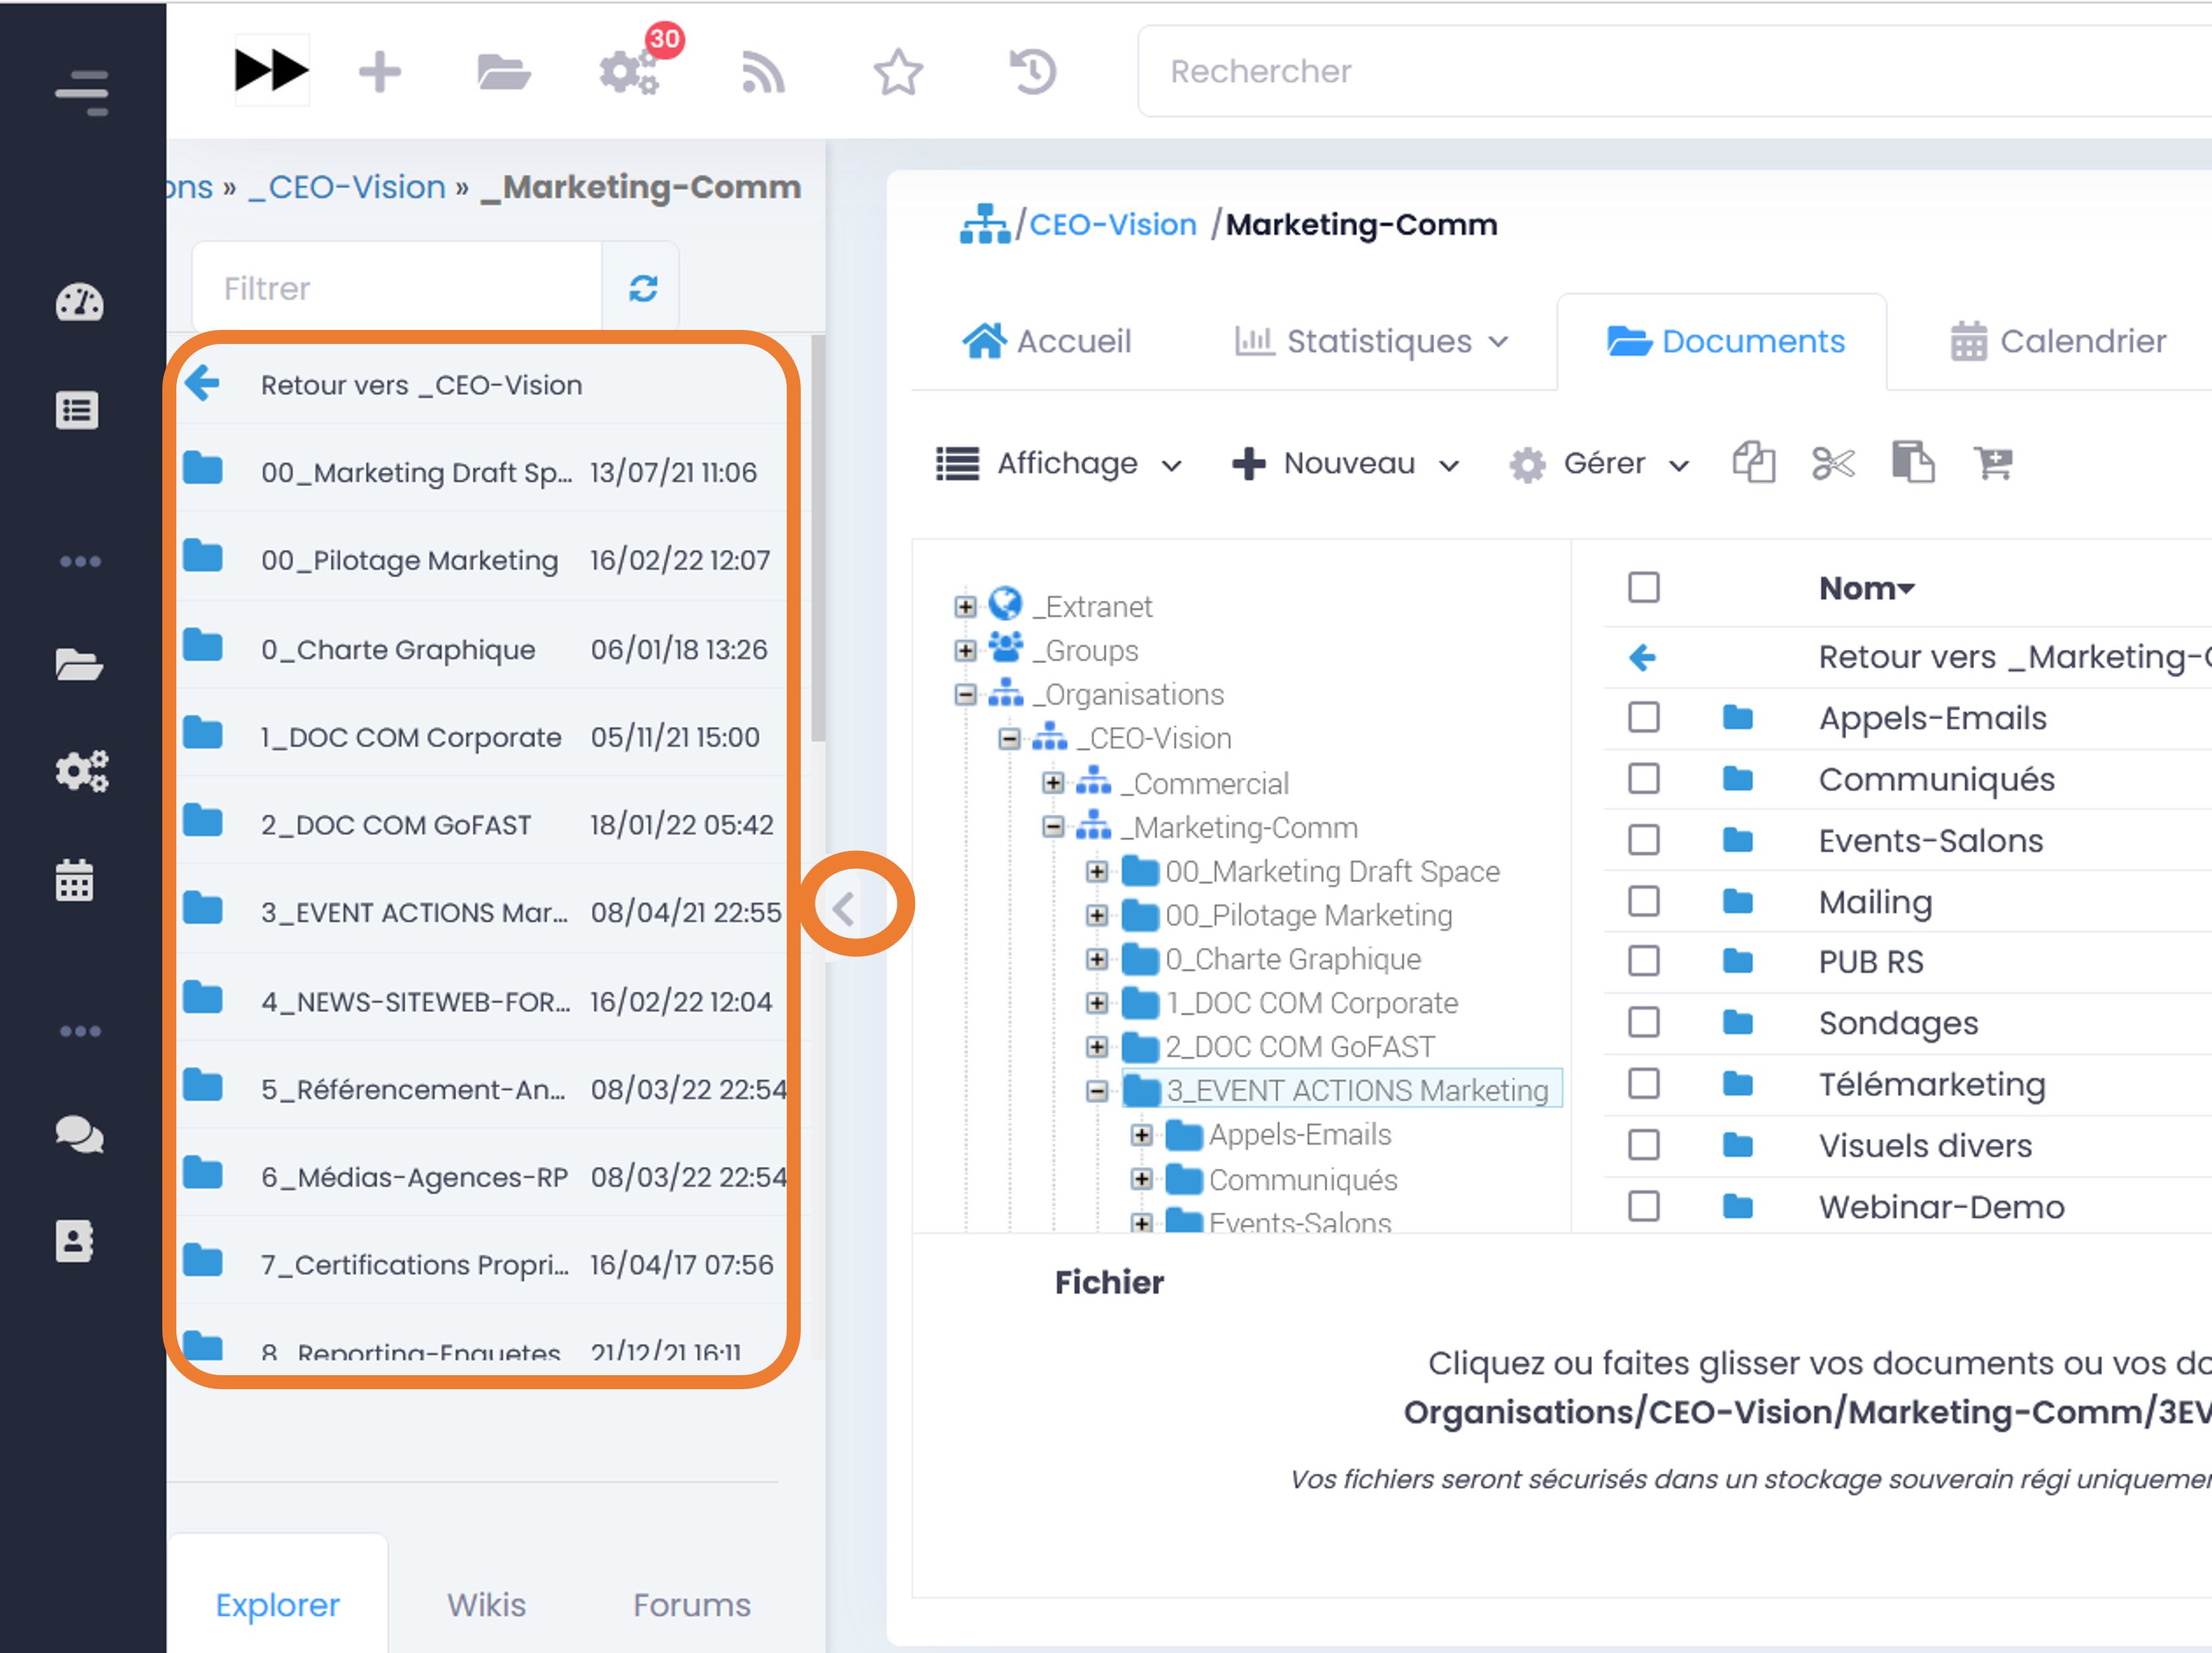
Navigating in the GoFAST File Browser
Navigating in the File Explorer
GoFAST File Explorer has 4 distinct areas:
Actions menu (horizontal bar at the top of File Explorer)
Tree structure area (vertical area on the left)
Main area displaying the contents of a folder (largest area, center-right)
Loading area, with progress bar (horizontal area at the bottom)
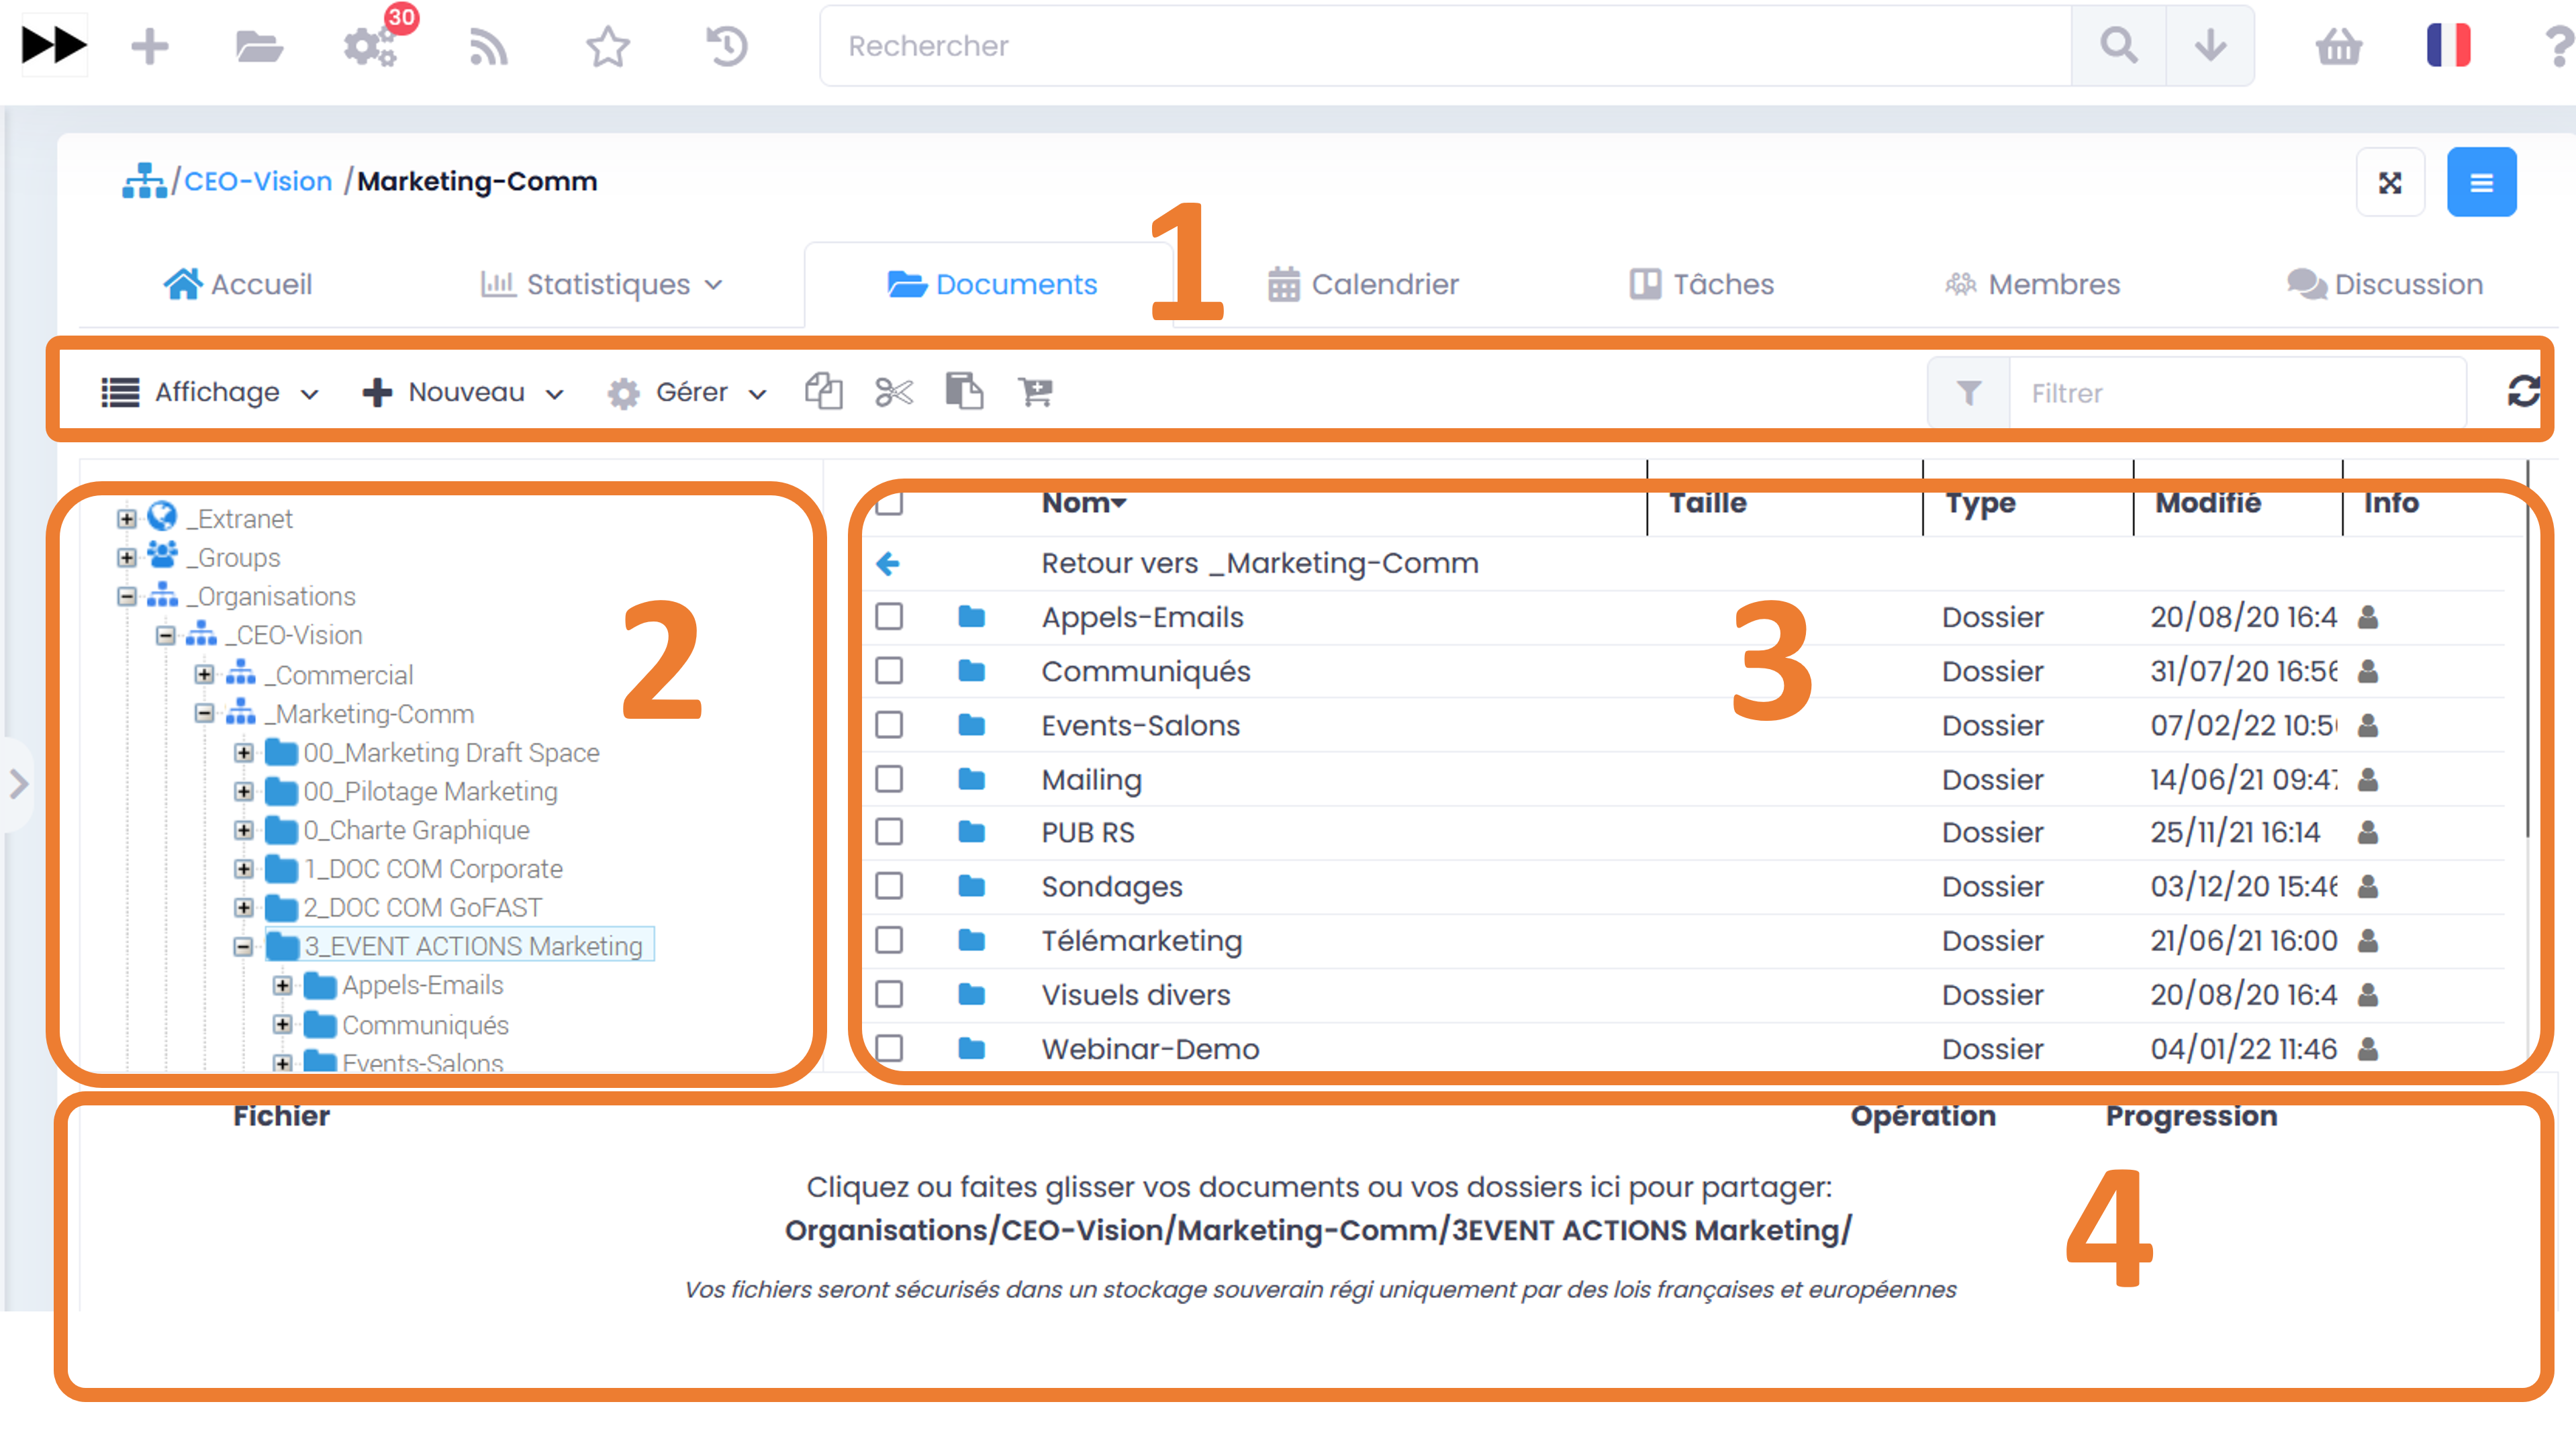
The various contents displayed in the file explorer are identified by icons according to their file type/format. Each type of collaborative space has a specific icon (Organization, Group, Extranet, Public, Staff). The so-called classic folders are represented by the “Folder” icon.
- In the main area, the folders and files are presented in the form of a table with the following columns:
The name of the folder or content (the title)
The size
File type or format, file extension
The date of last editing
Info: your rights associated with files or contents and existing sharings
Note
For better readability, you can resize blocks 2, 3 and 4 as well as the column headers of the explorer.
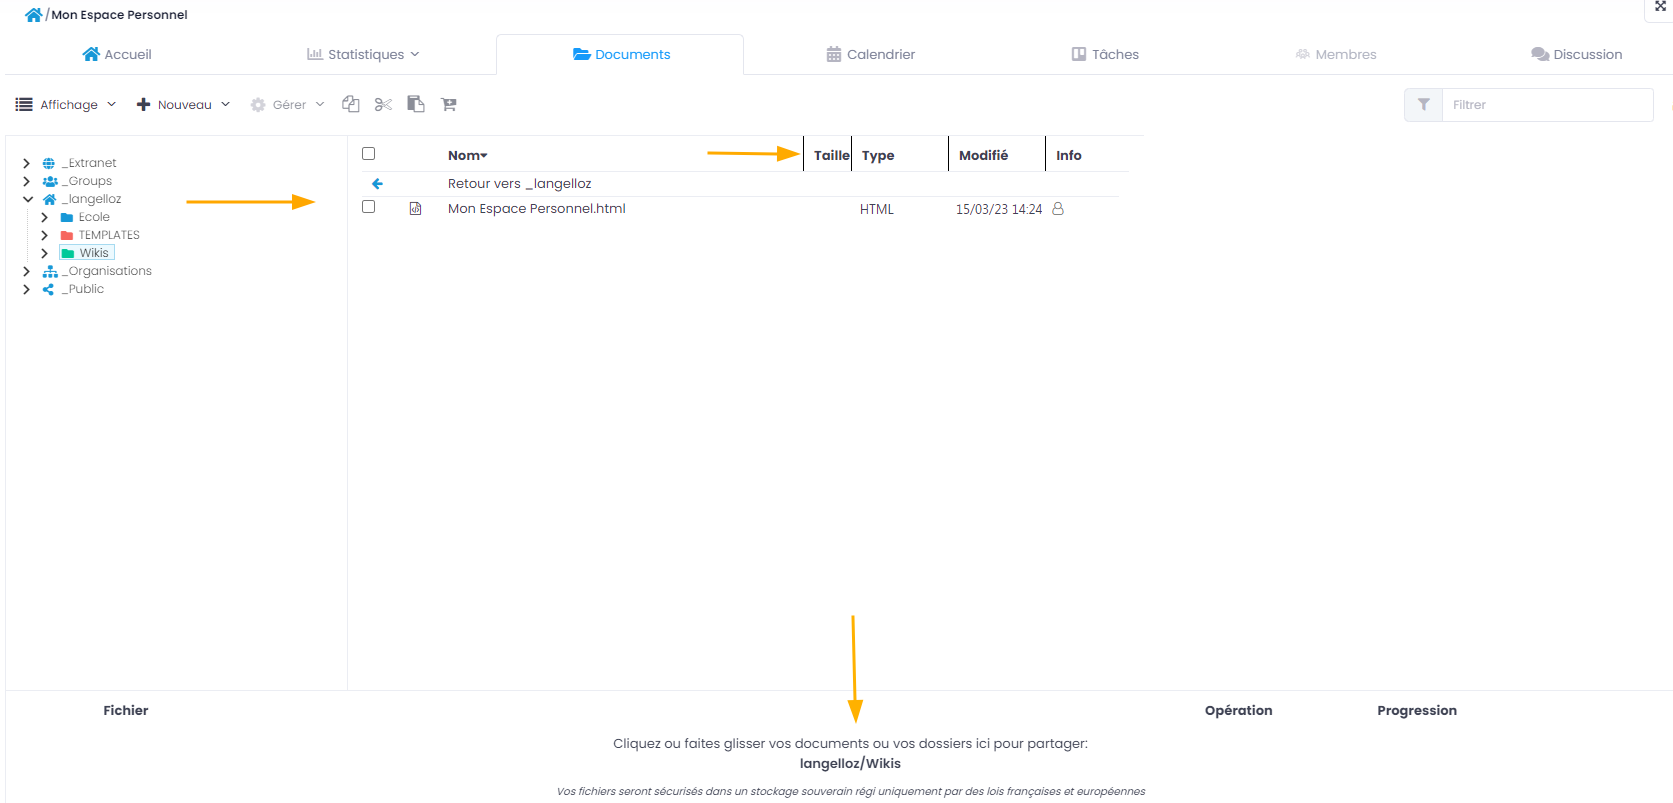
Understanding the icons (multi-location and permissions)
In File Explorer, there are several common icons in the Info column of the main area. These icons give information about multi-location and your permissions on documents, directories and spaces. The purpose of this display is to simplify the user’s work and avoid unnecessary duplication of elements.

Below is a list of icons and their meanings:
Icons |
Permissions |
Significations |
|
|---|---|---|---|
Read only |
You have read-only permissions, you can see the entire contents of this folder/space, but you won’t have any additional permissions. |
||
Contributor |
You have contribution permissions, you will be able to collaborate on all the contents of this folder / this space. |
||
Owner |
You can manage this content (edit, delete) because you have creator rights on it. |
||
Administrator |
You have admin permissions, you can manage all contents of this folder/space. |
||
Shared |
This content is in multiple locations but you don’t have access to all of them. |
||
Special category |
You can only view this content and comment on it because it has special permissions (archived, period retention..). |
||

|
Mirror back |
This icon indicates that the folder is mirrored |
|
How to drop files to GoFAST via Explorer
To drop files from your PC to GoFAST, it is recommended to drag/drop them directly into the desired space or folder.
Warning
The files must be placed either in the main frame (zone 2 in the screenshot above) or in the left frame where the tree structure is located (zone 3 in the screenshot above).
Files placed in this way are downloaded and progress is displayed in the horizontal area at the bottom of File Explorer. You can press Pause, Cancel or Resume the download at any time.
Note
The uploading will only be done if you have the rights to post content in the concerned space (including not authorized for members with the “Read Only” role in the Space).
Note
When you drag and drop a document with the same name from your PC to GoFAST, a window will pop up asking if you want to overwrite the existing file.
Warning
While uploading files from the PC to GoFAST: do not delete or move the files on the PC side because the original location must be preserved in order to upload.
GoFAST File Browser toolbar
The file explorer toolbar is located at the top of the screen.
By hovering the mouse over the icons, you will see which action it corresponds to with a small word displayed below the icon.
Possible actions from this panel are listed.
Changing the way content is displayed
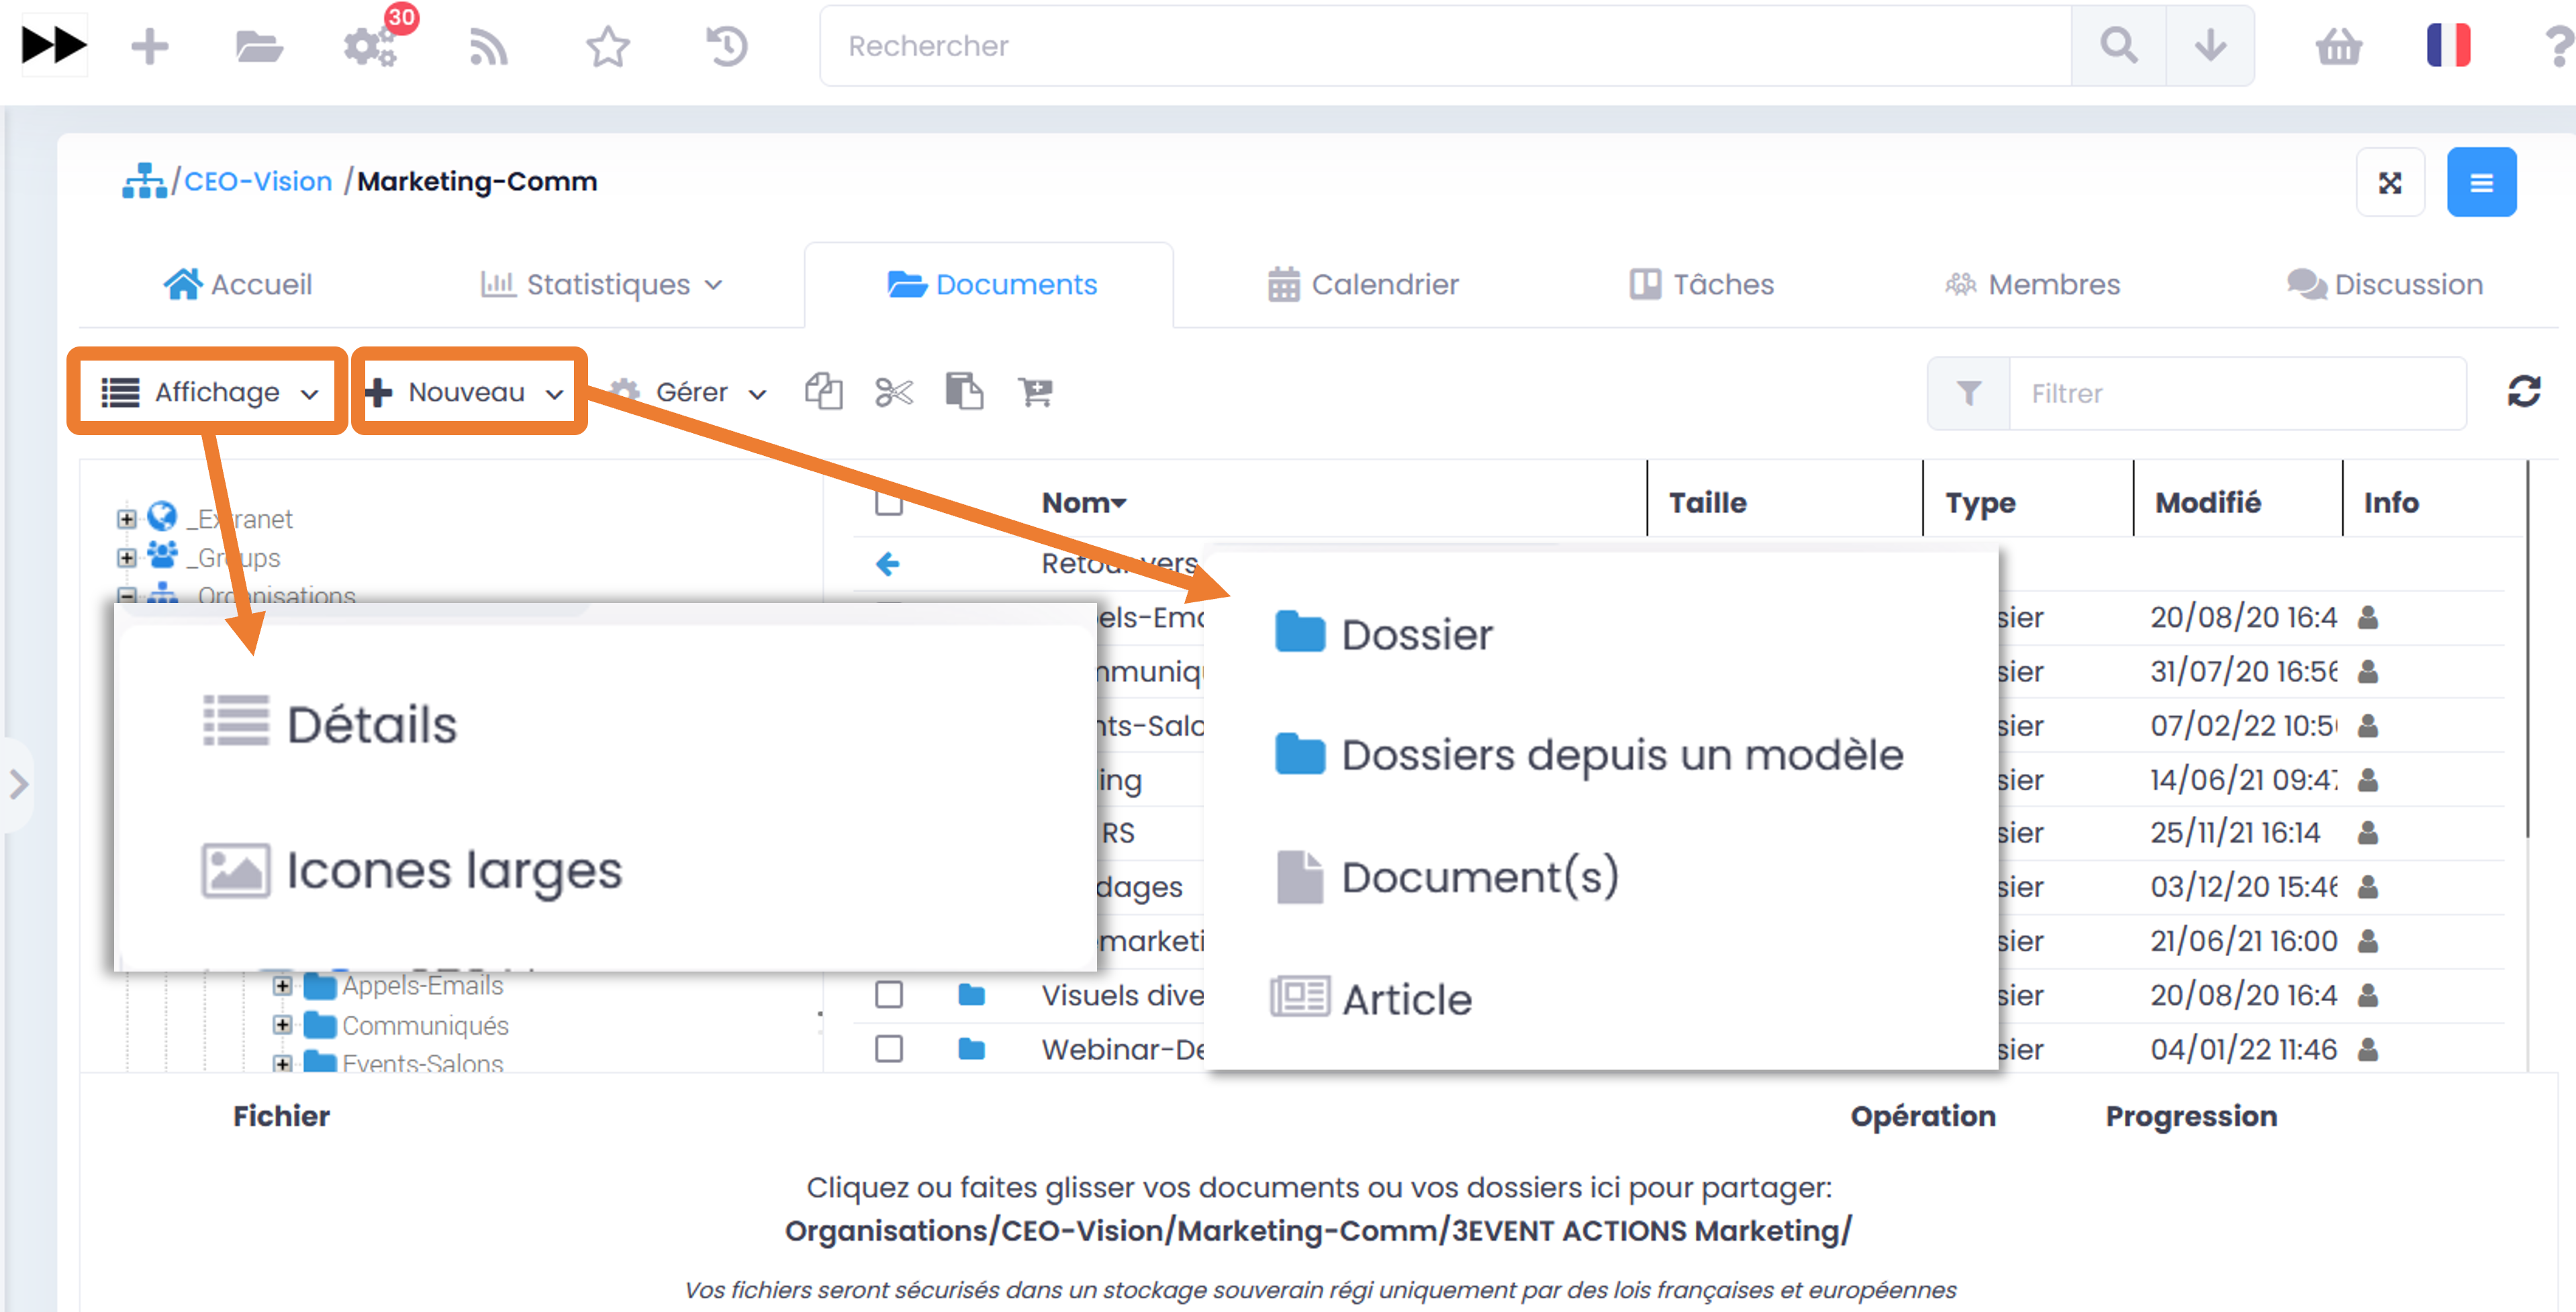
Note
The selected explorer view mode is applied instantly everywhere.
Create new content in the selected folder
- If you press the “New” button, you have the choice to create in the current location:
Folder
A folder from template allows you to add multiple folders according to a pre-recorded tree template
One or more documents
An article (Wiki page)
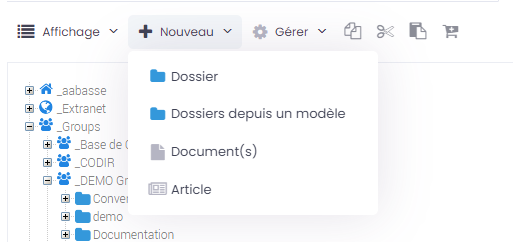
Note
In order to create a new document in your current location, click on New, then Document. You will then be taken back to the document creation form with the pre-selected location .
Management of metadata (taxonomy) and locations of content
To be able to click on the “Manage” button, you must first select at least one folder or content in the main area of the file explorer. Once the elements have been selected, you can perform mass actions via this “Manage” button, i.e. on several files or content simultaneously.
Available actions are:
Management of metadata
Sharing / Editing Locations
Creation of posts
Sharing by email
Pre-Archiving
Adding to the cart
Note
Taxonomy information modifications are possible on: state, category, tag(s), and language. If you do not wish to edit all these elements, leave the field positioned on Do not edit. This information will then be used in the filters of a search result.
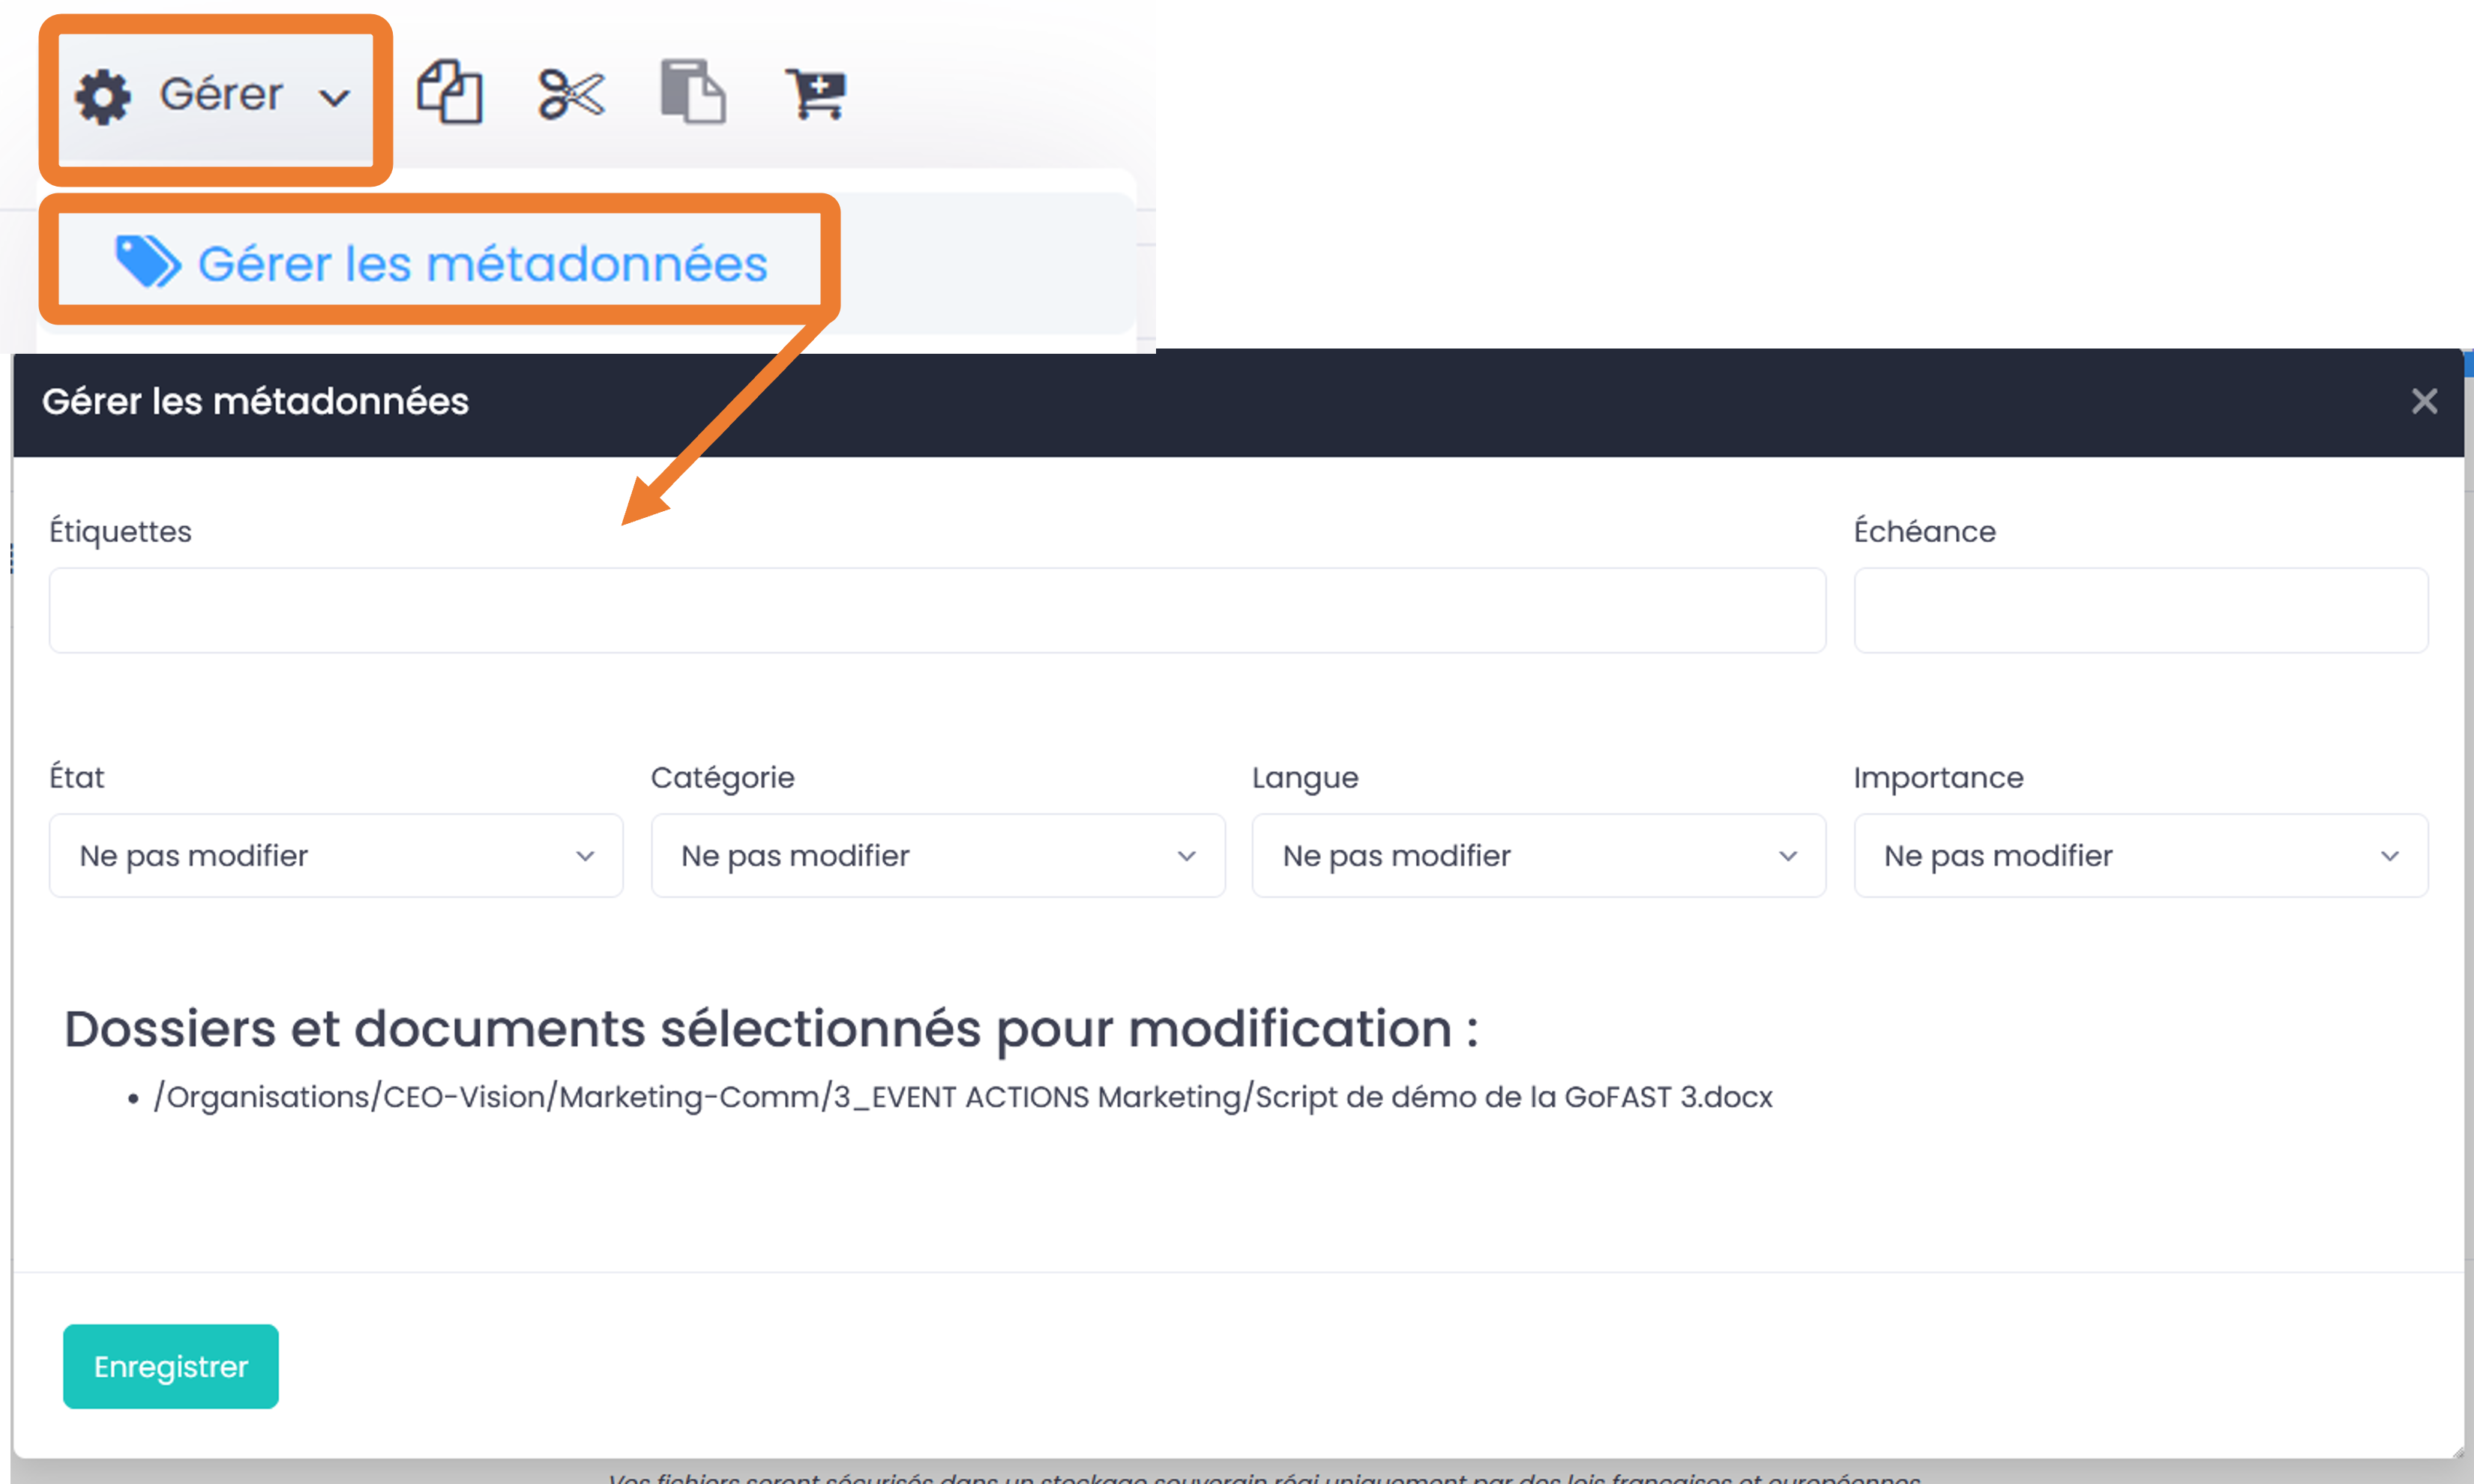
Filtering the content
This feature makes it easier find your documents in the folder where you are. In the Filter bar (in the main file explorer area), write the title of the document you are looking for, and all documents in the folder will be filtered.
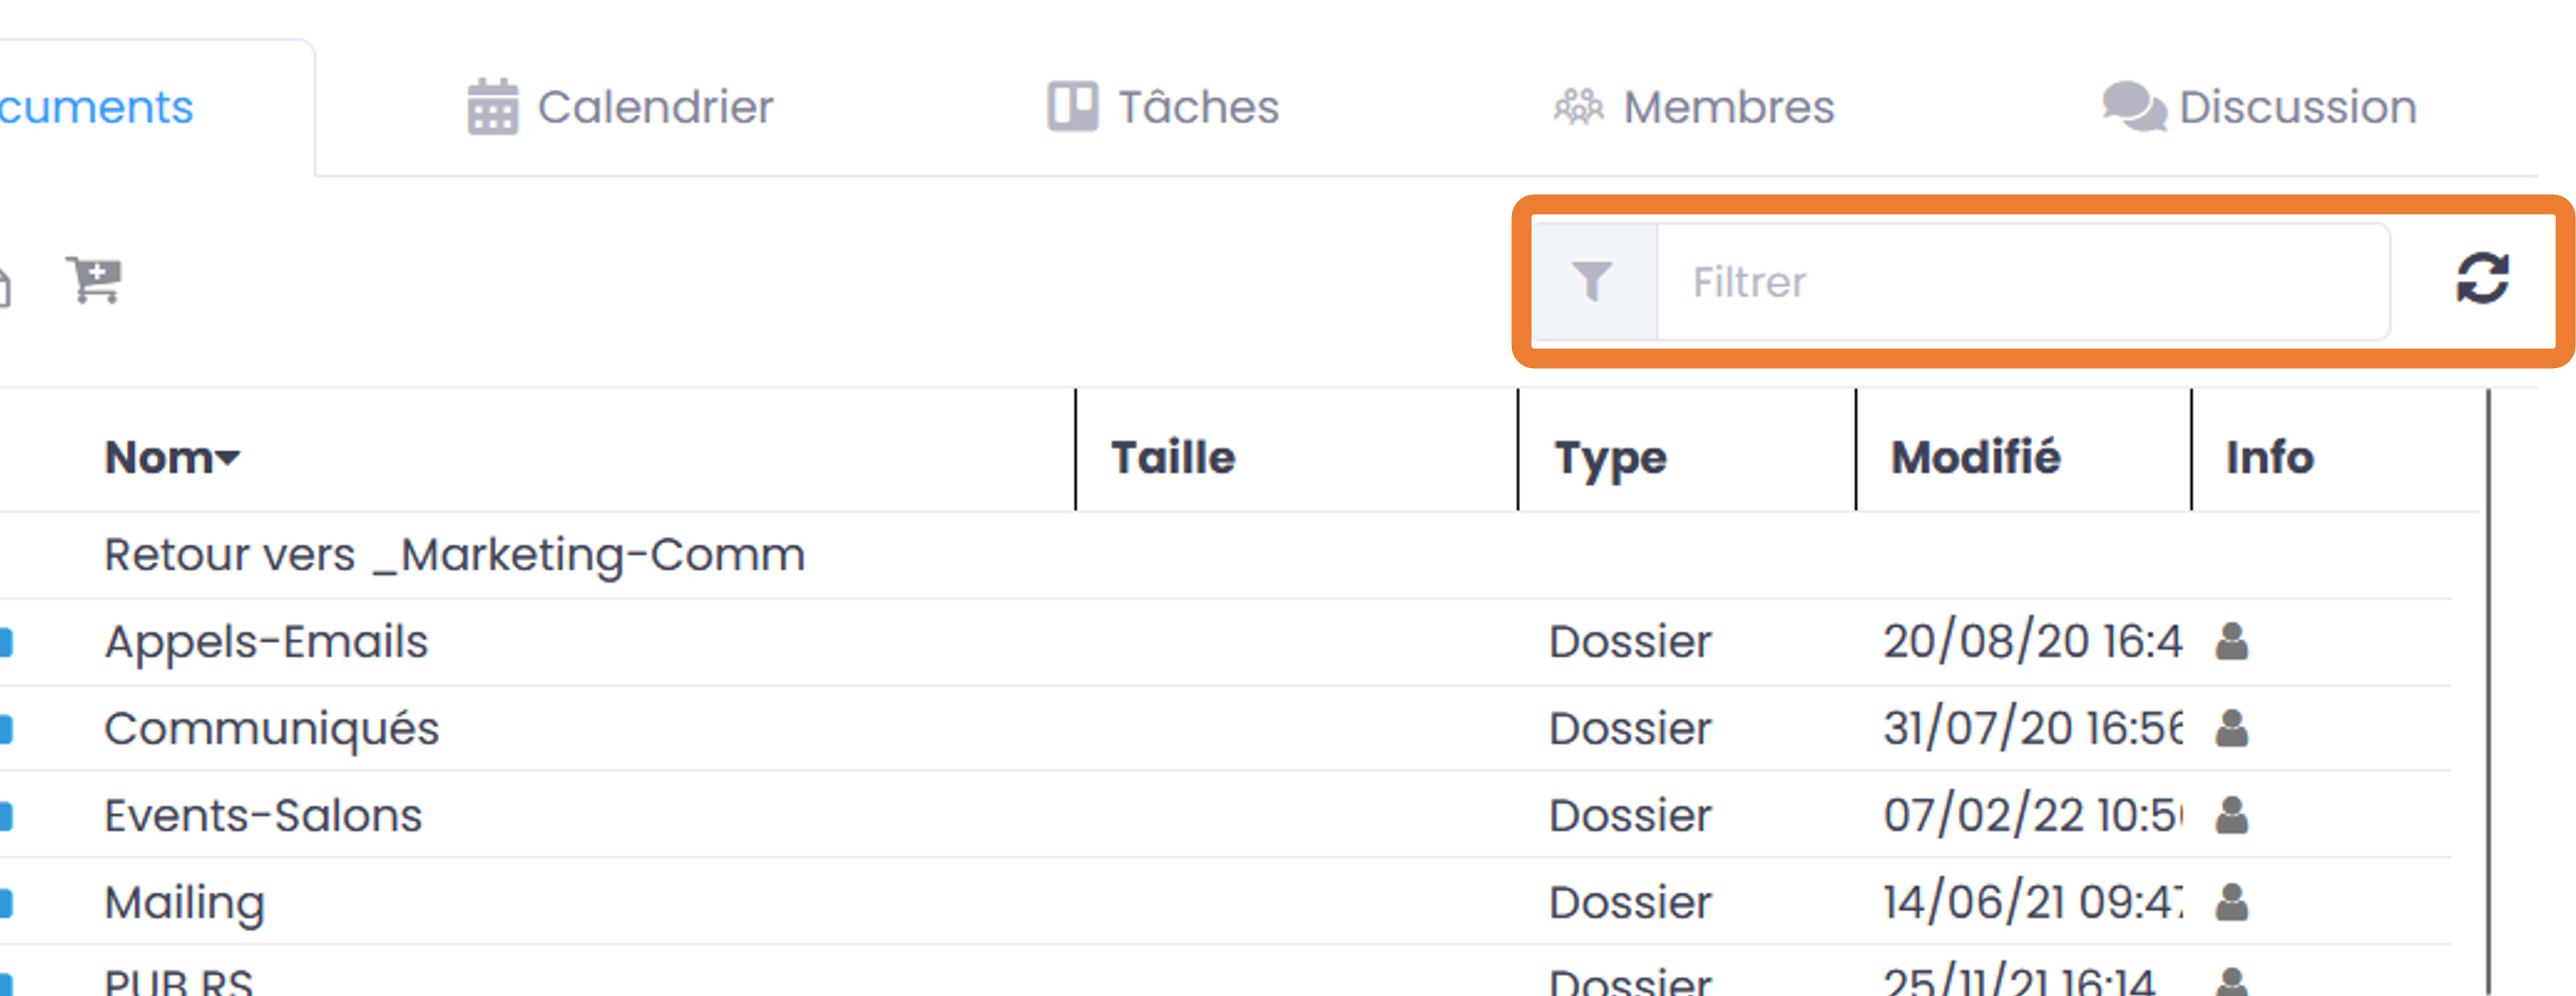
Copy/cut/paste document
Copy/Paste a document:
The icon of the 2 superimposed sheets allows you to Copy the selected document to another location of the GoFAST, you will then have to press the last icon when you want to paste the document in the location where you want to paste it, right-click mouse and “Paste”.
This approach means that the document will be duplicated, and currently there is a risk of having duplicates because if someone changes the document in one place, the other copied document will not be changed. You end up with 2 documents with the same name, in different places, with different versions.
In this case, we advise you to use the multiple places feature. Therefore, copying and pasting a document is only useful if you want to create a new document similar to the first one and change the title, but not use the same document in multiple places.
Note
GoFAST allows you to post documents in multiple locations without making copies of your documents. Preference is given to multiple locations (via metadata) so that the same version of a document remains visible from different locations and avoids duplication with different versions and always with the most recent update. (= one document, one current version, one permalink).

Cut/Paste a document
The principle is similar to Copy/Paste, but Cut/Paste allows to move a folder to another location on GoFAST =. This time, you must use the scissors to cut and the penultimate black and white icon to Paste.

This approach, unlike the previous one, avoids duplication. There is then only one version of the document in one place on GoFAST.
Note
- It also works with the usual keyboard shortcuts:
CTRL+C for Copying
CTRL + X for Cutting
CTRL + V for Pasting
Note
It is the same principle as dragging the document from one location to another in the tree structure. You can only Cut/Paste documents in GoFAST. You cannot therefore paste an external document to the GoFAST, it must be downloaded beforehand. It is also possible to move a document by changing its locations.
How to add document(s) to the cart
When you select one or more files, you can click on the “Cart” icon to add them to your cart. This cart is for performing actions on selected documents, such as starting a review process (workflow).
For more details, see the paragraph dedicated to Task Processes (Workflows)” and to the “Cart”.

Actions from GoFAST File Browser (File Explorer)
The actions authorized on spaces, folders and/or files visible in the file explorer remain strictly in accordance with your rights on the concerned space. When you are in File Explorer, right-click to display the contextual actions menu.
Actions on a single document
When you right-click on the desired document, the contextual actions menu opens and allows you to perform various actions, without going to the document page.
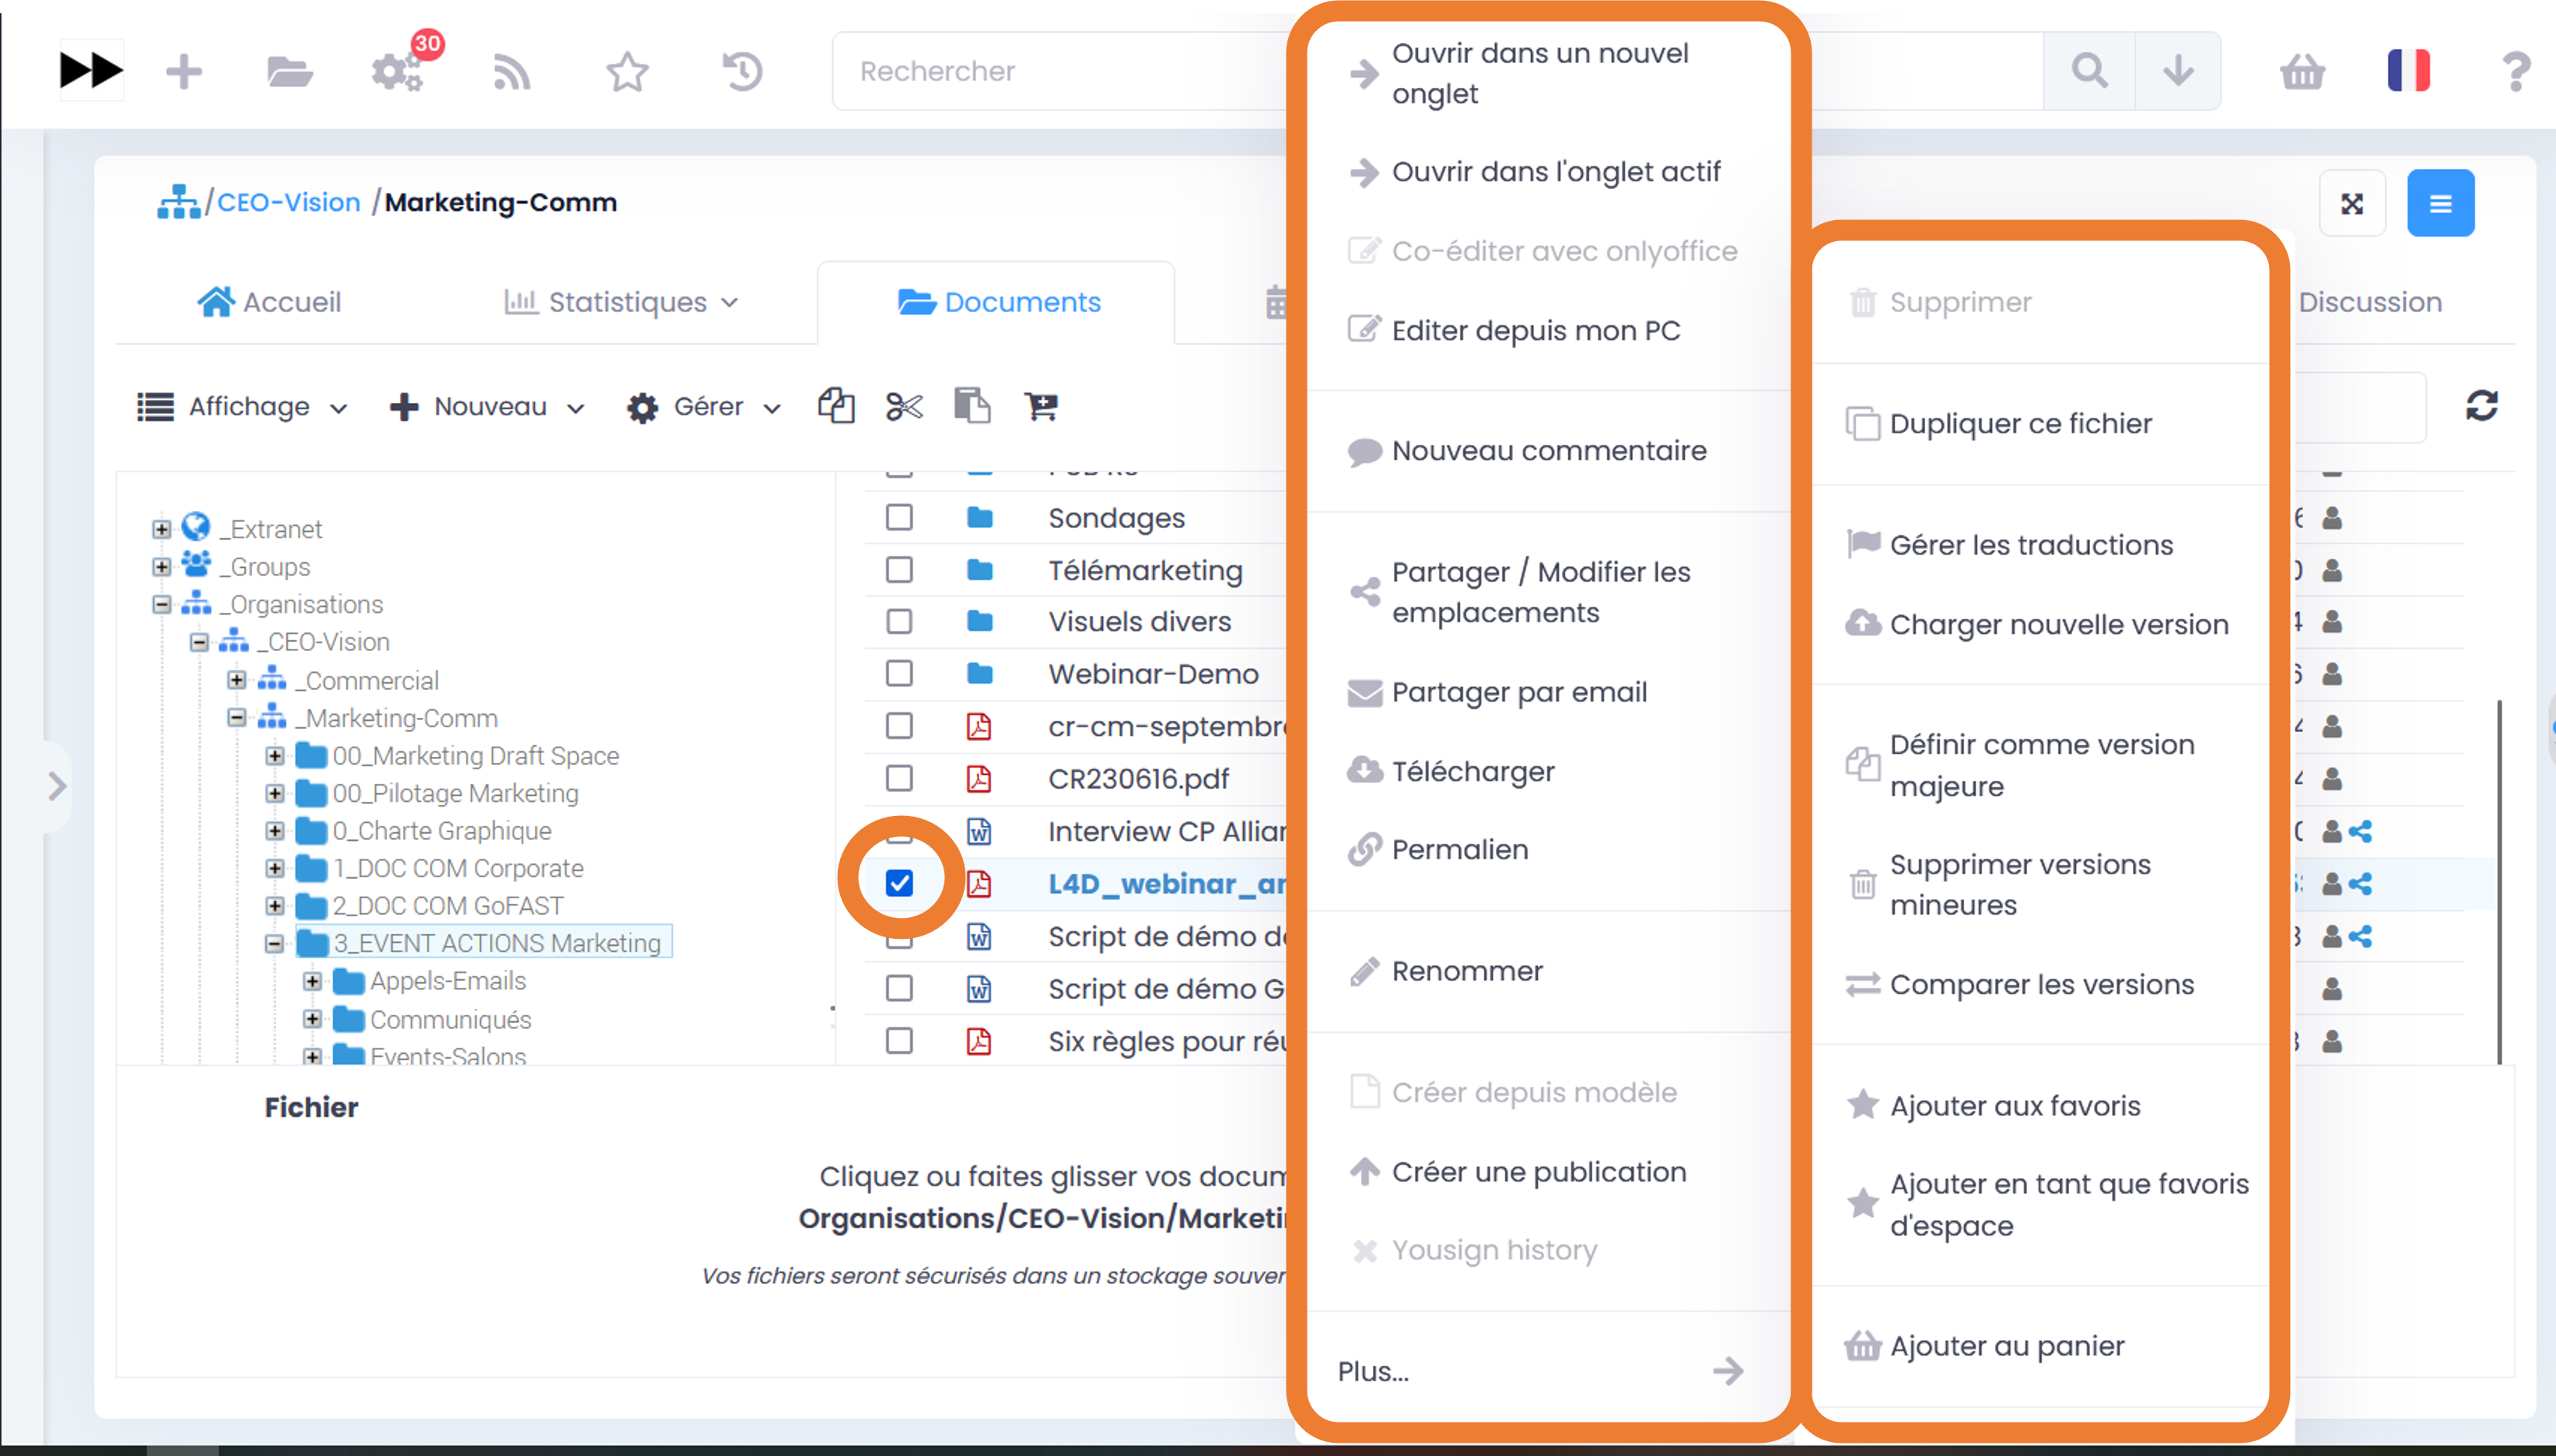
To find out the list of possible actions via the contextual actions menu on a document (“Hamburger” menu), please refer to the section: “Contextual actions menu”.
- In addition to the actions usually available in the “Hamburger” menu, from the file explorer, you have these two additional actions:
Open in a new tab (in your browser)
Open in active tab (replaces current view)
Actions on a selection of files or folders (classic)
To select multiple documents in the File Explorer, you must click the boxes to the left of the file titles (in the main area of the File Explorer). You can select all content from the location you are in with one click in the box at the top of the content list.
Note
You can also select the first document at the top of the selection list, and then hold down the Shift key and click the last document in the list that you want to select. This approach is valid for: Windows, Mac, Linux
When right-clicking on multiple files, the suggested actions are limited compared to the action on a single file:
Delete
Downloading
Compress
Management of metadata
Sharing / Editing Locations
Creation of Publications
Sharing by email
Pre-Archiving
Adding to the cart
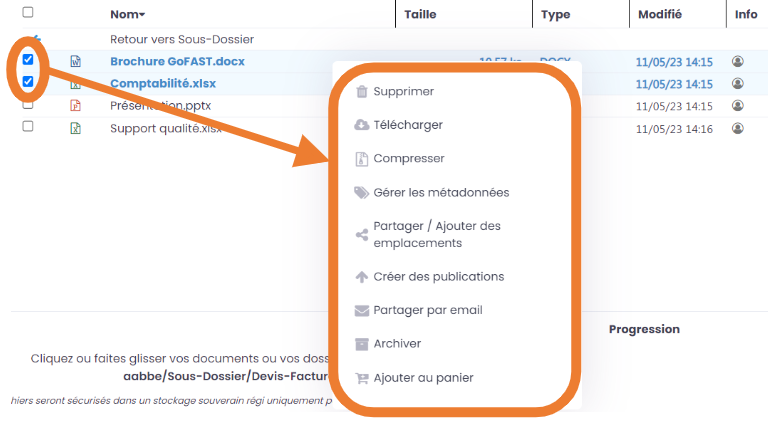
Note
When multi-selecting, if a folder is selected, only two actions are available “Delete” and “Compress”
Bulk documents download
You can drag a document to GoFAST at any time from the file explorer.
After selecting the desired documents, click “Download”. This will upload a ZIP file to your computer.
From File Explorer:
It’s possible to compress and decompress files from GoFAST’s File Explorer.
Compression of files and folders
After selecting the desired items, just right click on one of them and left click on “Compress”.
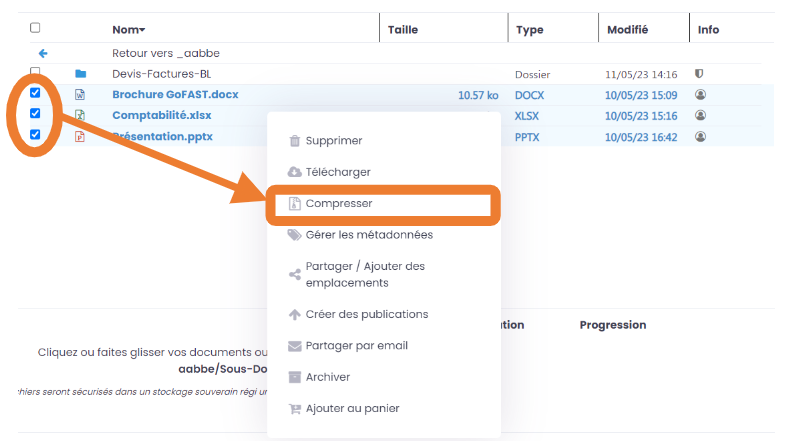
- The compression window opens:
Selected files are displayed
Click on “Compress” to finalize the creation of the ZIP file
Once it is created, it’s possible to interact with the ZIP file like any other file.
Extraction of files and folders
Right-click on a ZIP file that opens the suggested actions, click on “More”, then on “Extract”.
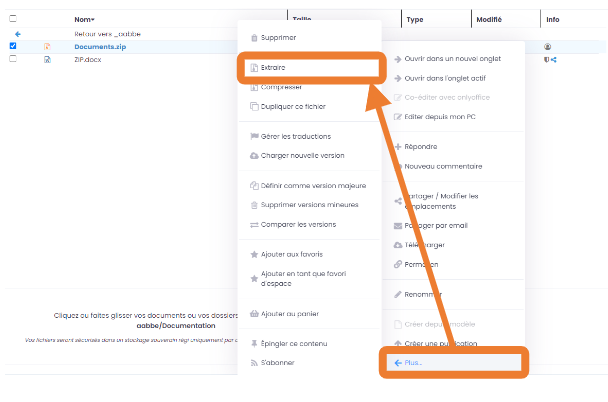
- The extraction window opens:
The selected ZIP file is displayed
Click on “Extract”
Note
If the files of this ZIP file already exist in this space, a new folder will be created with the name of the ZIP file and the files will be extracted from it.
Bulk document sharing via email
It is possible to send multiple files via email sharing.
Note
This functionality is possible individually on the document page, as well as in bulk from the GoFAST File Browser.
After selecting the desired documents, simply click on Manage (file explorer taskbar) or right-click on your selection, then click on Share by email.
The form for sending by email opens and you must then enter the users (GoFAST or external emails).
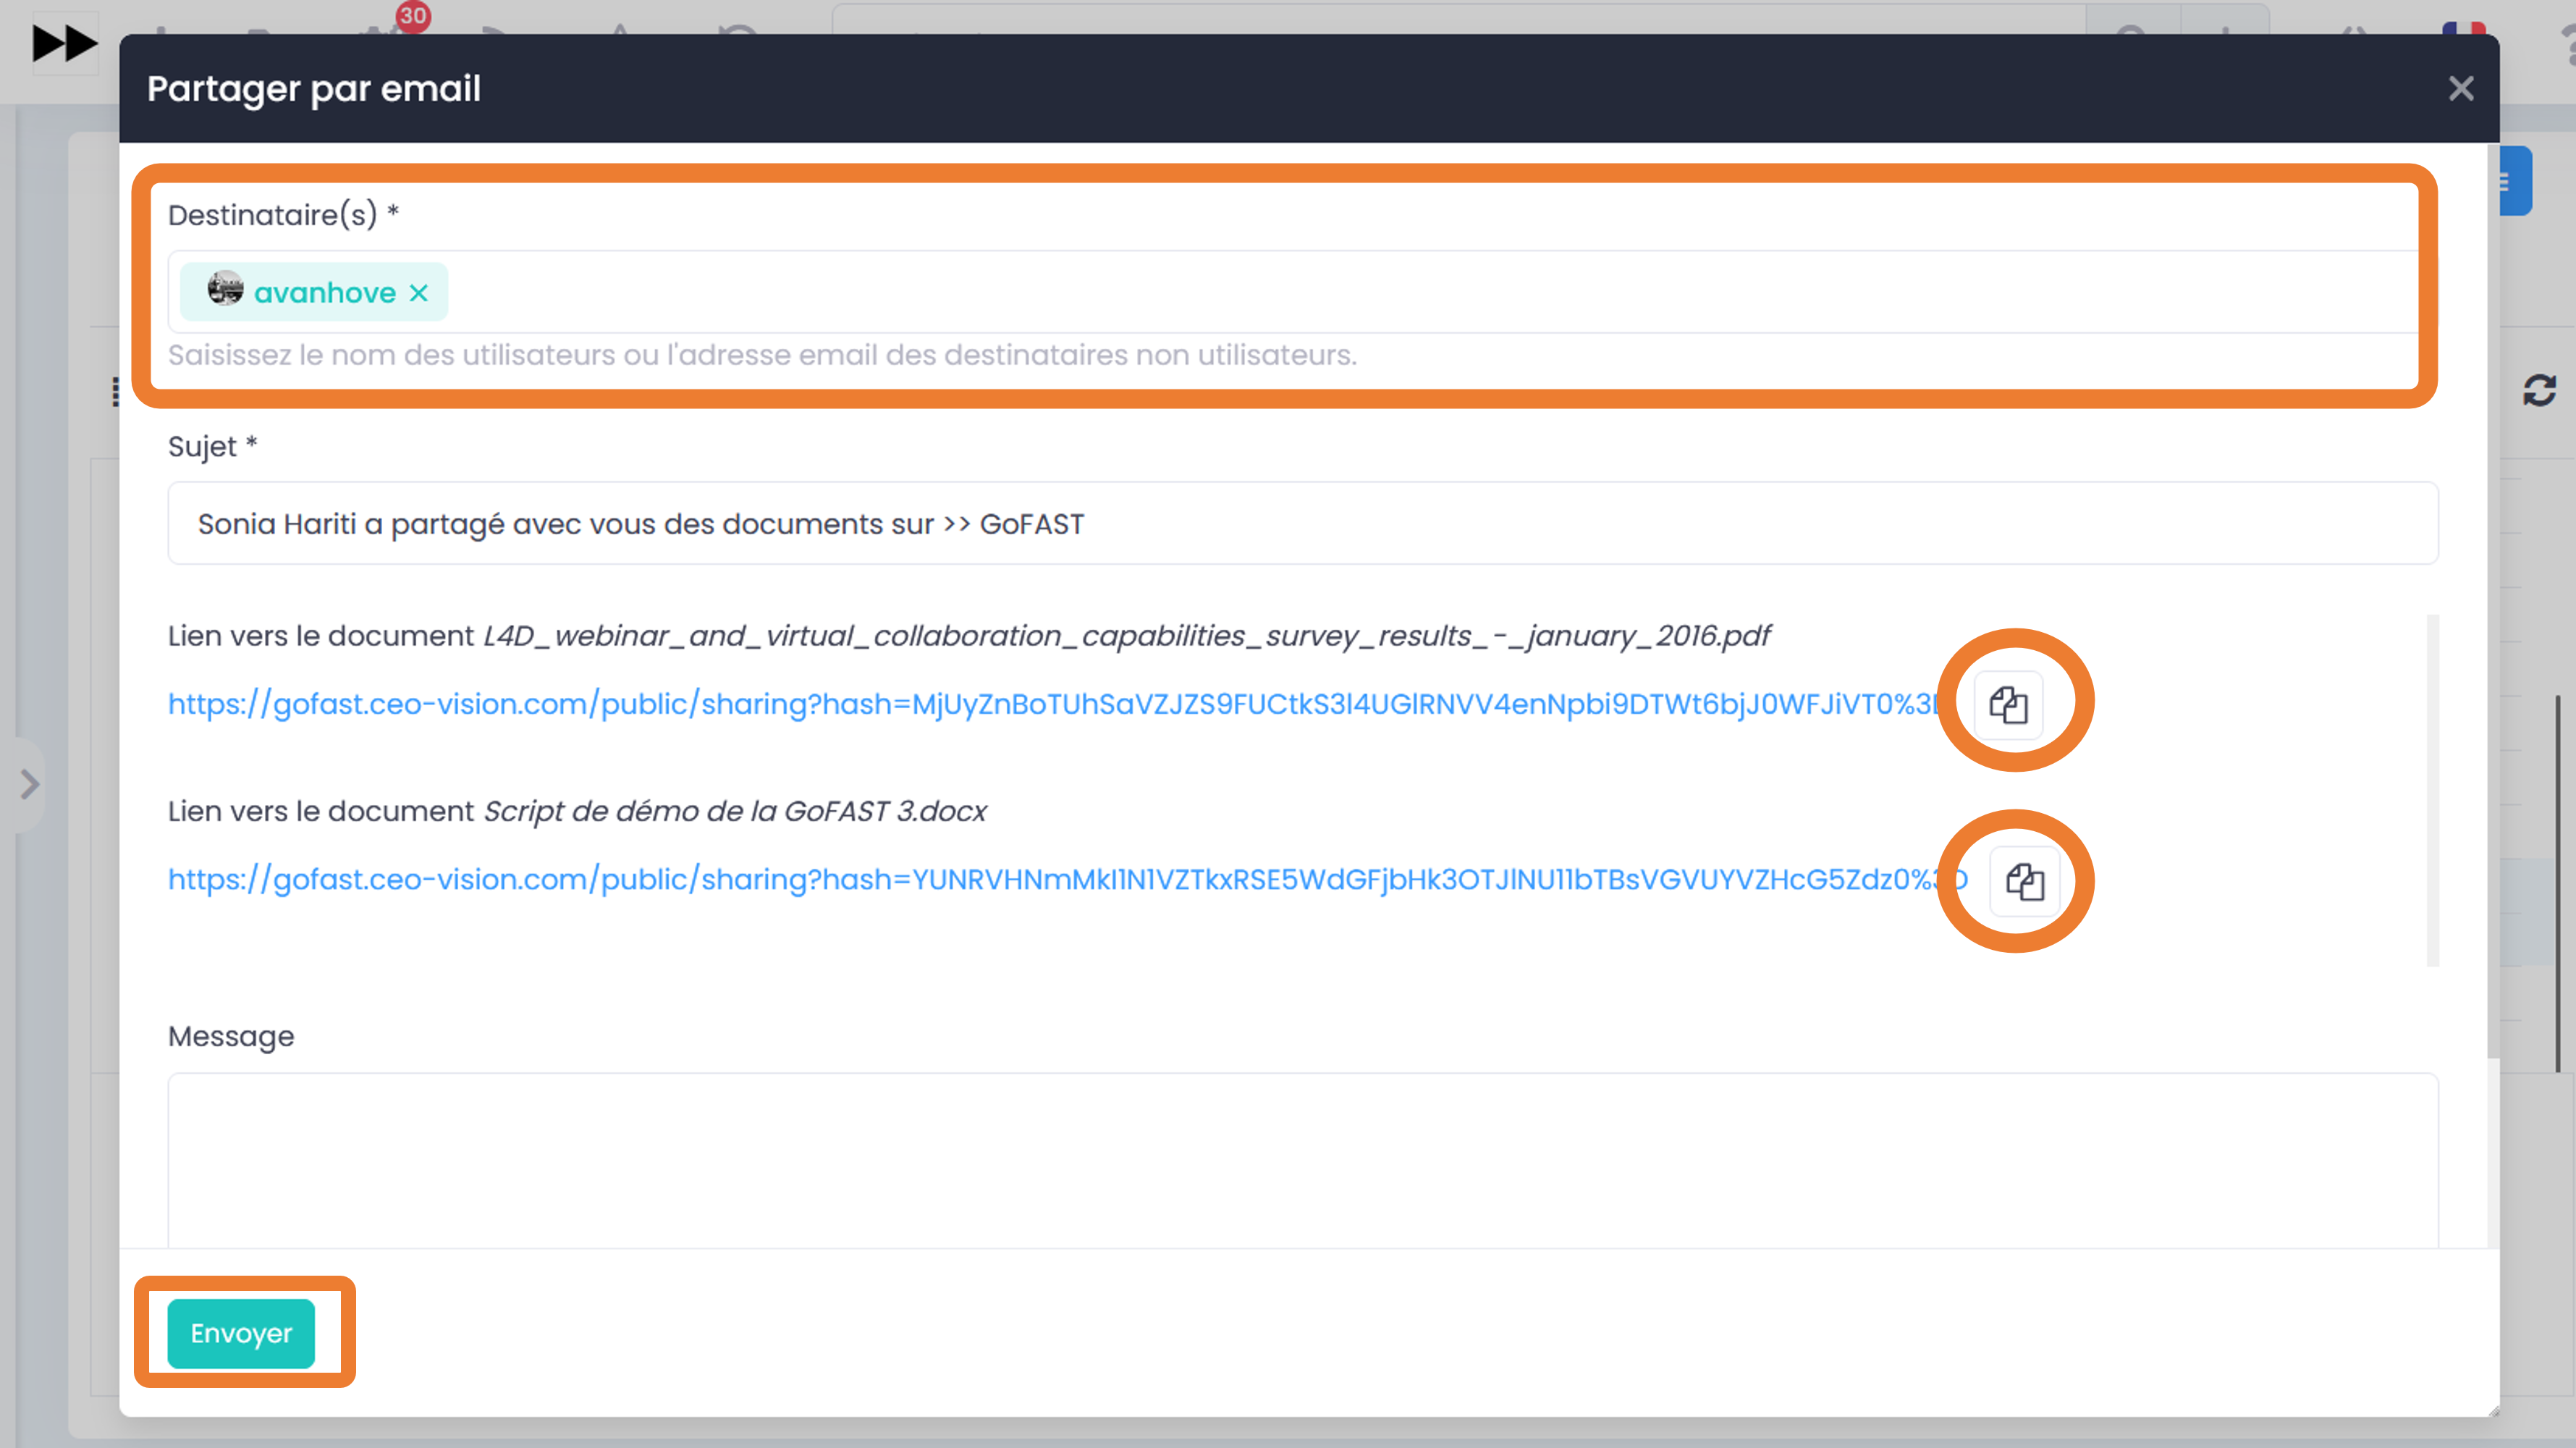
The user will then receive a notification listing all the documents with a “Download documents” button, as soon as he clicks on it, he will be redirected to the download page:
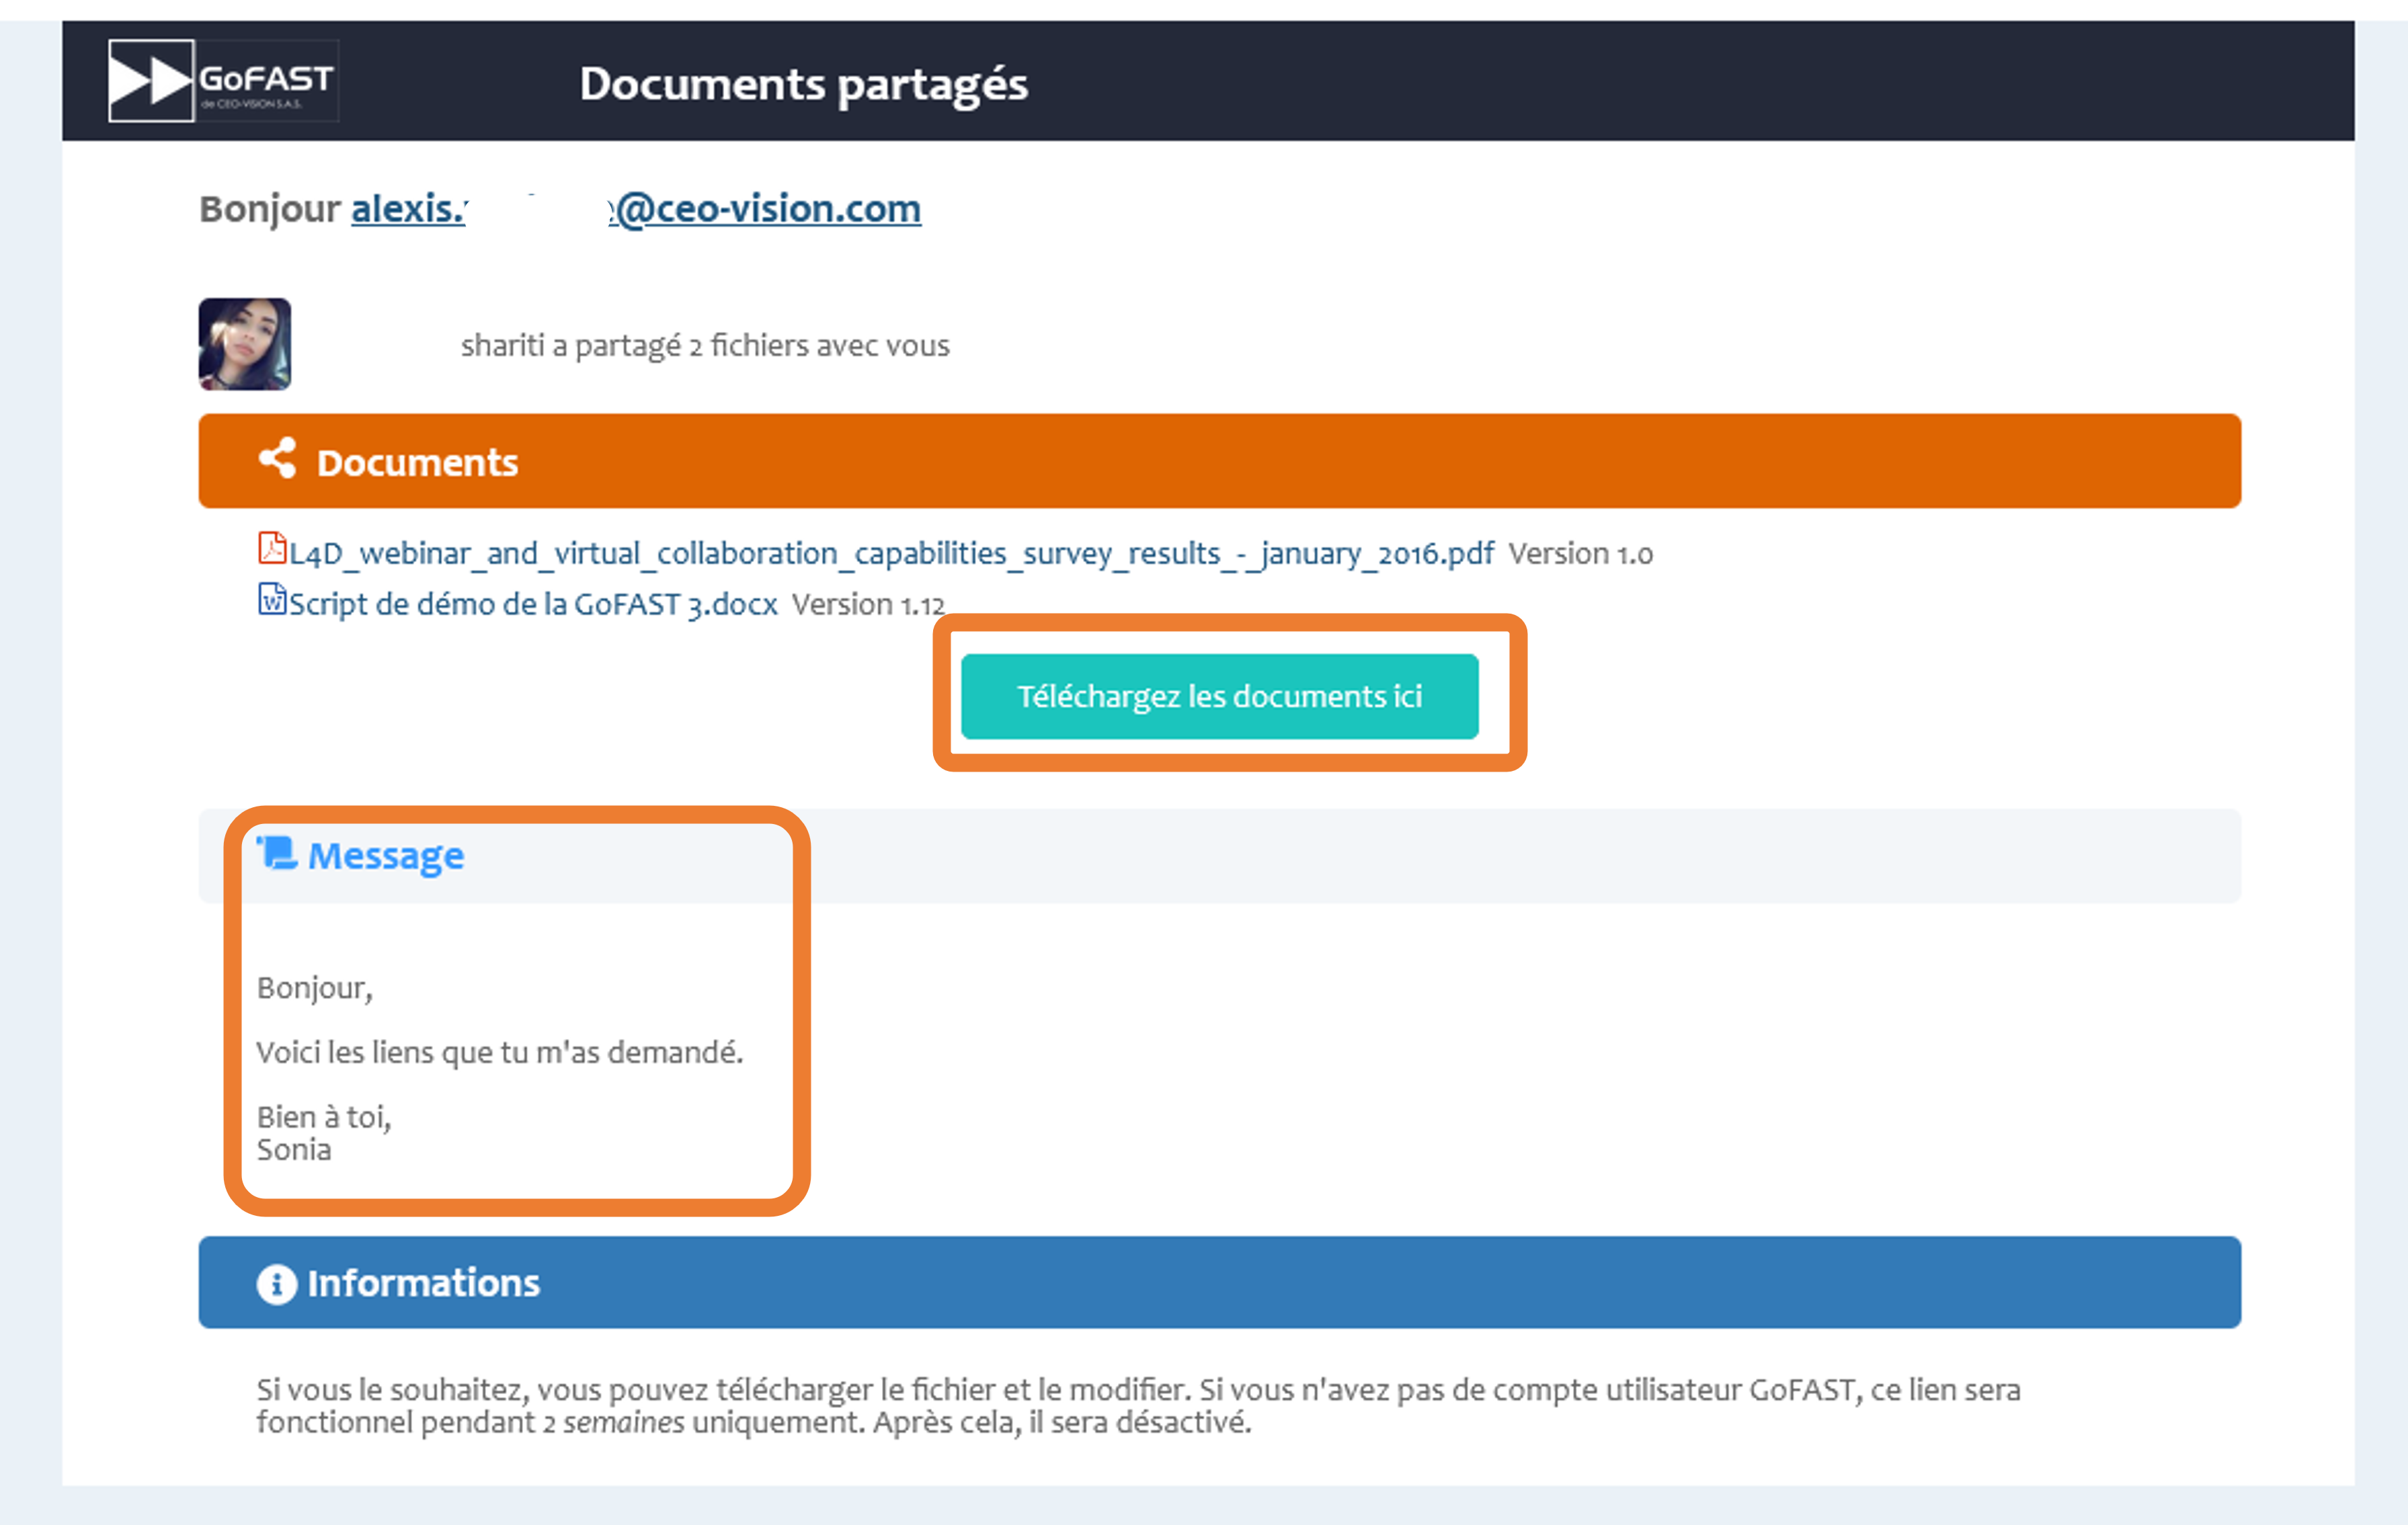
Note
You will receive an email notification as soon as the person has downloaded the document.
Bulk creation of document publications
You can create publications from a set of working documents to share finished/validated versions in other Collaborative Spaces, without sharing the entire version history and comments of working documents. Publications are thus widely shared and working documents remain accessible only in the original Spaces.
Note
This functionality is possible individually on the document page, as well as in bulk from the GoFAST File Browser.
After selecting the desired documents, simply click on Manage or right-click on your choice, then on Create publications.
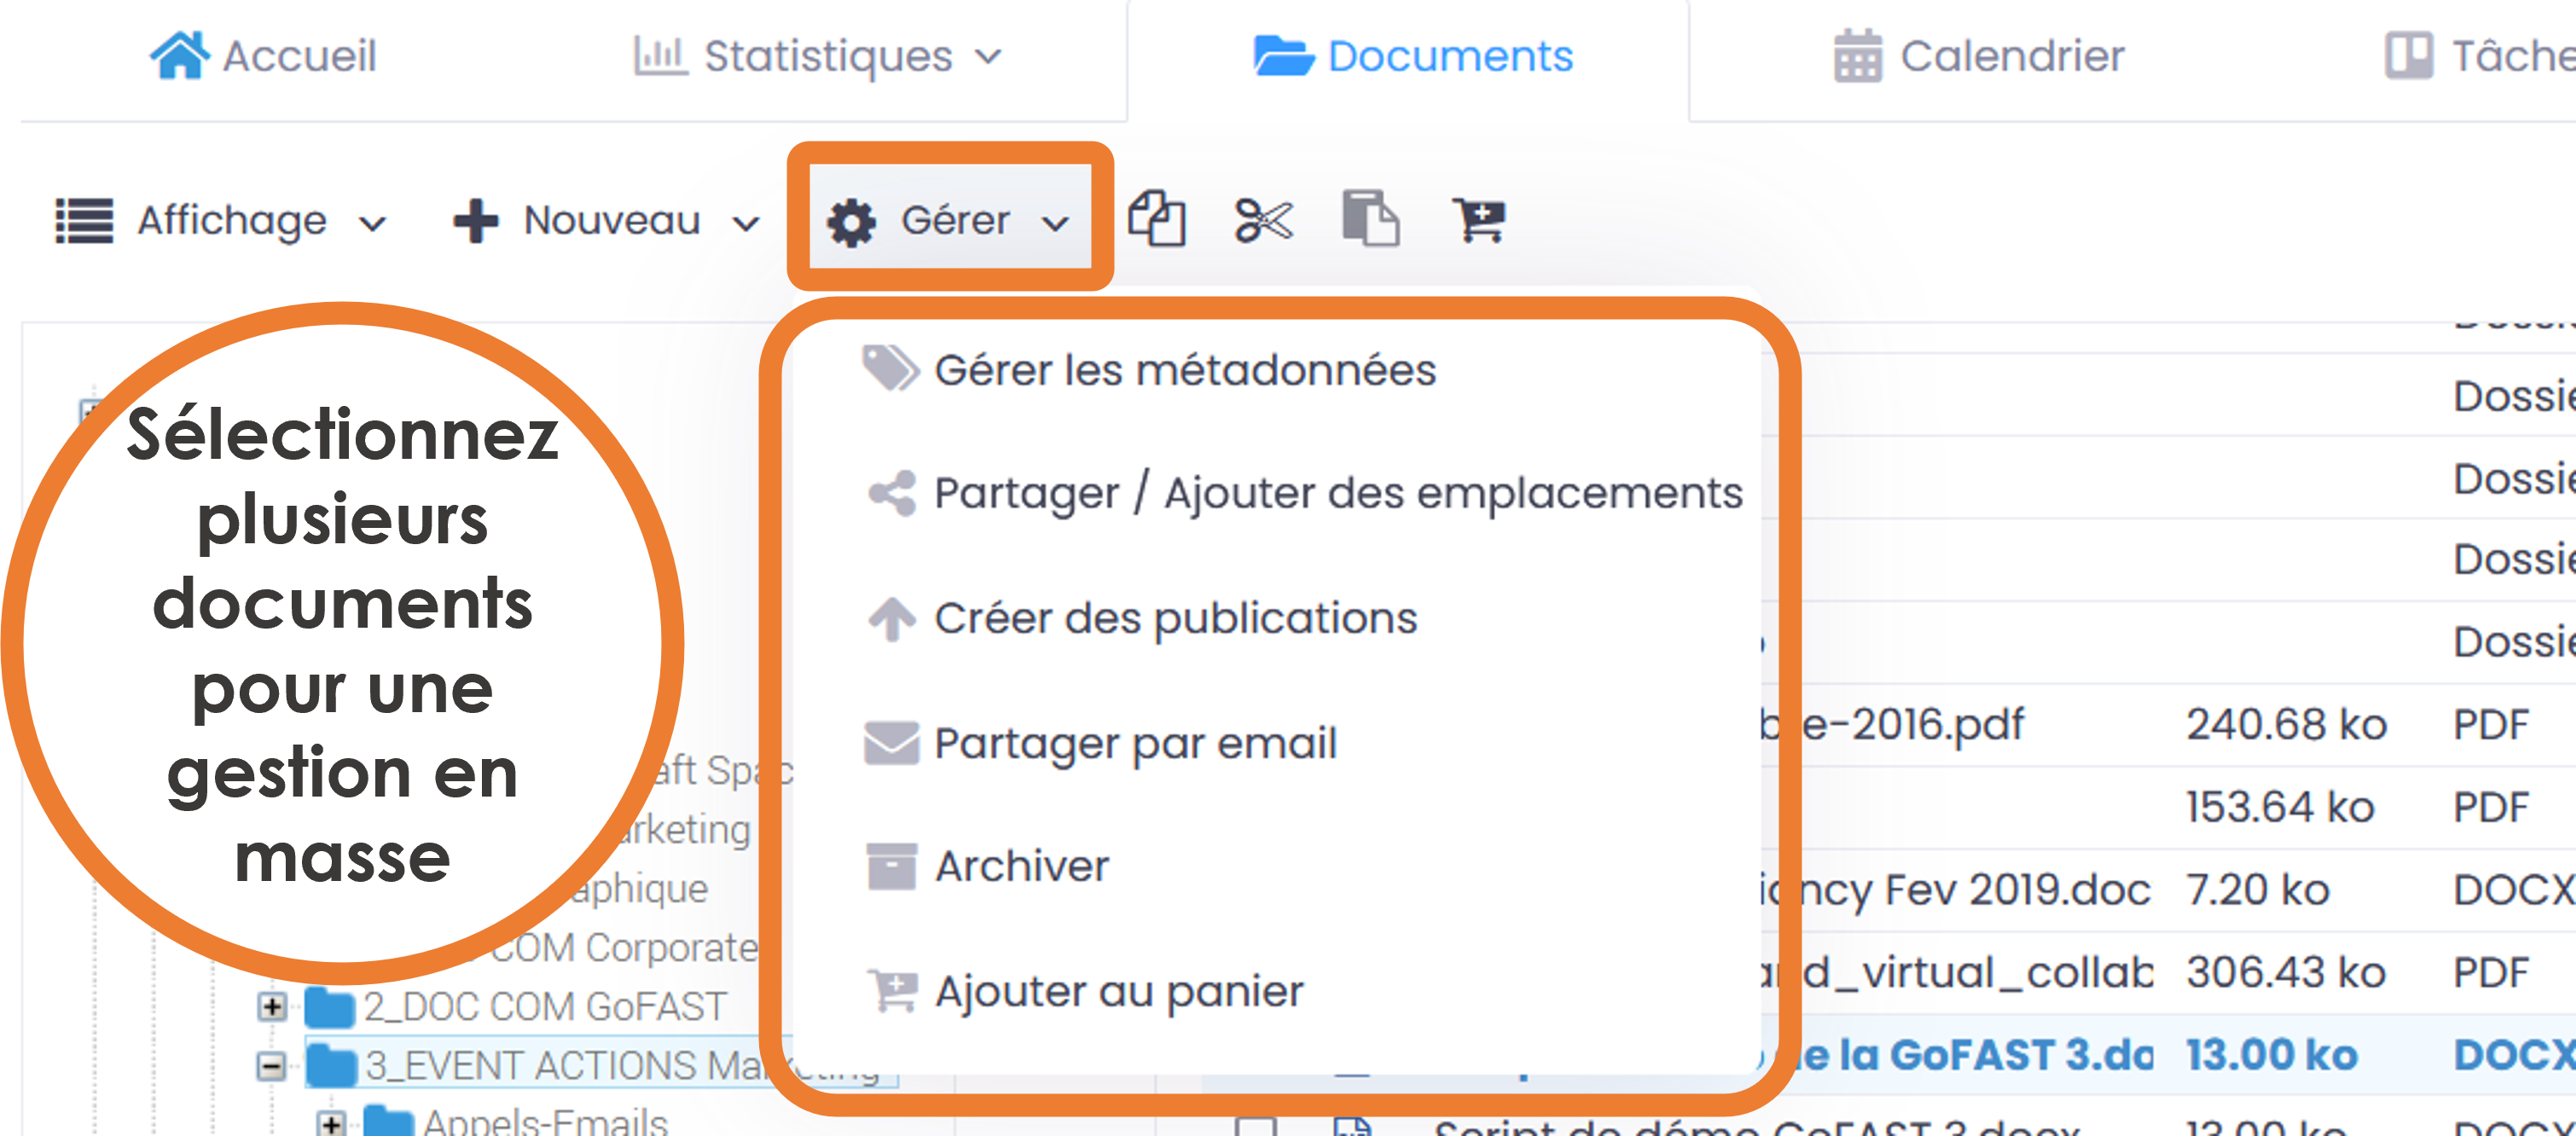
The publication management form opens and you must then click the locations where these publications will be shared. You can ask to convert to PDF or leave the original formats.
Note
Publications are a key feature for efficient and secure document management.
Bulk Pre-Archive Documents
You can pre-archive a selection of documents at once.
Note
This functionality is possible individually on the document page, as well as in bulk from the GoFAST File Browser.
After selecting the desired documents, just click on Manage then on Manage metadata, a window opens and you select Pre-Archived on the State field then click on “Save”
Sharing/Adding locations (Multi-location = zero file duplicates)
You can add locations to one or more documents at the same time from the file explorer. We are talking about sharing without duplication of documents.
- To find out more about the notion of Multi-location, please refer to the sections:
“How to edit Location/Sharing
“Collaborative Spaces”
After selecting the documents you want, just press Manage or right-click on the selected option, and then click “Share / Add locations”.
New Location window opens:
Tick the different locations where you want to share the document.
Finish by clicking on “Save”
Read the note in the box carefully:
You can go further in the tree structure by clicking on the small “+” in front of the space names:
Note
If you do not have administrative rights for the space, or if you do not own the document, the location box will be grayed out. You will be able to share the document in multiple locations, but you will not be able to remove it from its original location.
When documents have multiple locations, a “shared” icon is displayed in the “info” column in the main area of File Explorer.
Mirror folder (multi-share folder)
The principle of a mirrored folder is to share a folder between 2 spaces, of any type (group, extranet, organization, public). The contents of the folder will be visible to all members of the space where the folder is mirrored. People with rights in the space where the folder is located (initial or mirrored space) will be able to modify the files inside the folder. To create a mirrored folder : Select a folder, right-click on it, then click on “Share / Modify locations”, you can then choose the space where you want to mirror the document.
A window will appear confirming that the folder has been mirrored. … figure:: media-guide/dossier_miroir.png
- alt:
Your file is now mirrored .! NOTE:: It is impossible to mirror a document containing a multi-threaded document.
Directory tree template (folders)
Creation of Directory Tree Template is a feature that has been implemented with the purpose of allowing GoFAST platform users to duplicate a set of folders/subfolders to save time. This is very practical when you have to build a standard tree structure in a Space, for example a tree template of projects.
Note
The tree models are created in FOLDERS TEMPLATES by the user support. This folder is located in the file explorer and is only visible to user-support.
In the file explorer task bar, click on “New” then “Folder from template”.
Choose your directory template, ticking the folders you want to duplicate, then click on the “Validate” button.
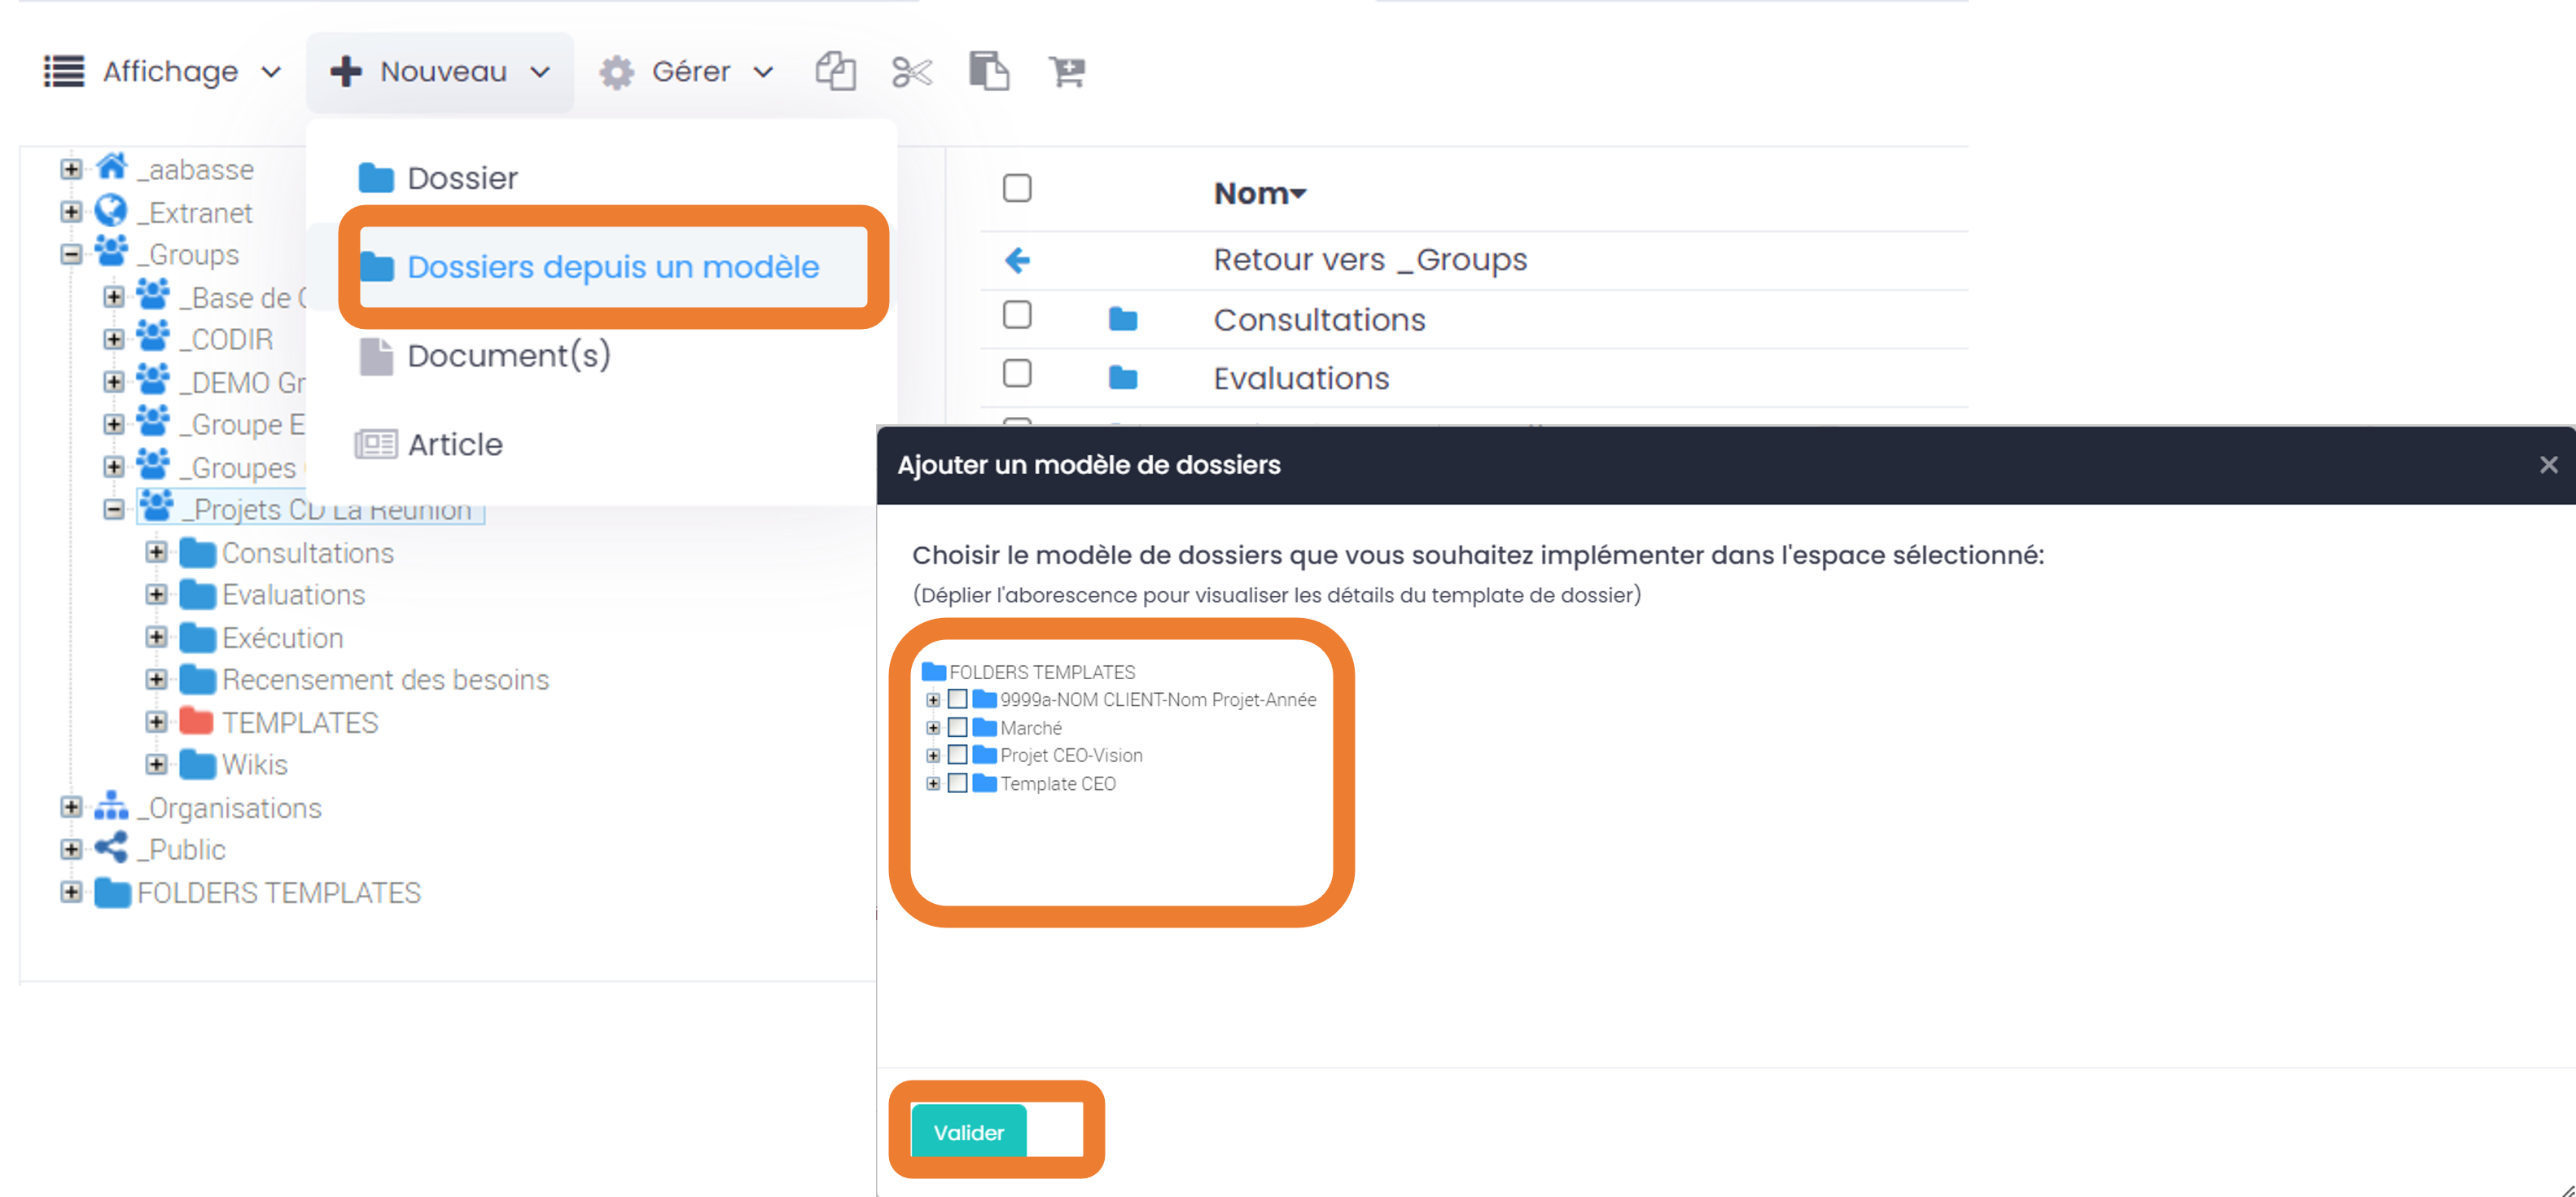
Note
Vous pouvez créer autant de répertoires et personnaliser votre arborescence à votre convenance, pour peu que vous ayez le rôle Contributeur ou Administrateur des Espaces où vous souhaitez créer ces dossiers.
Management of Collaborative Spaces
Collaborative spaces organize all the collaborative management and sharing of content across different departments, units, teams, external partners, and more.
This is a key element on the GoFAST Digital Workplace platform and it is strongly recommended to view the section: “Collaborative Spaces” in “The Basics”.
How to navigate the Collaborative Space page
General information
- The space is a set of:
Members with access to this space
Documents/Content/Tasks/Discussions/Statistics shared in this Space.
The name of the Space where you are is indicated on the top left of the Space page. Please view the section: “Basics” to find out more about the types of Collaborative Spaces.
Tabs available on the page of a Collaborative Space
Home: page configured by space administrators.

Statistics: with statistics of the activity of space members, as well as documentary statistics.
Please also view the section: “Statistics tab in a Space” (in “Statistics”)
But by clicking on the statistics tab, you can also access the audit of the space.
Note
Space audit is only available to space administrators.

Documents: file explorer positioned at the Space tree structure level.
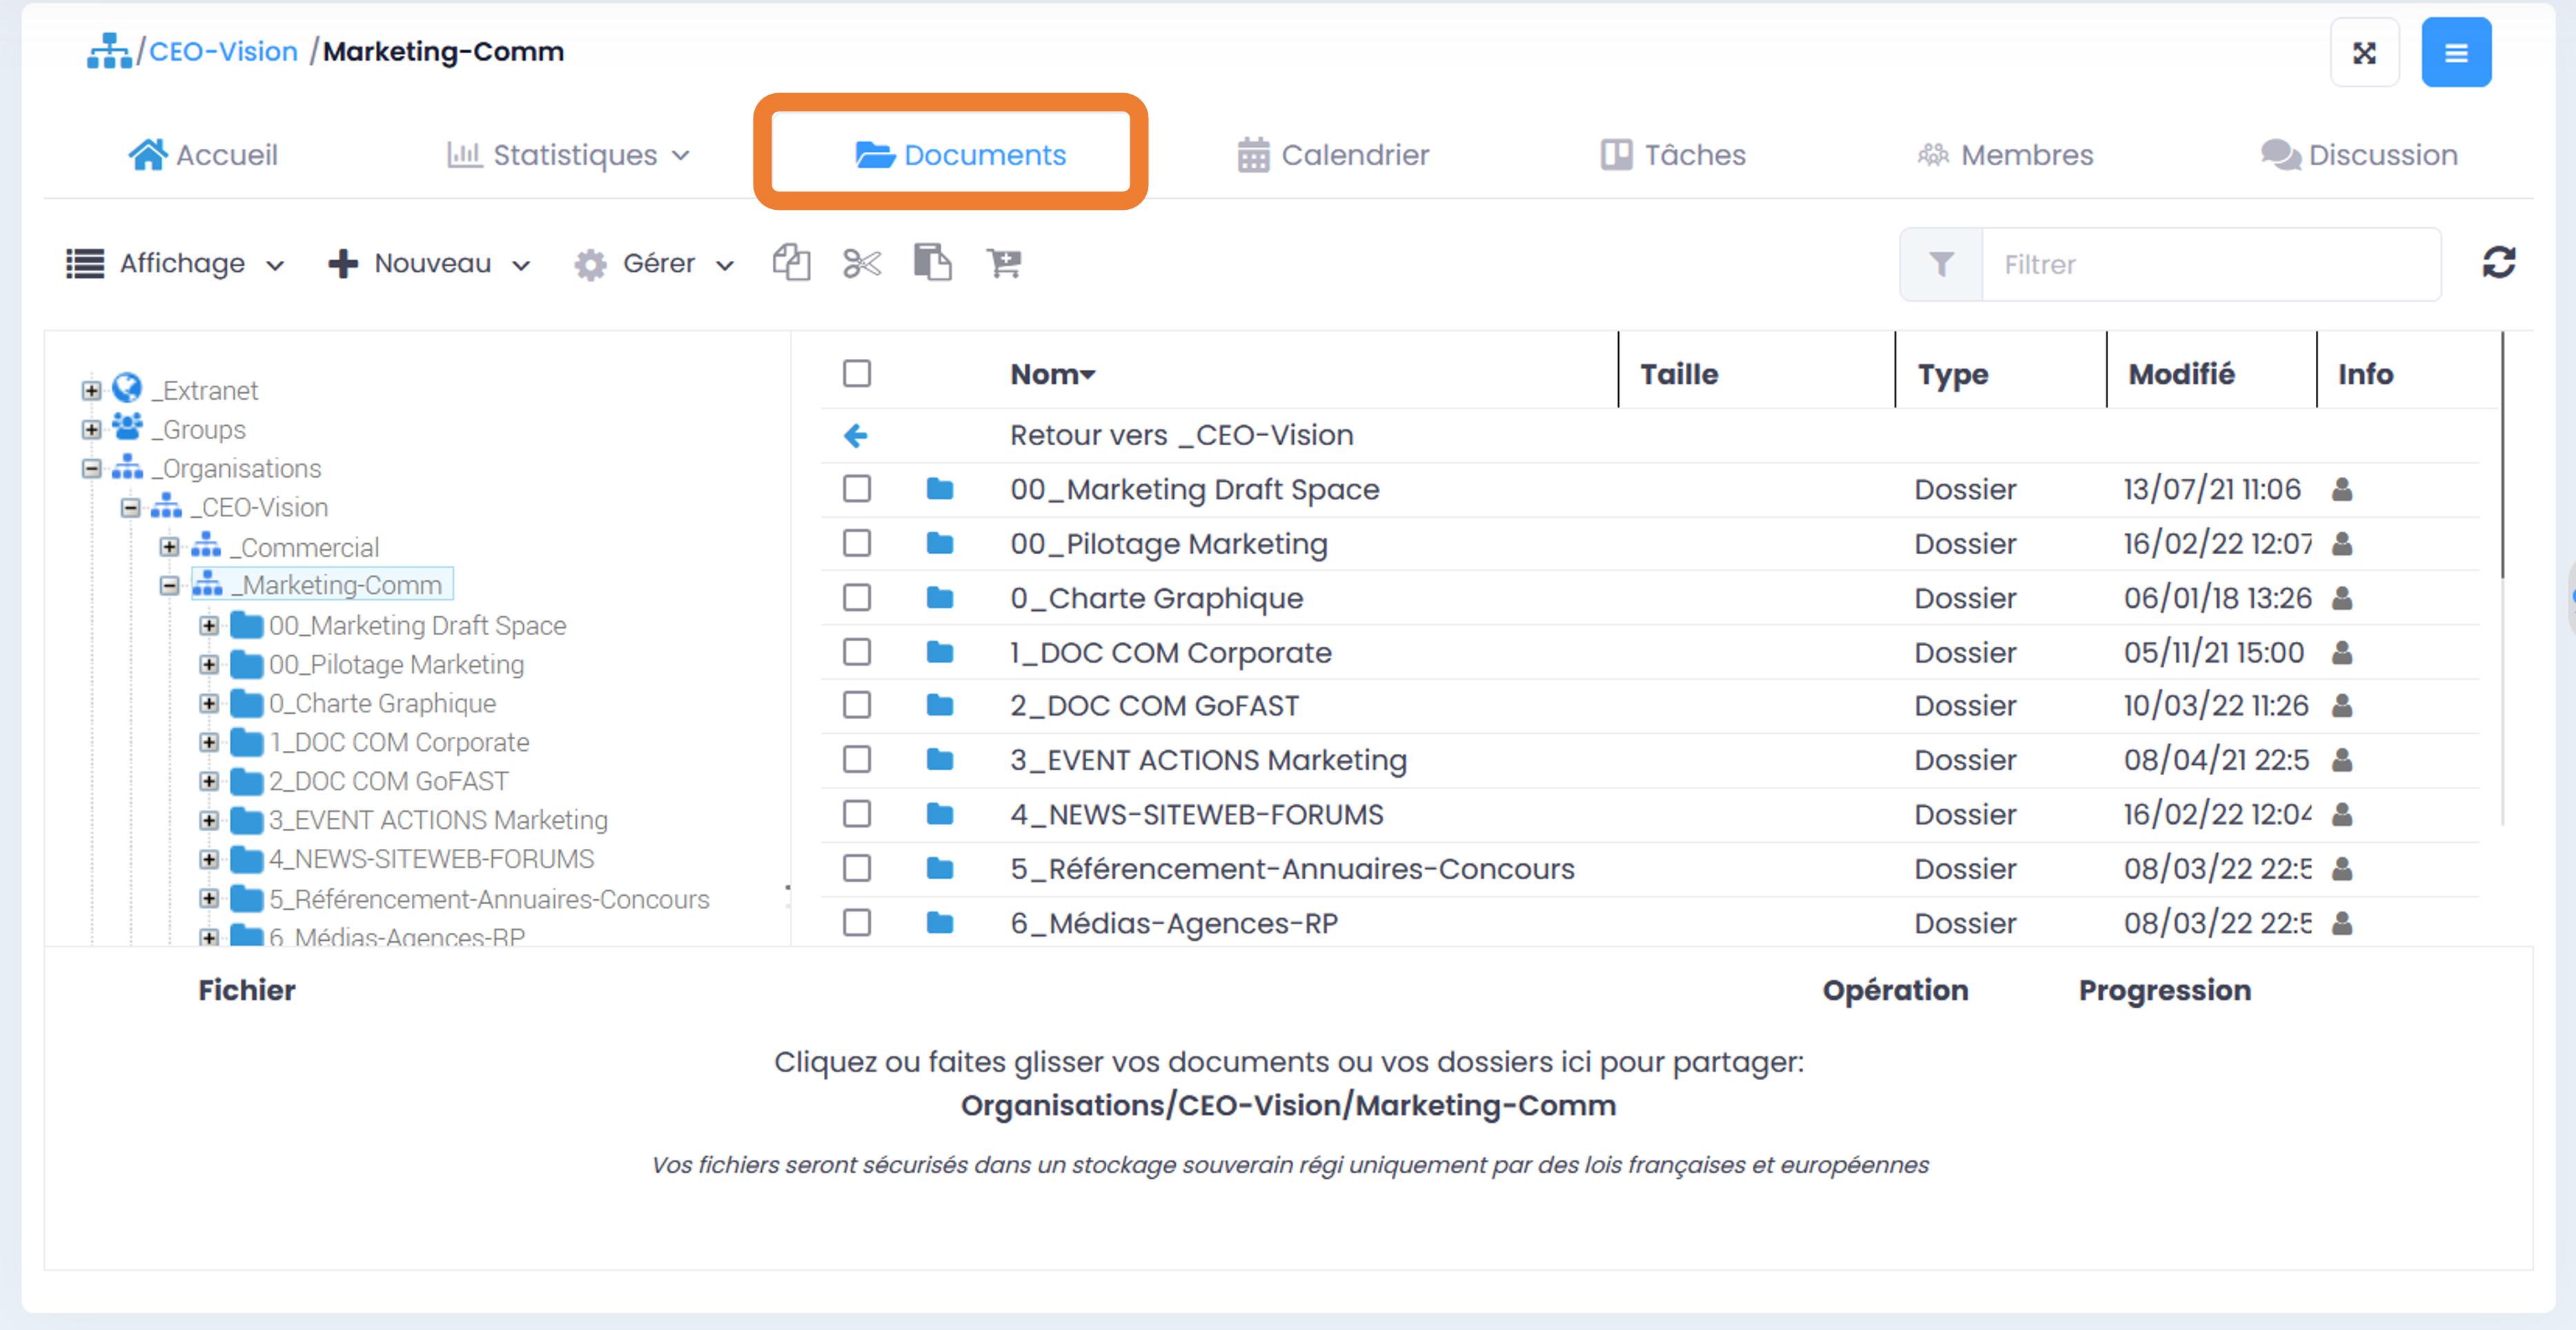
Calendar: with deadlines, meetings and tasks for this space.
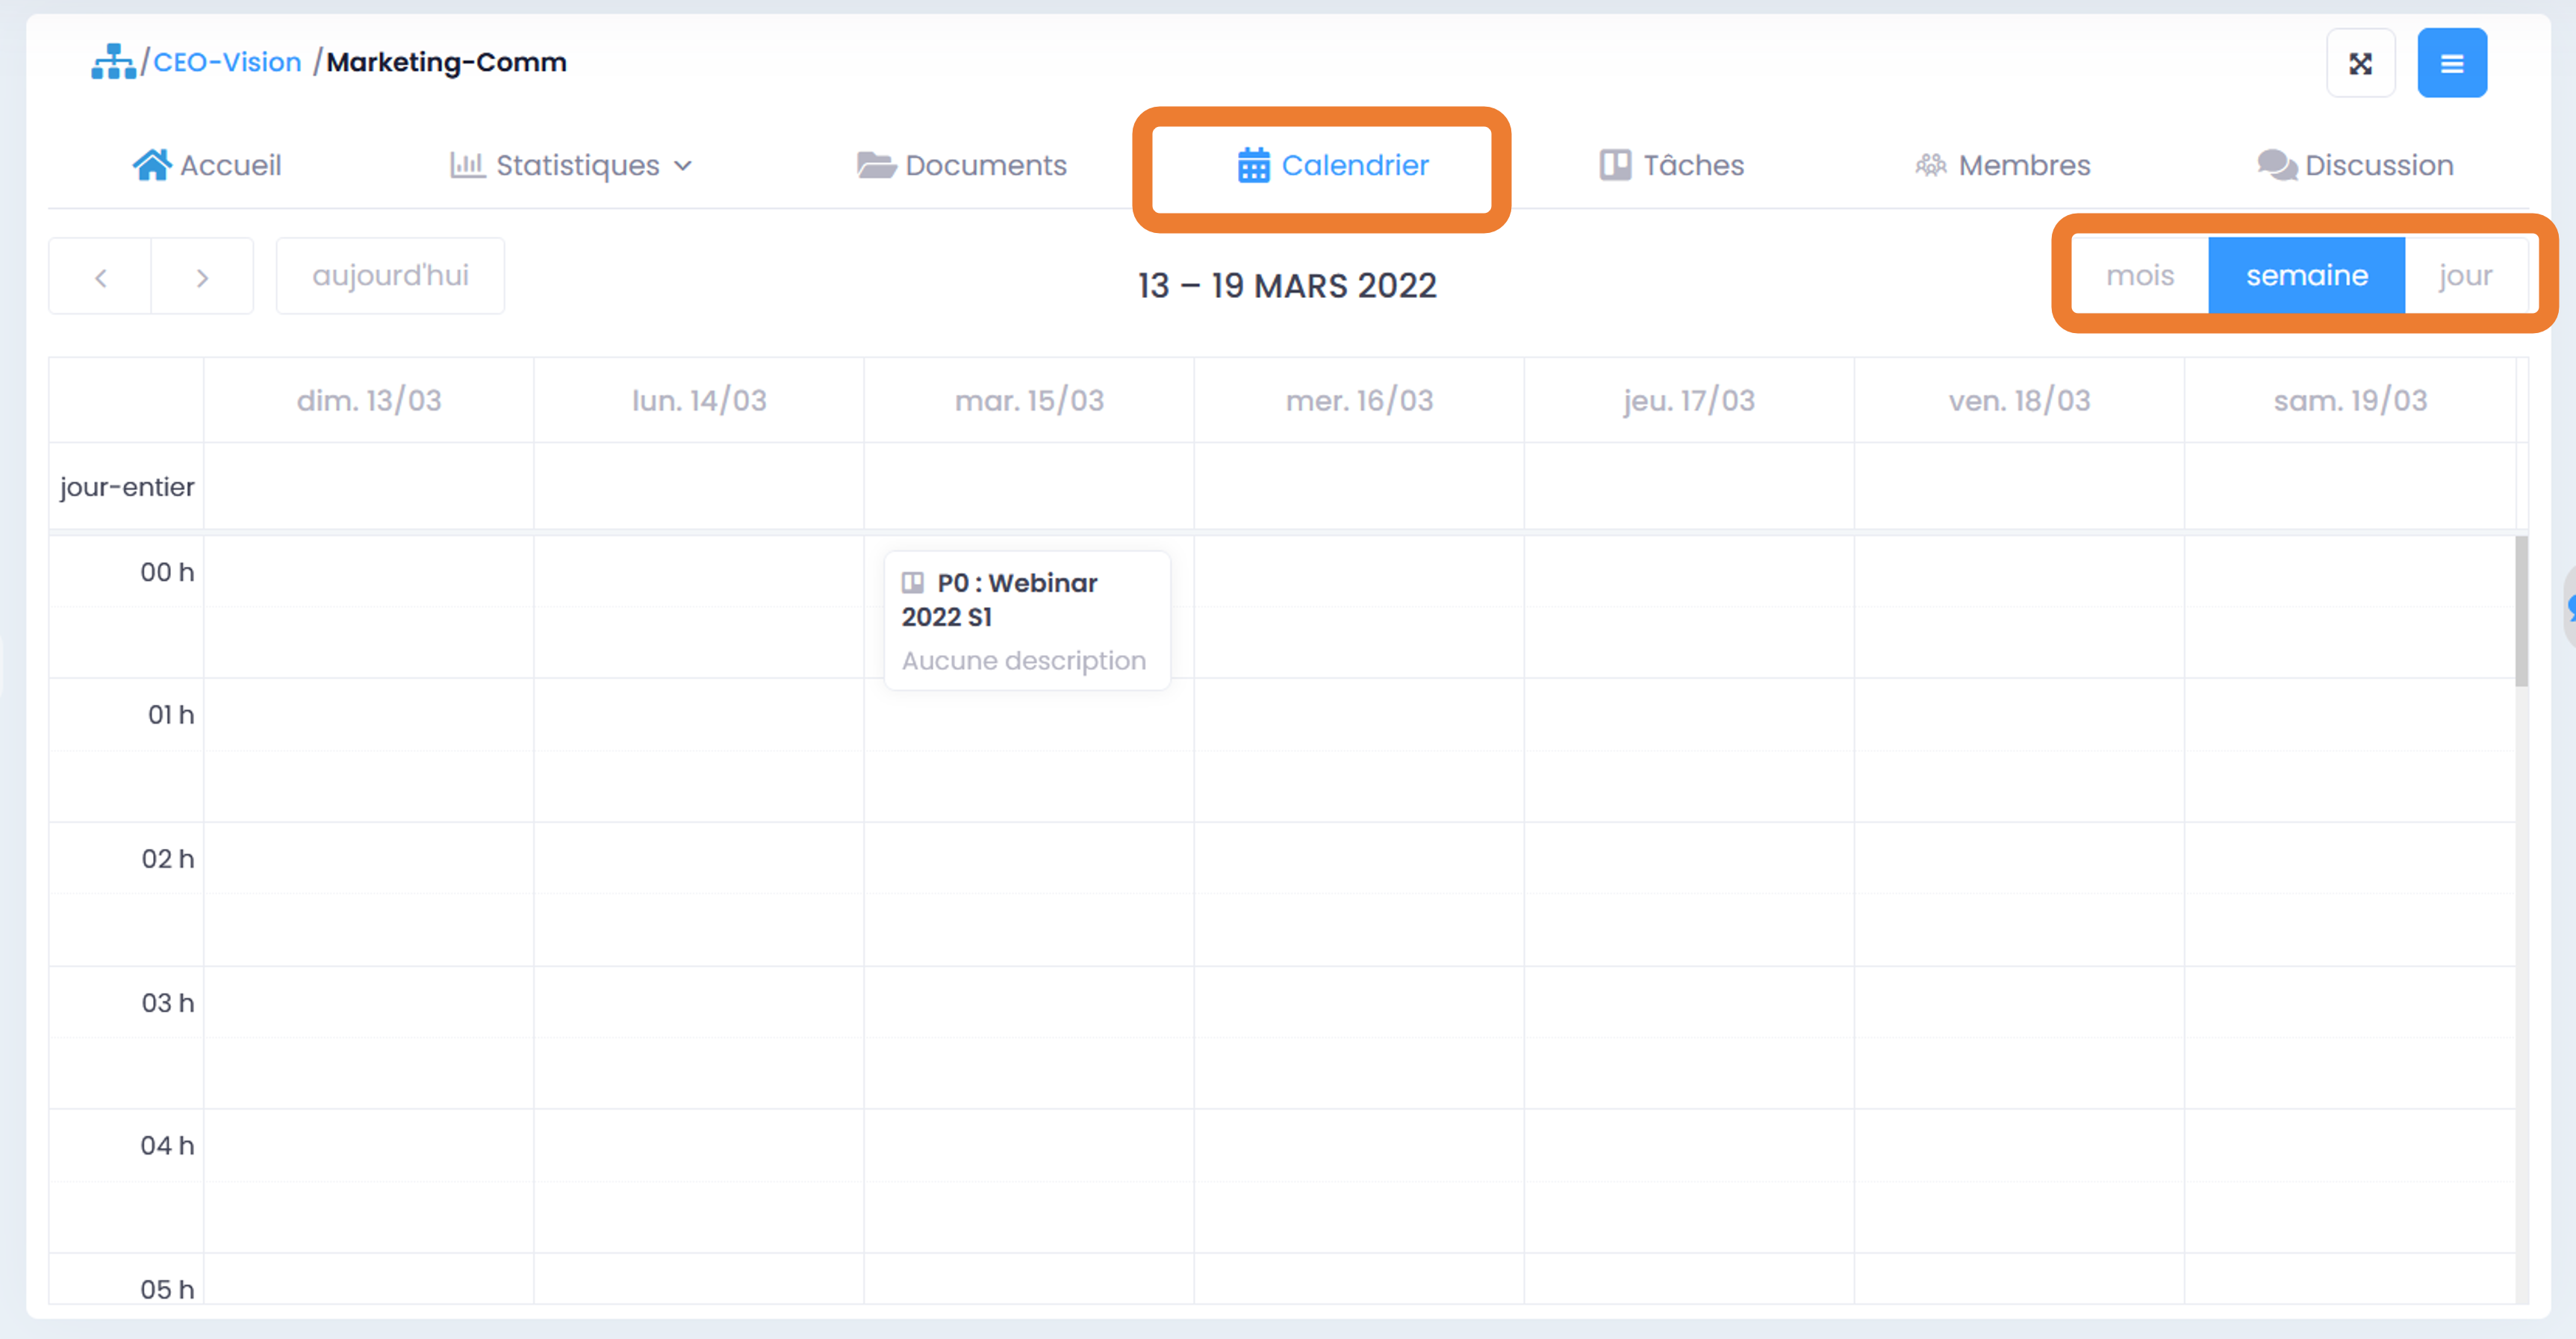
Tasks: gives access to the board of Space collaborative tasks (“Kanban” type task: post-it notes shared with “todolists”)
Members: with the list of Space members and their role (for unit users and for user lists).
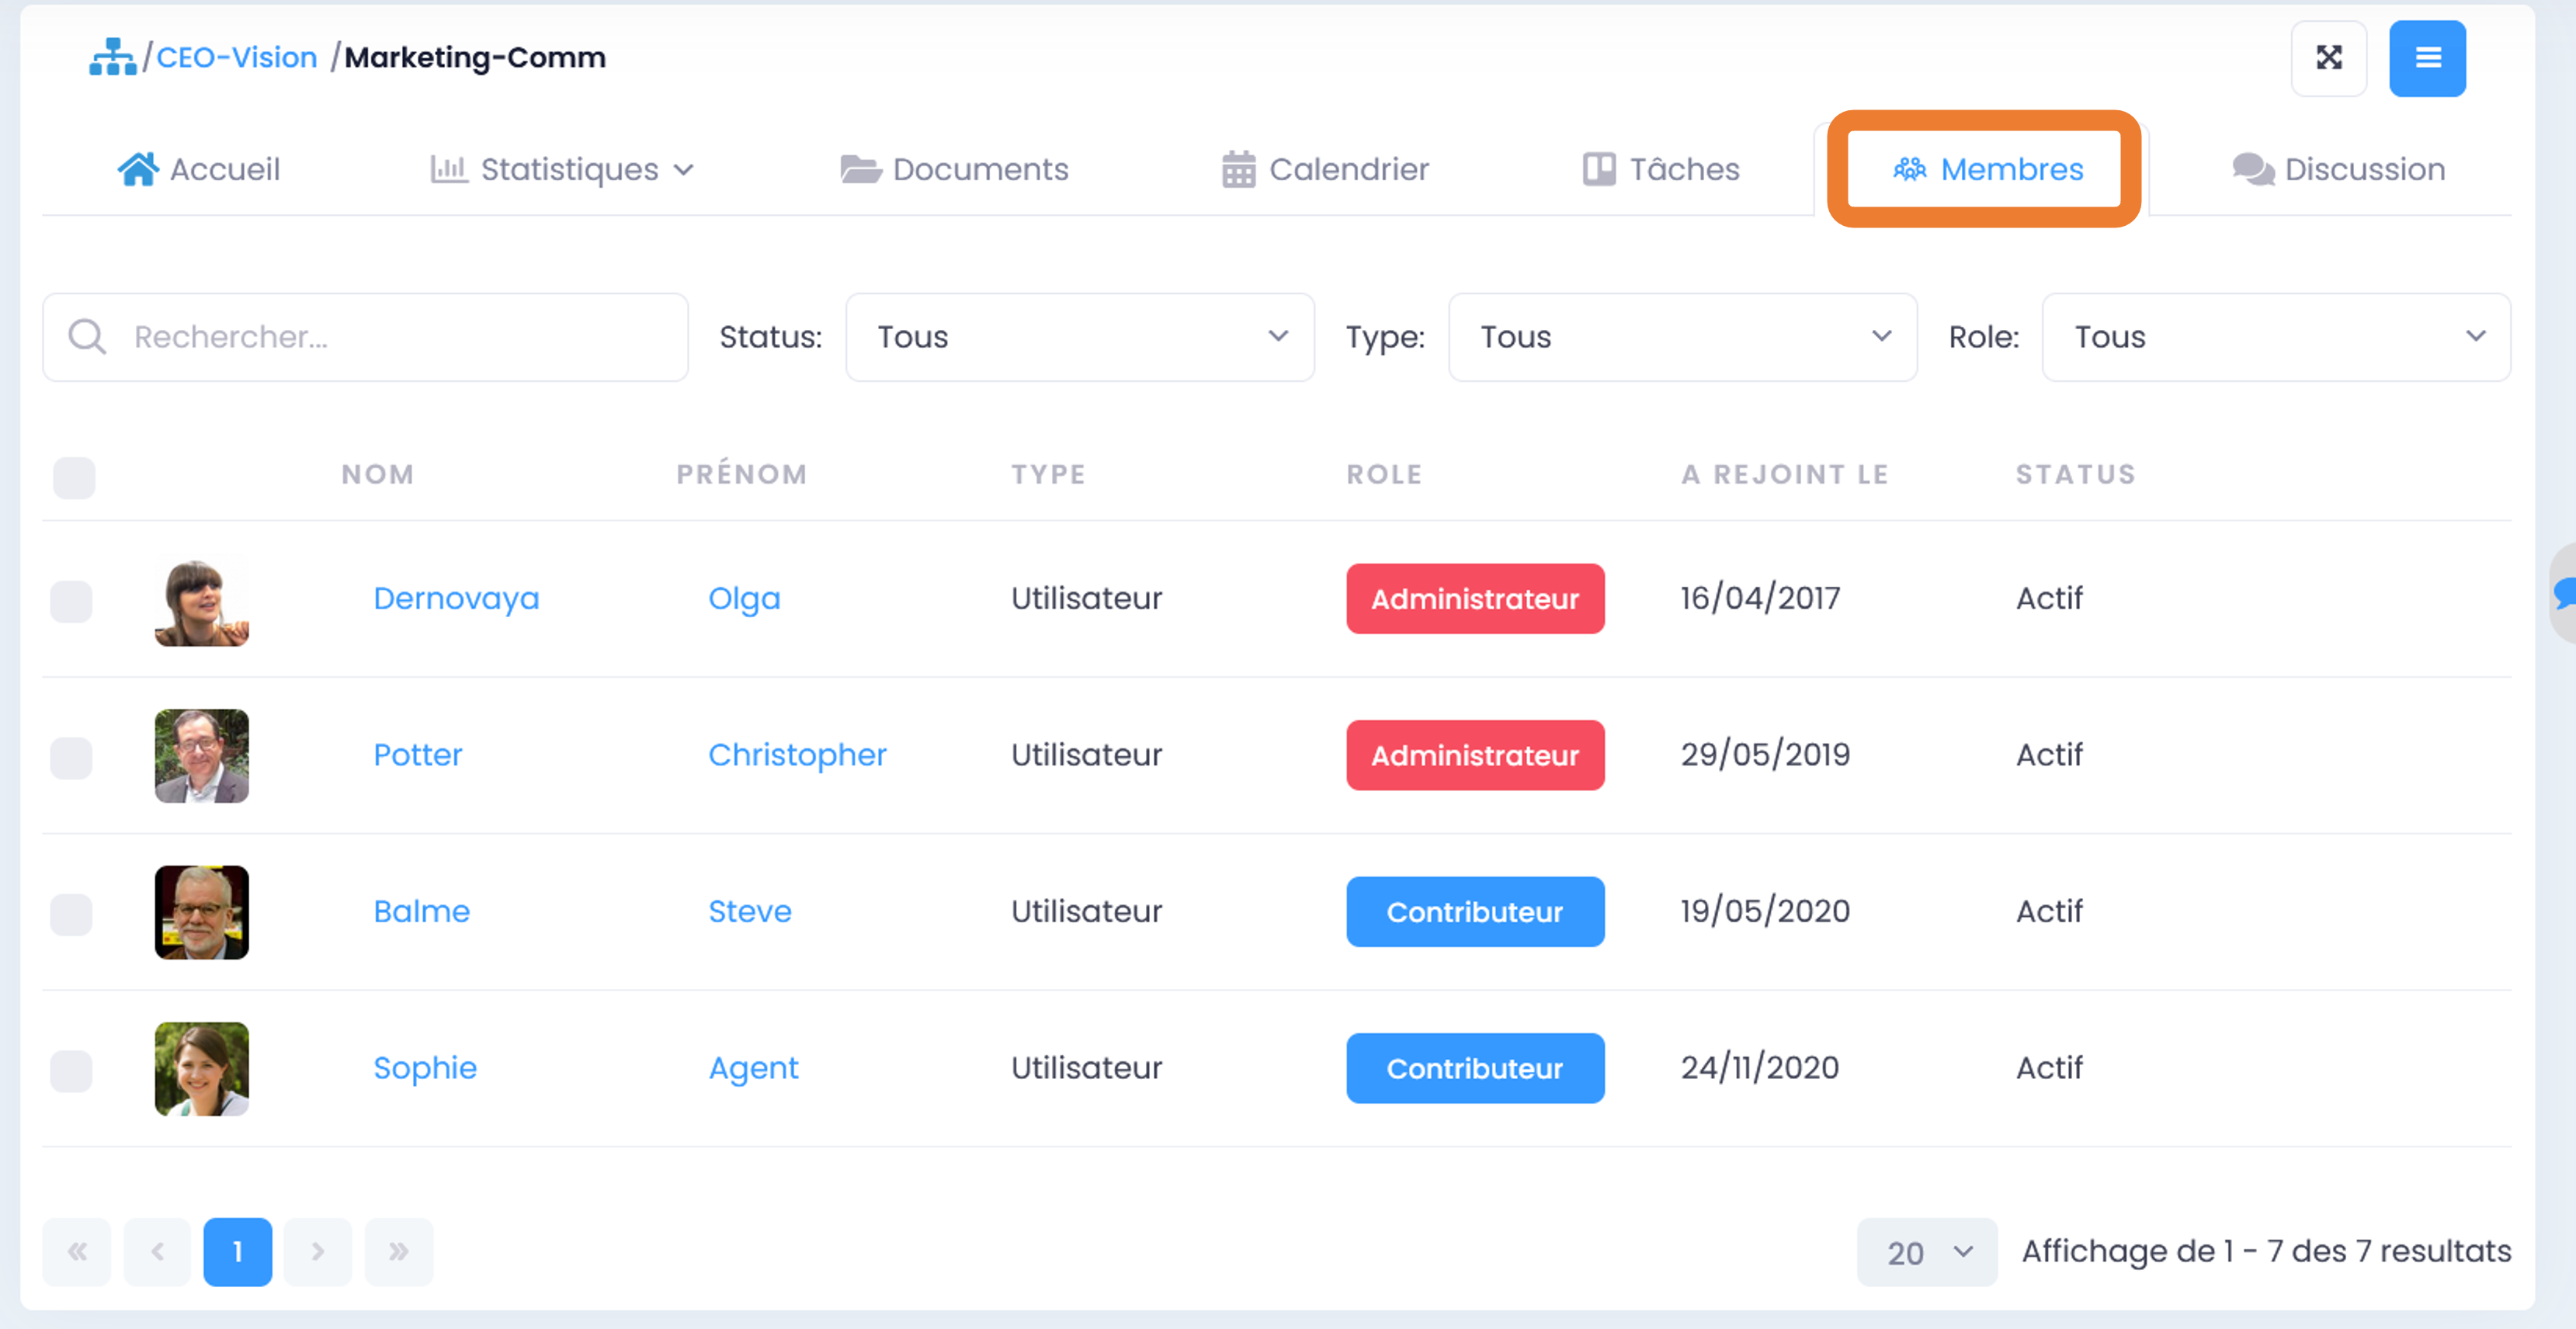
If there are users who have requested to join this space, the specified role will be “pending” and only Space Administrators can validate the access request and assign a role.
Discussions: Chat room / instant messaging dedicated to Space.
Note
Space tabs display elements related to the space we are in, and the name of which is listed right above the tabs. However, the “Document” tab does not partition the user to this single space, but allows him to navigate in all the locations where he has access. It may happen that the name of the space indicated above the tabs is not the name of the location in the tree where you are.
Actions on a Space
Several actions are available on a Space, depending on the role of the member of this Space (Administrator, Contributor, Read Only):
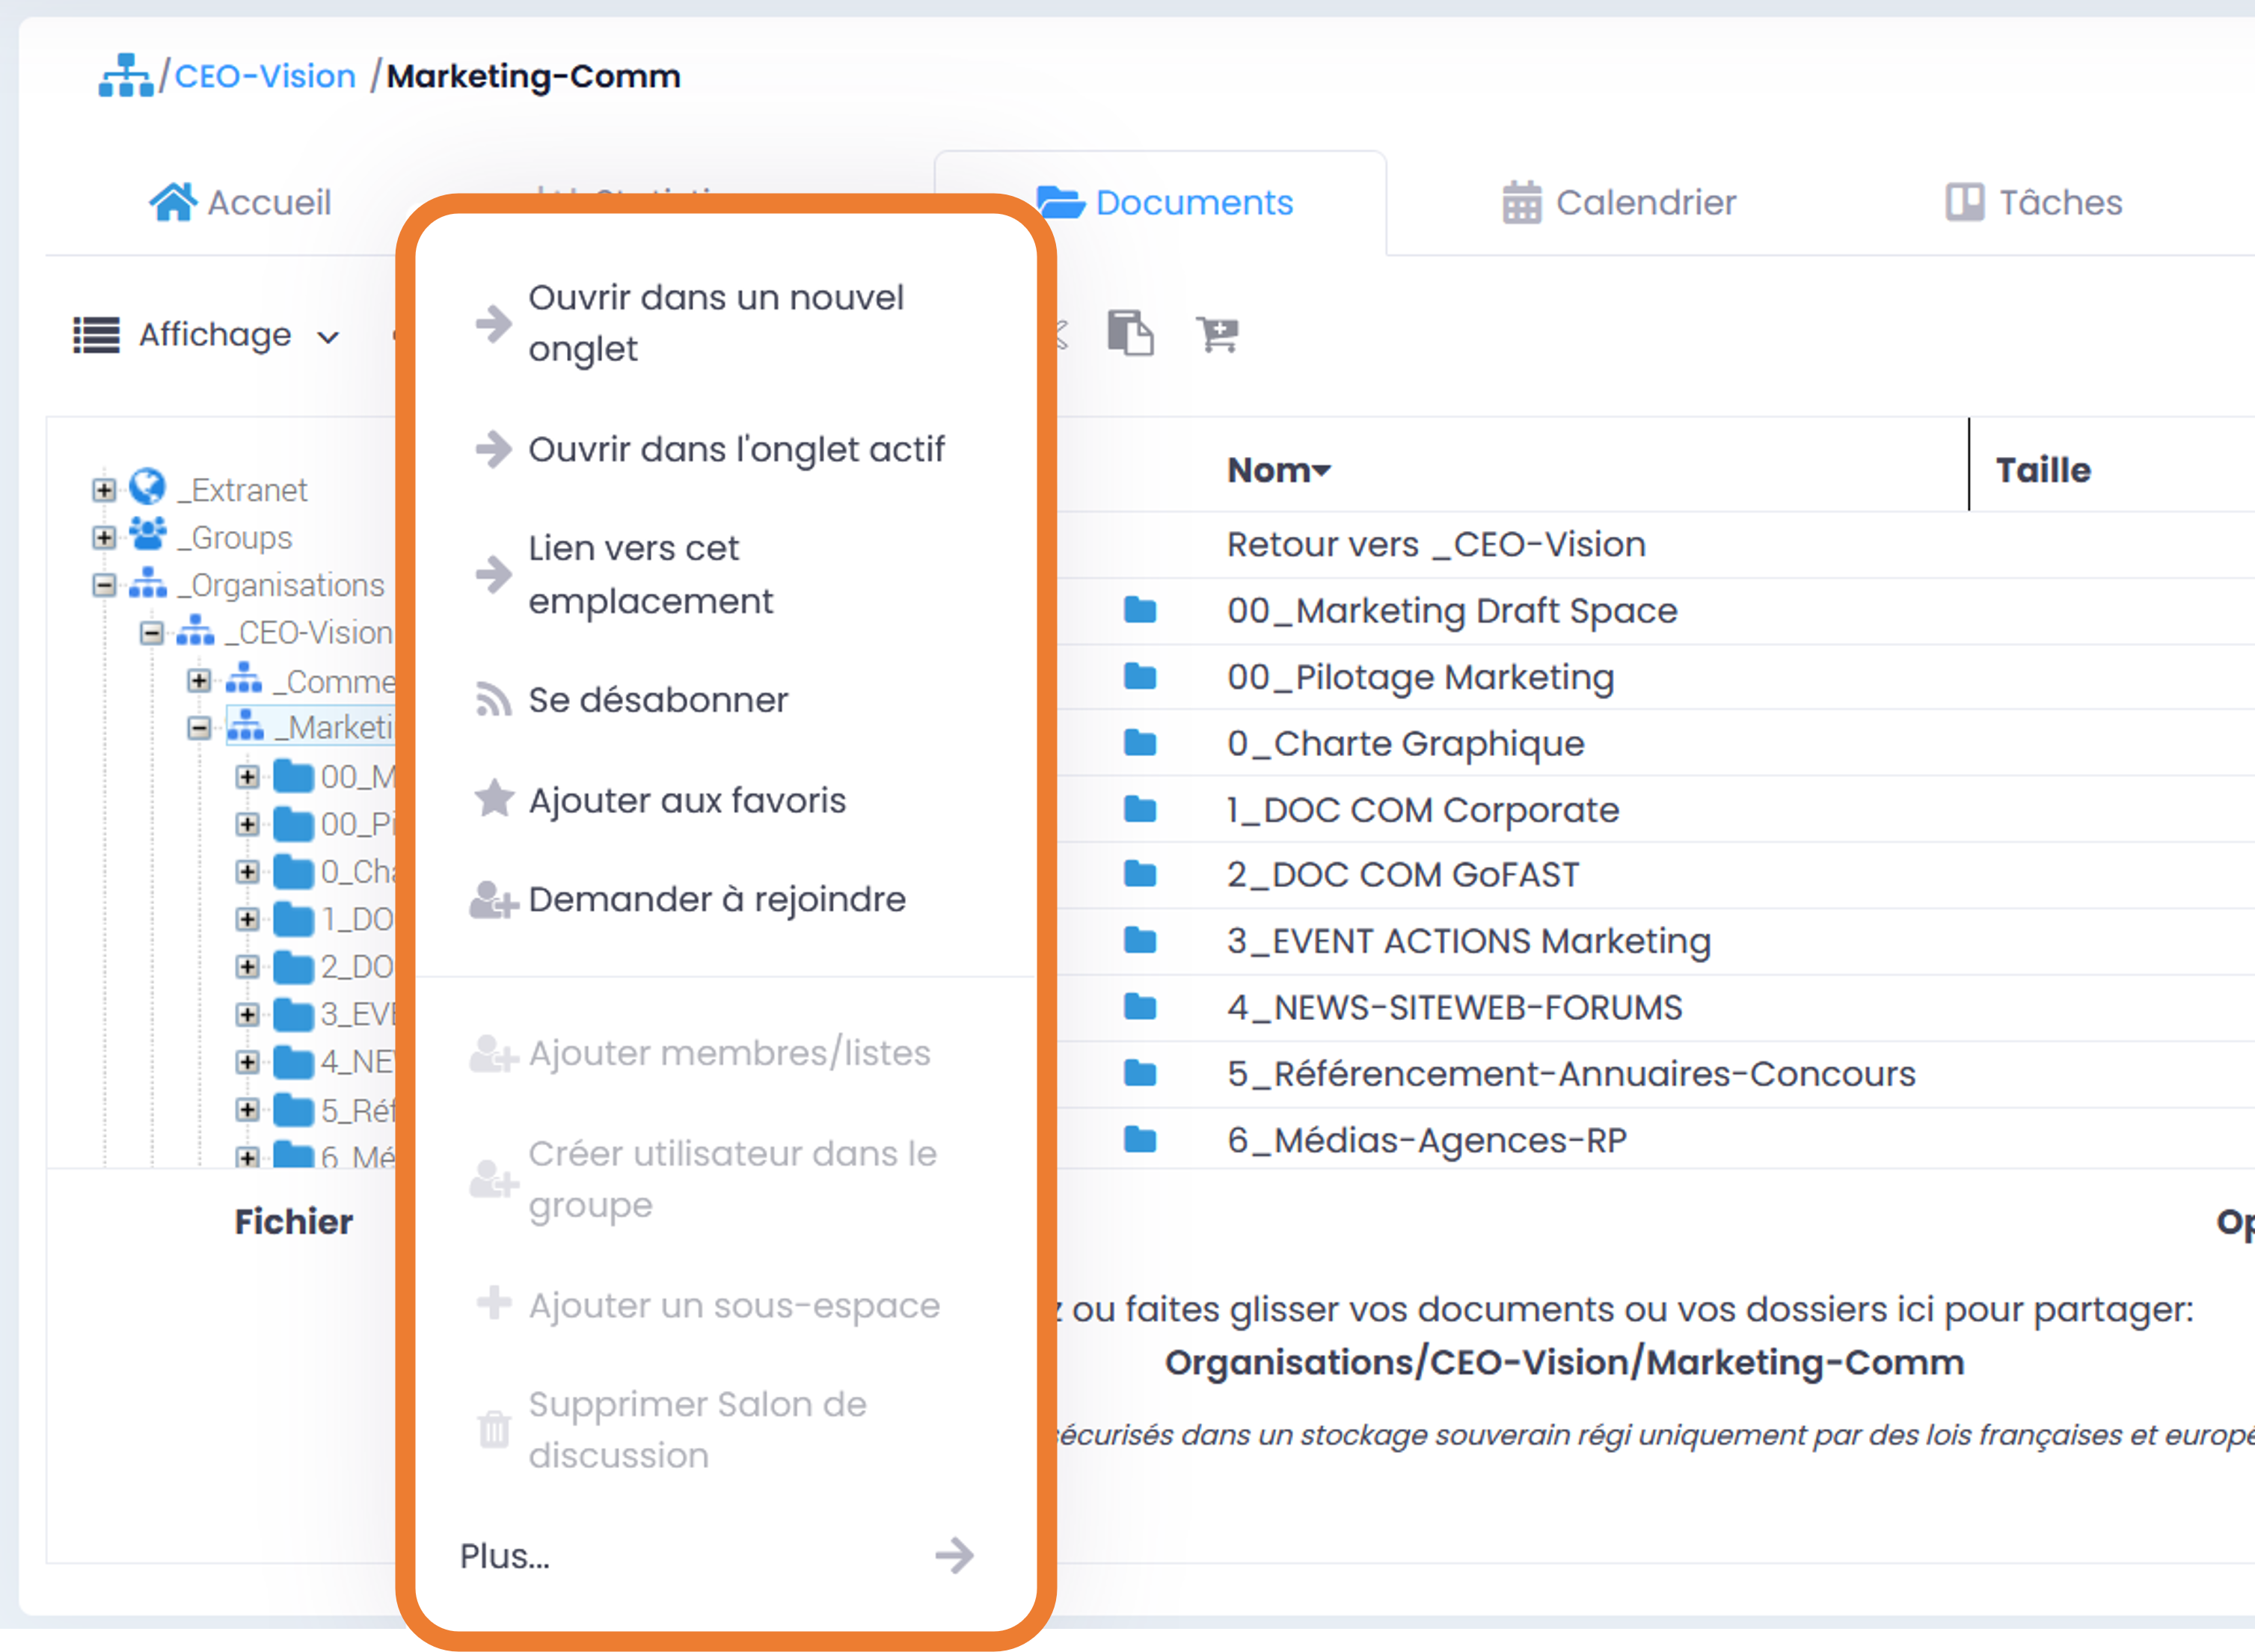
Depending on your role in the space, you can add members or change their role, create a new user in the space, create a subspace, archive or delete the space, unsubscribe or subscribe, create document/content, etc. . To access the various possible actions in a space, go to the Hamburger menu (contextual actions) using the icon with 3 horizontal bars in the upper right corner of the space page. Actions reserved for space administrators are specified with *. They will be greyed out and not available to members who contribute or have read-only access:
Subscribe / Unsubscribe
Add to / Remove from favorites
Ask to join
Add members / lists *
Create user in group*
Add a subspace *
Create / Delete Chat Room*
- More …
Rename this space *
Move this space *
Archive this space *
Delete*
Pre-add members*
Contact space administrators *
Note
The tabs of a space display elements related to the space on which you are. The space title and path will be updated just above the tabs.
Please also view the section: “How to create a Collaborative Space”
Be a member of a Space (including possible roles)
Of course, you must first have a GoFAST account. If it isn’t already, you should ask your internal IT department about it.
- Different ways to become a member of a topic:
either the Space administrator who created your account adds you directly as a member,
or by making a request through the Spaces directory: you have a list of collaborative spaces (select the ones you want), then from the Hamburger menu, click Join.
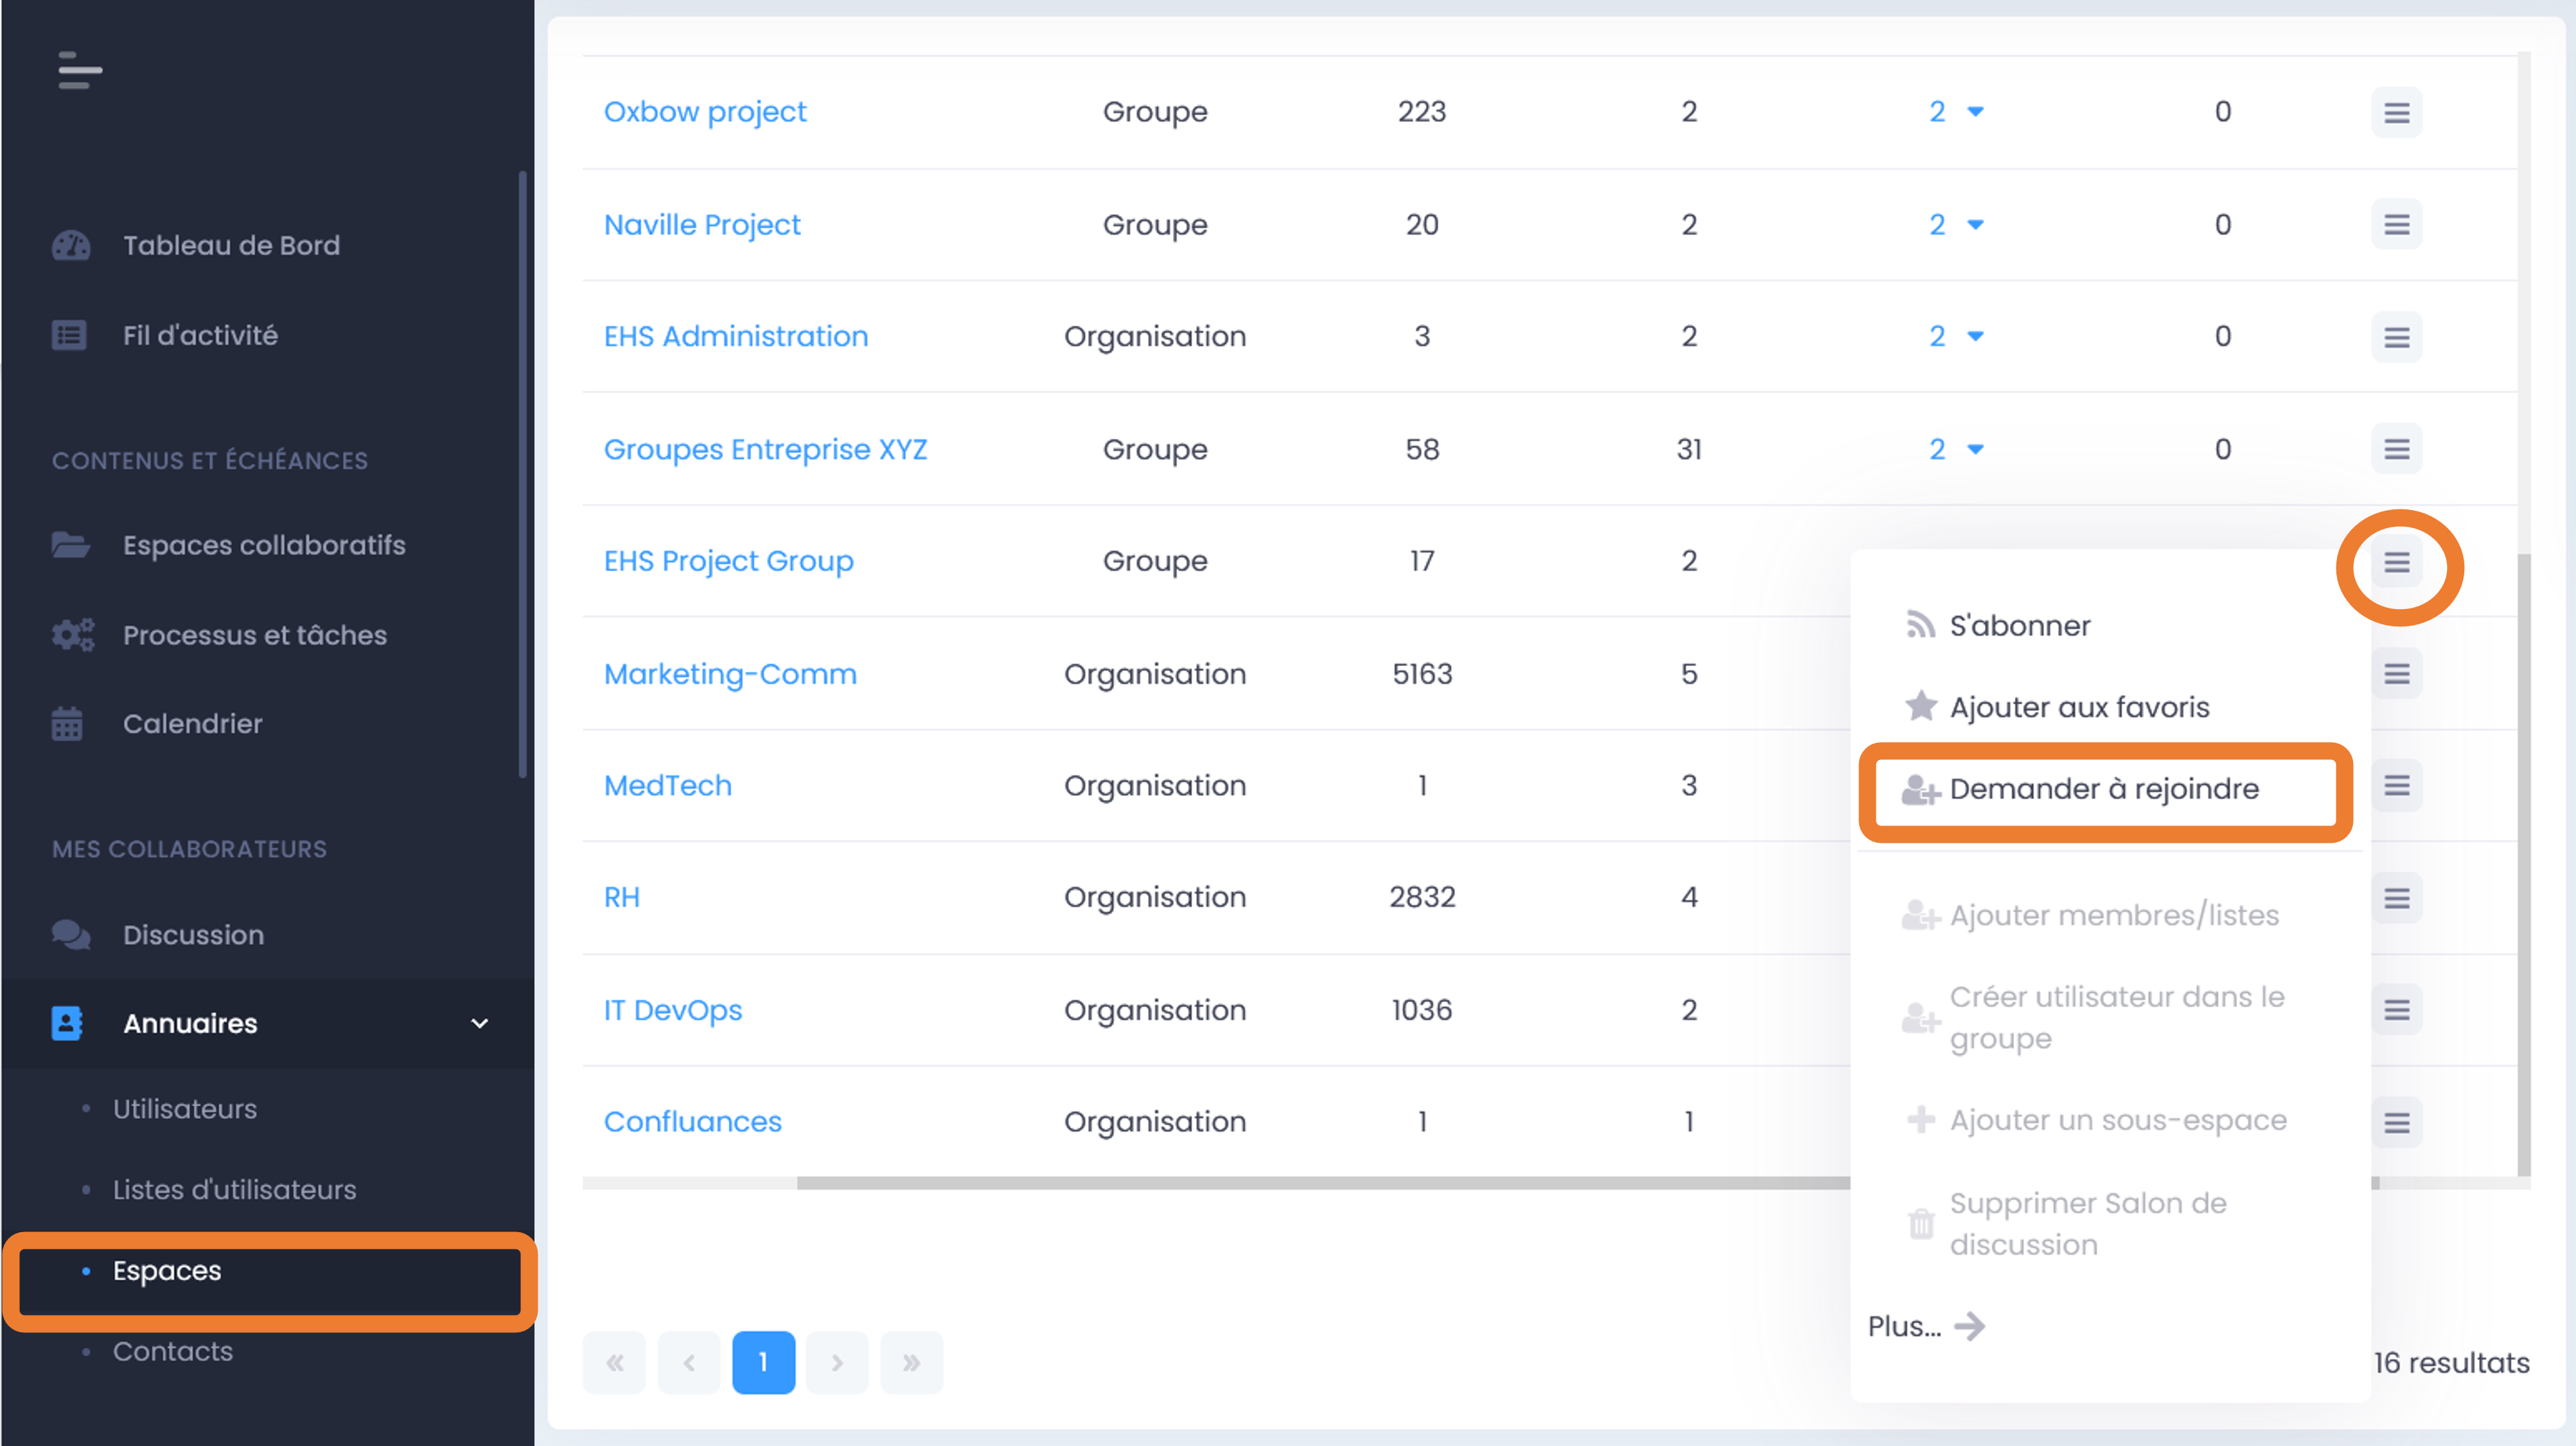
A message will appear confirming your request to join this space:
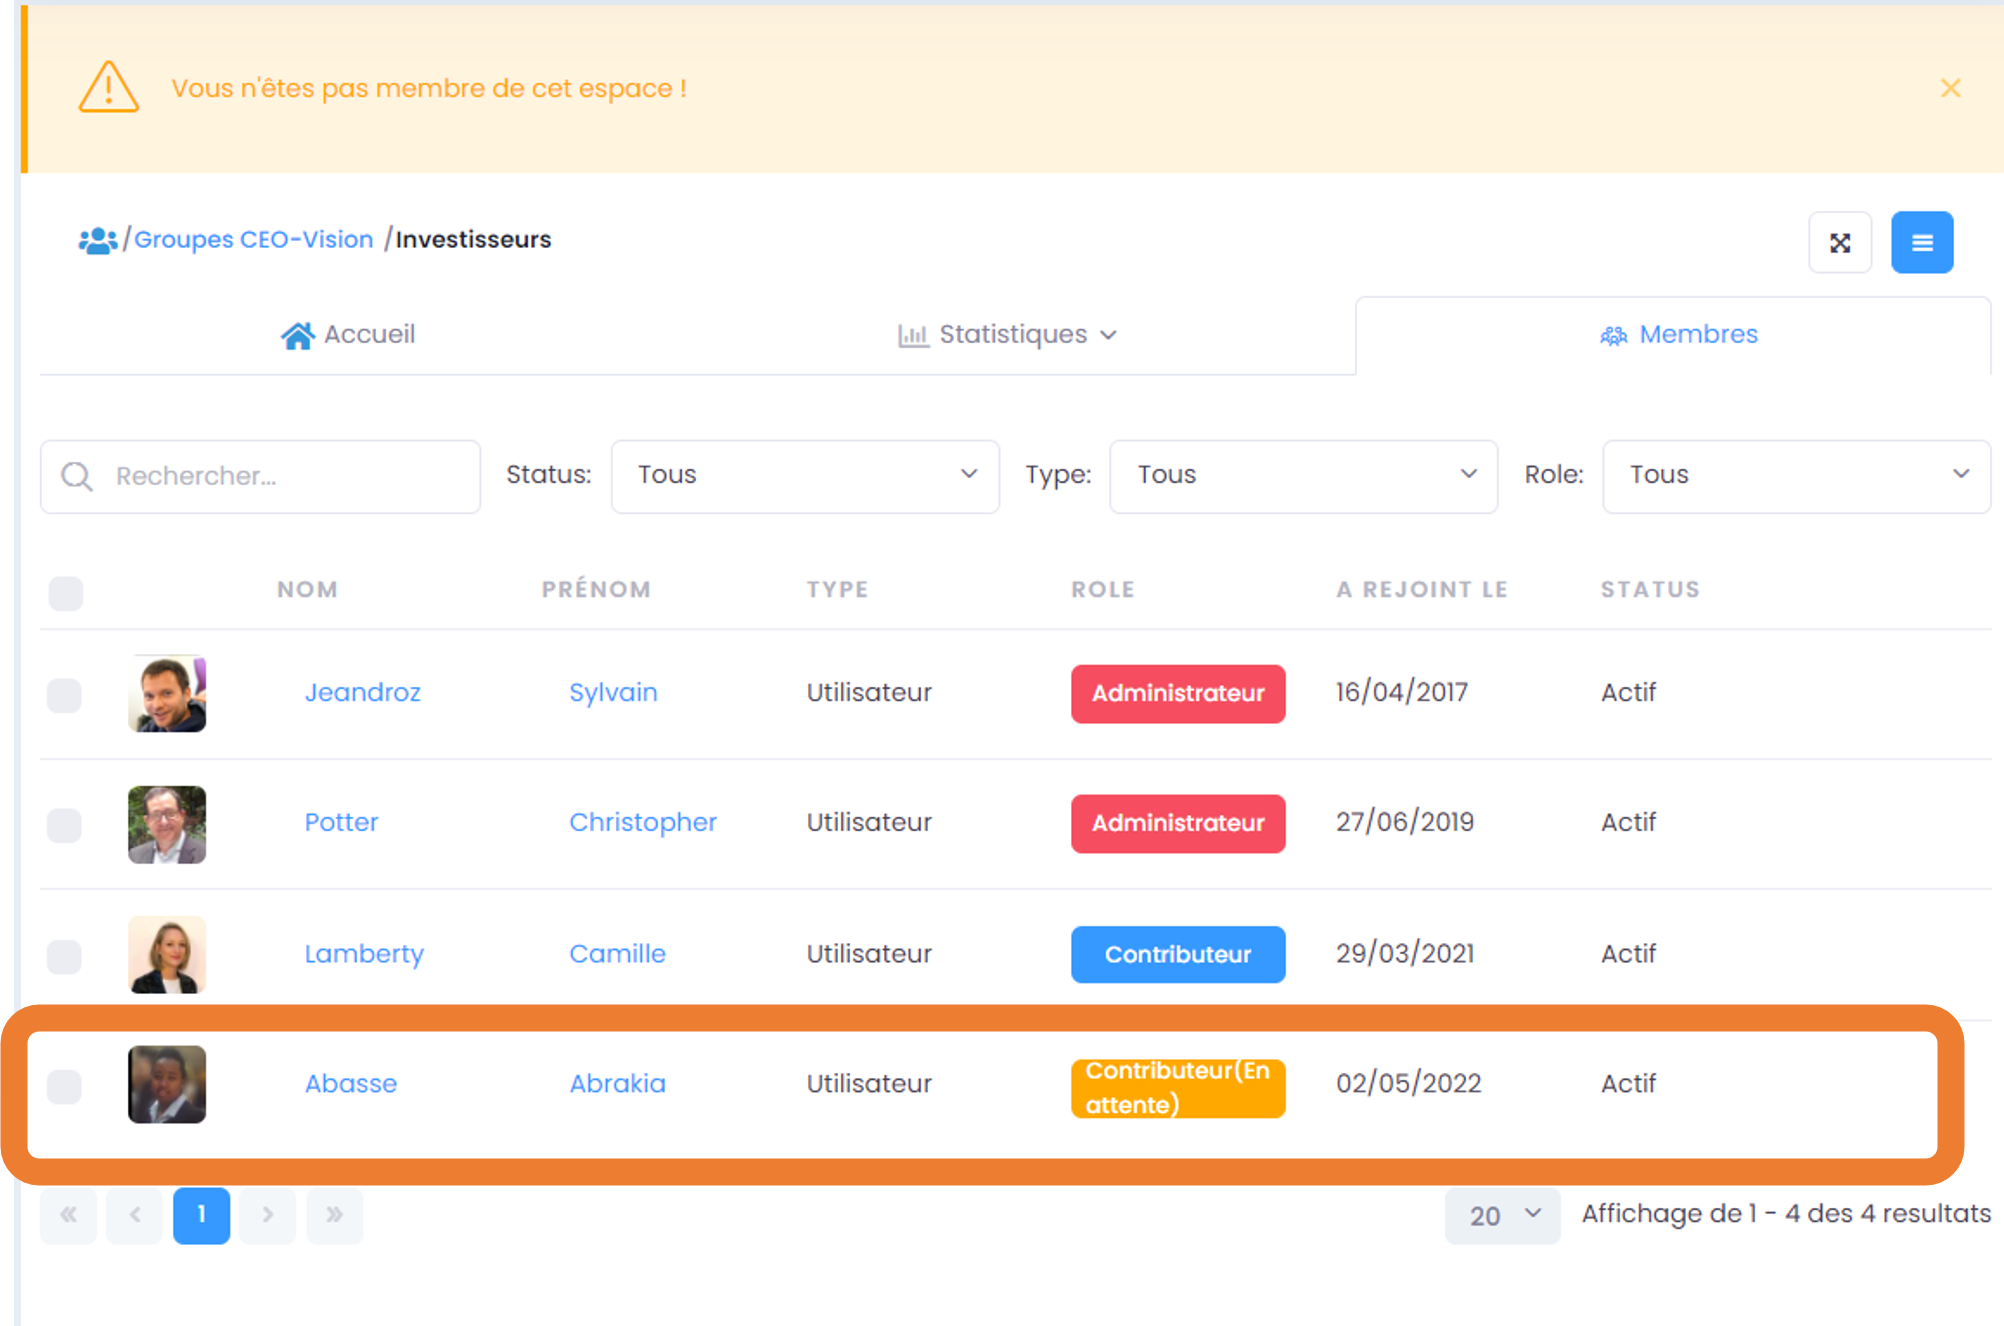
You will then find your requests on your user profile page.
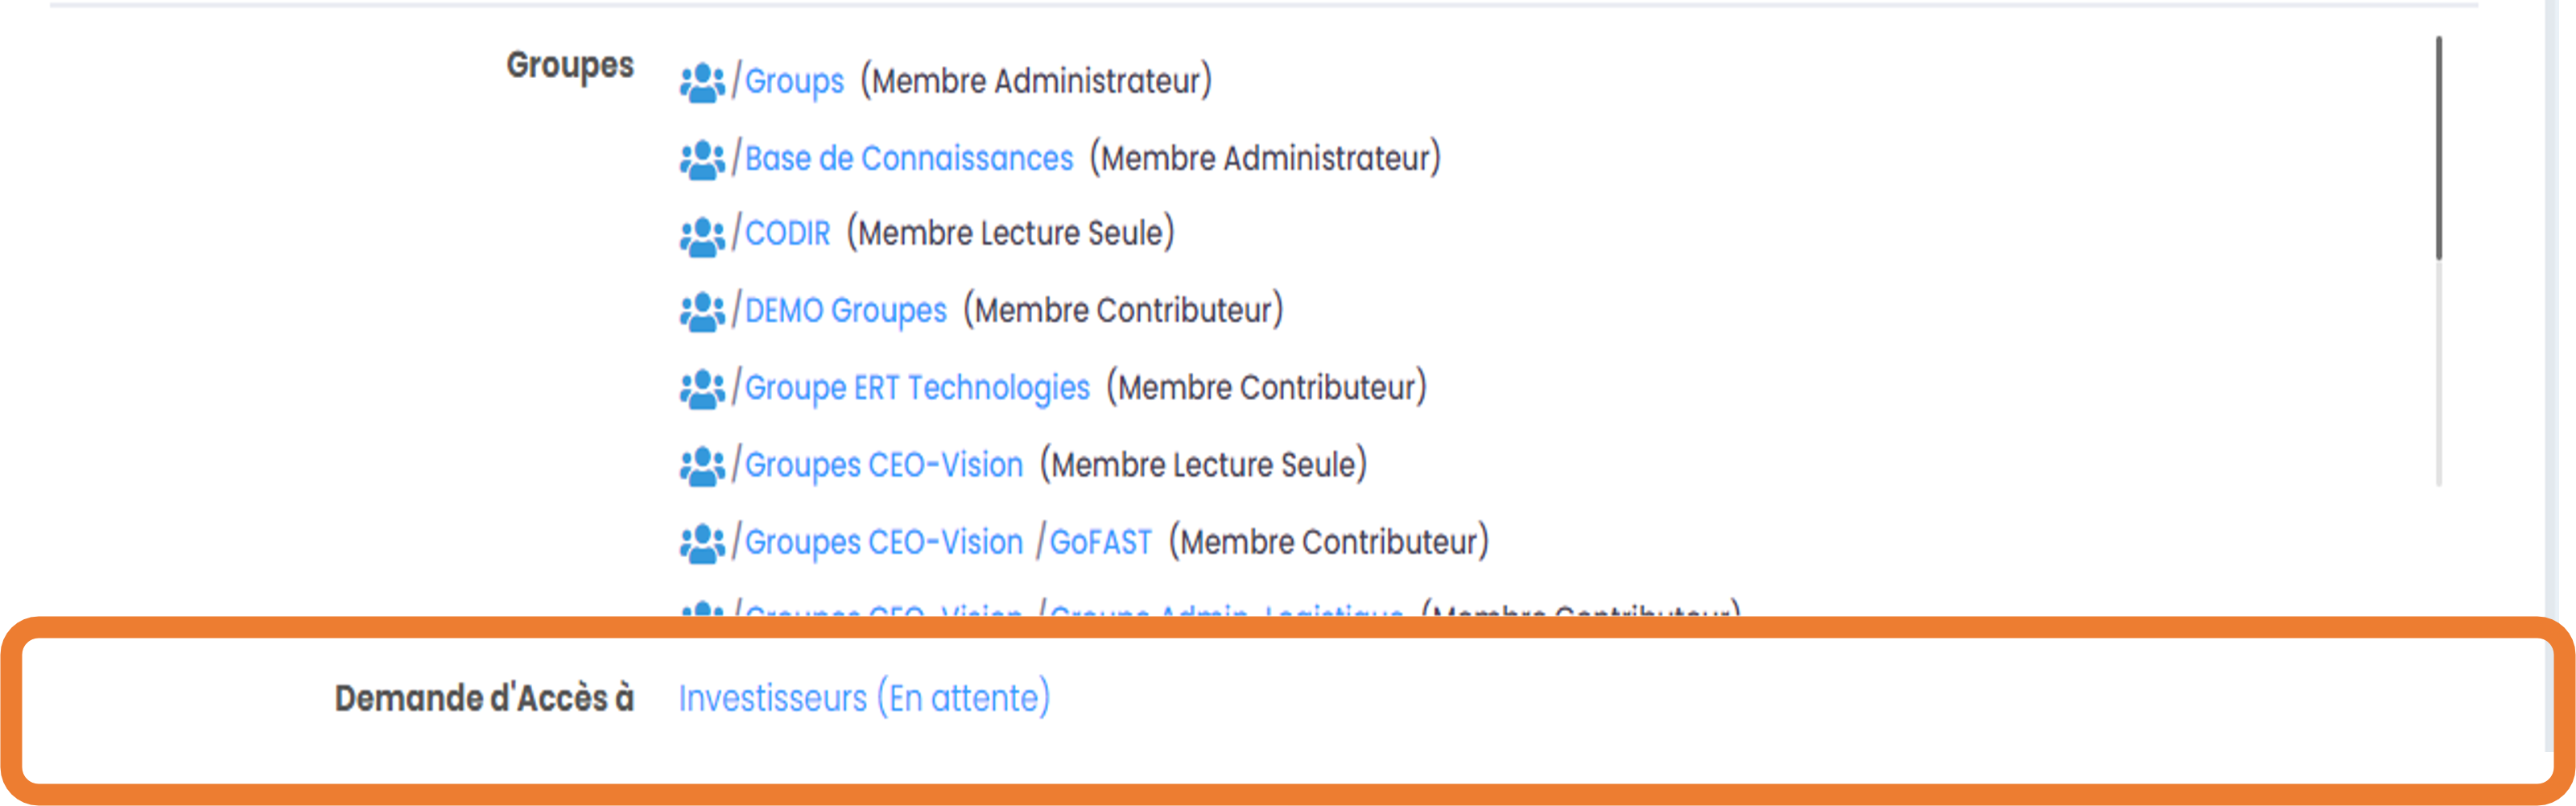
Be a member of a userlist, which itself becomes a member of the Space (so you will have the same role as the list).
How to create a Collaborative Space/ Sub-Space
How to create a Space at the root (1st level)
In case you need to create a new Space at the root, that is to say at the first level in Organizations, Groups, Extranet or Public, please refer to the section: «How to create Collaborative Spaces». This action requires having the “support-user” profile while creating a sub-space (the other levels in the Spaces tree) requires being an administrator-member of the parent space.
How to create a Subspace (within a Space)
To find out how to create new Collaborative Spaces/Sub-Spaces, please refer to the section: “How to create Collaborative Spaces”.
Note
Please read the difference between Organization, Groups, Extranet, Public type spaces in the introduction.
Roles/rights of Space members
In a space, a member user can have one of the three available “Roles” (administrator, member, read-only), which affects their rights to manage documents and the space.
Note
See the “Table of Permissions by Role” at the end of this section in addition to the description of each role).
Space Administrator Member
This role is reserved for business managers (e.g. managers of a unit, Project, etc.) who are therefore in charge of managing the Space, with the documents and other content shared in the Space.
Note
This is an important role that must be shared among several members to avoid any blocking in the management of the Space in case one of the Administrators is unavailable (for example, on vacation, left the company, does not have time to manage the space, etc.)
Main permissions related to the Administrator role: they can add/remove members and determine their role, create sub-spaces, create/edit/delete folders (to classify documents), perform all the actions available on documents/contents (including templates in “TEMPLATES” folder they can: add, rename, edit, share/move, download, manage metadata, comment, etc.). They also have the option to edit comments left by other members (it is clearly stated that the comment was edited, by whom and when).
Contributor Member of a Space
This role is given to most Members of a Collaborative Space, so that they can easily work on documents/content and create/share new ones. Main permissions related to the Contributor role: they can perform the vast majority of the actions available on the documents/contents of the Space (add, rename, edit, share in other Spaces, download, add/edit most metadata, comment, etc.). This role also allows you to create folders to classify documents.
Note
This Contributor role does not allow you to delete a document/content, unless he is the creator. The contributor cannot make certain metadata changes that impact the document (e.g., unarchive a document or remove the highest levels of document confidentiality, such as “Internal distribution” in the “criticity” field).
Read-Only Member of a Space
This role is given to all Members of a Space who must be able to view a document, often used in Spaces dedicated to the sharing of a repository, a knowledge base, or in Spaces whose purpose is to share finished and validated Publications (often PDFs generated from a working document that is filed in other Spaces).
Note
It is advisable to give this role in all the Spaces of the first levels, dedicated to organizing the tree structure /Spaces structure, e.g.: in the «HR Department» space the majority of users are Read Only», but these same users are Contributors, see Sub-Space Administrators “Training and Development Unit” or “Recruitment Service” or “HR Communication Service”, etc.).
Basic rights associated with the “Read Only” role: you can view documents, comment on them, download to a computer, send by e-mail (secure access / download link).
Role of space manager
The space manager is a contributor who is also able to delete and move content without being the creator.
Table of Permissions by Role
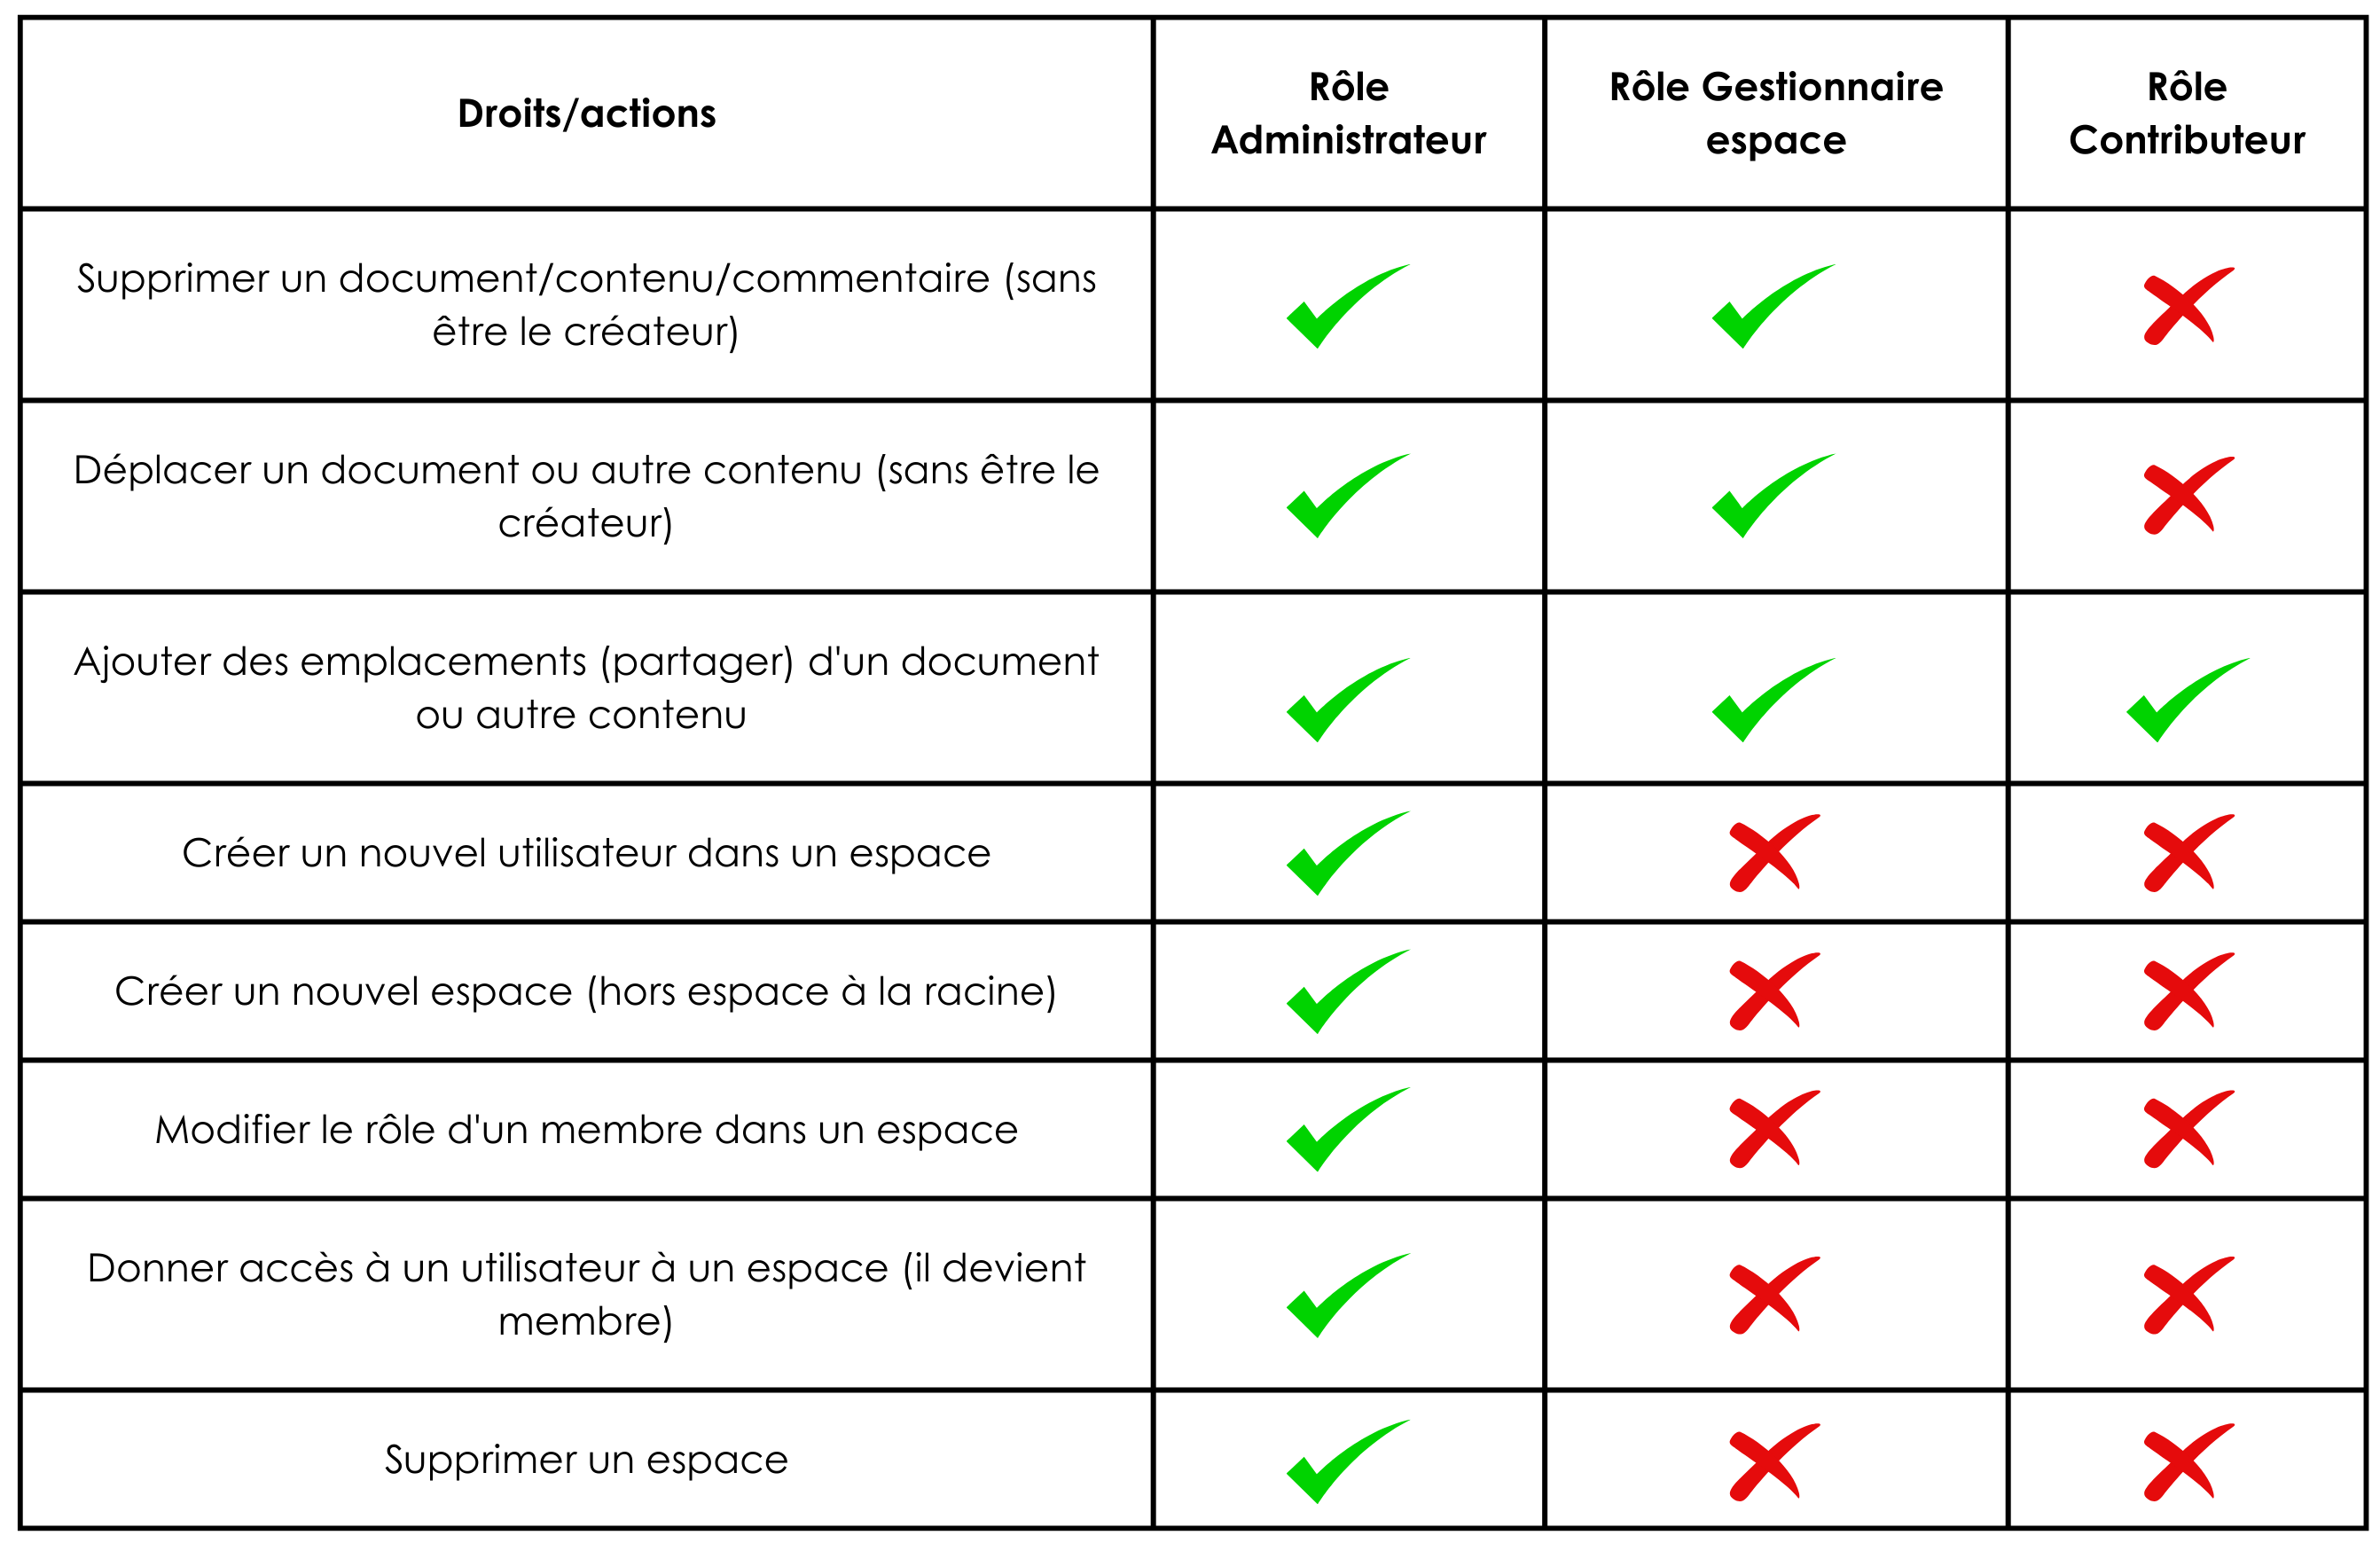
Management of space members
Managing the members of a Collaborative Space means adding/removing members and defining their role in the Space (see: “Roles/rights of Space members”).
Note
These rights are strictly reserved by admin members of Spaces. However, there is a “User-Support” profile that allows members to be pre-added to Spaces without being members themselves: the administrators of Spaces will have to validate this pre-addition before new members actually have access to Spaces.
The management of the Space members can be carried out via:
The “Hamburger” menu (contextual actions) on the page of a Space
The “Hamburger” menu (contextual actions) of a Space or a selection of Spaces, from the Spaces directory
Via the management of Userlists (see the section: “Management of Userlists”)
Search for a space member
Go to the “Members” tab on a Space page and you will find the members table, with the columns: Last Name, First Name, Type, Role, Joined, State, as well as the column with the menus of the possible Actions on a member (last column).
You can sort the members by clicking on the table column names (the table header row).
You can filter Space members by: “state” (active or blocked), type (single user or userlist), role (administrator, contributor, read-only).
You can search for a member by entering their last name/first name (at least the first 3 letters).
Note
You can find out all the Spaces a user is a member of by going to their profile page.
Gérer le rôle ou la suppression d’un membre d’un Espace
This procedure can be used to change a member’s role in a Space, or to remove them from the Space altogether.
Étapes à suivre pour modifier un rôle ou supprimer un membre :
Allez dans l’onglet “Membres” de l’Espace concerné.
Check the profile of the user whose role you wish to modify or remove.
Click on the burger menu (icon with three vertical dots).
- Select either :
The new role to be assigned ;
L’option pour supprimer le membre de l’Espace.
Une fenêtre de confirmation s’ouvre : validez pour confirmer l’action choisie.
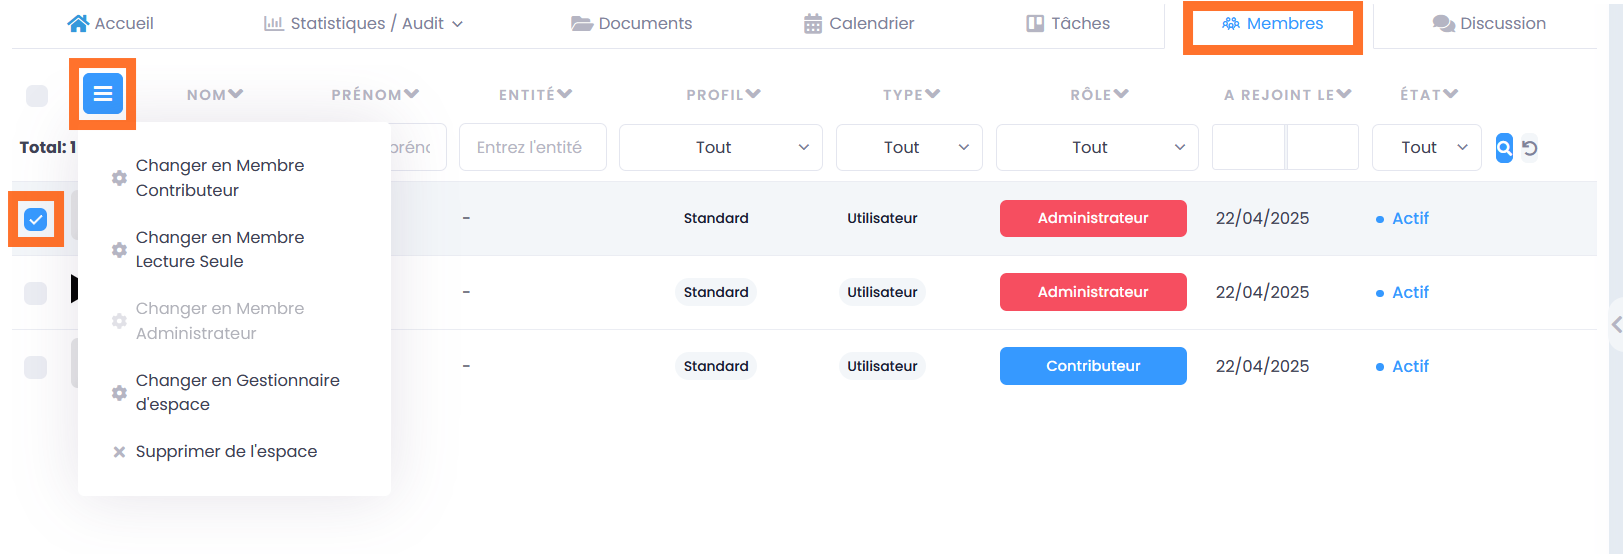
Please also view the section: “Roles/rights of Space members”.
Adding Members to a Space
Adding members to a Space means giving access to this Space to one or more User(s) or to a Userlist, specifying the role.
How to add members to a Space:
Go to the “Hamburger” menu (contextual actions, at the top right of the Space page or via the “Space Directory” page).
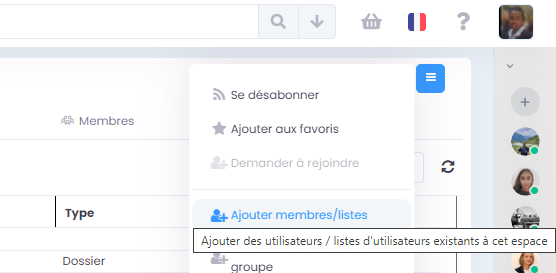
Click on “Add members/lists”, the window for adding members opens.
Use search to select the users or lists you want to add: enter at least the first 3 letters of the user or list name.
Click on one of the suggestions to add the user or userlist. You can search for and add multiple users.
Tick the desired role for all selected users and/or lists.
You can write a message that will be sent to other administrators of this Space.
Click on “Add New Member(s)” to validate.
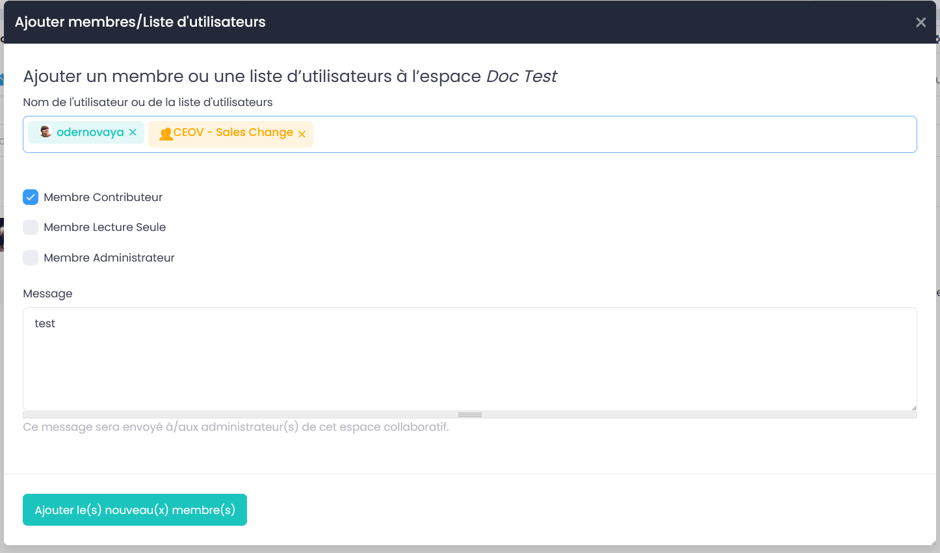
Note
If the user account does not exist yet, it must be created. It is possible to perform this action from the same “Hamburger” menu by clicking on “Create user in the Space”.
Creation of a user in a Space
This feature allows you to both create a new user and add them as a member in a Space.
- In order to create a User in a Space :
Go to the “Hamburger” menu (contextual actions, at the top right of the Space page or via the “Space Directory” page).
Click on “Create user in the Space” and you will be redirected to the user creation form.
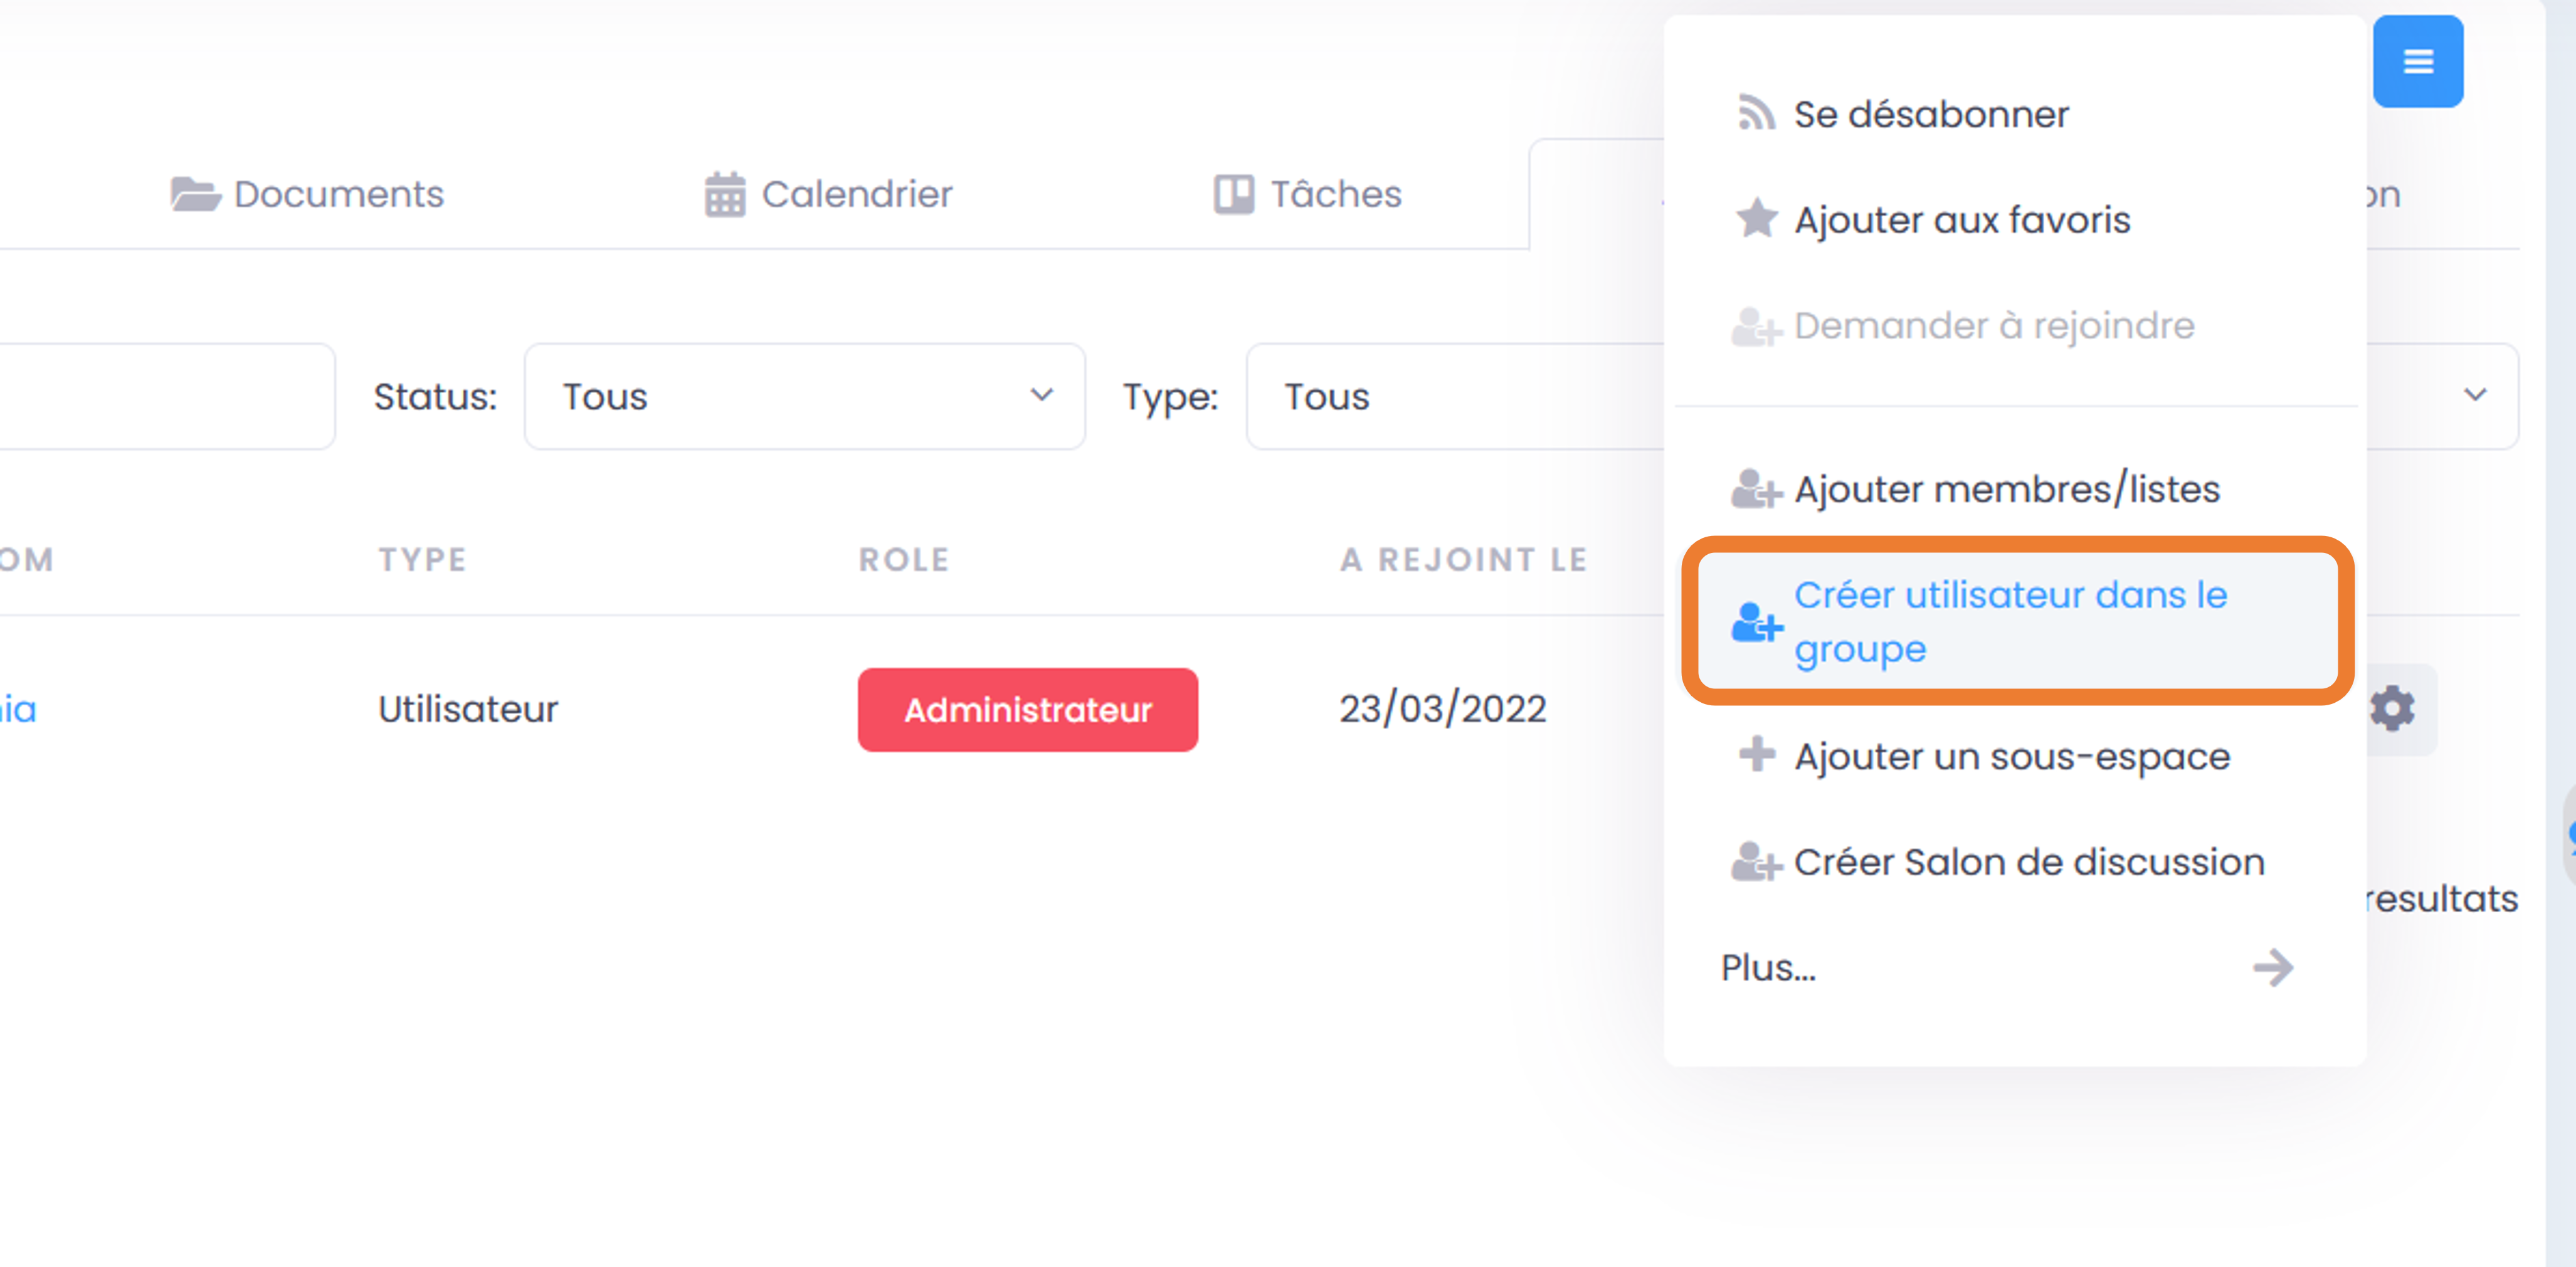
From the user creation form, you can either fill in the various available fields, or “search in LDAP” to pre-fill the data (this is the internal directory of your organization/company: AD or LDAP).
Complete the creation of the new user by clicking on “Save”
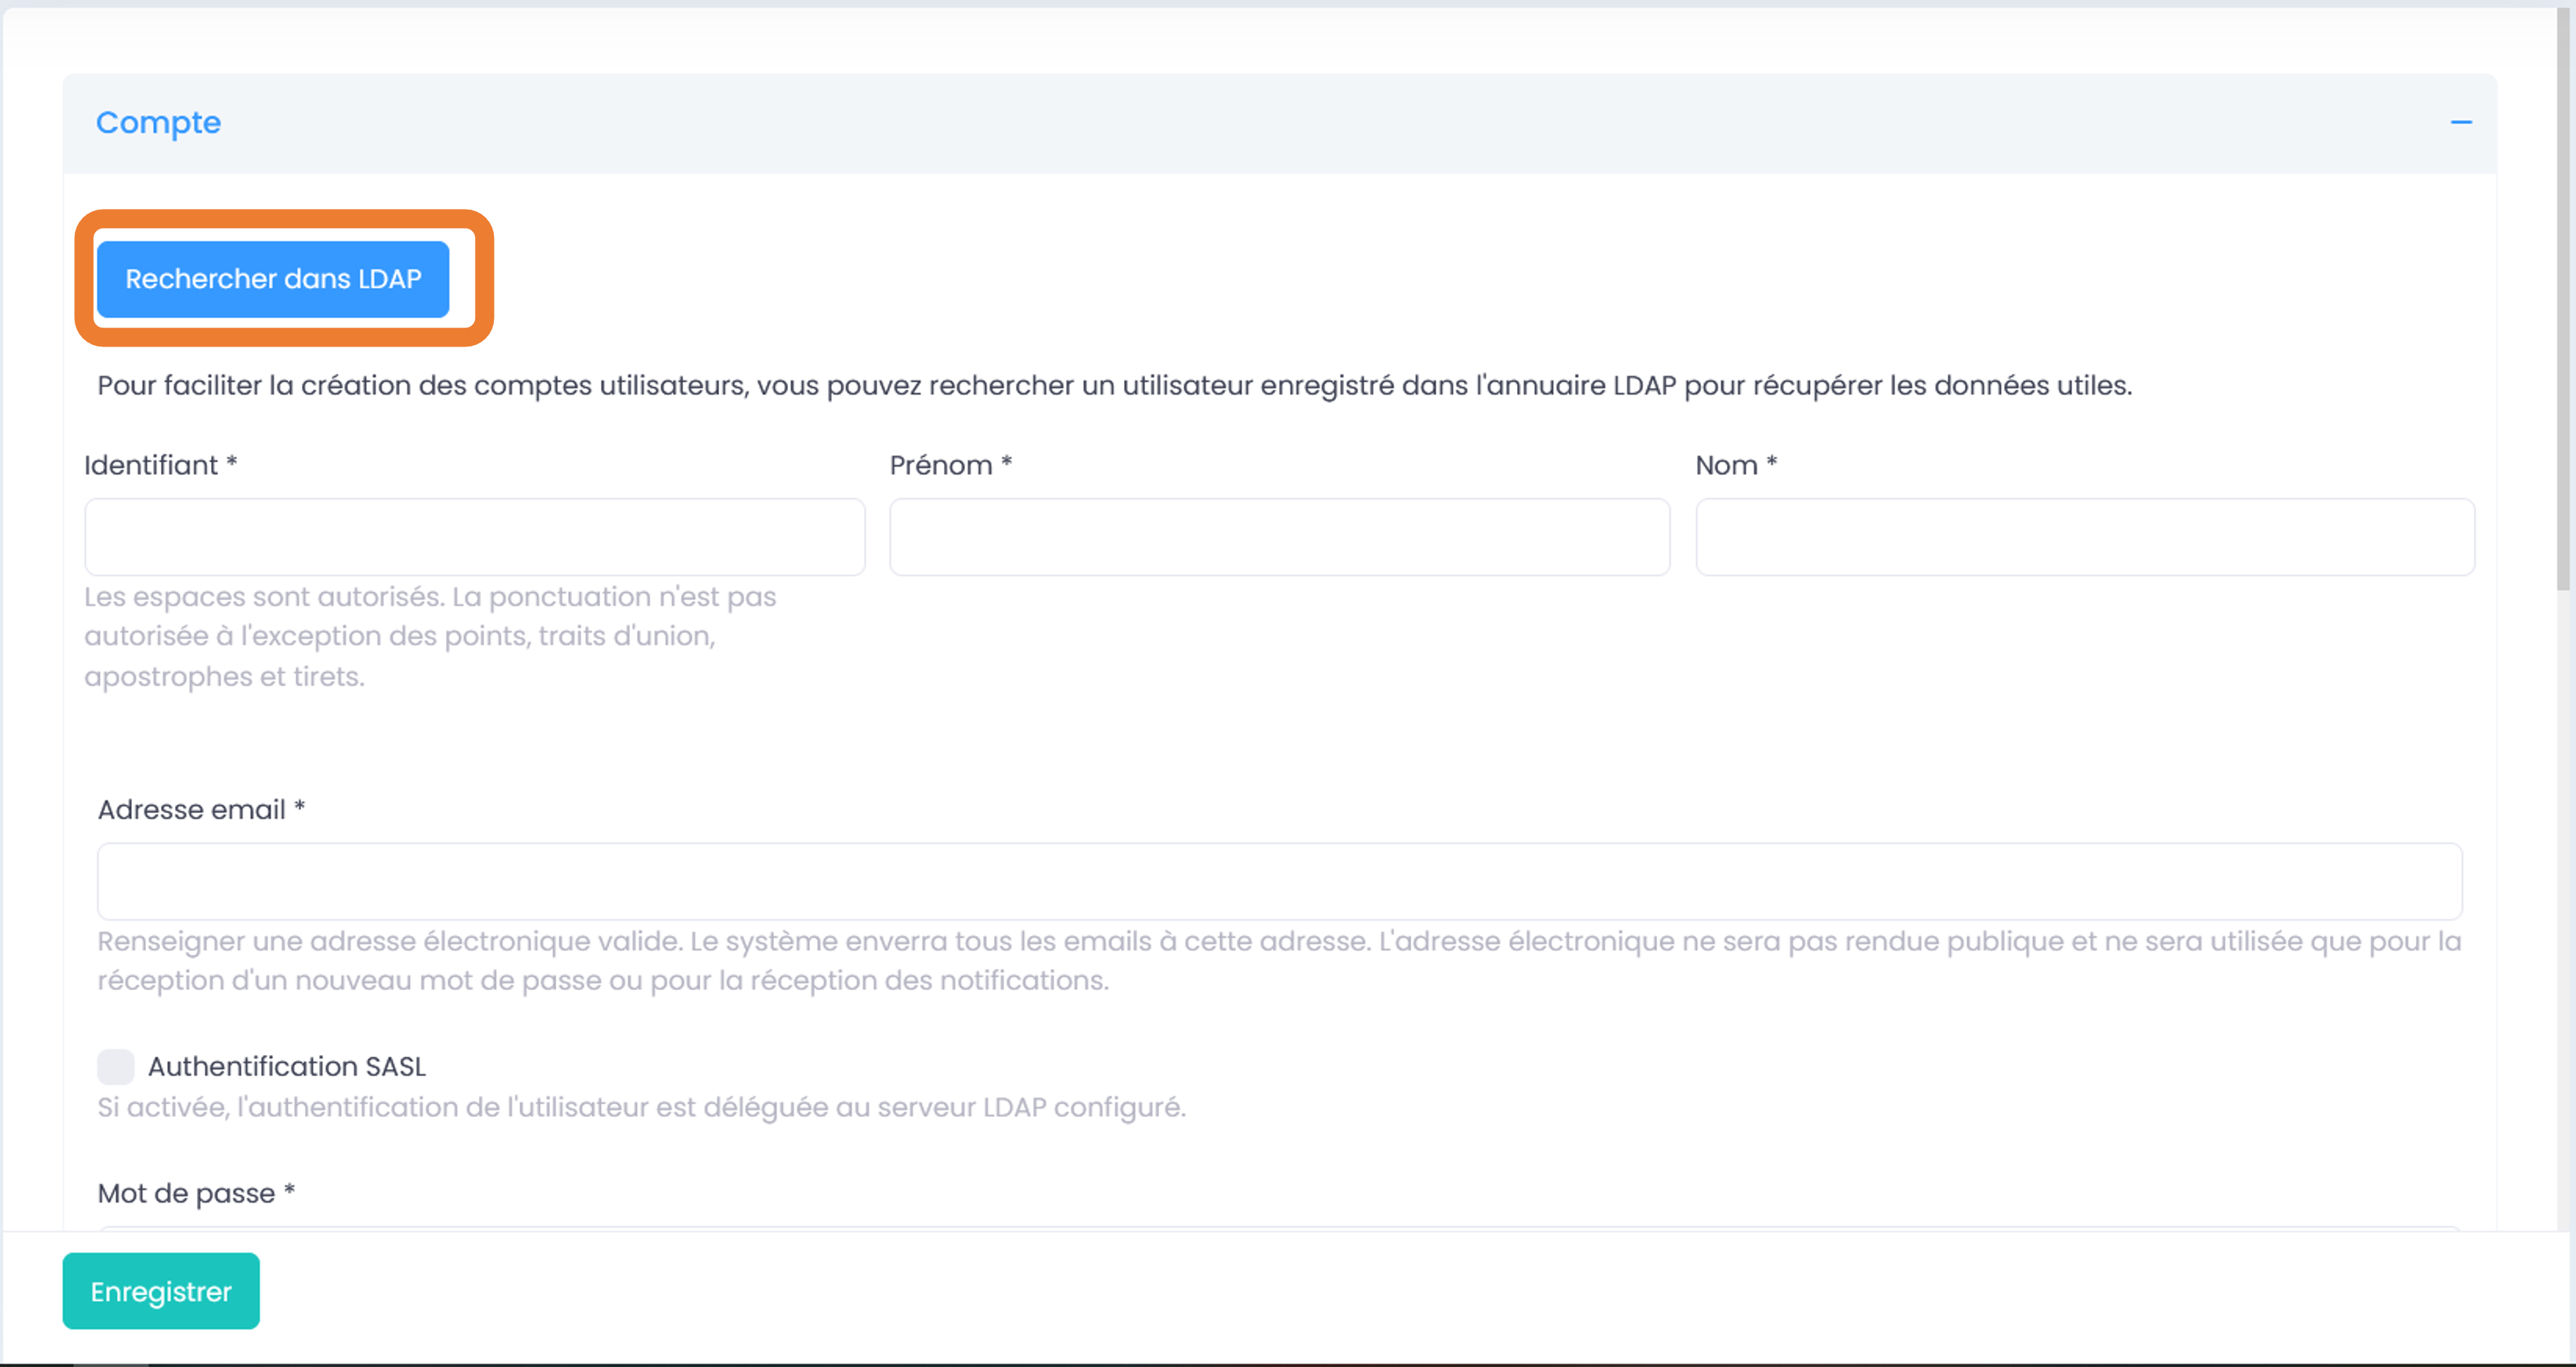
You can consult this section to discover other methods of creating a user.
Note
When you create a user, you specify its default role in Spaces. Once the user is created, you can change its role in the space at any time.
Note
If you enter an email address that is already associated with a user, a warning will appear that a user already exists with that email address.
Edit the name and homepage of Collaborative Space
- In order to rename the Space:
Via the “Hamburger” menu of the Space, then click on “Rename”.
By clicking on the name of the space (at the top of the space page): edit and click outside the field to save.
- In order to edit the homepage:
Go to the Space Home tab.
Click on a page to edit it (you have an editor with different layout options).
Editing the locations of a Collaborative Space
Modifying the location of a Space in the tree structure means changing the parent space: be careful, the Members will be automatically added to the new parent Spaces, with their default role).
Go to the “Hamburger” menu (contextual actions) of a Space.
Click on “Move this Space”, the window for editing the location opens (we see the current location of the Space in the tree structure).
Select the desired new location with one click.
End with “Move this Space”.
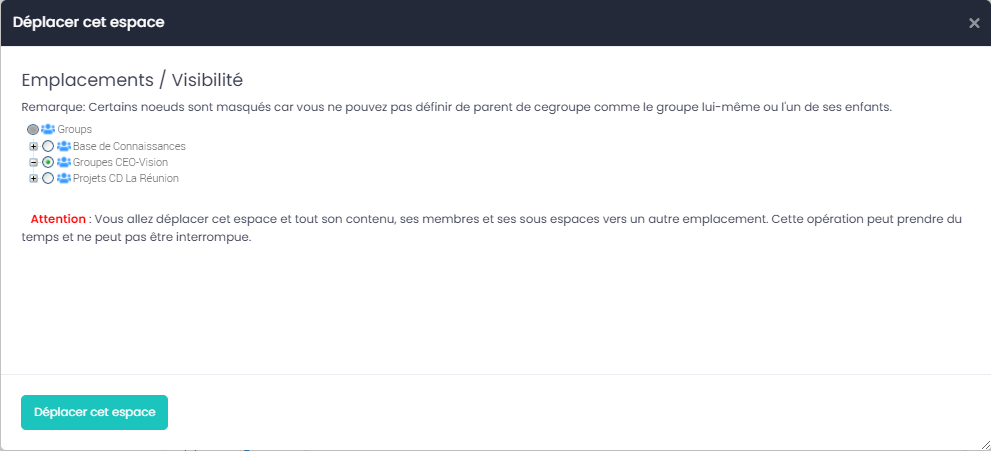
Note
In order to perform this move, it is necessary to have the administrator role both in the parent space (where your Space is located) and in the target space (which you want to move to). You will move this space and all of its content, members, and subspaces to another location. This operation may take time and cannot be interrupted.
Archiving a Collaborative Space
Archiving a space keeps all of its content read-only so that members can access it, but without the ability to change it or add new content.
Note
For example, it is advisable to archive a Group Space, dedicated to a project, once it is completed.
In order to archive a space:
Go to the “Hamburger” menu in the Space (contextual actions).
Click on “Archive this space”.
A confirmation window opens.
Confirm by clicking on “Archive”.
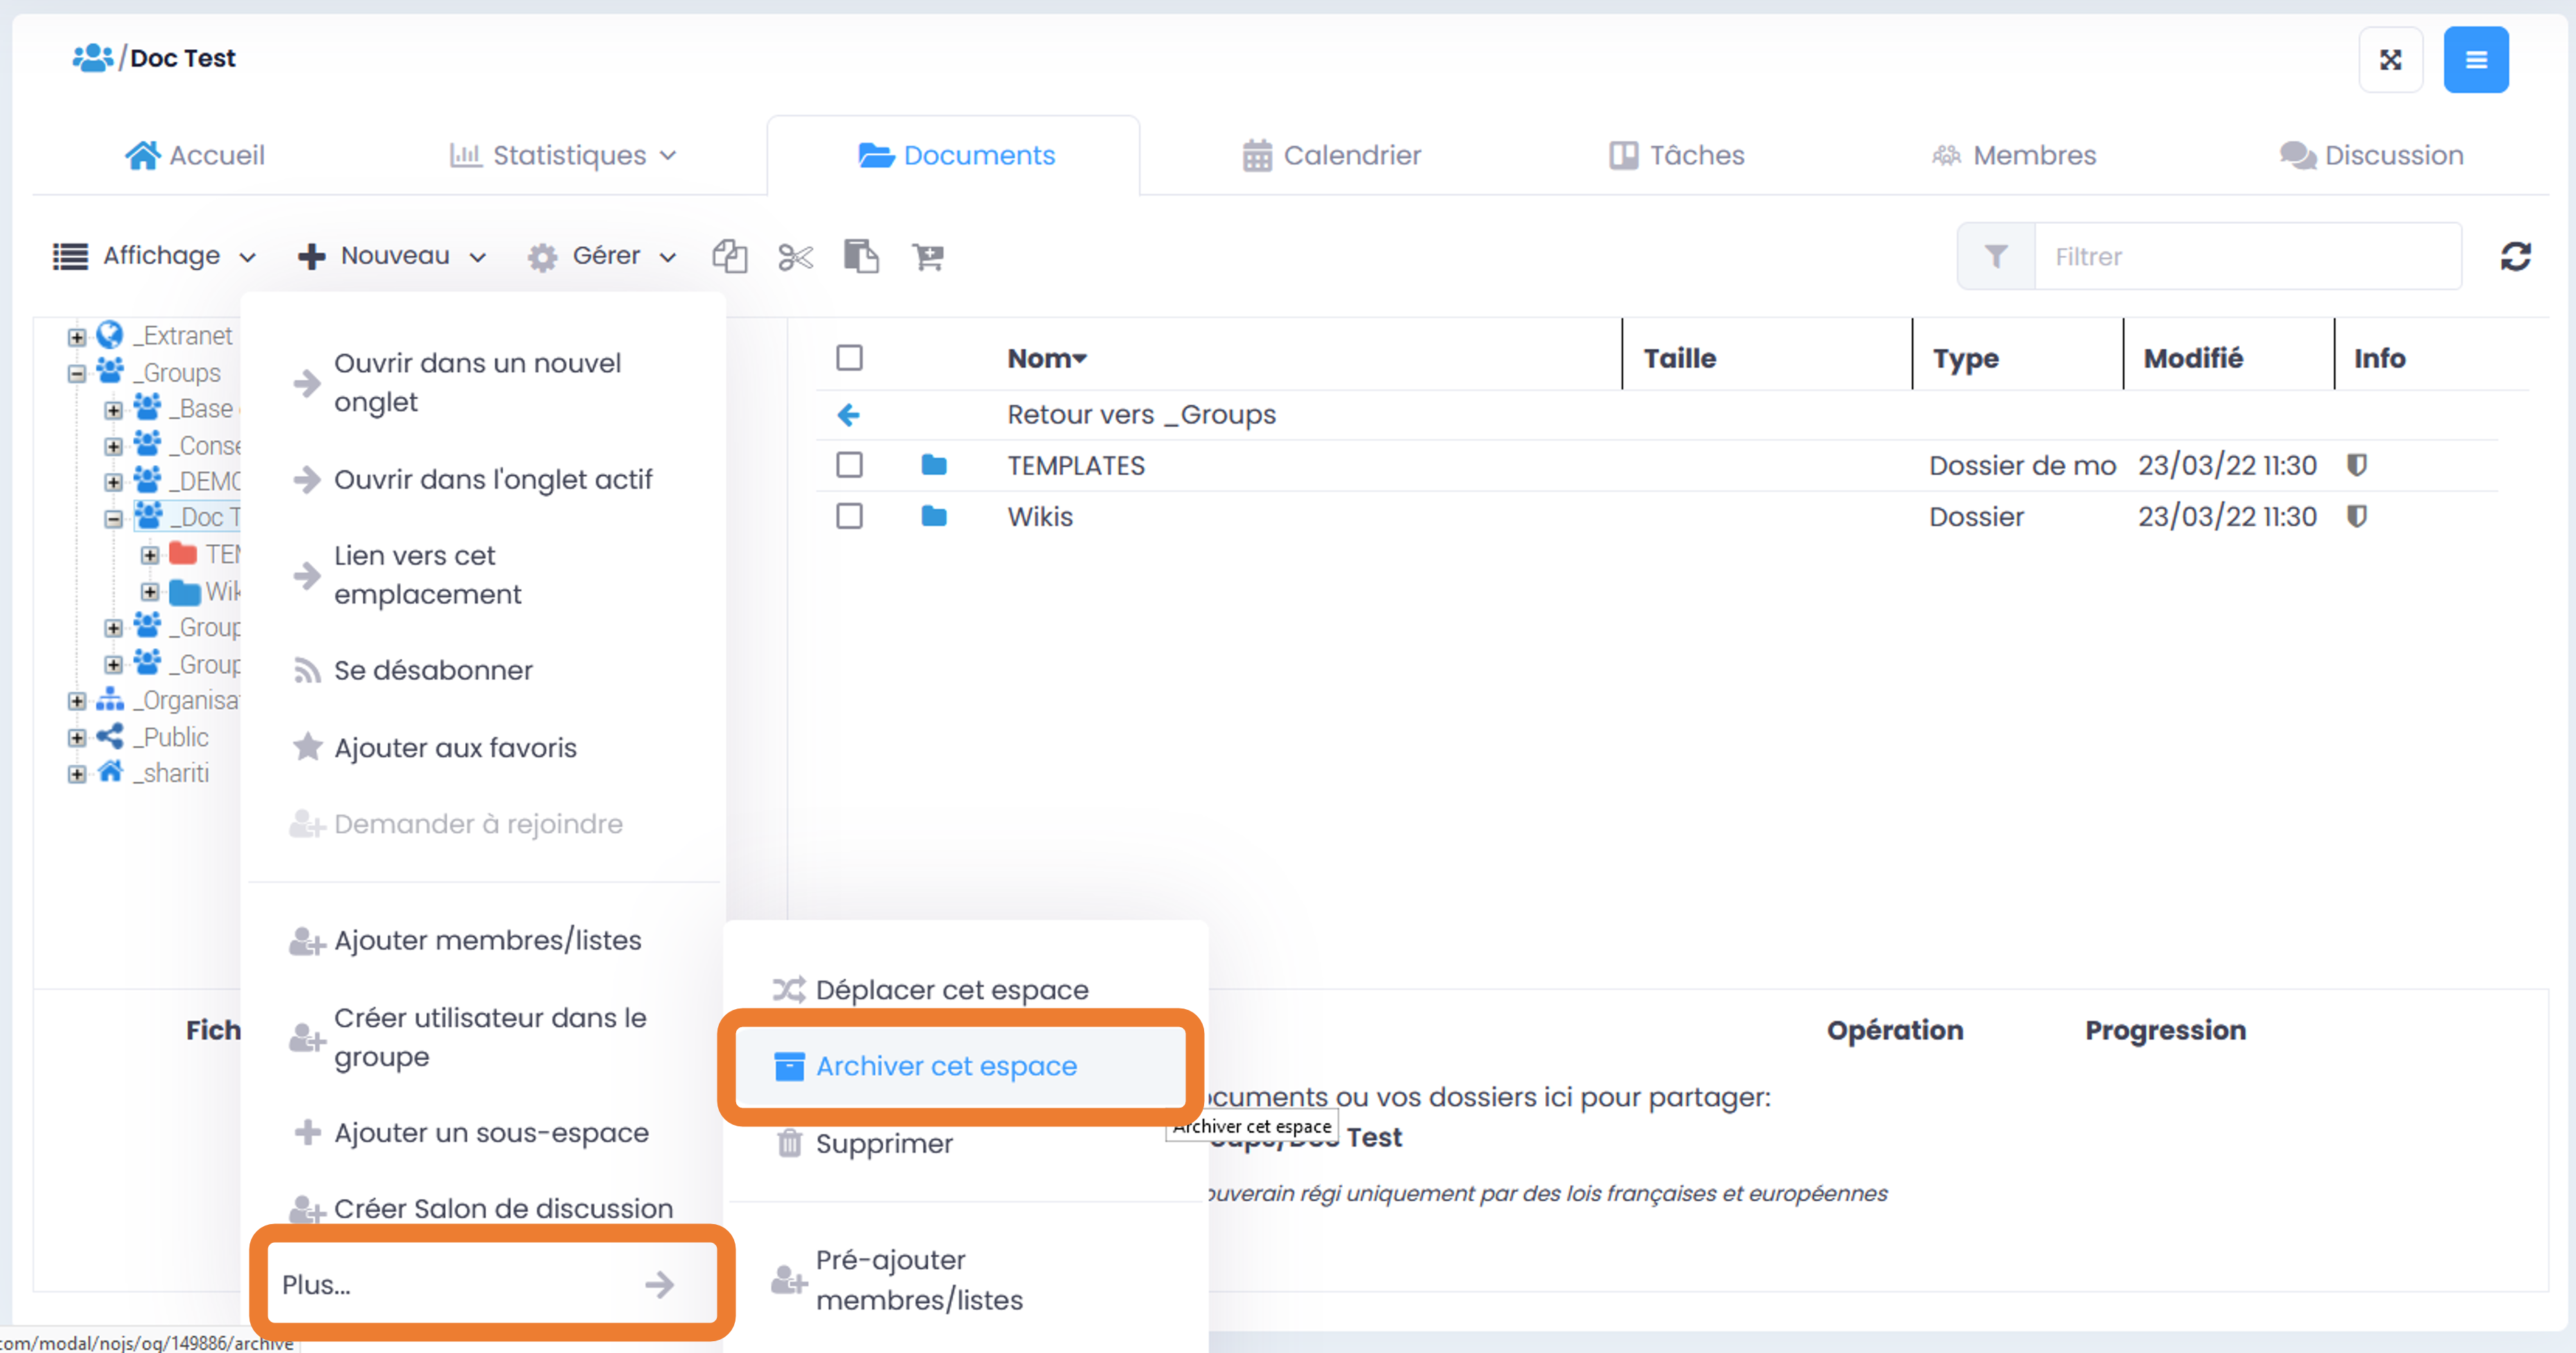
The content of this Space will appear as archived and will no longer be visible while searching, unless you put the search option “Search in archived content”.
Note
“Organization” type collaborative spaces cannot be archived, nor can users’ personal spaces. Archived items are identified in the file explorer by the “archive” icon.
Deleting a Collaborative Space
Note
Deleting Space is a permanent action: it cannot be restored. Once removed, the space won’t be visible anywhere else.
In order to delete a space:
Go to the “Hamburger” menu in the Space (contextual actions).
Click on “Delete this space”.
A confirmation window opens.
Confirm by clicking “Delete”.
Note
When deleting a Space, several operations are automatically carried out: processing of “multithreaded” content (those that have other locations in other Spaces), deletion of non “multithreaded” content, deletion of folders. If you want to keep the content while putting the Space in Read Only, choose the “Archive” action.
Subscribing or unsubscribing from a Collaborative Space
You can subscribe to a Space to stay informed of everything that happens there, and then you will receive regular notifications informing you about certain actions with documents in this space.
In the contextual actions of the group (3 horizontal bars), choose “Subscribe”.
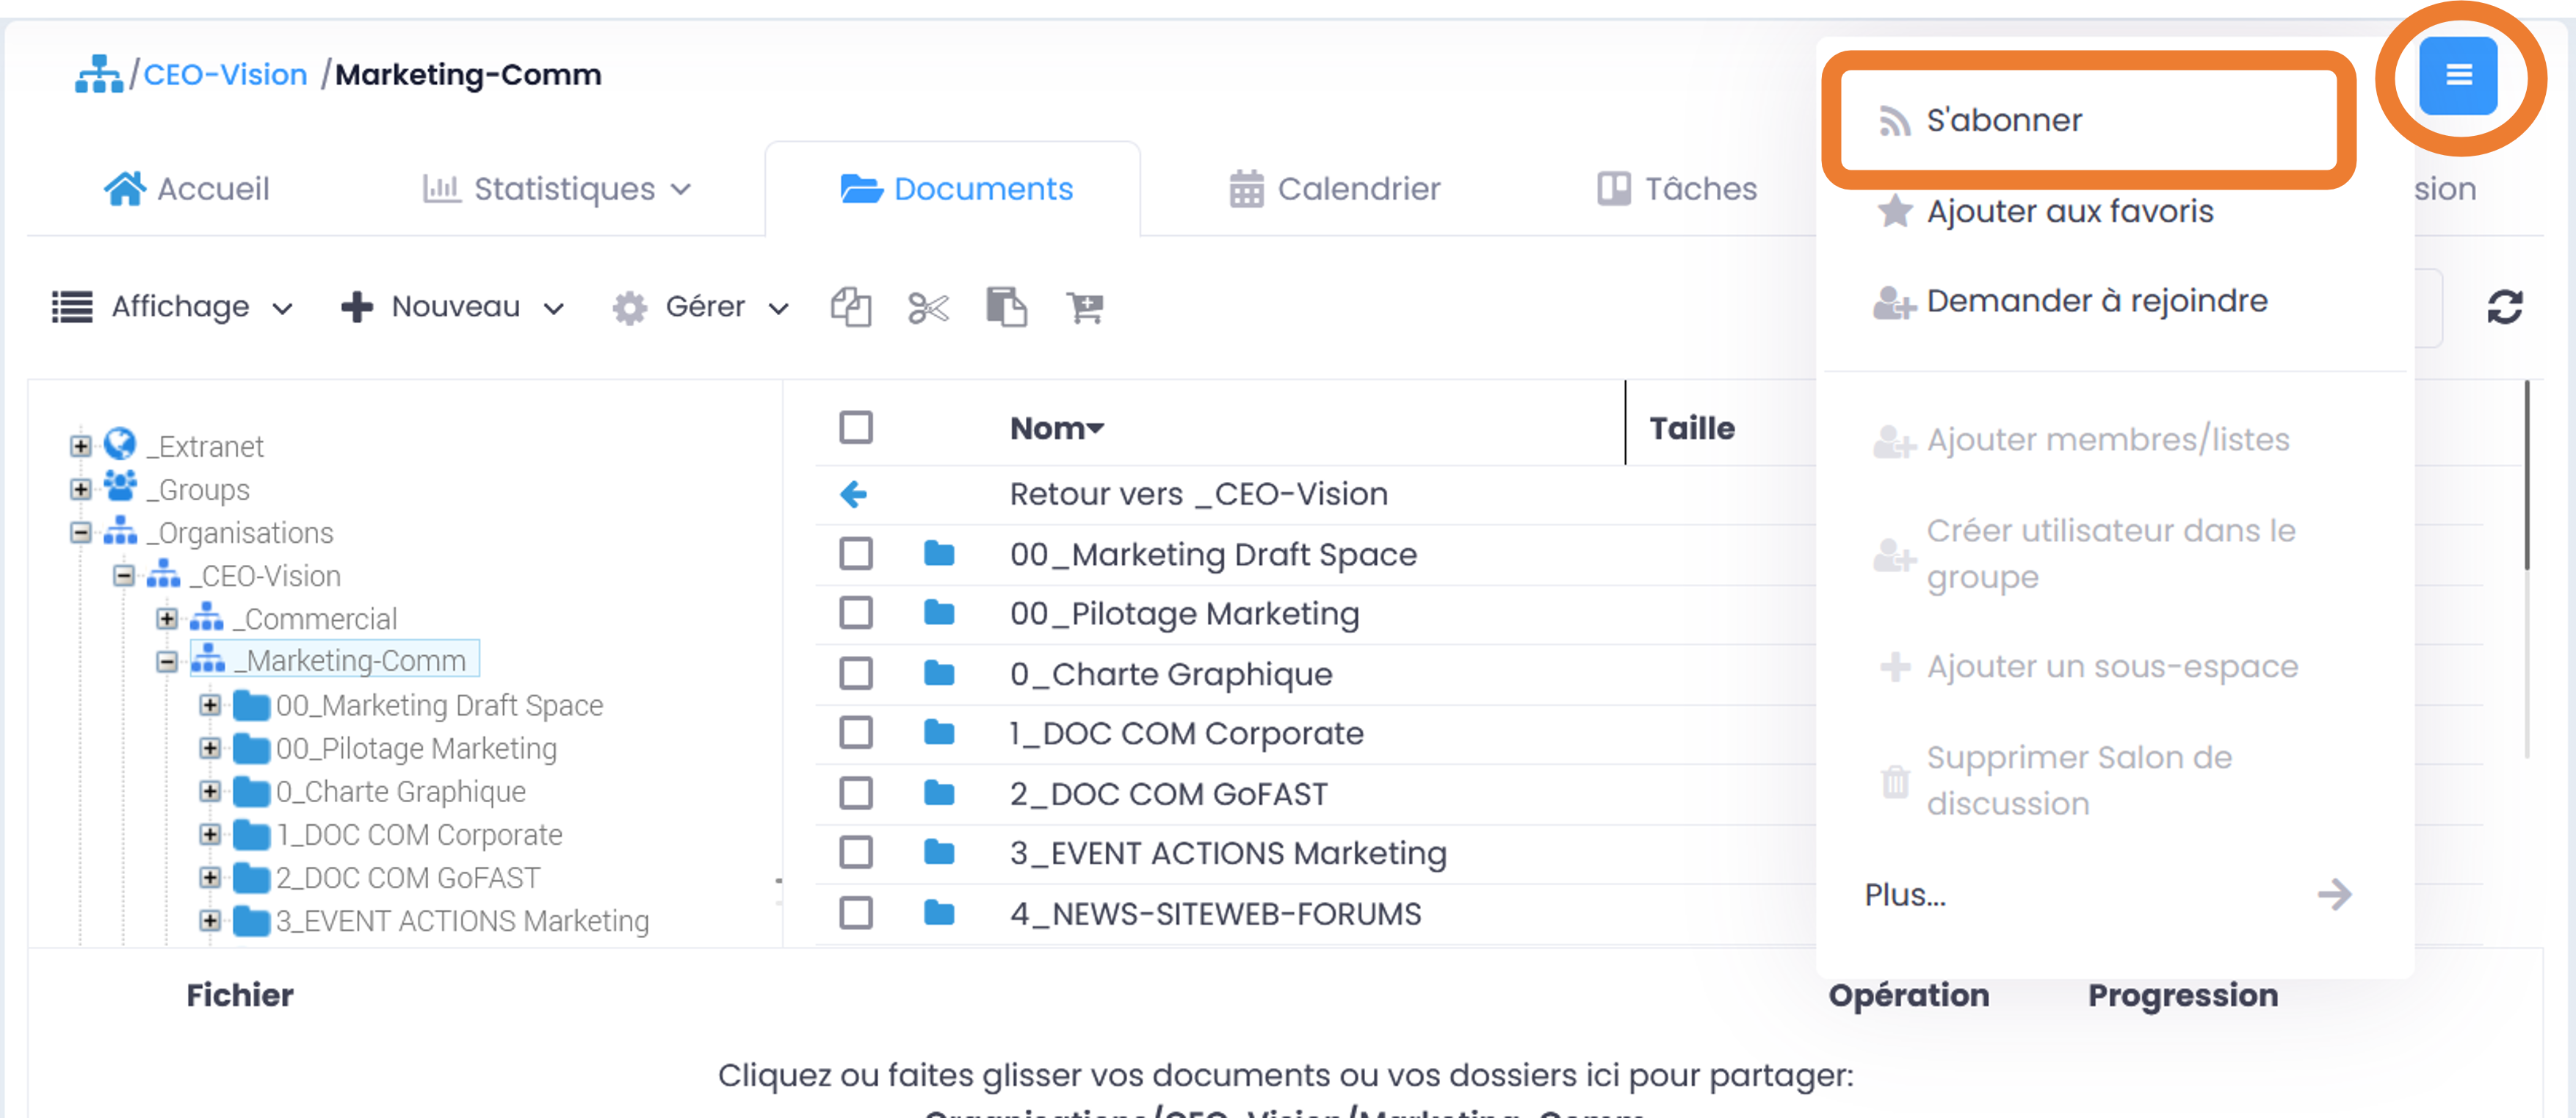
A green message will appear on the right side of the screen confirming your subscription to this group.
You can unsubscribe from this group by the same way. This means that you will no longer receive any notifications related to this group and its content.
The same message in green confirms your unsubscription
See also the section: “Management of your subscriptions”
Creation of a Chat Room in a Space
If you are the administrator of the space, you can Create a chat room which will be usable in the Chat tool (Instant Messaging). All space members will automatically be added to the new chat room.
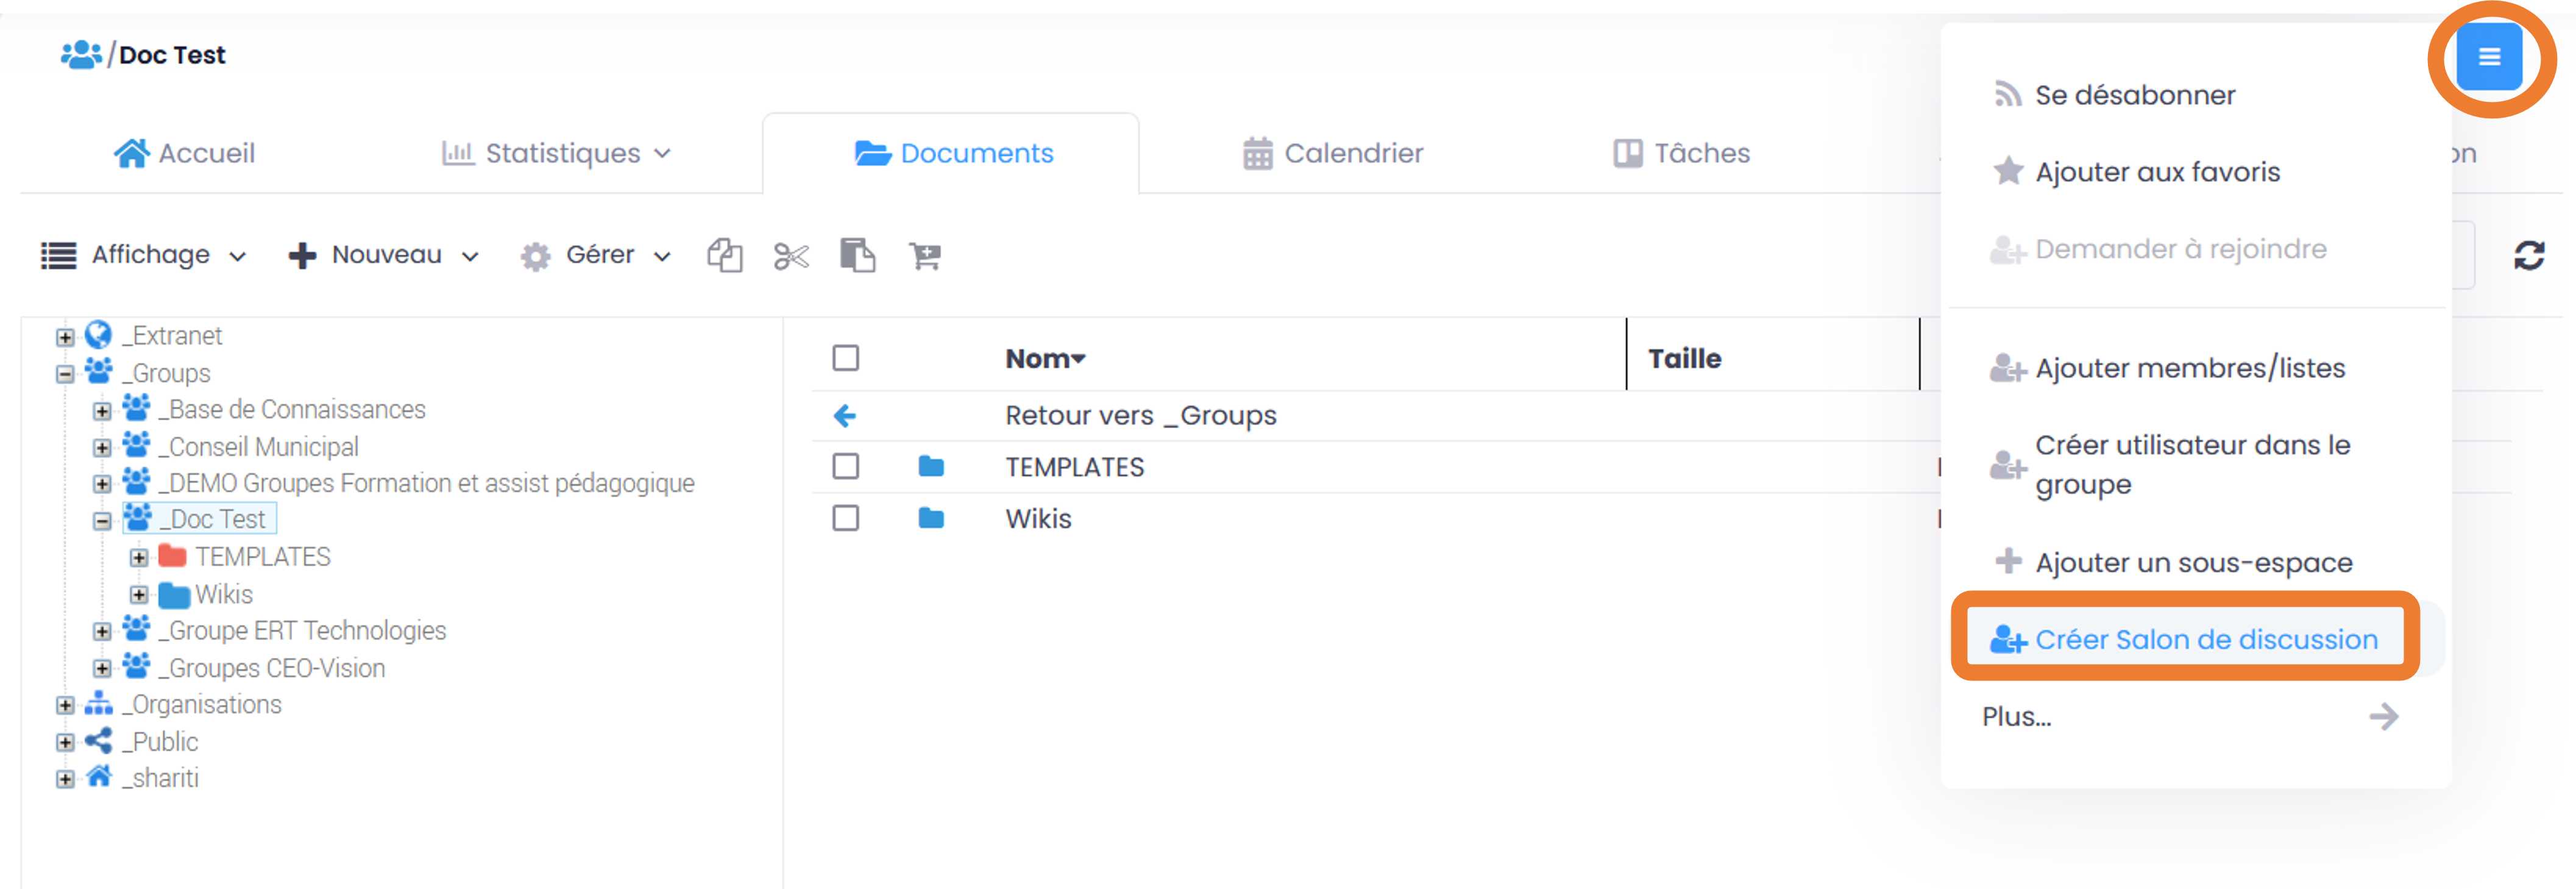
In order to find out more about how Chat works, please refer to the section: “Chat/Instant Messaging”.
Space metadata
In the collaborative space view, on the right-hand side of the interface, you can display metadata by scrolling down the dedicated block.
- Some metadata can be modified by the space administrator:
État
Documentary reference (label can be customized)
Deadline
Classification
Date (customizable label)
Responsable : cette métadonnée et non seulement modifiable par les administrateurs de l’espace, mais aussi par le responsable actuellement désigné. Par défaut, elle est initialement attribuée au créateur de l’espace
- Other metadata are automatically generated by the system and cannot be modified:
Type
Created on
Created by
Modified on
Confidential areas
Via the “Classification” metadata of a space, you can restrict access to members with confidential clearance.
- Conditions required to classify a Space as confidential:
Être « Administrateur » de l’Espace.
Have the “Confidential clearance” profile.
- Steps to classify a Space as confidential:
Acess the metadata** for the Espace concerned.
Click on the Classification tab.
Sélectionnez le niveau de confidentialité souhaité.
Note
Space members who do not have the “Confidential clearance” profile will be automatically excluded from the Space as soon as it is classified as confidential.
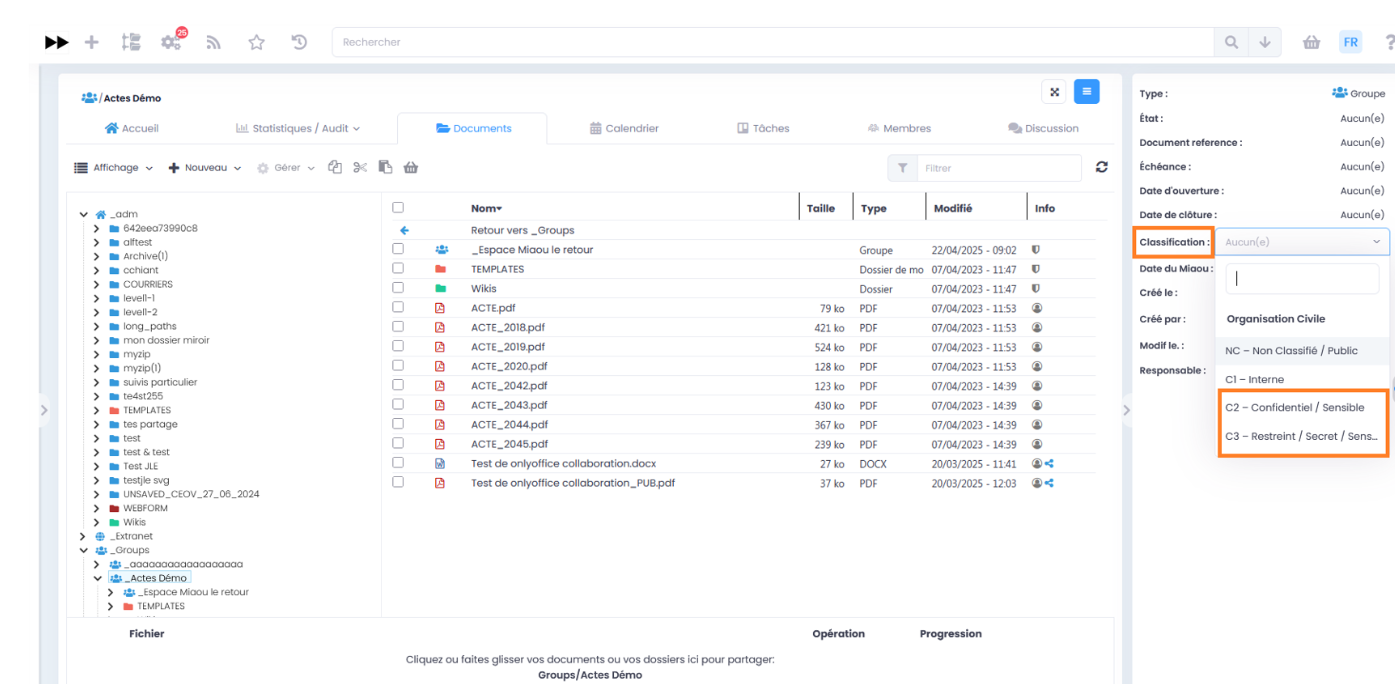
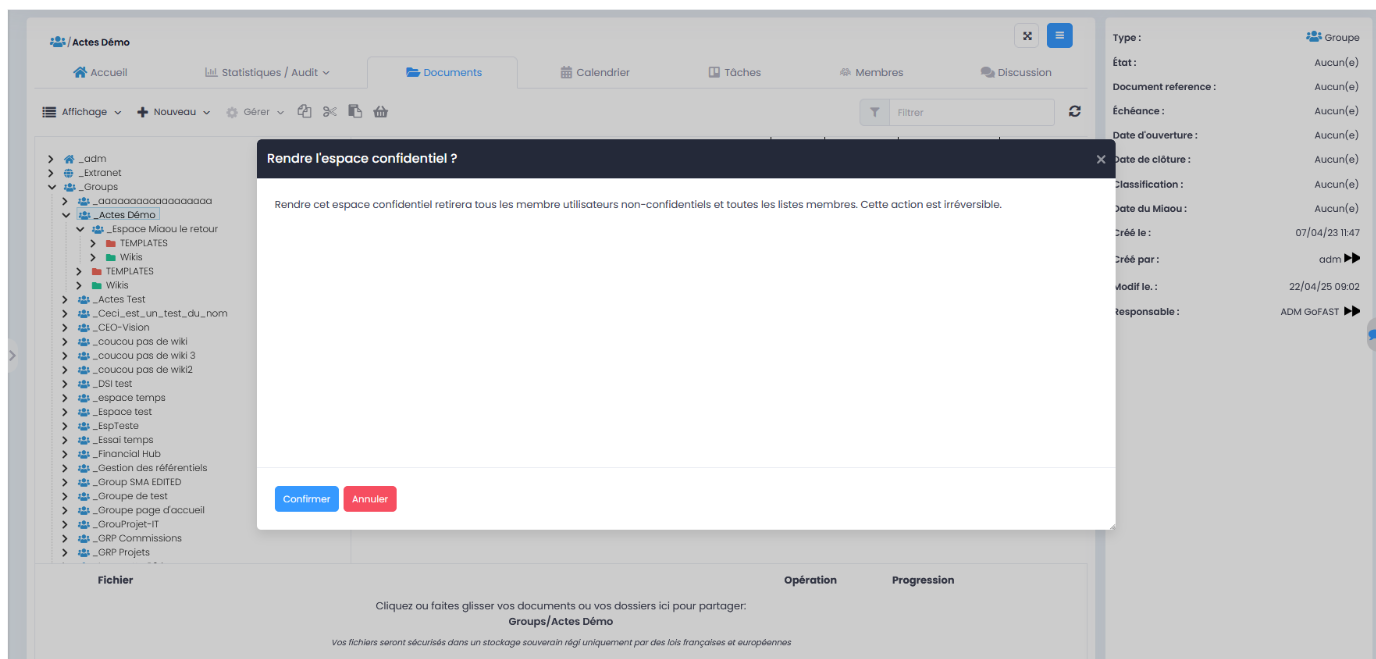
Management of user lists
Userlists facilitate the mass and automated management of Collaborative Spaces members and their roles. Thus, when a GoFAST user is added to a list, they automatically become a member of all spaces associated with that list.
Note
Lists can also be selected when sharing documents by email (see “Sharing the document by email”).
In order to find out how to create a User list, please refer to the section: “How to create a User list”
How to edit a user list
You can see the members of the user list by going to that list and then to the Members tab. You will then see who is a member and who is not an admin.
In order to edit the elements of the list (name, description, members), you must:
Click on the “Hamburger” menu (contextual actions) on the List page or from the User Lists directory.
Click on “Edit this User List”.
In the “User List Members” field, start typing in a user’s last name/first name and click on one of the suggestions (list that appears based on your input).
In the “User list administrators” field, start typing a user’s first name/last name and click on one of the suggestions (list that appears according to your input).
To remove a member or an administrator from the list, click on the cross to the right of the user’s name (in the thumbnail).
You can change the description of the list in the Description field
Click on “Save” to save your modifications.
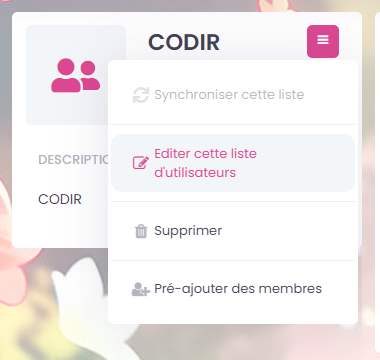
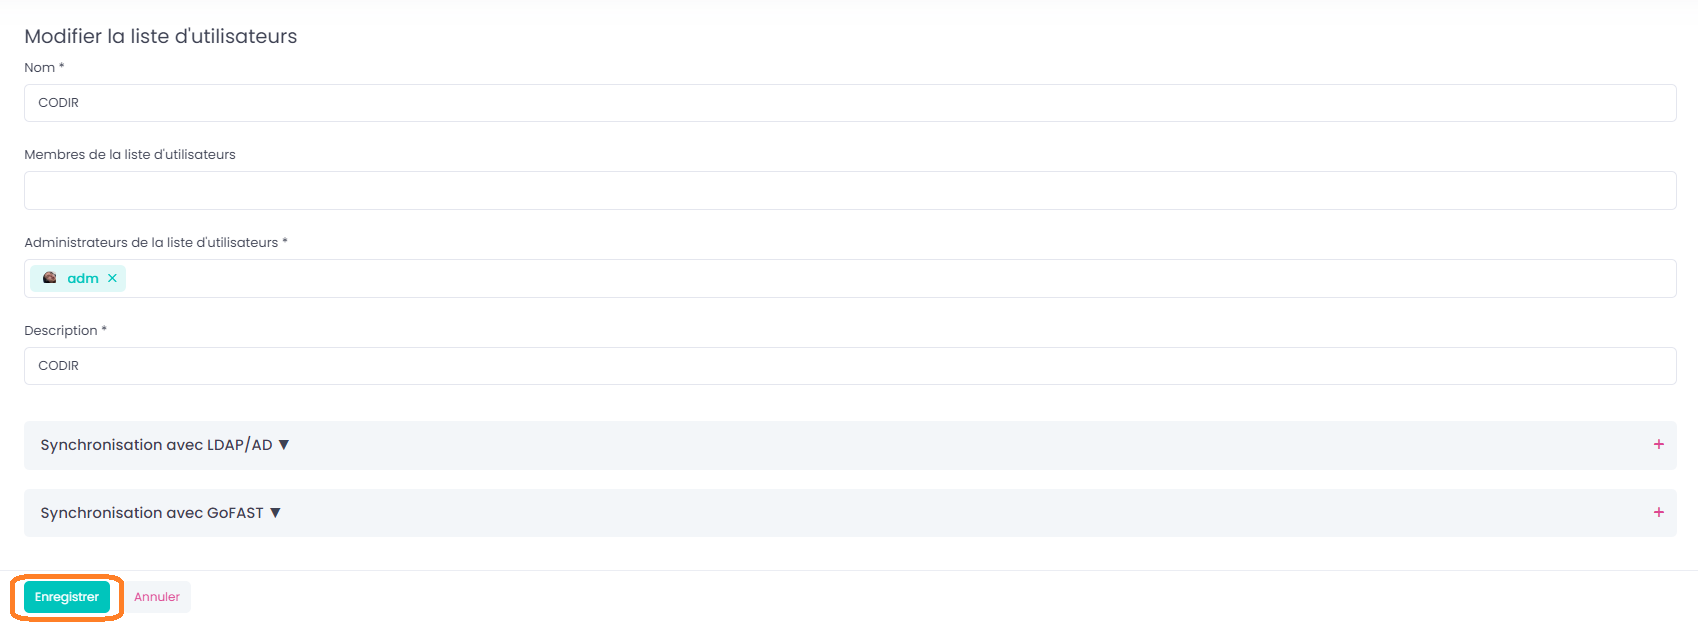
Note
Members of the list will have access to all spaces where the list itself is a member. List admins do not have access to Spaces, but they can manage the list.
See also the section: «How to create a User List».
Add/remove a list of users as a member of a Collaborative Space
- Adding a list in a collaborative space is similar to adding a single user:
Go to the space page (or via the Space Directory)
Open the “Hamburger” menu (contextual actions)
Click on “add member/list”
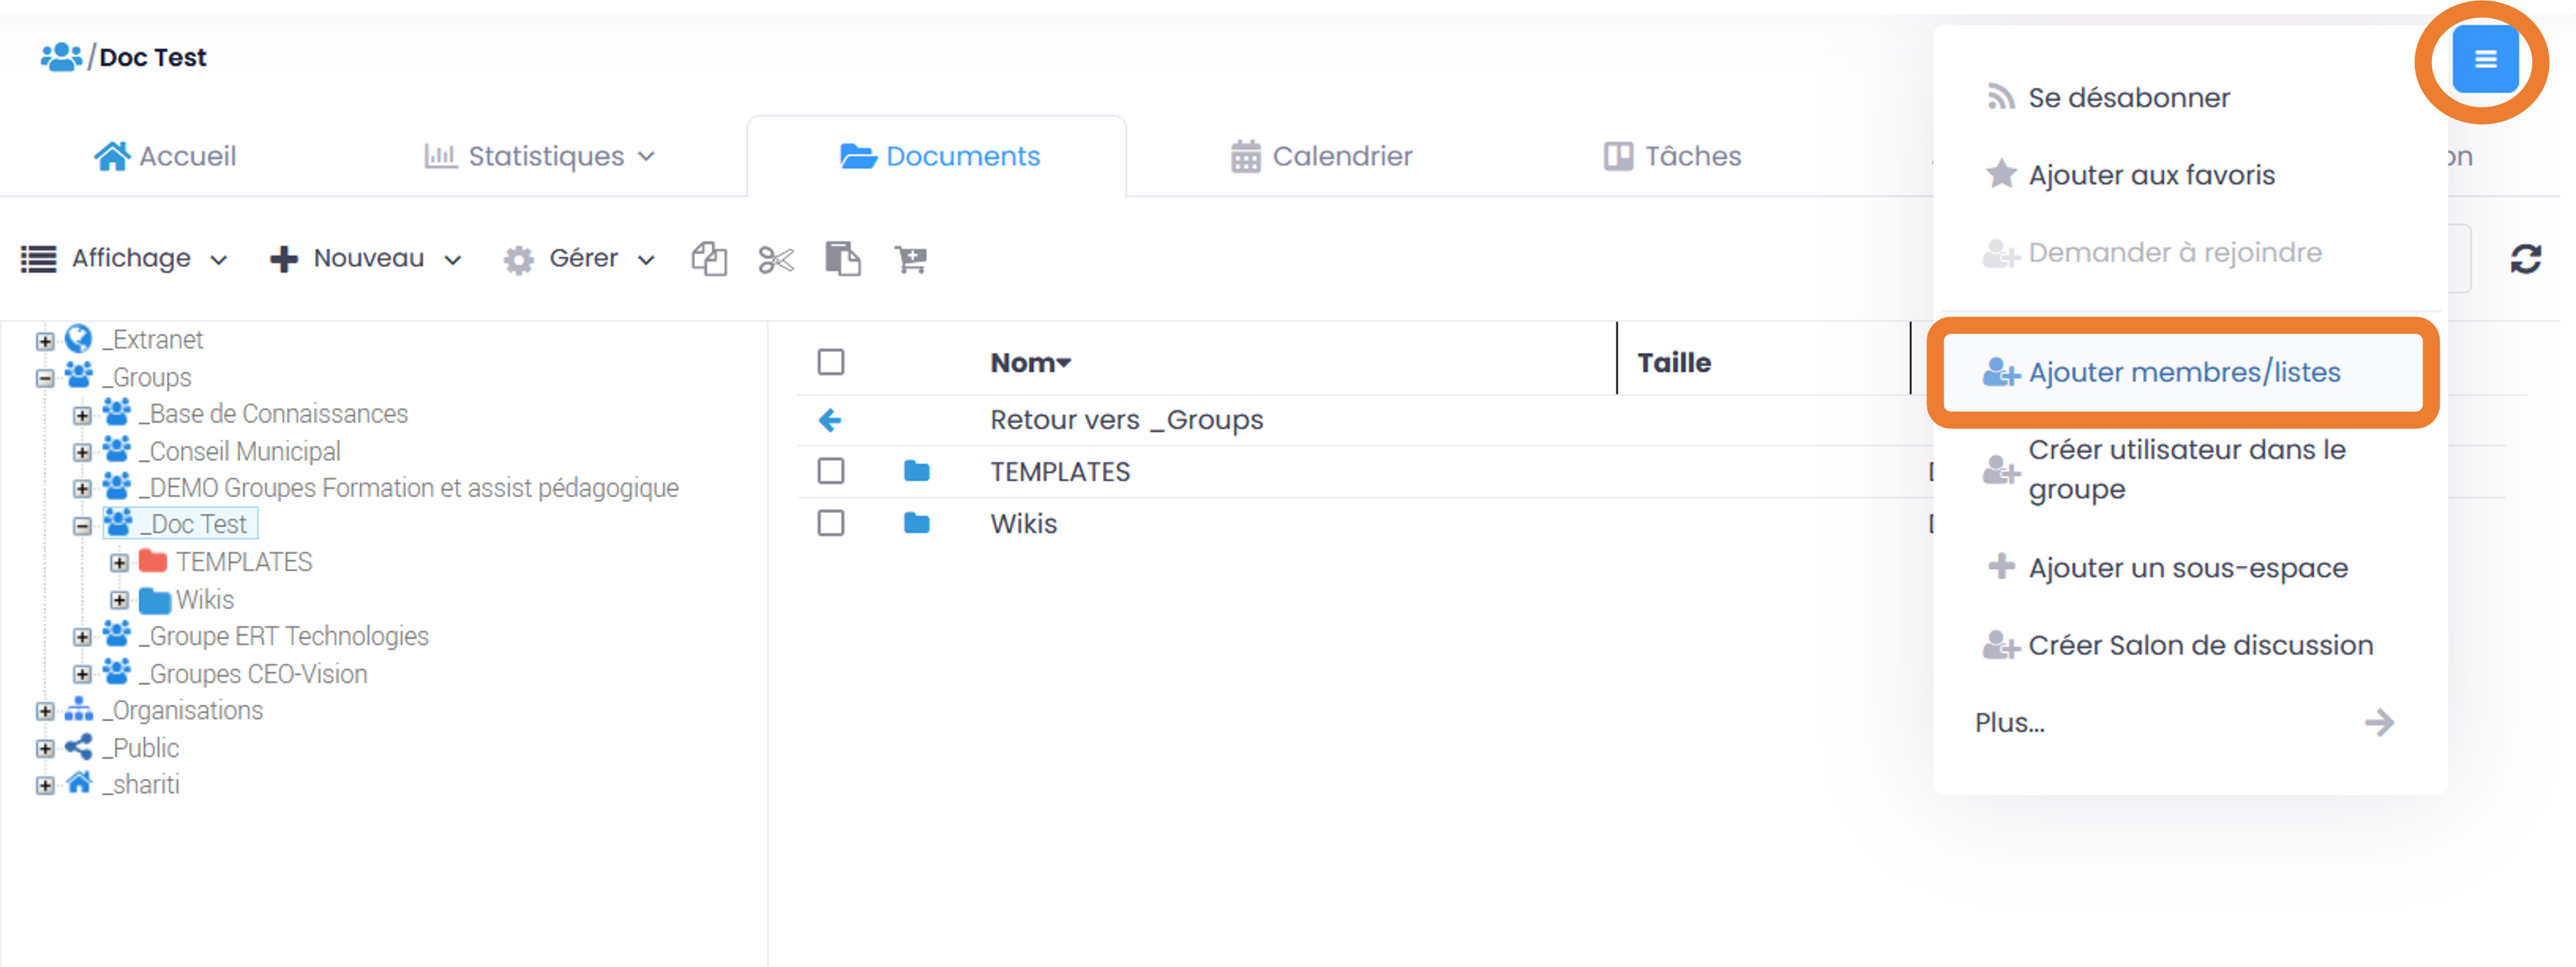
The form for adding a member opens and you have to start entering the name of the list (at least 3 characters) to get suggestions.
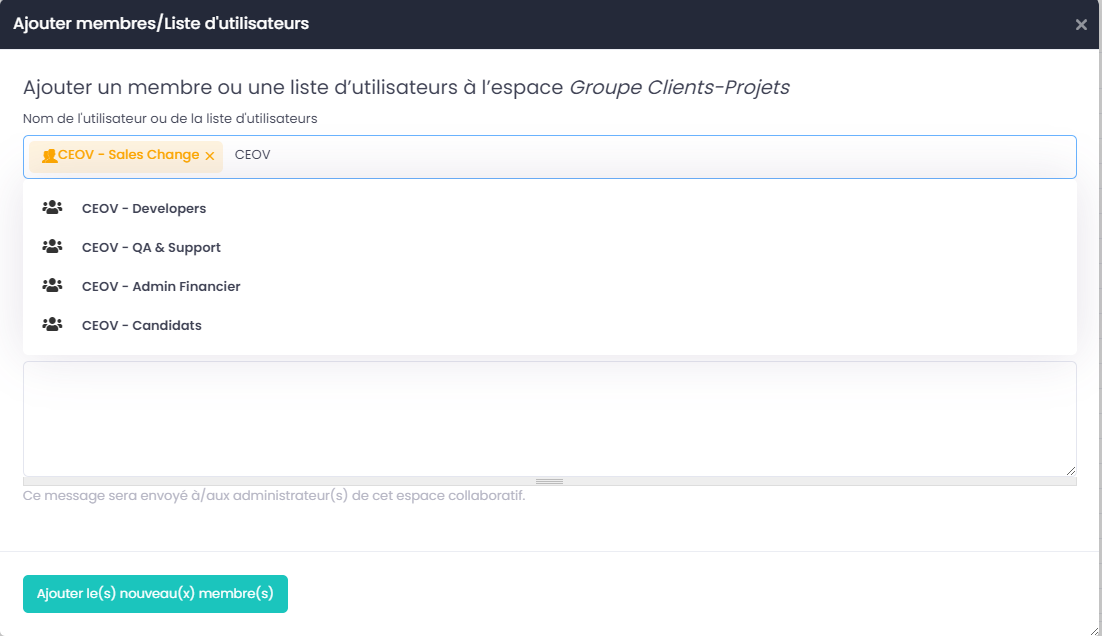
Note
To add a user list as a member of a Space, you must be a Space administrator.
Note
The role assigned to each user in the Collaborative Space and verified when the list was added. If the user is a member of a space in several ways (Lists + individually), the role that offers the most rights will apply. In this way, we avoid restricting the rights of a user who is already a member of the Collaborative Space… figure:: media-
Once the list has been added to the Collaborative Space, it is displayed among the other members.
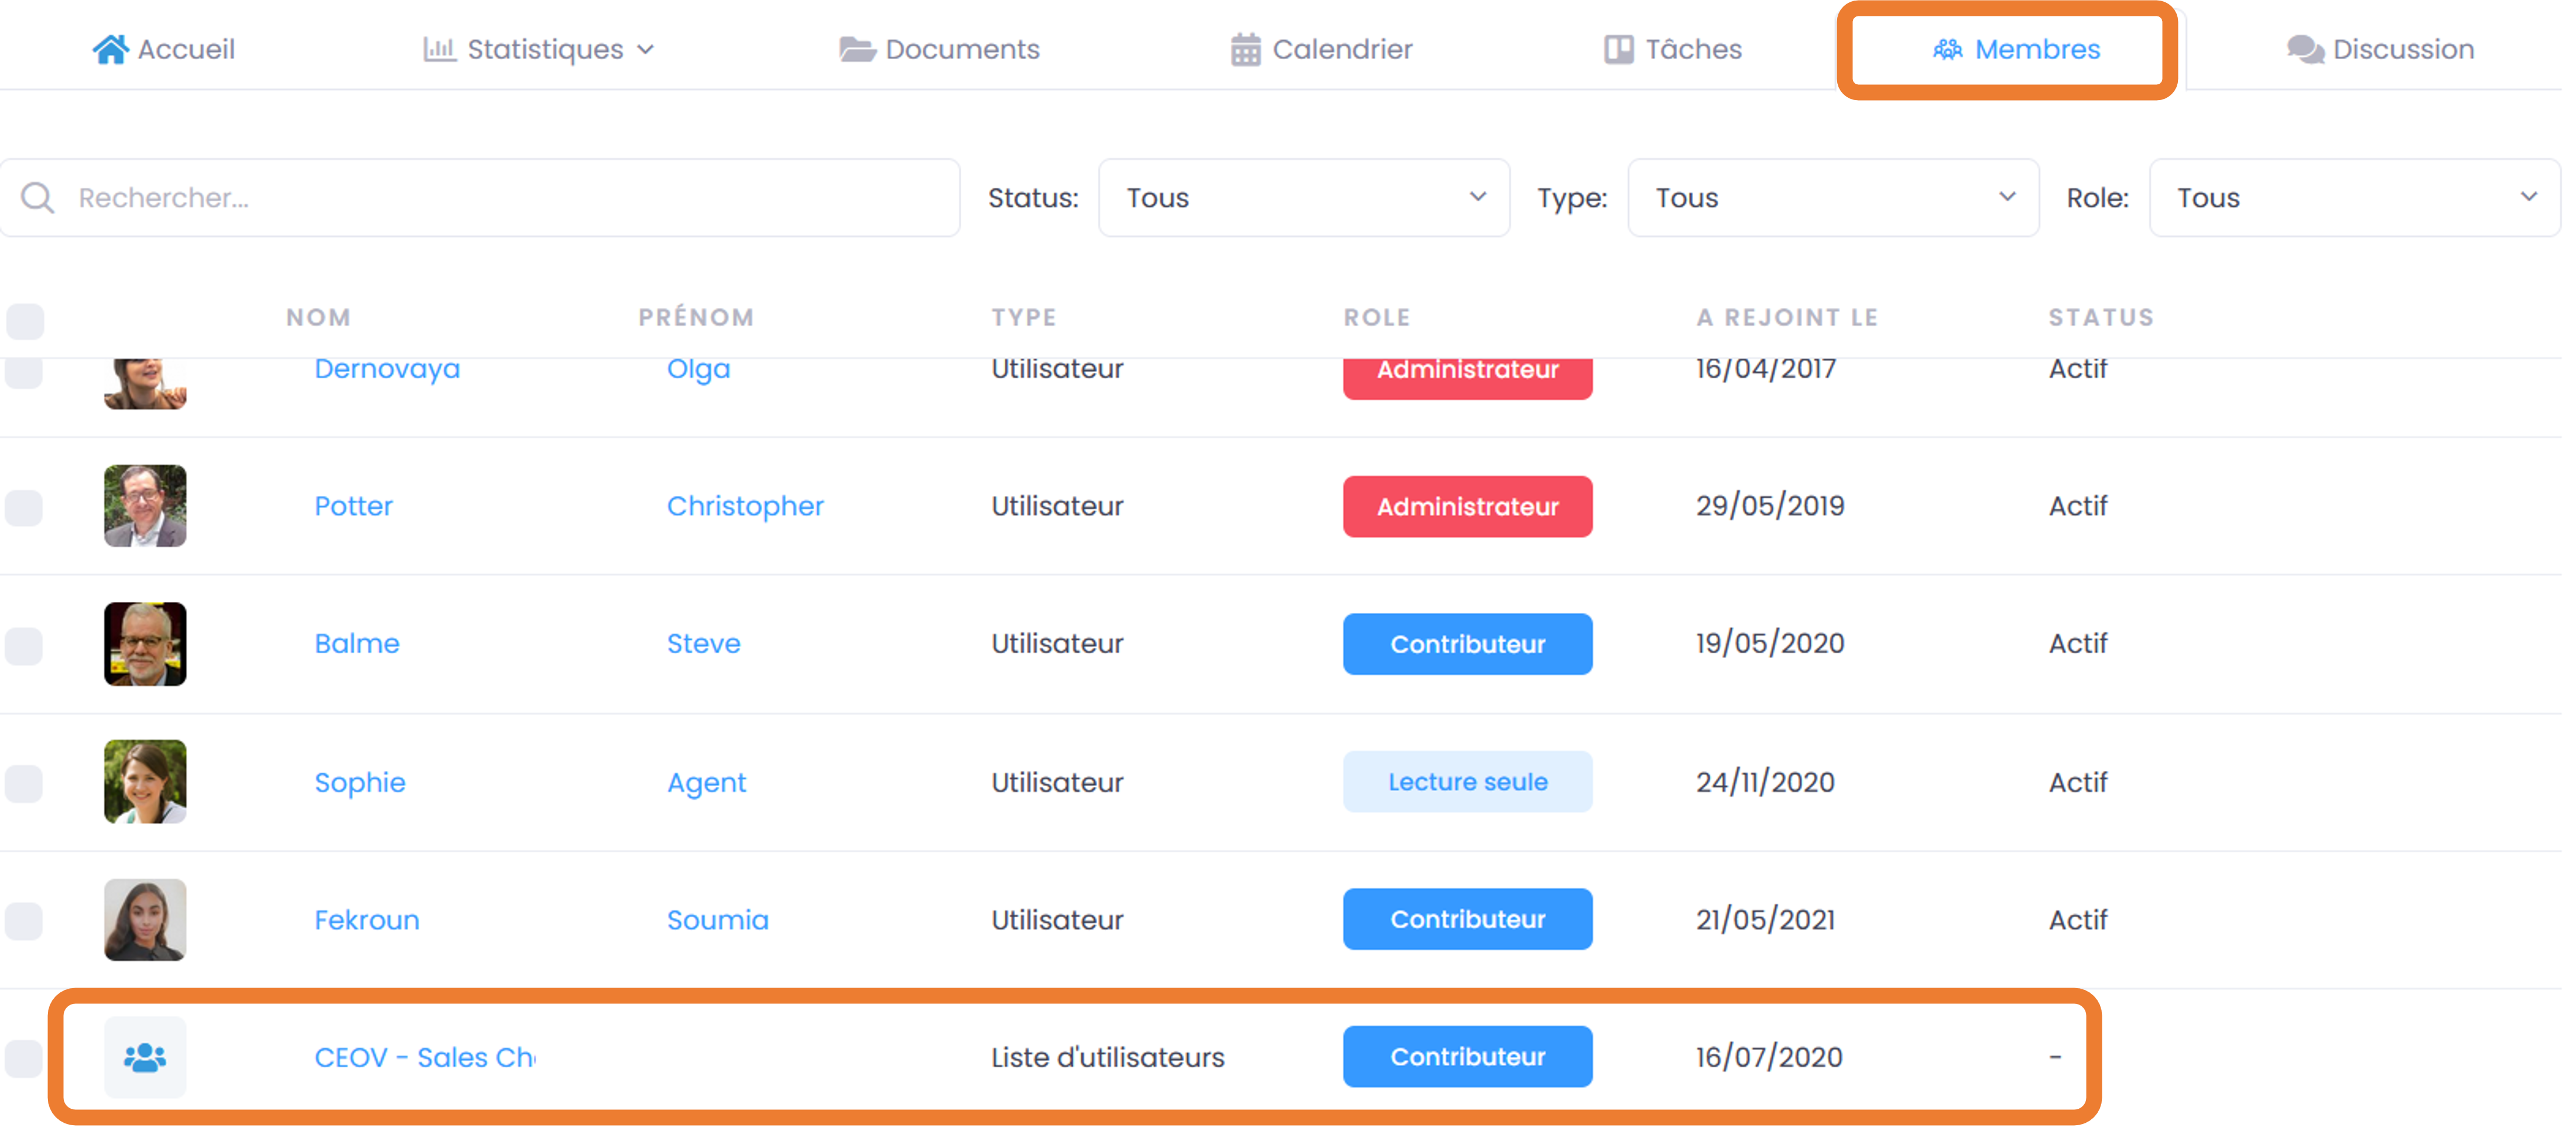
Collaborative spaces in which the list is a member appear on the list page, Locations tab.
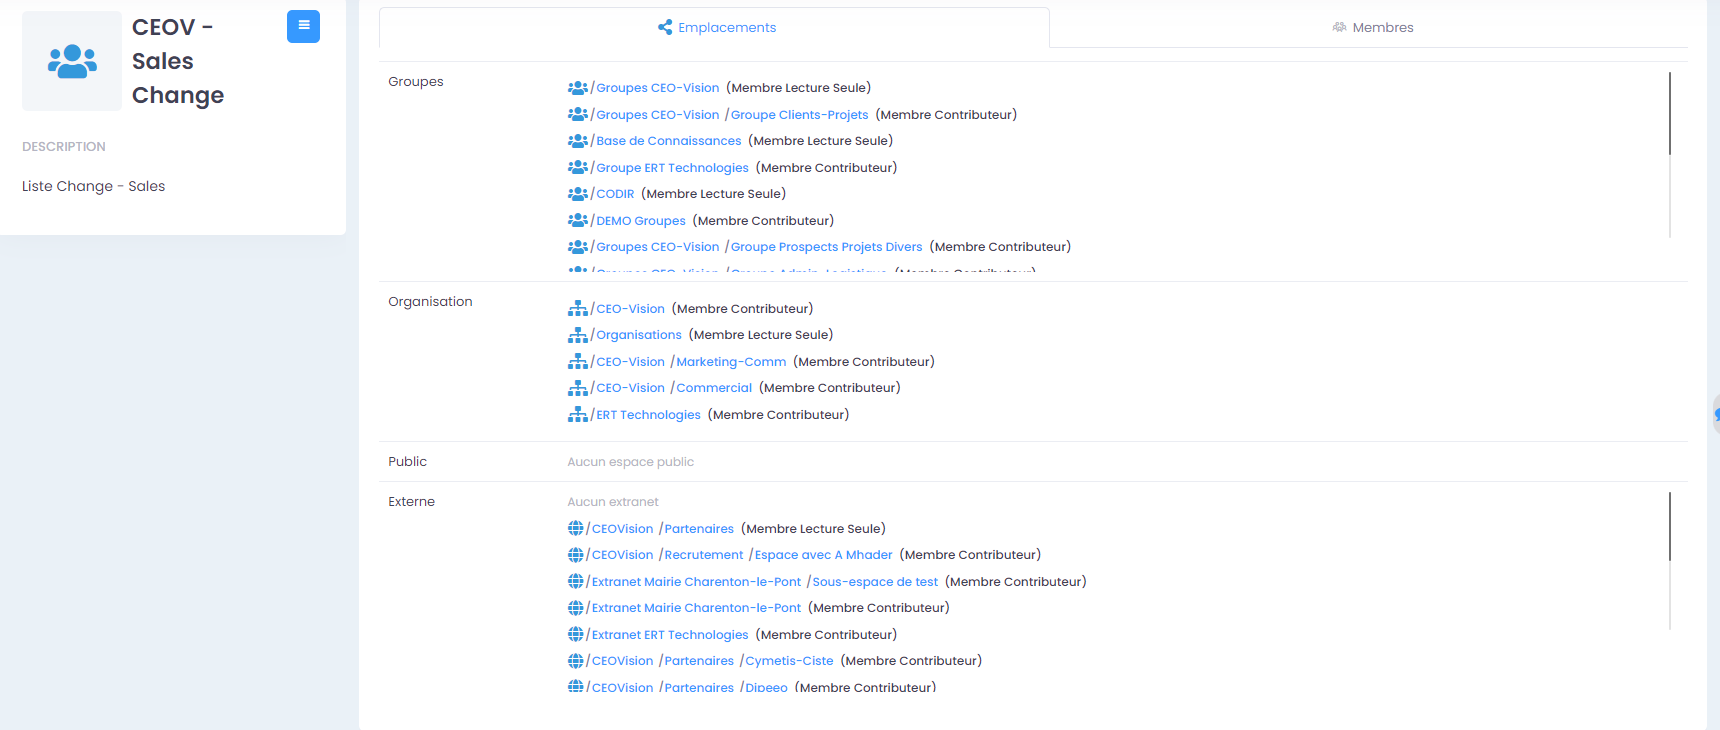
How to View/Search User Lists
User List Directory
In order to view the existing lists, simply go through the directories accessible from the main menu on the left.
In order to go to a list from the directory, you can click on the name of the list. You will then be able to view the members and the locations of this one.
Search for a User List
User lists are searchable via the search engine and can be used as a “format filter”.
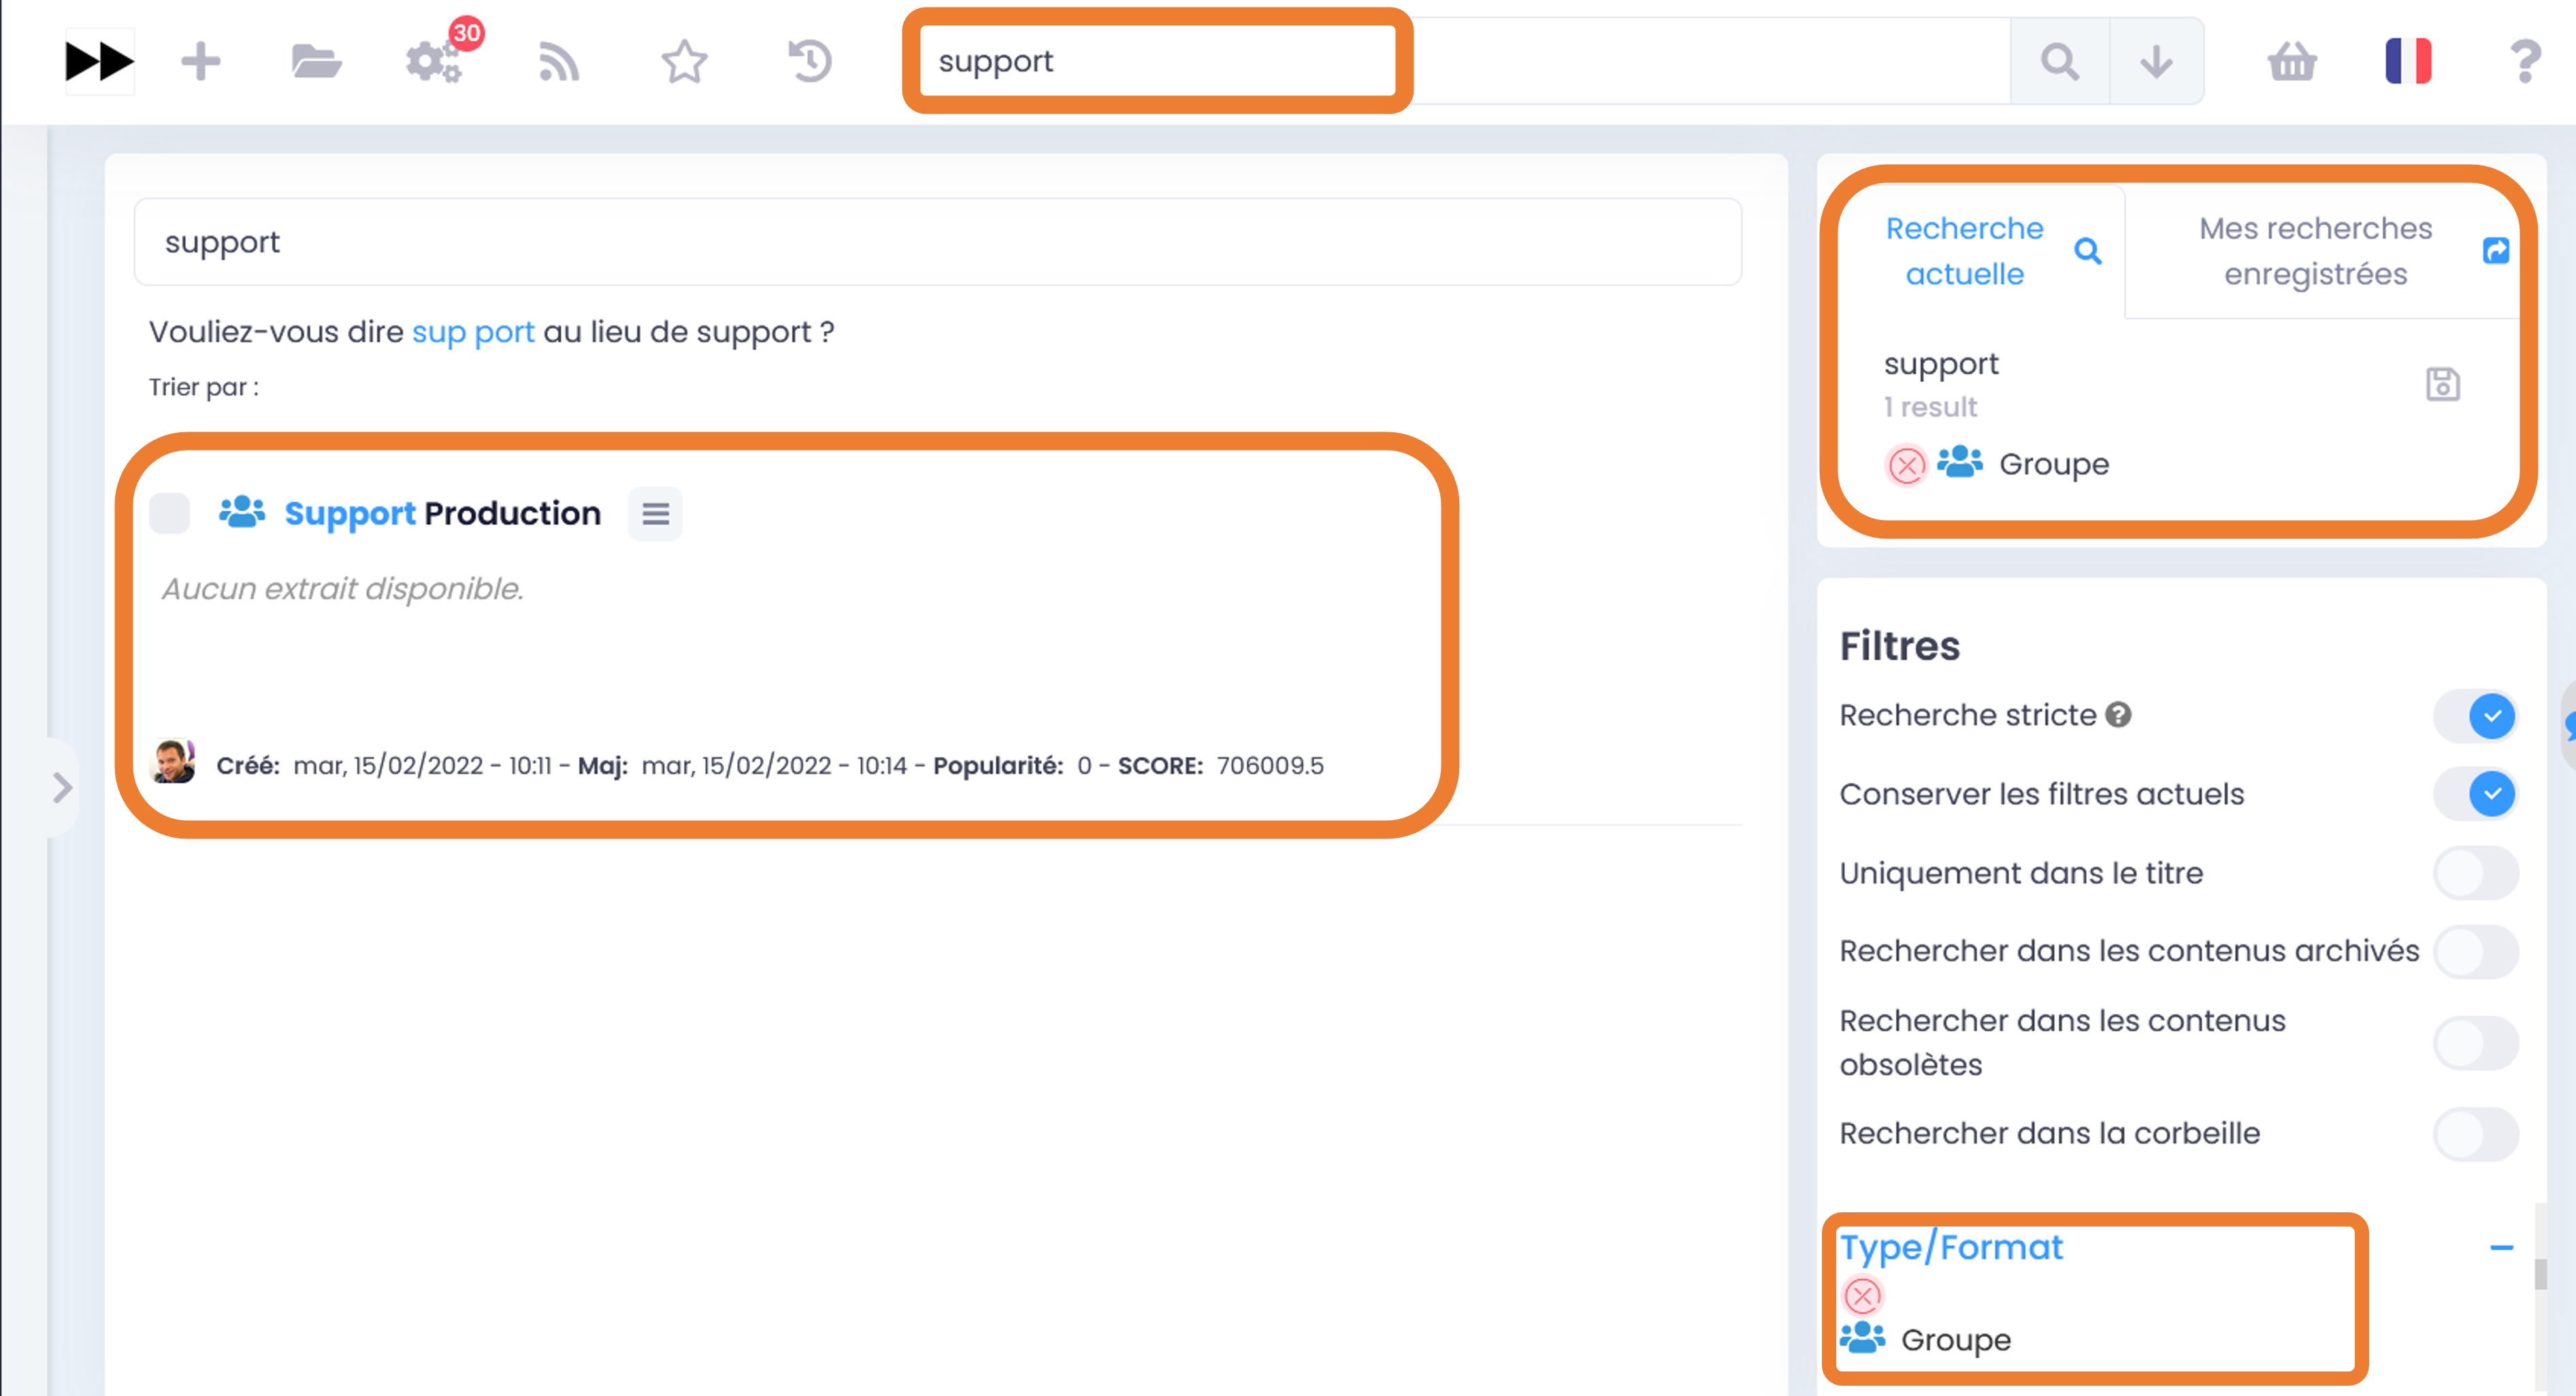
Note
The lists a user belongs to are displayed on their profile page.
Subscription/notification management
Subscription Objectives
Keep tracking of actions taken on documents/contents you have access to in the activity summary.
This significantly reduces emails, as there is no need to send an email to your colleagues to notify them of the changes you have made or the comments made. Everyone receives an email listing these actions, the relevant documents/content, classified by Collaborative Space and of course, according to their access rights to the Spaces.
By default, GoFAST sends 2 “Activity Summary” notification emails per day: one at noon and one at midnight (the latter to be read in the morning, when arriving at the office for example).
Types of subscription for the “Activity Summary”
All members of a Collaborative Space are by default subscribed to the activity of this Space.
- Notified actions apply to:
document/content update (after editing/modification, new version)
editing of information and sharing of a document/content (change of state, a location addition, renaming, etc.)
comments made on documents/content
Elements you can subscribe to:
Collaborative Spaces (all activities of spaces you are a member of)
A tag (metadata linked to documents/content)
A specific document/content
A user (changes and comments made by another user)
Notification frequency: Each user can subscribe to different elements at any time by specifying the desired frequency for each. For each element you can select: - 2 times a day - 1 time per day - 1 time per week - 1 time per month - Instantly
Note
You won’t particularly receive more emails at different intervals, but you’ll only see in these notifications the activity performed during the selected time period. Example: If you have chosen to receive notifications only once a week for a Space, you will only find information about the activity of this Space in one of your notifications (once a week).
How to edit subscriptions:
Each user can subscribe or unsubscribe at any time from the various elements, individually or in bulk.
In order to manage your subscriptions:
Via the menu of your Profile (in the quick access bar, top right), click on “Subscriptions”.
The Subscriptions window will open with a table of all the elements you are subscribed to.
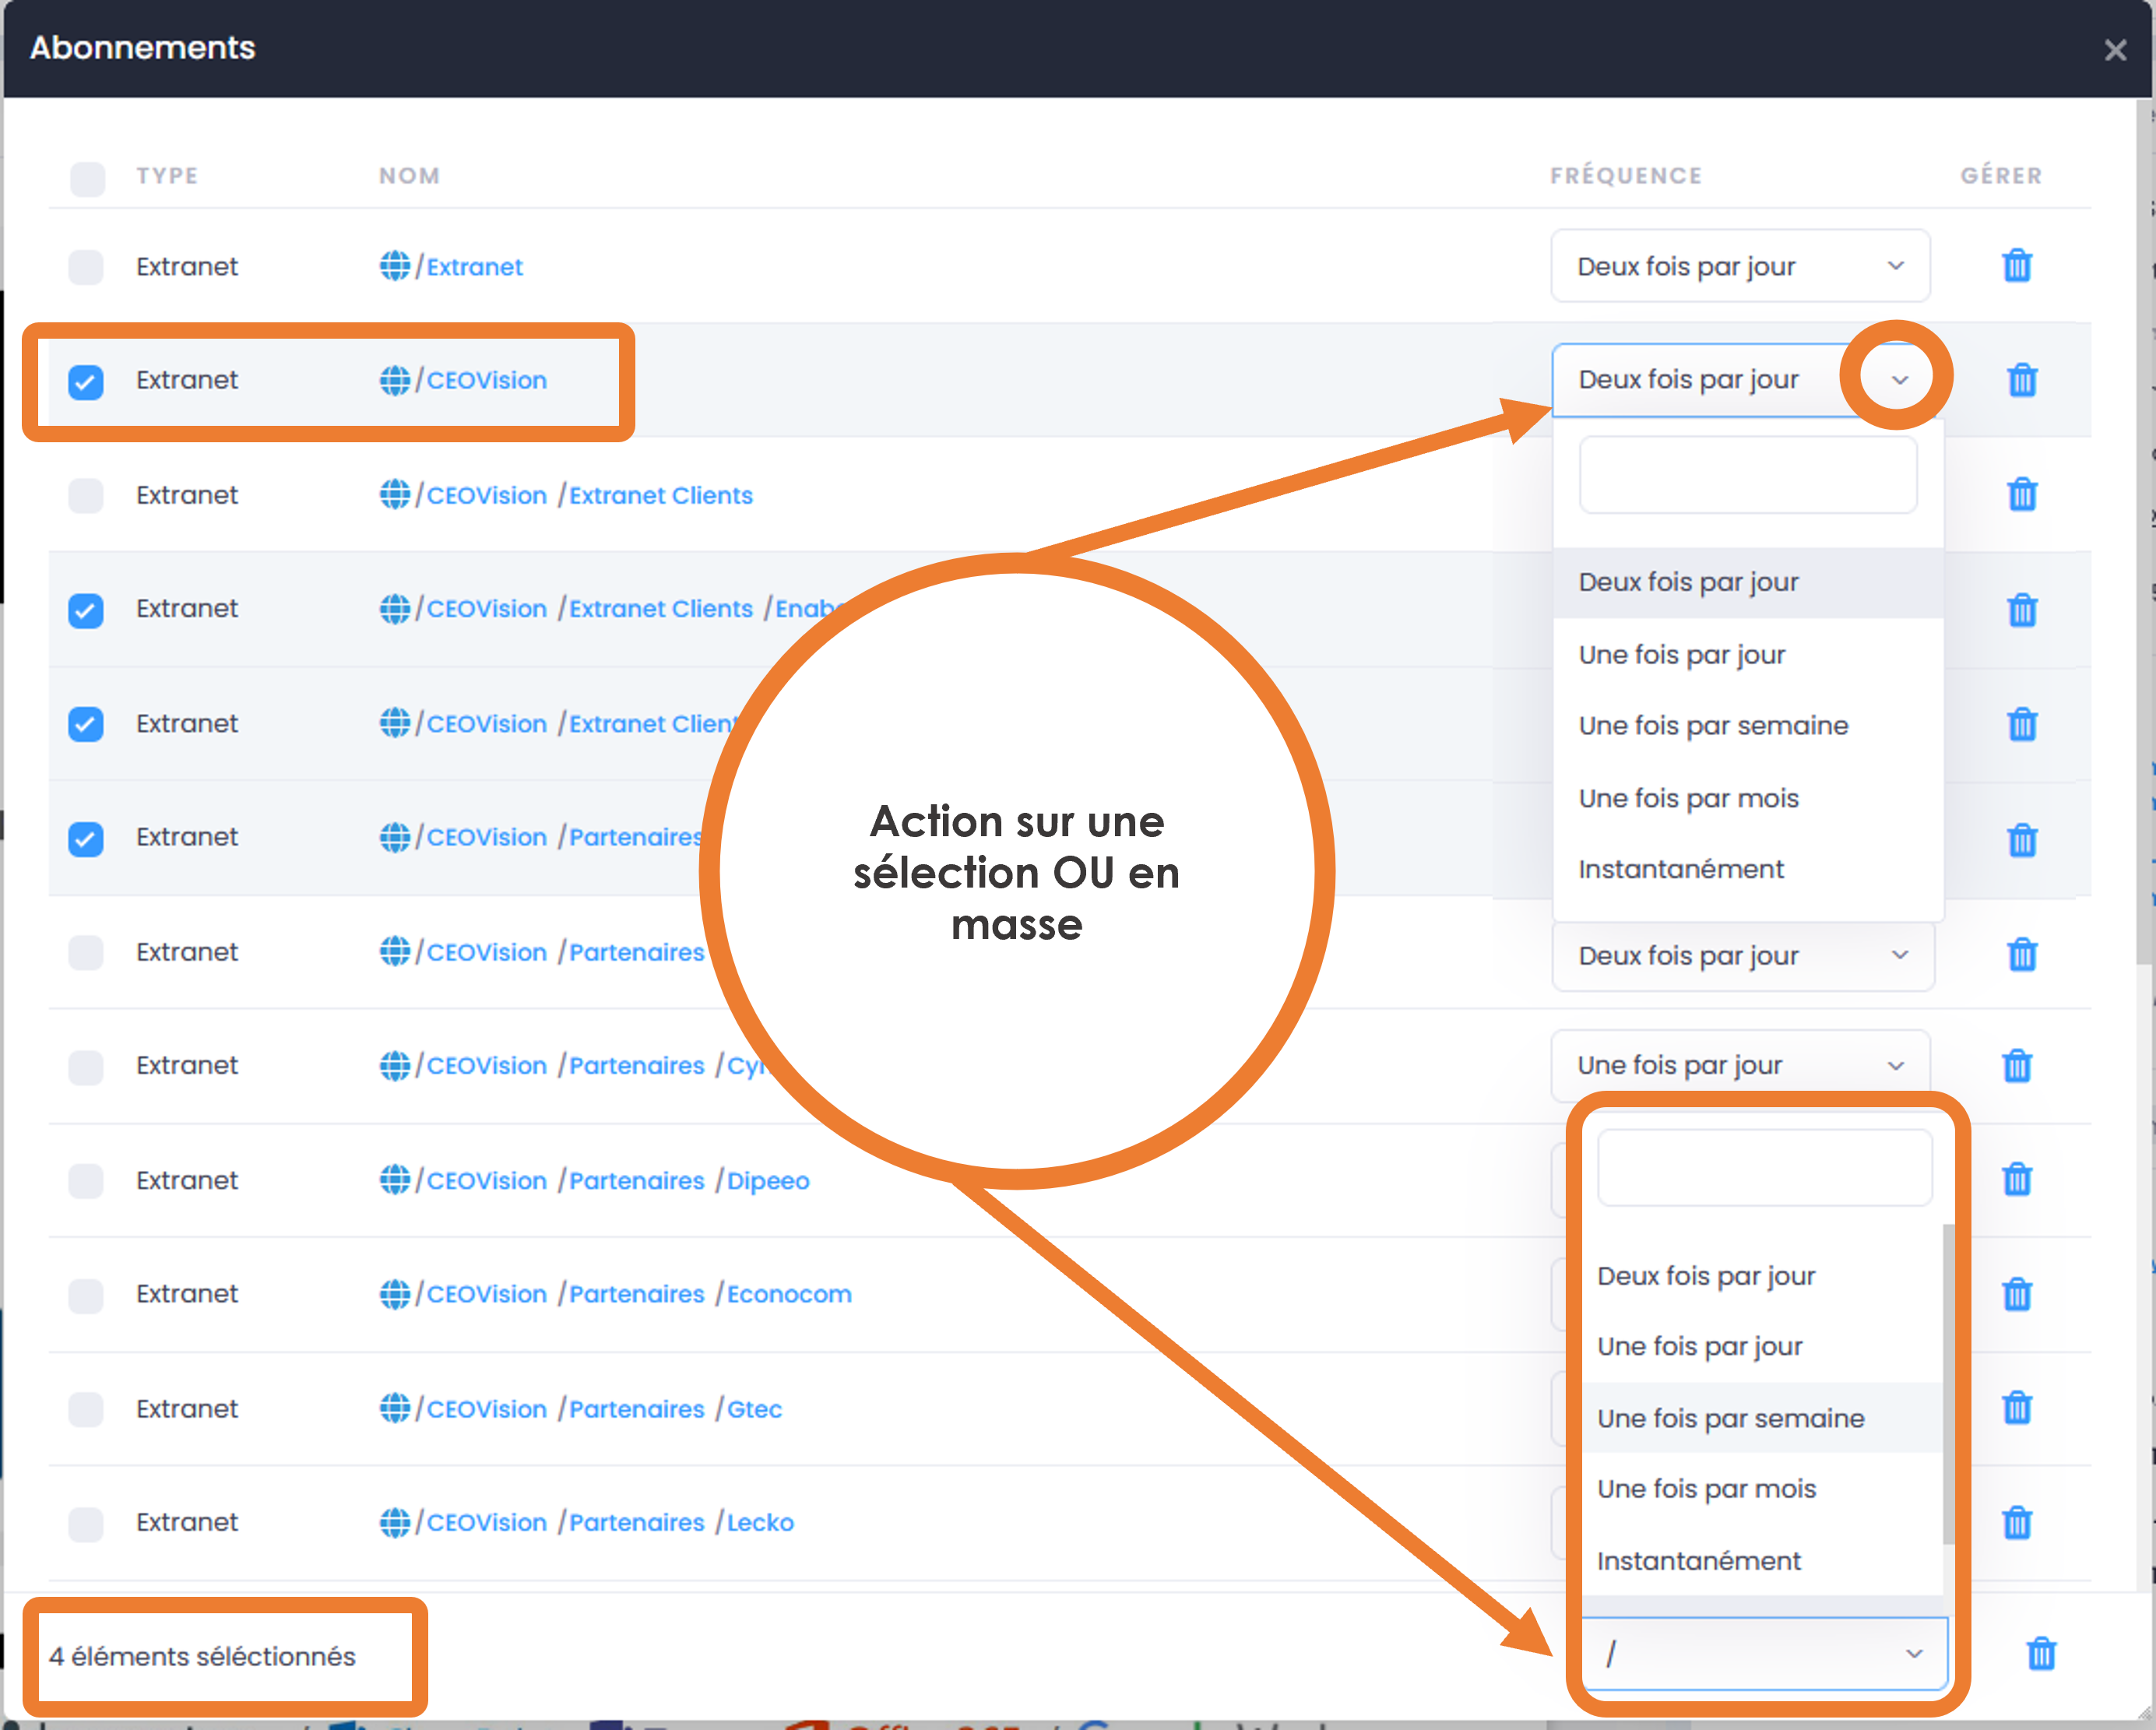
In the subscriptions table, you can change the frequency for each element or unsubscribe by clicking on the “Recycle bin” icon (far right in the table).
Note
If you see that you are receiving too many notifications related to a Space where you are not very active and which you are not more interested in, you can unsubscribe or choose a weekly frequency for example.
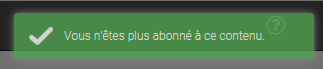
- In order to edit several subscriptions at once:
Tick the desired elements in the subscription table
Select the desired frequency from the drop-down list at the bottom right of the subscription window or click on the “Recycle bin” icon to unsubscribe.
Subscribe to an element:
In order to subscribe to a document/content, tag or an entire Space, you must first have access to this element.
- In order to subscribe to a document/content:
Go to the document/content page and click on the “Hamburger” menu (contextual actions) OR right-click on the document in the file explorer.
In the menu (of contextual actions), click on “subscribe”.
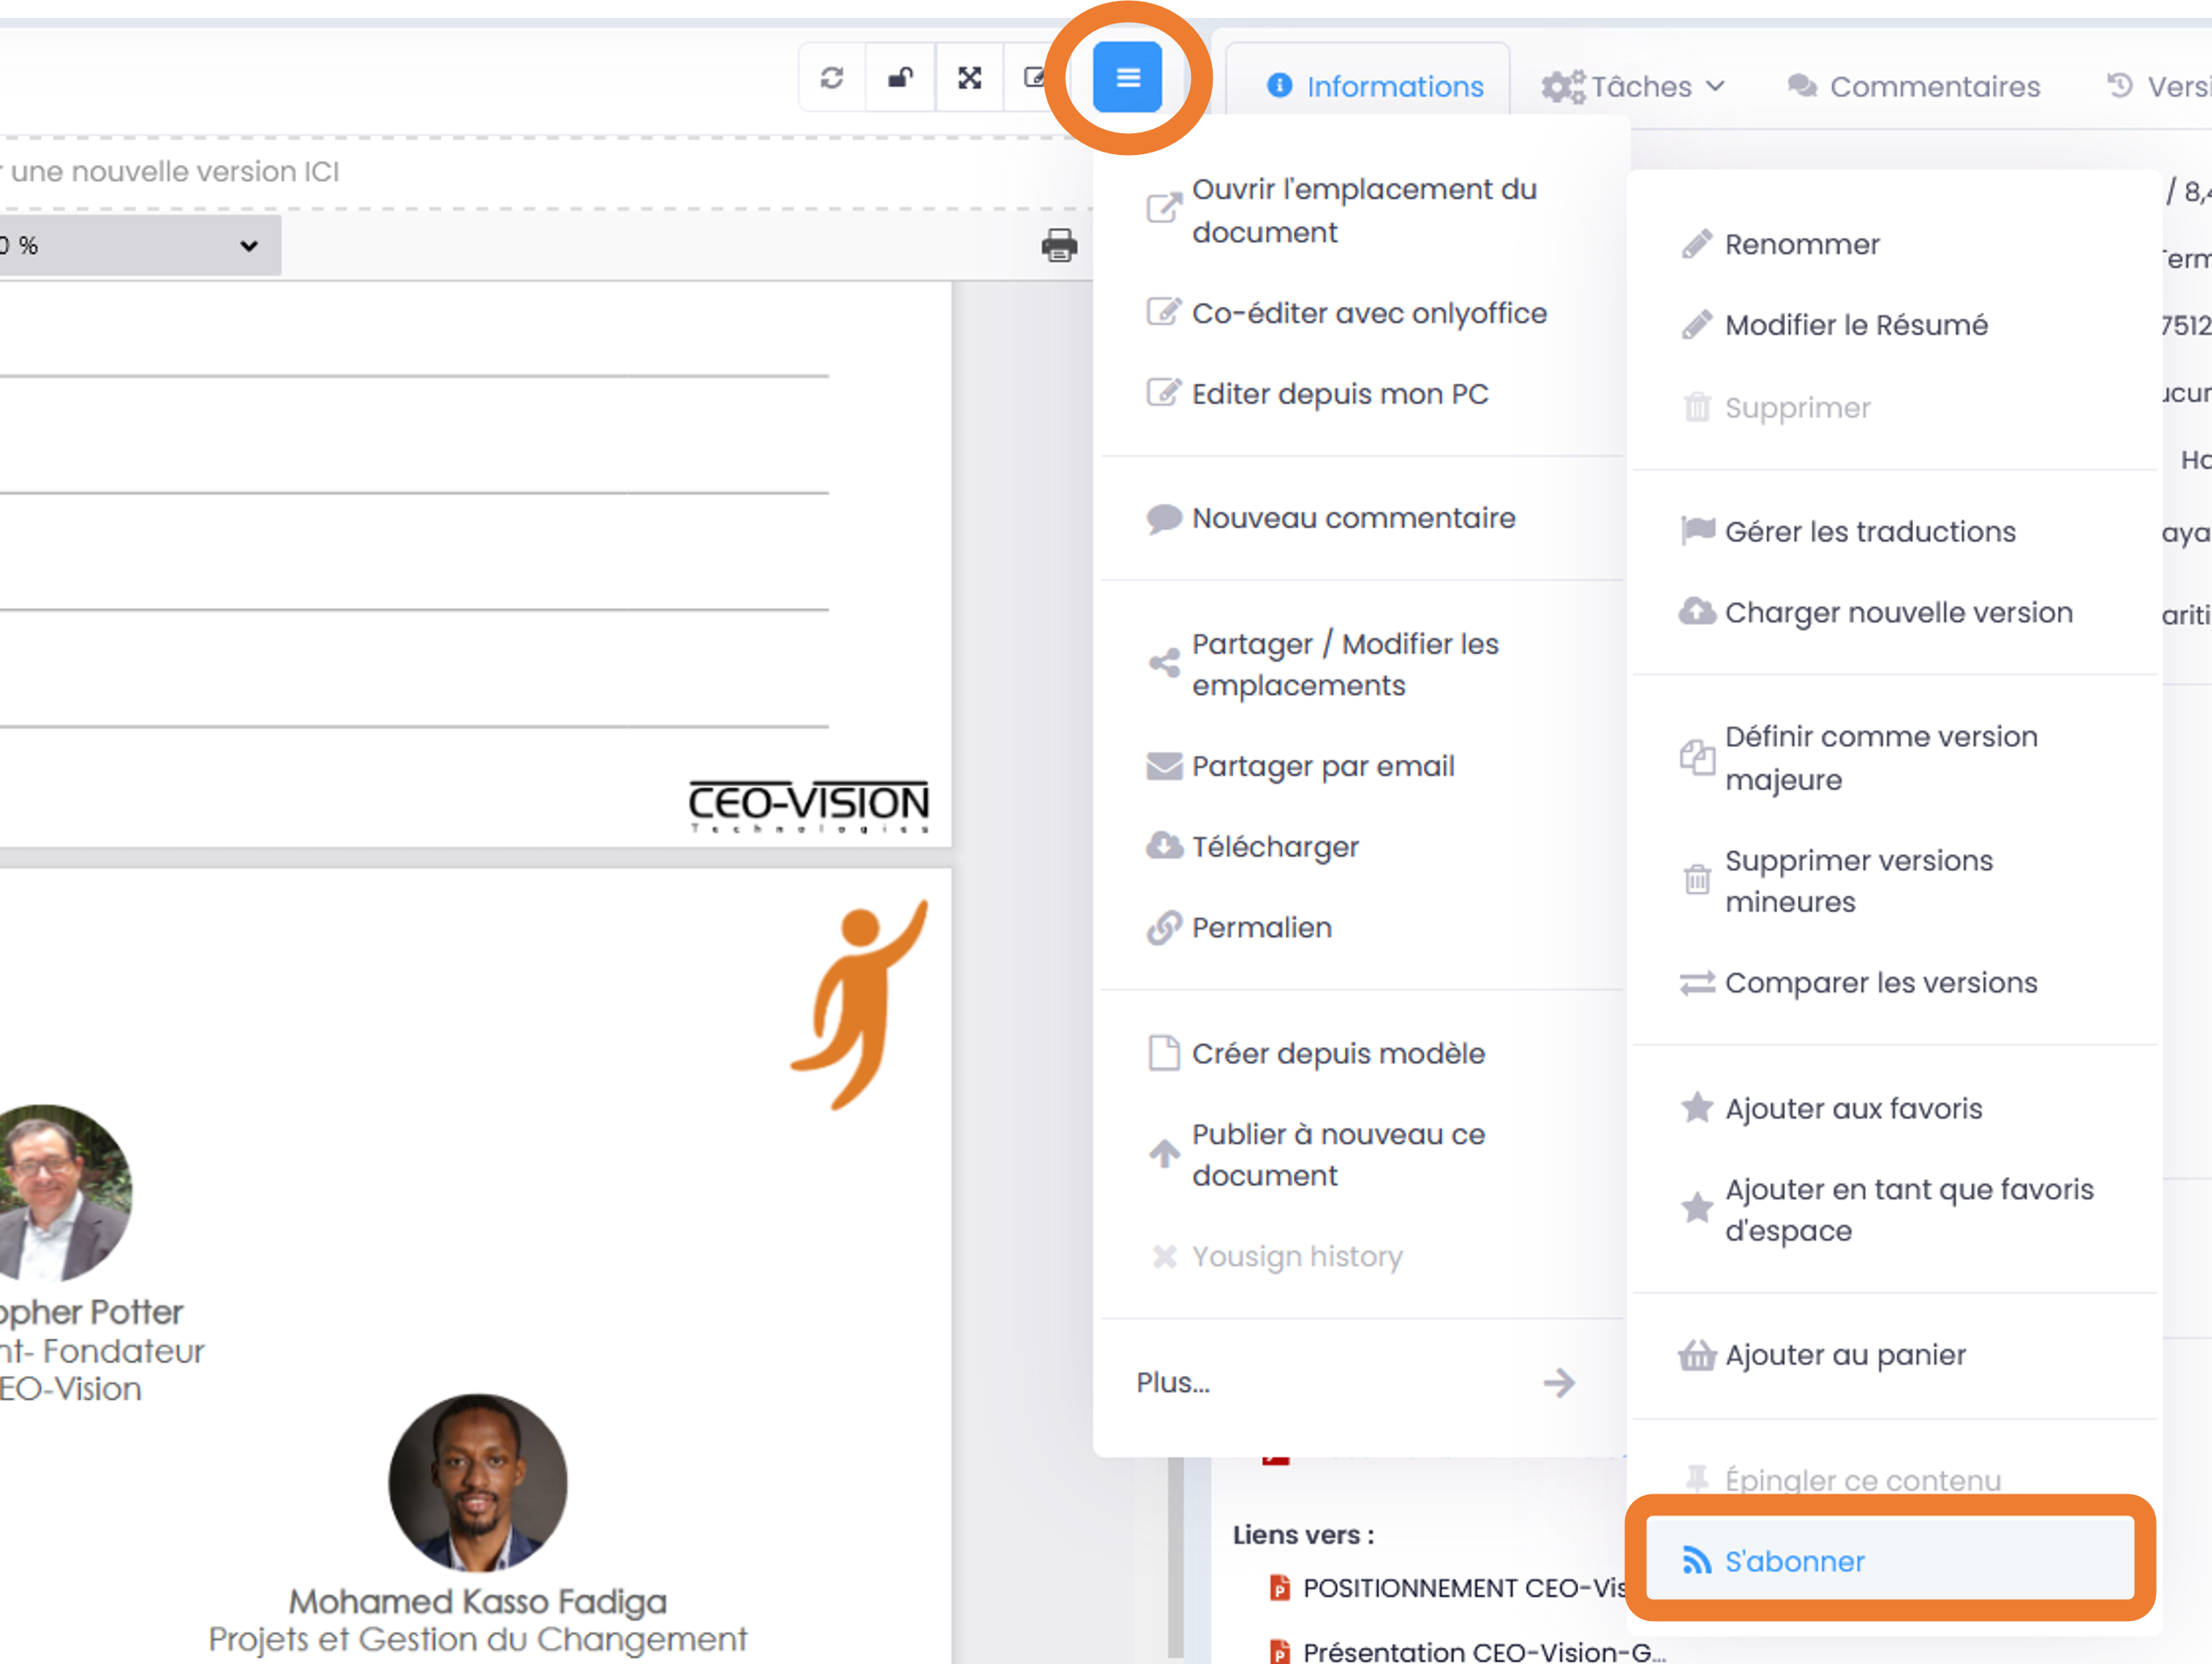
- In order to subscribe to a Tag or a User:
Go to the document/content page OR a user’s profile page.
For Tags: click on the “subscribe” icon (to the right of each tag).
For a User: in the “Hamburger” menu (contextual actions) on the profile page, click on “subscribe”.
In order to subscribe to a Collaborative Space: Please refer to the section: “How to subscribe to or unsubscribe from a Collaborative Space”
Task processes - Workflows (Enterprise only)
In this part of the documentation you will find how to view the current/archived processes, the tasks to be processed, but also how to start a task processes from the list of available processes, on one or more documents by assigning them to GoFAST users (including yourself).
Note
GoFAST offers a standard “Document(s) Dissemination” workflow that allows you to assign essential tasks in a very flexible way, to meet the majority of document verification, correction, validation and signing needs. It is possible that other processes will be offered to you (depending on the optional modules activated or a process specifically modeled for/by your organization/company).
Note
If specific processes are proposed to you, their operation and the associated forms may not correspond to certain parts of this documentation. To learn how to model a specific workflow, please refer to the GoFAST forums (https://community.ceo-vision.com/).
How to start a task process
GoFAST offers 3 ways to start a workflow:
From the top main bar, via quick access to “Workflows and Tasks”
From the page of a document, via the “Workflows and Tasks” button
From the documentary cart.
The icon representing the workflows is:

Start a process via the quick access bar
To select a process and start it from the quick access bar (top menu):
Click on the “Workflows and Tasks” icon at the very top of the page,
In the “Workflows and Tasks” window, click on the “New” tab
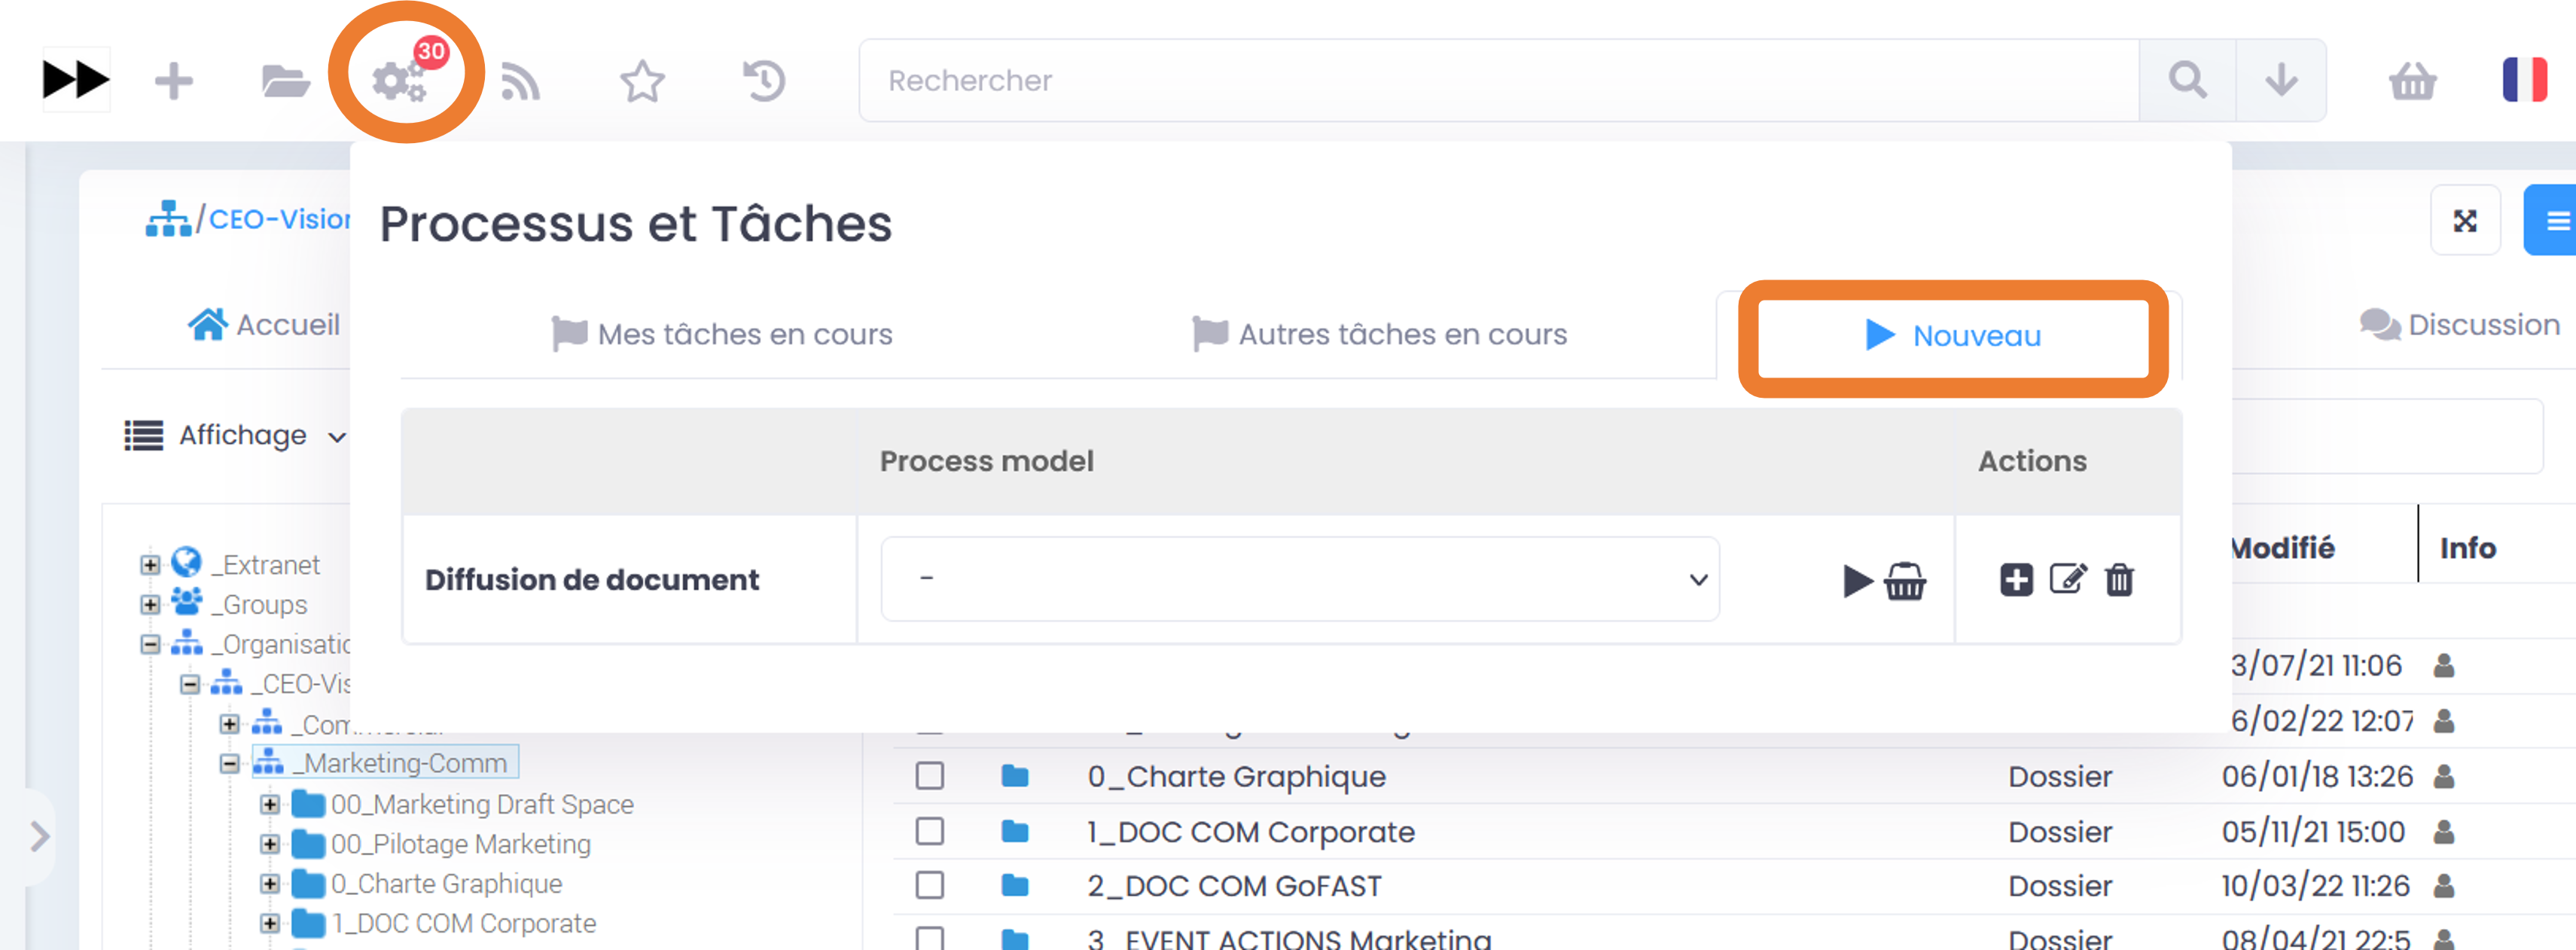
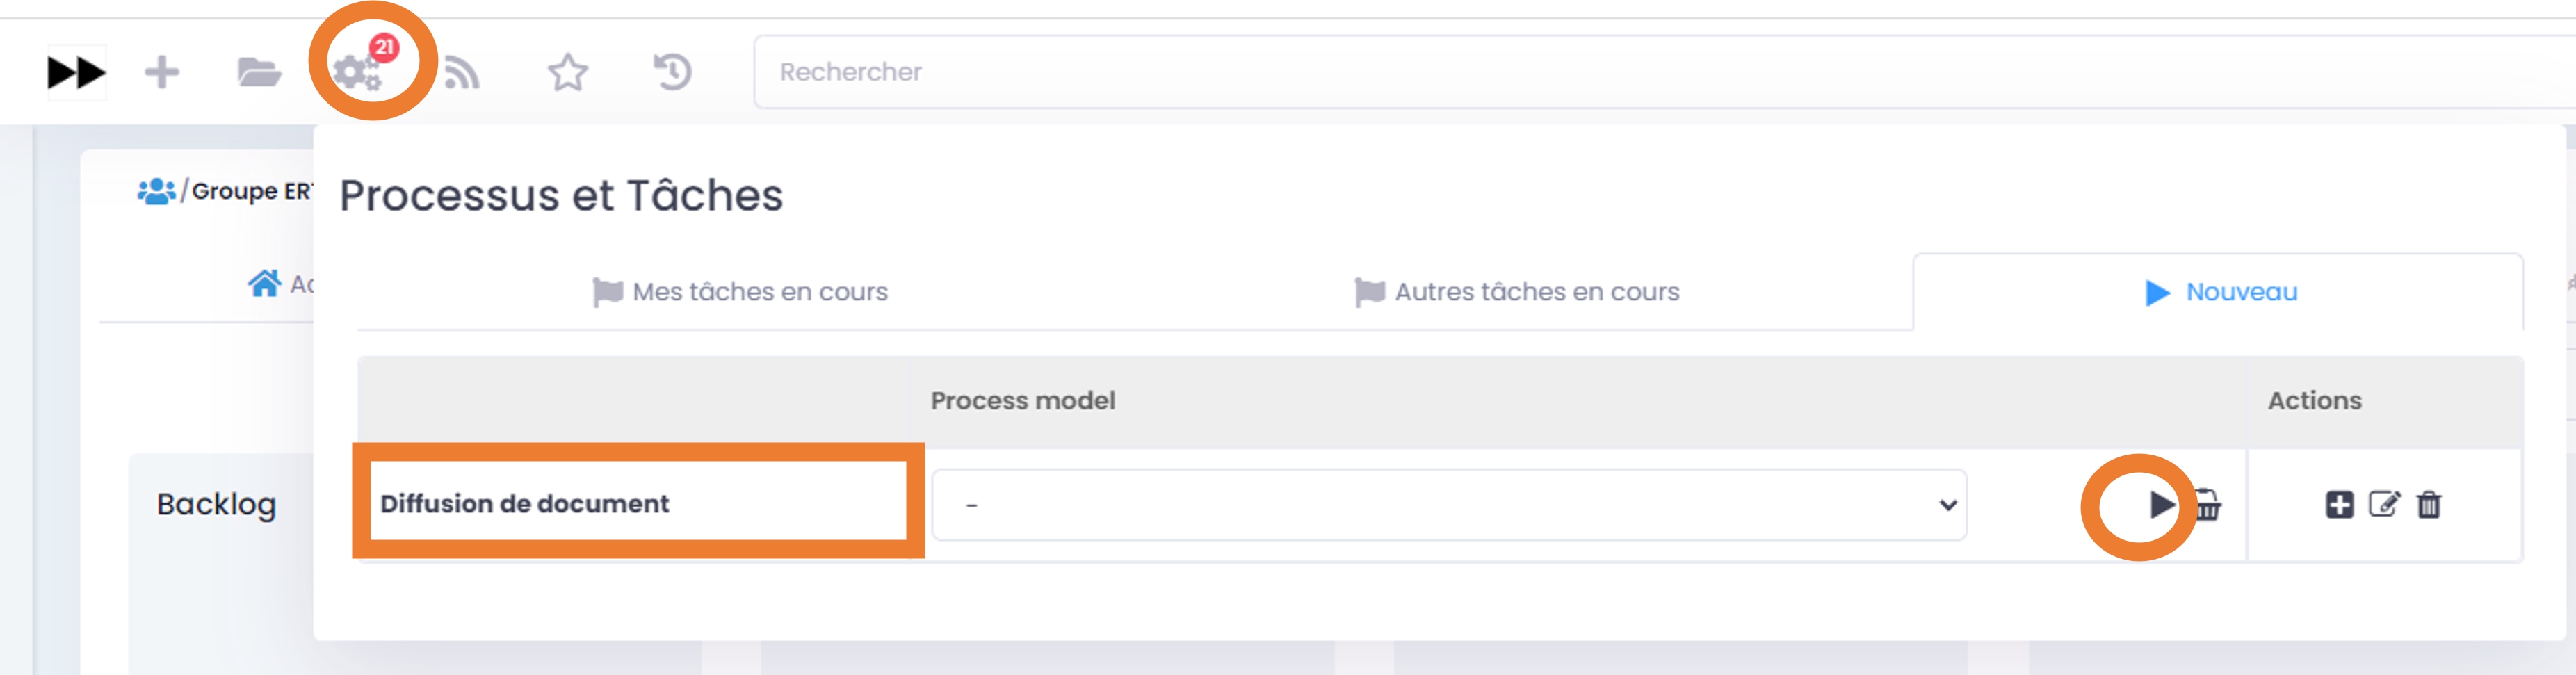
Note
When starting a process from the quick action bar (main menu at the top), the process form does not include a document, so it must be added directly from that form (unless the process is started on documents in your cart or a process model with already pre-selected documents).
Note
By launching a process from the main menu on the documents in the “cart”, the latter are automatically associated with the process. You then have the option to remove/add documents in the workflow form.
Note
Workflow deadlines are displayed in the calendar of the areas where the documents are located, as well as in the personal area.
How to start a process from a document page
In order to select a workflow and start it from a document page:
Go to the “Tasks” tab which is in the information block to the right of the document preview,
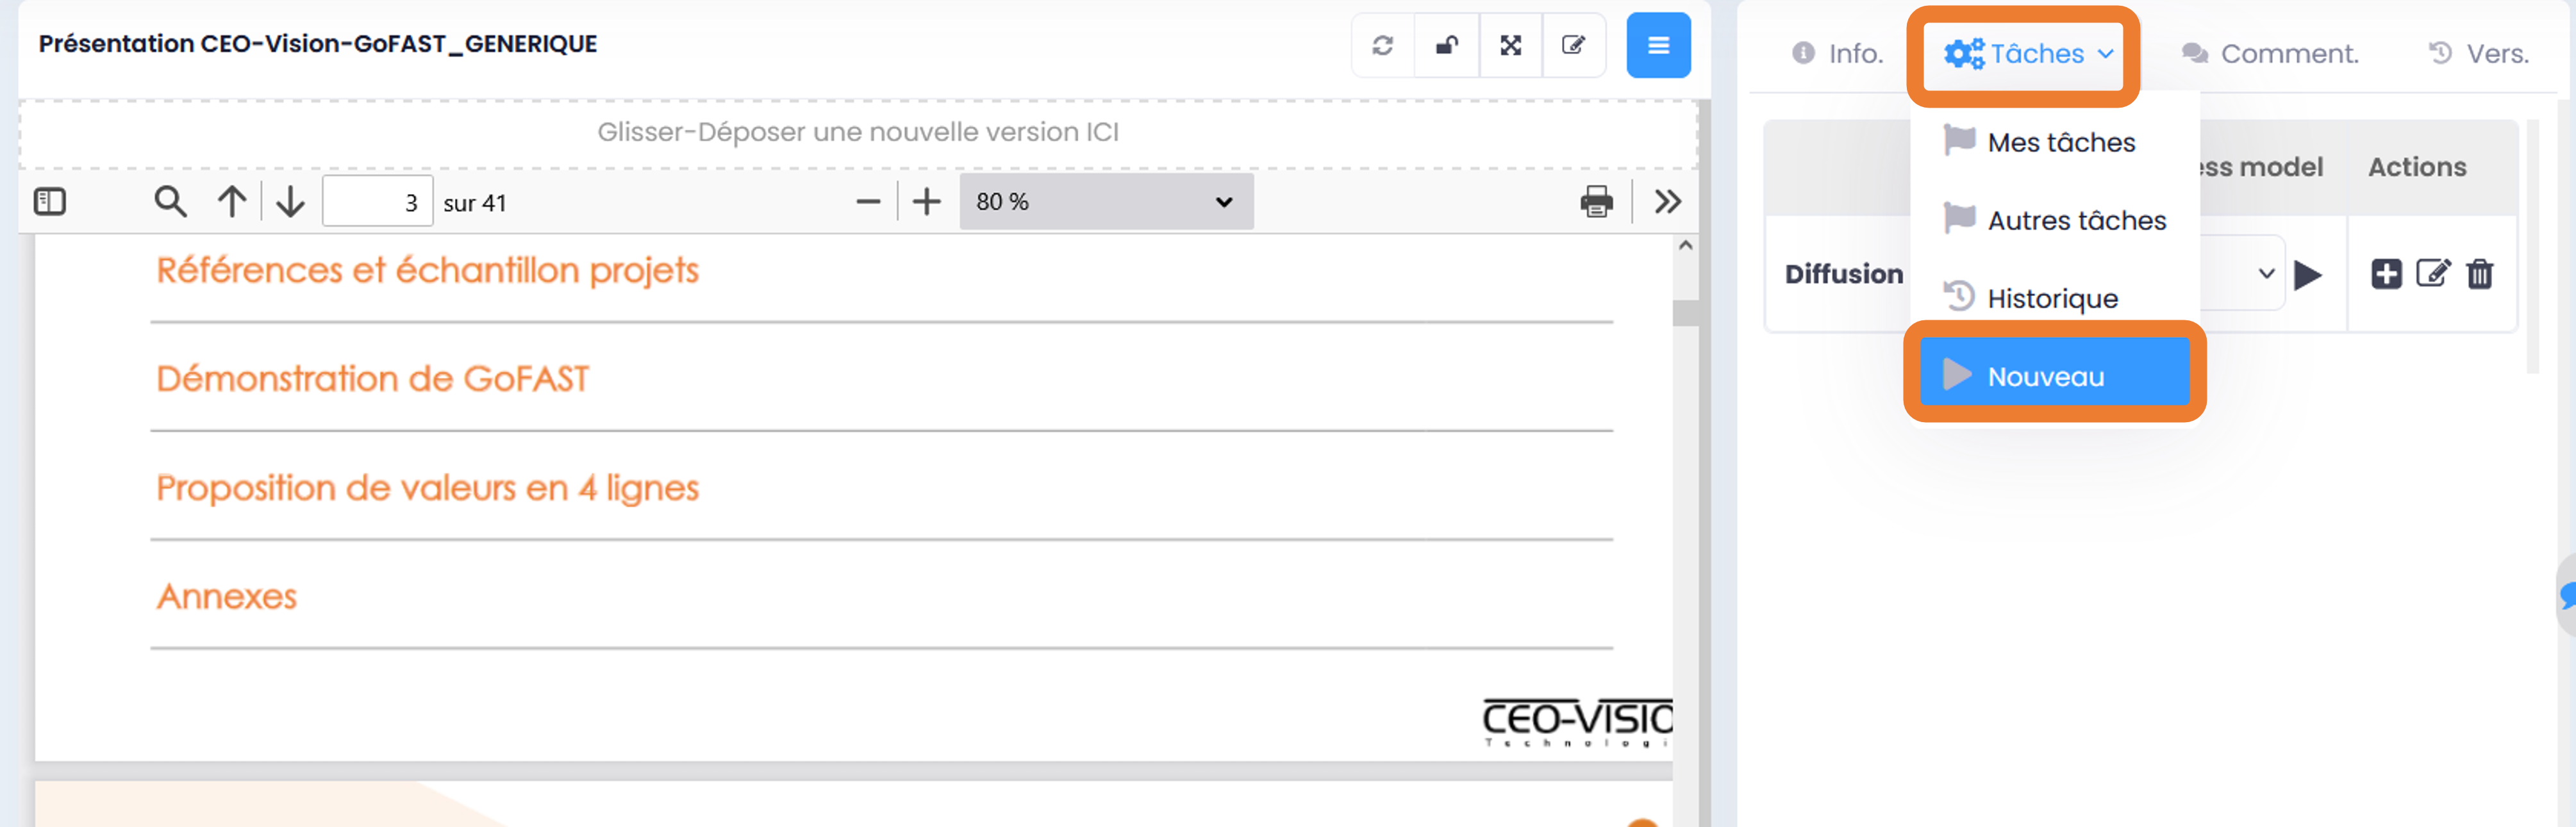
Note
By launching a workflow directly from the document page, the latter is automatically associated with the process form.
How to start a process from the cart
Click on the “cart” icon in the quick access bar (top main menu)
Under the list of documents in your cart, click on “New process”.
The list of available processes is displayed: select the desired process and click on “>” or the process title.
You can select a model (to have the pre-filled process form) via the drop-down list available for each process type. In this case, select the desired model before clicking “>”.
Please also refer to the section: “Cart”.
Complete the task process form
Once the desired process is selected, the associated form opens and allows you to fill in the various necessary information. The proposed form and therefore the fields to be filled in are totally dependent on the chosen process.
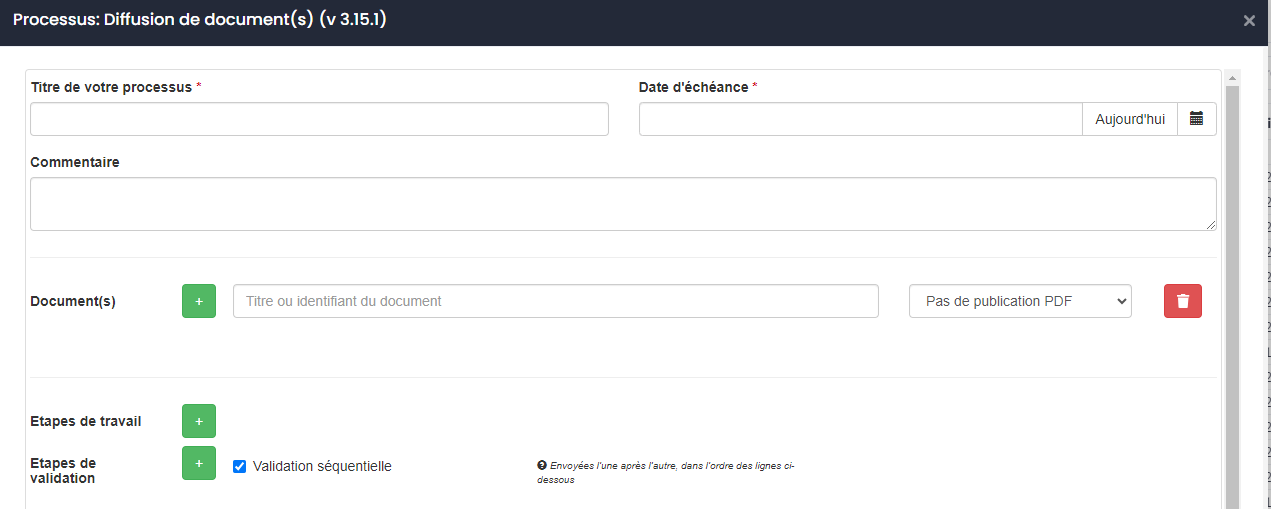
Focus on the “Document(s)” and “Assignment(s)” fields of the form: In the case of the standard process, among the proposed fields there are associated documents and the persons to be assigned.
Pour correctement renseigner ces champs, il est nécessaire de commencer à saisir le nom du document, d’un utilisateur (minimum 3 caractères),ou encore le nom d’une liste d’utilisateur, puis de cliquer sur la suggestion pour valider son choix.
Que ce soit pour les documents ou les assignations, vous avez la possibilité de cliquer sur “+” pour ajouter des champs supplémentaires, ou sur la corbeille pour en enlever. Il est possible de choisir pour chaque tâche une date d’expiration.

Finally, to start the process, just click on “Send” (at the bottom of the form).
Automatic creation of PDF Publications:
- When you fill in the standard process form, you have the option of transforming a working document (ex. docx) into a PDF Publication before:
The validation stage
The signature stage
Note
In this way, you will not need to create your PDF Publications by hand, they will be automatically created at the chosen step, then shared in the same locations as the original working documents.
If you do not want to generate a PDF Publication, choose «No PDF Publication».
Signature stage:
You can request signatures on documents through the standard process. In case the e-signature application is not linked to GoFAST, this is a simple signature request: The signers can then click on “edit from my PC” for the relevant documents, then affix a signature via their PDF application ( Acrobat Reader or Foxit Reader), either an image or a personal electronic certificate (eg on an RGS USB key**).
In case an e-signature application is connected to GoFAST via the signature module (Yousign, Pastell i-Parapheur, ESUP-Signature, Xparaph, etc.) you can choose the available e-signature application (or one of the signing processes of the e-signature application) .
Note
In the case of a connection with an e-signature application, the documents will be automatically transferred to the e-signature application at the signing stage. Once all the signature requests provided by the e-signature application are processed, the document will be automatically updated on GoFAST, with the action history in the comments to the document.
Don’t hesitate to ask your questions about the available signature modules, on the forums.
Since version 4.2, it is possible to assign a user to sign a document that is not accessible to him/her.
Process model
You have the option to fill out a form for a standard process and save it as a model to save time when you or another user wants to start the process.
How to create a process model:
To start the process, go to “New” (from Quick Access Toolbar or Document Page or Cart)
At the process level, you will see a “+” icon. Click on it and the form will open.
Fill in the process form and click on “Create Process Model”
You will find your new model in the proposed list of models when launching a process.
Note
If you create your model from a document or cart page, the document(s) are taken into account when creating the model.
See also “How to fill in the Task Process Form”
Tampon à l’étape de signature
To start a stamping process, start a document distribution process, fill in the process normally, and in “Signature steps”, “Type of allocation”, select “For stamping”. You can then fill in the process with the name of the user concerned, the due date and the position of the stamp. Finally, send the process.
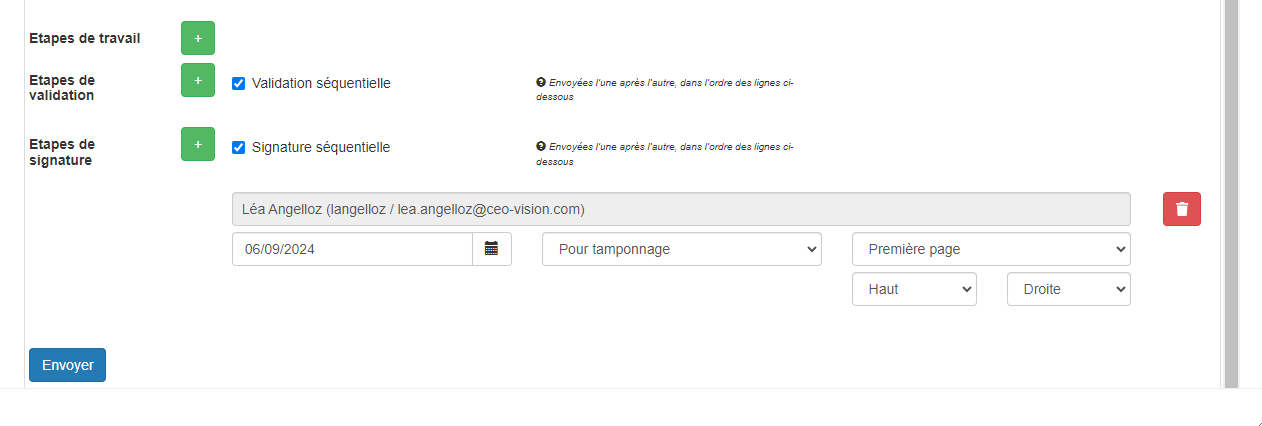
This process is available in “Processes and tasks” for the user you’ve assigned. As always, you can find the process you’ve assigned to the user in “Other tasks” in the “Processes and tasks” tab.

You can then select the options, and if you choose to validate, a stamp will be applied with the date and time of signature.
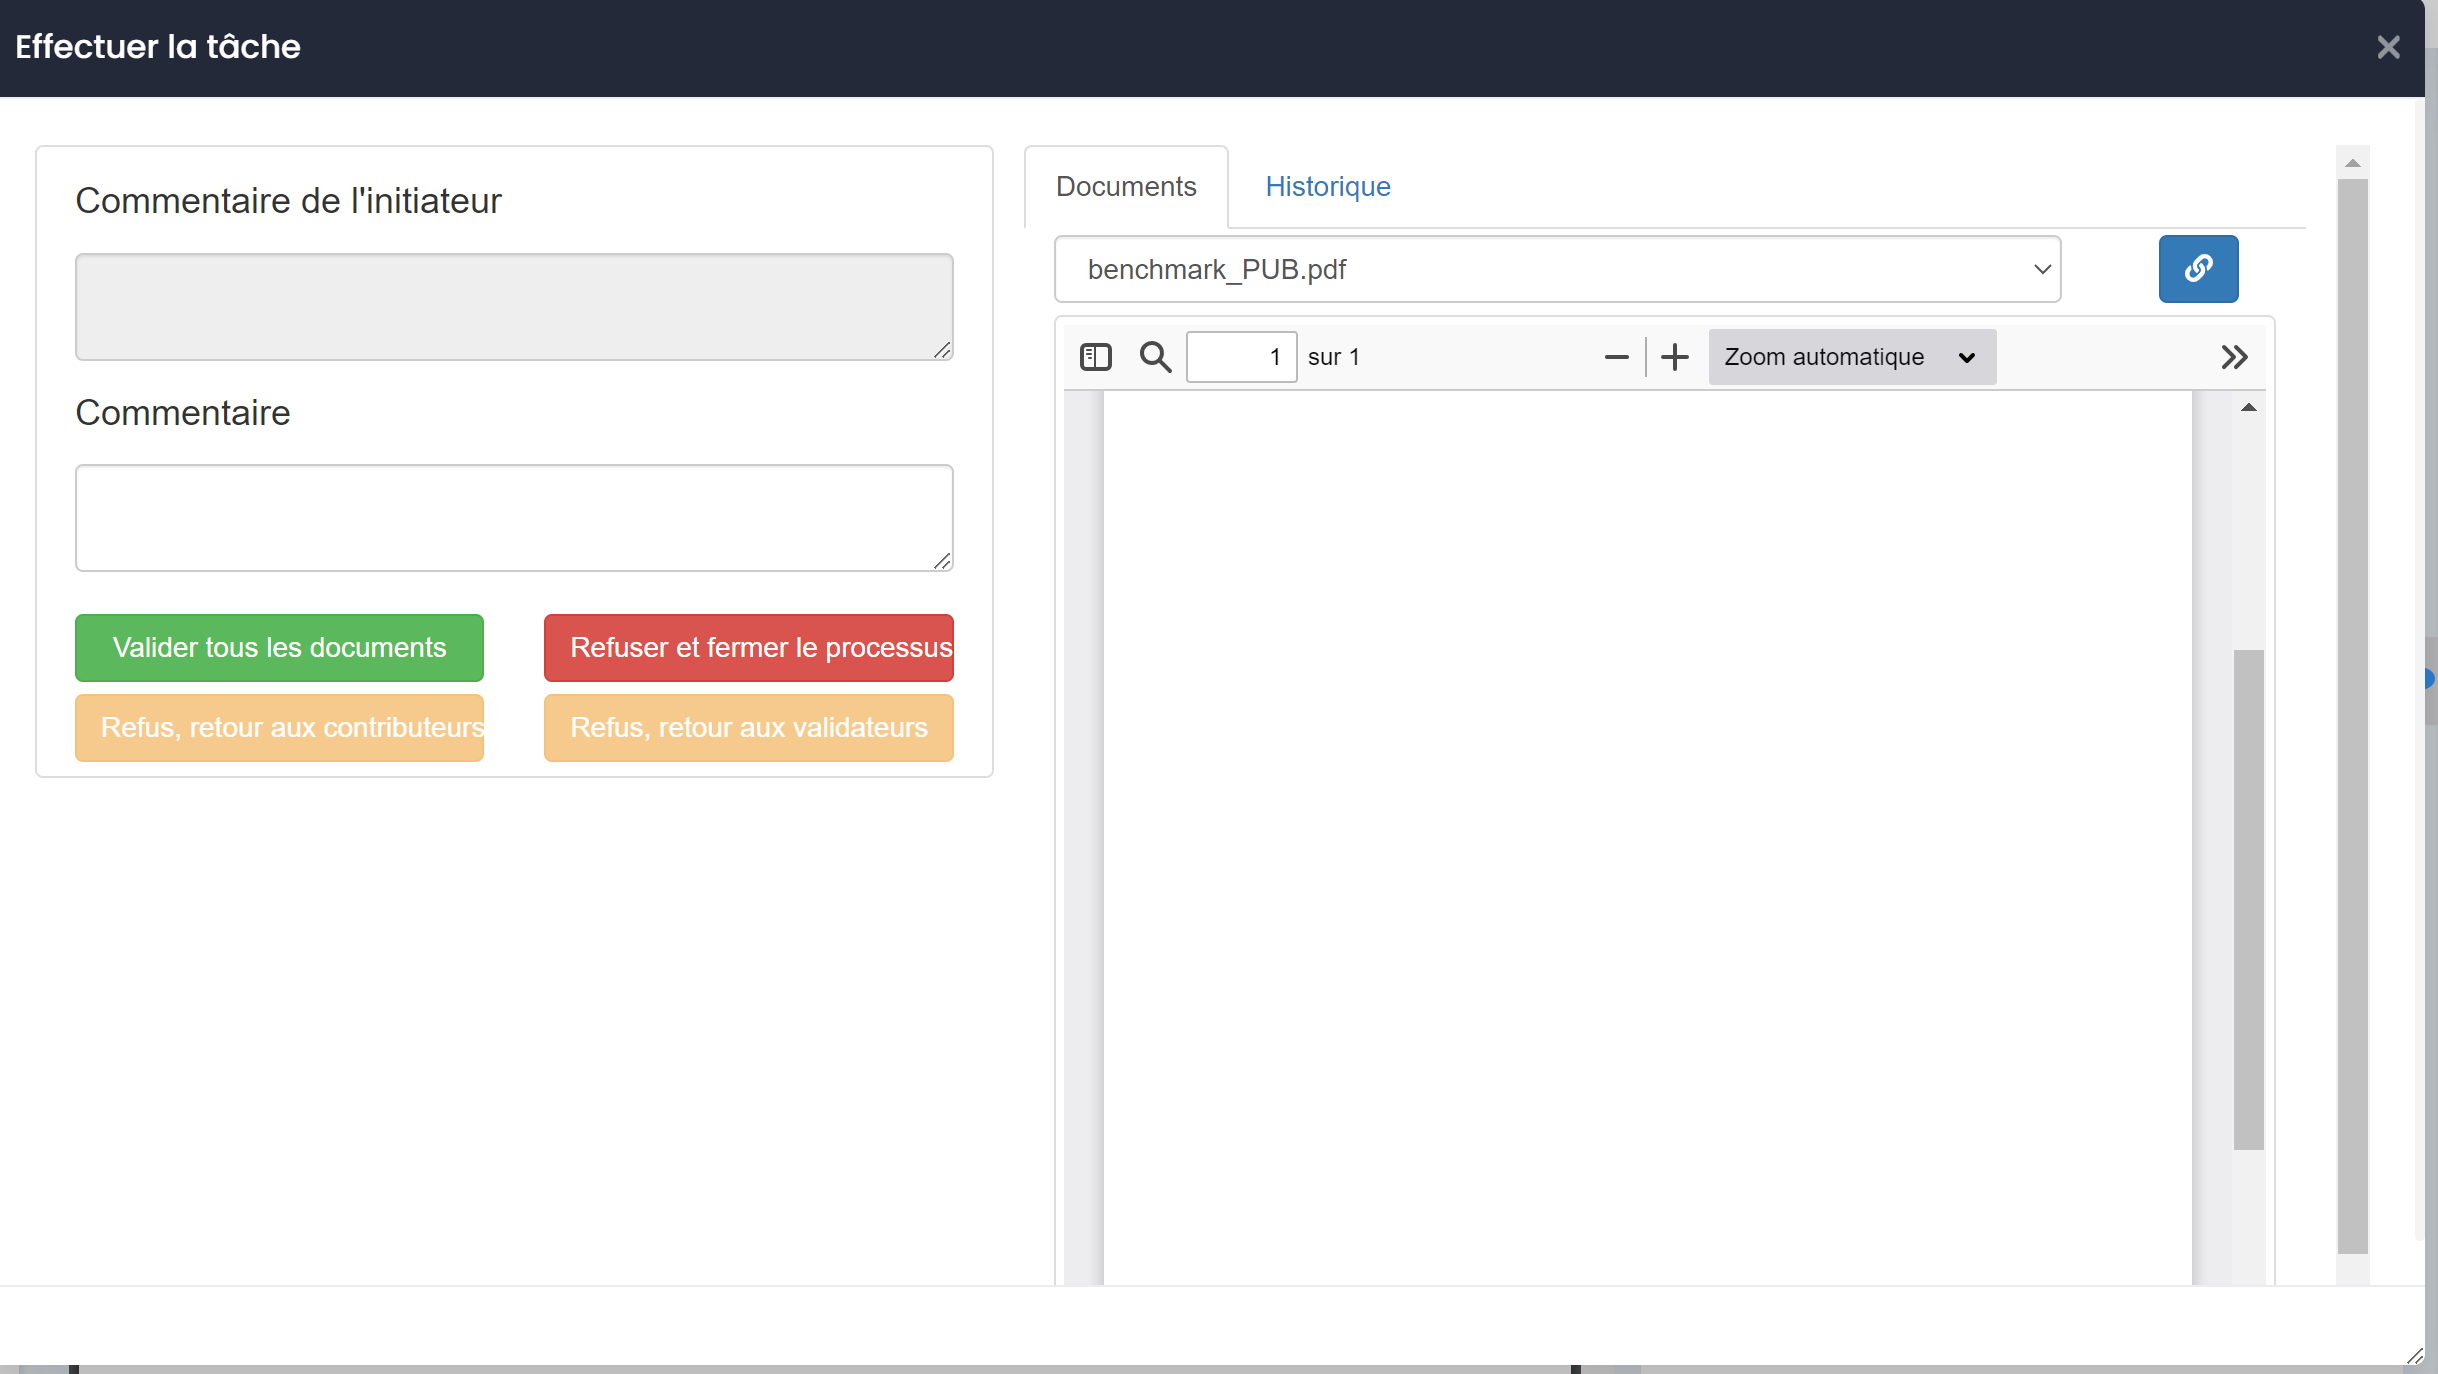

How to follow your tasks to be processed and/or assigned to others
Email notifications related to the Processes
At each start of the process, the assigned people are notified and this is also the case every time a step is processed.
Note
Notifications are dependent on the launched process. For example, in the case of a specific process, it is possible that the content of the notifications and their frequency are highly adapted to the concerned business teams. The description below is therefore based on the operation of the standard process available in GoFAST.

Notification state:
the type of launched process and the specific name entered by the initiator,
the initiator of the process,
the start date and deadline,
the progress stage of the process (e.g., initiation or deadline or end of the process),
a task to be processed and the other already processed tasks (with task state),
title(s) and link(s) to the relevant document(s),
the comment made at start-up, then added during task processing,
Note
Process-related notifications sent by email are not configurable by users as they are directly dependent on the launched process. It is therefore not possible to unsubscribe from these notifications or to change their frequency at will (as is the case for «Activity Summary» notifications).
List of tasks to be processed and assigned to others
Each user has the opportunity to get acquainted with the list of tasks that he must process, as well as with the list of tasks that he assigned to other users. Similarly, we are notified on the document page if it is associated with the current process.
In the quick access bar (top main menu):
A number appears on the “Workflows and Tasks” icon indicating the number of tasks you have to process.
Click the icon to display a list of tasks.

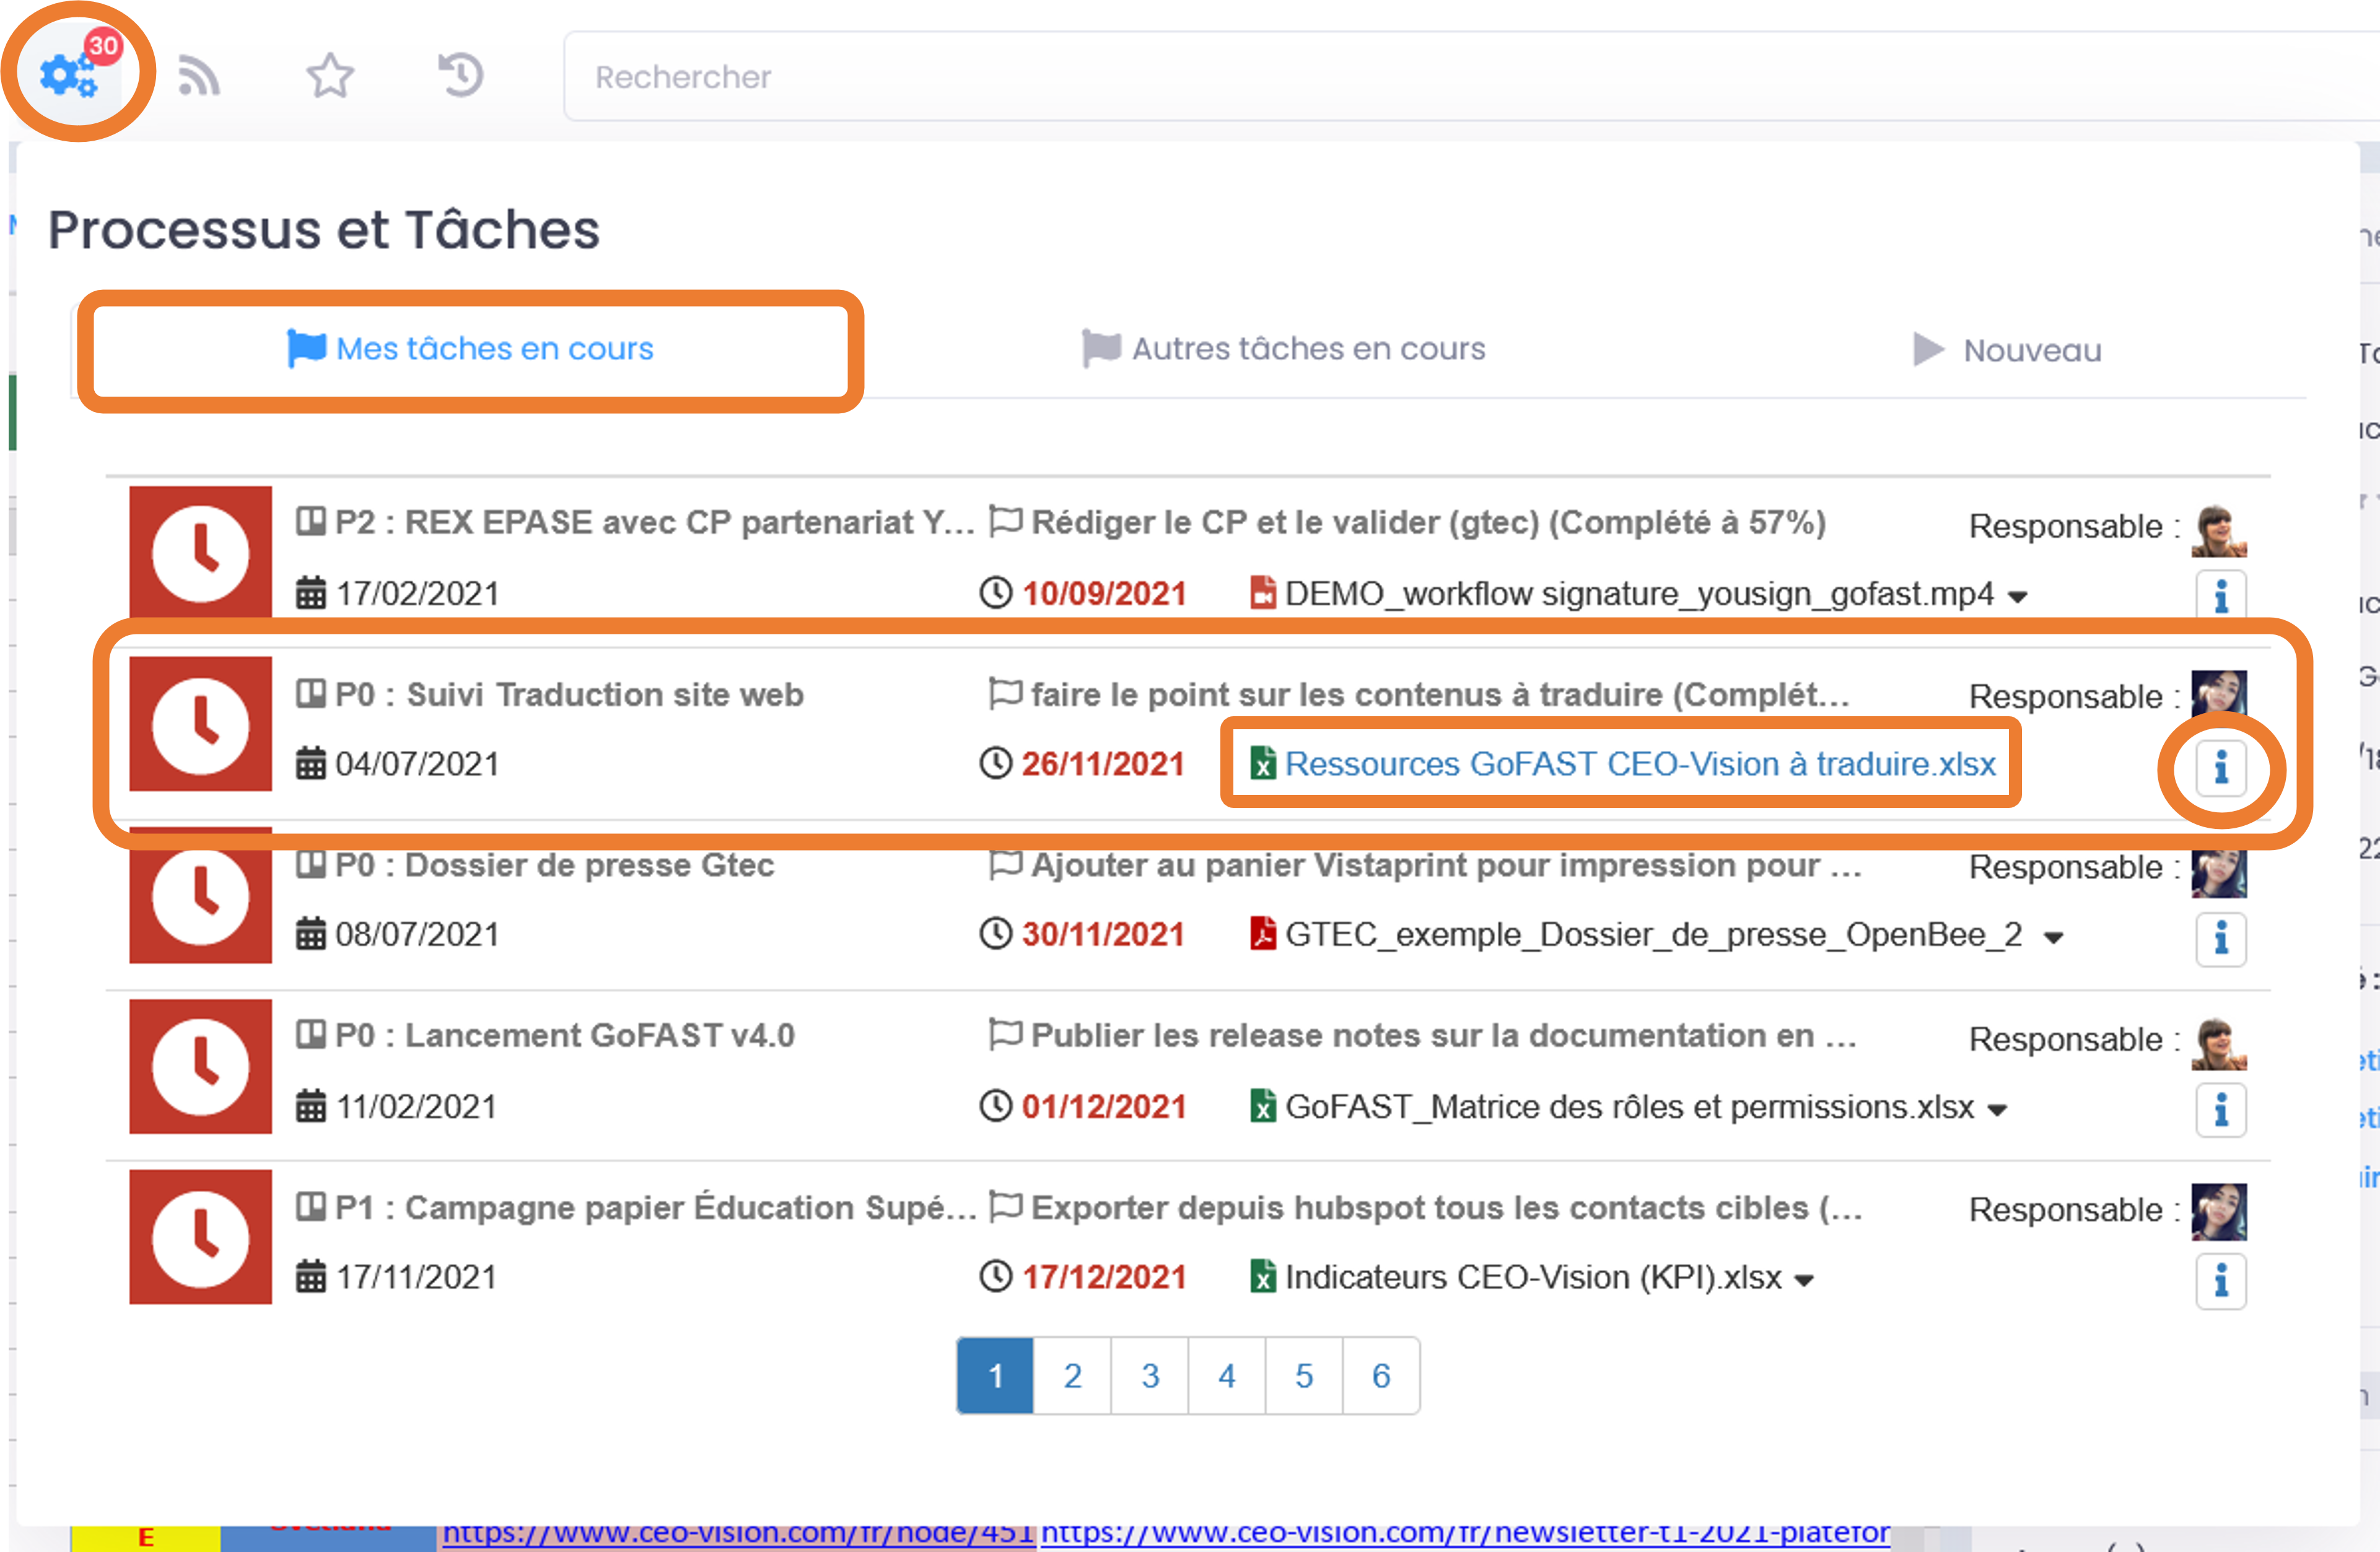
You then have a separate tab for tasks to be processed and another for tasks assigned to other users. In the case where there are many tasks, you have a pagination.
On a document page:
A number appears in the “Tasks” tab of the document information block, indicating the number of tasks waiting to be processed (all current tasks, not just yours).
Click once on this tab, then “My Tasks” OR “Other Tasks”, depending on whether you want to complete your tasks or verify those assigned to other users.
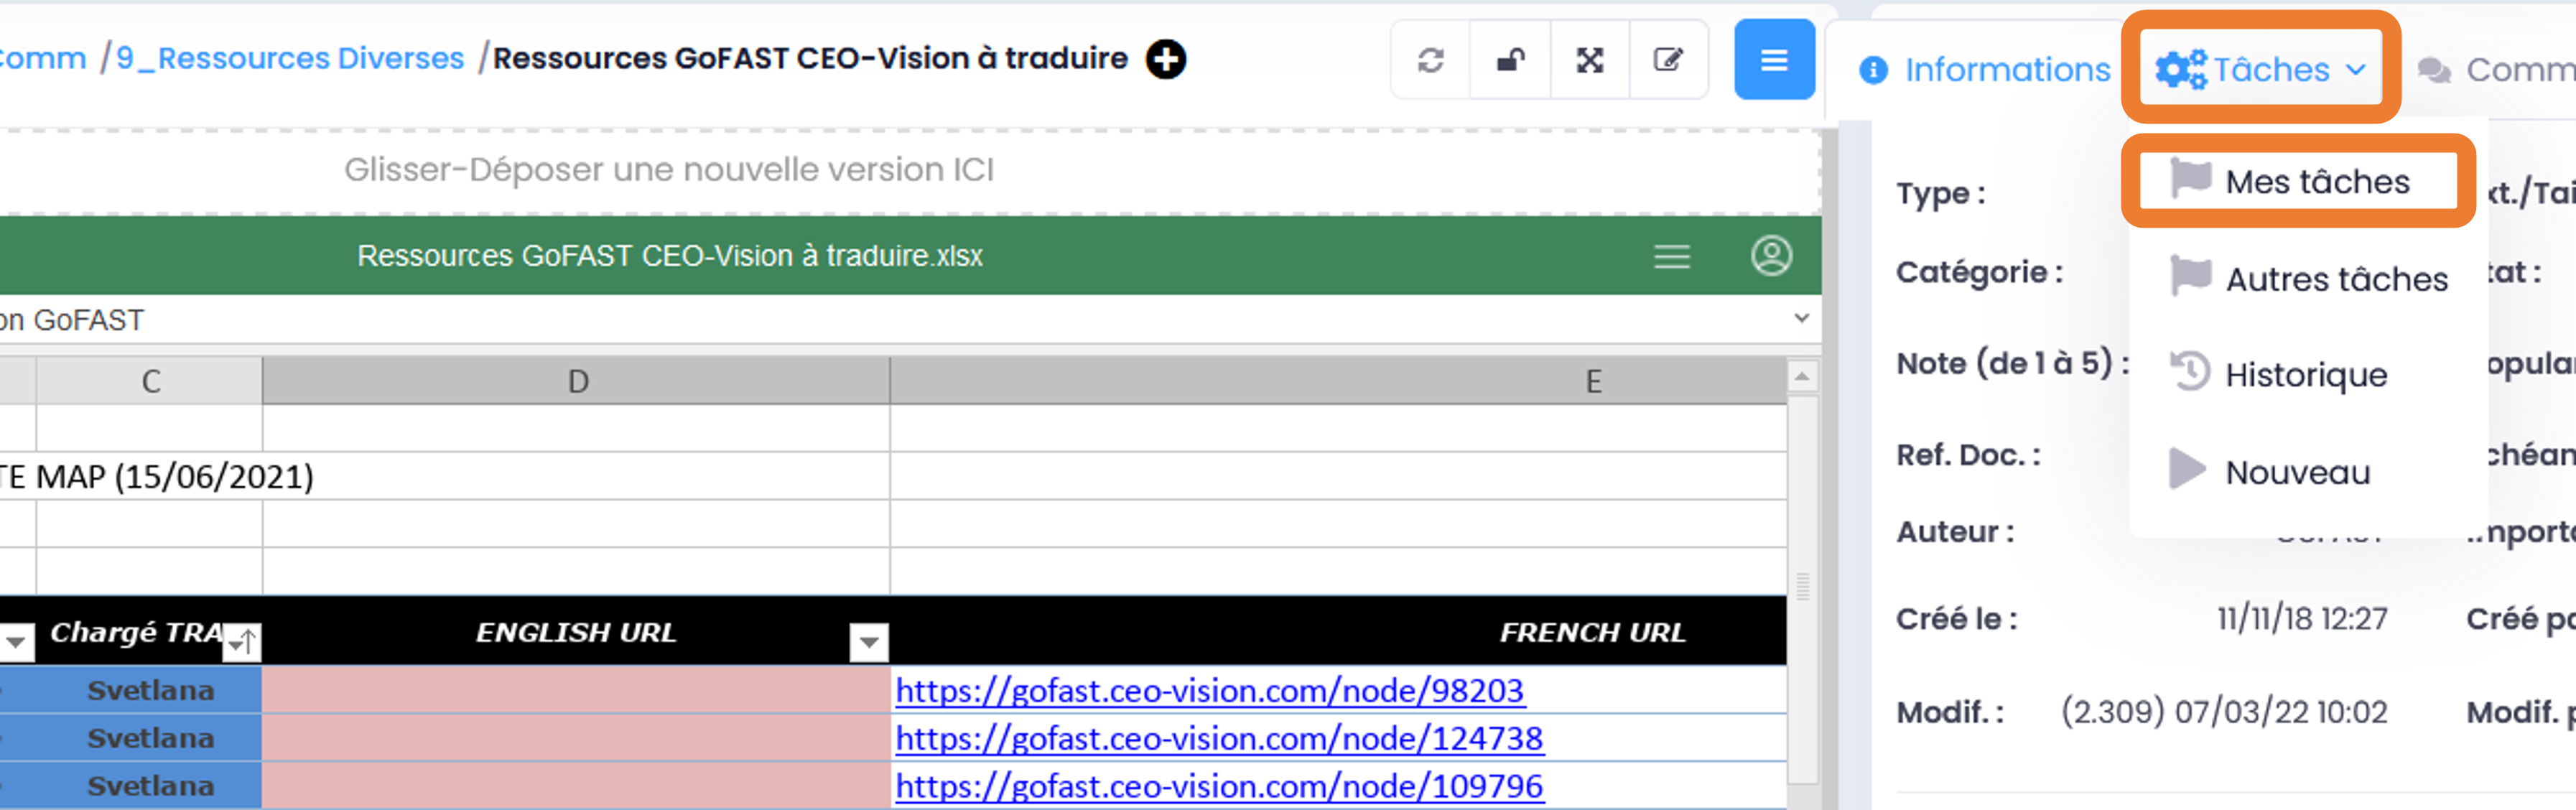
The task list allows you to get acquainted with key information:
process type and name
the tasks to be assigned (e.g. for comment, for validation, etc.)
relevant document(s)
start date and deadline
process initiator
- Possible actions from this list of tasks:
Go to the page of the document(s) of the process by clicking on the title of the document,
Check the history of the current process by clicking the “i” icon,
Delegate the task to another person by clicking on the orange icon,
Effectuer sa tâche et consulter l’historique du processus en cours en cliquant sur l’icône “>”.

When you delegate a task, a pop-up window will open asking you to reassign the task.
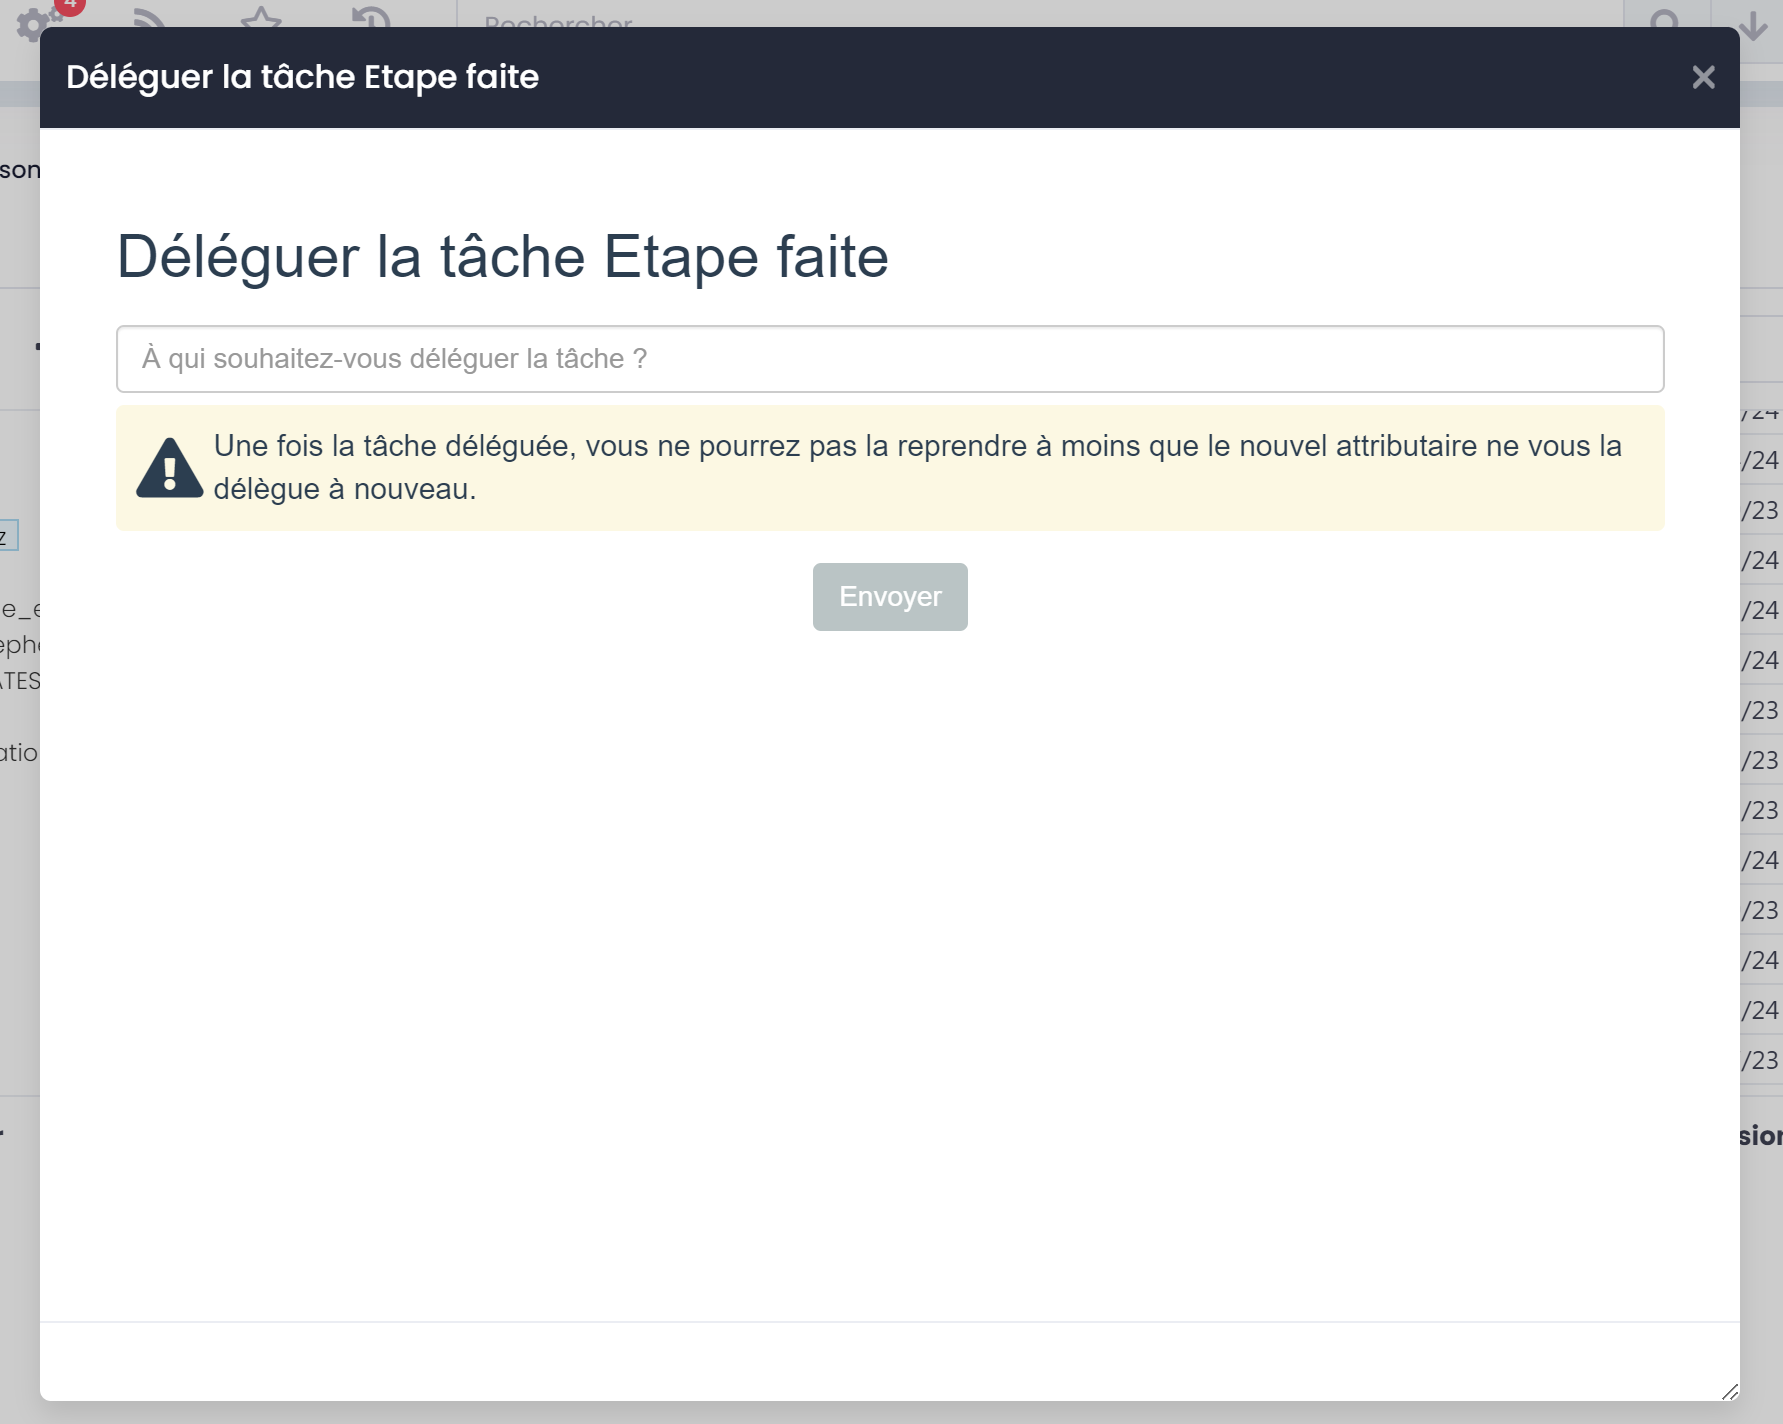
- In the task list, the “Clock” icon can be displayed in 3 colors:
Red if deadline is reached/exceeded
Orange if there are 24 hours before deadline
Green if deadline is more than 24 hours away
Process your tasks
You can process your tasks:
Either from the page of a document: in the information block, tab “Tasks”, you will find the form to complete your task (when you arrive at the document, you will be automatically positioned on this tab if you have a task to process).
[IMAGE]
Either from the list of tasks and processes: click on the “>” icon to open the form and indicate that you have completed your task, leaving a comment.
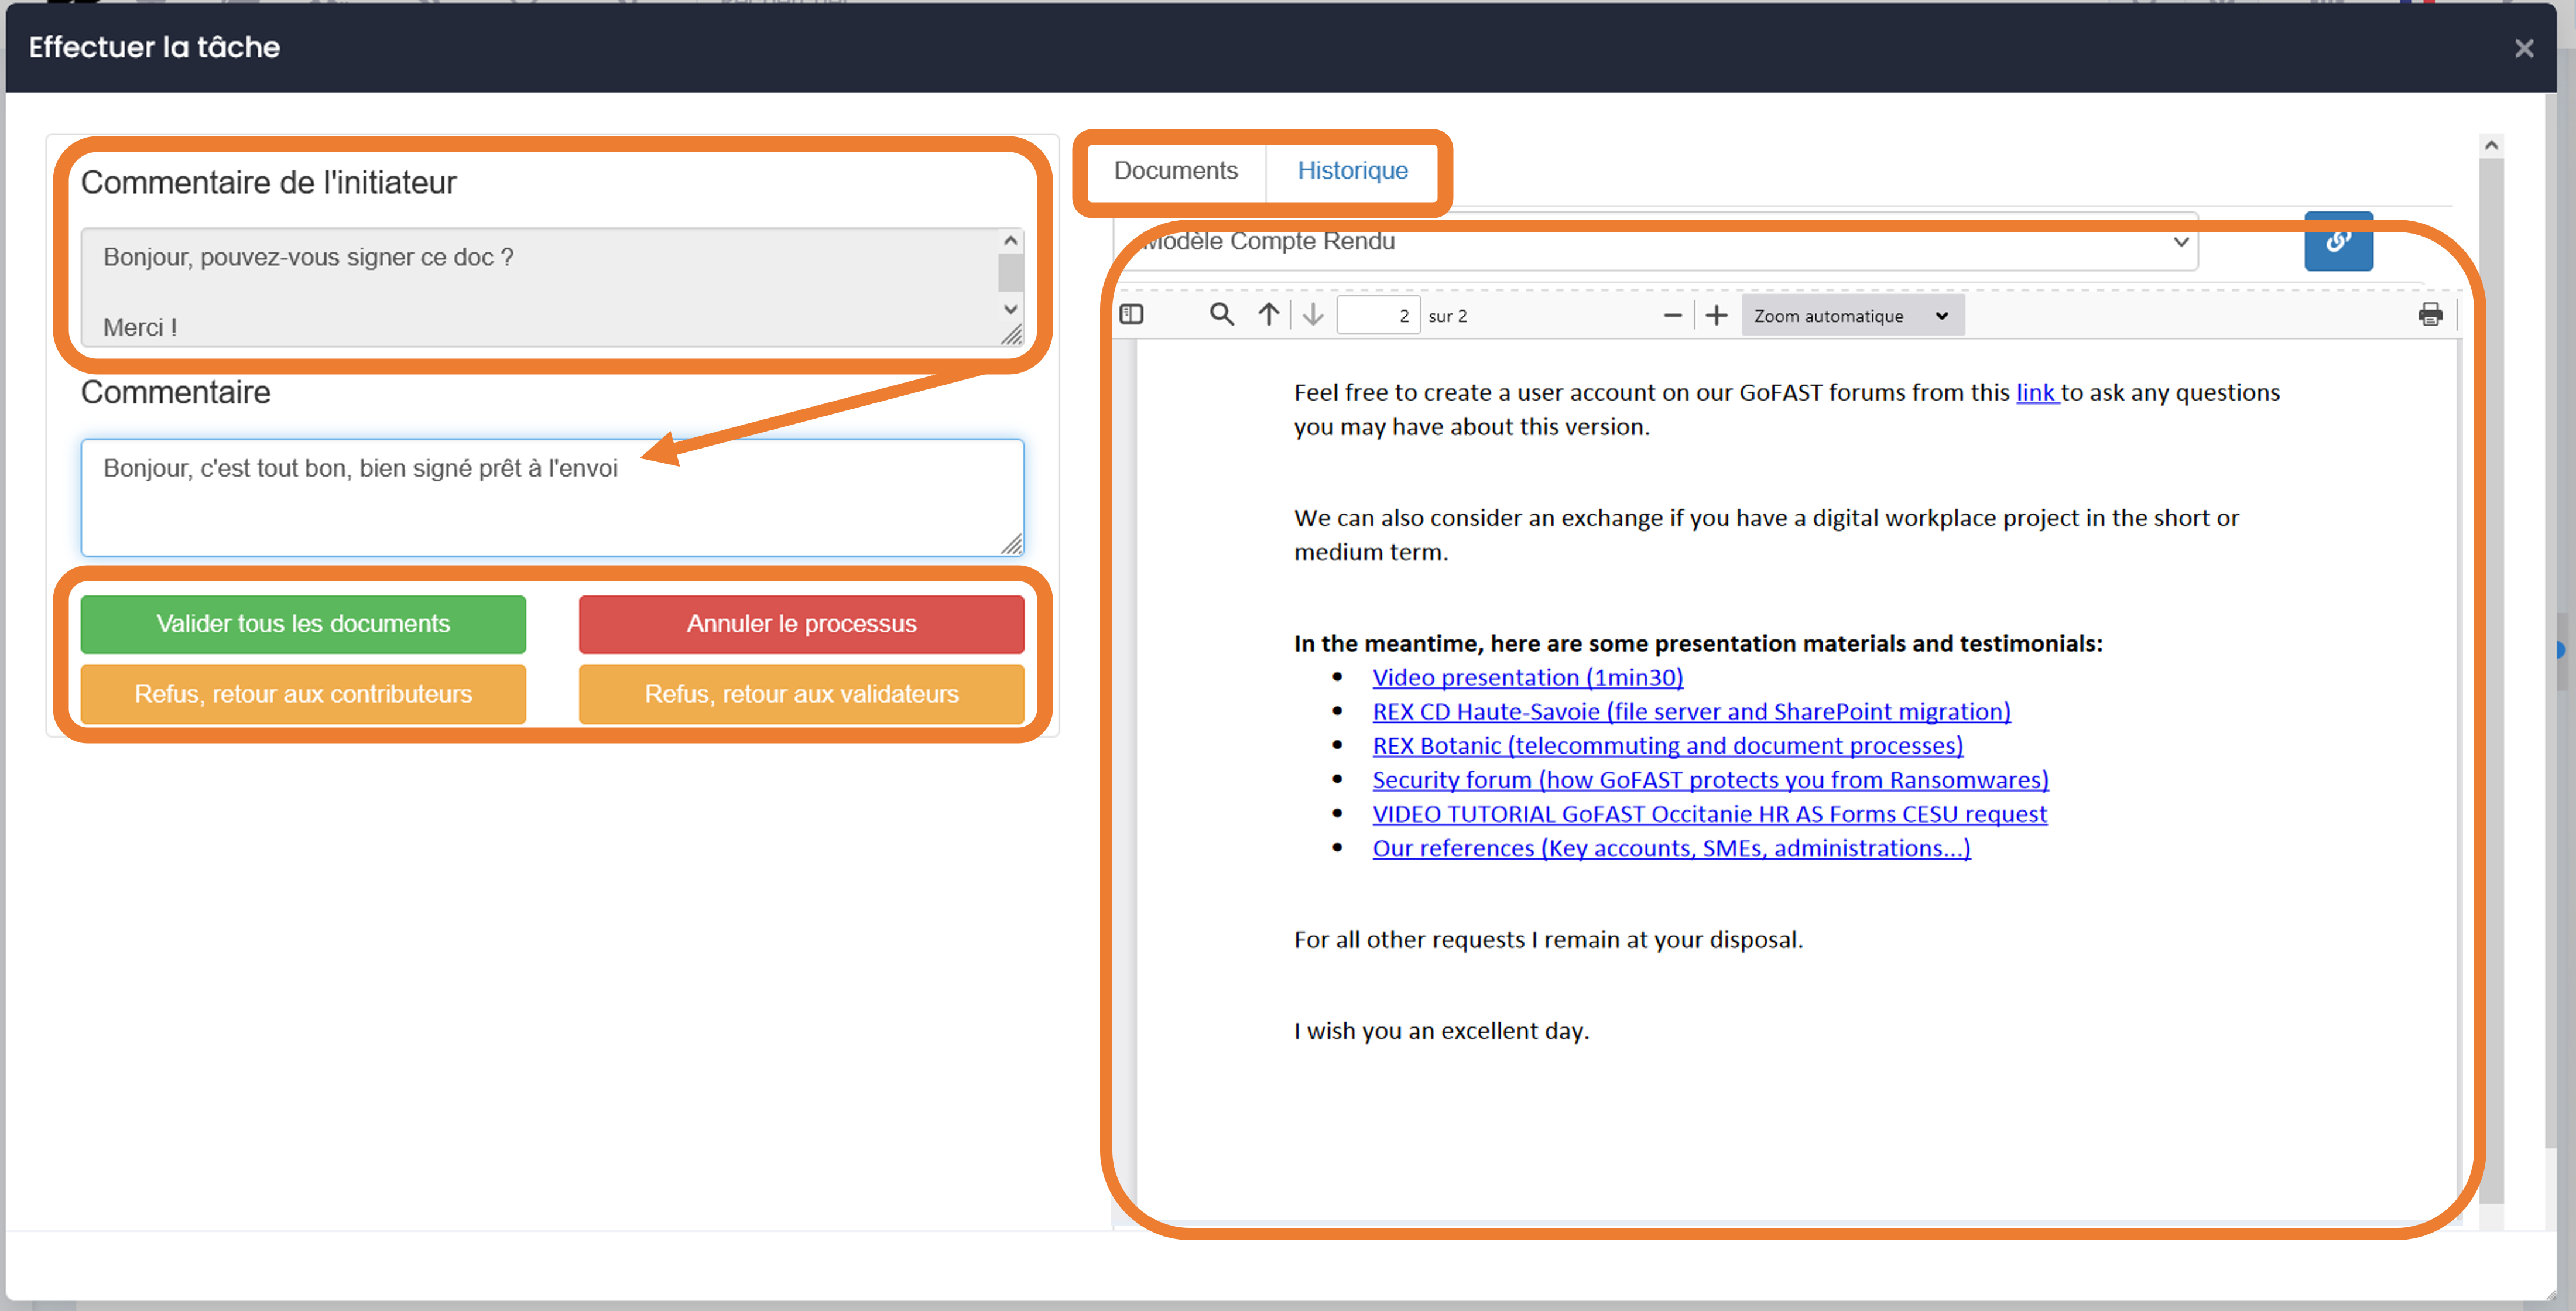
Either from the GoFast Calendar if the task has a due date. You will find the task in the calendar on its due date, clicking on it will redirect you either to the Kanban card or to the current process.
Click “Send” (or other depending on the task assigned to you) to save the processing of the task.
Note
Depending on the process, it is possible to leave a comment (ex: GoFAST standard process). This is strongly recommended to promote collaborative work.
History of current and archived processes
Whether for current or archived processes, you have the opportunity to view the details of the steps and comments.
This detailed history is accessible:
Via the quick access bar (main menu at the top), click on the “i” icon at the level of a process.
On the document page, Tasks tab, or on the process’s “i” icon if it’s current, or through the History tab for completed processes.
From the Process Table (please refer to the “Process Table” section).
History of current processes
In order to view the history of actions in a current process, simply click on the “i” or “>” icon at the level of a task: .. figure:: media-guide/Ecran-GoFAST_Workflows_details-tache- open-form-history.png
the “>” is displayed only if it is a task that has been assigned to you (allows you to open the form to perform its task and to see the history of already processed tasks by this process),
the “i” allows you to view the history from a task assigned to someone else (or to yourself, if you do not want to open the processing form).
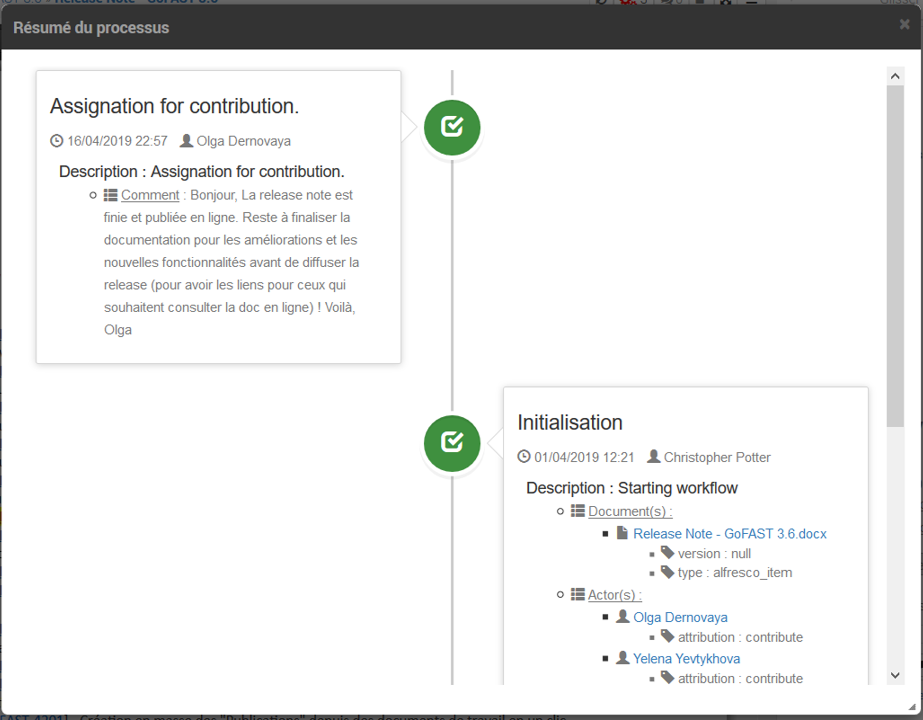
History of completed processes
From a document page:
To view the list of completed processes associated with a document, go to the document page and click on the “Tasks” tab of the information block, then “History” in the drop-down menu.
This tab displays a list of all completed processes associated with the document.

To view the details of a completed process, simply click on the “i” icon at the process level.
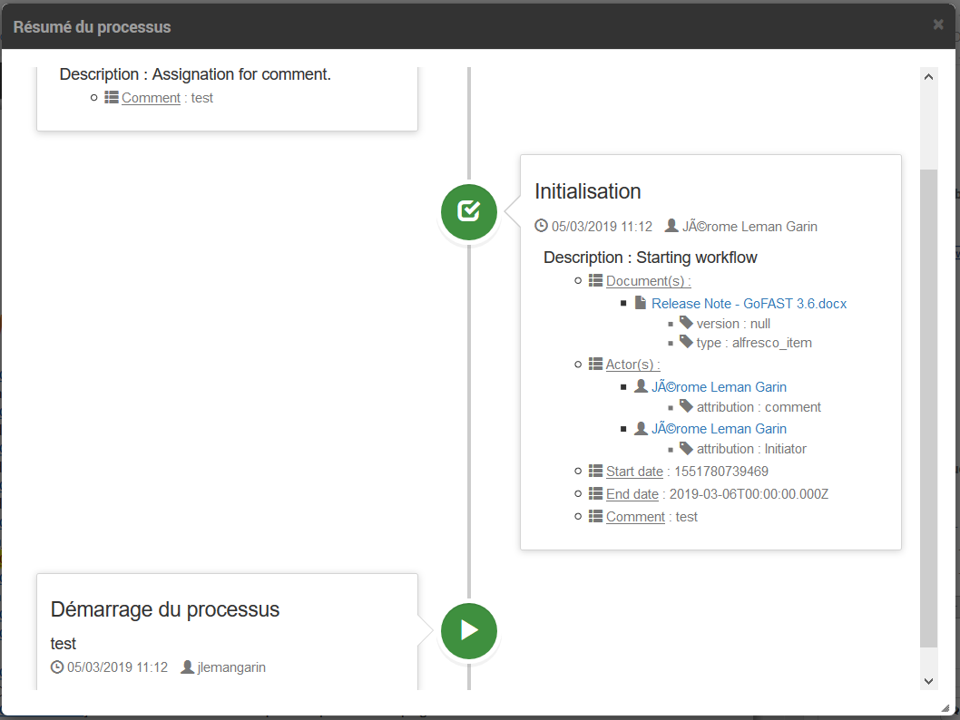
Table of processes
The process table displays all existing processes (in progress or completed), according to their access rights: created by the user and assigned to them.
- In order to access the Process Table:
Unfold the main menu on the left
Go to “Workflows and Tasks”
You can also click on the Processes icon in this main menu on the left.
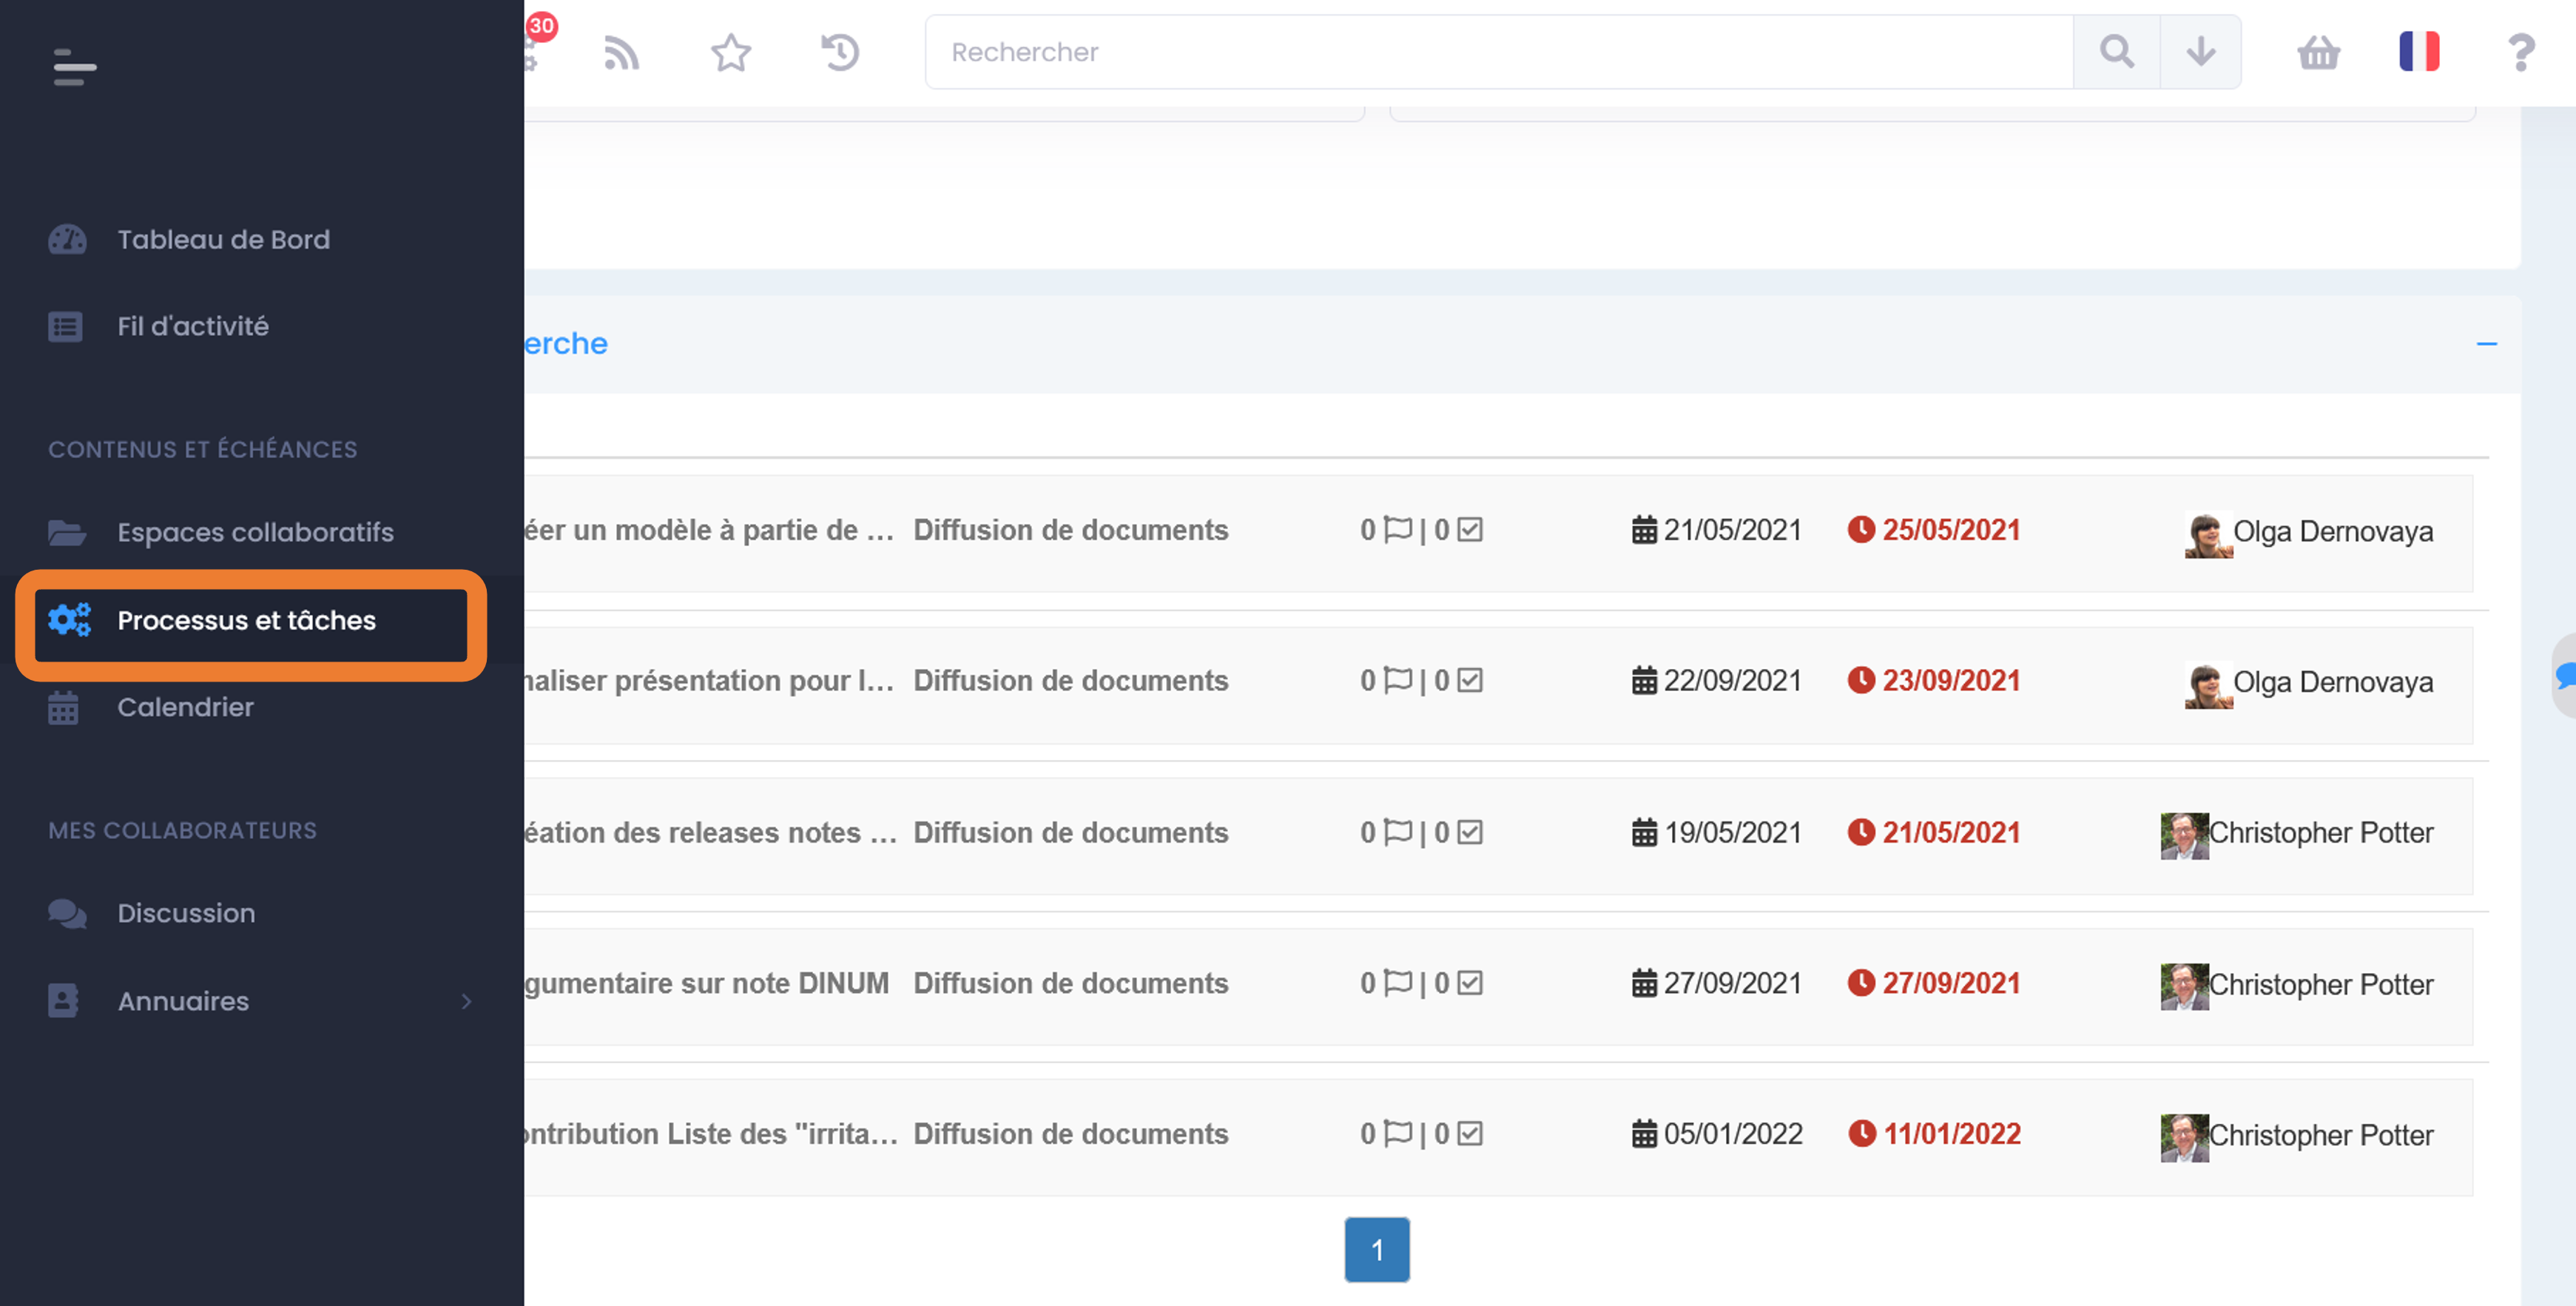
By default, when you get to the process table, only current processes are shown.

How to filter the list of processes
The dashboard offers various filters to search for a process.
The search is done with one or more criteria:
Process title: Full name of the process.
Started after: The date after the start of the process.
Deadline: Deadline before the end of the process.
Process type: You can sort by two process types “Document distribution” and “Document distribution sub-processes”.
Process State: Two states are available: “Current” and “Completed”.
Started by: This field is used to enter the name of the user who started the process (suggestions if you enter at least 3 characters of last name/first name).
Related Documents: Document(s) associated with the searched process (suggestions if you enter at least 3 title characters).
Related users: In this field, you can fill in the users assigned to the different tasks of the process you are looking for (suggestions if you enter at least 3 characters of last name/first name).
In order to start the search query, do not forget to press the “Search” button.
How to view process details
In order to view the details of a process, simply click on the name of the process in the Search results.
Three sections are available:
1- Process tasks
2- Documents in this process

3- Process History
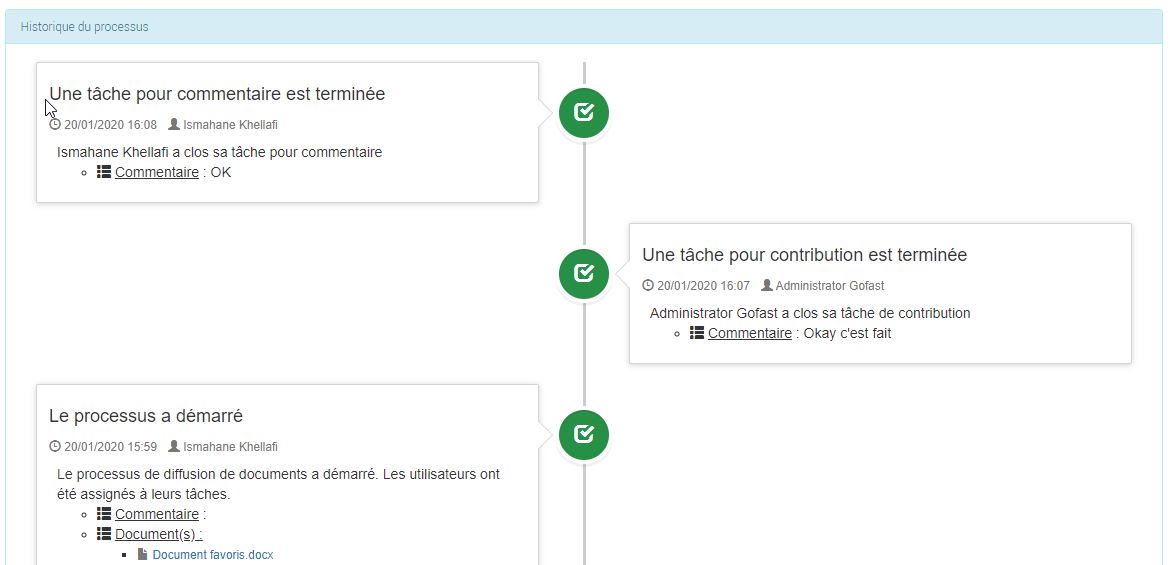
Collaborative tasks - Kanban
For better management of collaborative tasks, GoFAST offers a “kanban” type interface with a system of columns (by progress) and cards (post-it) to organize the different actions to be carried out during a project.
Note
Only one “Kanban” board is available per space. Public spaces do not have this task manager.
Kanban board management
In order to access a Kanban board:
Go to a Space page
Go to the “Tasks” tab in Space.
The most classic configuration consists of creating 4 columns: Start, In Progress, Finalization, Complete or Cancelled. In each column, you will find the existing cards.
Column management
In order to create a new column:
Fill in the “Enter New Column Name” field
Click on the “Add column” button and your new column will then appear in the kanban board.
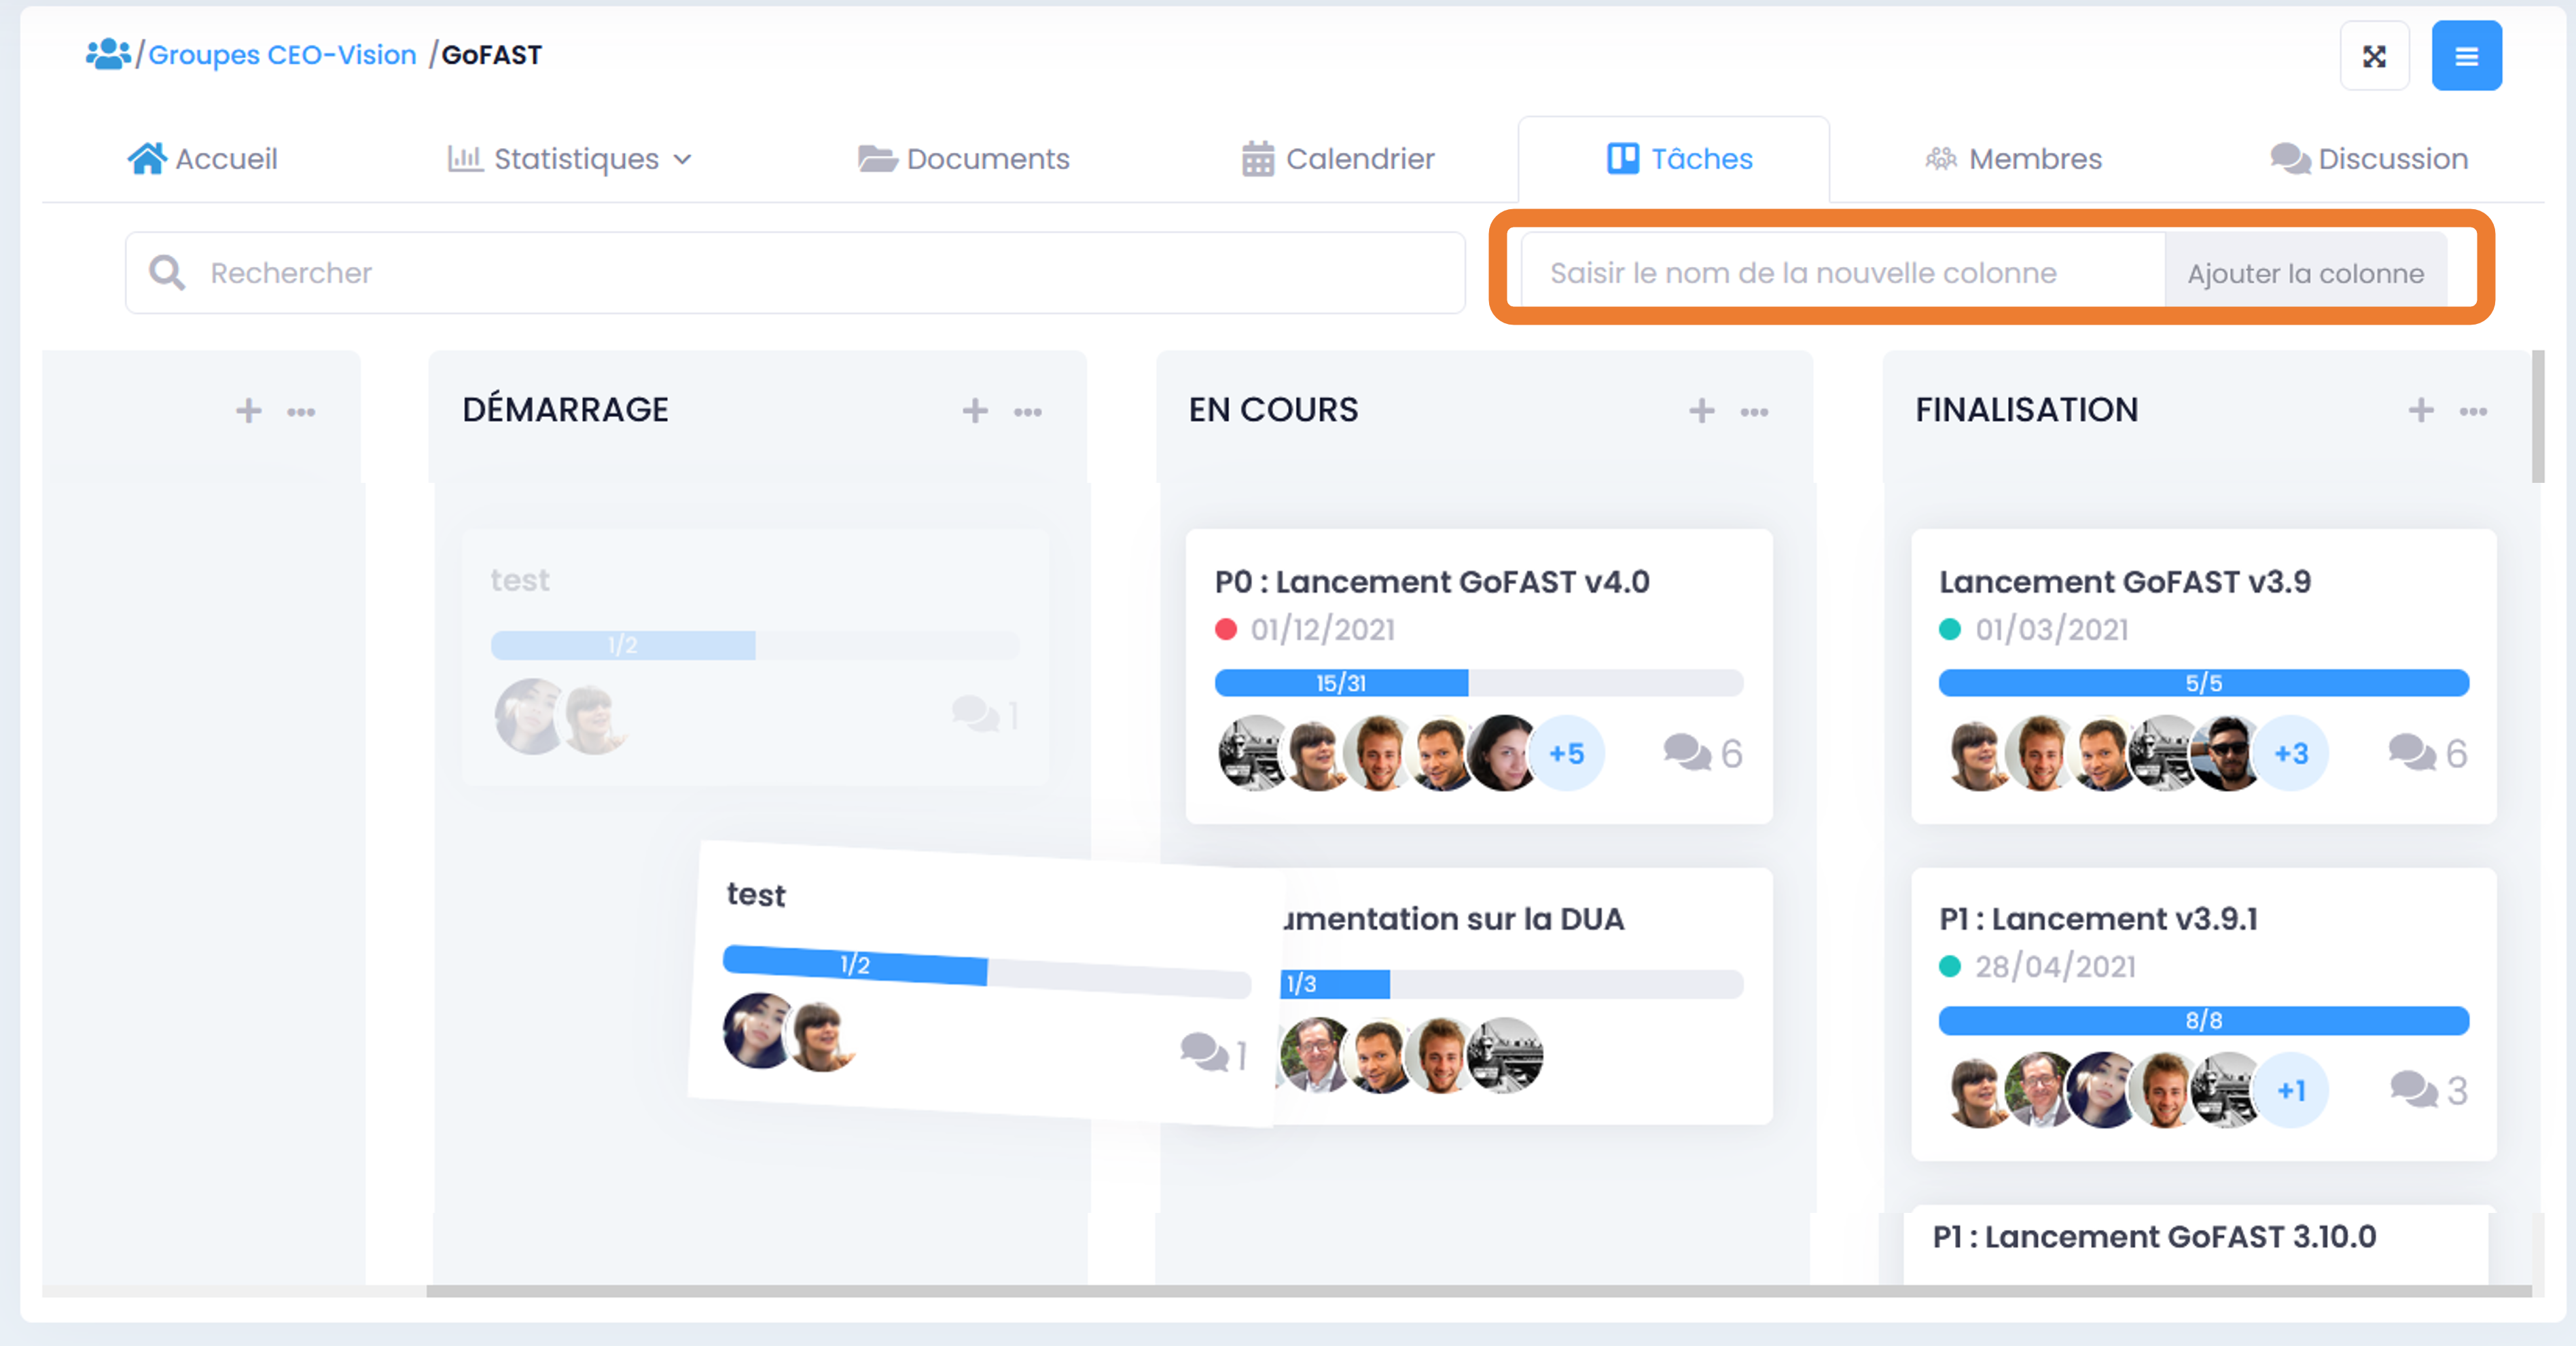
- In order to move a column:
Click on the column while still clicking
Drag to the desired location and drop.
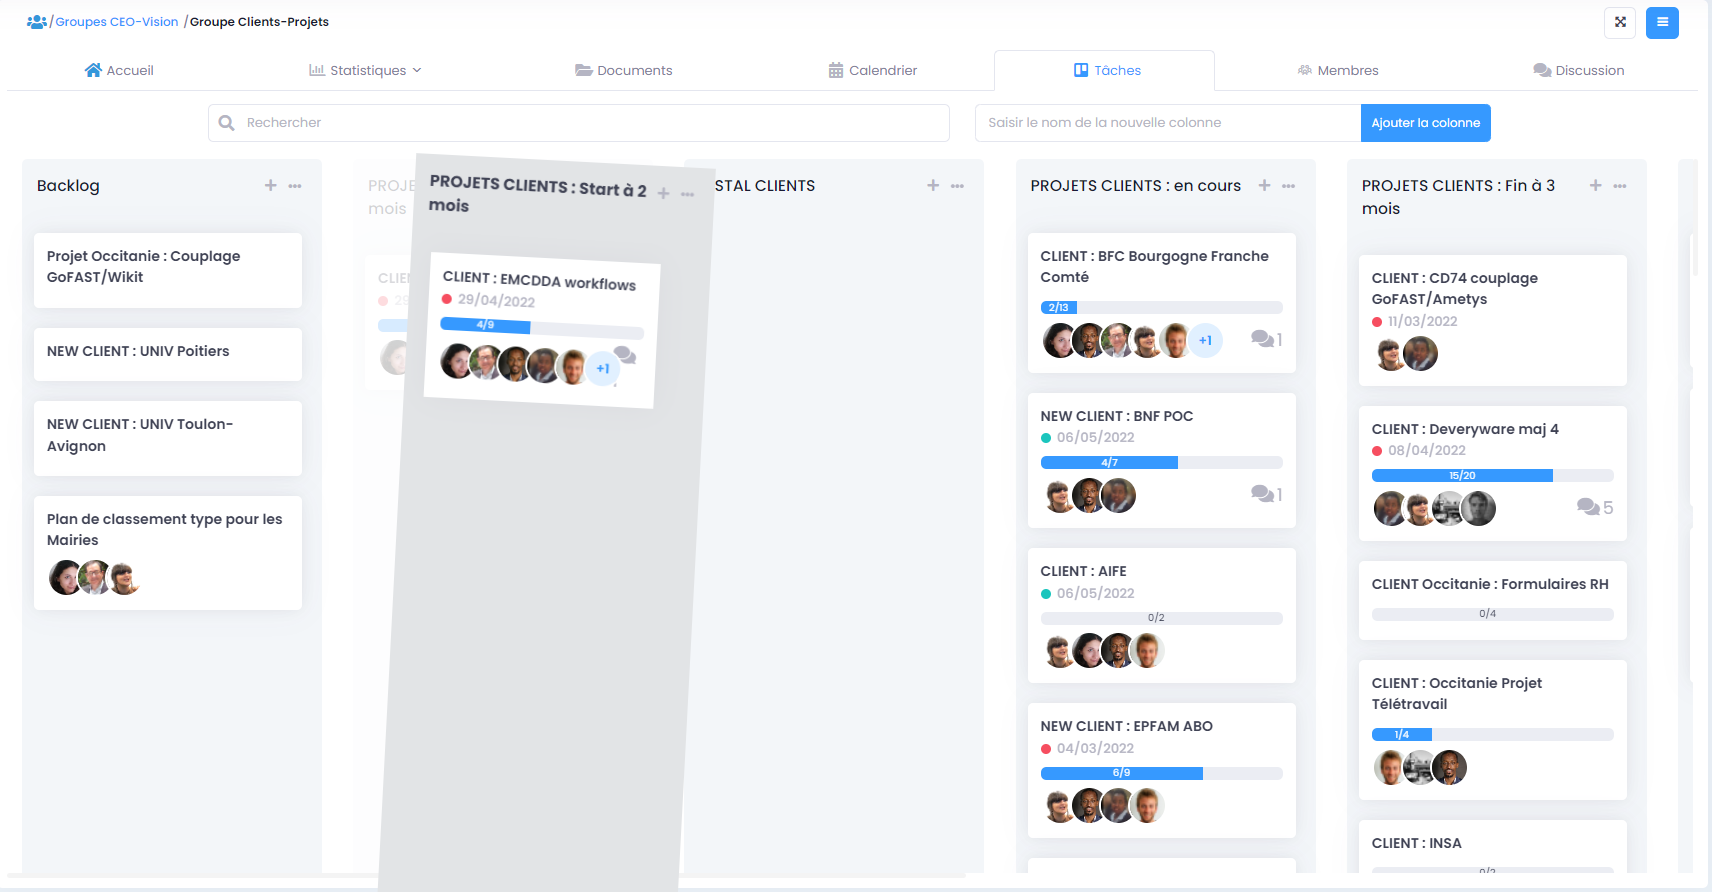
How to rename or delete a column: In order to delete or rename a column, simply click on the “…” icon located at the top right corner of the column, then choose the desired action.
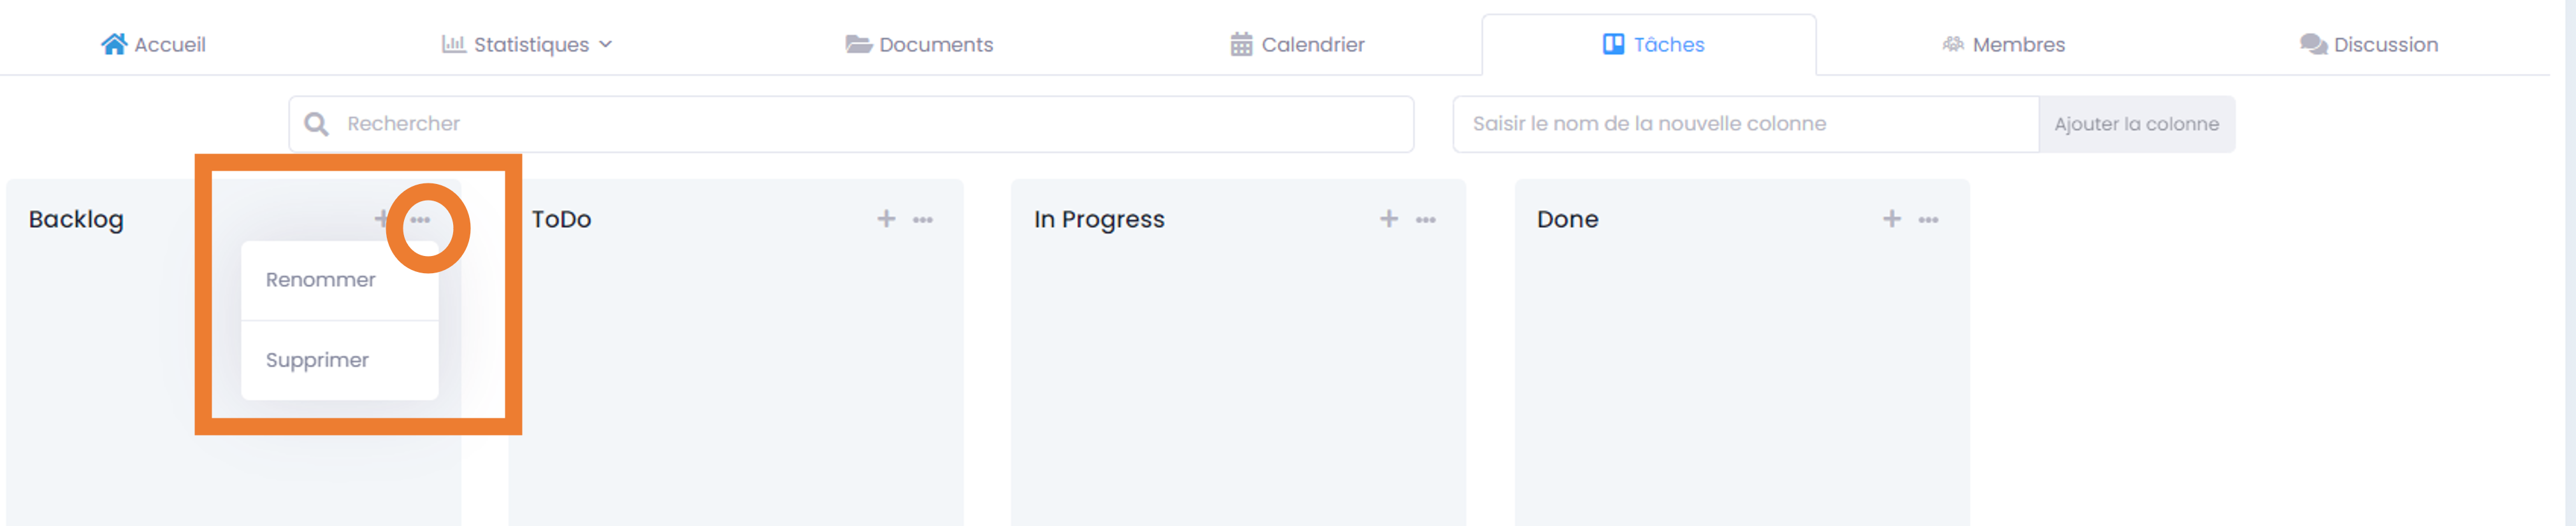
Note
Deletion of the column will clear all cards in it.
This action is irreversible.
How to create a new card
Click on the “+” button at the top right of one of the available columns
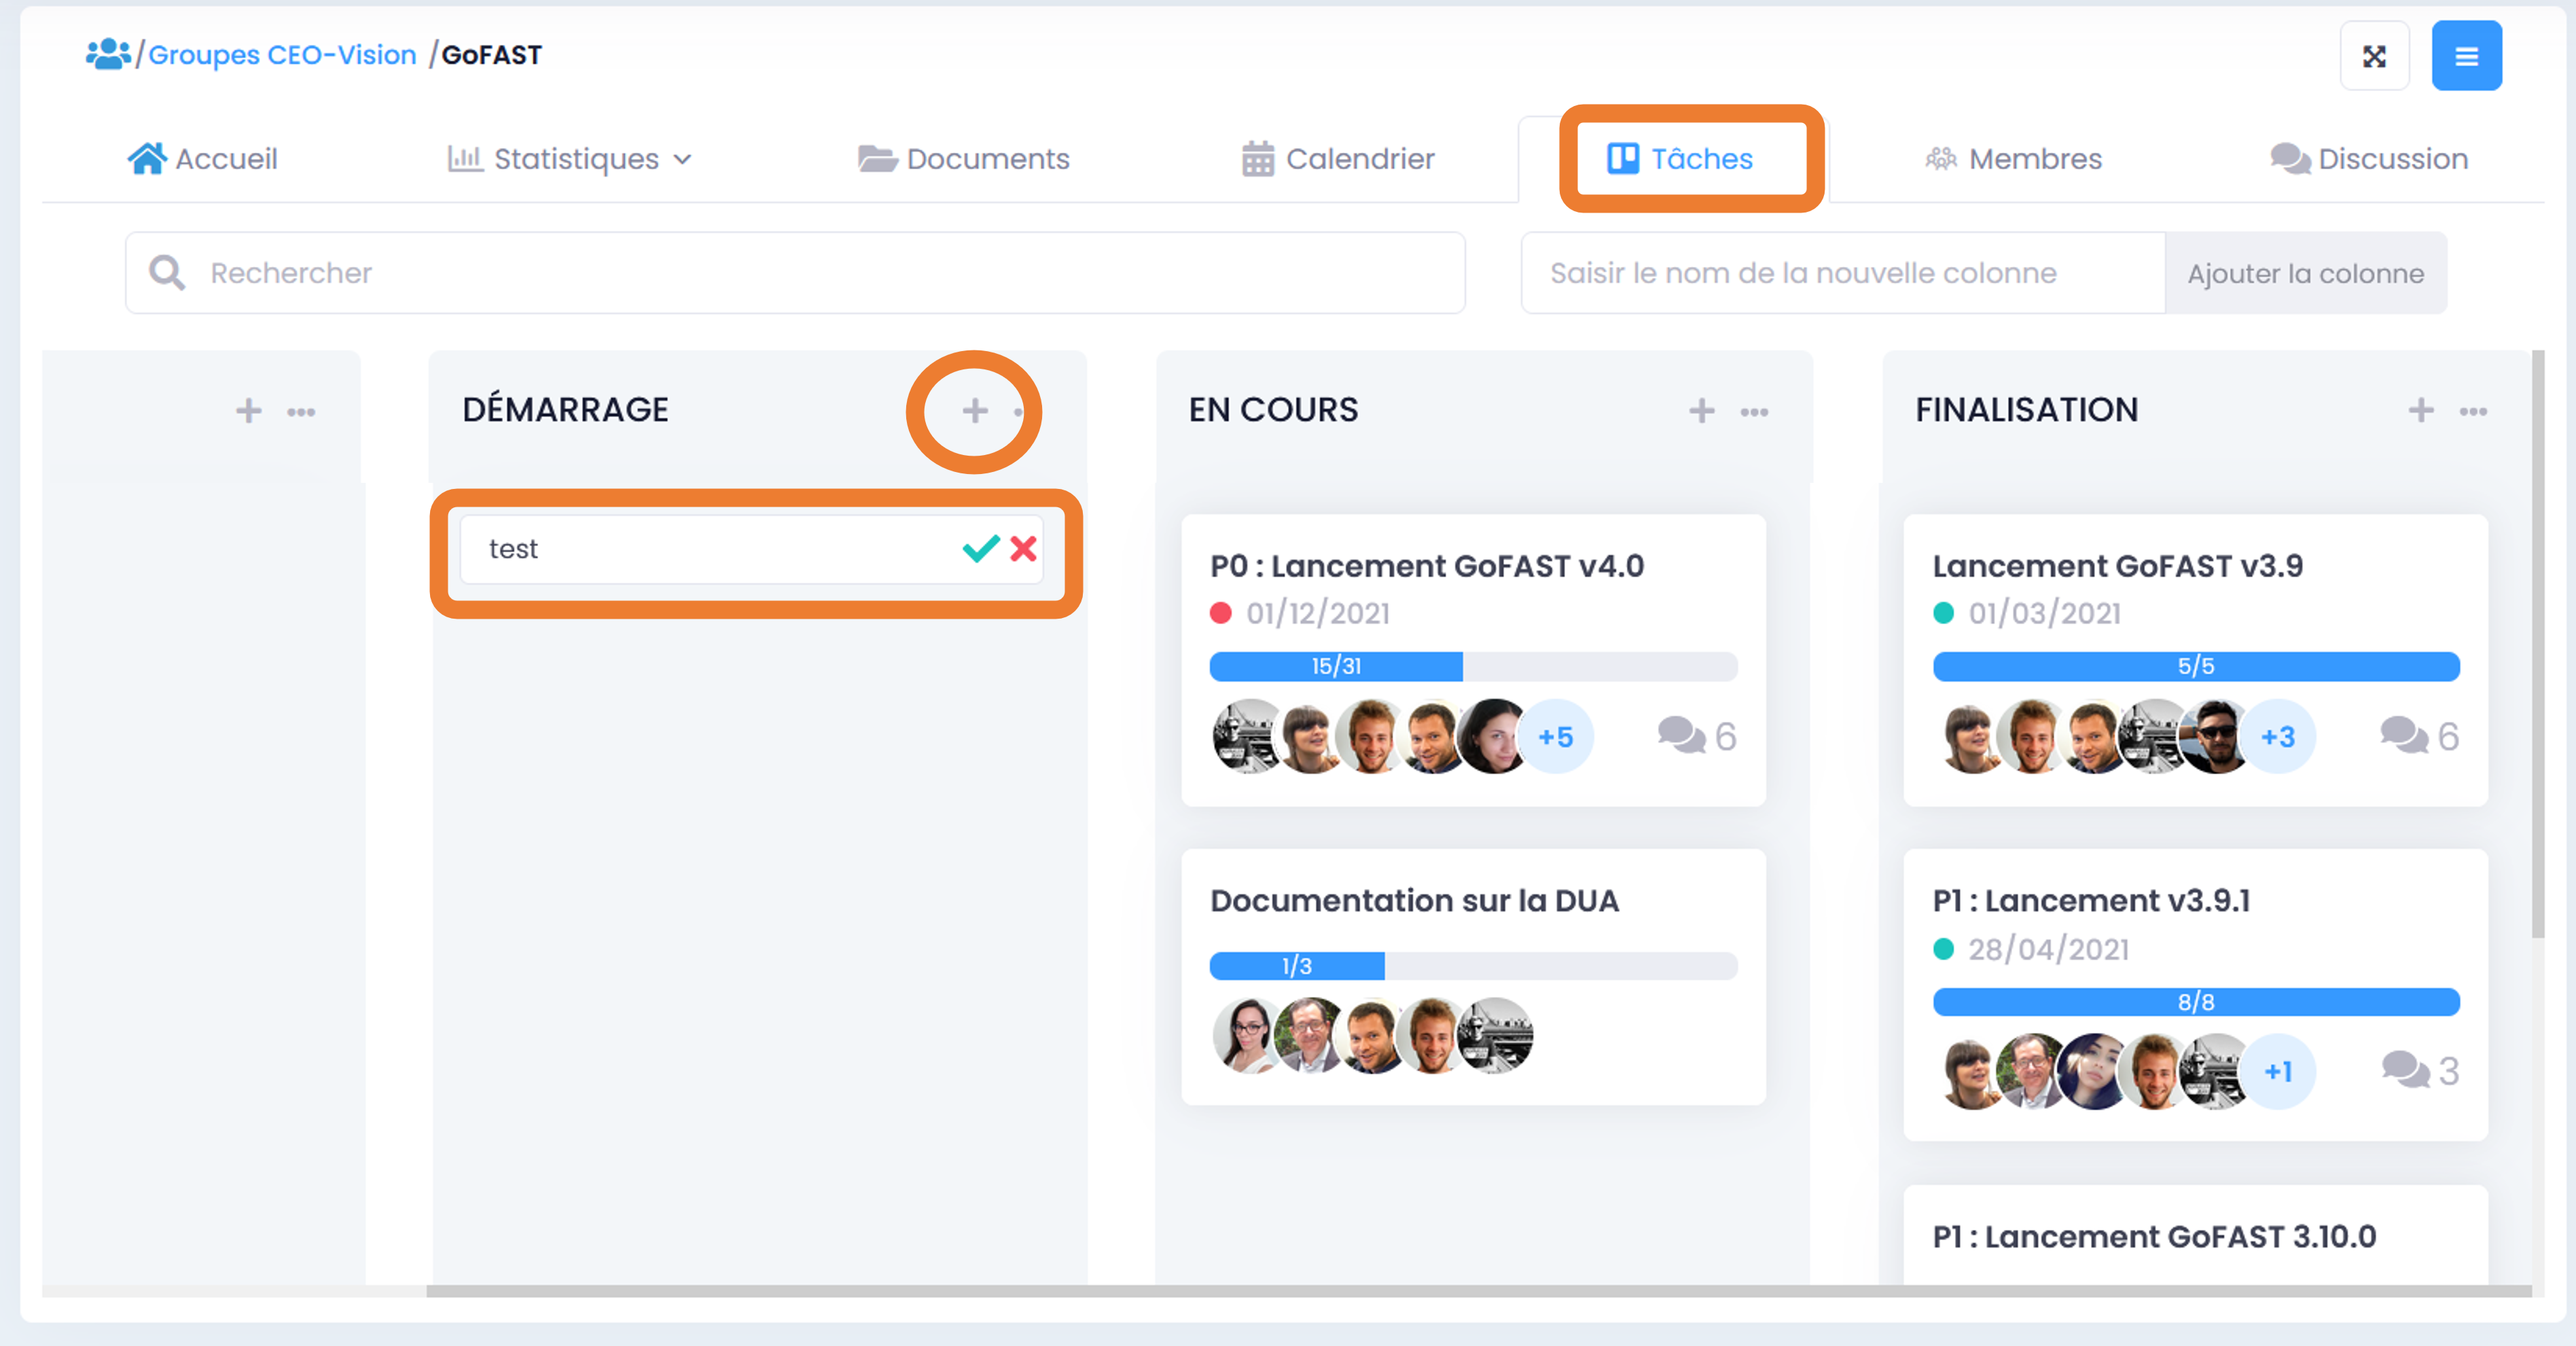
Enter a title for your card in the field that appears, then click on the “v” icon and your new card is created. Then click on the new card you just created to open the associated form.
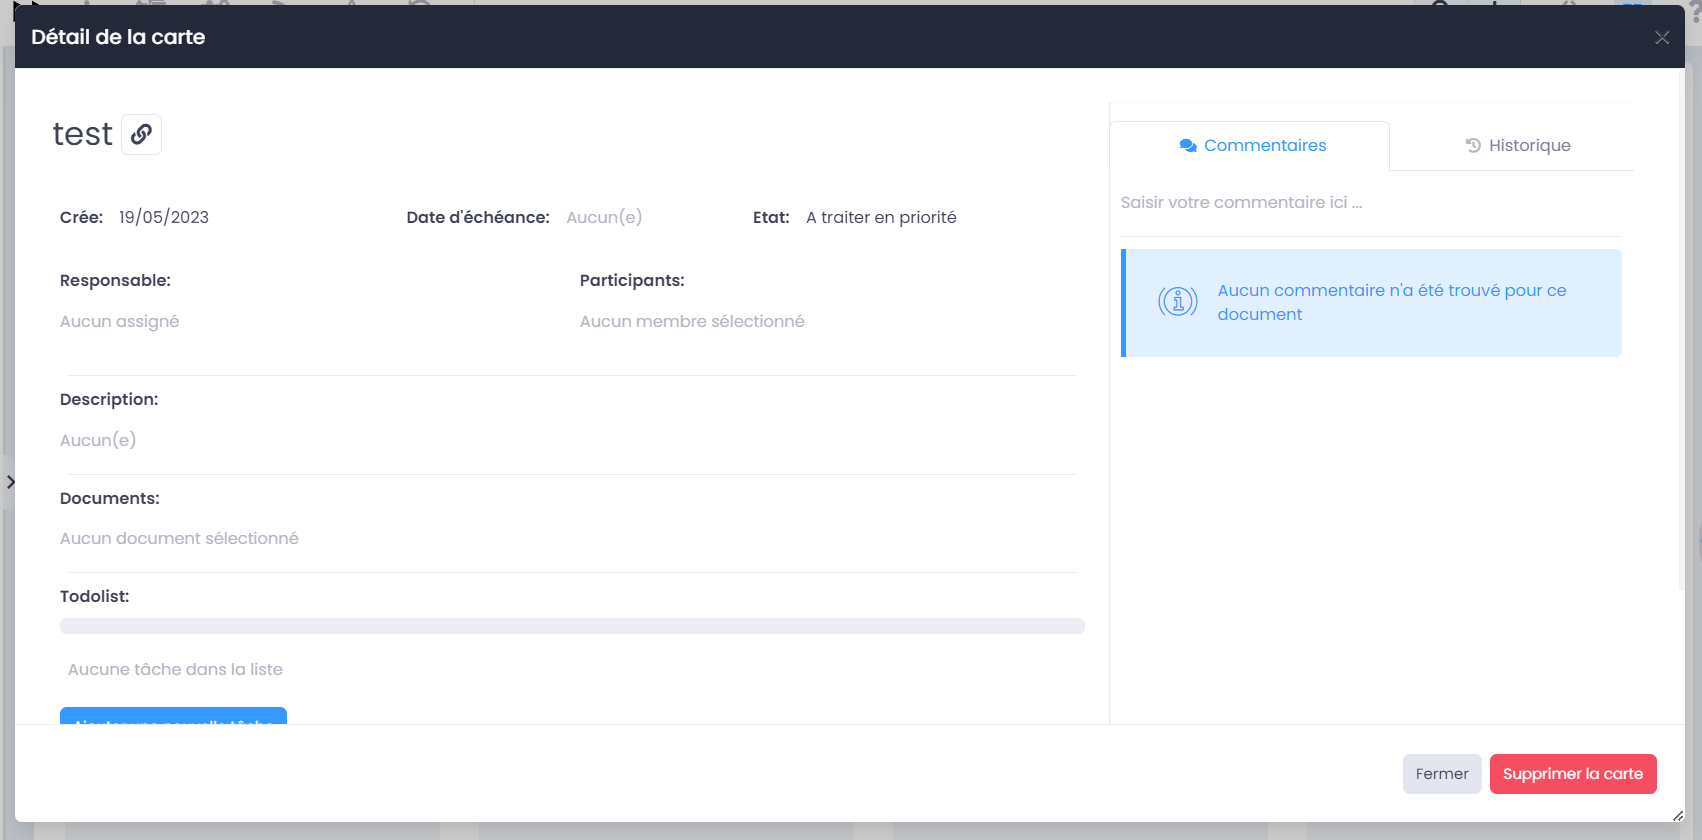
Fill in the title, description, relevant documents, deadline, person in charge, and then participants. This information is recorded automatically.
Note
You can edit previously entered information or add more items at any time, by clicking on the map.
Fields available in a card
The title of the card: editable field with one click on it
Permalink
Created : date cannot be modified
State: modifiable by clicking on it, then clicking to select the state. The card can have three states (To be processed as a Priority, In progress, Done).
Responsible: field that can be modified with one click, then entered a user’s name (at least 3 characters to enter for suggestions). Only one responsible is possible.
Labels: one-click field editing, followed by label name entry, making it easy to search and sort maps by keyword.
Participants: editable field in one click, then enter the name of a user (at least 3 characters to enter for suggestions). Multiple participants can be added.
Description: editable field, click on it to go into editing, then on “save” or “cancel” to exit the field.
Documents: editable field, you can link documents to this card by entering the title (at least 3 characters to enter for suggestions) or by pasting the title of a document. Click on one of the suggestions to link the document or on “x” for an already linked document.
Todolist: editable field, where you can list specific sub-tasks to complete. Click on “Add New Task”, enter a title, then click “v” to save your new task from the todolist. Each task can be assigned to a Space member with a specific deadline.
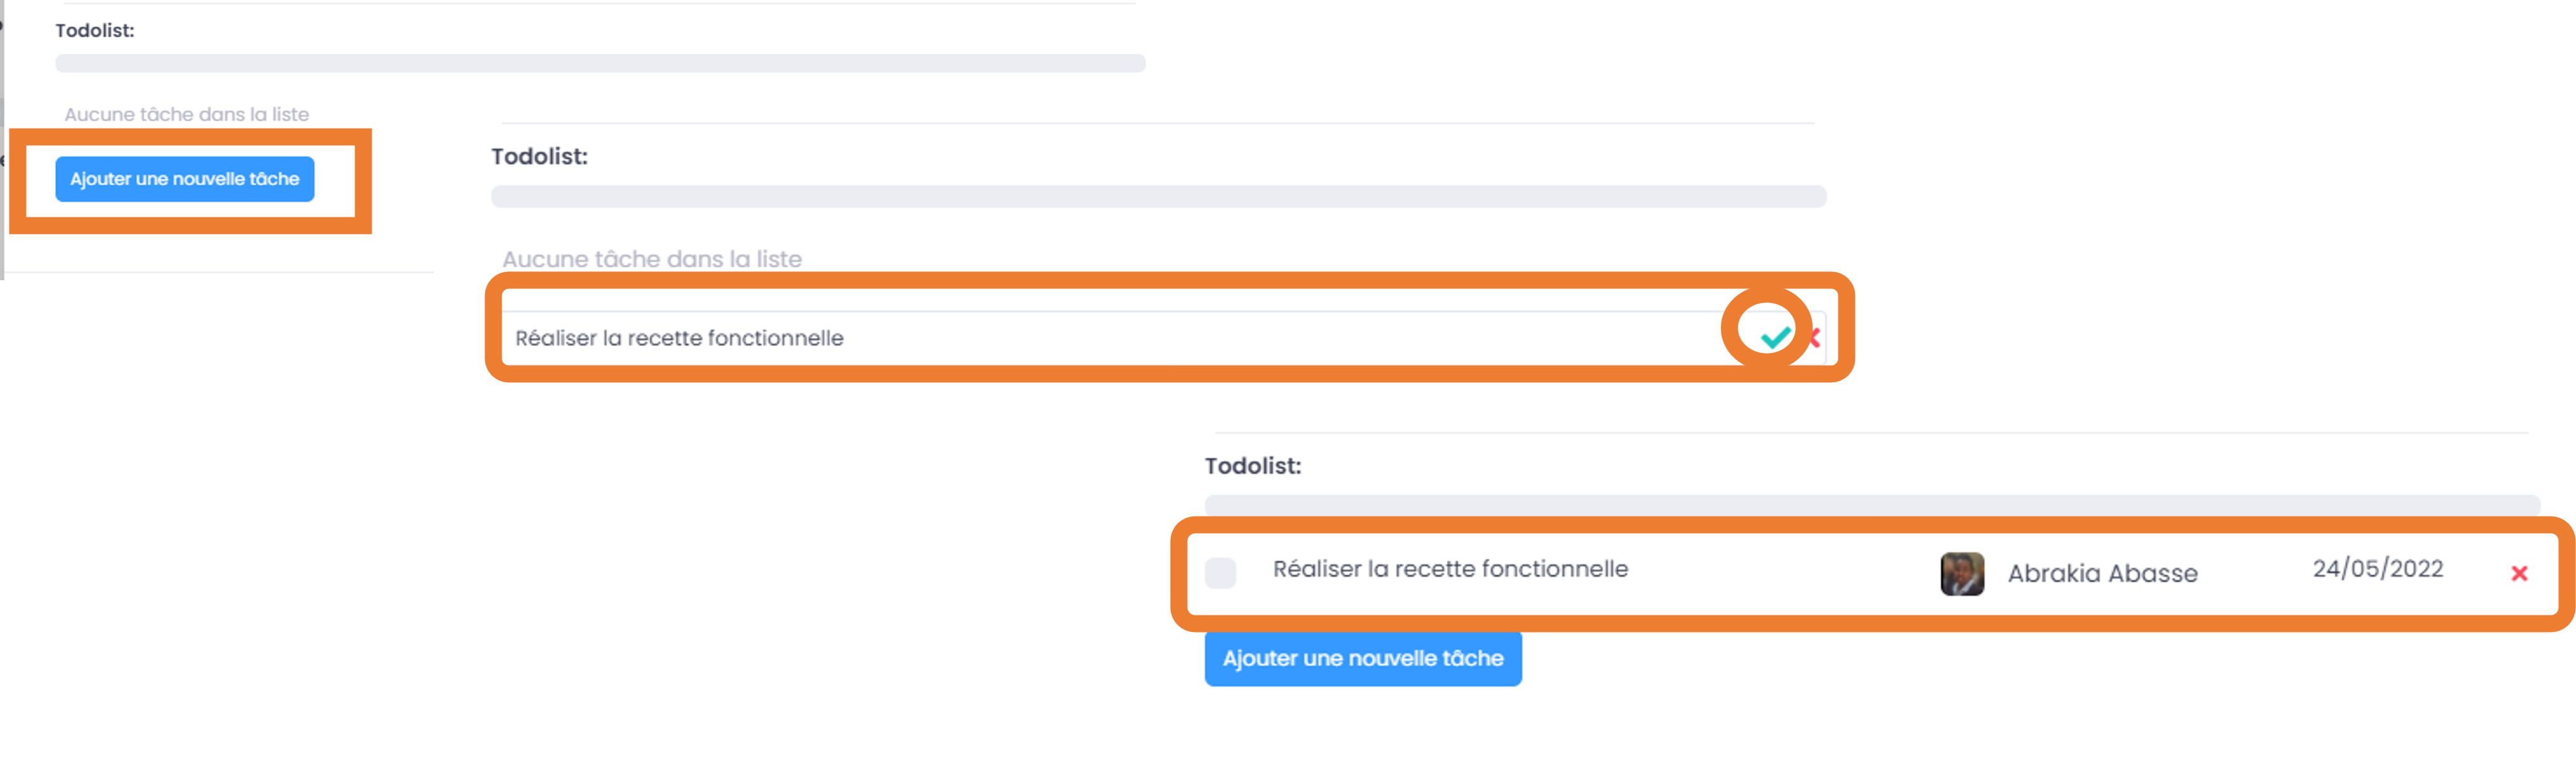
Commentaire (s) : champ modifiable, où vous pouvez partager des remarques et des suggestions avec les participants de la carte. Il est aussi possible de taguer des utilisateurs.
History: non-editable field, which displays the audit of the actions made on the card.
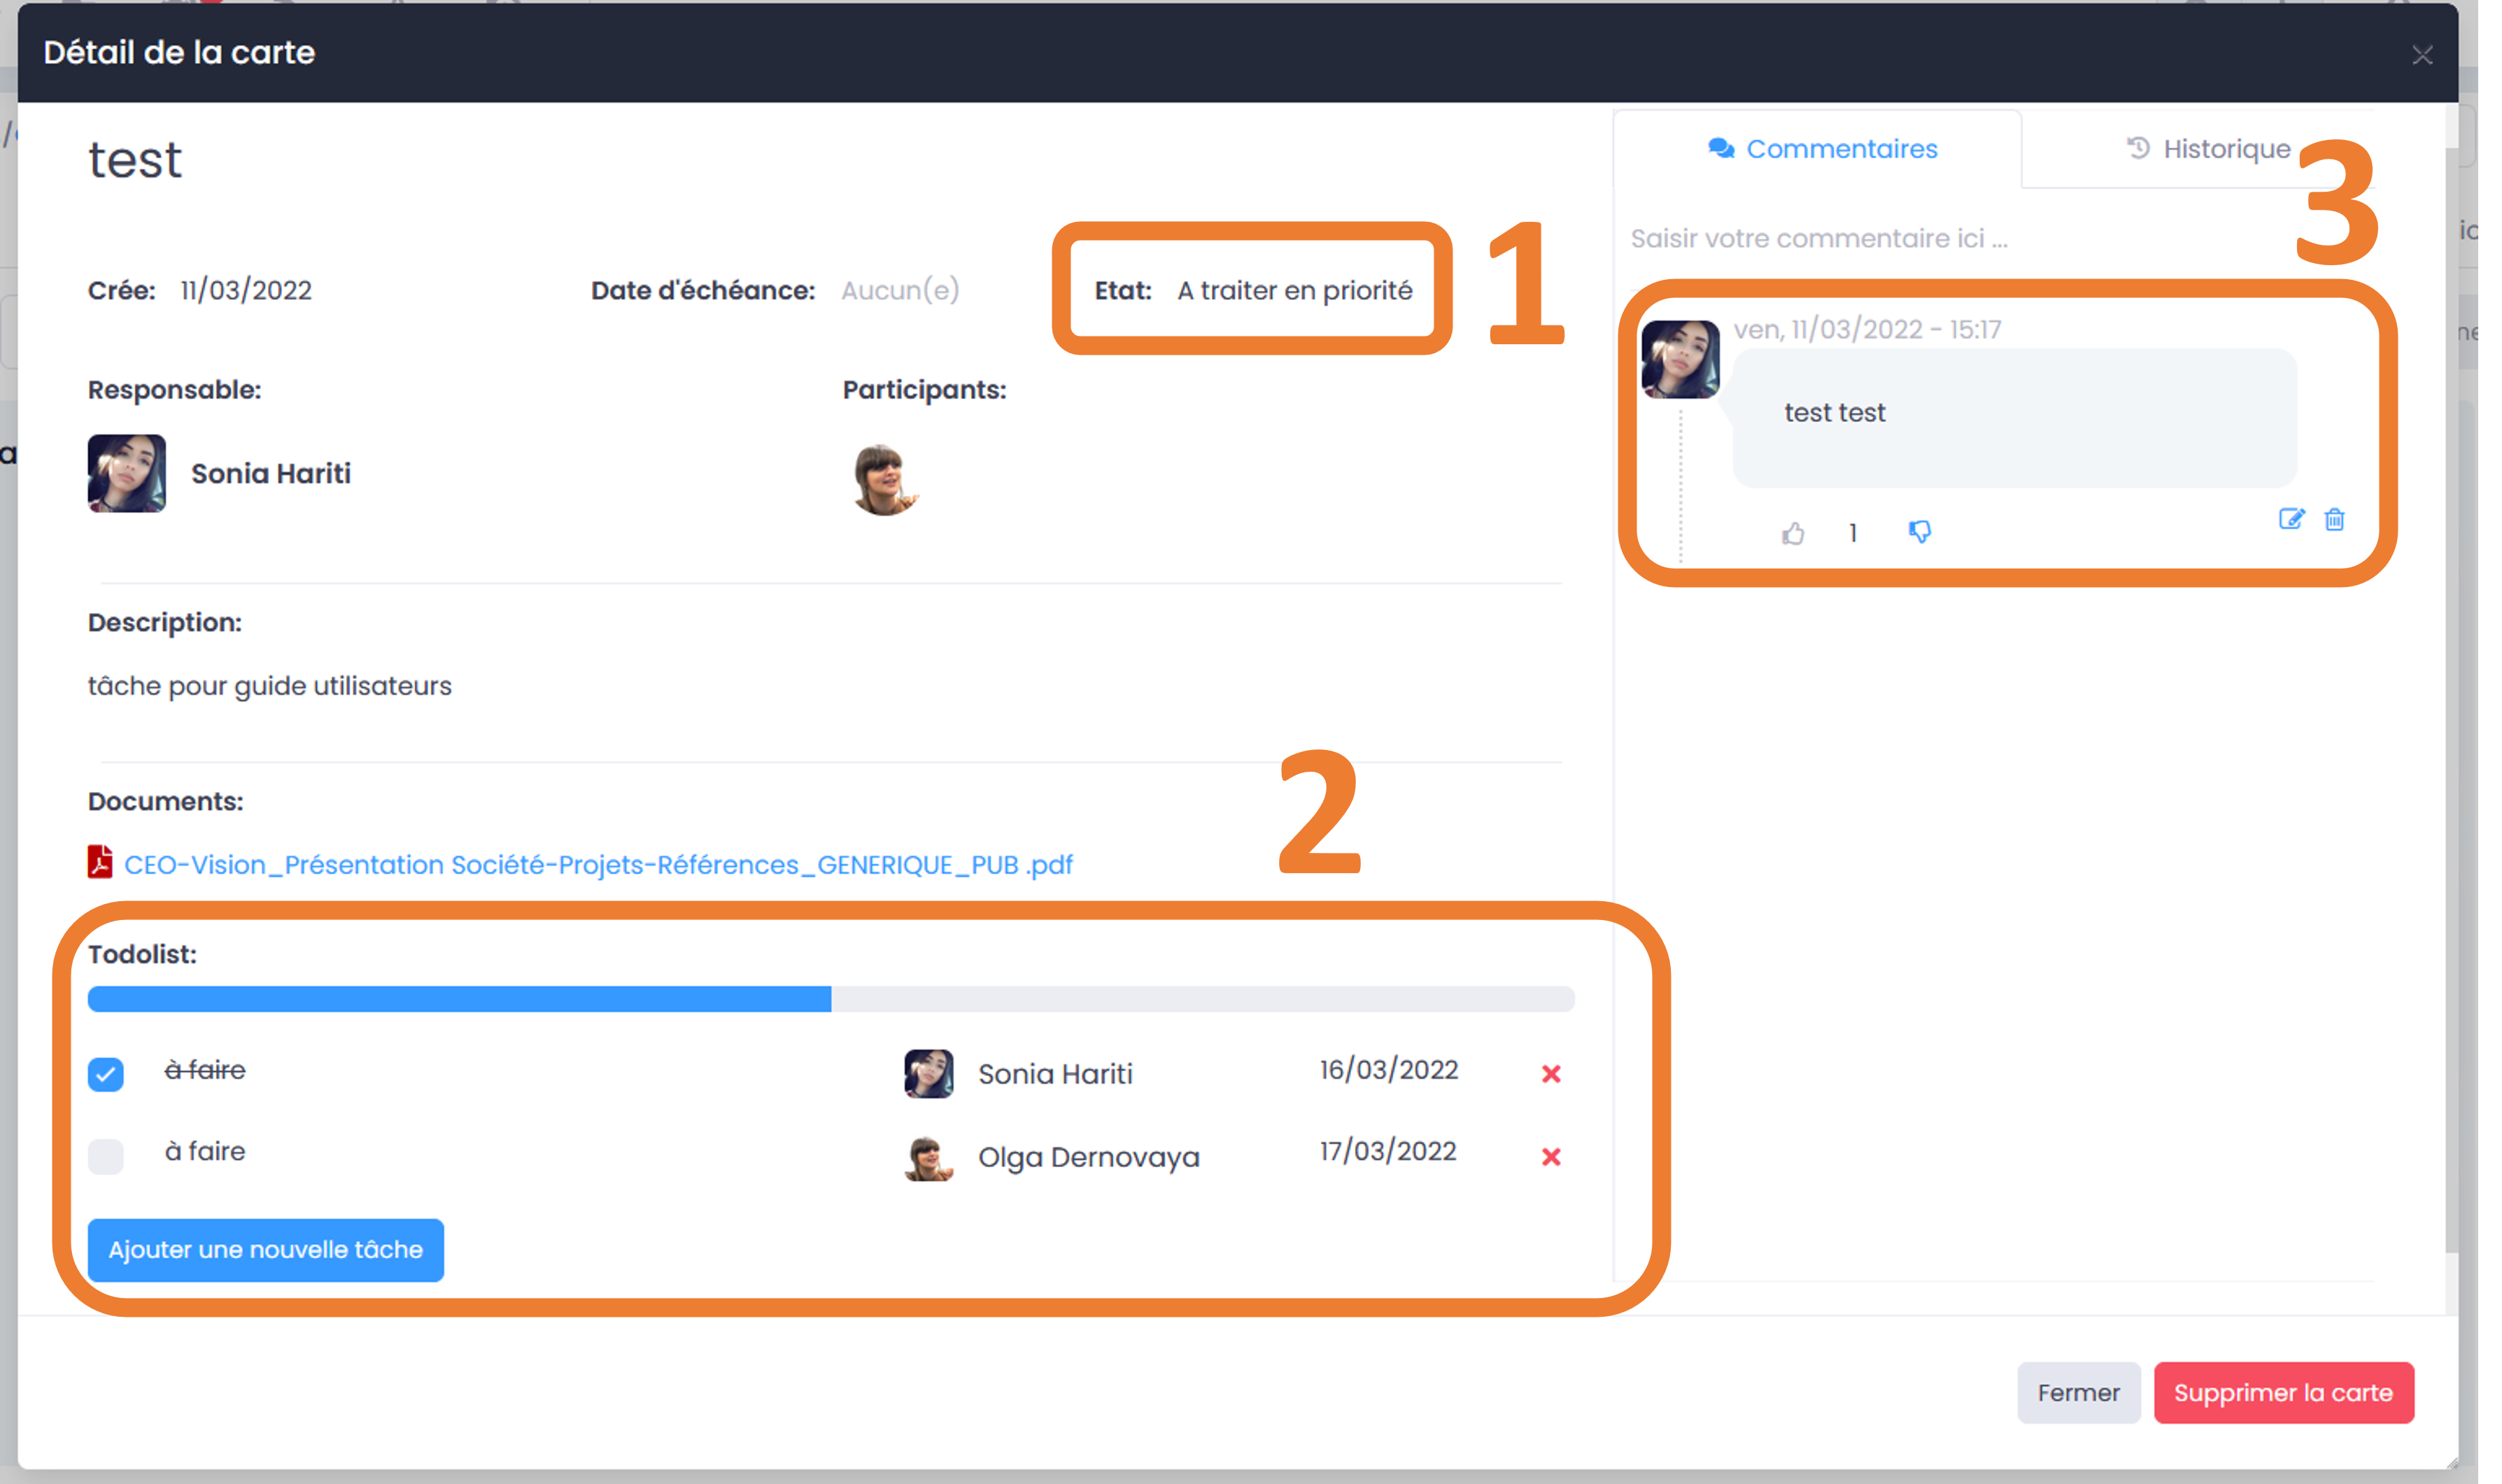
Note
In the Todolist section, Space members can indicate the completion of tasks by checking the boxes adjacent to the titles. This will make them appear in the GoFAST Calendar. Contributing members of the Space can also change the information on a Card.
Click on “Close” to exit the card.
Customize Kanban card colors
To customize your Kanban cards, simply click on the colored square next to the title of your card.
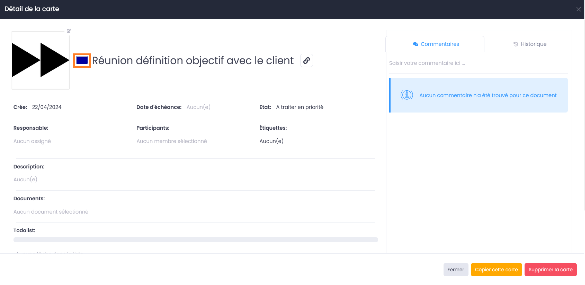
Once the color palette is open, select the color of your choice and apply it to your card. A colored border will be applied to the map.
Adding a cover image to Kanban cards
To add a cover to your Kanban cards, click on the pen icon at the top right of the default image, then click on “Upload file” (image). Finally, click on “Save” to apply the cover.
Duplicating Kanban cards
To duplicate a Kanban card, click on “Copy this card”, then click on “Confirm”.
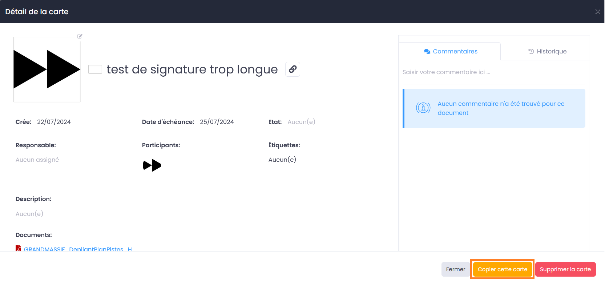
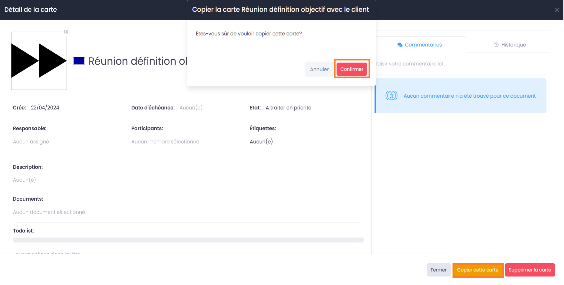
Deletion of the card
In order to delete a card, you must first open it, then click on “Delete” at the bottom of the card.
Deletion is only available to space administrators or the card creator.
Movement of a card
- Cards can be moved by dragging and dropping from one column to another, following the sequence of actions:
Click on the card without opening it, holding the click
Drag to the desired location and drop.
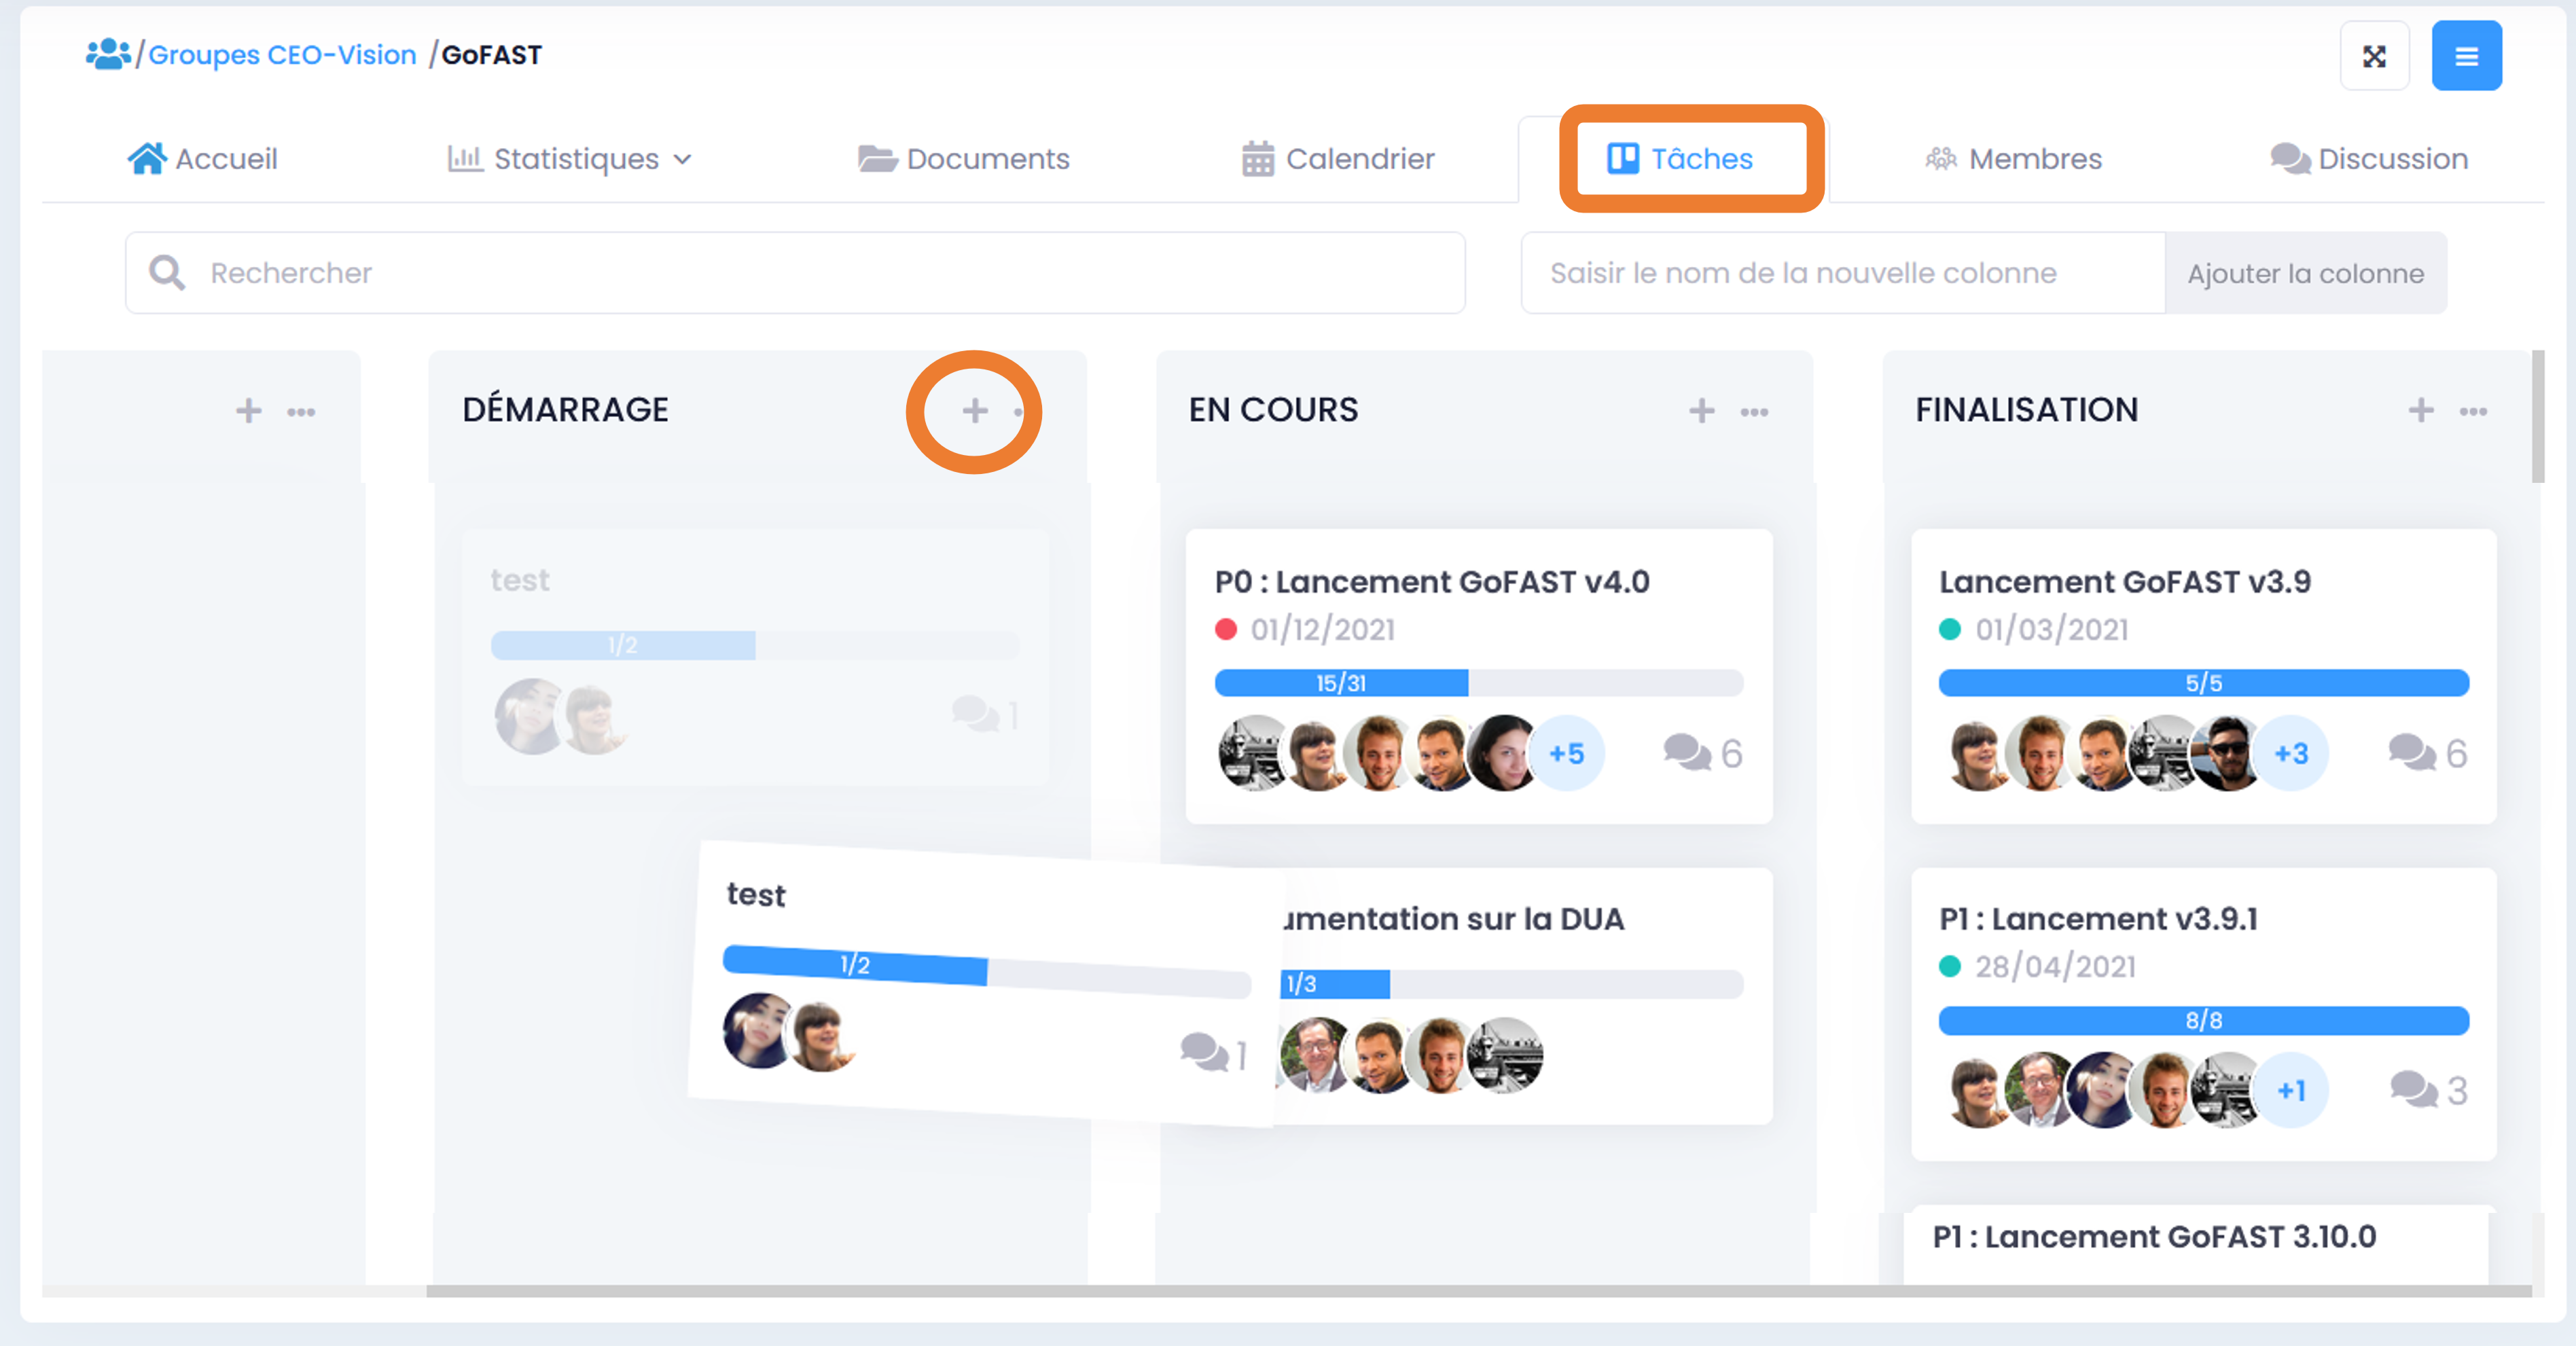
Displaying your cards (Kanban tasks)
Access to a Kanban card
The cards are visible to users who are members of the Space where they are located. You can access it:
From the “Task” or “Calendar” tab of a Collaborative Space or its Personal Space.
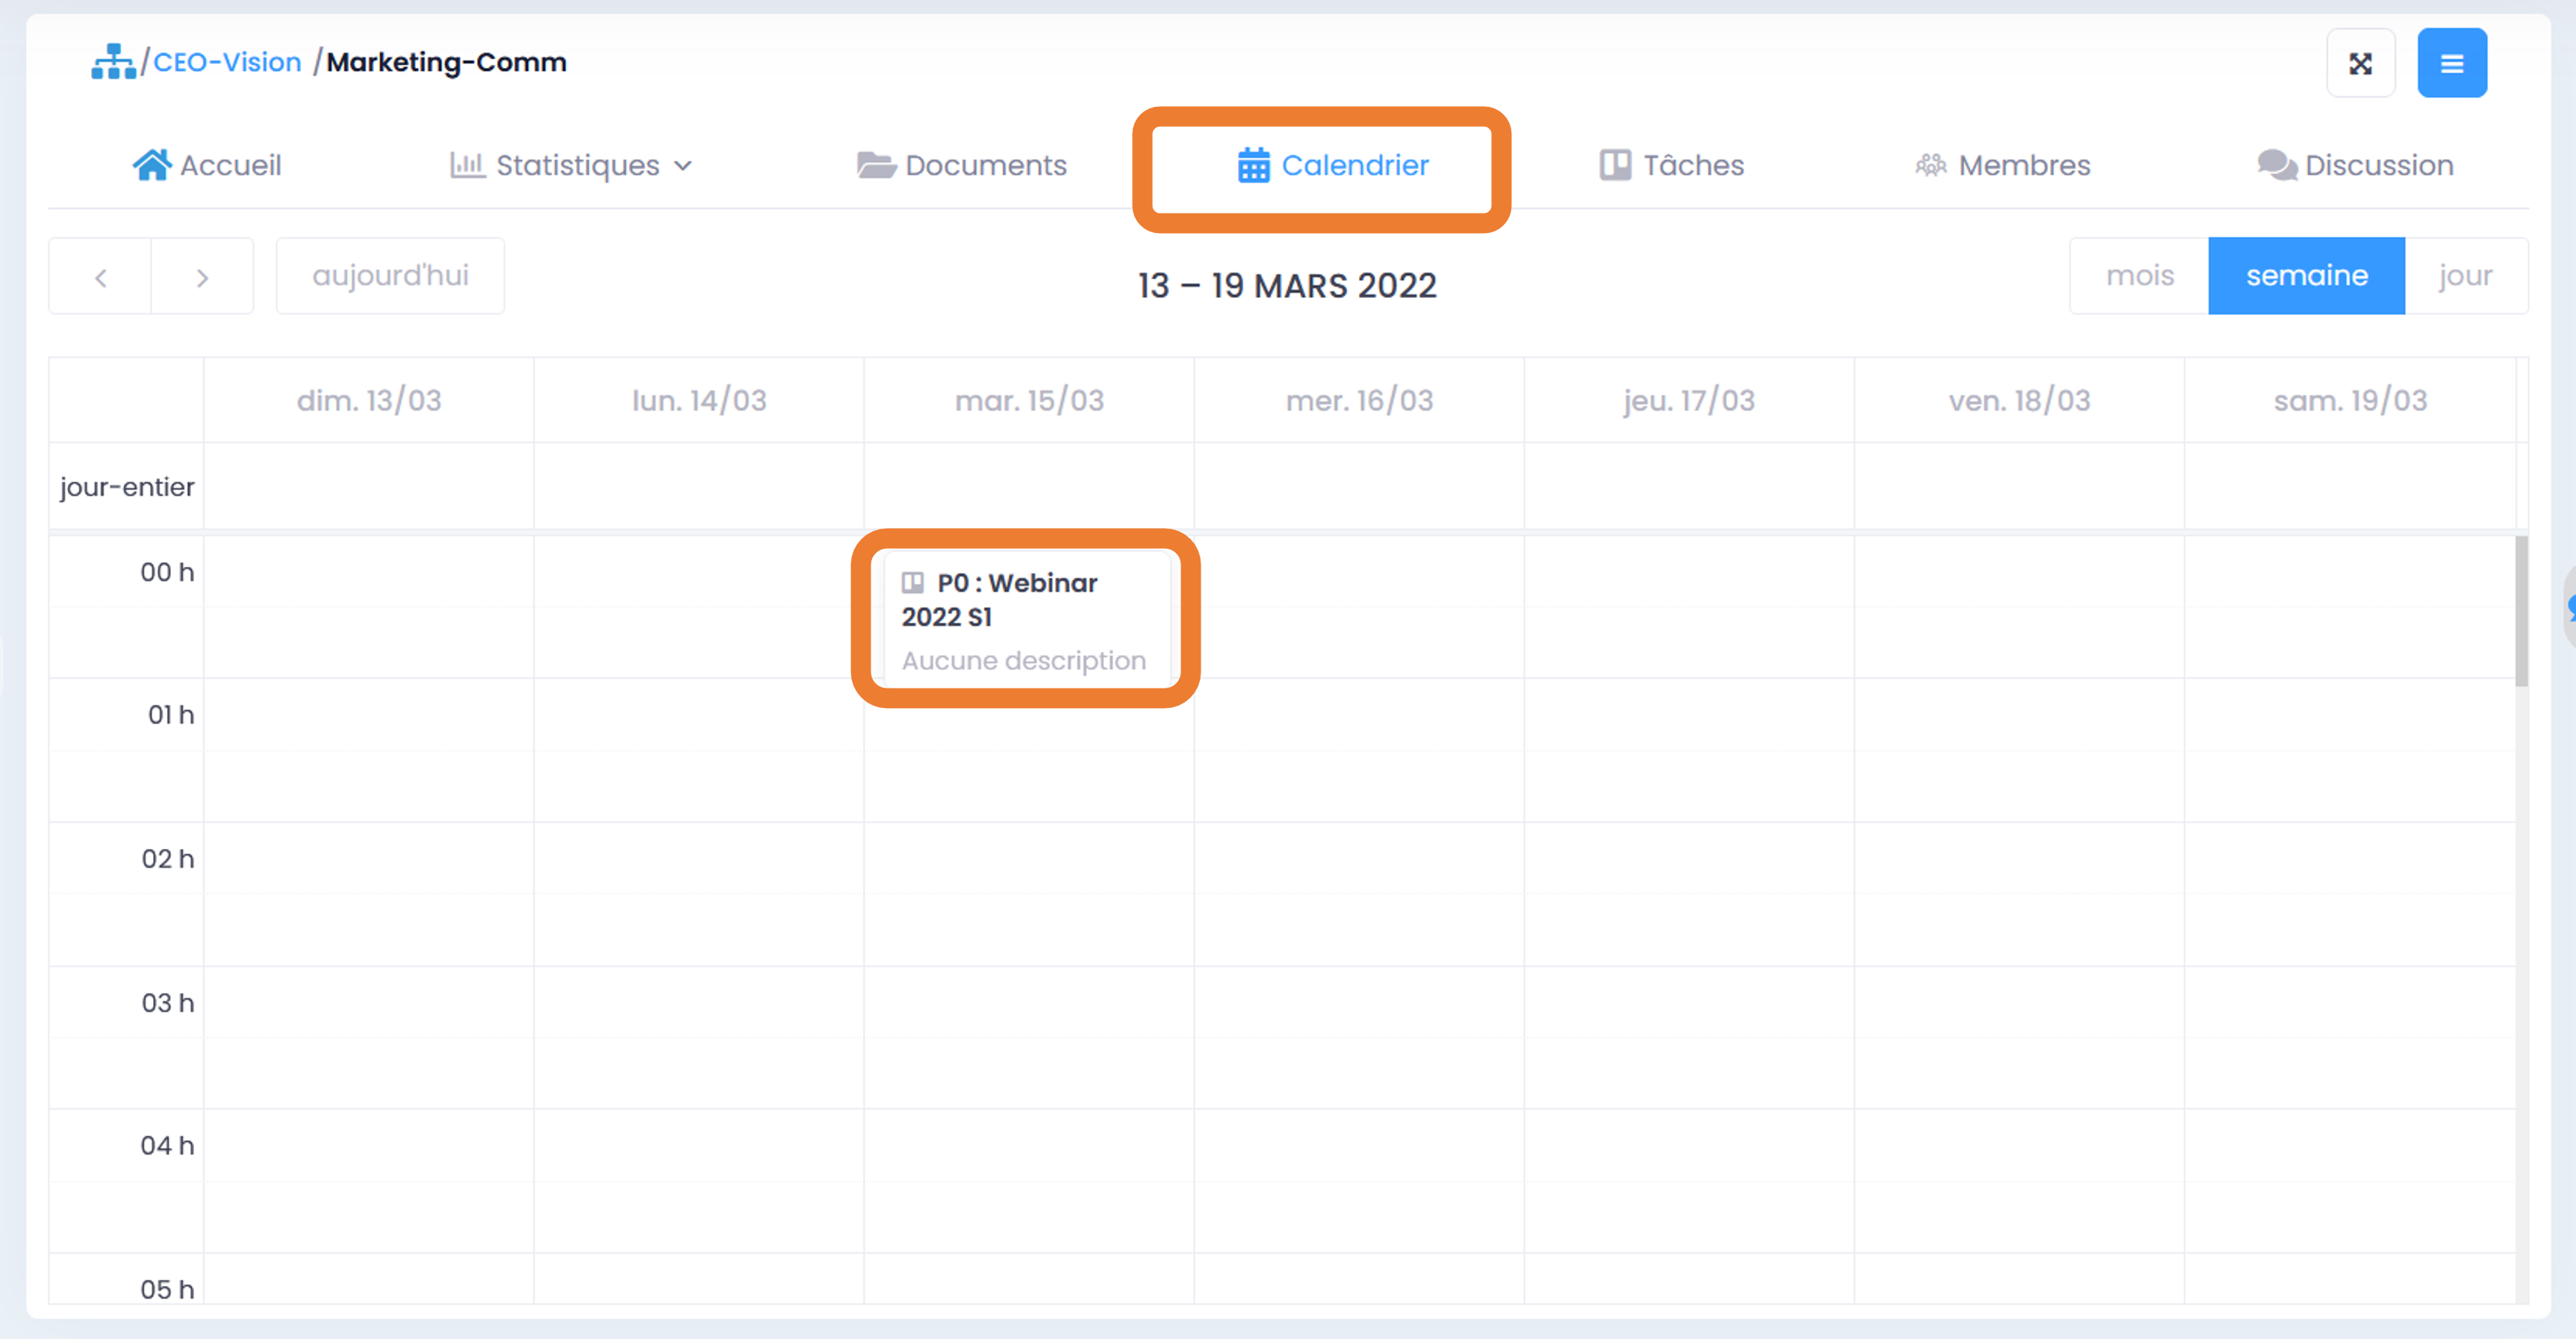
Note
The card and its sub-tasks will appear in the calendar on their due dates.
From the “workflows and tasks” icon in the quick access bar (top main menu), where there are only those tasks that you have been assigned to. To go to a task, click on the “i” icon at the bottom right of this task.
Note
The “Post-it” icon next to the map title allows you to differentiate between process tasks and collaborative tasks of Kanban.
From the search engine (including filter by type of content “tasks”).
Just click on the card to be redirected to the Kanban board, with the card open.
Filter of cards
GoFAST provides a search bar to filter cards, it is placed above the columns in the Kanban, on a Space page. The search is done only on the title of the card. Just type the title, the card will appear in the table and all others will become invisible.
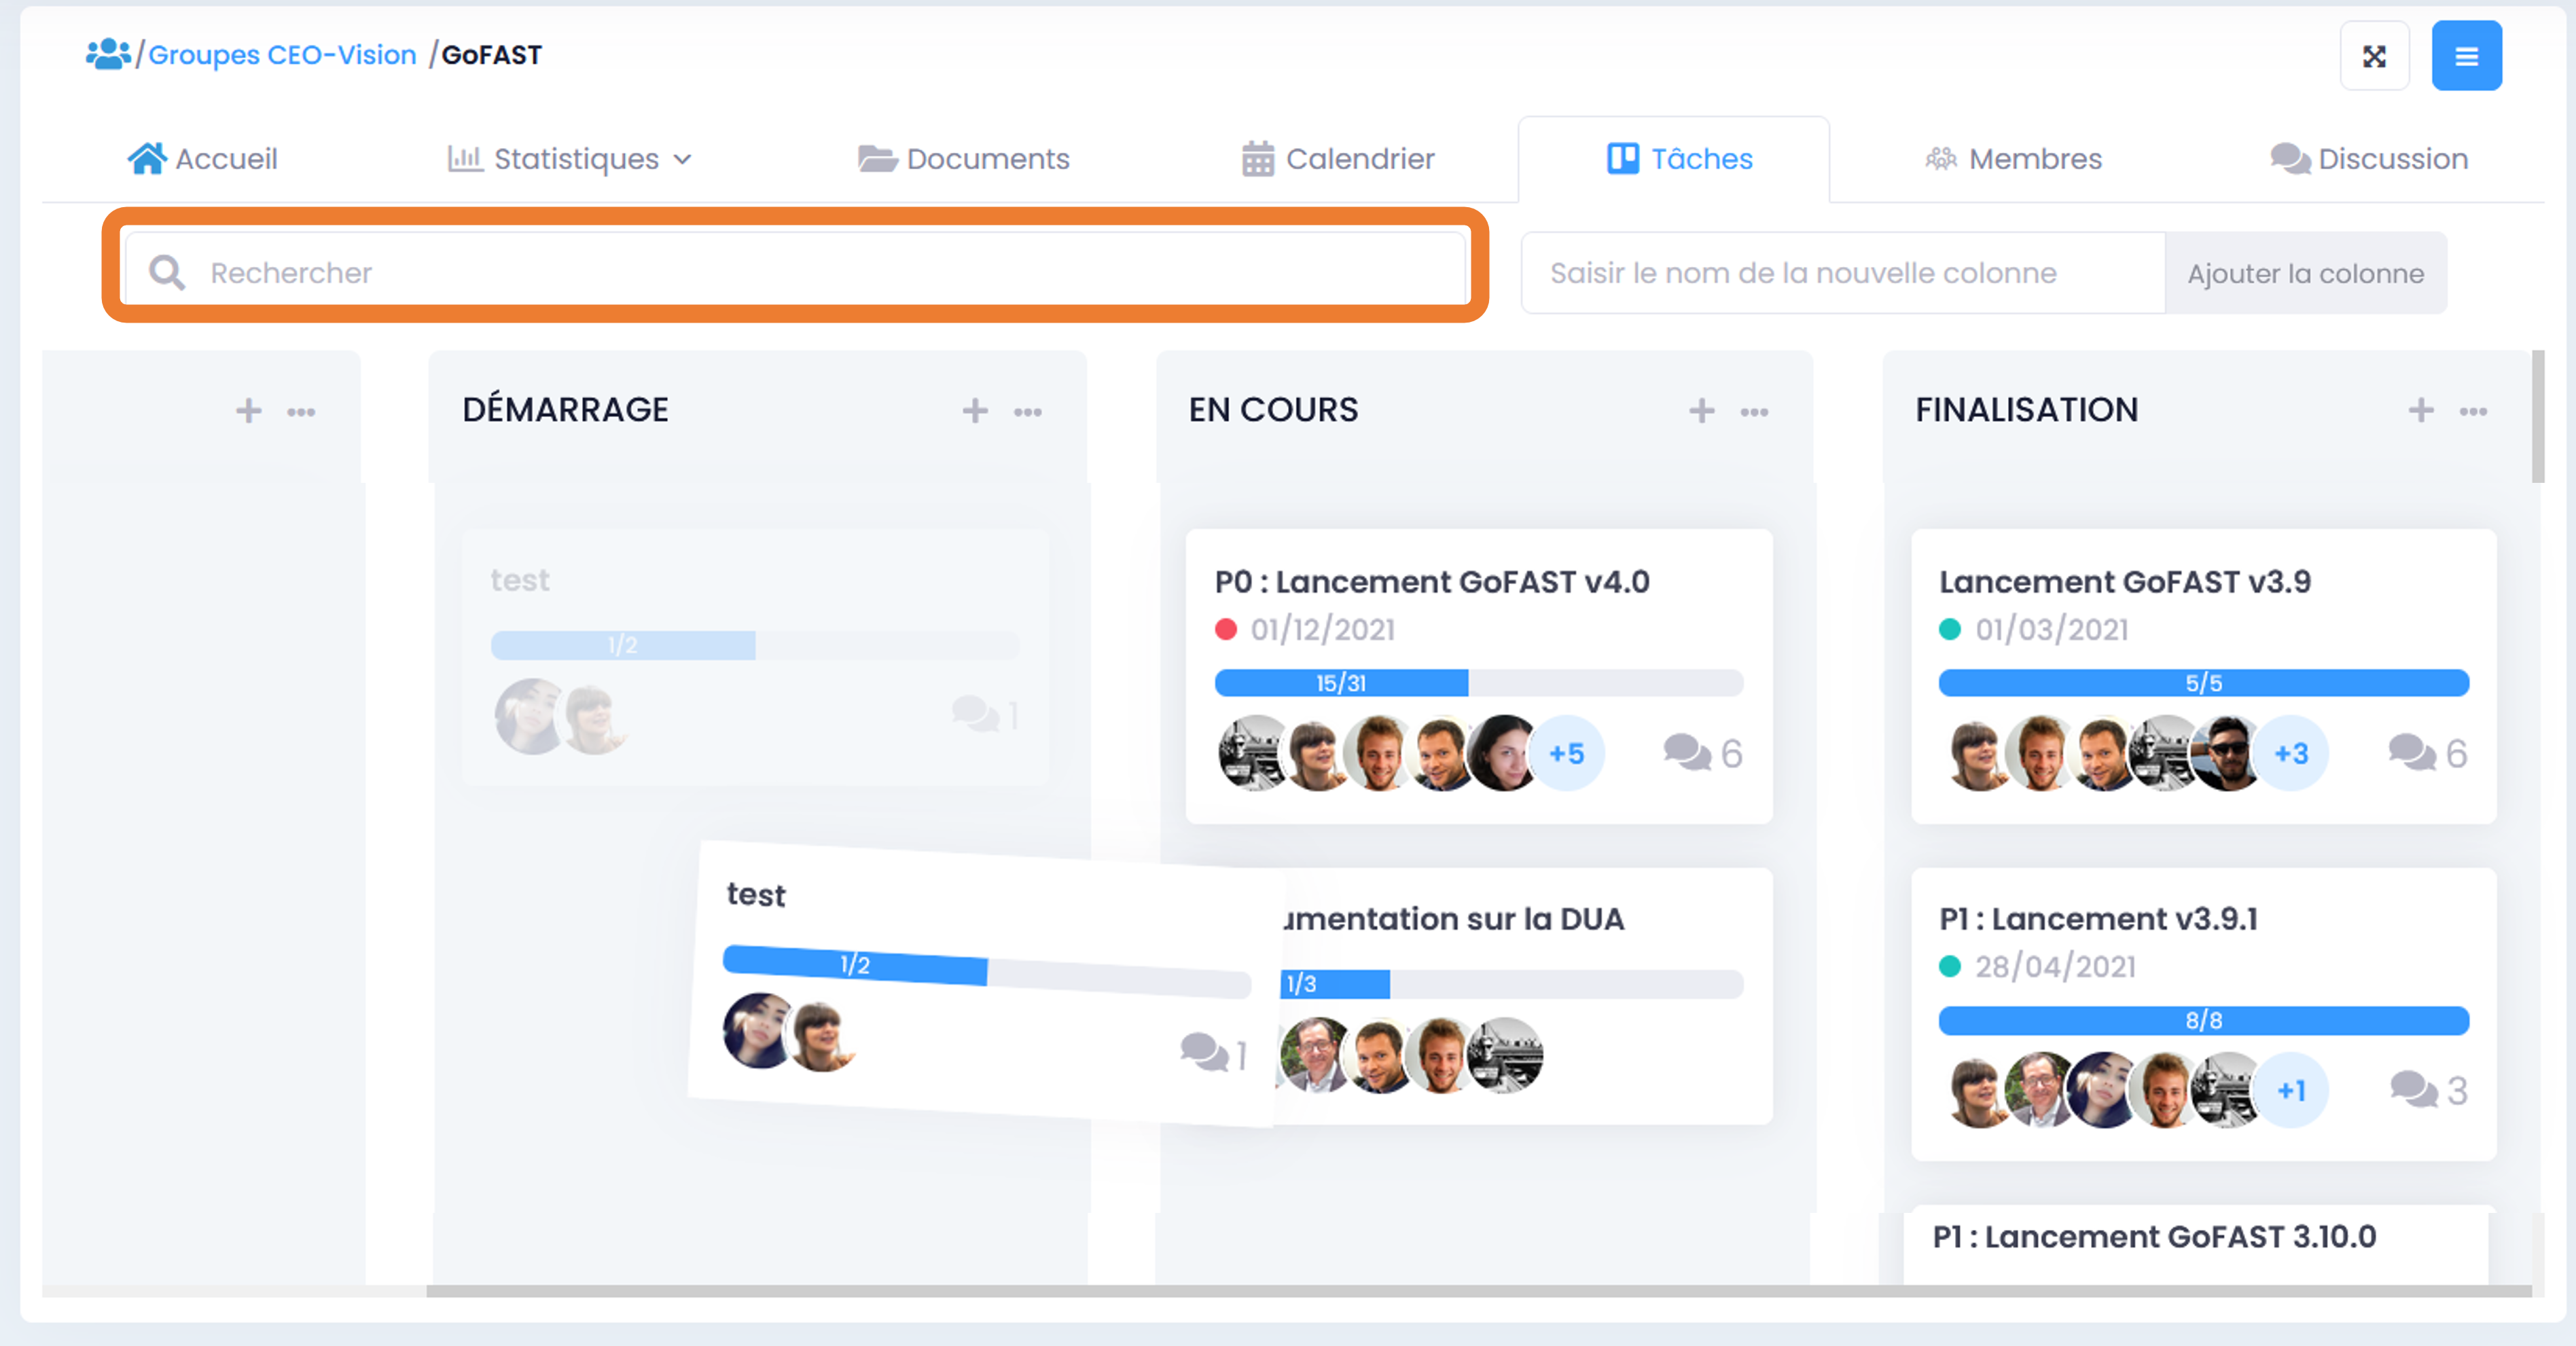
Permissions
To know the permissions on the management of columns and cards in a Kanban board, please refer to the section: «Table of permissions by roles»
Notifications
Notifications |
Responsable |
Participants |
Assigned to actions |
|---|---|---|---|
Card creation |
X |
X |
|
Task Creation (Todolist) |
X |
X |
X |
Card Deadline |
X |
X |
X |
Task Deadline (Todolist) |
X |
||
Comments on a Card |
X |
X |
X |
Note
The deadlines that are coming to an end are reminded in a summary email notification: the list of all the cards and tasks whose deadline is 24 hours away.
Forums and Wiki Pages
The forums
Objective of the forums: Share ideas, best practices and advice with members of one or more Collaborative Spaces, on one or more themes. The forums allow to preserve the exchanges and thus to constitute a knowledge base. This saves valuable time when information is needed, rather than constantly asking the same questions.
Visit to forum
Forums are available to all members of Spaces where these forums are shared, regardless of their role in those Spaces.
- In order to find the forum:
Through the left panel: click on “>” to expand the panel, then on the “Forums” tab at the bottom of this panel. You will see all existing forums that you have access to. You can filter the forum tree (summary) through the “Filter” field by entering the first letters of the forum name.
Via a search engine by entering keywords or doing an empty search, then filtering by “Forums” content type.
You have to click on the name of the forum to go to it.
Participation in a forum
All users with access can enrich the forum by sharing their comments.
- In order to share a comment in a forum:
Go to the forum page (see previous section).
Via the “Hamburger” menu, click on “New comment”.
OR click on the “arrow” icon under the forum introduction/description (message at the very top, under the forum title).
OR click on the “arrow” icon under a comment to reply to an existing comment.
You can then either delete (Recycle bin) or edit (pencil on sheet) your comment, as well as subscribe to/unsubscribe from this forum via the “Hamburger” menu. A message at the top right will appear indicating the publication of your new comment.
Only admins or Space members can create a forum. However, read-only members can post comments in existing forums. See also the section: “Creation of a forum”.
Wikis
Wiki objective: To share conference bases, good practices and advice with the members of a Collaborative Space, on one or more themes. This saves valuable time when you need information, rather than asking the same questions over and over again.
Going to Wiki
Wikis are accessible to all members of the Space where these Wikis are shared, regardless of their role in this Space.
- In order to find a Wiki:
Through the left pane: click on the “ >” to expand the pane, then on the “Wiki” tab at the bottom of the pane. You will see all the existing Wikis you have access to. You can filter the tree (the summary) of Wikis via the Filter field, by entering the first letters of the name of the Wiki.
Through the file explorer, “Documents” tab on the Space page, in the “Wiki” folder
Via the search engine, by entering keywords or by doing a blank search, then filtering by “Wiki” content type.
You have to click on the name of the Wiki to go to it or double-click if it’s from the file explorer.
Participation in a Wiki
All users with access can post comments on the Wiki.
- In order to share a comment in a Wiki:
Go to the Wiki page (see previous section).
Via the “Hamburger” menu, click on “New comment”.
Via the “Comments” tab in the information block of the Wiki: click on “New comment” OR click on the “arrow” icon under a comment to reply to an existing comment.
You can then either delete (recycle bin) or edit (pencil on sheet) your comment, and subscribe to/unsubscribe from this wiki via the Hamburger menu. Only admins or members of Space can create Wikis. However, read-only members can post comments on existing wikis.
Please also refer to the section: “Creation of a Wiki page”
Notion of Wiki Book
A Wiki Book is a collection of Wiki articles. All Wikis created in a Space are listed as pages in the Wiki Book of that Space. You can easily navigate from one Wiki to another via the left pane, “Wikis” tab.
Please also refer to the section: “Creation of a Wiki page”
Instant Messaging / TChat (Enterprise only)
GoFAST includes a real-time chat/conversation tool (based on “Element” formerly Riot Matrix) similar to MS-Teams and Slack. But, unlike these two competing solutions, you know exactly where your data is stored, in a sovereign datacenter or in your datacenter depending on the hosting chosen by your Organization/Company.
Note
Element is a free instant messaging software and it is the technology used by the French State (under the name of Tchap) and Thales (under the name of Citadel Team).
The tool allows person-to-person discussions or forums bringing together several users around the same theme. These exchanges can be text messages, images or audio/video conferences.
Access the Tchat
- Chat is accessible in several ways:
Via the right pane: click on the “chat bubble” icon or on one of the rooms represented by a circle image, to unfold the pane. Very practical if you need to discuss without leaving the page of a document for example.
On the space page, “Chat” tab (if the room has been activated)
In the main menu on the left, click “Chat” to open the chat in full screen mode.
From an application that will be installed on your PC or Smartphone: See Chat Application on PC/Smartphone
Organization of chat rooms
A chat room is normally associated with a Collaborative Space. In this case, all members of this Space have access to this room.
It is the space administrator who can decide to associate a room with the space. However, some chat rooms linked to Collaborative Spaces are created automatically (the first levels of Organization-type Spaces).
- The Chat is separated into several areas:
the “favorite” rooms area: if you have indicated favorites for certain rooms, they will be in the top area in the room column.
the area reserved for conversations between 2 users (2nd area if you have favorite rooms, or 1st area).
the room zone you are a member of (the last zone in the room column).
Note
To create a private room with a particular user or create a chat room not linked to a Space, you must click on the + in the room column.

- To select the room, click in the corresponding circle, then:
start typing (fields at the bottom of the Tchat).
Note
If you want to assign a specific user in the room, start with @, then the first and last name of the person, the latter will receive a special notification - initiate a web conference (audio or video), through the icons at the very top of the Tchat. If the meeting already exists, you can click “detach” to open the full page web meeting in a new tab.
Note
It is the room administrator (therefore the space administrator) who initiates the first web conference.
PC / Smartphone chat application
It is necessary to download the “Element” application to have access to Tchat via your Smartphone. Links to download the application:
Windows PC: https://packages.riot.im/desktop/install/win32/x64/Element%20Setup.exe
Mac PC: https://packages.riot.im/desktop/install/macos/Element.dmg
Smartphone App Store: https://apps.apple.com/app/vector/id1083446067
Google Play smartphone: https://play.google.com/store/apps/details?id=im.vector.app
F-Droid smartphone: https://f-droid.org/packages/im.vector.app/
- To access your chat via the application:
Enter the URL of your server, on the template: https://XXXXXX-comm.YYYYYYYYYY.com/ (copy the URL from your PC and add “-comm” before the “.”)
Enter your GoFAST credentials (same as when you log in to GoFAST).
Do not hesitate to ask your questions on the GoFAST community forums: https://community.ceo-vision.com/
Meetings / Web conferencing (Enterprise only)
GoFAST includes Jitsi Open Source Web Conferencing technology, an alternative to MS-Teams and Zoom. However, with Jitsi, your data remains on your GoFAST in your datacenter or in sovereign SaaS. It is possible to make web conferences with dozens of participants without quality problems. Jitsi also works through the Element app for Android and iOS.
When creating a meeting, you can choose to activate the waiting room.
Find a Meeting/Webconference
- To find a meeting / web conference, there are several options:
From the “Calendar” tab of your personal space or a collaborative space (if the meeting is linked to this Space).
Via the search engine
On your Dashboard (if “My Meetings” block is displayed)
Via your email tool (e.g. Bluemind, Outlook): meetings where you are invited to are notified by email with a calendar invitation.
Via the notification sent by email
Once you find the meeting, you can click on it and see the details (participants, organizer, related documents or folders, description, etc.).
Join a Meeting / Webconference
On the meeting page or email notification, you can click “Join” to go to the web conference page.
- On the first confirmation page, you can:
Choose/activate the microphone,
Choose/activate the camera,
Customize your name/ID,
Click on “Join meeting”.
Note
On the web conference page, at the top you have the name of the meeting, the number of participants present and the performance parameters.
- In a web conference, you can, in particular:
On the left you have thumbnails of all meeting participants, you can select the thumbnail of the person you want to see in full screen mode (especially if that participant is sharing a screen).
At the bottom of the page, you can turn the microphone and camera on or off by clicking on the icons.
At the bottom of the page, you can do a screen share. To do this, click on the icon, a window opens, you choose what you want to share (the whole screen, the window, a tab, etc.) then click on Share. You can stop sharing at any time by clicking on the “Stop sharing” button.
At the bottom of the page, the “little hand” allows you to raise your hand if you wish to speak.
Through the “participants” icon, you can see all the participants in the meeting and invite others if needed.
At the bottom of the page, you can turn on or off the mosaic view (for full screen or thumbnails).
At the bottom of the page, via the “…” icon , you can perform other available actions (e.g. recording the meeting, turning off the microphone of all other participants, if you are the organiser).
- To record a meeting:
The first participant to connect to the web conference can record the meeting (because they are considered as the organizer of the web conference.
Click on the three dots at the bottom of the screen (the actions menu).
Click on “start recording”. A voice message indicates at this time that a recording is launched.
Once the meeting is over, click on three dots again and then on “Stop recording”. A confirmation request is displayed, you validate after you hang up to close the webconference.
Go to your personal space on GoFAST to find the video file of the meeting.
Edit a Meeting
Only the user who created the meeting, or the administrator of the Space that the meeting is associated with, can edit it. To edit a meeting:
Go to the meeting page (via search, activity feed, or your calendar).
Click on the “Hamburger” menu of the meeting, then “Edit this meeting”
Once you save the changes, you and the participants will receive the changes (e.g. if the date or time has been updated).
To find out how to create a webconference, please refer to the section: “Creating a Meeting/Webconference (Enterprise only)”
Forms
Objective of the forms: Collect opinions, ideas, carry out a survey on a predetermined subject… the forms allow you to create questionnaires with various fields (dates, text, checkboxes, drop-down lists…) and distribute them to users. Once the forms have been completed by GoFAST users, it is possible to view and analyze the results.
Please also refer to the section: “Create a Form”
How to Find/View a form
Activity feed (if webform has been created, modified or commented recently).
In the calendar of one of the Spaces where the webform is located or in its personal calendar (if a deadline has been added to this webform).
Via keyword search, a “blank” search (= without keyword) and search filters, in particular by type of “webform” content
In their favorite content (if the webform has been added to it beforehand)
Note
Une fois que votre formulaire est créé, vous arriverez sur la page du formulaire. C’est sur cette page qu’arriveront les utilisateurs qui rempliront votre formulaire. Pour l’instant, elle est vide et tant que vous n’aurez pas publié votre formulaire, personne ne pourra le remplir. En tant que créateur du formulaire, vous avez la possibilité d’accéder aux onglets “Modifier, “Dashboard” et “Résultats”. Les administrateurs de l’espace dans lequel est ce formulaire y ont également accès.
This takes you to the “Form” page:
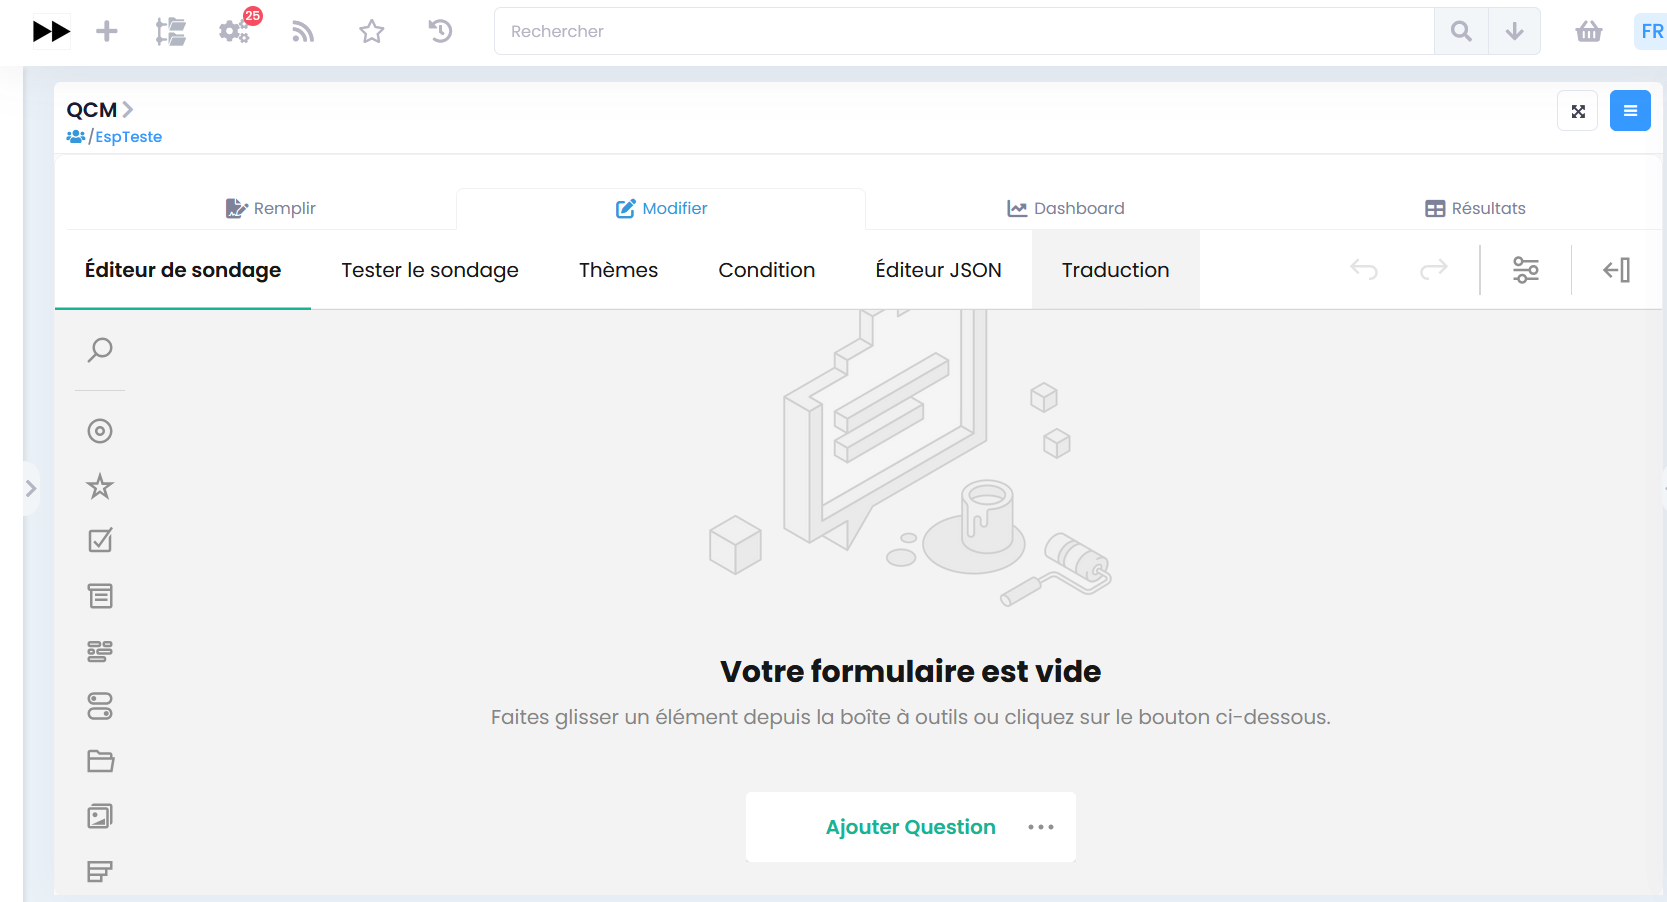
Le formulaire créé dispose de l’état “Non publié”, c’est à dire que les utilisateurs ne peuvent pas encore soumettre le formulaire. Intéressons nous maintenant à l’onglet “Modifier” qui va permettre d’ouvrir l’outil de “Création” de formulaire :
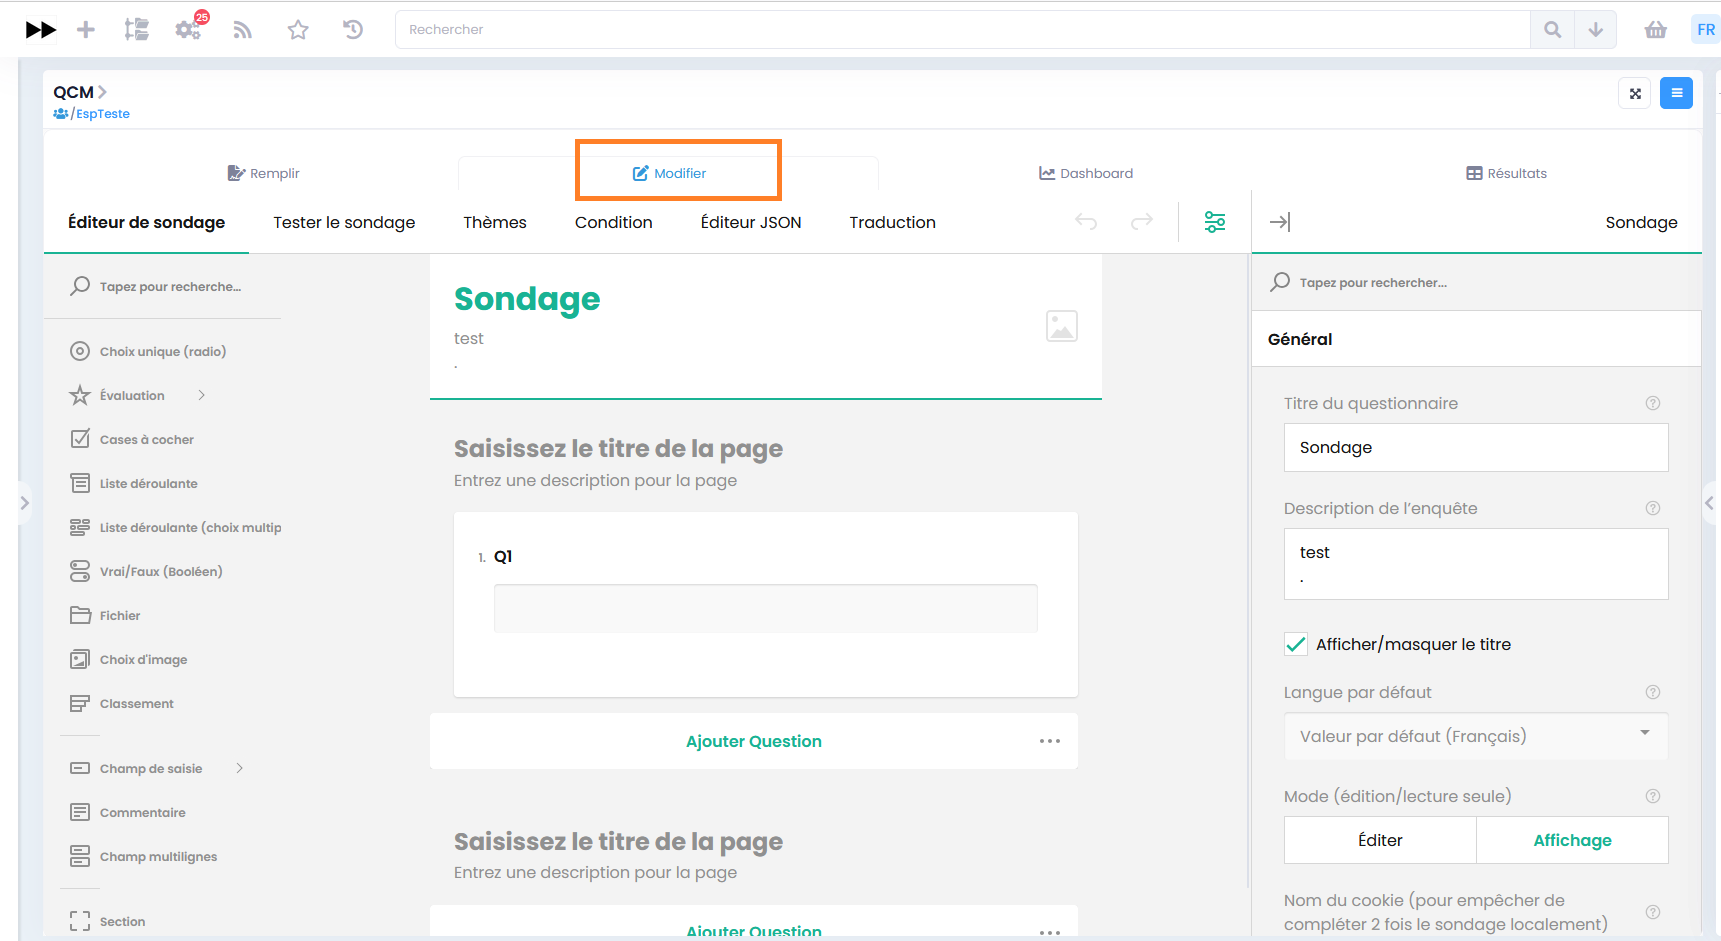
On the left we have all the tools for creating a form:
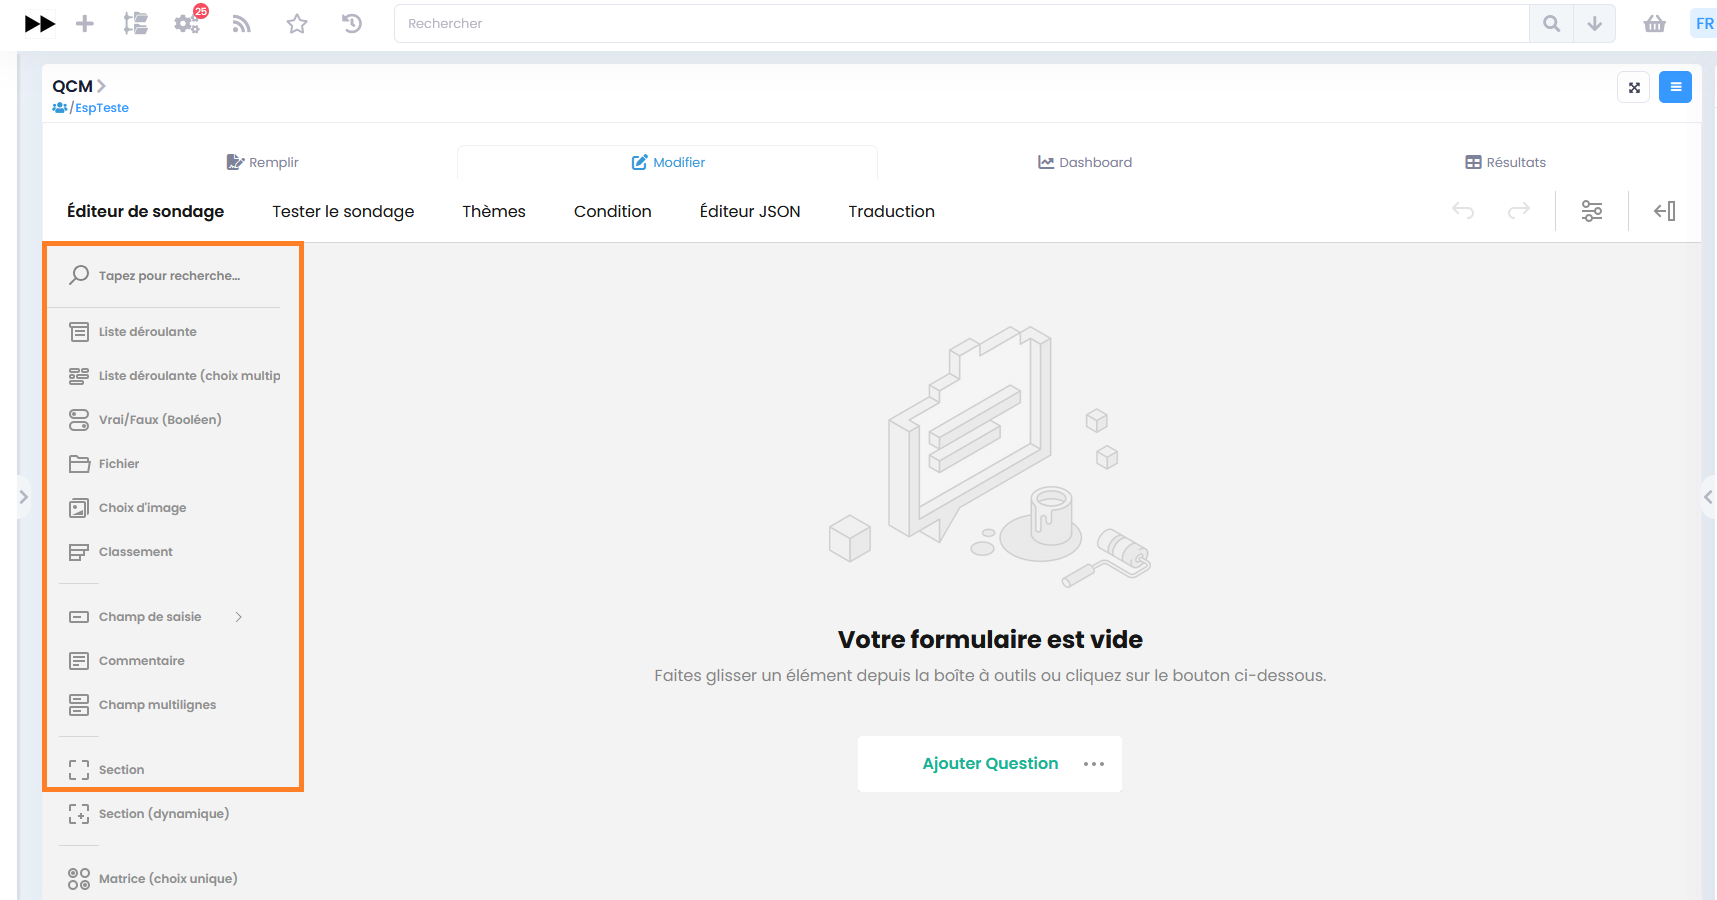
En haut , nous avons 6 onglets : “Editeur de sondage”, “Tester le sondage”, “Thèmes”, “Condition”, “Editeur JSON” et “Traduction”:
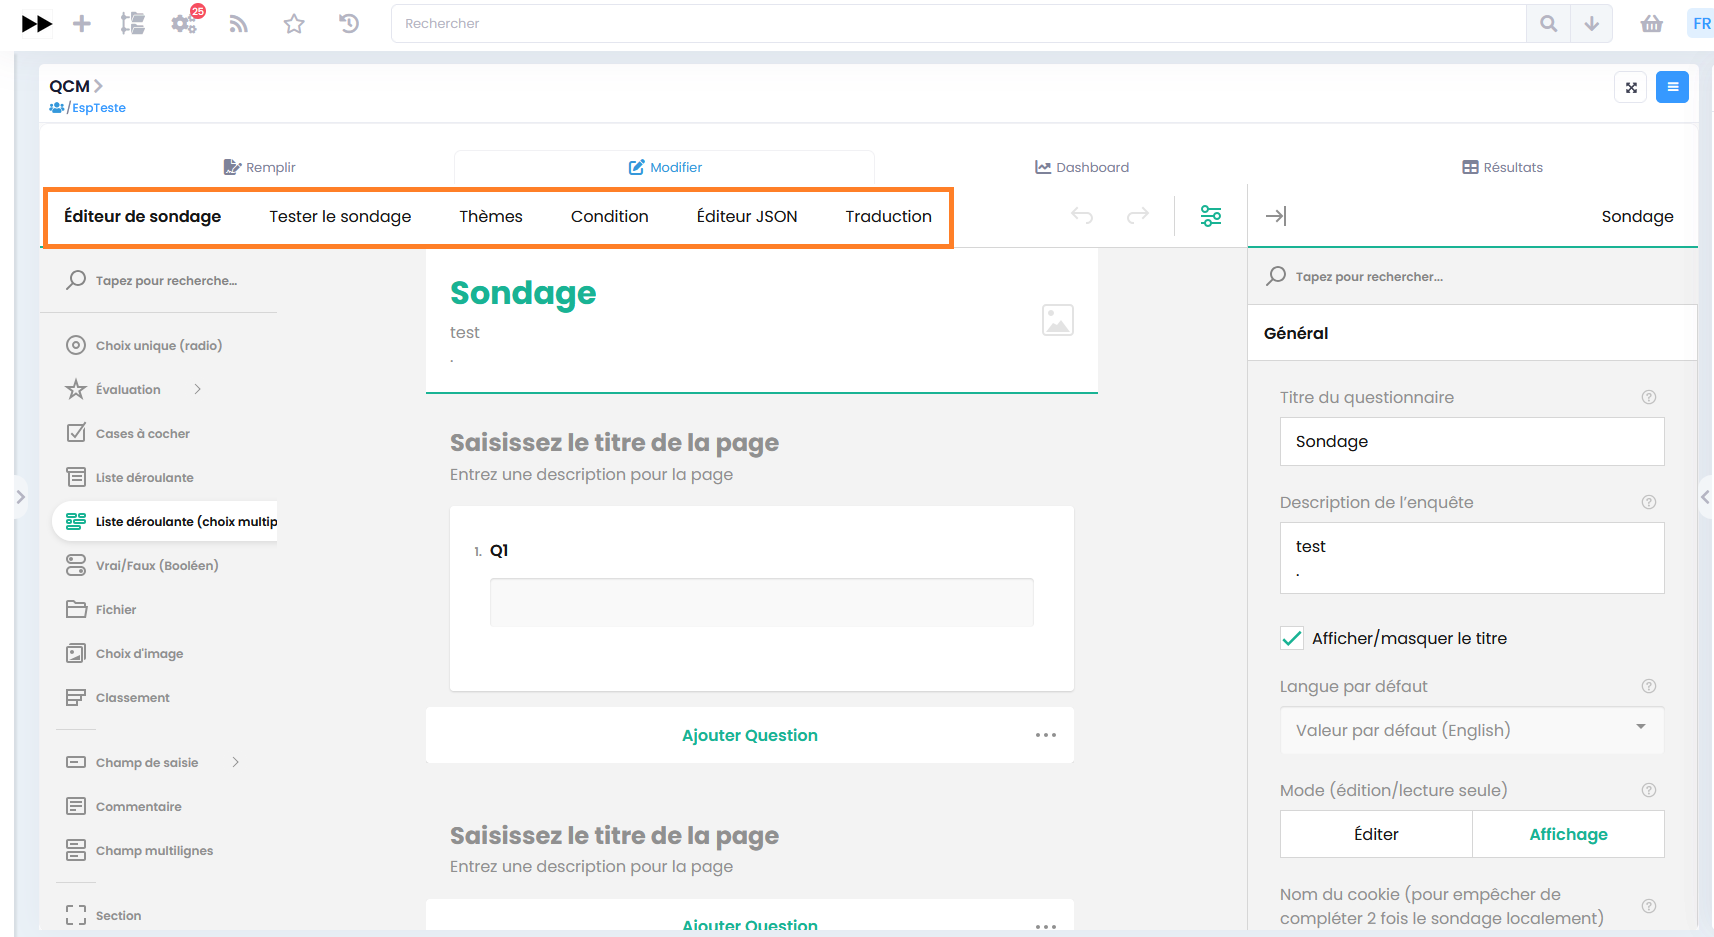
Le premier est l’onglet de création du formulaire
The second gives you a visual view of the survey being created, so you can make any necessary adjustments before publishing.
The 3rd allows you to create a fully customized theme that will override the form’s default theme.
Le 4ème onglet sert à définir des règles dans le formulaire
Le 5ème onglet sert à importer ou exporter les formulaires au format JSON
The 6th tab is for translation.
On the right we have all the options for the various form tools (when clicked), as well as the form’s global parameters:
Global parameters:
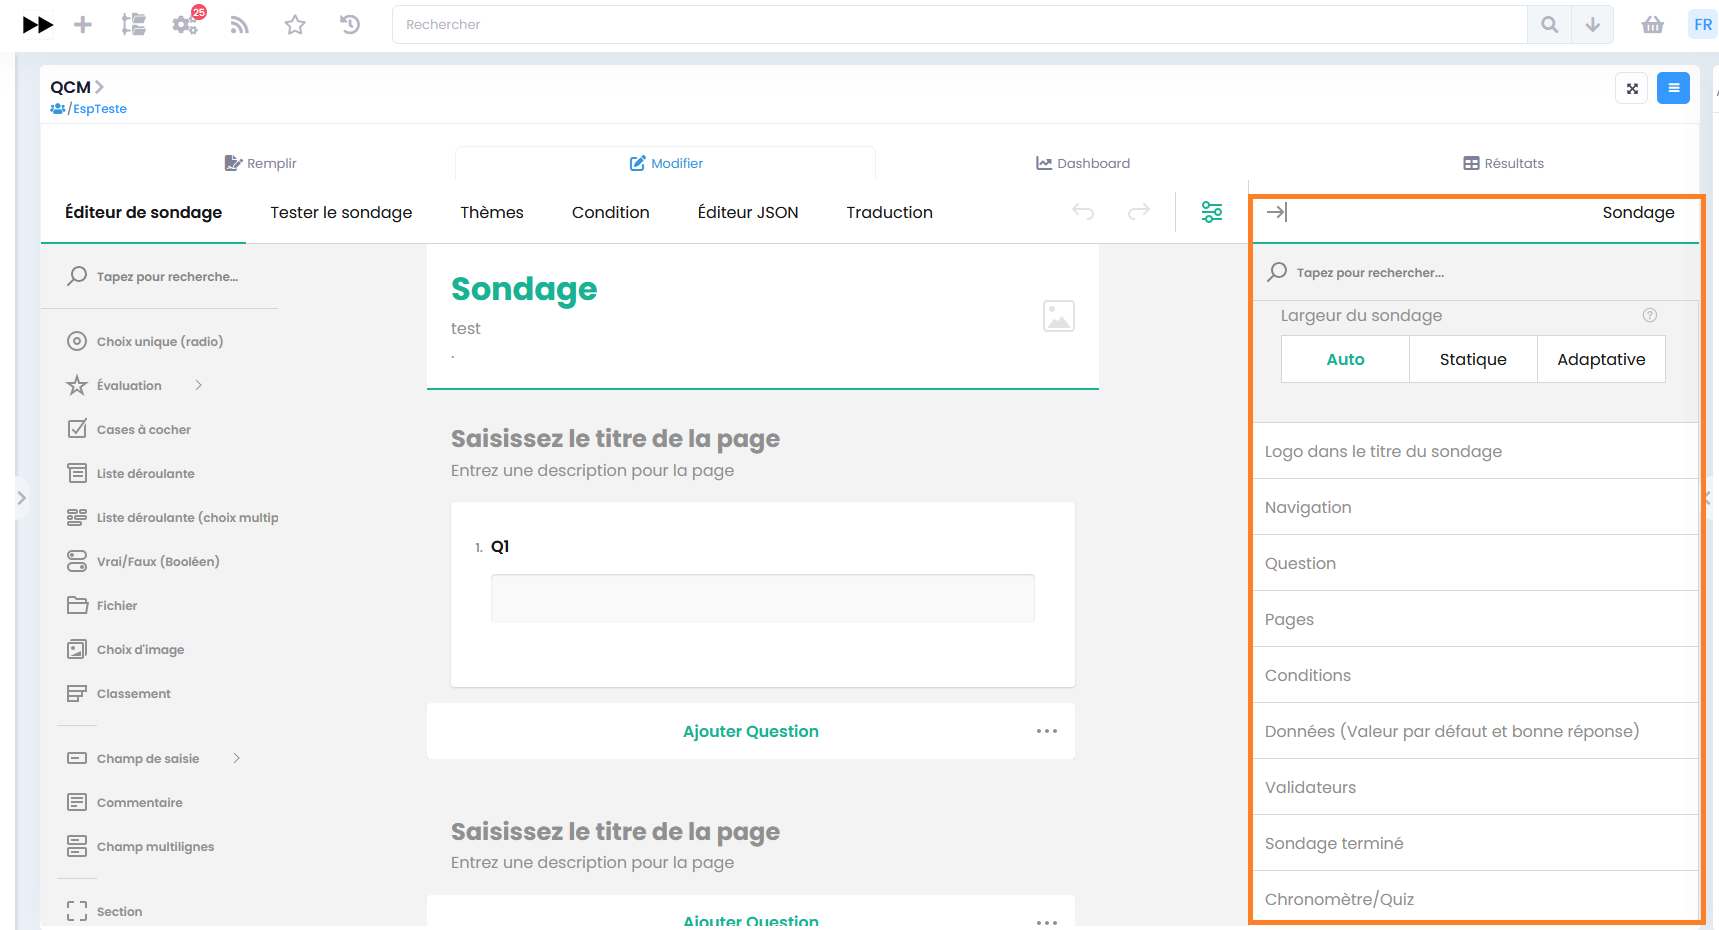
Paramètre d’un widget:
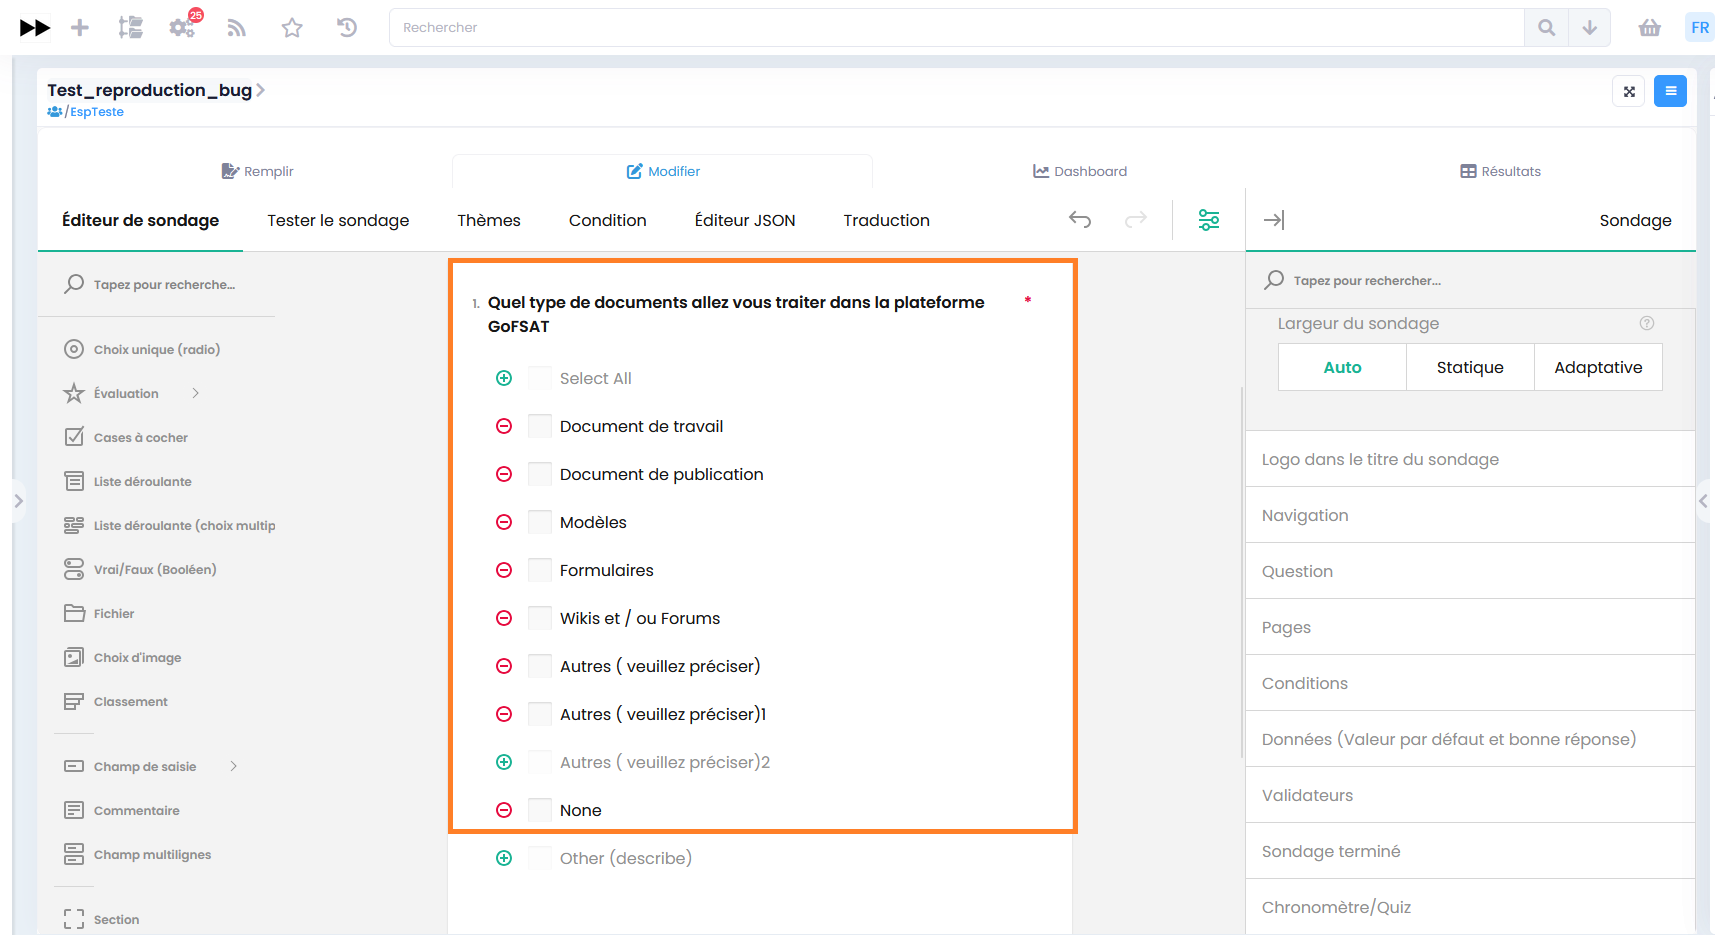
Publication d’un formulaire
Global parameters:
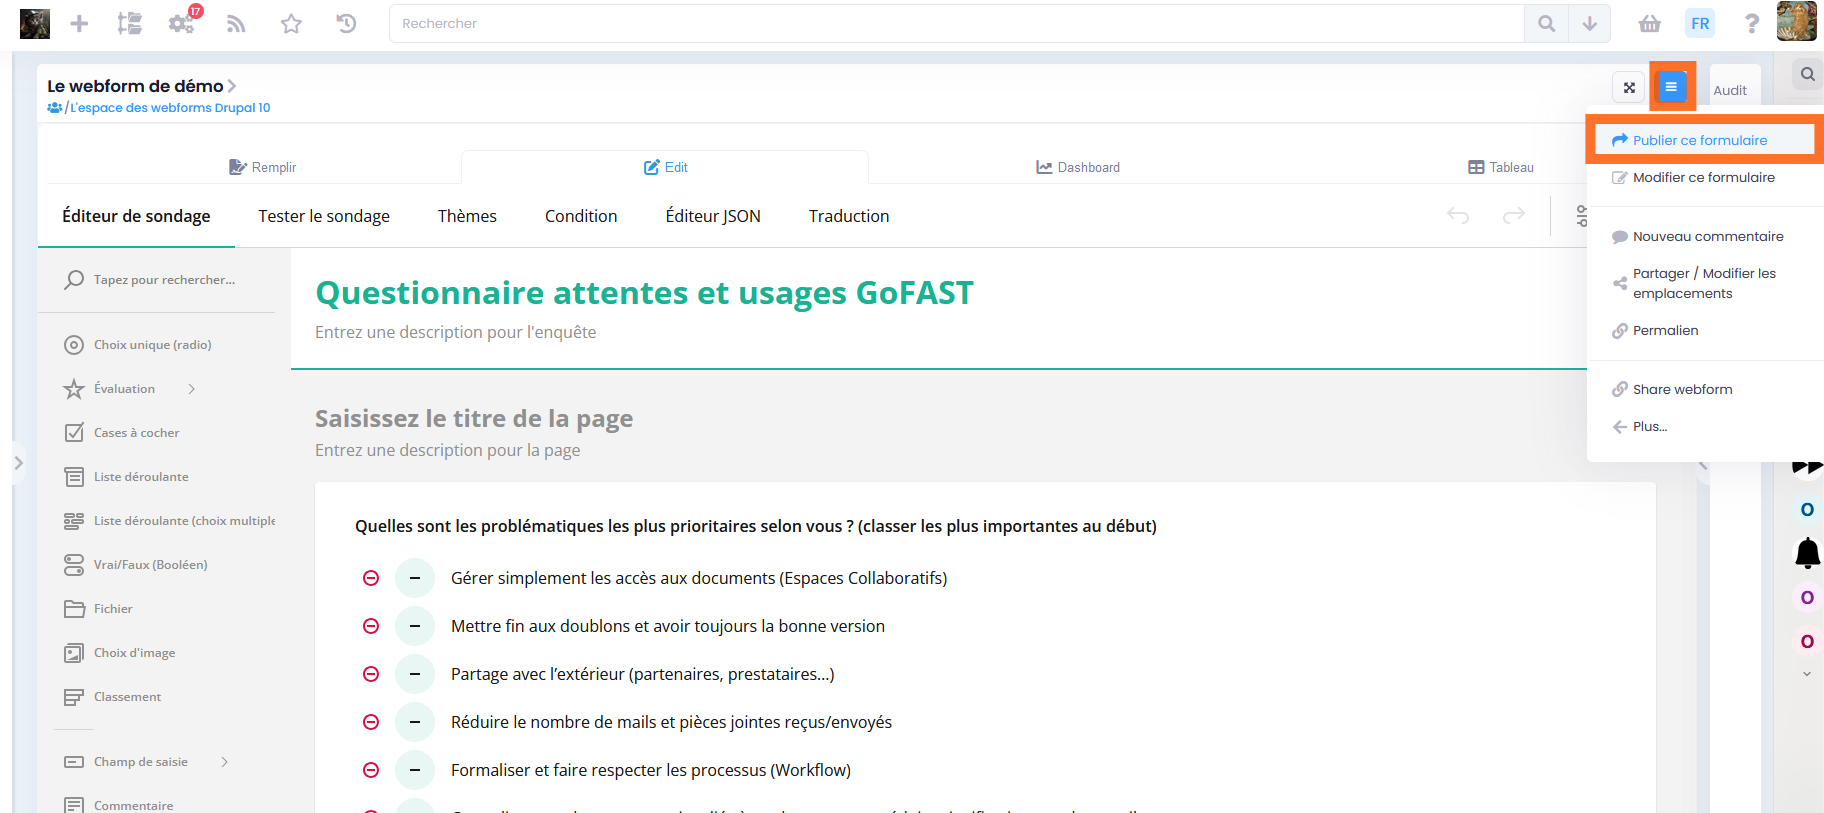
Then click on Validate in the modal to confirm publication.
Remplir un formulaire
To fill in a form, it must be published. If it is, go to the “Fill in” tab of the form.
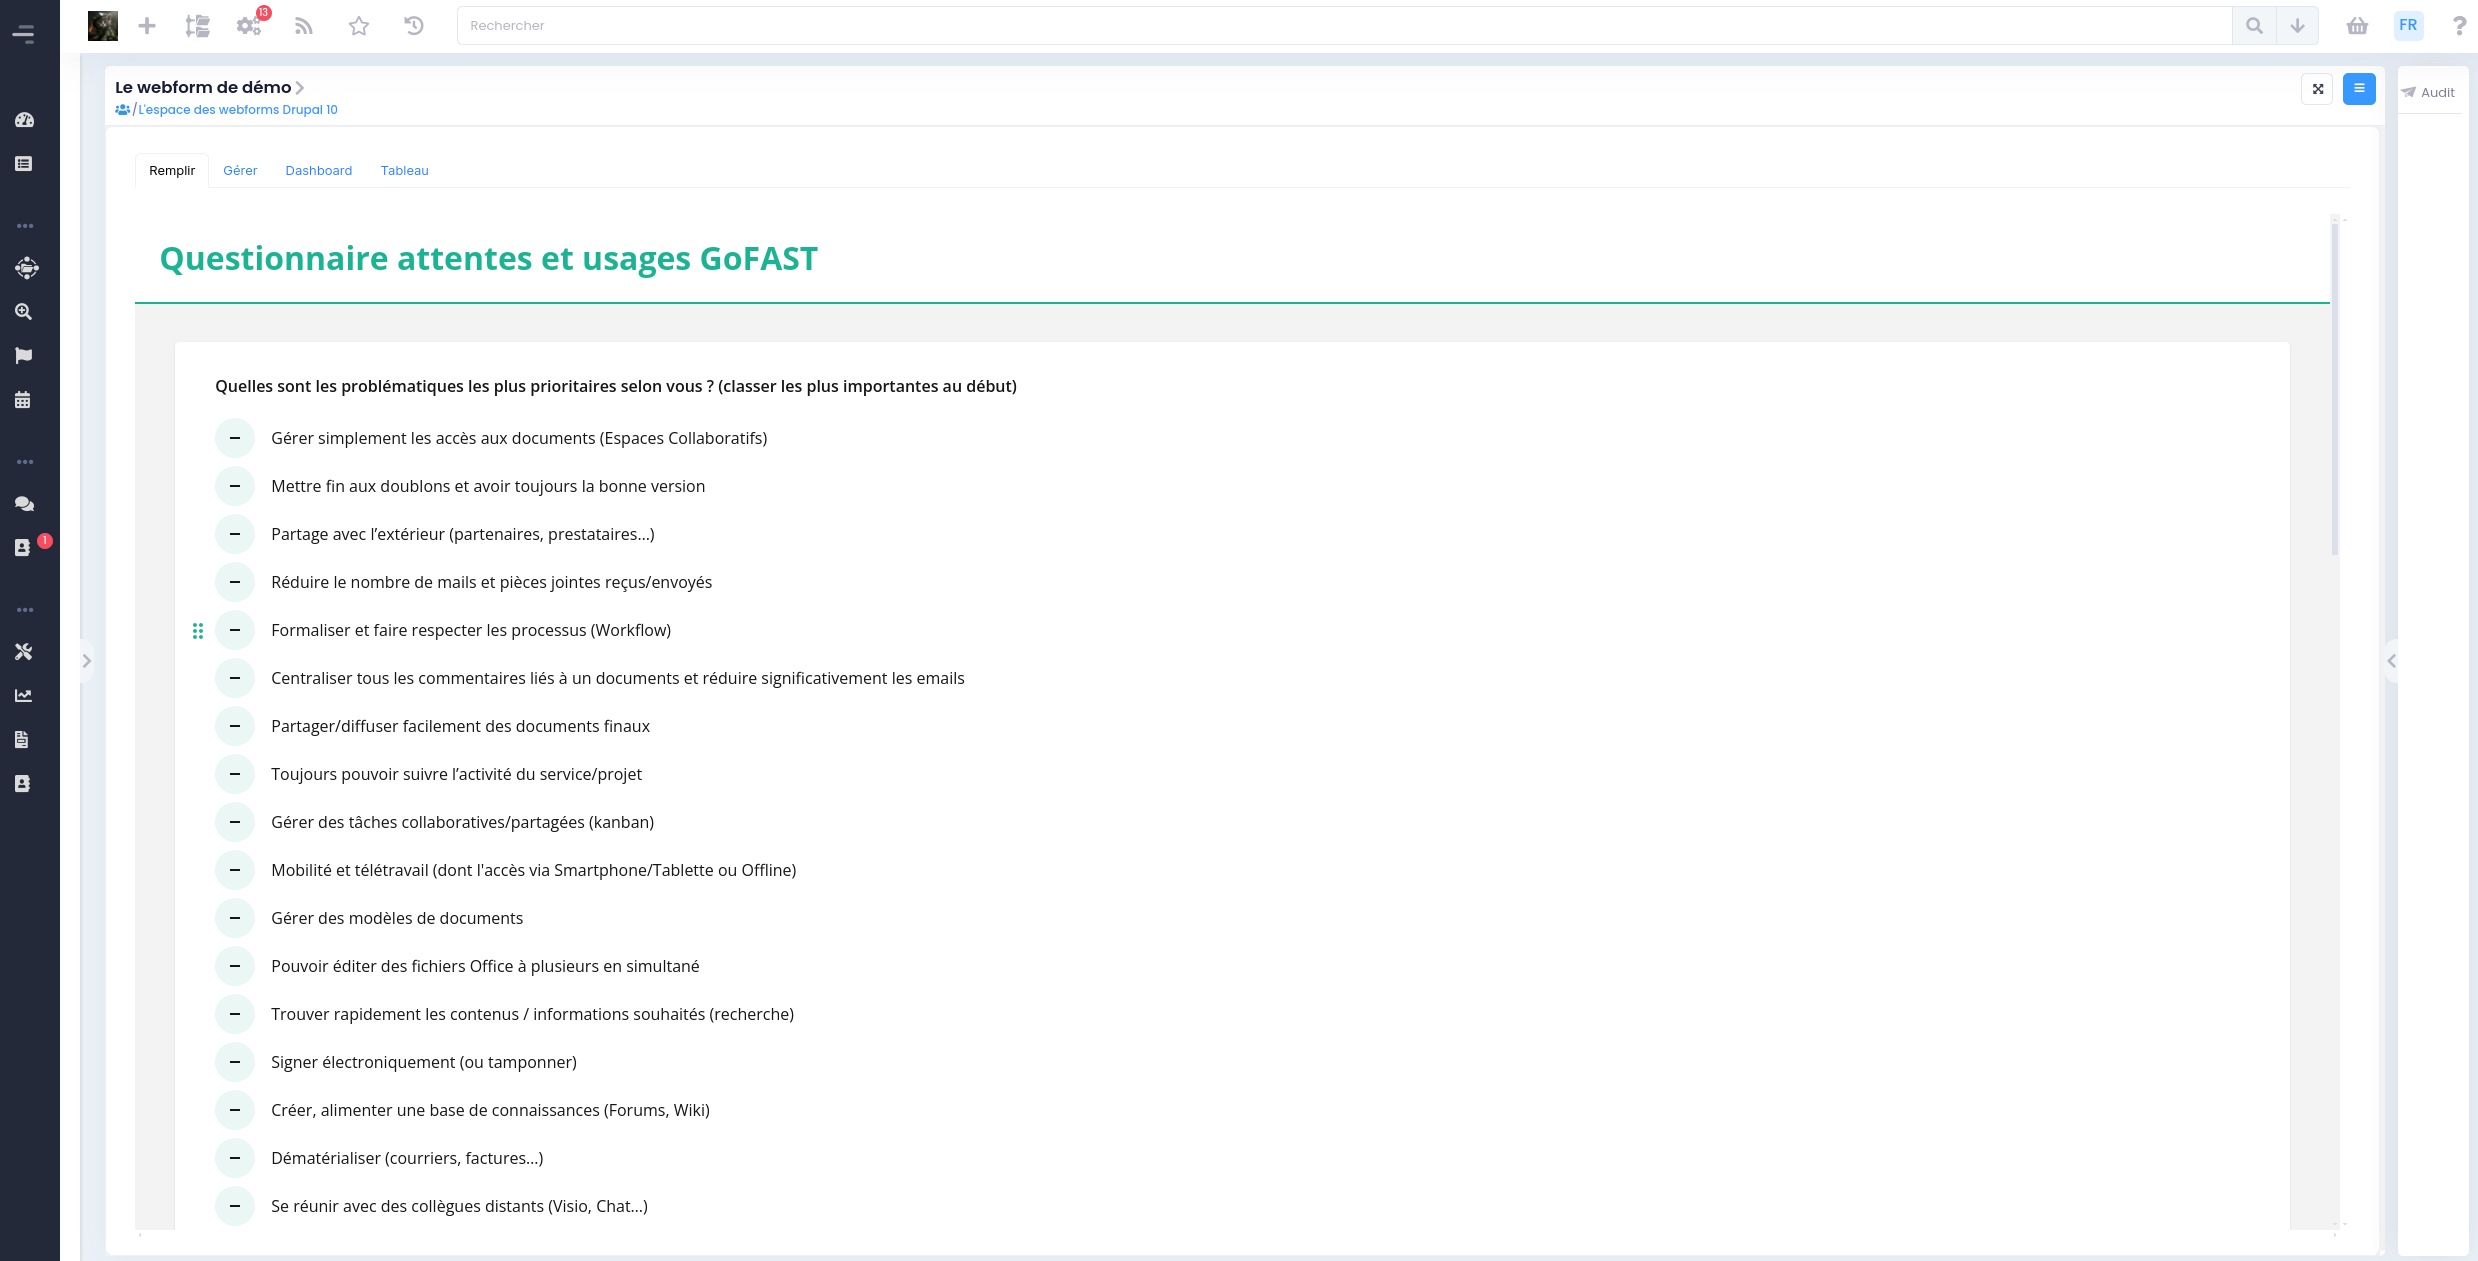
Partager un formulaire avec des utilisateurs externes
To enable an external person (without a GoFAST account) to fill in a form, you can use the “Share Webform” option. By clicking on this button, a public link will be copied. This link can be shared with the external user so that he or she can access and fill in the form.
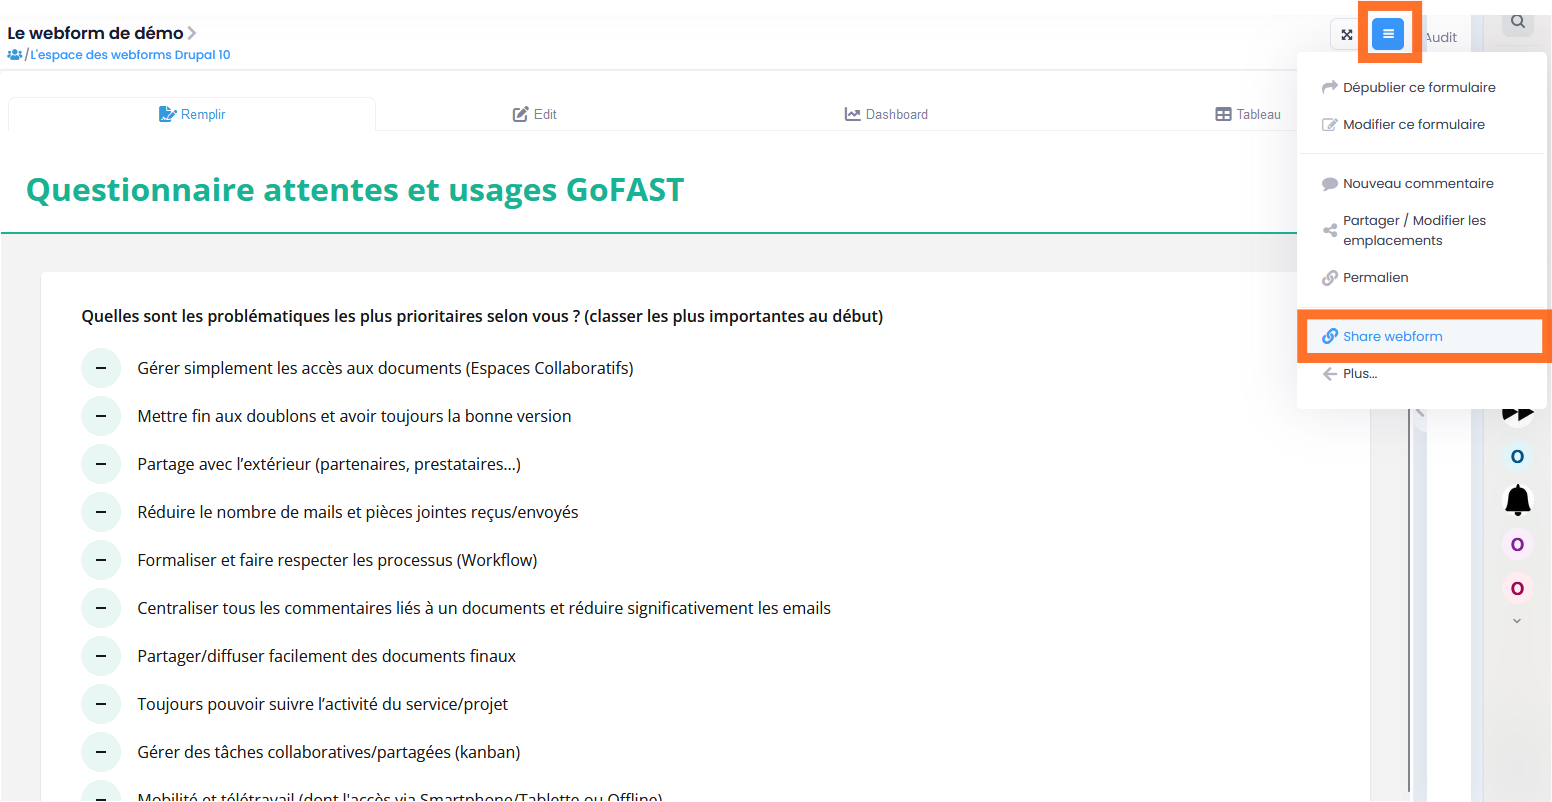
This makes it possible to collect information from third parties without requiring them to have direct access to the platform.
Soumettre un formulaire
To submit a form, simply press the “Finish” button at the end of the form:
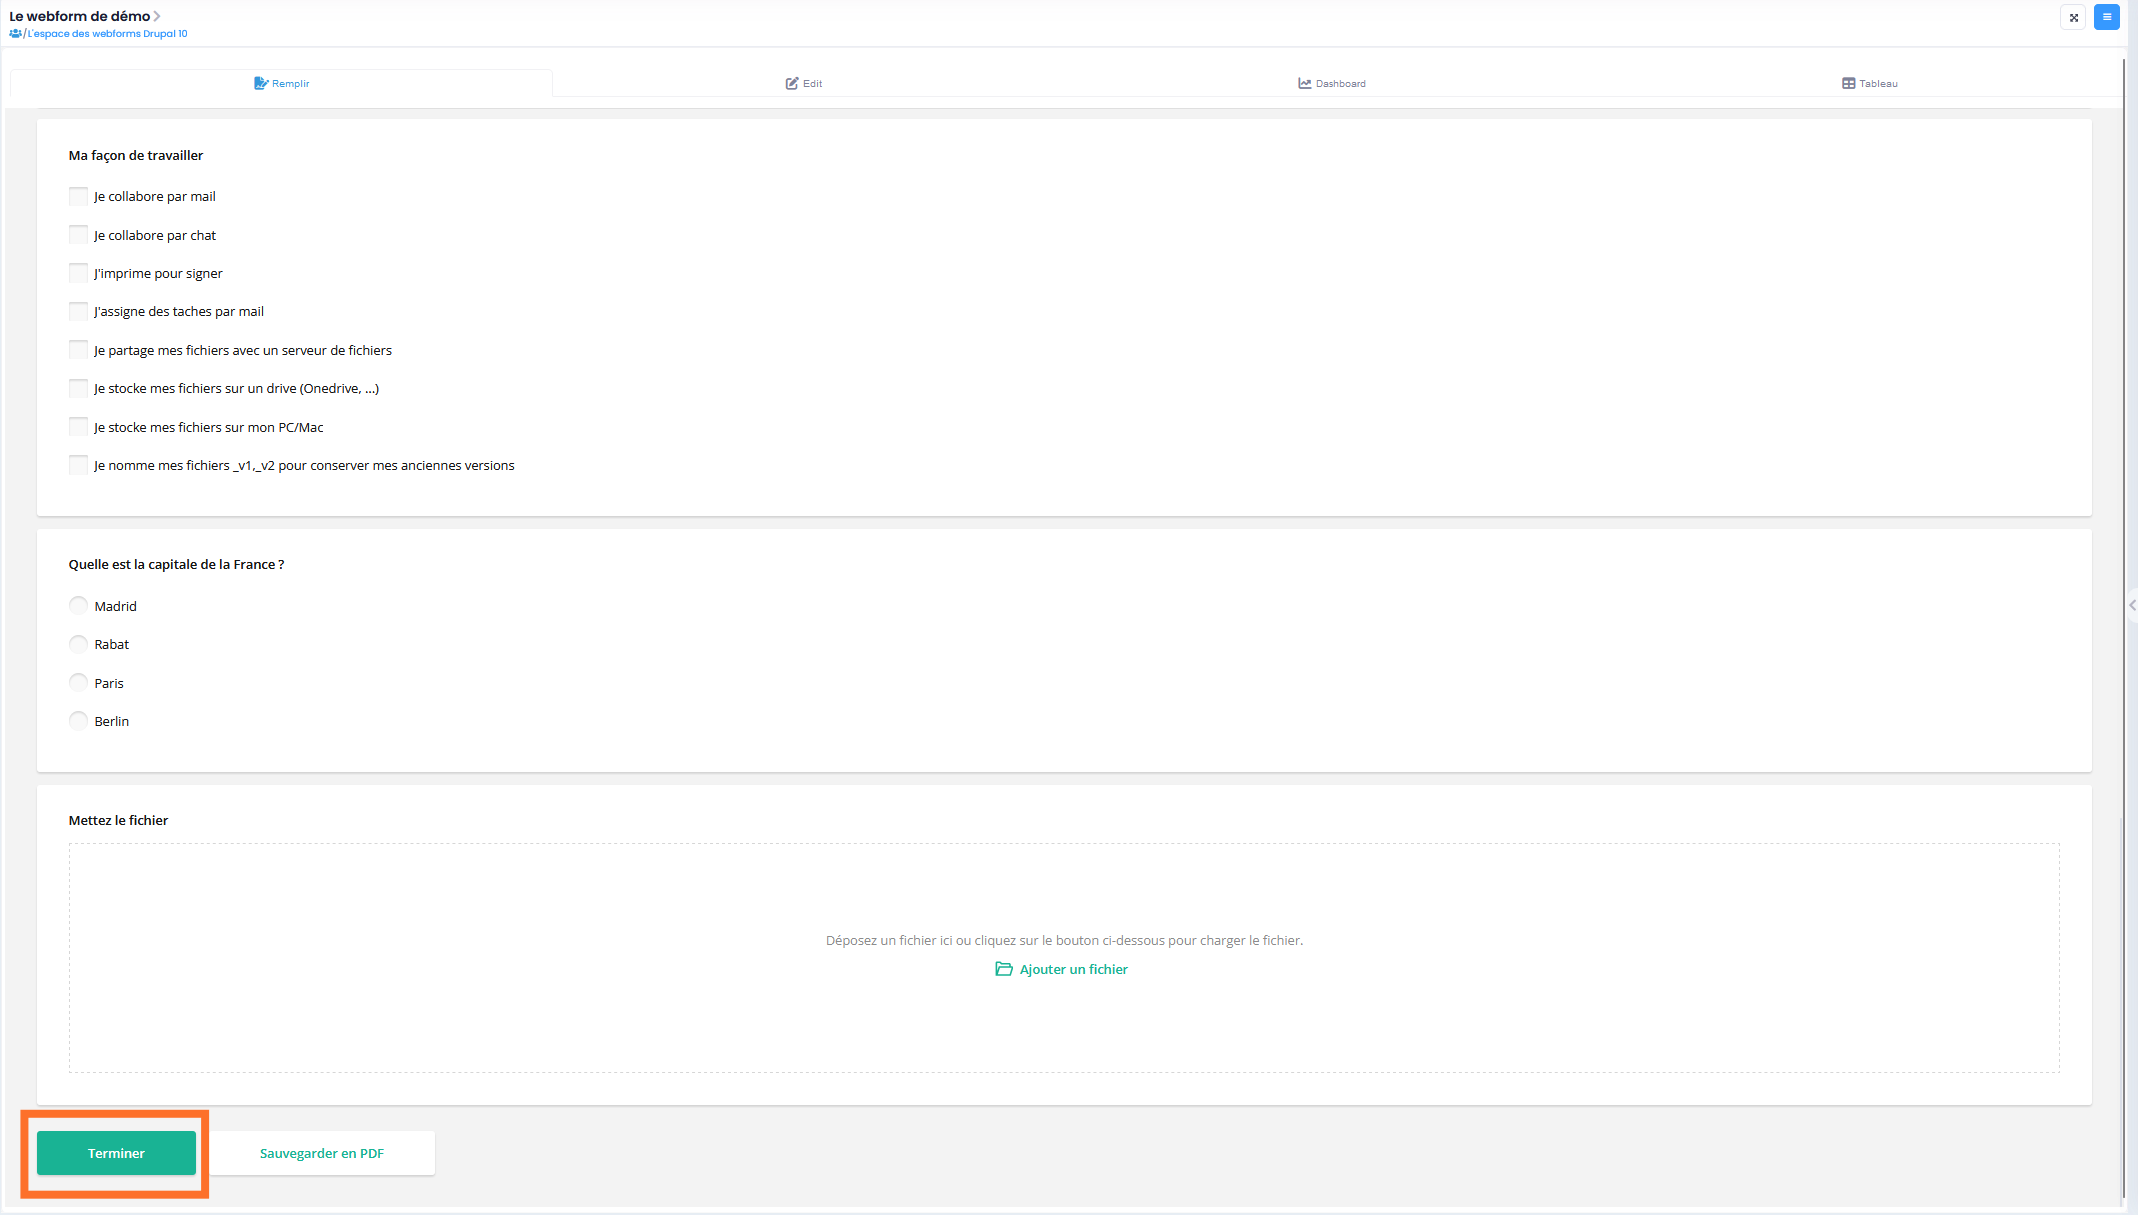
Ajout des fichiers dans un formulaire
To add a file/image, you can :
Drag and drop it directly.
Click on ‘Add a file’ and select the file from your computer.
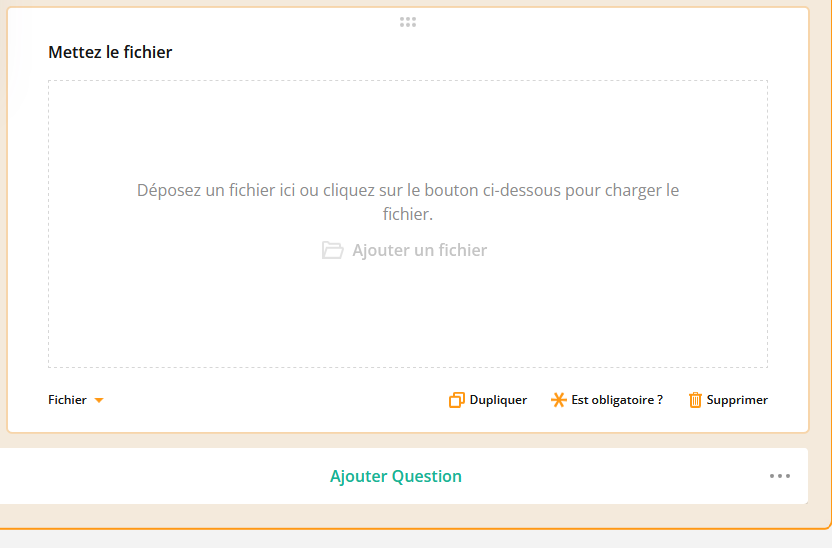
Export a form in PDF format
Once a form has been completed, before submitting it, you can export it in PDF format by clicking on the “Save as PDF” button.
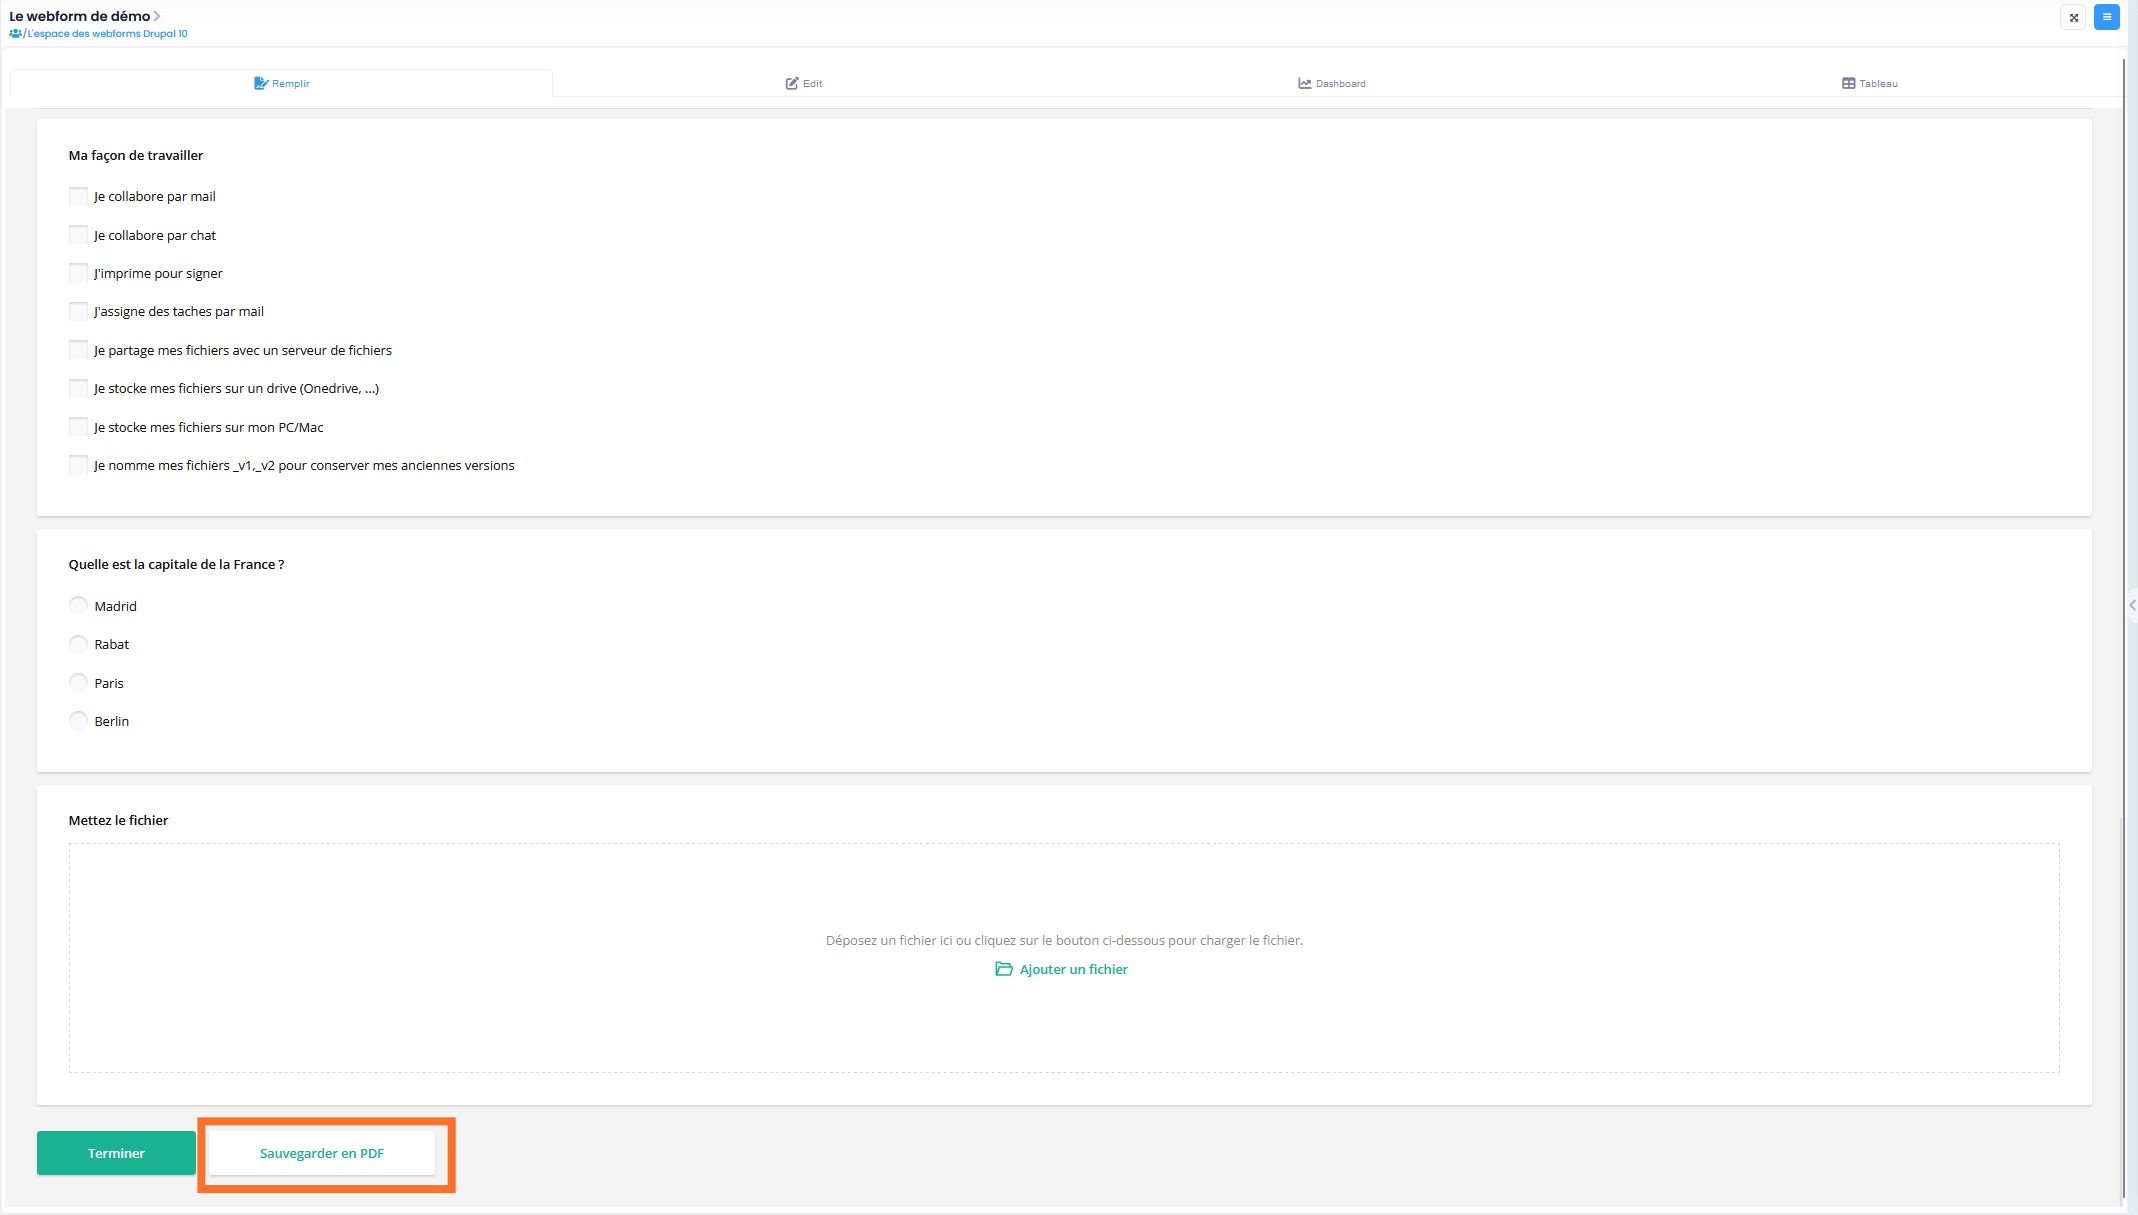
What’s more, when a form is submitted, a PDF is automatically generated and added to the person’s submission folder.
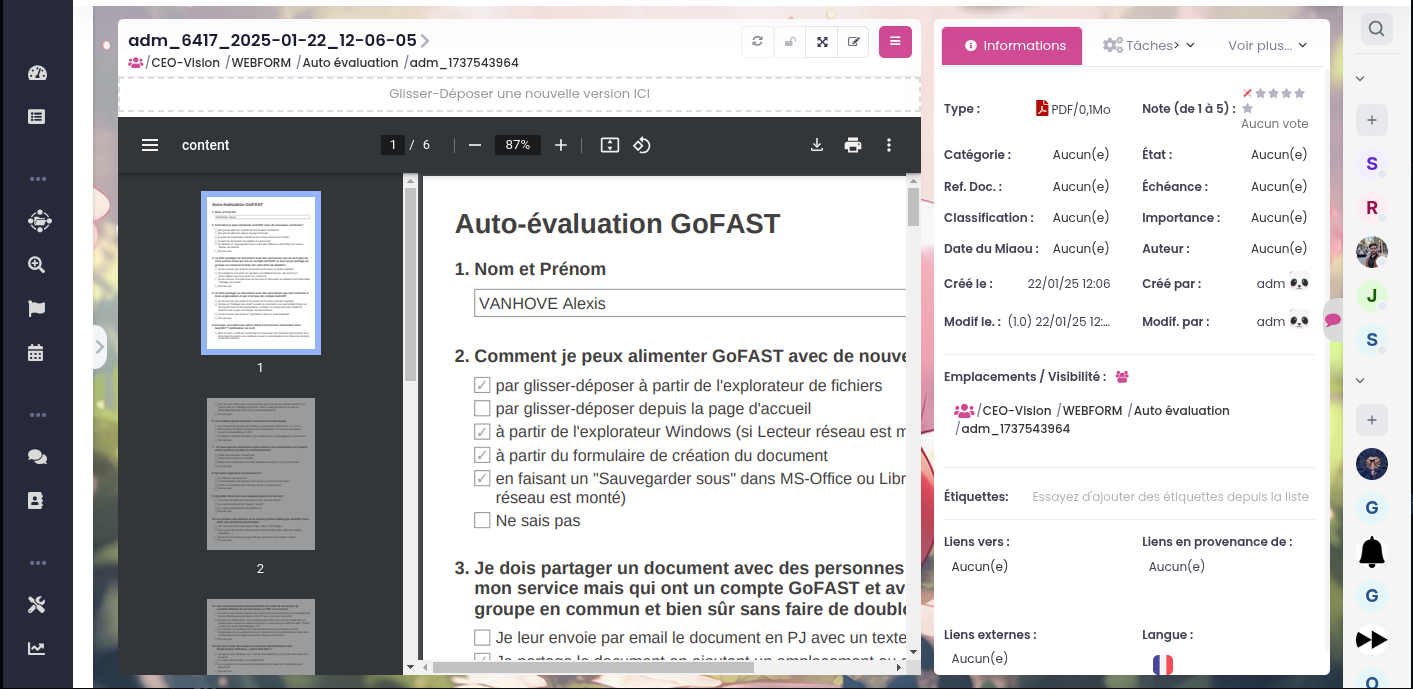
How a form works in questionnaire mode
To set up a form in Questionnaire mode, you need to define the correct answers for each question. This is done individually for each question. Here’s how to do it:
Access question parameters
– Allez sur la question que vous souhaitez paramétrer.
Click on “Open Settings” to access the configuration options specific to this question.
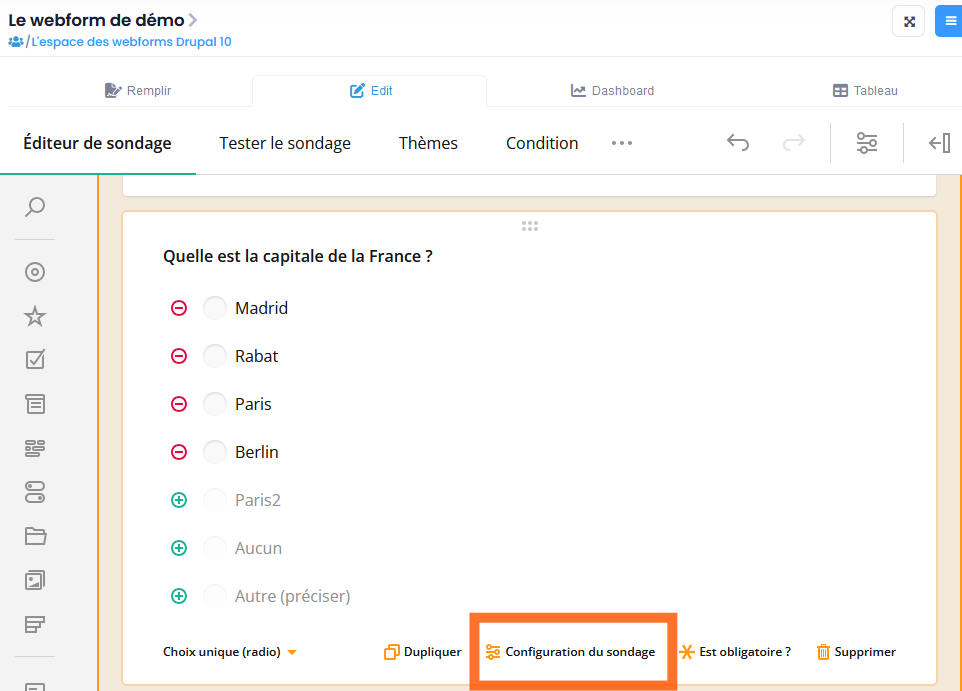
Go to the Data tab
Once in the settings, go to the Data tab. This is where you can manage response information.
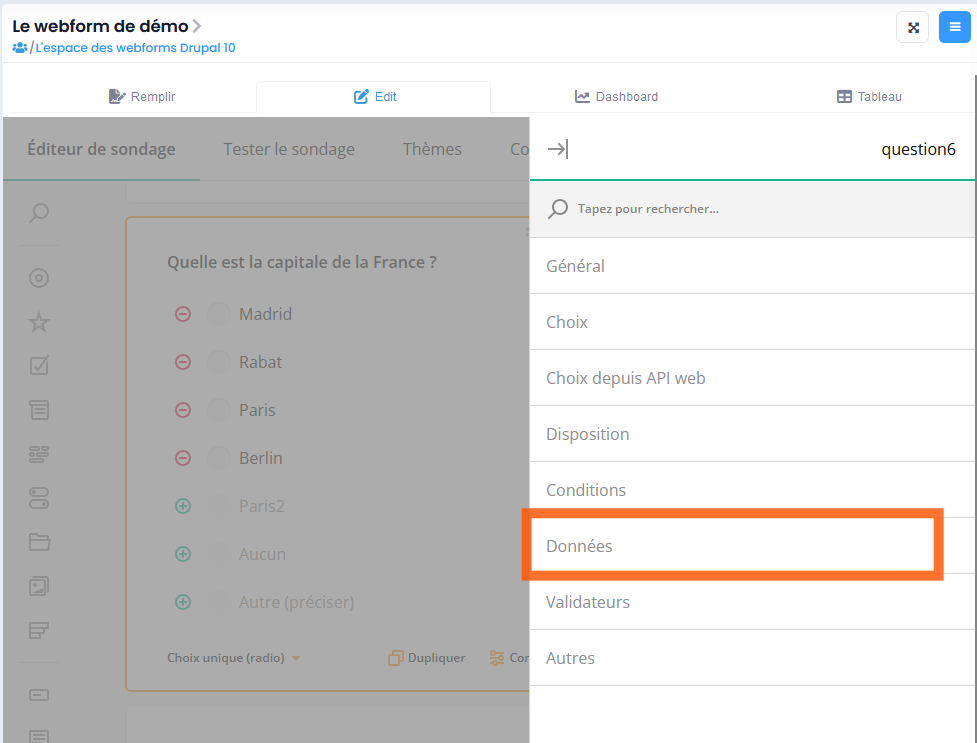
Define the correct answer
In the “Define correct answer” section, click to open the answer selection window.

Select the correct answer(s) from the options provided.
Once you’ve made your choices, click Apply to save the configuration.
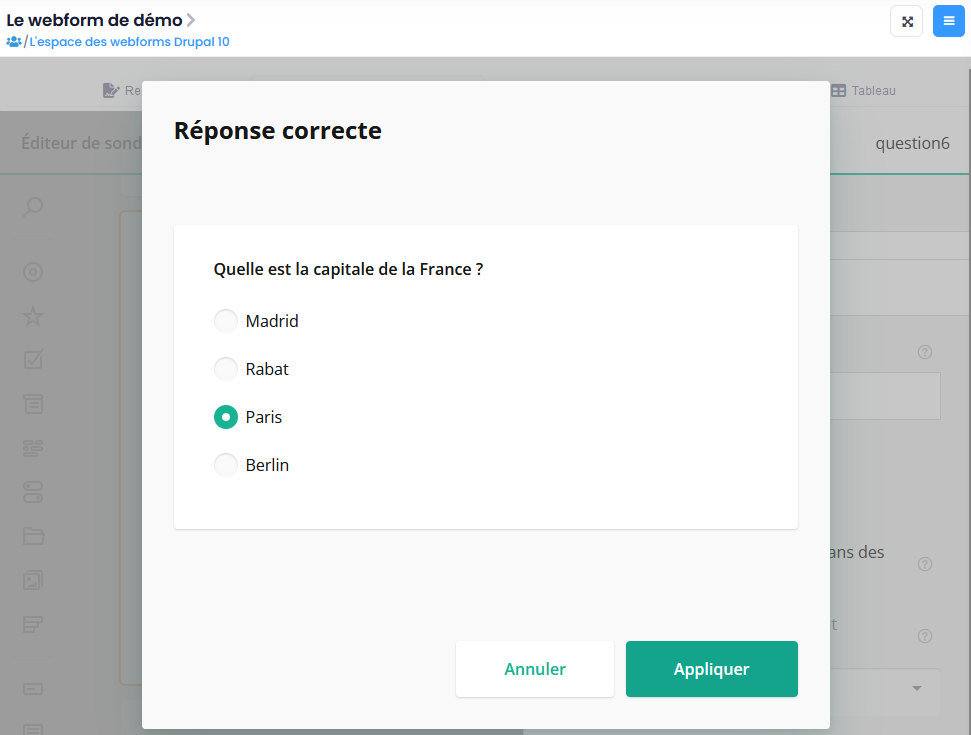
Repeat this process for each question on the form. This step is essential to ensure that the form correctly evaluates users’ answers according to the defined criteria.
Results analysis
Sous forme de tableau de bord
Under the “Dashboard” tab you’ll have access to the form’s results in the form of statistics with graphs:
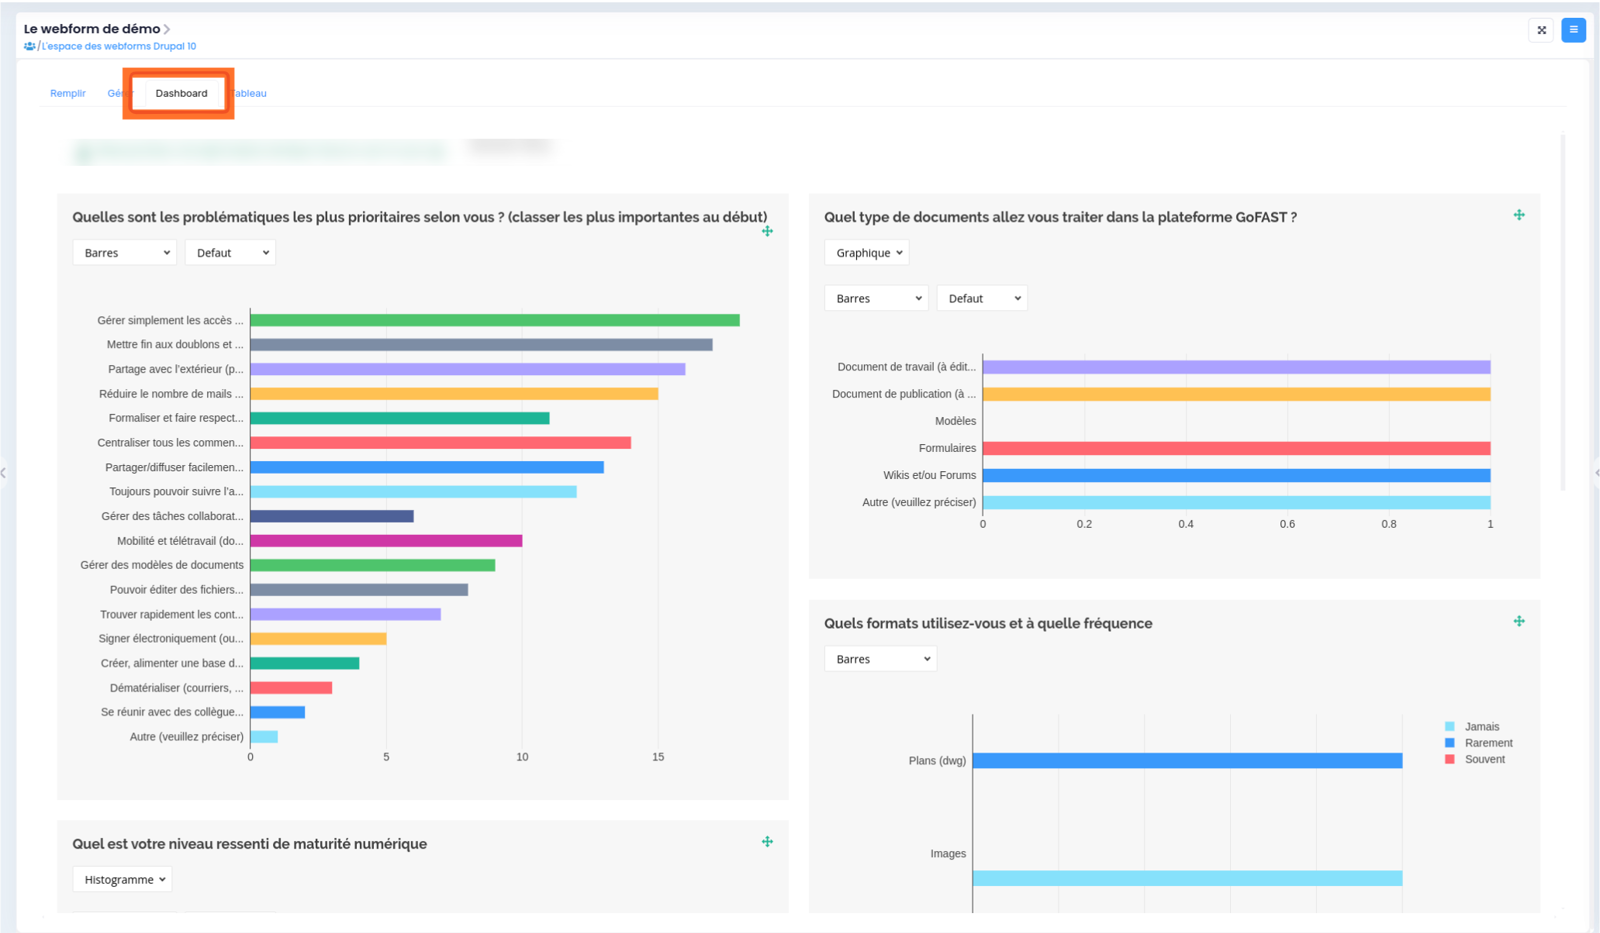
You can customize the type of graphic you choose:
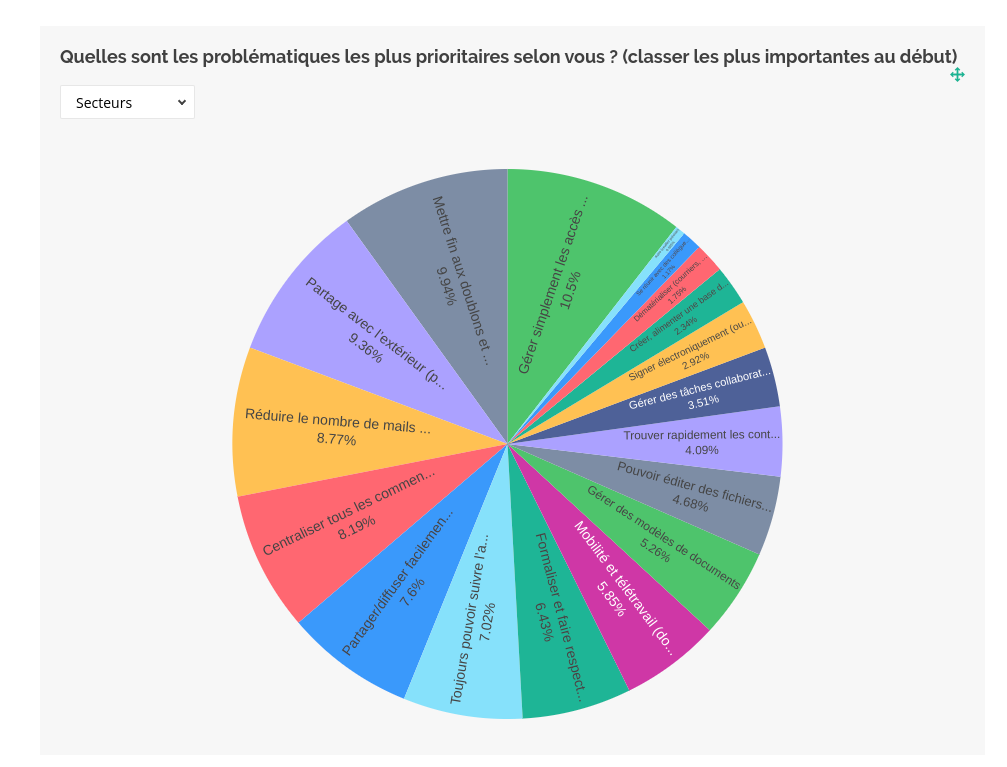
You can export individual results by exporting the graphics in PNG format:
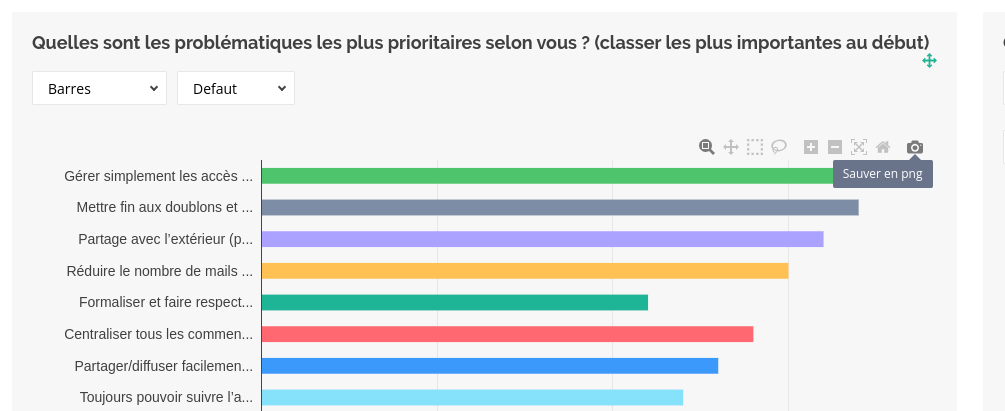
In table form
In the “Table” tab, you can access the results of the form in tabular form:
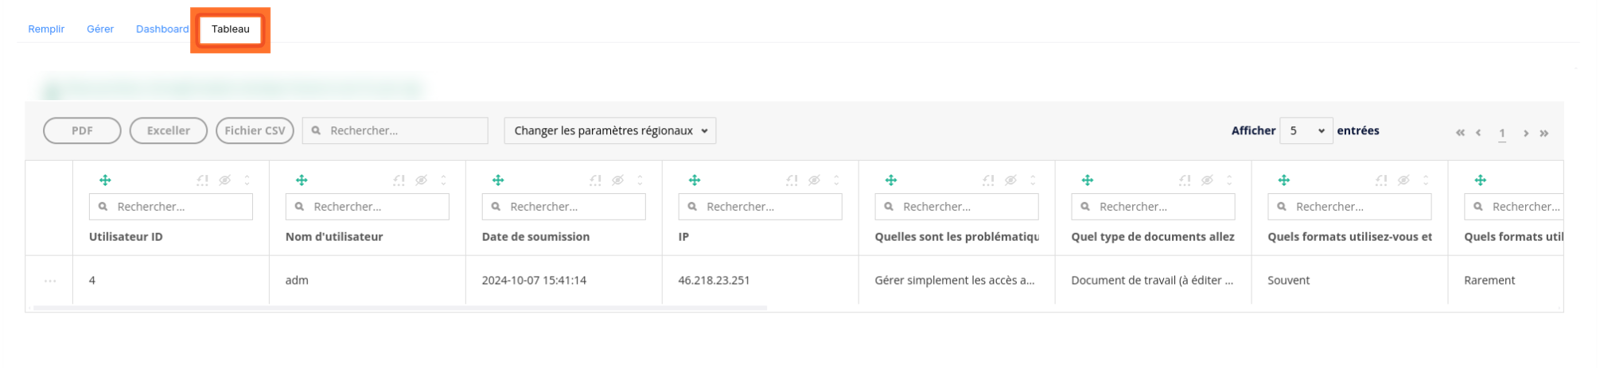
If the form is a quiz, you’ll see the score, percentage and time taken to answer.
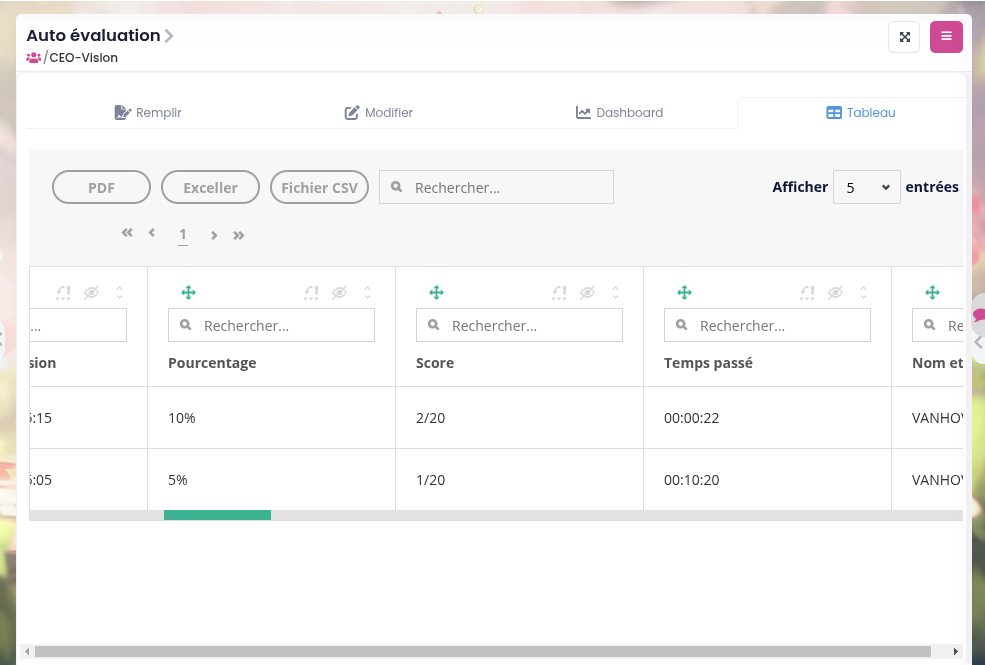
You can export the results in various formats (PDF, Excel or CSV).
Favorites, Last viewed content and RSS feeds
Last viewed content
At any time, you can go back to one of the last 10 content you saw, in other words, the ones you viewed by going to the content page.
- To find the 10 most recently viewed content:
Go through the quick access bar (main menu at the top)
Click on the “timer” icon
Click on one of the content to go to it.
Note
It is also possible to go to the latest content seen from the Dashboard (if this block is enabled). You will find in these last contents, all types of contents, including Spaces, documents, Wiki, etc. However, you will not find the folders of the file explorer.
Favorites (Contents and Folders)
You can view the list of your favourite documents/spaces/folders by clicking on the *star in the Quick Access bar (top main menu). A red pin will appear, which fixes the window with the list. To unlock the list, tap elsewhere on the black strip. When you add a favorite to your list, there will be the green message on the right side of the screen that will signal you to add the favorite.
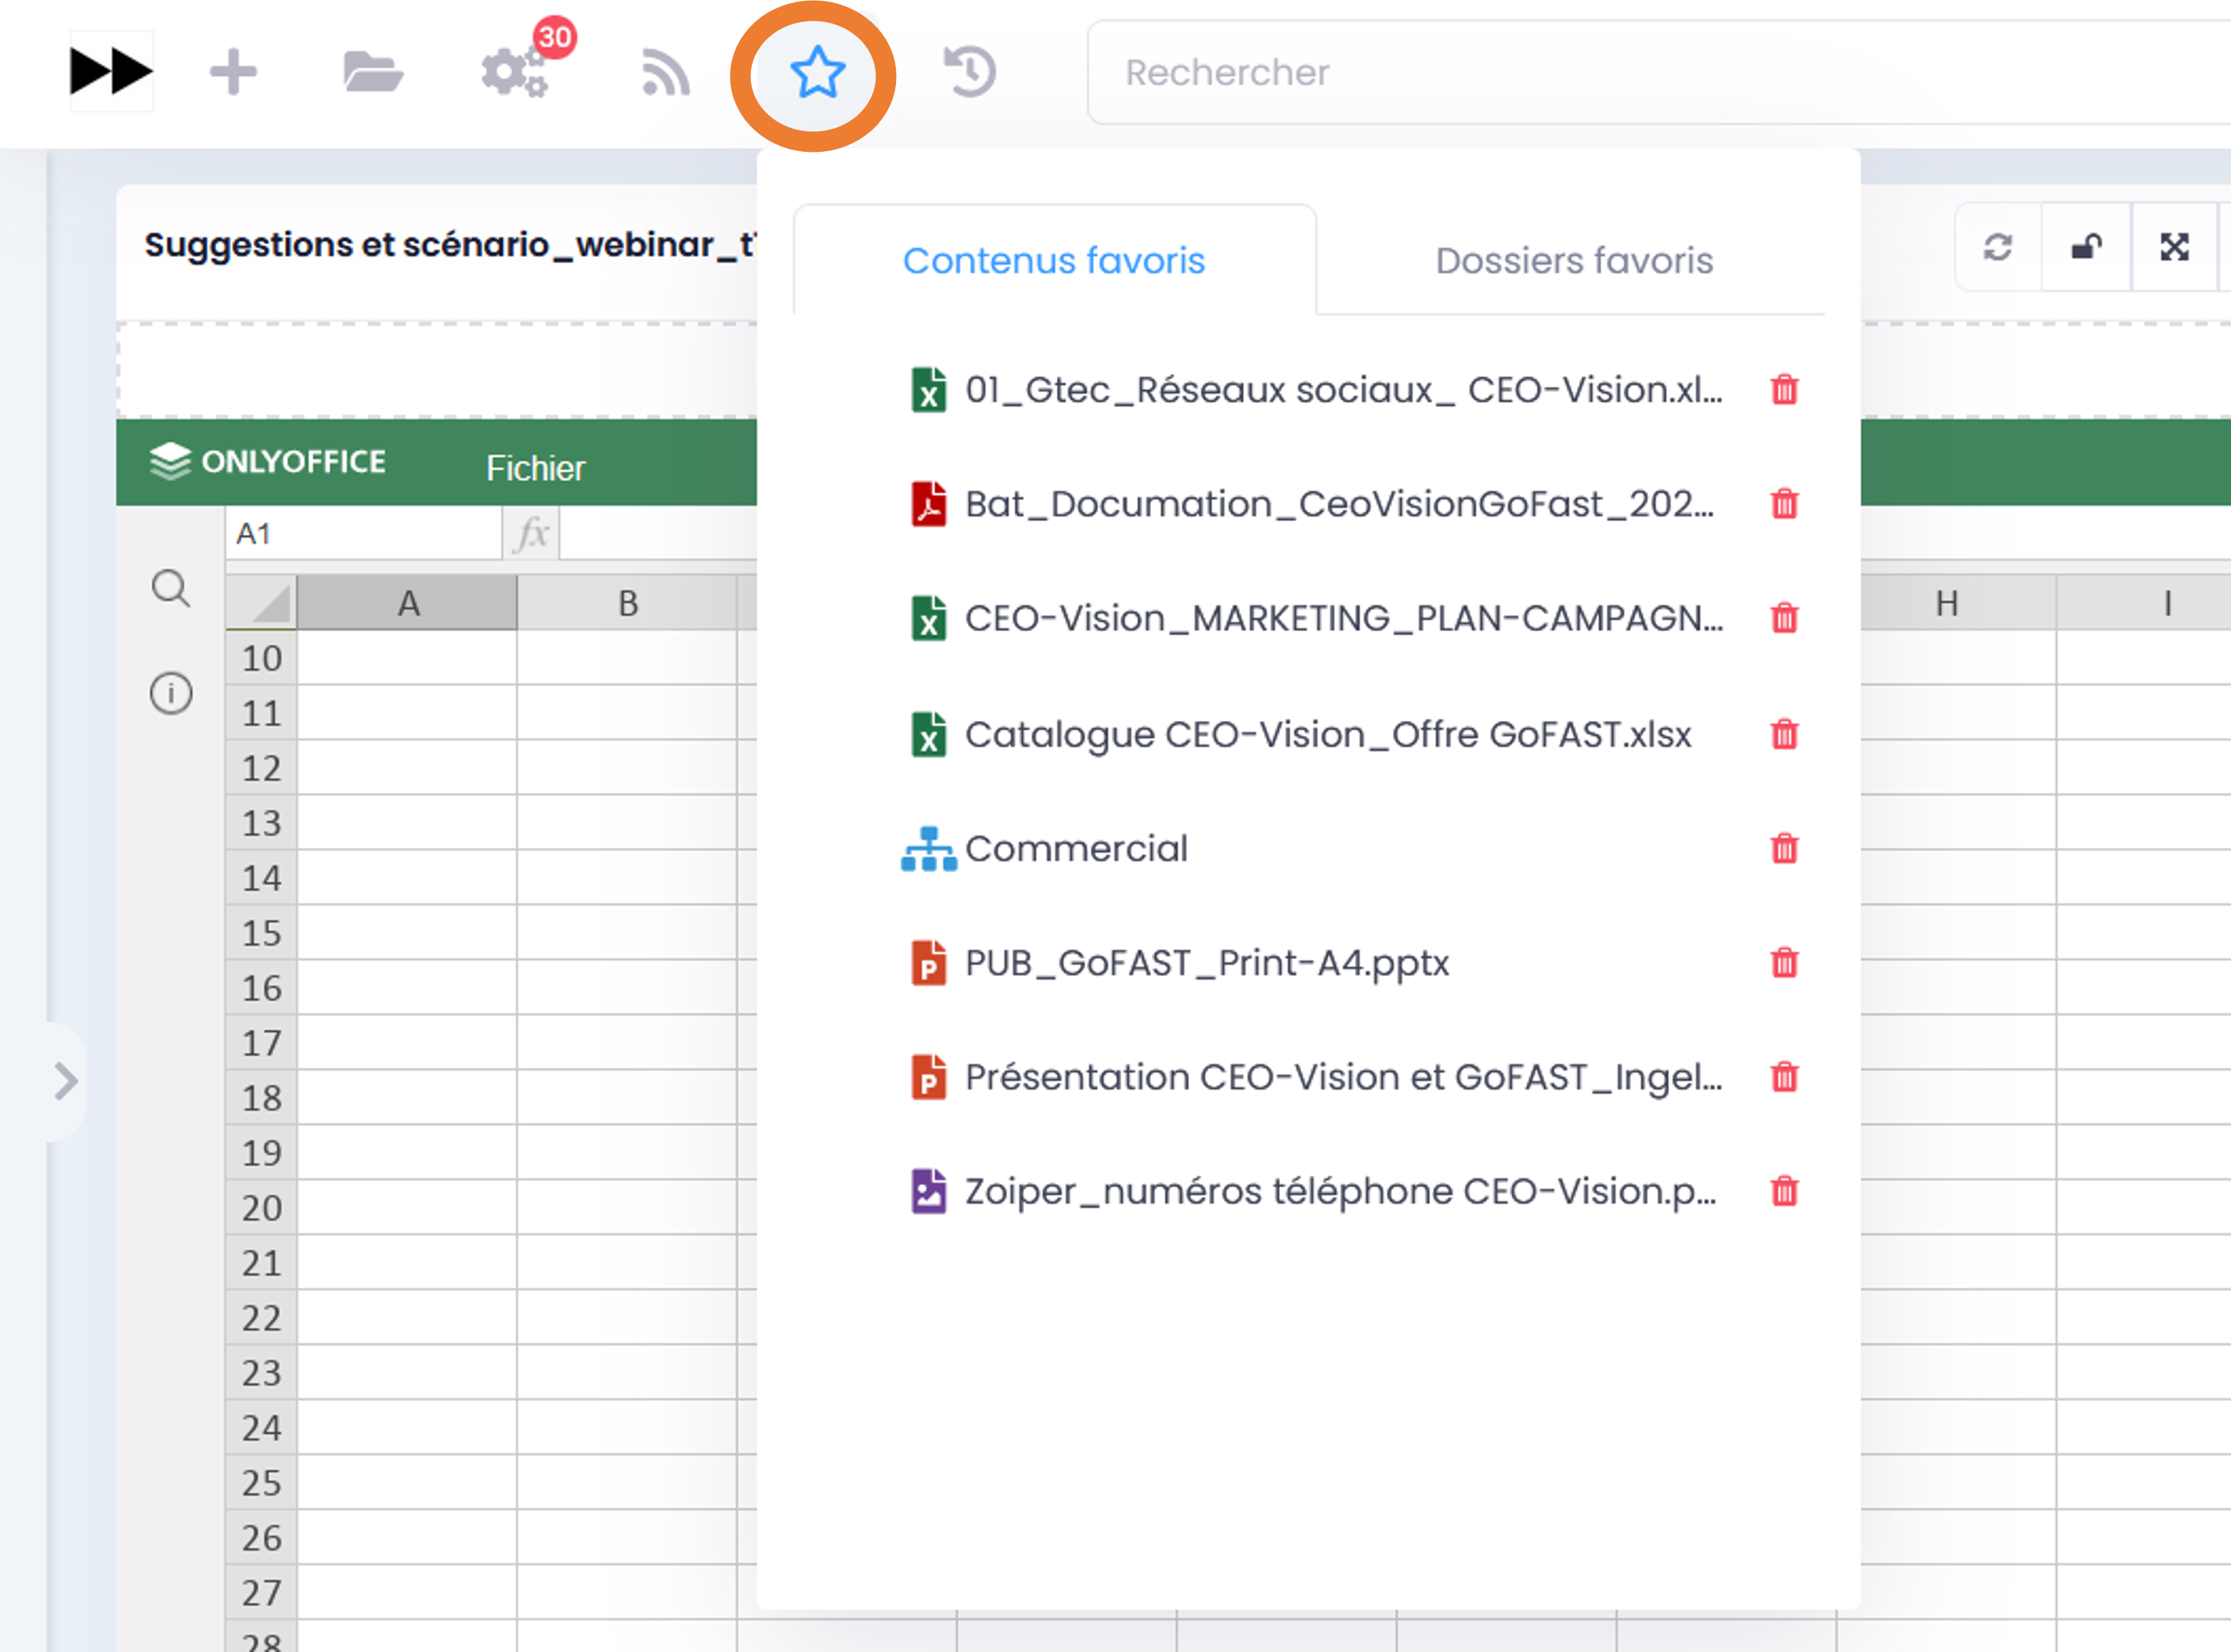
- See also the sections:
” Dashboard “
” Add to favorites “
RSS News Feed
You can see the news (retrieved from other sites, for example the Intranet or the website) via this “Feed” logo on the quick access bar (menu at the top of the page).

By clicking on one of the “news”, you will be redirected to the page of this “news”.
Directories
User Directory
- To search for a user you have the choice between:
Enter the name in the search.
Go to “Directories” / “Users”. You will find a table listing existing users.
On the directory page: In the block at the top, you can filter your search by last name, first name, entity, type of profile, time the user was logged in or created, and the status of the user account (enabled or not).
You can directly send an email or call the user via his profile. As well as sending him a “relationship” request, which allows you to contact/see the shortcut of this person even if he is not part of your collaborative spaces.
- It is also possible, once one or more users have been selected, to click on the burger menu. This allows, according to your rights :
Dashboard of permissions by profile
Unblock/Activate a profile
Disable a profile
Delete a profile if there has never been a connection
User List Directory
To search for User Lists through the directory, go to Directories in the left menu, then to User Lists.
You can then use the filters in the block on the right of the screen to specify the name of the list, its creator or the period of creation (in DD/MM/YYYY or DD/MM/YY format).
It is also possible to start synchronization with the AD, edit the list or delete it.
Directory of Collaborative Spaces
- To search for a Space via the directory:
Go to the main menu on the left.
Click on Directory then Spaces.
You will find a table listing the existing spaces.
Vous pouvez utiliser les filtres dans le bloc en haut de l’écran pour préciser le nom, le type d’espace, le nombre de membres, le nombre d’administrateurs, le nombre d’utilisateurs en attente et le chemin de l’espace.
When you select one or more spaces, a burger menu appears at the top left.
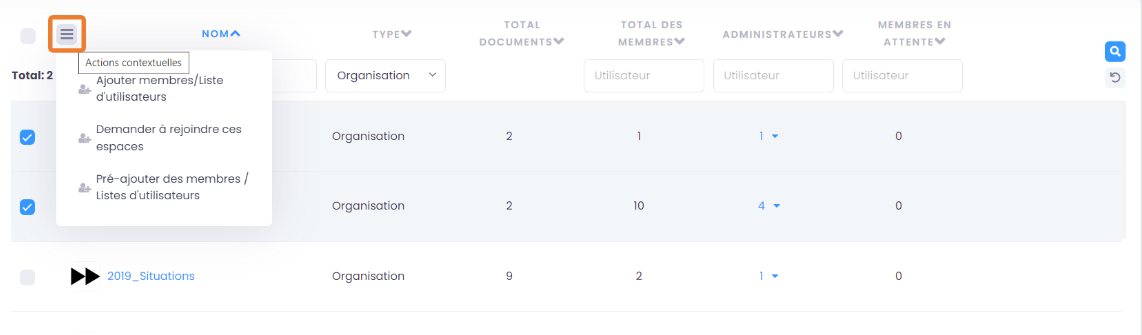
Add Members/User List: This feature is available only to administrators of the selected space.
Ask to join these spaces : a request is then sent to the business administrators of the Space.
Pre-add members/user list: a request is then sent to the Space’s business administrators.
Note
Depending on the configuration of the platform and your access rights, you will be able to access all or part of the existing spaces.
Contact Directory
- To access through the directory:
Go to the main menu on the left.
Click on Directories and then Contacts.
Contacts group all contacts created with their information: Last Name, First Name, Entity, E-mail and Mobile.
Note
Depending on your rights, it is possible to edit or delete the contact.
Statistics
“Statistics” tab in a Space
On the Statistics tab, you can select the information you want to find in graphical form and for the selected period. Go to the space page, “Statistics” tab. There are two available sub-tabs :
Le sous-onglet « Statistiques des membres » permet de visualiser les informations relatives aux membres actifs et inactifs, les nouveaux membres et membres connectés.
Le sous-onglet « Statistiques documentaires », permet de visualiser toutes les informations relatives aux documents par sa catégorie, son état et son importance.
Note
Active Members : Activity recorded in the last 3 months (without consultation)
Inactive members: No activity in the last 3 months
Platform statistics
Administrators of the Collaborative spaces have the ability to view statistics for all the spaces they manage. To access statistics, go to the main menu on the left, then click “Statistics”.
Please also view the “Statistics” section for the “User-Support Profile”.
Mobile version
The GoFAST platform can also work on the go and is accessible from any device on a smartphone or tablet through a browser. We offer you a limited version of the platform for greater ease of use. Below are a few examples of screens that can then be found in a pocket.
Home: Dashboard
Displays the various blocks of your dashboard.
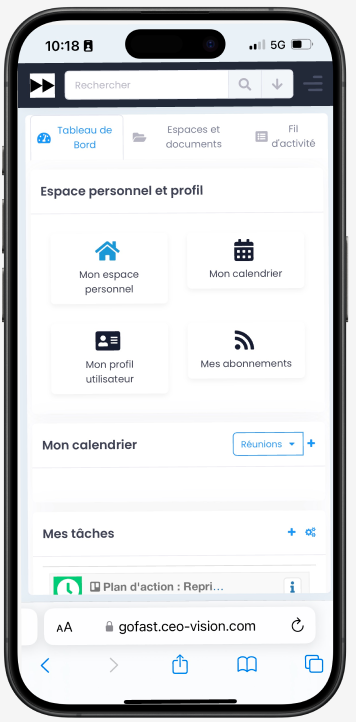
The dashboard: Newsfeed
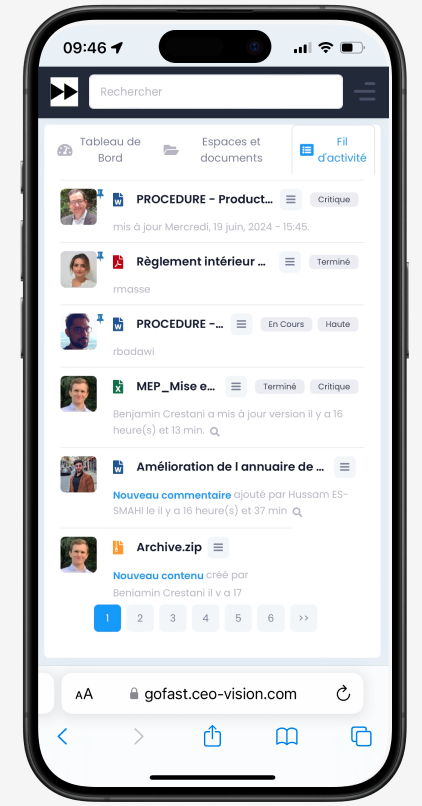
File Explorer / GoFAST File Browser
To go down to the spaces tree, open folders, preview files you have to double click on the space names.
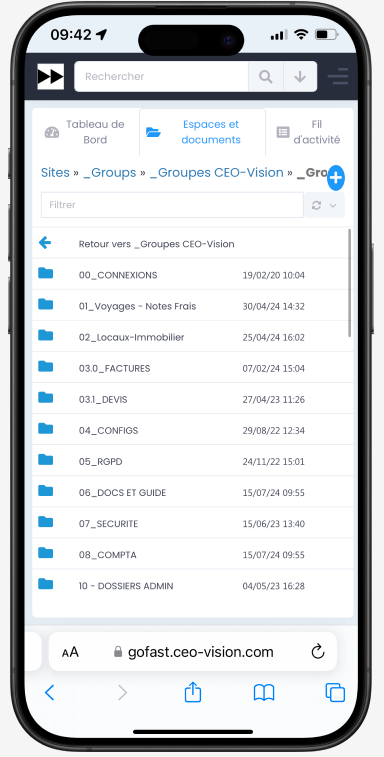
Preview and metadata menu
Compared to the “GoFAST Plus” version, the menu is more limited.
However, you can comment, share, download, rename or upload a new version as well as subscribe to a document/content. The metadata are visible by clicking on the “<” button.
As in the “GoFAST Plus” version, they contain information about the document (and specific information, if applicable), as well as through “View Plus” tasks, comments, and version history.
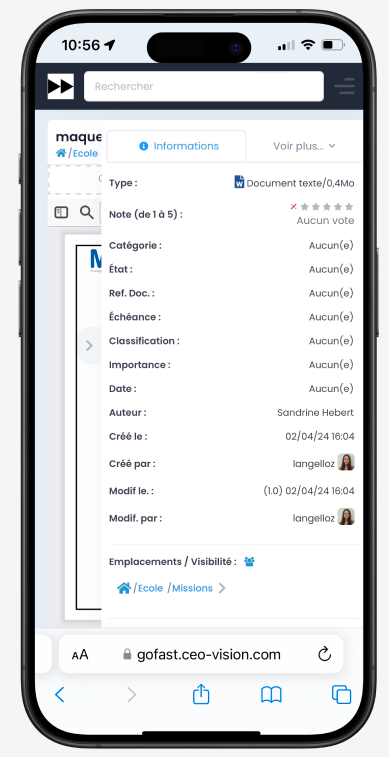
Search engine
The search engine works the same way in GoFAST Essential or GoFAST Plus mode.
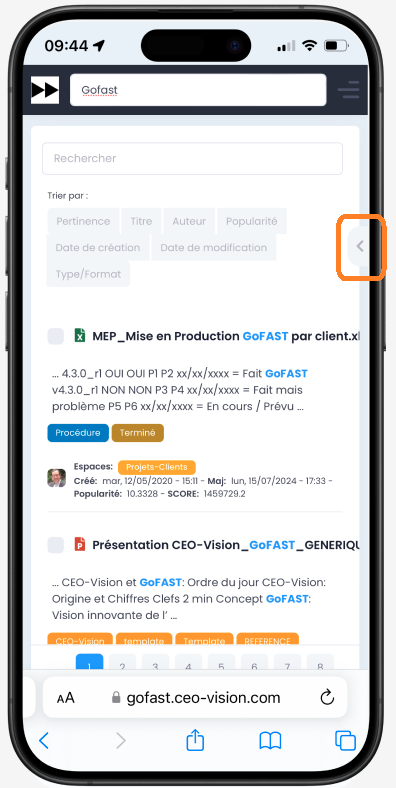
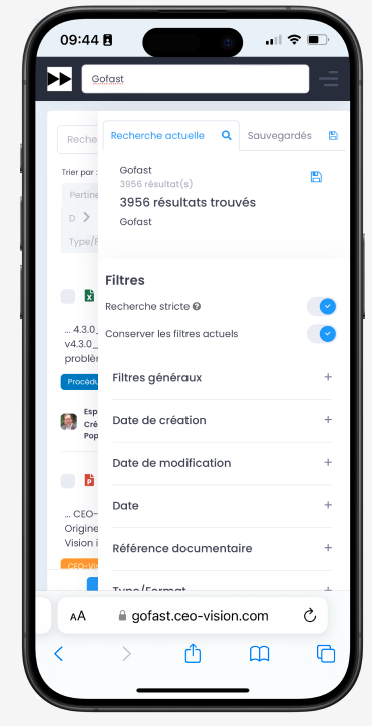
Calendar
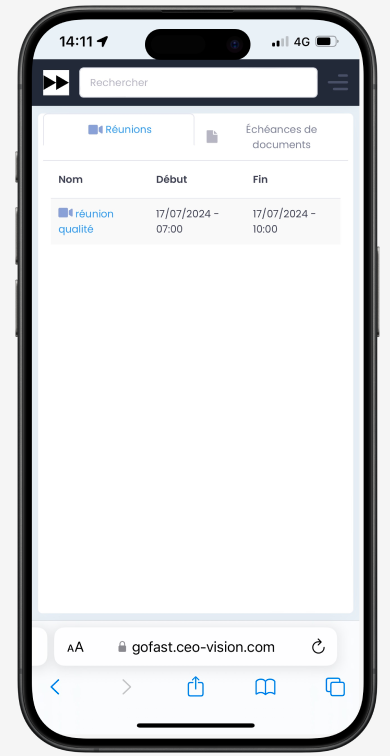
Advanced Use and Additional Modules
A separate guide is intended to provide configuration instructions for third-party software that works with the GoFAST platform, increasing the uses and the power of the platform.
- These additional tools allow:
Complementary tools in mobility (including Tchat)
GoFAST synchronization with a PC to work in “offline” mode (DropBox type)
Access to GoFAST on mobile devices (tablets/smartphones) via file explorer
Online viewing and/or editing of Office documents on tablets
Instant messaging (“chat”) on mobile
Videoconferencing on mobile (in browser)
Digitization tools (smartphone, copier, etc.)
E-signature tools
You can find this guide here: http://gofast-docs.readthedocs.io/en/latest/docs-gofast-users/doc-gofast-utilisation-avancee.html
How to “Edit from PC”:
From a document page:
This action is also possible from other GoFAST pages where a document is cited and where there is a “Hamburger” menu for that document (e.g. Activity Feed, search results, etc.).
From File Explorer:
In some cases, the system asks for your password before opening the document, in order to identify you. You must then enter your username and password (the same as to connect to GoFAST).
The document opens in Office and you can edit it. In some cases, the Microsoft Office Suite asks “to activate the editng”. Click on it to be able to go into editing. Don’t forget to save (“floppy disk” icon of your application) before closing the document to be sure that the system has saved your modifications.