GoFAST: Administration
Introduction
- This section of the documentation is intended for users with at least one of the following profiles :
Super-Administrator
User-Support
- GoFAST makes it possible to distinguish the concept of “Profiles” that give various permissions on the platform, from the concept of “Roles” in the Collaborative Spaces. Be careful to distinguish between these two different concepts:
Profiles give various administrative permissions on the platform. These profiles are decorrelated to the roles that a user may have within the Collaborative Spaces. Please refer to the “Available profiles” section of this documentation.
Roles in Collaborative Spaces: Administrator, Contributor, Read Only. A user can have one of these 3 roles in each Space he is a member of. He may very well have the role of administrator in one space, as well as being read-only or contributor in other Spaces. For roles related to Collaborative Spaces and their administration, please refer to the section “Collaborative Spaces Management”.
Available profiles
To find out which profiles are assigned to you or what roles you have in the Spaces where you are a member, you can go to your user profile page, using your photo in the top right corner of the Quick Access Bar.
The 3 main profiles
Standard: no permission to administer the platform (this is the most popular profile among users).
User support: allows you to have a global view of the Spaces tree even if you are not a member of these spaces (without having access to the contents of these spaces) and of existing user accounts. This profile makes it possible to support other users in the management of the spaces (e. g. pre-adding members), to help with the management and promotion of good practices.
Super-administrator: this is a technical profile that allows you to implement the various configurations of the platform (e. g. coupling with your internal directory, with your mail server… ). This profile does not allow you to see the tree of Spaces or existing accounts (except for Spaces where this super-admin user is a member).
Note
By default, no “Profile” gives access to the Collaborative Spaces or their contents. These are managed independently, through the concept of member and role in a space. The aim here is to guarantee confidentiality by preventing a technical or support user from having access to any data managed on the platform, without having been expressly added by a business manager as a member of a space.
Note
A user with the “standard” profile cannot be “Support-Users” or “Super-Administrator”. It is possible to combine the “Support-User” and “Super-Administrator” profiles (practical in small structures/companies).
Other profiles available
External: intended to identify users external to the entity (company/organisation), such as partners, service providers, customers, suppliers, etc. External users do not have access to the “Public” areas, which are reserved only for internal employees/agents.
Note
The external profile cannot be Support-Users or Super-Administrator.
For external user access, please refer to the “GoFAST Administration / User Support / Configuration External user access” section.
Broadcaster: allows you to share documents in collaborative spaces without being a member, or the personal spaces of other users. Warning: this profile does not allow you to see the contents (no folders or files) in these spaces, but only to deposit them.
Note
This profile can be combined with other profiles.
Restrictions on comments and annotations: a user with this profile can only make private comments and annotations. He will then be the only one who can consult them and will not be able to share them with other users (these are comments and annotations made on documents/contents).
Note
This profile can be combined with the standard profile.
Habilitation confidentielle : Pour qu’un utilisateur puisse être ajouté à un espace confidentiel
Table of permissions by profile
Note
For roles related to Collaborative Spaces and their administration, please refer to the section “Collaborative Spaces Management”.
“User-Support” Profile
The purpose of the “User-Support” profile is to support users, in particular those with the role of administrator of spaces, in the management of members and to ensure the consistency of the tree structure of the spaces.
Note
Under no circumstances does the “support-user” profile replace the administrators of the collaborative spaces, who must be business managers (e. g. heads of departments/directorates, team/project managers, etc. ). However, he or she may be an administrator in Spaces of which he or she is a member.
Configuration dans GoFAST Configuration :
Utilisateur et espaces
Create / Manage user(s)
Note
The “User-support” profile can create user accounts. However, it can only pre-add them to the Collaborative Spaces because the administrators of these Spaces will have to validate access for these new members.
Create a user and give them access to the Collaborative Spaces
To find out how to create a user, please refer to the “Create a user” section. To find out how to add a user or a list of users as a member of a space, please refer to the “Add a member to a space” section.
Disabled / activate (unblock) a user
- The 3 possible statuses for a user:
“Disabled” means a user who has been voluntarily disabled, e. g. if he or she has left the organisation/company.
“Blocked” refers to a user who has made too many failed login attempts and for security reasons their account has been automatically blocked.
“Activated” means a user who has an account and who can access the Platform on the condition of logging in with their username and password.
- Change the User statut:
From a user’s profile page :
Go to a user’s page, either through a keyword search (e. g. enter a user’s name and click on the search result of the “profile” type), or via the user directories menu. Once on a user’s profile page, click on the “burger” menu (= “contextual actions menu”), then on “Reactivate user” or “Disable this user” or “Unblock this user”. The text displayed in this button depends on the status of the user.
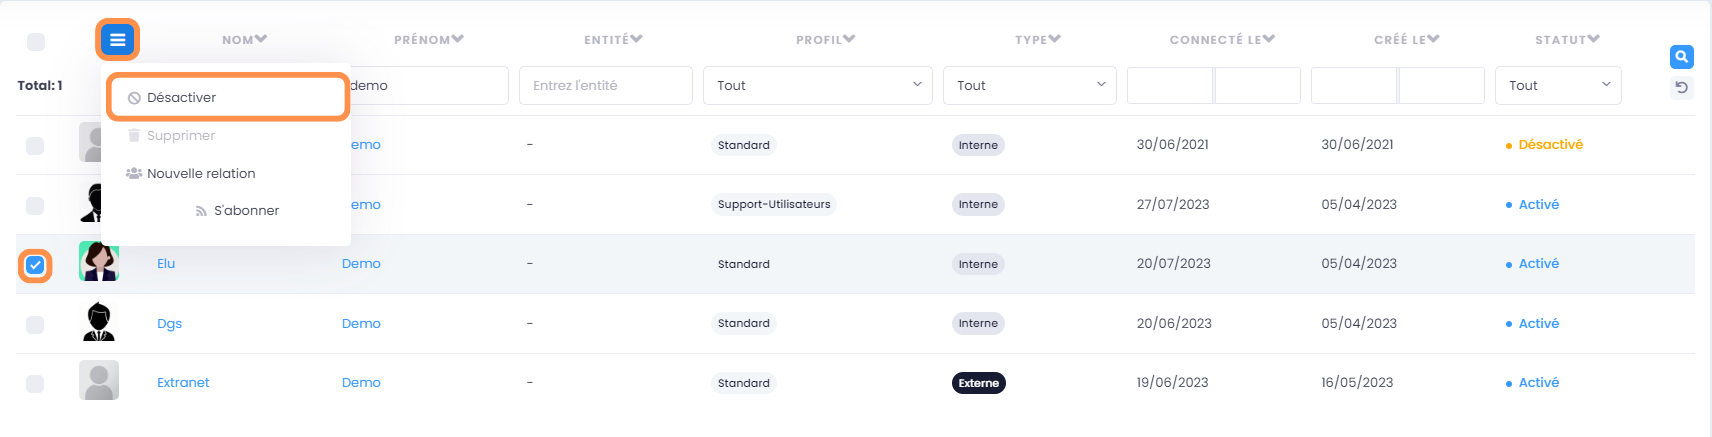
From the user directory page (modify individually or in bulk) :
Go to the user directory page from the main menu on the left “Directories/Users”. Once in the directory, you have the option to sort and filter users (for more information on filtering and sorting, please refer to the “User Directory” section). You can change the status of a single user: click on the menu “burger”, then on “Reactivate user” or “Disabled this user” or “Unblock this user”. The text displayed in this button depends on the status of the user. You can change the status of several users at once: in the left column you have checkboxes. Select the users you want to edit, then click on the “burger” menu at the top (directory header, other menus being greyed out) and click on “Reactivate these users” or “Disable these users” or “Unblock these users”.
Modify a user’s information
- In order to change the information related to a user, go to :
The user’s profile page (from search or directory)
The page of the user directory
Create/Manage User Lists
List Visibility: Users with the “User-support” profile can see all existing lists (even if not a member), either through the List Directory or through the search engine. They can then see the list members and their administrators. Actions from lists: Users with the “User-support” profile can only pre-add a list as a member of a space. They do not have the ability to manage the list itself, unless they are explicitly the administrator (or creator) of the list. To be able to perform the actions allowed on the lists, you have to go to the List Directory or to the page of a list (e. g. from the search engine).
Create / Manage Spaces
Users with the “User-support” profile have the possibility to perform various actions on collaborative spaces. However, the spaces management and their members depends on the validation of the administrators of those spaces.
Note
Please consult the introduction to understand the objectives of this profile in the management of the Collaborative Spaces tree and Users.
- On the page of a space, the “User-support” can consult the following tabs:
Home
Statistics
Member
The other tabs will be locked to him, unless he or she becomes a member of the space.
Creating Spaces at the “Root”
Via the quick access bar (top menu), click on “+” , then on space, then on the type of space you want (Organization, Group… )
Root space = 1st level in Organizations, Groups, Extranet, Public
The user who created a space automatically becomes the administrator of that space. Additional directors and other members must be added.
Note
The “user-support” profile is the only one that can create a space “at the root”.
For more information, please refer to the section “Creating a Collaborative Space”.
Pre-add members to Collaborative Spaces
Pre-adding members means that access to collaborative spaces will only be effective once the pre-adding has been validated by at least one of the space administrators. It is possible to pre-add members :
Through the “Burger” menu of a space (on the space page, from the space directory or from the search result).
In the “Burger” menu of the space, go to “see more”
Click on “pre-add a member/user list”
Fill in the fields according to the procedure in the “Add Members” section
A request will be sent to the space administrators to validate or deny the request to add users.
On the “Members” tab of the space, these users will be marked “pending”.
Manage the “Home” tab of a Collaborative Space
The “user-support” profile has the possibility to customize the home tab of a collaborative space. To edit the welcome of the space, go to the menu “Burger” of the space, then to “Edit the homepage”.
Contact Space Administrators
In order to properly assist users, in some cases it is necessary to ask space administrators to perform certain actions or to ask them to access the spaces to perform them yourself. For example, you could ask a space administrator to change the role of another member or simply share best practices. To contact the Space administrator :
Go to a Space page OR to the Space Directory page.
Click on the “Burger” menu, then on “Contact Administrators”.
A window opens to compose the message and validate the sending.
Note
This action is possible with the “User-support” or “Super-Administrator” profile. The difference is that only the “User-support” profile can see the entire Collaborative Spaces tree (via directories and search).
Restore a document
In the process of updating please refer to the section: “Manage Documents / Contents”.
Etiquettes
Les étiquettes permettent de catégoriser et de retrouver rapidement des documents en leur associant des mots-clés pertinents. Elles facilitent la recherche et l’organisation des contenus au sein de la plateforme et contribuent à une navigation efficace, notamment dans des projets ou des dossiers volumineux.
Note
Seul le profil « support-utilisateurs » peut gérer les étiquettes.
Créer une Nouvelle Étiquette
Pour créer une étiquette, il est nécessaire de passer par un document existant : - Accédez à la prévisualisation d’un document sur lequel vous souhaitez ajouter une étiquette. - Dans la section Étiquettes, saisissez le nom de la nouvelle étiquette que vous souhaitez créer. Si cette étiquette n’existe pas encore, elle sera automatiquement ajoutée lors de l’enregistrement. La nouvelle étiquette est maintenant créée et peut être utilisée sur d’autres documents.
Une fois l’étiquette créée, elle devient accessible dans la section des Étiquettes de GoFAST Configuration pour toute modification ou gestion ultérieure.

Associer des Étiquettes à d’autres Documents
Pour associer des étiquettes déjà existantes :
Dans le bloc des métadonnées du document, cherchez la section Étiquettes.
Tapez les premières lettres de l’étiquette souhaitée pour afficher les suggestions ou parcourez la liste des étiquettes existantes.
Sélectionnez l’étiquette et les modifications seront enregistrées automatiquement.
Rechercher des Éléments par Étiquettes
Les étiquettes facilitent la recherche et la navigation :
Dans les filtres avancés, sélectionnez une ou plusieurs étiquettes pour affiner les résultats de recherche. Cela est particulièrement utile pour trier les documents par thématique, projet ou autre critère spécifique.
Gestion Avancée des Étiquettes
Les utilisateurs ayant les droits du support utilisateurs peuvent gérer les étiquettes dans la section des Étiquettes de GoFAST Configuration :
Renommer une Étiquette : Les étiquettes peuvent être renommées si le besoin de précision ou de changement de libellé se présente.
Mettre en Majuscules : Pour uniformiser la présentation, il est possible de transformer le texte d’une étiquette en majuscules.
Fusionner des Étiquettes : Pour regrouper des étiquettes similaires et garder une liste simplifiée.
Supprimer des Étiquettes : Pour retirer des étiquettes obsolètes ou inutilisées et maintenir une structure cohérente.
Visibilité
Cloisonnement des Utilisateurs et des Espaces
This configuration allows you to define the level of visibility or partitioning of users between them and on spaces. Two options available: - Visibility of Collaborative Spaces: This is to open or restrict the fact that a user can see spaces of which he is not a member.
Visibility between users: This is about opening or restricting the fact that a user can see other users with whom he or she does not share any space.
Note
Only the “User-Support profile can manage Visibility Partitioning.
Note
Partitioning only applies to users who do not have any Collaborative Space in common. If two users are members of the same space, they will still be able to see each other.
Visibility among users
This is to allow users to see each other in the user directory or through the search engine, and to view their profile.
- Visibility or partitioning can be defined according to the “profile” of users:
Users with the “External” profile may or may not see each other.
All users regardless of their “profile” may or may not see each other.
Note
The partitioning between external users prevents partners and providers from seeing each other, unless they are members of the same space (from level 2 of the extranet space tree).
Visibility of Collaborative Spaces
It is about allowing users to see or not the different Collaborative Spaces of which they are not members.
- It’s possible to define visibility or partitioning according to the “profile” of users:
Users with the “External” profile may or may not, see all the Collaborative Spaces (in the Spaces directory or through the search engine).
Users with the “External” profile may or may not, see all the Collaborative Spaces (in the Spaces directory or through the search engine).
Note
This partitioning prevents users from seeing the existence of Spaces of which they are not members. However, even if there is no visibility partition, in the file explorer or the Spaces quick access menu (top bar), you can only see the Spaces of which you are a member.
Note
For users with the “External” profile, this prevents partners and providers from accessing the internal Spaces tree (e. g. Organizations and Groups), as well as Spaces intended for other partners or providers. This is important if there are Extranet Spaces dedicated to competing providers or partners.
Visibility of users Disabled
For reasons of traceability (audit and security), users who have left the entity (company/organisation) will be disabled on the platform and not permanently deleted.
Note
Be careful to distinguish between “Disabled” users (voluntarily) and “Blocked” users (those who have tried to log in with a wrong password more than 5 times, and who need to be unlocked by a “User-support” or a “super administrator”).
Disabled user profiles are inaccessible and anonymized to standard users. Only administrators of the platform (user-support profile) can retrieve them and reactivate them if necessary.
Note
Disabled users are visible to the “user-support” in the user directory, in all the areas where they were members, as well as through the search engine.
Entités
Les entités permettent de structurer et organiser les données et les utilisateurs de manière à refléter la hiérarchie ou les besoins spécifiques de votre organisation.
Attribuer/Créer une Entité
La création d’une entité se fait au niveau du formulaire de création d’un utilisateur :
Accédez à la page de création d’un utilisateur.
Dans la section ‘Informations sur l’utilisateur’ puis ‘Entité’, commencez à saisir les premières lettres de l’entité. Une liste d’entités déjà créées s’affichera. Si cette entité n’existe pas encore, elle sera automatiquement créée.
Enregistrez la fiche du profil. La nouvelle entité est désormais disponible et peut être attribuée à d’autres utilisateurs.
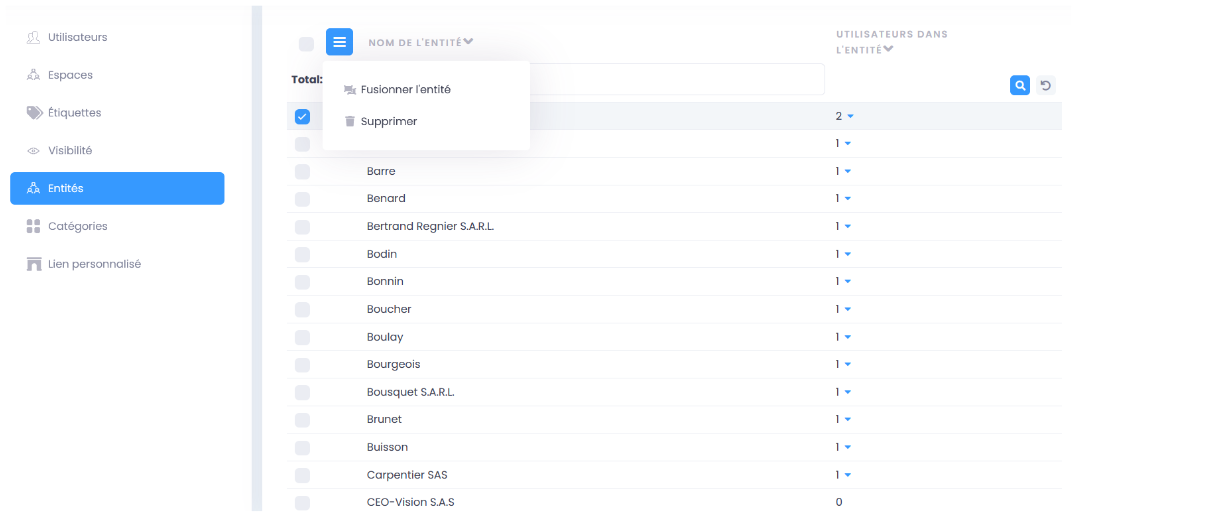
Gestion Avancée des Entités
Les administrateurs peuvent gérer les entités pour maintenir une organisation optimale :
Fusionner des Entités : Regrouper des entités similaires si nécessaire pour simplifier la structure.
Supprimer une Entité : Retirer les entités qui ne sont plus nécessaires pour maintenir une liste propre et actuelle.
DES CORRECTIFS SONT EN COURS POUR LA PARTIE ENTITE.
Catégorie
Les « Catégories » sont des métadonnées qu’un utilisateur peut appliquer sur les documents auxquels il a accès. Il s’agit du type de document, par exemple : courrier, facture, rapport, contrat, etc.
Note
Only the “user-support” profile can manage categories.
Créer/Modifier une catégorie et son emplacement
GoFAST offers a standard list of “Categories” applicable to documents. However, it is possible to add custom categories, with the associated translations. To add new categories of records:
Via le menu principal de gauche, allez dans « GoFAST Configuration »
On the configuration page, go to the “Categories” menu
Cliquez dans le menu burger sur « + Ajouter » ou en sélectionnant une des catégories existantes dans la liste.
Si vous souhaitez créer une nouvelle catégorie, renseignez les champs dans « + Ajouter » en y saisissant le nom de votre catégorie (ex. Devis) dans les langues disponibles.
If you wish to modify a category, select the non-standard category you wish to modify, then in the burger menu select ‘Manage spaces’.
Click “Save” to validate.
Note
Only non-standard categories can be edited
Configuration: DUA (Duration of Administrative Utility)
A “Duration of Administrative Utility” allows documents to be prepared for archiving. It is a question of defining a timeline (in days, months, years) that will be triggered from the moment the document is in “pre-archived” state and will depend on the duration defined for the category associated with the document. At the end of this period, an alert is sent to users identified as “Archivists” to either “Archive”, “Sort” or “Destroy” the document.
Note
Only the “support-user” profile can handle DUAs.
Where to manage DUAs:
À partir du menu principal de gauche, aller dans « GoFAST Configuration ».
Click on Categories.
Create or modify a DUA
- To create a new DUA:
From an existing category,
In the ‘Retention’ column, on the chosen category, press ‘+ Define’
Choose the time you want,
Then confirm.
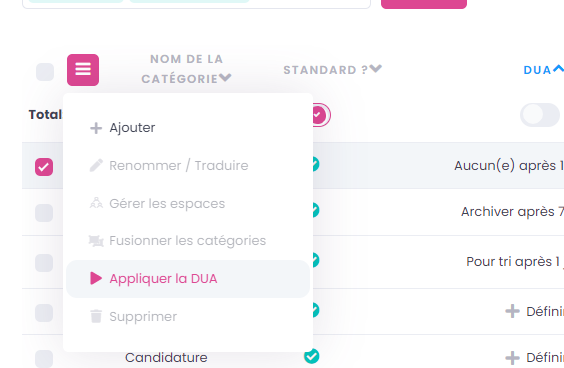
Applying retention
To apply retention, select the category you want to apply. Then select ‘Apply retention’ from the burger menu.
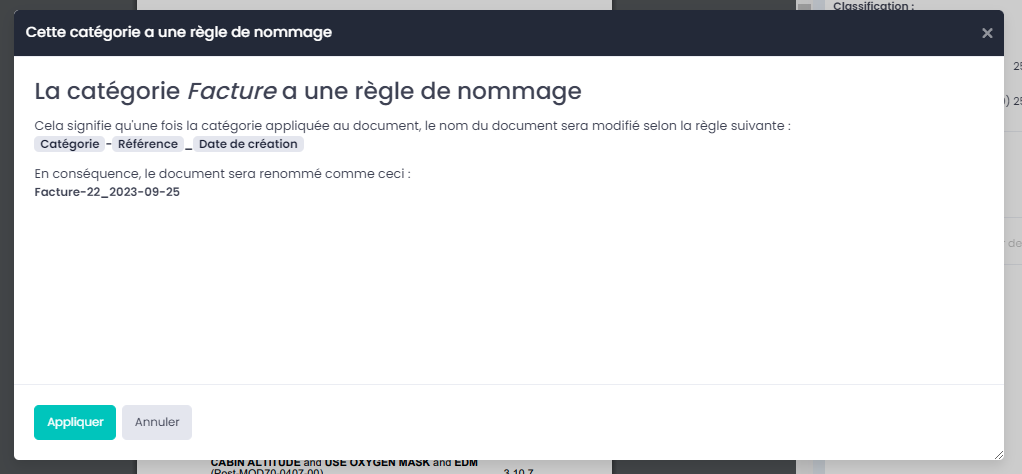
Configuration : Règles de nommage
A naming rule is used to structure and organise files. It is applied when a category is selected on a document.
Créer une règle de nommage
Via le menu principal de gauche, allez dans « GoFAST Configuration »
On the configuration page, go to the “Categories” menu
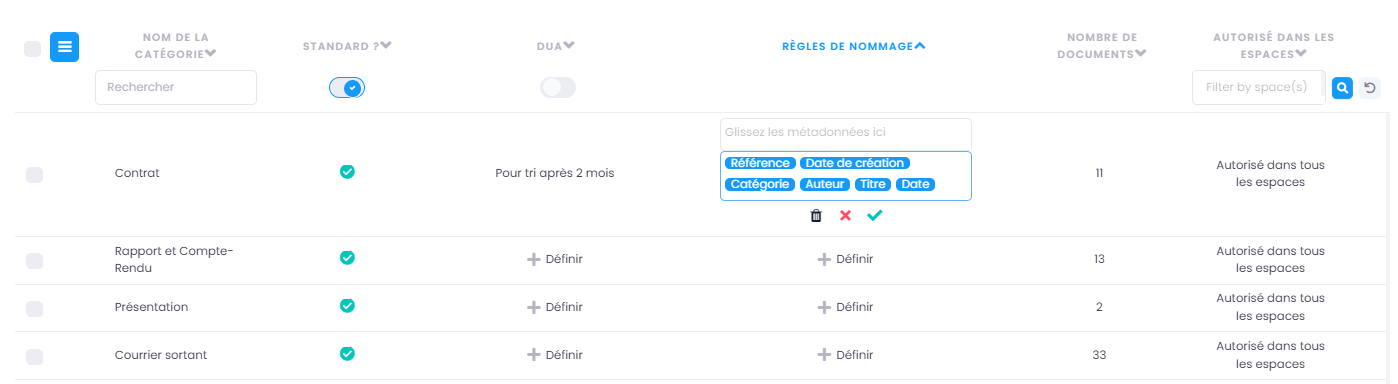
In the ‘Naming rules’ column, in the category you want, click on ‘+ Define’
Drag and drop the metadata in the desired order to create the naming structure. Available options include Reference, Date Created, Category, Author, Title, Date, etc.
Appliquer une règle de nommage
To apply the rule, go to the desired document and select the category configured in the Category tab. A message will be displayed to confirm that the document name has been changed.
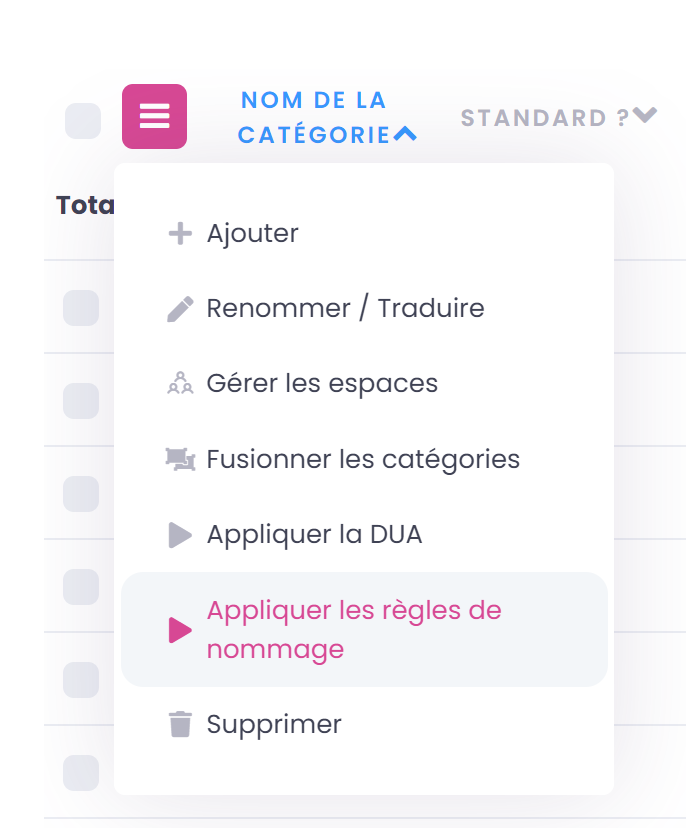
Vous pouvez aussi appliquer la règle de nommage à tout les documents ayant déjà une catégorie : - Rendez-vous dans « GoFAST Configuration », puis “Catégorie” - Vous pouvez cocher le ou les règles de nommage que vous voulez appliquer, puis cliquer sur le menu burger et sur “Appliquer les règles de nommage”.
Delete a naming rule
Go to GoFAST Configuration and then to the Category section. Find the naming rule you want to remove. In the Naming Rules column, click on the cross to the right of the label to remove a specific piece of metadata, or on the bin icon to remove the entire rule.
Lien personnalisé
Configuration: Custom Link
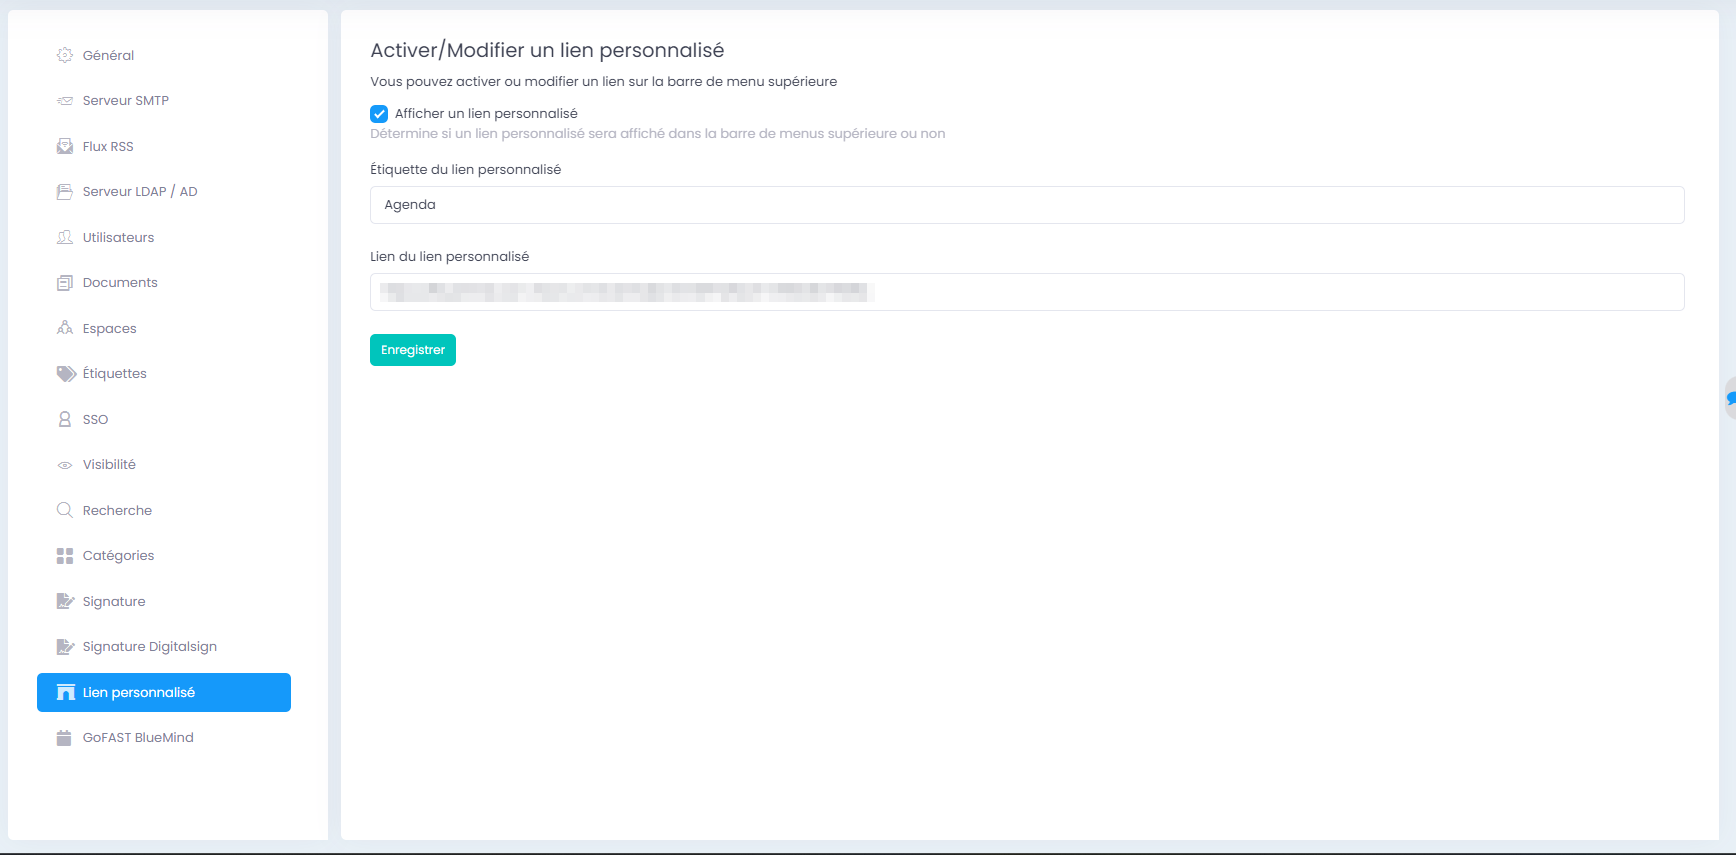
The custom link lets you add a shortcut directly to the top menu bar. Navigate to ‘GoFast Configuration’, then ‘Custom Link’.
Activation :
Tick the ‘Display a custom link’ box to activate the feature.
In the ‘Custom link label’ field, enter the name that will appear in the menu bar. This text will be the label visible to users.
In the ‘Custom link’ field, insert the full URL to which the link should point.
Once you have filled in the required fields, click on the ‘Save’ button to apply the changes.
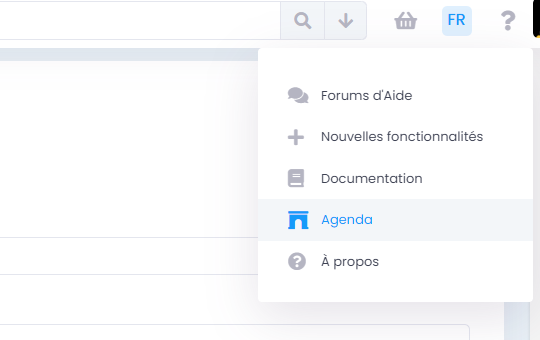
Once saved, the customised link will appear in the top menu bar. Users can click on this link to be redirected to the defined address.
Autres utilisations du support utilisateur
Visibility on Users
- The user support has visibility of all existing users through the directory of lists and users, as well as the search engine :
User-Support can see unit user accounts and to some extent manage them.
User-Support can see all User Lists, but does not have the ability to manage them if it is not the creator or designated administrator of these lists.
Note
For more information, please refer to the section: “Permissions table by profile”.
Disable/Unblock a user: To disabled or unblock a user and thus block or authorize their access to the platform:
Go to the User Directory and find it through the sorting and filters available.
OR Search the user via the search engine (search by name, first name or username).
Then… - Click on the menu “Burger” (contextual actions) from the directory or search. - OR Go to his profile and click on the menu “Burger”.
Via the “Burger” menu, click on “Disable” or “Unblock” and then on “Confirm”.
Note
There is a difference between “Inactive” users and “Disabled” users. Inactive users are not blocked, they are users who rarely log in to the platform.
Changer les identifiants des utilisateurs
Il est possible de changer les identifiants, pour cela rendez-vous sur le profil dont vous souhaitez changer l’identifiant, cliquez sur la roue cranté, puis changez l’identifiant.
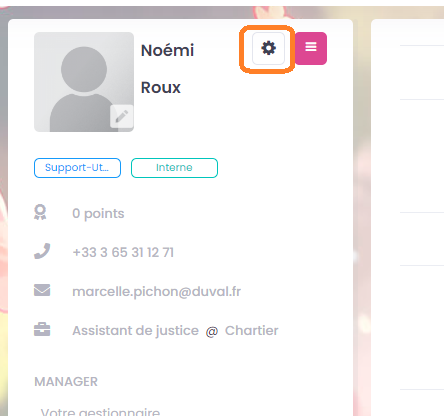

Pour changer l’identifiant, vous devez avoir le rôle de support administrateur et il ne faut pas que l’utilisateur ait l’authentification SASL de coché
Pré-ajouter des membres dans une liste d’utilisateur
Il est possible de pré-ajouter des membres dans une liste d’utilisateur. Pour cela il faut cliquer sur le menu burger, puis sur “Pré-ajouter des membres”. Il vous faudra alors renseigner le ou les membre(s) à ajouter.
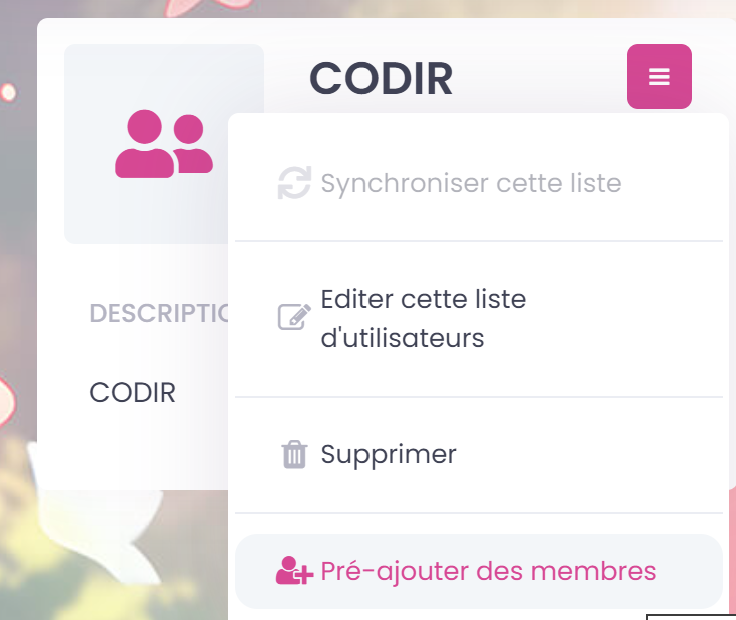
Note
Seul le rôle administrateur peut pré-ajouter des membres à une liste d’utilisateur dont il n’est pas administrateur
Statistics
The Statistics view allows you to view various information about the activity on the platform. The information is rendered graphically, over a selected period of time. The Statistics view is divided into 3 parts:
User statistics
Documentary statistics
Spatial statistics
It is also possible to export the data.
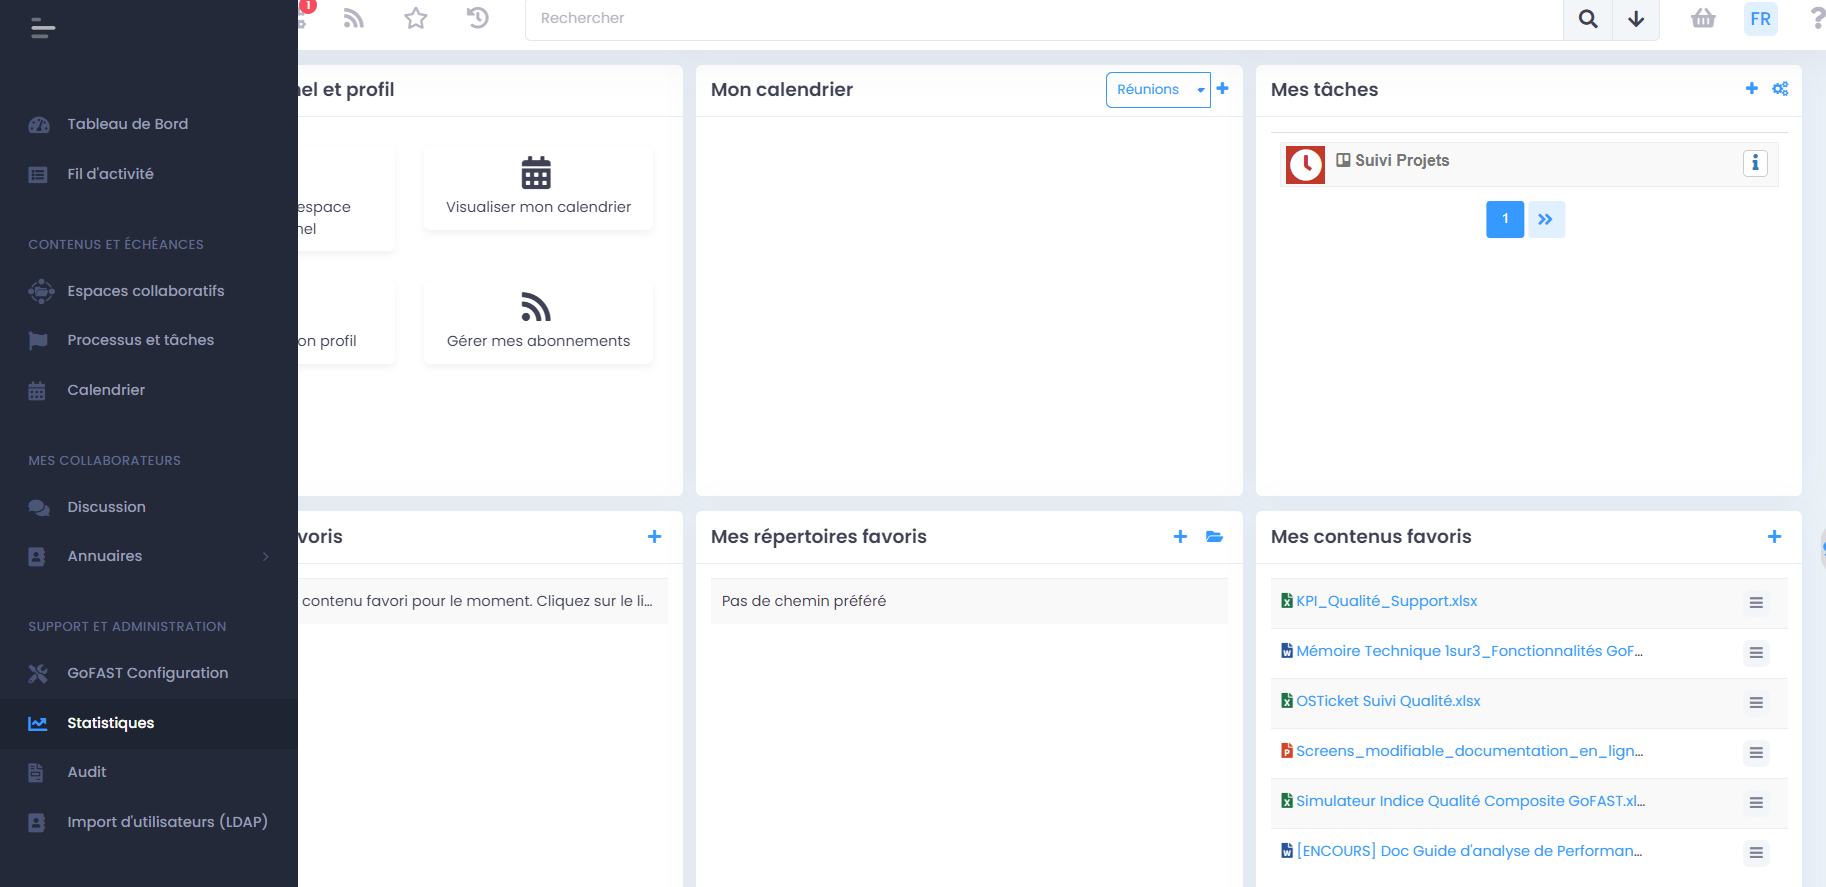
Access to Statistics
To access the statistics, select Statistics in the left-hand navigation panel. This section provides an overview of the various metrics relating to users, documents and rooms.
Note
Only users with the “User-support” profile are entitled to access the global statistics of the platform. However, the various administrators of the spaces can also access them, but the statistics displayed will be limited to the spaces that these users administer.
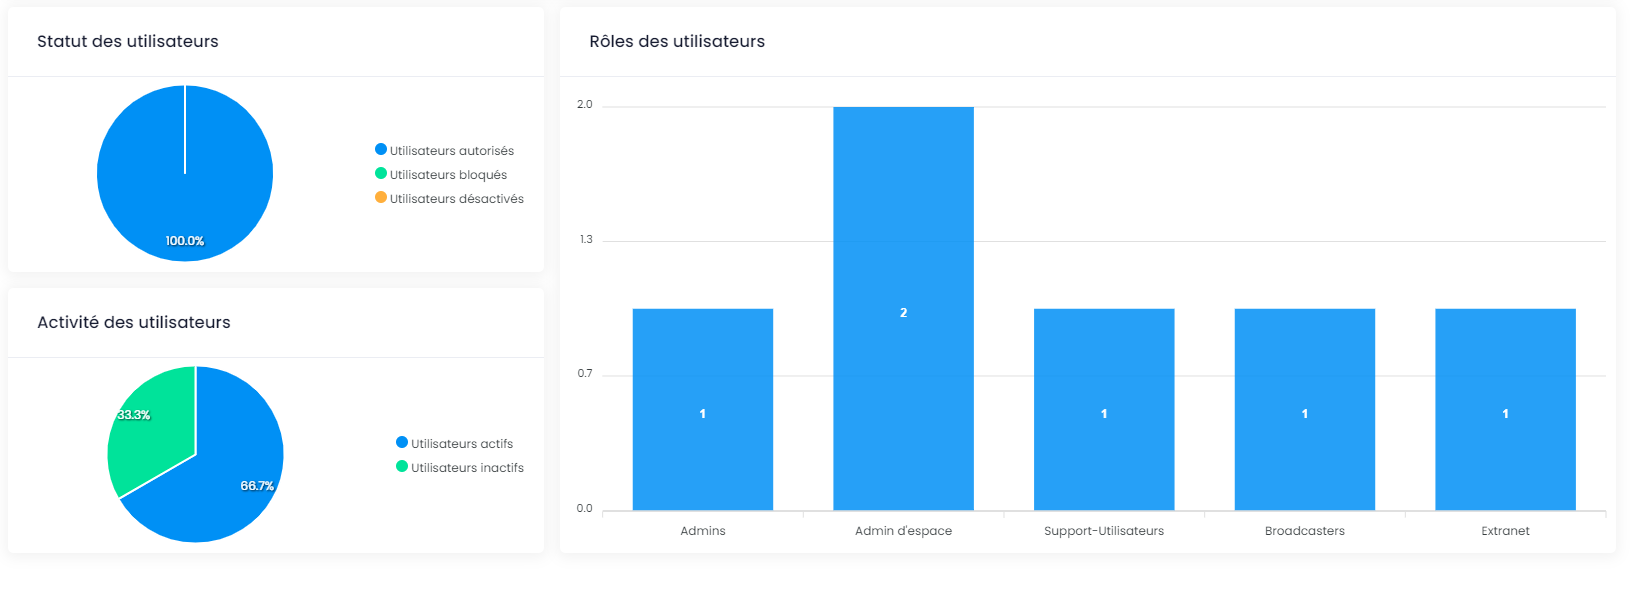
Three sub-tabs are available: 1. User statistics tab Shows the proportion of users blocked, authorised or deactivated. It also shows the users created and the various connections. User activity: Distinguishes between active and inactive users. User roles: Distributes users according to their roles within the system.
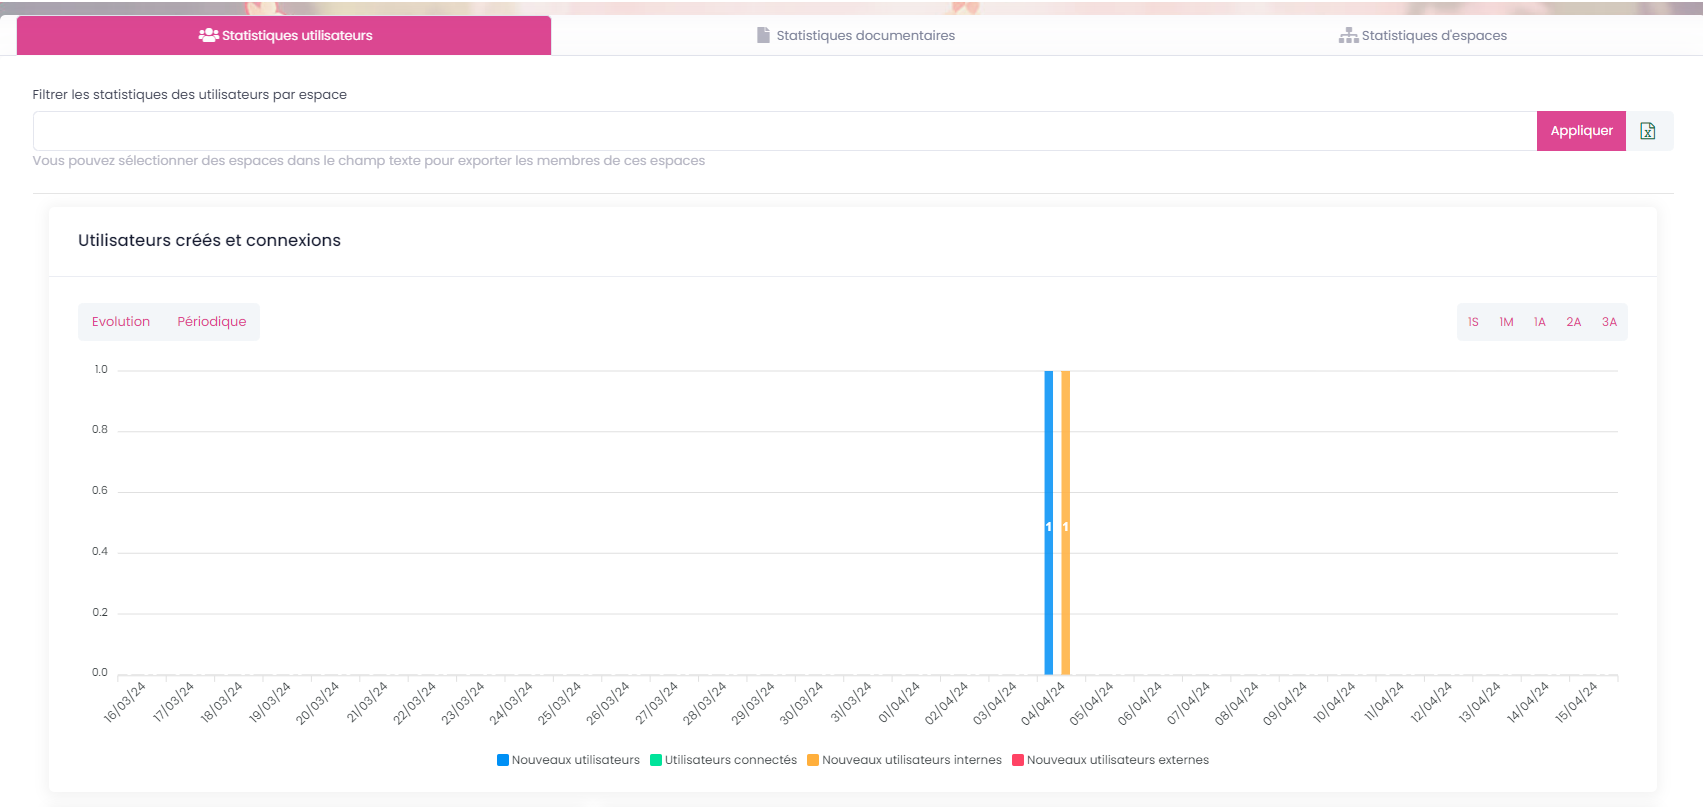
But you can also choose to sort user statistics by space, at the top of the page.
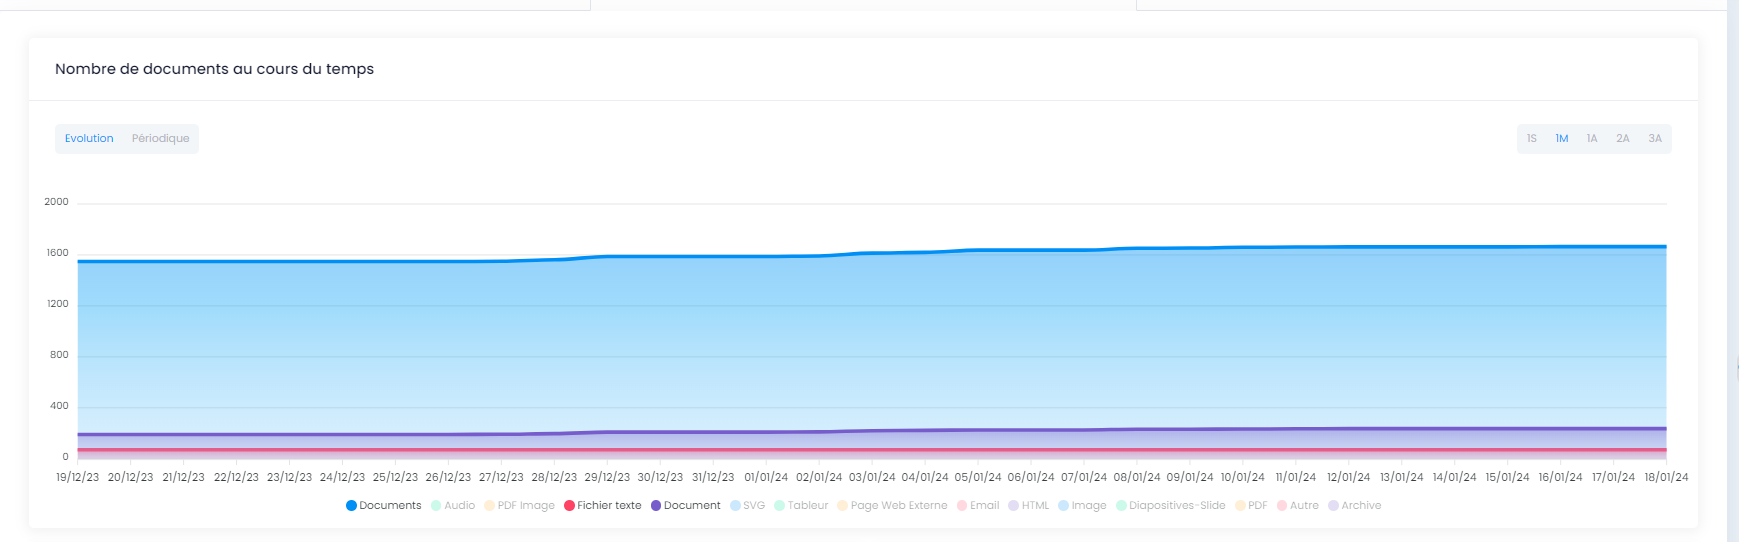
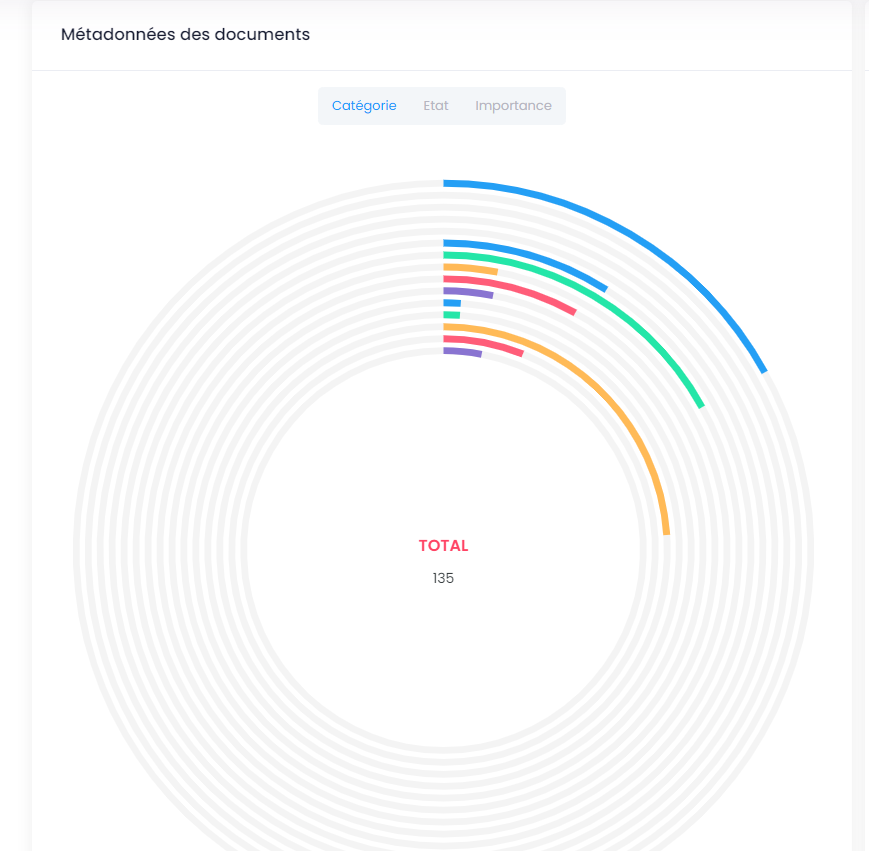
Tab “Document statistics”, allows you to view the number of documents and information related to documents by category, status and importance.
Number of documents over time: Displays the evolution or periodic distribution of documents.
Storage: Shows the amount of storage space used compared to the amount of free space. Indexing: Shows the indexing status of documents.

Document metadata: View the distribution of documents according to various metadata such as category, status and importance.
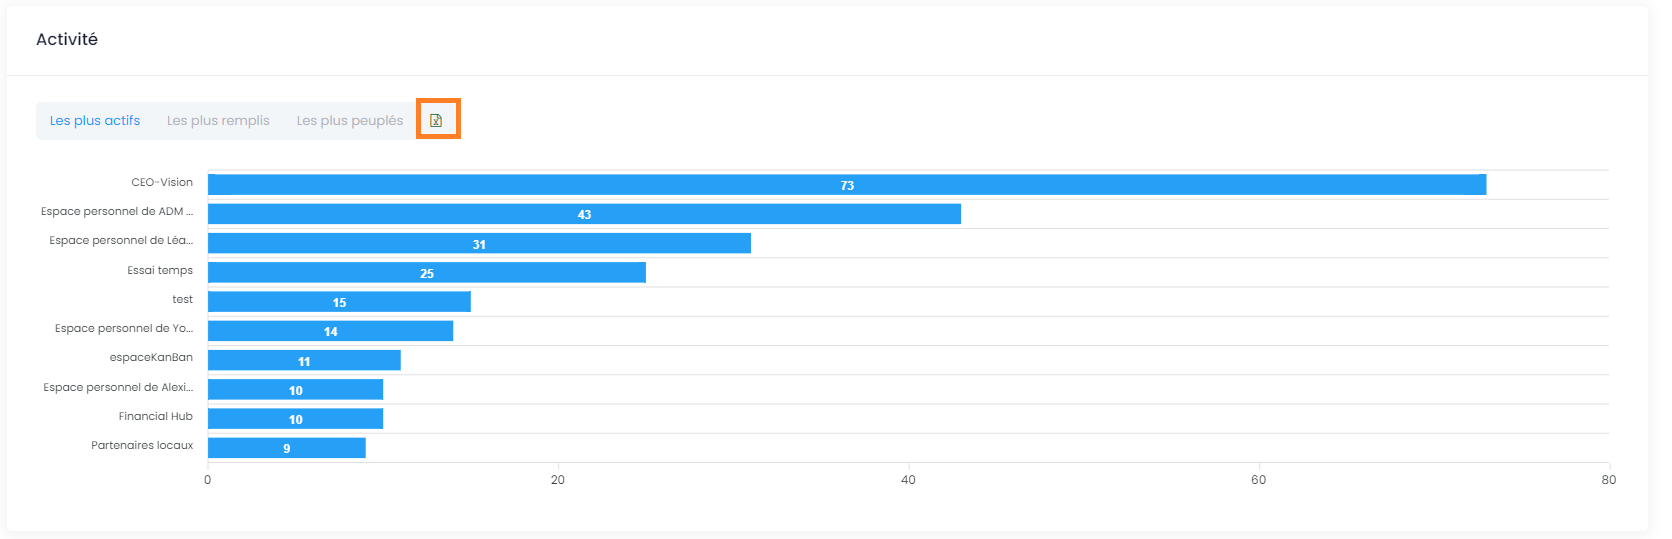
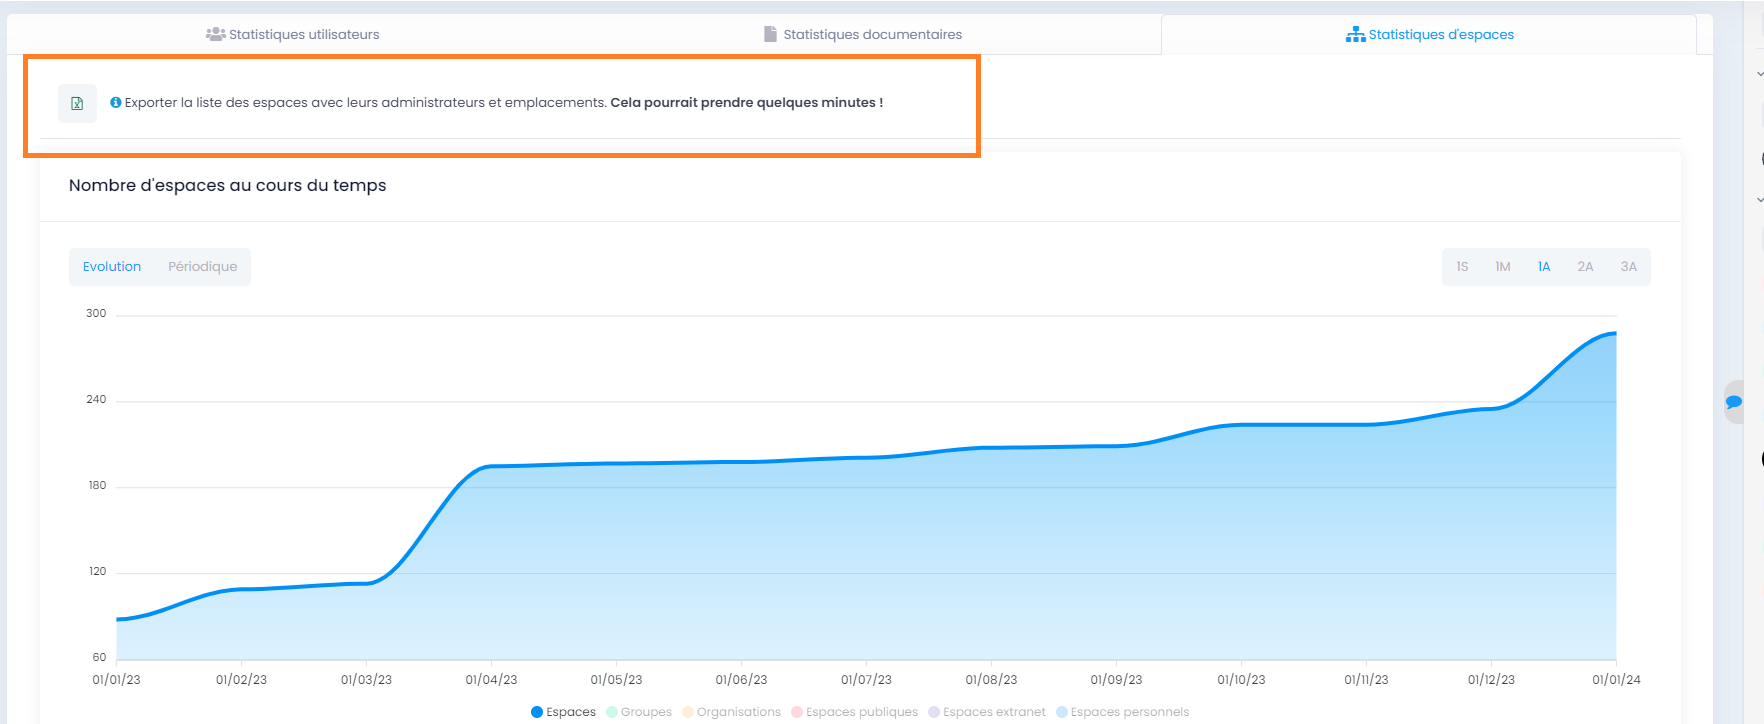
Tab “Spaces statistics”, allows you to visualize the number of spaces and information about the spaces, their evolution by period, the most active, the most populated and the most filled.
Number of spaces over time: Track the growth or periodic distribution of spaces. Activity: Identify the most active, fullest and most populated spaces.
Export Data
The export will be in spreadsheet format (XLSX).
Export users: In the tab User statistics it’s possible to export all existing users, with their :
unique registration number (ID given automatically when creating a user)
their user ID (used to log in)
First name
Name
Date of registration (date of account creation)
Date of last connection
Status (1 if active = already connected and 0 if not active)
Column “super administrator” (indicating “TRUE” if has profile OR “FALSE” if does not)
Column “User-support” (indicating “TRUE” if has profile OR “FALSE” if does not)
Column “Space Admin” (indicating “TRUE” if administrator of at least one collaborative space OR “FALSE” if administrator of no space)
Column “Broadcaster” (indicating “TRUE” if profile or “FALSE” if not)
Column “External” (indicating “TRUE” if it has profile OR “FALSE” if it does not)

Export d’une liste de documents : Dans l’onglet Statistiques documentaires il est possible de réaliser un export de tous les fichiers existants dans un ou plusieurs espaces, avec leur :
“node” (the automatic reference number assigned to the creation of the document and present in the URL of the document page).
Title (of the document)
Link (to document page)
Path (the location of the document)
Current version (the current version number of the document)
Popularity (automatically calculated according to activity on the document)
View counter (number of times the document was viewed in a given period)
Category (of document)
Date of creation (of document)
Created by (user who submitted/created the document on the platform)
Date of amendment (last date the document was amended/edited)
Note
To export a list of documents, you need to select at least one space.
Note
It’s possible to select the information of your choice for the list of documents, by selecting one or more data from among those available (check the box).
Export of the list of spaces:
- In the tab Spaces statistics it’s possible to export all the existing spaces, with their :
“ID” (the automatic reference number, assigned to the creation of the space and present in the URL of the space page).
Title (from space)
Type (Organization, Group, Public, Extranet)
Path (the location of space)
Administrators (users with the administrator role in the space)
Contributors (users with the contributing role in space)
Read-only (users with read-only role in space)
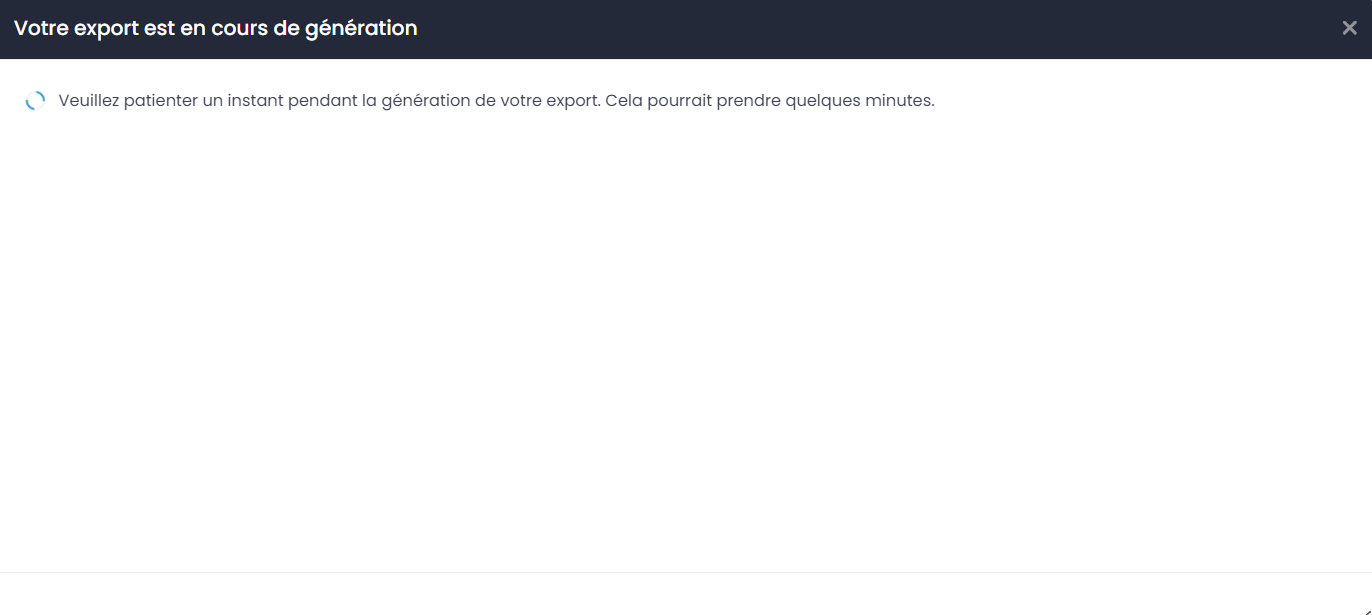
In the tab Spaces Statistics, click on the button with the Excel icon.
A small window opens and informs you that your export is being generated. As soon as the download is started, the download will close automatically.
Audit
- The “Audit” view lists and timed the “events” (actions) performed, including:
Node creation (creation of a document/content or space)
Connections (from a user)
Consultation of the document
Consultation of documents/content
Updating of documents/content
Updating locations
Removal of space
Archived space
Unarchived space
Sharing by email (of a download link)
Downloaded link sharing
Adding a member (in a space)
Deletion of member (from a space)
Create User
Delete a user (if he has never logged in)
etc.
Go to Audit:
Note
This feature is only available to users with the “User-support” profile.
L’audit complet est accessible via le menu principal de gauche, en cliquant sur « Audit ». À partir de cette page Audit vous pouvez : * Utiliser les filtres mis à disposition pour retrouver une action en particulier ou un contenu. * Exporter l’audit dans la limite de 50 000 résultats
Note
For example, to be able to restore a document: filter by event type “delete node”, then specify a period to further narrow the list. Once your action is found, click on the document/content concerned to go to its page and restore it.
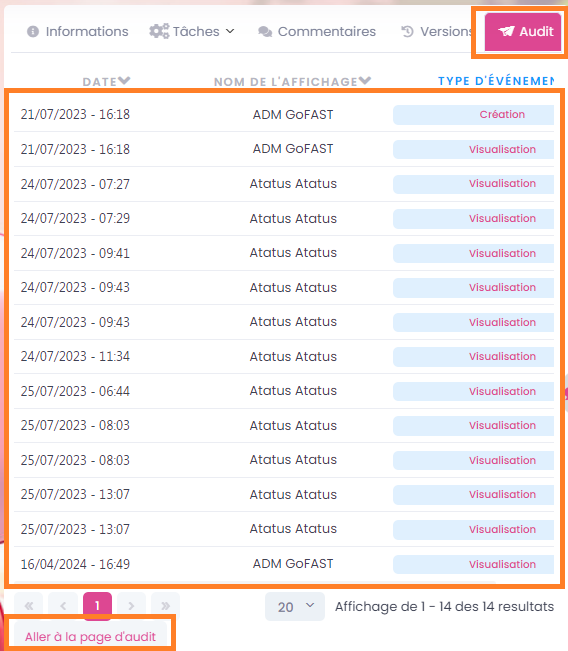
The specific audit on a document is available on the document page: You can see the most recent events performed on that document, the date and time of the actions, and the users who performed the action.
Profile “Super-Administrator”
Général
Personnalisation
GoFast propose diverses options de personnalisation permettant d’ajuster l’apparence de l’interface selon vos préférences.
Ces trois options de personnalisation peuvent être modifiées directement depuis ‘GoFast Configuration’ puis ‘Général’.
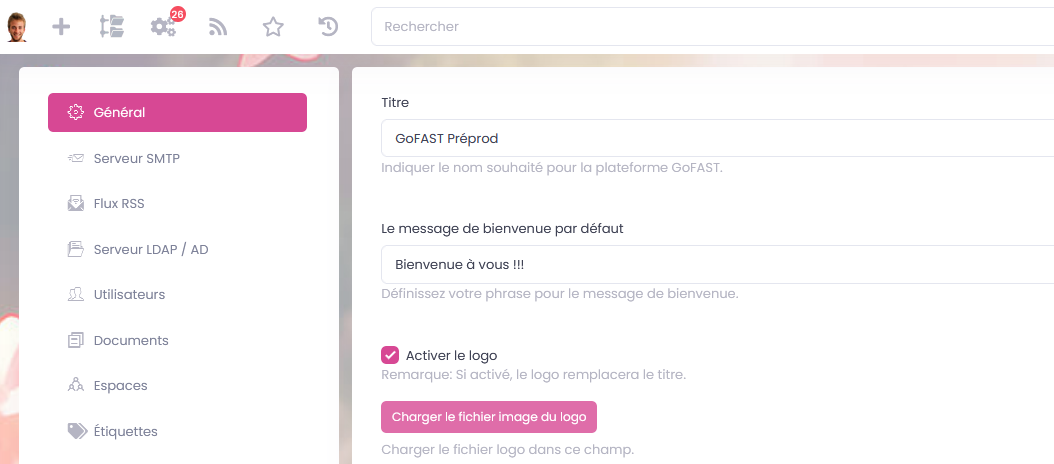
1. Titre de l’onglet: Il est possible de définir le titre qui apparaîtra lors du survol de l’onglet dans le navigateur. .. figure:: media-guide/titregofast.png
2. Le message de bienvenue par défaut: Il est possible de personnaliser le message de bienvenue qui s’affiche par défaut à la connexion. .. figure:: media-guide/messagebienvenue.png
3. Logo en haut de la page: Il est possible de choisir un logo qui apparaîtra en haut de la page, à gauche, sur toutes les pages après connexion. .. figure:: media-guide/logoimage.png
Customisable logo on the login page
GoFast allows administrators to customise the appearance of the login page by adding a company logo or image. 1. Go to ‘GoFast Configuration’ from the left-hand side menu, and select the ‘General’ tab 2. Activate the ‘Enable logo’ option. 3. Upload your logo image by clicking on ‘Upload logo image file’
4. Sélectionnez l’emplacement de votre logo sur la page de connexion. Trois emplacements sont disponibles pour l’affichage du logo : a. Pos.1 : Au-dessus du formulaire de connexion. b. Pos.2 Dans le coin en haut à droite c. Pos.3 Au centre du bloc gauche 5. Après avoir choisi l’emplacement souhaité, cliquez sur « Enregistrer » pour appliquer les changements.
Vous pouvez aussi retrouver d’autres options de personnalisation ici
Serveur SMTP
Le serveur SMTP (Simple Mail Transfer Protocol) est essentiel pour permettre d’envoyer des emails(des notifications, des alertes). Une configuration correcte est indispensable pour assurer l’envoi et la réception efficaces des emails.
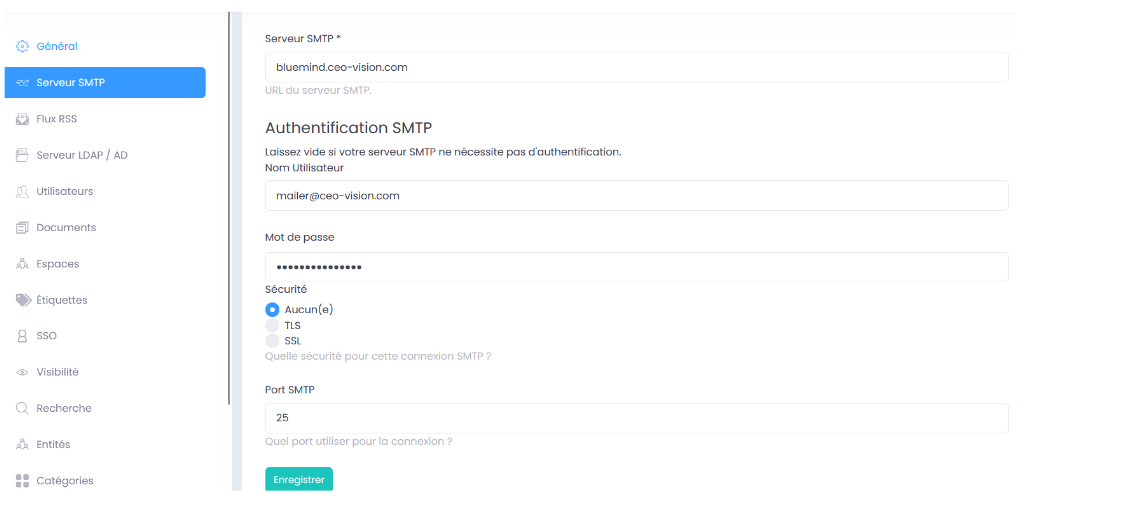
Configurer le Serveur SMTP
Pour configurer le serveur SMTP, suivez ces étapes :
Accédez à GoFAST Configuration : Allez dans le menu de configuration à gauche et sélectionnez l’option Serveur SMTP.
Renseignez les Informations du Serveur SMTP : Dans cette section, vous devrez fournir les informations suivantes :
Serveur SMTP : Indiquez l’adresse de votre serveur SMTP (ex : smtp.votreorganisation.com).
Authentification SMTP : Passez ensuite au bloc Authentification SMTP où vous devrez fournir les informations suivantes :
Nom d’utilisateur : Entrez le nom d’utilisateur du compte SMTP ( information transmise par le client ).
Mot de passe : Saisissez le mot de passe correspondant du compte SMTP.
Sécurité : Sélectionnez le type de sécurité à utiliser ( Aucune, TLS, SSL )
Port SMTP : Indiquez le port utilisé pour la connexion SMTP (par exemple, 25, 465 ou 587).
Enregistrer les Modifications : Une fois que vous avez rempli tous les champs requis, cliquez sur le bouton Enregistrer pour appliquer la configuration.
Note
Cette fonctionnalité est accessible uniquement aux utilisateurs ayant le profil « Super-administrateur ».
Flux RSS
Les flux RSS (Really Simple Syndication) permettent de récupérer automatiquement les mises à jour de contenu d’un site web sans avoir à le consulter directement.
Ajouter un flux RSS
Cliquez sur le bouton + Ajouter un flux.
Dans la fenêtre qui apparaît, vous devrez entrer un titre pour le flux ainsi que l’URL du flux RSS. L’URL doit être le lien direct vers le flux RSS du site que vous voulez suivre. Cliquez sur Ajouter un flux RSS pour valider et enregistrer le flux.

Modifier un flux RSS existant
À côté de chaque flux ajouté, vous avez une icône en forme de crayon (comme on le voit sur l’image). Cliquez dessus pour modifier les détails du flux.
Vous pouvez modifier l’URL ou le titre du flux.
Supprimer un flux RSS
À côté de chaque flux, il y a également une icône en forme de croix (X). Cliquez dessus pour supprimer un flux que vous ne souhaitez plus suivre.
Les flux RSS sont visibles sur le bar de menus en haut :

Serveur LDAP/ AD
Automatic synchronization of GOFAST accounts with AD/LDAP
GoFAST offers a new feature that automatically synchronizes users from the Business Directory to your collaborative platform. Synchronization is done only with accounts that have authentication delegations enabled. Users that do not exist in GoFAST but are present in the Directory, at the time of synchronization, will be created and activated on the platform. In the case of deleting a synchronized user on the Directory page, the user will be “Blocked” on GoFAST. This mechanism makes it possible to retain the traceability of the actions of that user and to reassign that information to him under certain circumstances.
Note
Please note that accounts that do not have authentication delegations will be out of sync cycle. They will not be automatically blocked or unblocked from the platform.
Connection to LDAP / AD Server
To establish a connection with your LDAP server, you must connect to GoFAST as a Technical Administrator. Go to the control panel and click on ‘LDAP/AD server’.
Once the page is displayed, in the left sidebar click on the “LDAP /AD Server” heading. Fill in the settings of your Server according to the recommendations given below :
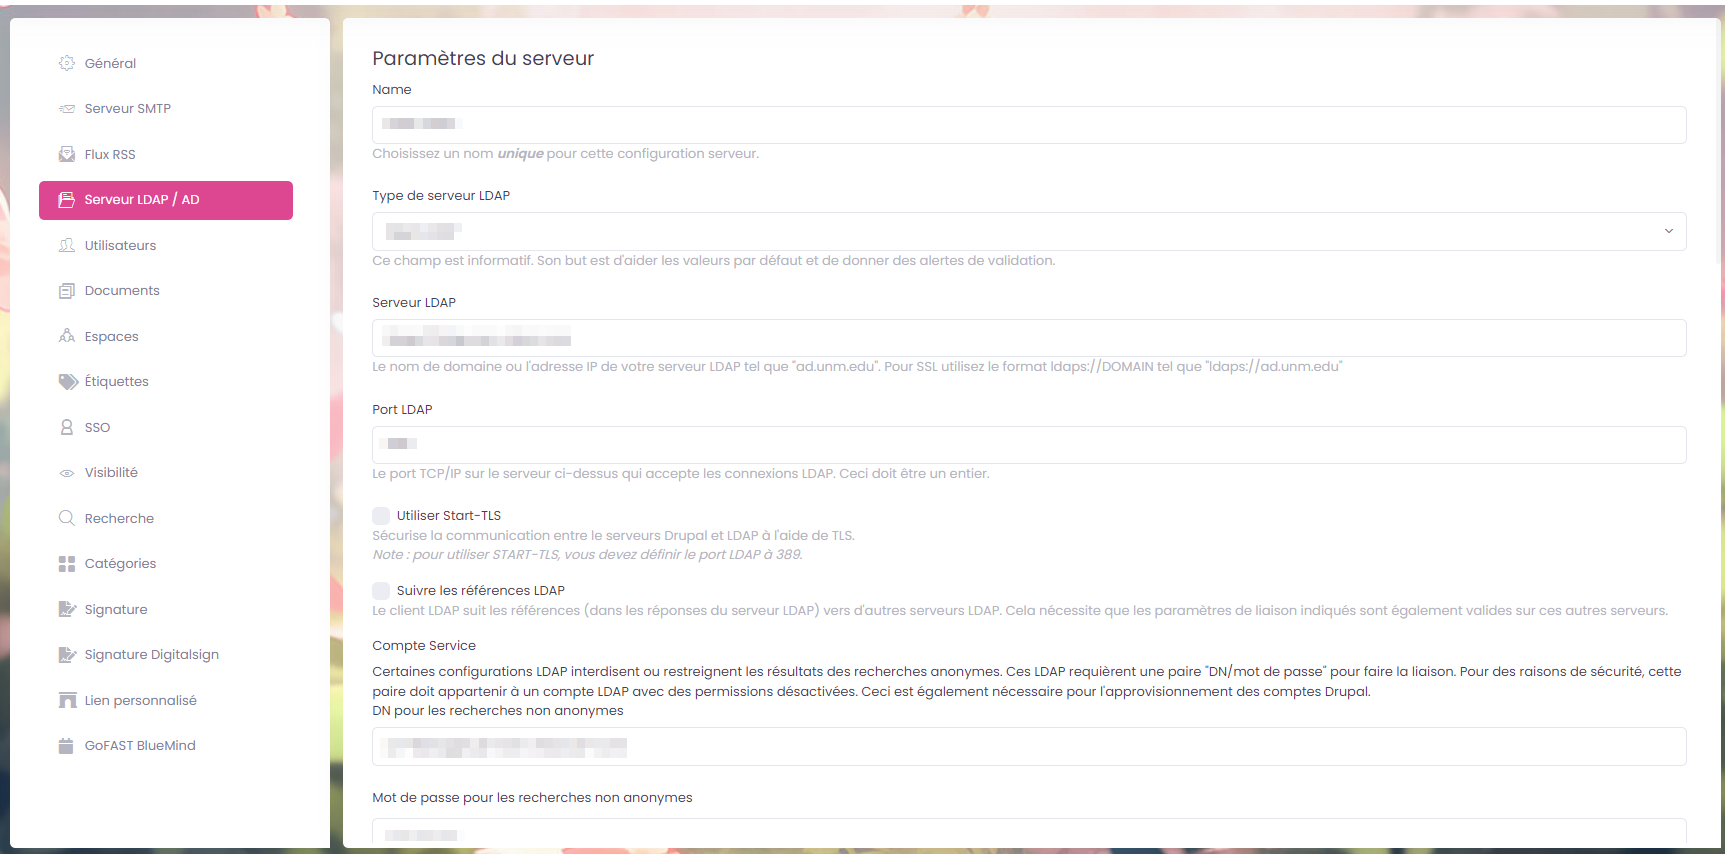
Name: Choose a unique name for this server configuration.
LDAP server type: Four types are available, Active Directory, Open LDAP, Apple Open Directory, Novell. This field is informative. Its purpose is to help default values and give validation alerts.
LDAP server type: Four types are available, Active Directory, Open LDAP, Apple Open Directory, Novell. This field is informative. Its purpose is to help default values and give validation alerts.
LDAP port: The TCP/IP port on the above server that accepts LDAP connections. This must be an integer.
Use Start-TLS: This option allows secure communication between Drupal and LDAP servers using TLS ( To use Start-TLS you need to set the LDAP port to 389 ).
Follow LDAP References: The LDAP client tracks references (in the LDAP server’s responses) to other LDAP servers. This requires that the specified connection parameters are also valid on these other servers.
Service Account: Some LDAP configurations prohibit or restrict anonymous search results. These LDAPs require a “DN/password” pair to make the link. For security reasons, this pair must belong to an LDAP account with disabled permissions. This is also required for the provisioning of Drupal accounts.
DN for non-anonymous searches.
Password for non-anonymous searches.
Base DNs for LDAP users, groups and other entries: Which DNs have appropriate entries for this configuration? ex: ou=campus accounts, dc=ad, dc=uiuc, dc=edu. Keep in mind that each additional base probably doubles the number of queries. Place the most used in the first position and use one high base DN instead of two low base DNs. Enter one DN per line if more than one is required.
Once all the information has been entered correctly, a button is available at the end of the “Connection Test” form, which allows you to test the connection between GoFAST and the LDAP server. An information message will be displayed to the right of the button indicating whether the connection was successful or unsuccessful. In case of failure, it is imperative to check the parameters and start the test again. If the test is successful, press the “Save” button to save this configuration.
Note
It’s possible to make changes or set up a new configuration, just remember to test the connection then save the changes only if successful.
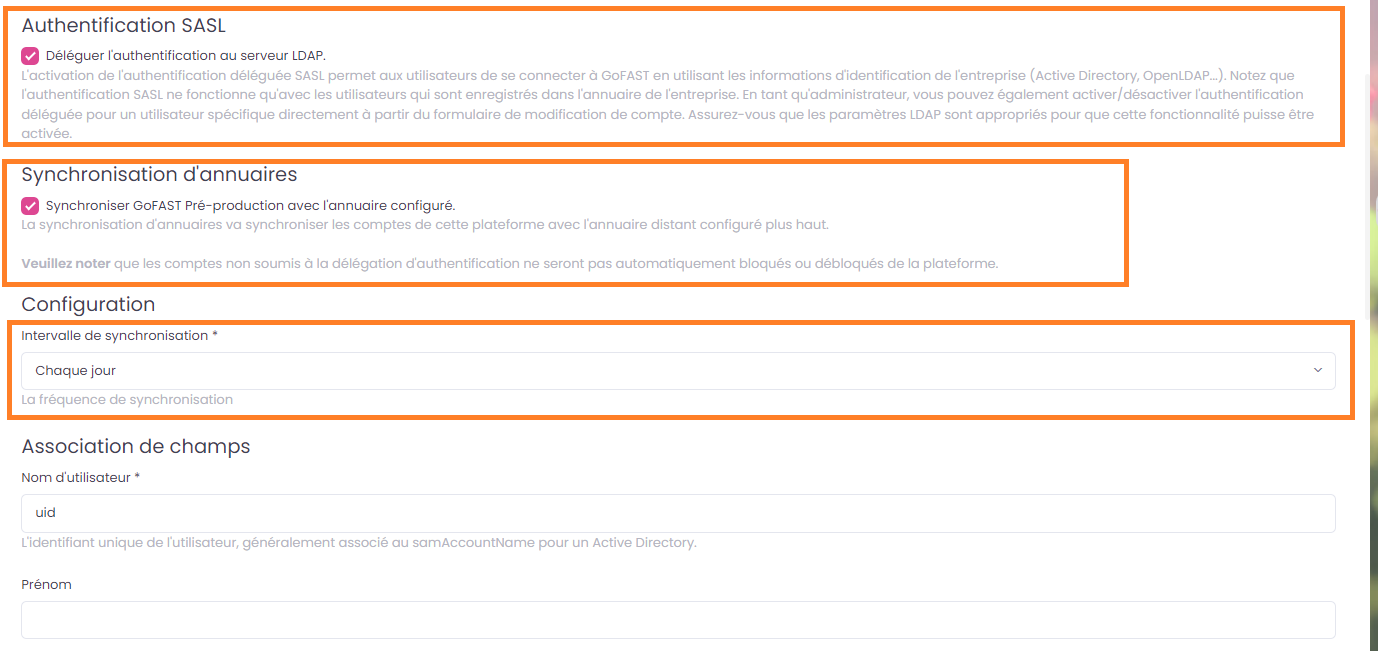
Enabling SASL Delegated Authentication
Une fois la connexion établie avec le Serveur LDAP, aller dans la section «Authentification SASL» qui se trouve en bas du formulaire de paramètres, cocher la case «Déléguer l’authentification au serveur LDAP». N’oubliez d’enregistrer pour lancer l’opération de délégation. Cette opération peut prendre quelques minutes selon le nombre d’utilisateurs actifs sur GoFAST.
SASL delegated authentication enables users to connect to GoFAST using the company’s credentials (Active Directory, OpenLDAP, etc.).
Note
SASL authentication only works with users who are registered in the company directory. As an administrator, you can also enable/disable delegated authentication for a specific user directly from the account change form. Make sure the LDAP settings are appropriate for this feature to be enabled.
Configuring the synchronization
After activating the delegation, a new section “Directorium Synchronization” is visible at the bottom of the page, which is dedicated to the configuration of the synchronization of the platform accounts with the remote directory configured above. To configure the synchronization, first check the box “Synchronize GoFAST with the configured directory”. Then go to the subsection “Configuration” and choose the synchronization frequency.
Vous pouvez aussi choisir de “Déléguer l’authentification au servur LDAP”, l’activation de l’authentification déléguée SASL permet aux utilisateurs de se connecter à GoFAST en utilisant les informations d’identification de l’entreprise (Active Directory, OpenLDAP…). Notez que l’authentification SASL ne fonctionne qu’avec les utilisateurs qui sont enregistrés dans l’annuaire de l’entreprise. En tant qu’administrateur, vous pouvez également activer/désactiver l’authentification déléguée pour un utilisateur spécifique directement à partir du formulaire de modification de compte. Assurez-vous que les paramètres LDAP sont appropriés pour que cette fonctionnalité puisse être activée.
Two other important subsections should be noted :
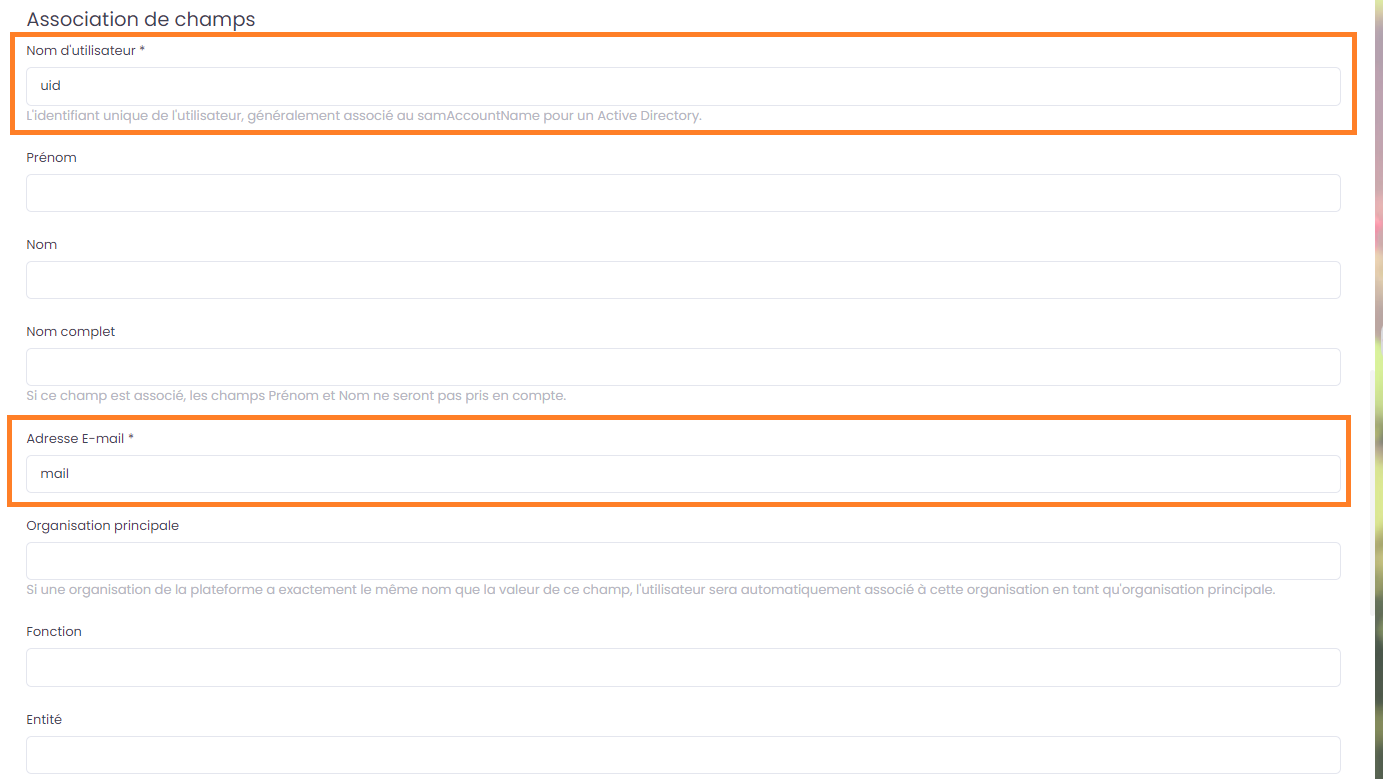
Field association (Required): You must at least fill in the fields “User name” and “Email address” with their respective attributes in the directory (Example: Username -> uid, Email address -> mail ). Other fields are optional.
Note
The unique user ID, usually associated with the samAccountName for an Active Directory.
Filters (Optional): Here you can perform specific filters for your synchronization request. It is recommended to separate each filter list with line returns.

Once the synchronization setup is complete, click on the “Save” button to perform the operation.
If, however, you want to synchronize before the next set date, just click on the “Synchronization” button.
Utilisateurs
Configuration Validation creation users
It’s possible to activate an option in “Configuration” and then “Users”. This option allows when a business/space administrator creates a new user, to submit it for validation by a support-user profile before it is created.
Once the business/space administrator has created the new user, the support-user profile receives a notification and can validate or deny the activation of a user profile from the profile page or from the directory (this action can be done in bulk).
A user awaiting validation appears as “Pending” in the directory.
Configuration External user access
In “GoFAST Configuration” and then “Space”, you will find the possibility to limit the addition of external users in certain spaces.
Disable adding external users to groups - When this option is enabled, an external user cannot be added to the “Groups” space type. - When this option is disabled, a warning message is displayed when you are going to add an external user to the “Groups” space type.
Disable adding external users to organizations - When this option is enabled, an external user cannot be added to the “Organizations” space type. - When this option is disabled, a warning message is displayed when you are going to add an external user to the “Organizations” space type.
Visibility on Spaces
- The user support has visibility of all existing Collaborative Spaces through the directory of spaces and the search engine:
If he or she is not a member, he or she will not be able to access the contents of the Spaces (either files or folders).
If a member of a space, he or she can access it and these permissions depend on the “role” he or she has in that Space.
Note
For more information, please refer to the section: “Permissions table by profile”.
Password policy
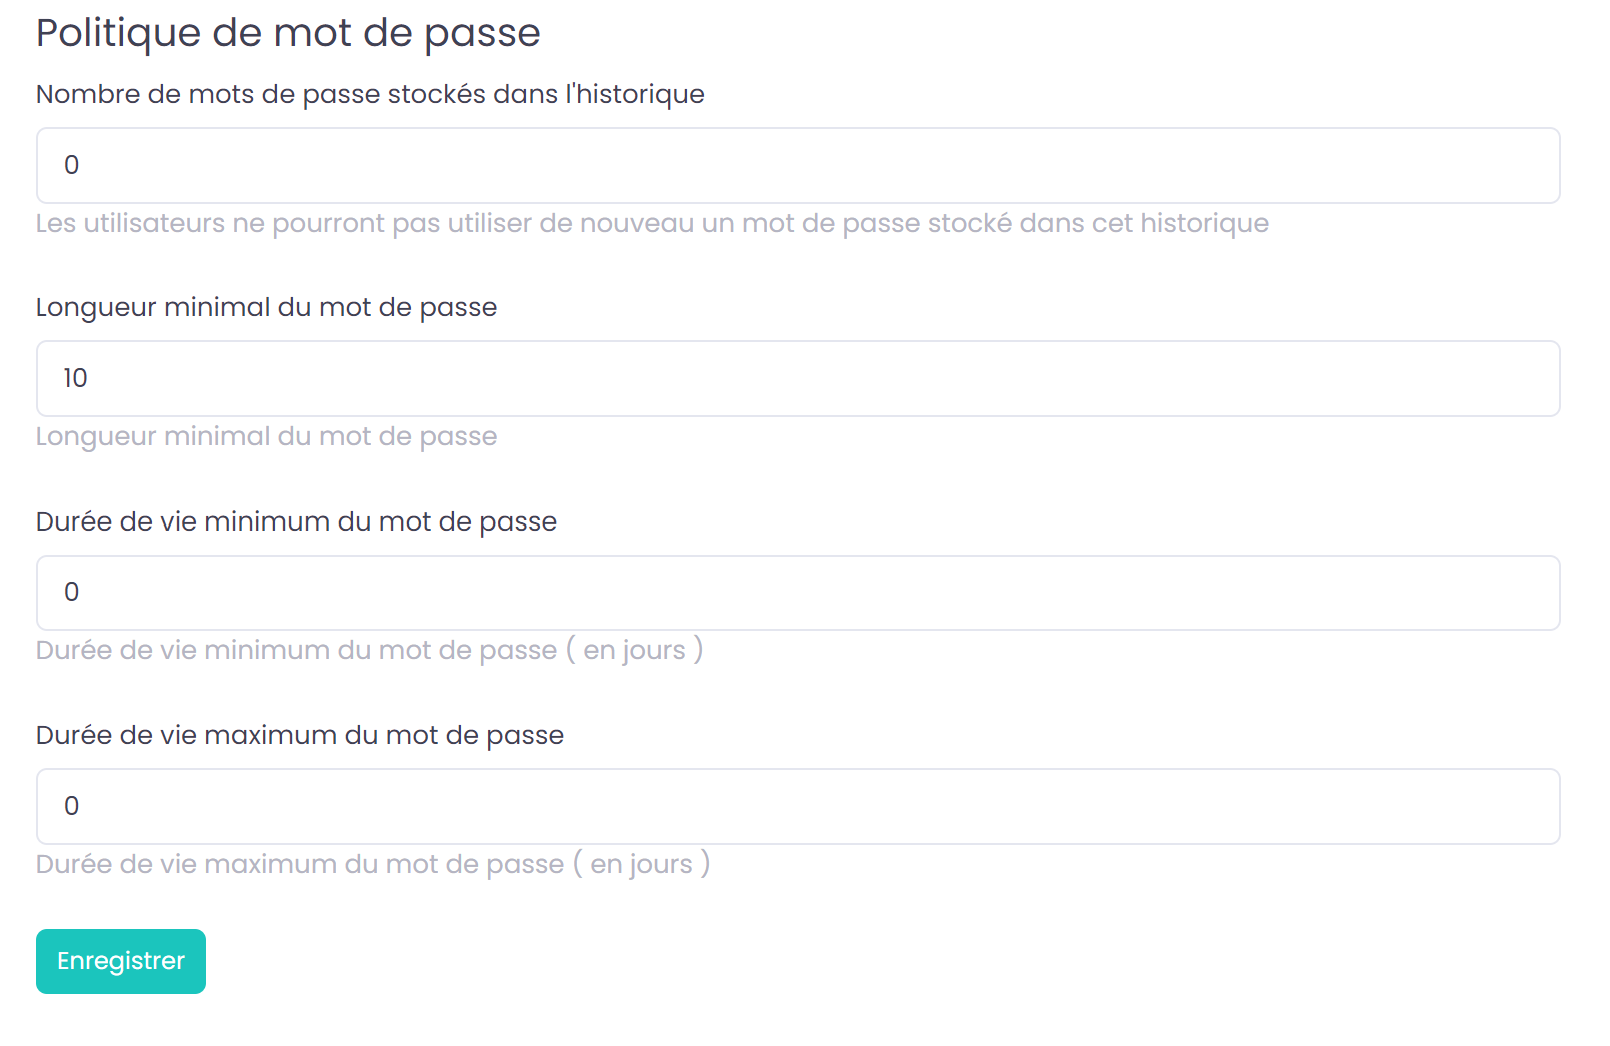
In the GoFast Configuration panel select users. Scroll down to the ‘password policy’ selection. In the Password Policy section you will be able to set the following: - Number of passwords stored in history: This field determines how many of your old passwords will be stored by the system to prevent them from being used again. - Minimum password length: You can specify the minimum length a password must be. - Minimum password lifetime: specify the minimum length of time a password must be retained before the user can change it. - Maximum password lifetime: specify the maximum length of time a password must be used before the user is obliged to change it.
Documents
La section Documents dans la configuration de GoFAST permet de gérer divers paramètres liés à l’édition, la prévisualisation, la sécurité, et l’affichage des documents sur la plateforme. Ces options permettent d’ajuster le comportement de la gestion documentaire pour mieux répondre aux besoins de l’organisation
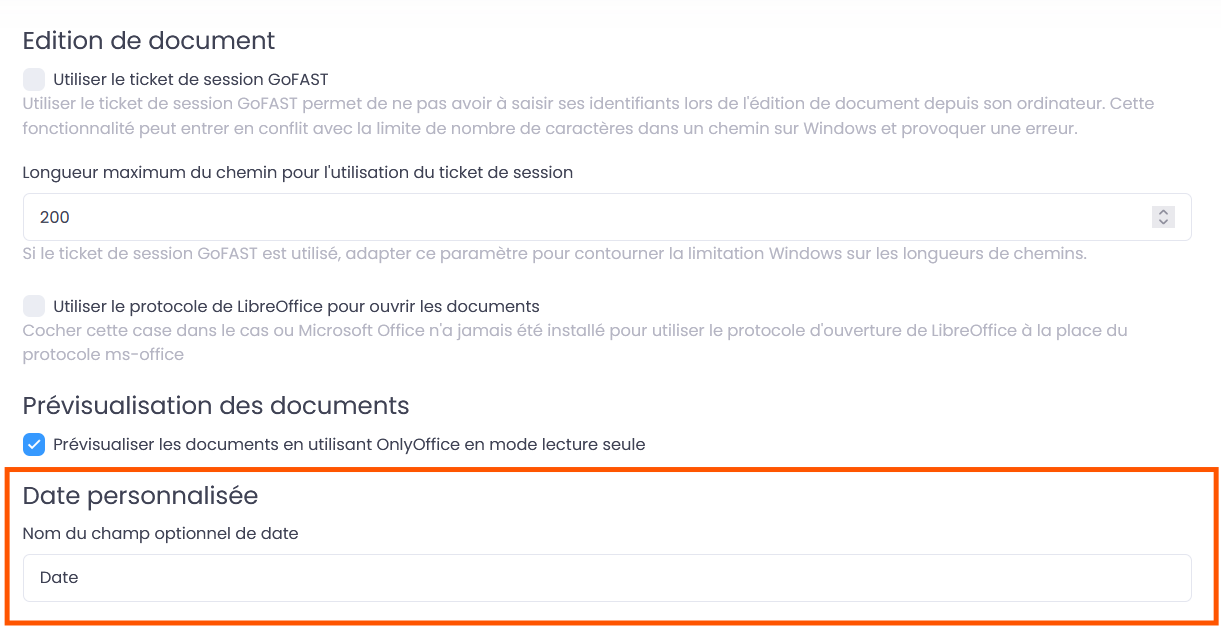
Édition de document
Utiliser le ticket de session GoFAST : En activant cette option, les utilisateurs n’ont pas besoin de saisir leurs identifiants pour éditer un document depuis leur poste.
– Longueur maximum du chemin pour l’utilisation du ticket de session : Définit une limite en nombre de caractères pour le chemin d’accès lors de l’utilisation du ticket de session.
– Utiliser le protocole de LibreOffice pour ouvrir les documents : Si activé, LibreOffice est utilisé pour ouvrir les documents, utile pour les utilisateurs n’ayant pas accès à Microsoft Office. Ce protocole remplace alors celui de Microsoft Office pour l’édition de documents.
Prévisualisation des documents
– Prévisualiser les documents en utilisant OnlyOffice en mode lecture seule : Permet de prévisualiser les documents directement dans OnlyOffice sans possibilité de modification, ce qui est utile pour des consultations rapides sans risquer des changements accidentels.
Date personnalisée
Il est possible de configurer un champ date, dans les métadonnés :
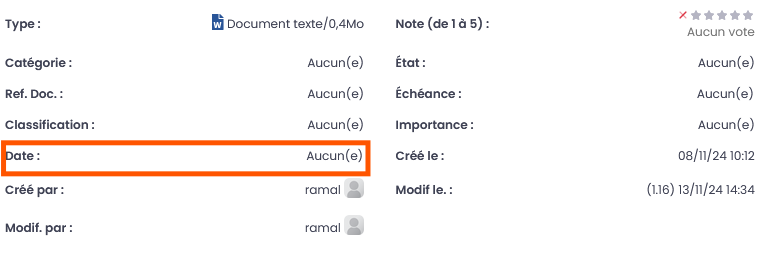
Dans ce champs, vous pouvez donner un nom au champ optionnel de la date.
Sécurité des documents
– Liste blanche pour le filtrage XSS : Une liste d’articles ou de page d ‘accueil d’espaces qui serait non soumise au filtrage XSS ( filtrage de sécurité qui interdit l’utilisation de certaines balises HTML)
DUA
Liste actuelle des archivistes de la plateforme : Les utilisateurs qui seront notifiés une fois la DUA sera atteinte.
Liens externes
– Activer le renommage automatique : Active la récupération automatique du titre des pages pour les liens HTTP, permettant de simplifier la gestion des liens en obtenant un titre descriptif au lieu de l’URL brute.
– Autoriser les liens externes à rediriger vers des URLs HTTP : Autorise ou bloque les redirections vers des liens externes non sécurisés (HTTP).
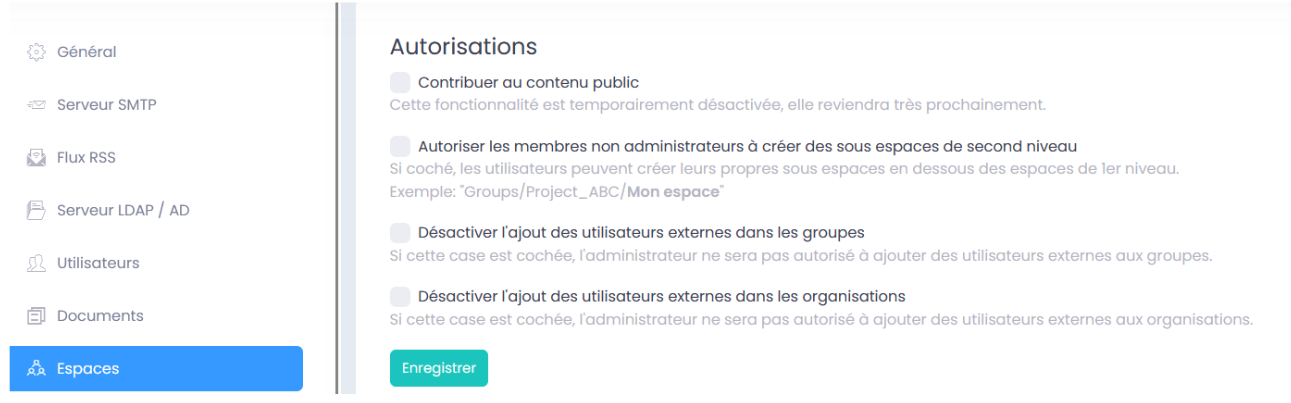
Espaces
Cette section permet de gérer les autorisations relatives à la création et à l’accès des espaces de collaboration. Ces options influencent la manière dont les utilisateurs peuvent contribuer aux espaces, notamment en ce qui concerne les utilisateurs externes et les sous-espaces.
Contribuer au contenu public : Cette fonctionnalité, actuellement désactivée, permettra bientôt aux utilisateurs de contribuer au contenu public directement.
Autoriser les membres non administrateurs à créer des sous-espaces de second niveau : Lorsque cette option est activée, les utilisateurs non administrateurs peuvent créer leurs propres sous-espaces sous les espaces de premier niveau. Cela permet une organisation hiérarchique flexible.
Désactiver l’ajout des utilisateurs externes dans les groupes : Si cette option est activée, les administrateurs ne pourront pas ajouter d’utilisateurs externes dans les groupes, limitant ainsi l’accès aux membres internes uniquement.
Désactiver l’ajout des utilisateurs externes dans les organisations : En activant cette option, l’ajout d’utilisateurs externes aux organisations sera également restreint, assurant ainsi que seuls les utilisateurs internes ont accès aux informations et documents partagés dans ces espaces organisationnels.
SSO
Single Sign-On (SSO)
Protocol used by the application
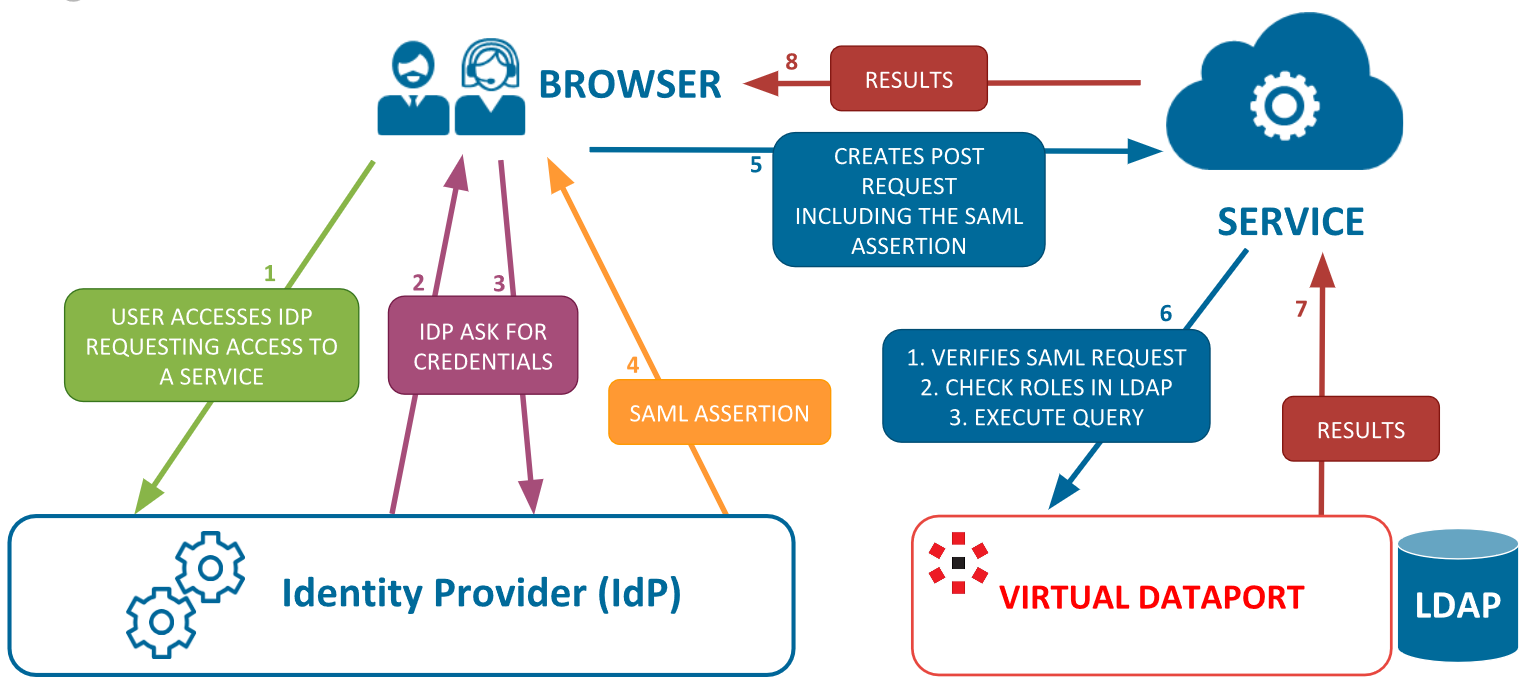
GoFAST uses Security Assertion Markup Language Version 2. 0 (SAML 2. 0). This standard is based on data structuring in XML format.
Its operation involves an Identity Provider or IdP that corresponds to the application that provides the identification of a person, as well as a Service Provider or SP that corresponds to the application on which you wish to identify. In our case, GoFAST is the Service Provider (SP).
Identity Provider Configuration
The setting of the identity provider will allow GoFAST to tell how and or to request verification of an identity. This configuration also makes it possible to secure the exchange by means of certificate(s).
Les paramètres à remplir sont : - Nom : Le nom du fournisseur d’identité. C’est ce nom qui sera affiché aux utilisateurs sur le formulaire de connexion. - Identifiant (ID) de l’entité : Le champ ‘entityID’ qui permets d’identifier le fournisseur d’identité. Il s’agit généralement d’une URL. - Nom de l’application : Le nom de l’application passé au fournisseur d’identité pour identifier l’origine de la requête. - URL de connexion de l’IDP : L’URL de connexion du fournisseur d’identité. - URL de déconnexion de l’IDP : L’URL de déconnexion du fournisseur d’identité.
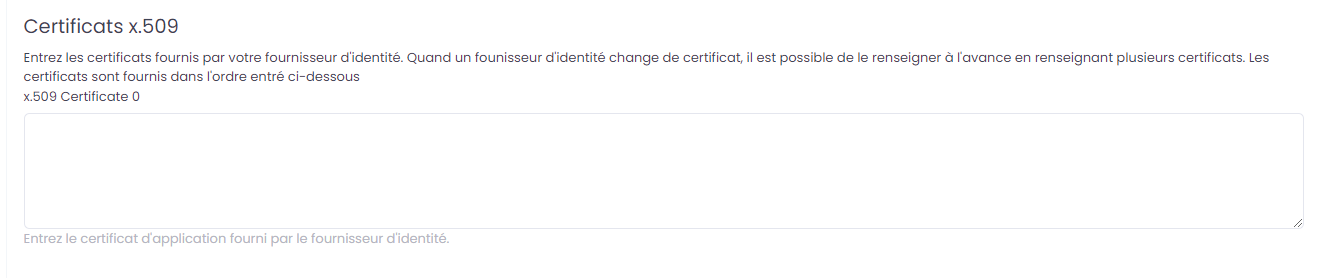
A certificate must be provided by the identity provider. This certificate will be used to identify with certainty the correct identity provider.
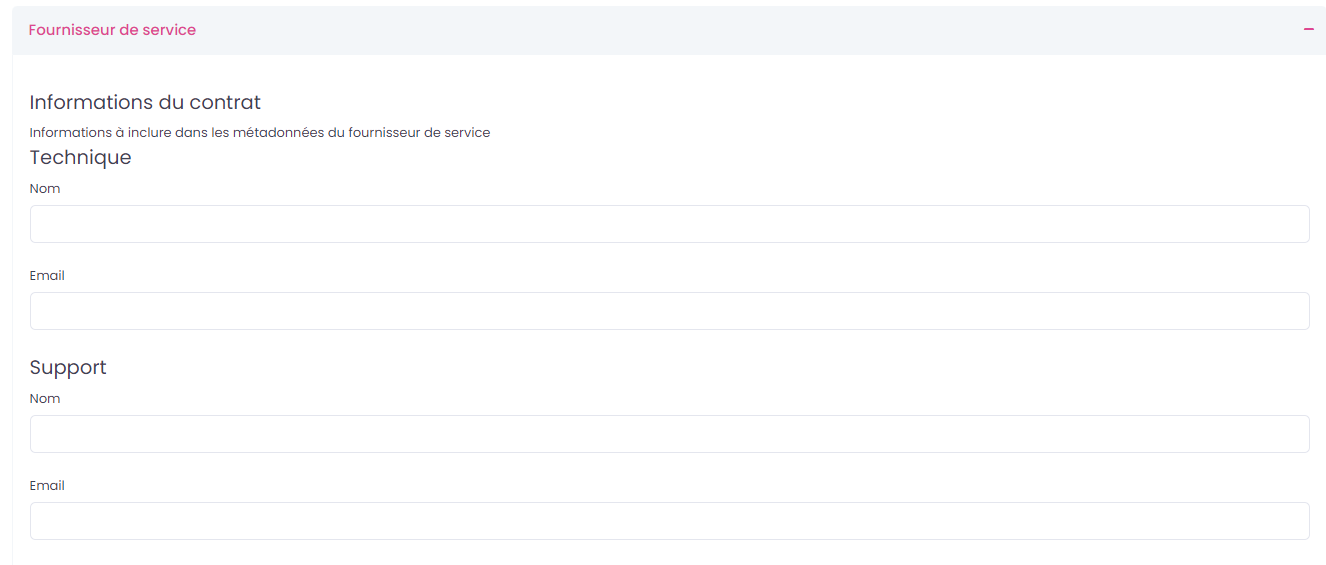
Configuring the service provider
Setting the service provider allows the application to transmit the right information to the identity provider in the right format and with the right level of security.
It is possible to define technical contacts and support to be passed on to our identity provider :
Information on the organisation of the service provider may also be provided to the identity provider
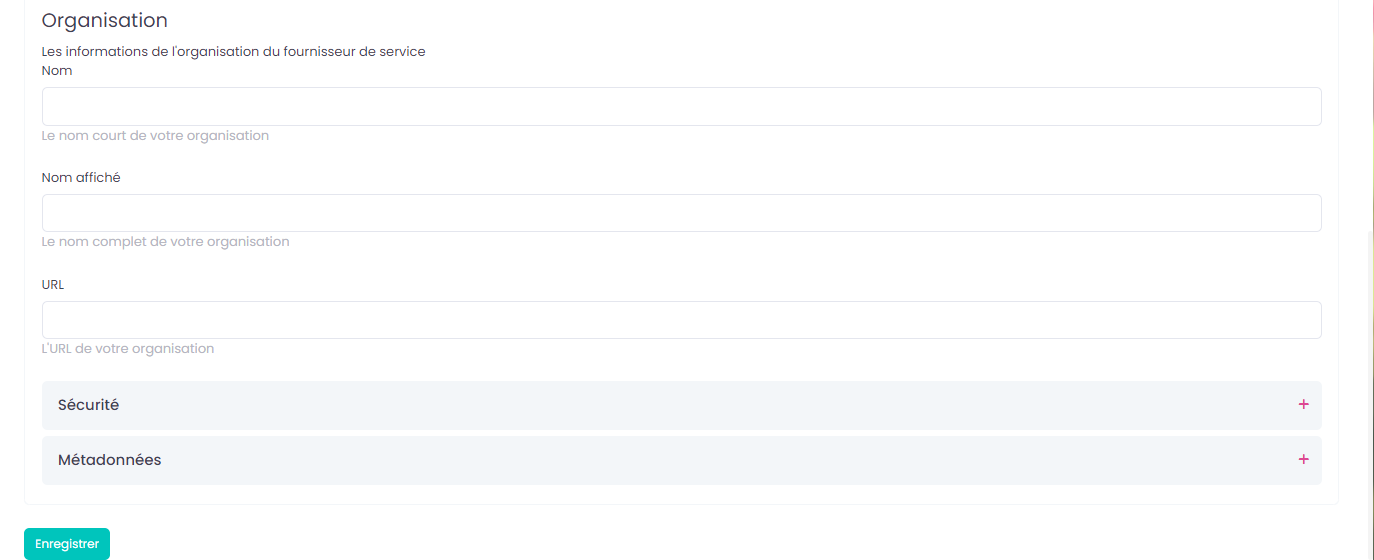
And finally, we access the security settings that will allow us to adapt to our identity provider and be able to communicate with them. The available parameters are :
Attention: The following 3 parameters require GoFAST to know the private key that will decrypt the information on the IdP side. Check with support.
Encrypted ‘NameID’ field : Allows to encrypt in a particular format the identity information that is transmitted between applications
Signed ‘Authn’ requests: Ask the SP (GoFAST) to sign its requests to the IP
Encrypted disconnection requests : Allows to encrypt connection requests to the IdP
Encrypted disconnection responses : Allows to encrypt disconnection requests to the IdP
Signed messages required: Allows you to ask the IdP to sign its messages
Signed Assertions Required: Allows you to ask the IdP to sign its authentication validations
Encrypted ‘NameID’ field : Allows you to ask the IdP to encrypt the NameID field in the query return
Metadata Signature: Applies our signature and asks the IPI to apply its signature on the metadata
Once the configuration is complete, a metadata tab will be generated containing the metadata to enter into the IdP to register the SP (GoFAST) application as valid.
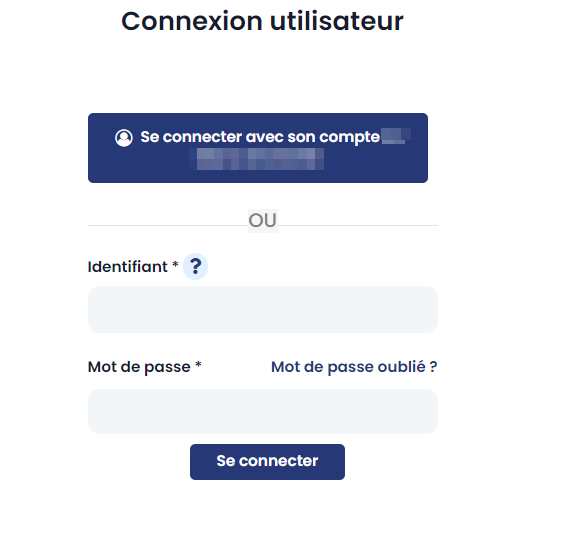
On the login page, the user will now be able to log in by clicking on the “Log in with XXX” button.
Recherche
La section Recherche dans la configuration de GoFAST permet de voir l’état global de l’indexation et résoudre les problèmes de documents indexés.
Note
C’est un écran très technique souvent utilisé par les équipes de support de la plateforme.
Signatures
This category is currently being written and will be available soon.
Configuration du message de consentement
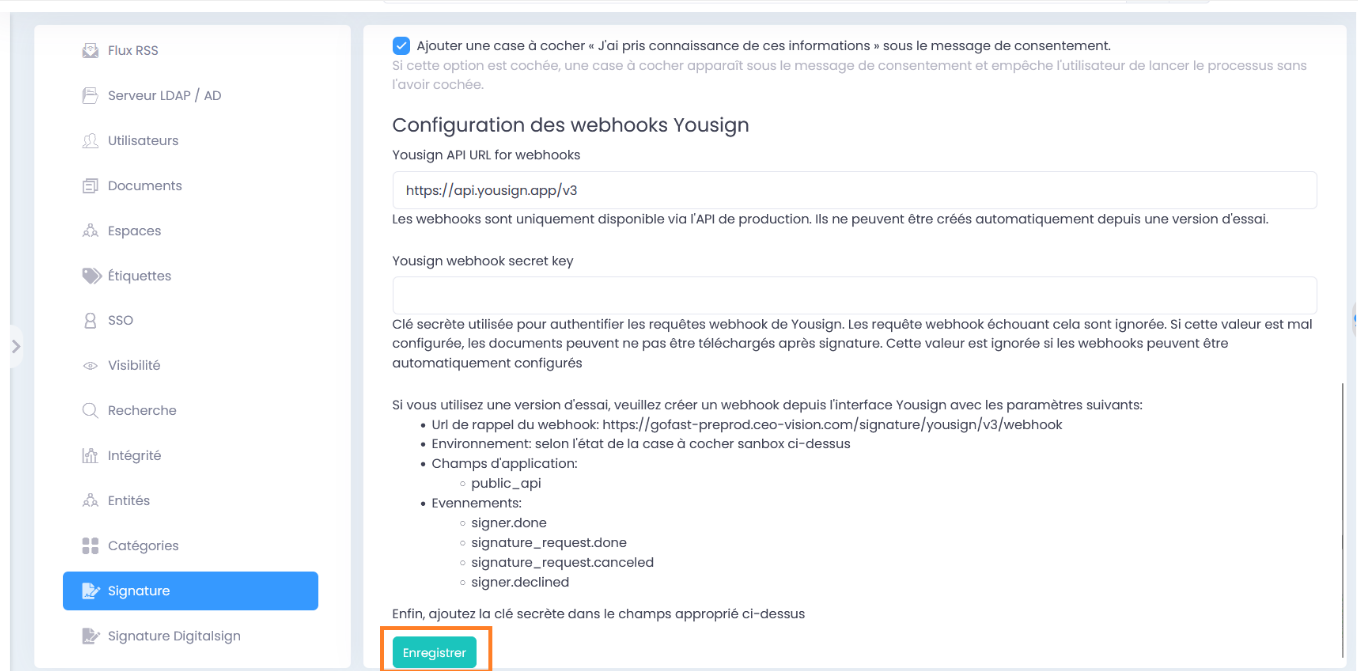
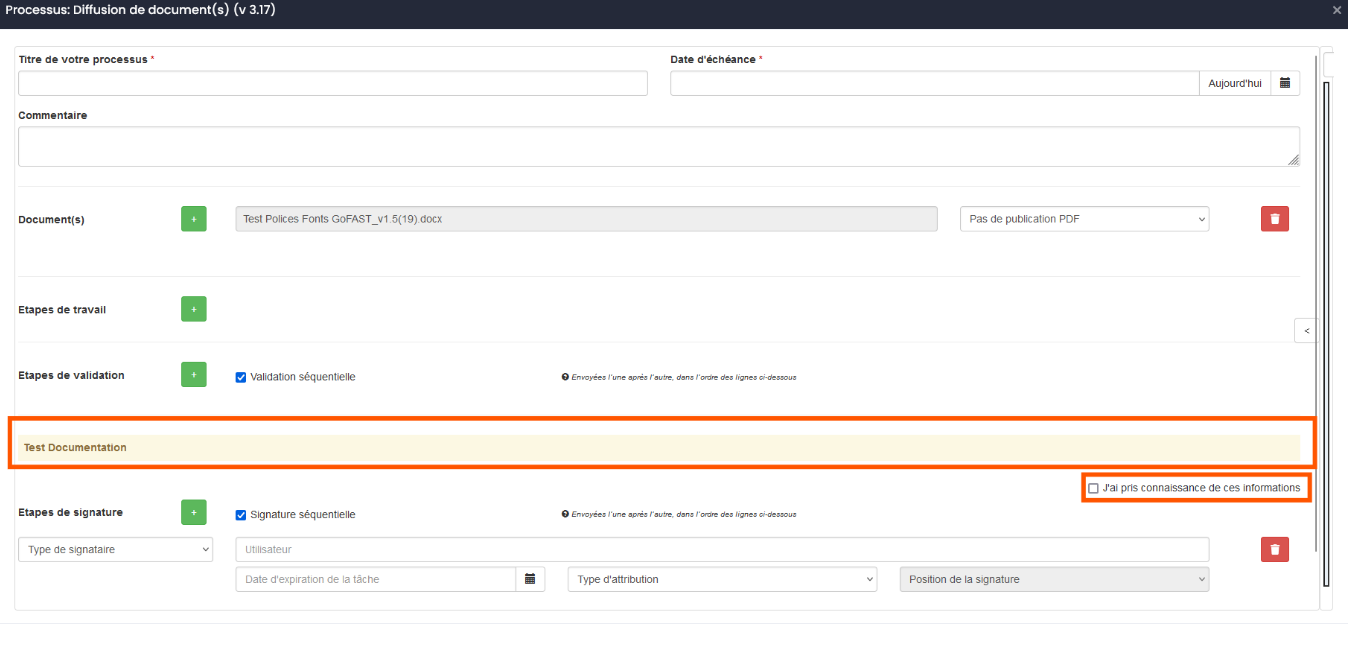
To activate the consent message option, access the configuration interface, then go to the Signature tab. Fill in the Consent message field and click on “Save”. Once configured, when a document distribution workflow is launched, the “I have read this information” message and checkbox will appear.

GoFAST Bluemind
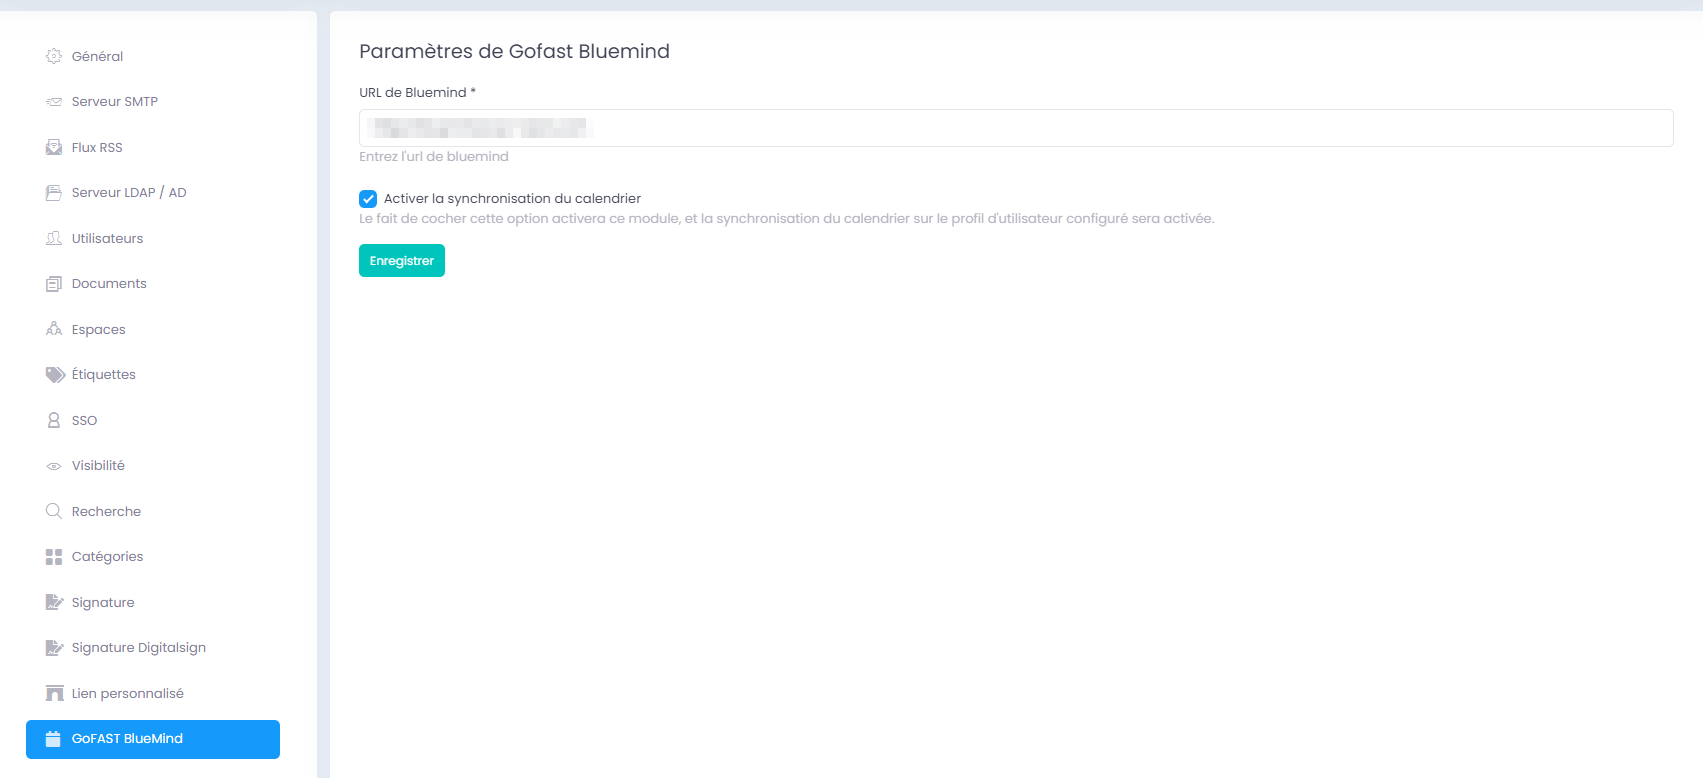
Setting up GoFAST BlueMind
Administrators need to set up the GoFast BlueMind module to enable calendar synchronisation for all users.
In the GoFast Configuration panel, select ‘GoFast BlueMind’.
Enter the URL of your BlueMind server.
Tick ‘Enable calendar synchronisation’ to enable synchronisation.
Cliquez sur « Enregistrer » pour confirmer la configuration.
By following this procedure, you ensure that events created in BlueMind are synchronised with users’ GoFAST calendars, giving them an integrated experience for managing their conferences and meetings.